
Foundation in the construction of a house. DIY strip foundation: stages of work and step-by-step instructions
The basis of any structure is the foundation. The stronger and more correctly it is installed, the longer any building will last.
But to make a high-quality base, you need to spend a lot. The third part is the cost of the building - this is the average price of a good foundation.

Therefore, to save budget, many people want to know how to make a foundation with their own hands.

First you need to choose the type of foundation, because there are several types: strip foundation, columnar, pile and slab options. We will explain below how they differ from each other.
Strip foundation
The most versatile and frequently used type of building foundation is a strip foundation. It cannot be used only in permafrost and for structures “on water”.

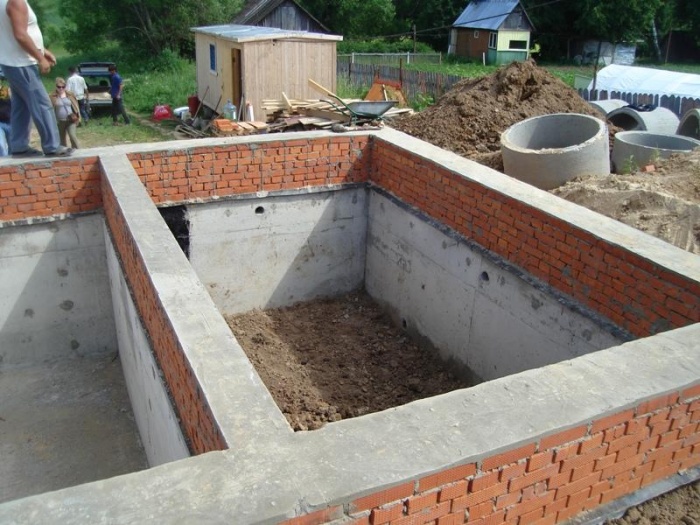
The essence of the foundation is a closed strip - the base, stretching along the perimeter of the building and in place of the load-bearing internal walls. The photo of the foundation clearly shows that the thickness of the strip should be the same in all areas.

Such a foundation is suitable for any building and allows you to build a high-quality basement or ground floor.

The supply of housing communications at the base can be positioned as conveniently as possible for their operation.
The main disadvantage of this type of foundation is the large amount of excavation work and building materials.

Columnar foundation
For small buildings, to save materials, it is recommended to use a columnar foundation. It allows you to provide a high-quality foundation for a lightweight building with less time and effort.

The foundation for a house consists of pillars at the points of maximum load of the building (corners, on long sections with calculated steps, under load-bearing walls).

You can build supports from brick, concrete, or even wood (only rot-resistant wood - larch, for example). The depth for the pillars is selected taking into account the material and type of soil.

After installing all the supports, you need to tie them into a single system for greater strength.
The disadvantages of the foundation include the impossibility of founding a basement. The base is not suitable for heavy buildings; unstable soil types also preclude its use.

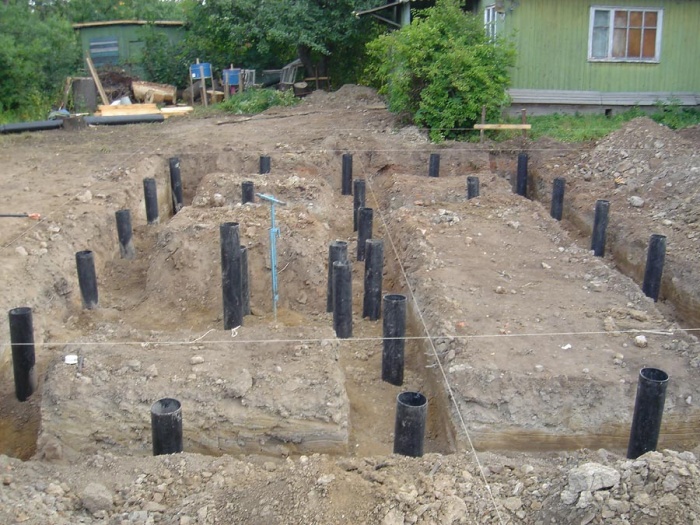
Pile foundation
The foundation of a house on stilts is similar to a columnar foundation, but it is not. The main difference is the depth of the supports. Due to their small diameter compared to the pillars, holes for piles are not dug, but drilled. This allows you to install the supports to greater depths and dig them into more stable rocks.

Otherwise, the technology for placing and tying supports is identical to the columnar foundation.

The main disadvantage of this base is the use of special equipment. However, recently piles with a screw at the end have begun to appear, which allows them to be screwed into the rock like a self-tapping screw. This is what made the piles accessible to the layman.
Note!


Slab foundation
One of the most rarely used types of foundation. Reinforced slabs are usually used more often for roads and boulevards, but some people also use them as a foundation for a house.

To create it, a gravel-sand cushion is first poured, after which reinforcement is placed and the foundation is poured. This creates a “floating” foundation for the house.

The advantage of such a basis is independence from the type of soil and its freezing in winter.

But there are many more disadvantages: the impossibility of creating a basement, the difficulty of connecting communications, the high consumption of materials, and the possibility of construction only on level ground.

Now we will tell you in detail about the creation of a strip foundation, as the most common and universal in construction.
Note!

Foundation construction plan
To build a reliable and strong foundation, a lot of calculations will be required. Knowing the future dimensions of the structure, you need to calculate the depth of the foundation and its width.

And here we will make an important clarification. It is best for a specialist to independently calculate these parameters. The fact is that the correctly calculated depth and width of the foundation determines whether the foundation of the future building, and therefore your life, will support it or not.

There will be a lot of nuances when calculating, but only professionals know them. For small buildings, if you decide to do without calculations, the depth of the building will be small and the width will be a multiple of 100 mm.

Step-by-step instructions for building a foundation
- Mark the territory.
- Carry out excavation work (dig trenches).
- Create a bed of sand and gravel.
- Make formwork for the foundation.
- Lay the future foundation with a reinforcement belt.
- Provide ventilation (if necessary) using pipe sections.
- Pour concrete.
- Smooth the surface until it hardens.
- After a week, remove the formwork.
- After another 3 weeks, the concrete will completely harden and waterproofing can be done using roofing felt and hot bitumen.
- Lay a brick plinth on top of the concrete and waterproof it.

The foundation is ready!
DIY foundation photo


Note!


The choice of foundation design for the future frame house was based on a simple study of the soil on the site. Previously, a well was drilled on the site using a garden drill, about 2 meters deep. The excavated soil turned out to be clay, the drilling was carried out in winter, and it appeared 40 cm from the surface. This indicates that the soil does not have the best bearing capacity. When drilling a well, a lot of stones came across, which made the well not straight. Therefore, the pile foundation, typical for the construction of a frame house, had to be put aside; the standard strip foundation of roads, the strip shallow foundation remains. After research, the cross-sectional dimensions of the tape were taken to be 520x300 mm. The volume of concrete mixture for such a tape was exactly 5 m³. Next, it was necessary to develop a drawing of the formwork.
Before pouring the foundation strip, it is necessary to dig a trench around the perimeter and fill it with a sand and gravel mixture.
![]()
Marking the trench and removing soil for the foundation began in mid-May. The ground had already dried out and nothing prevented the work from starting.


Under the sand and gravel preparation, drainage pipes were laid, which were sewer pipes with perforations (small cuts, you can use special corrugated drainage pipes with factory perforation) and wrapped with non-woven material. Groundwater is drained into a drainage ditch located behind the site.


After laying the drainage pipes, the trench is covered with geotextiles to minimize siltation of the sand and gravel preparation. Next, the sand and gravel mixture is laid in layers, spilled with water and compacted. The last layer is leveled using a hydraulic level.


Next in line is the production of formwork. The formwork is made from a two-meter fence board with a thickness of 25 mm. If possible, use thicker boards, since the load from the concrete mixture is very high. Using a stapler, the inner surface of the formwork is covered with glassine (cheaper) or plastic film.


Now the reinforcement is being done. A simple conductor is made and frames for the entire foundation are welded from reinforcement with a diameter of 6 mm. Already on site, the frames are connected at the corners with longitudinal reinforcement threads with a diameter of 10 mm. It is best to connect the reinforcement parts of the foundation tape using tying wire or welding. Think over the ventilation system in advance and lay embedded plumbing pipes in the foundation so that after casting there will be ventilation holes.


The next stage is preparatory work before pouring the foundation. An additional transfer box is made, with the help of which the concrete mixture solution will be supplied to the extreme corners of the formwork, an access road is laid from a free slab so that the mixer with concrete does not get stuck in the soil of the site and does not mix it.
FOR REFERENCE: the weight of a fully loaded mixer is ≈ 35 tons.


And finally, we order a 5 m³ concrete mortar mixer, invite friends, call workers, hand out shovels to everyone and start making the mortar. The side walls of the formwork are strengthened with jibs, the upper edges are connected with scraps of boards, and, if possible, bunded. After the solution has been poured, but has still set, preliminary planning of the upper surface is carried out according to the hydraulic level.


While the concrete is setting, you can go and relax for a week at the seaside. Upon arrival, the formwork is disassembled, all nails and screws are removed, and the boards are stacked to dry. The formwork boards will be useful during further construction.


Using a hydraulic level and a trowel, plan the upper edge of the foundation with cement mortar. Then the waterproofing of the lower trim of the future frame of the house is made. We cut the roll of roofing felt with a chain saw into three parts and roll it out along the foundation strip in two layers.

Video foundation for a house with your own hands
Any building is based on a solid foundation. The durability of the entire building depends on the correct choice of the type of this structure. How to make a foundation for a house, taking into account all the nuances, so that it lasts for decades?
Competent construction work involves analyzing several factors:
1) soil type and structure;
2) selection and correct calculation of the required materials;
3) reliable hydro- and thermal insulation of the finished base.
Correctly building a foundation for a house means choosing the right device technology, taking into account all existing conditions and thinking through important details. The process should not be interrupted due to unexpected circumstances or inconsistencies.
Strip base device
Strip foundation is the most common design for central Russia. There are several advantages to this foundation:
- possibility of construction on your own;
- low labor and material costs;
- a basement or subfloor can be installed inside such a foundation;
- tapes running under all load-bearing walls and places of highest load provide a high level of strength;
- durability of use.
It is impossible to build a strip foundation on heaving soils prone to flooding. You can find out the characteristics of the soil available on the site from specialized organizations conducting geological exploration.
Important: data on the depth of water will be needed not only when building the foundation, but also when planning the water source on the site (well, well or centralized pipeline).
In order to build a solid foundation for a house on strips, you will need the following materials:
- sand-cement mixture;
- crushed stone or gravel;
- water into solution;
- unedged boards for the production of formwork;
- wire for knitting the frame;
- reinforcement bars;
- bars for spacers;
- brick;
- waterproofing material;
- nails.
The master will need the following tools: shovel, level, cord, hammer, level, tape measure, trowel. To prepare the concrete solution you will need a container.
Important: if the strip base must have decent dimensions, it is more advisable to purchase ready-made concrete using mixers or buy an internal vibrator.
Start of work: site marking and soil excavation
Any foundation construction begins with marking the site. According to the project data, the master must place the corner and intermediate points of the future foundation on the site. The locations of the points are marked with pegs. The width between two driven pegs is the width of the foundation strip, which should always be greater than the width of the load-bearing wall. All pegs hammered around the perimeter are connected with a cord or twine.
The accuracy of the marking must be checked with a level, which measures the diagonals of the resulting rectangle. All diagonals of the future foundation must be equal. If there are arithmetic deviations of even a few mm, the marking begins again until an accurate result of the control measurement is obtained.
After the external markings are finished, you can move on to the internal ones. The width of the tapes is usually from 30 to 40 cm. Inside the marked perimeter you need to dig a pit to the depth of the tapes. All walls of the pit must be smooth, without protrusions or depressions.
Important: the depth of excavation under a strip foundation should always exceed the groundwater level.
Each region of the country has its own value of the soil freezing point, the information is graphically depicted on the map.

Typically, a pit is dug to a depth of 1.2 to 1.5 m. This is quite sufficient for soils that are not heaving and not subject to flooding. Next, you need to form the formwork in the direction of the tapes. For this, an unedged board and pegs are used. The boards are fastened to each other with nails.
After the formation of the bottom of the foundation is completed, a cushion of sand and crushed stone (or gravel) is arranged, which is thoroughly compacted and moistened with water. Experts advise compacting each layer of the cushion separately: first sand, then gravel. The optimal height of such a layered “pie” is from 15 to 20 cm. The need is due to the function of frost heaving of the soil during the changing seasons. A well-compacted base under the foundation will reliably protect it from the expansion of individual soil layers.
Formation of a reinforced frame and waterproofing the base
If a master wants to form a support for a house according to all the rules, he must know that the strip structure must have a reinforced frame. The bottom of the pit is lined with bricks on which reinforcement bars are laid. A mesh should be formed from the reinforcing bars, i.e. they are laid crosswise. At the connection points, the reinforcement is tied with a special wire.
Important: tying reinforcement requires the craftsman to be careful and careful; do not overtighten the fasteners.
It is the flexibility required when tying reinforcement that determines the manual nature of the work. The use of welding will speed up the process, but does not guarantee the strength of the future foundation.
After tying the reinforcement cage, it is necessary to lay a layer of waterproofing. The most commonly used roofing felt material is durable and affordable. When laying roofing felt, the sheets are overlapped, and the places where they are layered are taped. This will enhance the reliability of the waterproofing and prevent the penetration of groundwater.
Making concrete and pouring the foundation
Concrete is produced independently or purchased from specialized companies. If the master chooses the first option, it is recommended to purchase only high-quality cement (grades M300, M400). Fillers should be coarse sand and crushed stone. The ratio of all components is shown in the table.
 Table of the ratio of concrete components when using M400 cement
The better the materials used to prepare the solution, the stronger the finished base will be. An important point is the connection of water with cement, when a certain water-cement ratio (W/C) must be met. This indicator, along with the brand of cement used, is extremely important for the strength characteristics of the base. If concrete is made using gravel, practical W/C values are shown in the table:
Table 1. W/C values for various grades of cements and concrete mixtures on gravel
| 100 | 150 | 200 | 250 | 300 | 400 | |
| 300 | 0,75 | 0,65 | 0,55 | 0,50 | 0,40 | — |
| 400 | 0,85 | 0,75 | 0,63 | 0,56 | 0,50 | 0,40 |
| 500 | – | 0,85 | 0,71 | 0,64 | 0,60 | 0,46 |
| 600 | – | 0,95 | 0,75 | 0,68 | 0,63 | 0,50 |
Externally, you can determine the readiness of concrete by looking at the mound of mixture at the end of the shovel. If it does not spread or flow, it means that the required rigidity has been achieved.
Important: the lower the fraction of concrete mortar fillers, the more water is required.
The ratio of water depending on the fractional size of plasticizers is given in Table 2.
Table 2. Approximate values of water consumption (in l/cub.m) for the production of concrete from materials of different fractional structures
| Gravel, mm | Crushed stone, mm | ||||||
| 10 | 20 | 40 | 80 | 10 | 20 | 40 | 80 |
| 185 | 170 | 155 | 140 | 200 | 185 | 170 | 155 |
In order for the foundation under a private house to be as strong as possible, it is necessary to prepare concrete with the highest rigidity. The tougher the solution in its parameters, the more durable the foundation of the house will be.
Concrete is poured into the formwork in layers, each layer is carefully leveled and pierced to get rid of air bubbles. You can use a deep vibrator, but it can damage the reinforcement frame. Baying concrete is an important procedure that increases the strength of the foundation being poured.
The solution poured into the formwork gains its strength within 4 weeks. During this time, the foundation needs additional protection: if it is sunny and dry, it should be covered with polyethylene and regularly watered. If it’s rainy and damp, just cover it with film or geotextile. When the strip base has completely hardened, the formwork is dismantled.
We build a foundation on pillars
Are there any rules for constructing a columnar foundation? Firstly, you need to know some nuances: it is advisable to choose such a base on heaving soil with a deep freezing point. Tapes on moving soil will not withstand constant deformation, but support pillars will serve property owners for decades.
To install a columnar base, the craftsman will need the following materials:
1) pipes made of metal or asbestos cement;
2) fittings;
3) sand-cement mixture;
During the construction process, you will need a container for preparing the mortar, a trowel, and a shovel. To mark the area you will need a level, tape measure, pegs and construction cord.
Carrying out marking and ground operations
The marking sequence is similar to the work on. In the same way, the location of support pillars is placed on the ground using the design documentation for the development. Location of supports: in the corners of the house and in places of highest load (load-bearing walls, stairs, passages, etc.). The optimal distance between pillars is from 1.5 to 2 m.
When the marking is completed, you can begin to excavate the soil for the pillars. The diameter of each hole is equal to the cross-section of the pipe. The depth should be below the freezing point of the soil. When the pits are ready, a sand cushion with a height of 10 to 15 cm is placed in them. It is thoroughly compacted and moistened.
Important: the denser the cushion under the pillar supports, the stronger the future foundation.
Installation of pillars and pouring concrete
After completing the installation of the cushion under the supports of the future foundation, concrete can be prepared. The solution is prepared in the same proportions as in the case of a strip foundation. The consistency of the finished concrete should resemble thick sour cream.
- an asbestos-cement or metal pipe is installed in the pit;
- a little concrete solution is poured inside the pipe;
- the pipe is raised so that the concrete is distributed over the sand cushion;
- The pipe is leveled using a level in a vertical position.

All pillars are installed according to the algorithm described above. Next, they are reinforced. 3-5 rods of reinforcement are laid inside the pipes so that they go deep into the sand cushion, and the top rises 25-30 cm above the pillars. When all the supports are reinforced, they are filled with concrete. If there are holes around the supports, they are carefully filled with soil and compacted well.
The concrete in the pipe supports sets within 1-2 weeks. After this period, you can proceed to installing a grillage, which will fill the space between the corner supports and increase the reliability of the foundation being built. Subsequently, load-bearing walls will be placed on the grillage.
Construction of a foundation on homemade piles
Is there a specific type of foundation for a house on unstable soil? The way out of the situation is to install a pile foundation. The main characteristics of this design: durability and high strength, ability to withstand high loads.
A distinctive feature of construction is the absence of the tedious stage of excavating soil and forming a pit. Such a base is attached to piles immersed in the soil. The cost of finished piles is not affordable for every craftsman, so many prefer to make these products themselves.
During the construction process the following materials will be required:
1) fittings;
2) cement with sand;
3) steel wire;
4) roofing felt;
Preparing concrete will require a special container and a vibrating machine. On the ground, the locations of future piles are marked with pegs using a tape measure and a level. To make the recesses you will need a hand drill.
Well formation
Self-drilling of wells takes place in the places marked out on the site. The step from one pile to another should not exceed 2.5 meters. The required number of holes is drilled with a hand drill. If water appears in the well during drilling, it must be pumped out with a pump.
Piling and concrete production
After all the piles have been formed, formwork made of roofing material rolled into a tube is inserted into them. The diameter of the homemade pipe should be equal to the cross-section of the future pile. A soft steel wire fixes the size of the roofing felt roll, after which it is carefully inserted into the hole.

This method is used to make blanks for all wells. The purpose of the formwork is to preserve the strength of homemade piles and prevent the absorption of cement laitance by the soil. In addition, if you pour the solution directly into the ground, the pile will have a rough surface. All rough bases are more susceptible to the forces of frost heaving than smooth ones without flaws. An unstable foundation will begin to collapse very quickly, thereby reducing the life of the building.
After immersing the formwork in the wells, it is necessary to make a spatial reinforcement frame. For this purpose, reinforcement bars with a cross-section of 6 mm are used. To form one frame, you will need 3-4 rods, fastened every 50 cm to each other. Having installed the structure in the well, you need to see its top above the ground. Protrusion height – from 40 to 60 cm.
Next, you can move on to concrete production. The manufacturing technology is described in the section on strip foundations; repetition is unnecessary. The solution should be supplied into the well in portions, filling approximately 0.5 m each time.
Important: filling the wells with the solution must be alternated with its bayoneting, removing excess air.
Bayoneting is performed with a reinforcement rod. To improve the quality of work, you can use a vibration installation, but very carefully so as not to damage the reinforcement contents.
Within 2-3 weeks, the concrete will gain strength, after which it will be possible to begin constructing the grillage. The tops of homemade piles are not cut off; they provide better adhesion between the grillage structure and the piles.
Construction of the foundation on finished piles
What are the main points of constructing a foundation from ready-made, factory-made piles? The master will need the following set of materials:
- scrap metal;
- 2nd pipe;
- a mixture of sand and cement;
- metal piles;
- ready-made heads;
- anti-corrosion coating;
- water.
As for tools and equipment, you need to have a shovel, tape measure, level, welding machine and grinder on hand.
Stages of work
Traditionally, construction begins with marking the area. The step between the piles is up to 3 m. Then they begin to screw in the piles. This can be done manually, involving several assistants, or you can order well drilling from a specialized company. The second option is preferable, but costs a lot of money.
The depth of the wells should exceed 1.6 m, this prevents them from bulging during periods of seasonal soil deformation.
Important: if there is an obstacle on the way of the pile, you need to try to get rid of it and continue working. Only a fully installed pile ensures 100% strength of the base.
The screwed-in piles are carefully trimmed to an equal height of protrusion from the ground, after which the products are concreted. A ready-made solution is poured inside the piles, this prevents corrosion of the products in the soil. The final stage is welding the ends and coating the joint with an anti-corrosion agent.
With this method of construction there is no need to wait for the final one; it is fashionable to move on to the construction of the grillage and subsequent operations.
Construction of the foundation is the most important stage in creating your home, since the reliability of the future structure depends on it. That is why, before starting work, it is necessary to learn about all the features of such work. But first you should choose the type of foundation on which the house will be installed. In certain circumstances, you can build a house without a standard foundation with your own hands.
Strip foundation
Before pouring the foundation of a house, it is necessary to consider the features of different types of foundations. The most common are strip structures. This type of base is the most common. It has several advantages:
- the ability to build the foundation with your own hands;
- low cost of materials;
- possibility to create a basement;
- foundation strength;
- durability.
It is worth remembering that such a foundation cannot be laid on heaving soils that are prone to flooding. You can find out about the type of soil on the site from organizations that are engaged in geological exploration. Only after this can you begin to create the foundation for the house with your own hands.
Important! It is worth finding out information about the depth of water not only to create a house foundation, but also to correctly plan the creation of a well or well.
It is worth remembering that laying such a foundation for a house is a complex process, but with careful attention to each stage of creating the foundation, you can do everything yourself.
Pillar foundation
This type of foundation for a house is chosen if the site is located on heaving soil, if the freezing point is located deep enough. The strip base on moving soil quickly deforms, and the pillars can be used for several decades.

The advantages of this type of foundation for a house include:
- High speed of work. If you have several workers, you can create a columnar base in just a few days.
- Saving money. Due to the fact that a small amount of material is spent on creating pillars, you can save a large amount.
- Possibility to do all the work yourself. In this case, there is no need to attract heavy construction equipment and hire workers.
- The ability to install a house on unstable soil, the freezing depth of which is quite large.
When choosing this type of foundation, it is worth remembering that the marking sequence is similar to when creating a strip foundation.
Pile foundation
The choice of pile foundation is carried out in several cases:
- if the soil is plastic and contains clay;
- when the soil contains dust particles with a small amount of lime and clay;
- if the soil is floating.
Often the use of piles is due to the fact that the site is located on heaving soil. Also, such a foundation for a house can be created in a situation where there is no possibility of spoiling the natural landscape. In addition, piles are often installed to reduce the construction period of a house.

The advantages of a pile foundation include:
- lower cost of creating a foundation;
- reduction of construction time;
- the opportunity to refuse to carry out “wet work”.
It is worth noting that a house on a pile foundation can stand for the same period of time as buildings on other types of foundations.
Disadvantages of a pile foundation:
- increased cost of design work;
- a horizontal tie made of wood, metal or reinforced concrete structure must be installed on the piles;
- difficulties during the creation of the foundation when taking into account the non-standard landscape.
Before building a foundation of this type, it is necessary to take into account all the features of the site and consult with professionals.
Marking the strip base
Having chosen a strip base for a house, you need to correctly mark the area. Many site owners prefer to entrust this work to professionals. This is due to the fact that this work requires precision in all actions. When creating markup yourself, you need to consider several points:
- The width of the base should not be 20 cm greater than the width of the walls.
- When designing the foundation, it is necessary to plan in advance exactly where the windows and doors will be. This is necessary in order to make reinforced concrete reinforcement in certain places.
- You also need to determine the axis of the building. To do this, first measure the first angle, and then measure the remaining angles of the future foundation along it. The correctness of the angles can be checked by measuring the diagonals, which should be equal.
It is worth remembering that level ground is not important for a strip base, but when installing it, it is necessary to maintain a horizontal position. If marking the foundation with your own hands is done correctly, the foundation will be durable and reliable.

Digging a trench
After marking the foundation for the house with your own hands, you need to dig trenches for the strip foundation. If a pile foundation has been chosen, wells are drilled at this stage. The walls of the trench being created are reinforced with boards, which will serve as formwork for the strip foundation.

When creating trenches, it is worth remembering that their bottom should be below the freezing level of the soil. The minimum possible distance between these levels is 20 cm.
It is worth remembering that before pouring the strip foundation, it is necessary to create a sand cushion. After falling asleep, the sand is compacted and spilled with water. It is worth remembering that a waterproofing tape material is laid on top of the sand.
Reinforcement
Since the building creates a large load on the foundation, the cement mixture itself cannot support it without reinforcement. Reinforcing elements do not allow the material to deform under the influence of compressive forces.

Metal rods connected to each other with wire are used as the “skeleton” of the foundation. The foundation must contain both vertical and horizontal reinforcing elements. The elements are connected using metal wire or welding.
Pouring concrete
When creating the base, you need to remember that the solution must be prepared immediately before pouring into the trench. If a ready-made mixture is ordered, it is delivered to the site in a concrete mixer. If the solution is made independently, you should mix one part of cement with three parts of sand and five parts of medium-sized crushed stone. It is important to choose purified sand.
Concrete should be poured evenly around the perimeter. During pouring, you need to carefully ensure that no voids form in the solution. Their appearance can lead to the fact that the structure will be unreliable and the foundation will crack when installing the house. After pouring, compact the concrete using a vibrating plate or similar device. In summer, the strengthening of the foundation lasts about a month. To make a durable foundation for a house with your own hands, you must follow all the rules described.

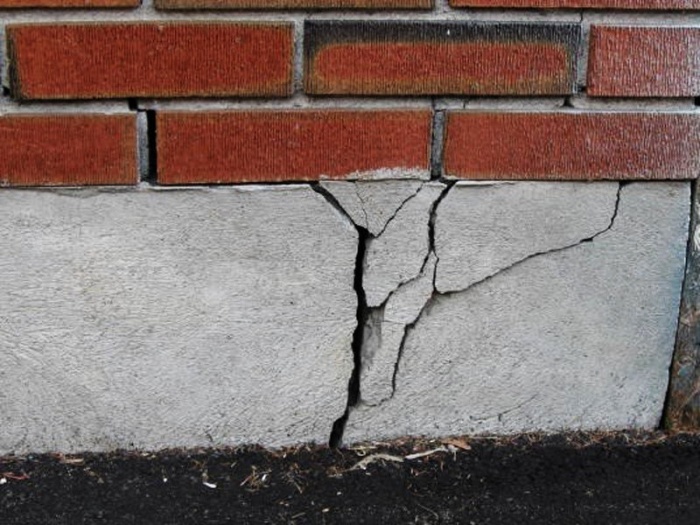
How to strengthen an old foundation
If during inspection of the base you notice that it has cracks or depressions, you need to begin strengthening the foundation, since such signs indicate that the base has begun to collapse.
To determine whether destruction has begun, it is necessary to stick paper tape across the crack. After this, you need to monitor her for two weeks. If after this period it remains intact, this will indicate that the foundation is not destroyed. Such a defect can be repaired by pushing crushed bricks into it and pouring concrete.

If the tape breaks, this will be a sign of destruction of the base. It is worth remembering that you can only strengthen the foundation yourself. The foundation can only be completely repaired using expensive equipment.
To strengthen, you will need the following materials and tools:
- shovels;
- metal or asbestos-cement pipes;
- plaster patches that will act as beacons;
- cement mortar;
- wooden planks.
First, beacons are installed on the cracks, and the date of installation is recorded on them. If the rupture occurs quickly, it is necessary to dig a hole next to the foundation, the slope of which should be 35 degrees. Digging occurs to the depth of the bedded stone.
After this, a pipe is inserted, the diameter of which is approximately 15-20 cm. Then concrete solution is poured into the pipe. If the solution does not go away within 2 hours, the filling stops. In this case, resumption of filling can be continued after two days. This process must be repeated at least three times. After this, beacons are again installed on the cracks. If they rupture again, the described steps must be repeated. A repaired foundation can last a long time.
Having considered all the information presented on how to make a foundation with your own hands (video and photos), you can perform all the steps without the involvement of professional builders.
There are many types of foundations for the construction of wooden structures, small houses or massive buildings. The most popular in construction in the private sector is a strip foundation. Because this is the most affordable way to build the foundation of a house, which you can do yourself. In addition, this option allows you to include a basement or ground floor in the project.
Due to its versatility, such a foundation can be used: for a home, for a bathhouse, under a garage or under a porch. In the article we will talk about the advantages and disadvantages of a strip foundation, consider what types there are, and tell you with the help of short instructions how to build it yourself.
Features of strip foundation
It is worth noting that LF is not suitable for swampy areas and requires mandatory waterproofing and thermal insulation work, which we will discuss below. Depending on the project, ground and soil, heavy construction equipment and complex excavation work may be required. In any case, these factors will depend on the depth of the foundation.
Filling the strip foundation
Despite this, several arguments can be identified in favor of this type of foundation:
- you can make the foundation yourself;
- high strength and reliability;
- you can add a basement or ground floor to the project;
- high load-bearing capacity;
- possible installation on unstable soils;
There are 3 types of strip foundations, which differ in the depth of the structure:

Based on the name, we can conclude that for a multi-storey building, a recessed tape should be used, which can withstand heavy loads. And the first two are suitable for light buildings (a small brick or wooden house, for example).

They also highlight solid cast And made strip foundation. With the prefabricated method, ready-made concrete slabs are used, from which a strip is built and fastened with cement.

With the solid-cast method, the foundation for the foundation is constructed directly at the construction site, after which concrete is poured. This method is also called monolithic. It is worth noting that for independent work, it is preferable to use a monolithic version, since it does not require complex lifting equipment. We have prepared instructions for this method for you.

Comparative table of foundation types
| Monolithic slab | Strip foundation | Screw piles |
| Construction period 1 week. | Construction period 1 week. | The construction period is several days. |
| Construction is allowed a month after pouring. | Construction is allowed after 20 days from pouring. | Due to its loosening when screwing the pile, the foundation requires soil shrinkage. |
| The permissible load on the foundation is 3 tons per sq.m. | The permissible load on the foundation is 17 tons per sq.m. | The permissible load on one pile is no more than 3 tons. |
| Service life more than a century. | Service life more than a century. | Service life is about 35 years. |
| When building on a slope, a combination with screw piles is needed. | The soil and soil must meet the requirements for installation. | |
| It is impossible to include an underground room in the project. | You can make a basement or ground floor. But waterproofing work is required. | — |
| Construction of the foundation will cost 250-350 rubles. with an area of 9x9 m. | Construction of the foundation will cost 200 rubles. with an area of 9x9 m. | Construction of the foundation will cost 150-180 tr. with an area of 9x9 m. |
DIY strip foundation step by step instructions:
The service life of the structure will depend on the quality and strength of the foundation. Therefore, we suggest that you familiarize yourself with all the nuances and requirements for the technological process of constructing a strip foundation.
Preparatory work
Before any construction begins, preparatory work takes place. Which include designing a structure, applying markings, as well as conducting geological surveys.

Geological surveys must be ordered from a specialized company. Which will accurately determine the structure of the soil, the depth of soil freezing and the passage of deep water.
Based on these data, it will be possible to determine the elevation and thickness of the tape. When the geological research is completed, you can proceed to the next stage.
Before applying markings, you need to remove the top layer of earth where the future building will be. Usually this is a layer of up to 0.5 meters (where there will no longer be plant roots). Then, along the perimeter of the tape, markings are made using a cord or wire, which can be fixed with reinforcement or a peg. It is better to install the stakes a little further than the axes of the walls, so that our markings do not interfere or sag during further excavation work. Marking allows you to adjust the height level throughout the entire area of construction work. This way you can do everything exactly to the level.

When you have made the markings, the digging of trenches for the foundation begins, according to the markings made according to the project and the depth of the structure. If you have a basement, then a pit is also being dug. This is the most labor-intensive process. You will need to dig trenches manually at a uniform level from 1 meter to 1.5 meters.
Only a geological study of the soil can give an accurate answer whether underground drainage is necessary or not. Therefore, drainage may not be a prerequisite for a high-quality foundation; sometimes you can do without it.
To arrange drainage, it is necessary to deepen the base of the tape by 25-35 cm. Create a general slope of the system in one direction by 4 degrees. After which drainage pipes are installed to remove moisture. This allows you to keep the soil of the house structure dry. The drainage is filled with sand and gravel to the level of the bottom of the trench. After which a pillow is made for the foundation.


The sand base will allow you to redistribute the loads on the future foundation. To make the right pillow, you need to level the bottom of the trench with sand and gravel. Pour the sealant over the drainage layer by layer, 10-15 centimeters at a time. The height of the sand cushion should be up to 50 cm.
When filling the bottom with sand and fine gravel, try to immediately compact the non-metallic material by pouring water on it. The cushion and drainage will ensure a long service life of the foundation and prevent its destruction.
To prevent destruction of walls and loss of strength of the entire concrete structure, it is necessary to strengthen it by applying reinforcing mesh. Therefore, before pouring the formwork with concrete, a strong and reliable frame is made from steel rods, which strengthens the base of the building. A short instruction will help you correctly reinforce a strip foundation:

- Every 15-20 cm, iron rods are inserted vertically (the height is up to the marking of the foundation line, not higher);
- after which the long reinforcement is carried horizontally and fastened with a dressing wire (it is also possible by welding, but the wire is more reliable in our case);
- after all the work, you should have a frame with 15-25 centimeter cells around the entire perimeter of the formwork;
Formwork is a wooden structure that is used as a form for the future foundation. You can make it from boards. The formwork for a strip foundation must withstand the huge mass of concrete poured into it. Therefore, it must be made strong immediately. If during the process of pouring cement, the formwork begins to collapse, then you will have to stop work and start collecting the formwork again.

The formwork walls should be made higher than the level of the future foundation. This will prevent the solution from overflowing. To regulate the fill level mark, additional markings are pulled along which you will need to navigate.
Don’t forget to put plastic inserts in the formwork for communications and to have ventilation.
After all the preparatory work, it is necessary to fill our formwork with concrete. The mixture can be made independently from cement, sand and crushed stone, with proportions of 1: 3: 3. This option is the most budget-friendly, but requires a lot of physical exertion to mix the solution and pour it. The mixture should be thick and homogeneous. After pouring, the solution must be compacted and ensure that no bubbles form. This can be done by piercing the poured solution with a piece of reinforcement.

It is recommended to pour a shallow and shallow strip foundation immediately. And the buried one is poured in several stages. You need to pour no more than 70 cm of concrete at a time, with breaks of no more than two hours. After 12 hours, you can continue pouring the cement mortar.
A pile-strip foundation takes about 1 week to dry in summer. Dismantling of the formwork should be carried out when the solution has hardened by 60%, but at least 3 days.
In addition to monolithic filling, you can order a ready-made solution. This method is more expensive, but this way you will be able to pour the formwork efficiently and quickly. It is best to order the M300 solution.
A more expensive method of formwork construction is the use of block technologies. The finished foundation blocks are lined up in a strip, without the need to make formwork and wait about a month for the solution to harden. But initially, for the blocks, you need to make wider trenches.
4 days after pouring the foundation, it is necessary to make a blind area away from the walls to drain rainwater. At any time of the year, it is important to care for the foundation and prevent the loss of water from the surface of the structure after installation. To do this, the concrete is covered with a film and watered with water for a week. These methods will prevent damage to the walls of your foundation.

In the summer, various chemical additives can be used to slow down the process of hydration and heat generation. In winter, it is necessary to prevent the freezing process, because when the level is below 0, all the water freezes and destroys the structure from the inside.
Conclusion
This type of foundation can easily support a house or several-story cottage. In order for the structure to last as long as possible and the foundation not to crumble, you need to follow certain rules during construction, which we described above. In order to save money, a strip foundation can be built independently using monolithic pouring or using ready-made blocks. The only difference is the time and the need to make formwork.
Video instruction
Articles on the topic