Adjusting thread tension in a sewing machine. Setting up a manual sewing machine
The promised ordinal post. How to adjust the tension of the lower (!) thread in a sewing machine.
Everyone loves to turn the upper thread tension wheel, but at one time a master taught me that this is not where the perfect seam begins! And with the correct tension of the lower thread. For some reason, many people are very afraid to twist the shuttle that contains the bobbin. In this case, the main argument is: “There’s a small screw there, I’m afraid it will fall and I’ll never find it again.” I don’t see any drama in this - how blind I am, but I always find this screw. Mainly by the sound, I hear where it fell. If something important falls in a closed room, where will it go? Search the nearest meter and find it. Not to mention that it is generally very rare that such a screw falls out, and if you are so afraid, work on the table and on a sheet of white paper. You definitely won't miss it.
So, this screw actually needs to be turned very, very little. Minimal! By just a tiny bit of a degree! Those. with feeling and without fanaticism. If you twist it like that, it won't fall out.
In general, we put a bobbin in the shuttle. At this point, one of the most furious discussions already begins - in which direction should the bobbin be placed? In which direction should it unwind? This “rewinding clockwise” thing is a complete mess. Endless discussion - what should spin clockwise? Nika? Bobbin?
So, take the bobbin so that the thread hangs on the right side. Like this.
And on this bobbin, held like this, you put a shuttle on it. The closed part is towards you, the open part is away from you. Then it will be right.
Now let's take the thread, like this:
And let's see what happens. If the shuttle hangs on the thread without moving, and when shaken it remains in the same place, then the tension is too strong. If all this is rushing down at high speed, it is too weak. We begin to twist the screw (with a suitable screwdriver). And those who have two screws on the shuttle (older models) turn them approximately equally, one, then the other. We tweaked it a little (just a little!) and tried again.
The ideal result looks like this: you take the thread, and the shuttle first hangs on it. But if you shake it all slightly, it rolls down about 5-10 cm, then slows down and stops. If it just flies down, it's not enough. If after 10 centimeters it *almost* stops, but after braking it still continues to slowly creep down - not enough. If it just rolled onto some such piece, and then stopped and stands - good! If you shook it, and it went down just a couple of centimeters, and stopped with a sharp movement - a lot. If it descends two or three times in very small jerks, then stops, but overall it has flown less than 5 cm - still a bit much.
When it became “just right,” we insert the shuttle into the machine and begin to work on the upper part.
Attention: if you start sewing with a different type of thread (for example, you had cotton thread, and then you decided to sew with synthetic thread, which is smoother and thinner), you need to readjust everything. Surely, when changing the thread, it will turn out that the tension has become very low. (Cotton “shaggy” threads are much more slow).
And one more thing: while you are trying like this, you will unwind a lot of thread. Sometimes it takes about 10 attempts until the tension is good. For some reason, many people feel sorry for this meter of thread that they unwind. Like, it's gone. Isn’t it a pity that you sew a million meters of bad seams, ruining threads, fabric, and nerves?
Now we refuel the machine and sew. Let's look at the resulting seam.
Here is a wonderful picture found on the Internet that shows what we are trying to achieve. The threads, top and bottom, meet and intertwine somewhere between the layers of fabric. So, you need to ensure that the place where they meet is, if possible, in the middle between the layers of fabric. And not closer to one of the surfaces.
It is clear that there is little thickness there. And we are talking about some tenths of a millimeter. But this can be adjusted to be really right in the middle.
A good seam is when the stitches lie side by side, the stitching is even, but (!) each individual stitch is visible. Those. you can clearly see the place where the needle stuck into the fabric, and one stitch ends. This should really be a place where you can see how the thread has sunk into the depths of the fabric!
Here's an extreme example of too much tension. On the side where you see almost entirely a straight thread, and from the thread on the opposite side you see loops - on that side the tension is too strong. Those. If you see such a picture from above, loosen the top tension. If you have such a picture from below, increase the top tension.
But now we are approaching a normal seam.
I tried to find a suitable picture, but I didn’t quite find it. Here's an example of a seam:
This seam is smooth, normal, and does not loop. We can say that he is OK. You can sew a thing with this seam, it will hold, everything will be fine. But I would not use such a seam to make a decorative stitch in a visible place. Because it is not yet “drawn” enough, not “chased” enough, there is no beautiful stitch pattern.
What are they missing? In the top picture, the top tension is still quite a bit high, there is a straight line, there is not a sufficiently beautiful depth of stitches (especially at the very top seam this is visible). In the second picture it’s the opposite - there’s a bit too much pull from below. The seam has not yet been damaged so much that it is impossible to sew directly with it. But the beauty is spoiled. The top thread is too immersed in the fabric, too poorly drawn, “sinks”.
It seems to be a good seam, normal, even, does not pull. As already said, if you sew so that all the seams are on the wrong side, you can live happily ever after with such a seam. But in a visible place, I would not sew anything with such a seam. Although everything is smooth, and nothing is bad about it. But the “graphics” from it will not be beautiful enough. This is especially visible on the part of the seam that is closer to the bottom. There the seam is turned as if facing us, it is clear that it is too uniform, like a line. It doesn't read like a seam. Is not cool.
A beautiful, good seam, this is:
The thread sinks into the fabric, goes under its surface, you can clearly see where one stitch ends and another begins. But in the very middle of the stitch, the thread lies on the surface of the fabric, not too taut. The pattern is smooth and does not jump. And ideally, if we turn the fabric over, we should see exactly the same thing on the other side! The more similar, the better!
I want to write something important here:
Setting the machine so that there are no loops on either side, so that the seam holds the layers of fabric together well, and so that nothing from the seam gathers in waves - this goes without saying. Without this, you will not sew anything you will be happy with. You will never be able to iron it well, it will always ripple at the seams, or the seam will spread and be too visible, etc. This is a “minimum program”.
But between “a seam that sews great” and a seam that looks great” there is this small difference, and you need to learn to feel it. And you need to develop in yourself the desire not to stop at the “normal seam”, but to turn your machine until you you won't see a *nice* seam, the kind that really enhances the item when it's visible from the outside.
And - this is very important - I am sure that such truly beautiful seams are the first thing that distinguishes a well-made item from what is called “handmade smells bad.” What is contemptuously called “amateur housewives” or “Samovar Violin” or “Home-grown” is when something seems to be sewn smoothly and well, but everything is finished with seams that “distinctly smell like a home machine.” Someone will look at such a seam on the street and immediately understand that it was sewn by hand at home. Because industrial machines don’t sew like that. Industrial machines are always distinguished by the fact that their tension is adjusted perfectly. (It is automatically adjusted there, and in any case the threads meet EXACTLY in the middle between the layers.)
The next thing that distinguishes industrially sewn items is smooth seams and an ideally maintained distance from the edge. But this is a separate story. This is not so difficult to learn, you just need to take your time when making a visible stitch.
P.S. What else would I like to say: even if we are talking about tenths of millimeters. Any good master who adjusts sewing machines will tell you that any machine can be adjusted to a good stitch (if it is not broken). In the case of capricious machines, this may take some time. But it can be achieved! The main thing here, firstly, is patience, you must not give up, but continue to twist until it is where you need it. And the second is pickiness. Don't settle for a seam that's "OK"! Demand that your car be beautiful. So that she sews a stitch that you want to show off with pride! The only difference is that some people stop too early. And others continue to tighten the car little by little until it becomes completely good!
P.P.S. In this sense, for me, cars whose shuttle cannot be removed are a tragedy. There are modern models in which the bobbin is directly inserted into the shuttle train in the machine, and everything is automatic. There is also a screw there that you can turn. But how can you tell if it's screwed down enough? After all, there is no such trick that you hold it, shake it, and it falls down. Do we need to somehow study and remember the feeling with which a thread is pulled out of such a shuttle? To feel if she is resisting enough? I have seen expensive cars that have such a shuttle, but on the other hand they have “automatic tension adjustment”. I don't know how well it works. But it's good that it exists. But when the shuttle cannot be removed and there is no automatic machine, I don’t know how to adjust the lower tension. (Who knows?)
You are the author of a new idea, you are a creative person, you have a plan, and all that remains is to complete the task. Sewing, as a certain element of art, always requires such an approach. People used to say: “A master of skillful works.” What kind of personality is this? This is a person who has skill and originality, for example, a skilled tailor. We are probably talking about you, who always has a variety of tools and devices at his disposal. One such technical assistant is a sewing machine. You need to be patient and show all your perseverance to study this complex mechanism. The main thing in the operation of this invention is precise synchronization all parts and components and, of course, the main criterion is the correct thread tension. You will not be able to realize yourself fully as a tailoring master until you master the skills to perform this important operation.
From coil to needle
Before starting the adjustment, you must make sure that the three of things.
First. The winding of the thread on the upper and lower spools should be uniform. The thread is of high quality, without roughness or small knots. The thickness of the thread is proportional to the needle number and the choice of fabric.
Second. Mechanical serviceability of thread tension paths.
Third. Threading is carried out strictly according to the instructions. Threading the upper thread is mandatory with a preliminary inspection of the entire tract from top to bottom. There should be no obstacles in the way of the thread (for example, dust mixed with machine oil and scraps of small threads, forming lumps of dirt). Hangnails may appear from an accidental impact with a metal object (scissors, screwdriver). Threading the lower thread requires the same approach; the bobbin unit constantly needs to be cleaned and lubricated. Lubrication occurs after eight hours (cumulative) of operation.
General provisions
The task before us is to get the perfect stitch. To resolve this condition it is necessary to achieve balance tension of the upper thread in relation to the lower thread. Regulators that change the tension of the upper thread, depending on the model, are located either on the front panel or on the arm of the machine head. In most cases, the regulator is numbered.
The tension of the bobbin thread is achieved by rotating the screw on the surface of the bobbin case (in the case of a design with two screws, adjustment is made by the one closer to the center). An important detail should be noted: rotating the adjusting screw on the bobbin, even a slight turn to the left or right, significantly changes the tension of the lower thread. To loosen the thread, the screw rotates to the left. To increase tension, rotate to the right. In most models with a “vertical shuttle” system, all operations associated with this adjustment are performed outside the shuttle mechanism, after first removing the bobbin case from its seat.
Suppose you have performed balancing and achieved a result where the tension force of the thread, upper and lower, is the same (to check, pull two threads toward you at the same time, one coming from the eye of the needle, the second from the bobbin assembly; there is no difference in the resistance of both paths). If during cleaning the lower tension was disturbed and you decided to readjust it, a correction must be made to the upper tract.
Preparatory activities
Make a control seam by setting the stitch length dial to the middle position, folding a small piece of fabric in half and stitching it at an angle of about 45 degrees. Now inspect the line. An ideal seam has no loops on both sides and the fabric does not wrinkle. If the bottom thread on the top side of the seam makes loops, but the top thread is straight, then the tension on the top thread is stronger. Conversely, if the top thread on the bottom side of the seam is looped, and the bottom thread is straight, therefore, the tension of the top thread is weak. In the first case, the tension of the upper thread was too tight, in the second, it turned out to be too loose.
Testing a stitched fabric sample
Make a control stitch again. Then take this sample in such a way as to grab the ends of it on both sides of the stitch, between the thumb and forefinger of each hand. Pull evenly, hard enough to break the threads.
One of four things must happen:
1. Broken upper thread. This indicates that its tension was stronger than that of the lower thread.
2. The upper thread turned out to be less tense in relation to the lower thread. As a result, the bottom thread breaks.
3. The thread tension is balanced and the stitch is perfect, but if the fabric is wrinkled and the stitch breaks on both sides of the seam, it is a sign that the tension is too tight.
4. Not a single thread was destroyed, their tension was balanced, but at the same time their mutual connection was weakened.
Tension Balance Adjustment
1. Loosen the tension of the upper thread by moving the adjusting element to the left by half a division. We make a control diagonal seam again and test the stitching by stretching the fabric. Repeat, if necessary, changing the thread tension with a small movement of the regulator until you reach balance, that is, until both threads break or not one of them breaks. They can both be loosened or tightened as described in points 3 and 4 above.
2. Strengthen the upper tension by turning the adjusting dial to the right about half the number. Make another diagonal seam and check the stitch. Repeat, if necessary, changing the upper thread tension by small turns until the thread tension is balanced.
3. No further adjustment is required if there are no suture wrinkles on the fabric. If wrinkling nevertheless occurs, you need to loosen the lower thread and adjust the tension of the upper thread, as described above in the first paragraph. Repeat the adjustment until the result is perfect, that is, the tension is balanced and there is no puckering of the fabric along the seam.
4. Tighten the lower thread slightly, then adjust the balance by slightly increasing
upper thread tension as in step 2.
Adjusting the zigzag stitch
Setting up this stitch is similar to the straight stitch.
It must be remembered that light, thin fabrics are especially prone to wrinkling when using a zigzag stitch. To eliminate this drawback, you need to simultaneously adjust the length and width of the stitch.
Adjusting seams with decorative stitching
There are times when unbalanced thread tension, one in relation to the other, turns out to be the best adjustment option. This is the case when we sew with decorative stitches and loops. The tension of the upper thread is weakened in relation to the lower thread. This will make the stitch look fuller and rounder, and will ensure that the bobbin thread doesn't show at the top of the seam. For this type of sewing, the tension path of the lower thread turns out to be too “light” (light thread, light bobbin), and it is not always possible to achieve the required result by loosening the upper thread. This is most often achieved by reinforcing the bobbin thread, and many prototypes are sewn to adjust its tension. To avoid wear on the bobbin threads from frequent adjustments, it is recommended to purchase additional bobbins for this type of sewing. Decorative thread is heavier in weight, and filling it into a bobbin makes the latter more massive and suitable for this type of work such as decorative stitching and machine embroidery.
One of the main criteria for obtaining a straight and beautiful stitch when sewing is correctly adjusted thread tension in your sewing machine. Many people mistakenly believe that understanding the tension adjustment process is very difficult and try to avoid independent intervention. In fact, having become familiar with the basic principles of regulation, everyone can adjust the optimal tension level.
To really be sure that the stitching is unsightly due to improperly adjusted thread tension, you need to check the following.
- The amount of yarn wound on the upper and lower bobbins should be the same. In addition, pay attention to the consistency of the thickness of the thread and the needle used. The yarn should not have any damage over the entire surface.
- Serviceability of all working mechanisms. Make sure all operating mechanisms are well lubricated, and their movements do not have sharp shocks or extraneous sounds.
- Correct threading of yarn. This point is especially important due to the fact that many housewives thread their threads incorrectly. Check the filling using Operating Instructions, where the only correct method of refueling is indicated.
Checking and adjusting the upper thread tension
The upper thread tension regulator is a cylindrical rotating mechanism that can be located either on the top of the body or on the side.
Detailed information about the location of this mechanism can be found in the operating instructions for the sewing machine.
It is worth considering that you can determine the optimal level of thread tension by trial sewing several lines. An excellent result is a situation in which the stitching will have an even and neat appearance - which means the thread is tensioned correctly. If, when sewing stitches, you notice that the stitch is pulling the interlacing points with the bottom thread onto the outer surface of the fabric, then the tension balance is shifted towards the top yarn and should be loosened. The situation is similar with too little tension - the places of weaving will be visible, but from the underside of the fabric.
Depending on which of the above options characterizes your lines, you must:
- increase tension;
- reduce tension.
Don't twist regulator wheel too harsh. Gradually increase or decrease the tension until the appearance of the stitching meets the standard. If for some reason you cannot adjust the tension of the upper thread in your sewing machine, proceed to the next step.
Checking and tensioning the bobbin thread
Responsible for the level of tension of the lower thread shuttle mechanism. In order to determine the optimal tension of the lower yarn, you need to pull out the shuttle and hang it in the air, holding the thread coming from the bobbin by the tip. The ideal situation is when the shuttle drops no more than 2-3 centimeters and stops the rotation of the bobbin.
If the shuttle does not lower at all, the thread tension is too high. If it falls too easily when unwinding the bobbin, it means the tension is insufficient. This parameter can be adjusted using special screw.
- Depending on whether you need to tighten the screw (increase) or loosen (decrease), use a miniature screwdriver to turn it clockwise or counterclockwise.
- Make a test stitch to make sure the tension is at the optimal level.
- Continue tightening the adjuster screw until the stitching is straight and neat.
Screw on shuttle
You should start adjusting the lower thread only after you have done a trial adjustment of the upper thread. In 95% of cases when the stitching looks crooked, the reason lies precisely in the upper thread.
For a more convenient interpretation of the results when sewing a stitch, use threads of different colors, which should contrast both with each other and with the fabric used. This will help you determine exactly which yarn tension needs to be adjusted.
Please note that if you are using upper and lower thread different thicknesses, this may require you to make additional tension adjustments. Ideally, the threads should be from the same spool or at least the same type. A mismatch between the needle size and the thickness of thread used can also result in uneven and crooked stitches.
Same as the thread thickness set stitch length can significantly affect the quality of the finished product. Setting this setting too small may result in fabric often getting pushed under the surface of the needle plate.
Thread and needle correspondence table
To successfully work with your sewing machine, every housewife needs to know the characteristics of each type of thread.
- Polyester can be considered the most versatile material for making sewing threads. It is very convenient in the sewing process when solving problems of any complexity.
- Wool yarn is quite thick. It requires a special needle and appropriate tension force.
- To work with denim materials you need thick needle, which will not break when stitching.
Work order:
- Remove the top cover.
- Remove the regulator from the machine.
- Disassemble.
- Restore the spring.
- Collect everything.
- Install correctly in the car.
- Place the top cover.
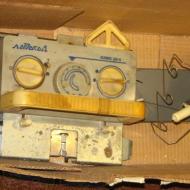
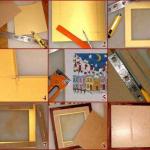
In photo 1, the front cover has been removed.
Photo 1.
Disassembly:
- Loosen the screw 3-4 turns and pull out the upper thread regulator. Photo 2.
- Inside, we see a wire spring - pull it out.
- Pull out the upper thread tensioner bracket.
- We pull out the lifting handle - the rod of the foot. Photo 3.
- Lubricate it oil I – 18 A (spindle).
- We put everything in place except the upper thread regulator.
Lubricate with oil the axis of the lifting lever and the foot rod. No disassembly, no access to lubricate.
Photo 2

Photo 3 shows a screw that needs to be loosened by 3 - 4 half turns so that you can pull out the axle, lever, lift, rod - tab.
Photo 3.

On photo 4, disassembled regulator, top thread.
In disassembled form, it consists of:
- Screw.
- Cone spring.
- Washer with jumper.
- Plate.
- Plate.
- The rod is a pusher.
- Threaded axle.
- Groove for cone spring.
- Seat for compensation spring.
- Compensation spring.
Photo 4.

On Photo 5, compensation spring, mounted on the axis of the upper thread regulator.
Photo 5.

Assembly and immediate adjustment.
- Place a compensation spring on the figured axis. Straighten one new coil of the compensation spring, and bend it into a ring instead of a ball and a thread guide. As shown in Photo 5.
- The tension of the compensation spring is free. The spring touches the far ledge from the thread guide to the upper thread. Photo 7.
- Screw on the base, tighten. Photo 7.
In photo 6, the first bend, the spring from the bottom is not positioned correctly. If we take the base housing as a dial, then the compensation spring stands at 15 minutes. The axis must be turned counterclockwise for 15 minutes. And in this position, tighten the screw on the base. It should look like photo 7.
Photo 6.

Correct position, photo 7.
Photo 7.

On photo 8. Assembled regulator, for alignment, bent axis.
- We put on the plates, with the convex part facing each other.
- We put a squeeze washer on the plates with the curved jumper facing outwards.
- We put a large diameter spring on the release washer, and screw a pressure nut on the narrow part of the spring.
If the split part of the figured axle is compressed, then in order to align it and not break the axle, we do this: We put it on the axle - screw the nut upside down, and push the slot of the axle apart with the tip of a screwdriver (if the axle is bent).
- If it is slightly bent, the nut, when turned out, will straighten out this bend.
We install the tension regulator, the upper thread in place, under it there is a three-turn spring. We press the regulator into the spring so that the boss on the sleeve body is level with the lower part of the base. The distance from the top of the guide bracket to the bottom of the curved part of the spring is 19 - 20 mm.
- Check the bend of the spring. We press the spring ball and place the spring under the thread guide bracket.
If the front bend, the compensating spring, enters under the thread guide bracket, without touching, then everything is normal. If the spring touches the bracket, braking will occur, and this will break the upper thread. You need to take pliers and bend the spring.
When inserting the assembled upper thread regulator into the machine body, you need to raise the presser foot shaft lifting handle by 1/3, otherwise the following will happen when sewing: When switching from thin to thick, the plates will spontaneously unclench. And the upper thread, at the thickening, loops from below.
On photo 9, the assembled regulator is installed in the car.
How many craftswomen dream of an industrial sewing machine!
After all, what a beauty this is! You can sew thick, heavy, thin, dense - emphasize what you need - fabrics and materials.
From numerous comments in the discussion of industrial, and not only industrial, sewing machines, I realized that many of those who dream and, after all, buy industrial sewing machines I've never sewn on machines like this! That is, they dream of a wet machine in the depths of their souls, comparing it with an ordinary household household machine. I will have to disappoint you a little - these are not exactly the same thing. Or rather, they are similar, but not exactly.
But! Despite all the obstacles - no space, no money, or, conversely, you received a machine as a gift... You have an industrial sewing machine! Hooray! Comrades! Let me clarify right away that we are talking about any machine with a vertical shuttle. That is, we have both a bobbin and a bobbin case.
The mechanic came, adjusted the machine, configured it, tightened it up, explained it and... left :)
And you were left alone with the machine and the multi-volume technical description for it, often in Chinese or another incomprehensible language. Come on, the language is incomprehensible. We'd figure it out. But the terms are also unclear. Again, there is the saving Internet. But while you get to the bottom of the truth there, you will curse everything in the world.
So! A course for a young fighter or a few rules for a master craftswoman.
Before we begin, let me clarify once again: we can understand the settings ourselves under two mandatory conditions.
Firstly, the machine was previously adjusted by a mechanic and everything was fine!
Secondly, nothing in the machine fell off with a ringing or rattling sound and the needles did not break!
It is important! If something extraordinary happens, it’s better not to get involved yourself, but to call a specialist (husband, neighbor, or at worst, a mechanic)
If everything is in order and the machine is acting up, we begin to figure it out.
The first rule of the craftswoman queen. If the machine suddenly stops producing high-quality stitching - it loops, confuses the marks, there are clumps of threads at the bottom, threads stick out at the top too - again, methodically, carefully and accurately check the threading of the upper and lower threads.
Attention! According to safety precautions, the machine must be refueled with the engine turned off!
Top threading.
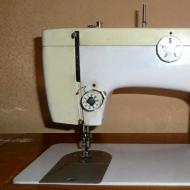
General view of our machine.
From the bobbin the thread passes through the upper guides


And professional trick You can thread the thread into the guide plate in any way you want - this is just one of the options for additional tension of the thread or to prevent the thread from twisting; Try playing around with different options for threading the holes.


The top thread has been threaded.
Now threading the lower thread.
And a professional trick about winding thread on a bobbin if you are winding the thread idle, remove the thread from the needle (otherwise the thread will get tangled in the shuttle mechanism and you will have trouble getting it out) and raise the foot (otherwise the thread will be washed faster than necessary) teeth of the advancing rack).

Another one professional trick.
Pay attention to the bobbin case in my machine.
A sheet of office paper or a piece of non-woven kitchen cloth, as the mechanic said "for softer or tighter sliding of the bobbin in the case." It definitely won't get any worse!

The direction of rotation of the bobbin in the bobbin case.
Professional trickin fact, it doesn’t matter where the bobbin rotates in the cap, as one mechanic told me. Try it - it won't be worse, but it might be better.


We insert the bobbin into the cap and thread it into the shuttle mechanism.
Attention, once again!We insert the bobbin case only when the thread take-up is raised to its highest position!

We check whether we have inserted the bobbin and cap well.
How to check?
Make one full turn flywheel.

The machine will make a cycle of one stitch and pull it to the surface bottom thread.

Attention again! If the bobbin case is not inserted all the way, that is, when you inserted it into the hook mechanism there was no click, then the cap and bobbin will fall out with a roar or the thread will not come out.
In this case, we start over.
Thread take-up in the upper position, cap in hand and go! Here is a small lyrical technical digression.
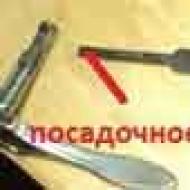
In some machines the cap fits better (or so you are used to) if hold the lever or loop of the latch(white arrow).

In some machines (and mine was one of them), it is better to simply hold the cap and insert it into the shuttle mechanism - until you hear a clearly audible click.
Professional trick pay attention to how and where the bobbin thread is directed (arrow).
When threading a cap with a bobbin, the thread always lies freely and points upward.

We check again whether we have inserted the bobbin and cap well.
The machine sews, but continues to loop.
But we forgot one small detail. We bought new threads and decided to sew a new thing from thick, heavy, thin, dense - emphasize what is necessary - fabric and material.
The second rule of the craftswoman queen.
If the machine sews poorly with new threads, on new fabric, it loops, it means We begin to independently adjust the stitch quality.
And for this we need to fearlessly, that is, quite consciously, tighten two screws.
And turning these screws is not only possible, but necessary!
Let's look carefully at our machine. Here they are - two magic screws.
Upper thread tension regulator.
Red arrow - adjusting screw.
Green arrow - plates that press the thread.

Tighten the screw - plates

Bottom thread tension regulator.
In a circle - adjusting screw.
Arrow - a pressure plate that regulates the thread tension depending on the tightening force of the screw.
Tighten the screw - pressure plate We clamp the thread tighter, unscrew it looser.

This is how we check the thread clamping force of the pressure plate.
Tightened the screw pulled the thread towards you(in the direction of the arrow) - checked how tighter or weaker it goes.

Twisted - stitched - looked - twisted - sewed - looked and so on until complete victory over the miracle of technology - the industrial sewing machine.
And so on until the stitching is of high quality and beautiful.


By the way, another little professional trick. Pulling the threads at the end of the stitching until lift the presser foot using the knee lifter! Do not try to forcefully pull out the threads, especially the top one, if you are too lazy to lift - help with your hand(white arrow).

The fact is that knee lift raised all the way= raised foot - you completely release the thread from the “embrace” discs in the upper thread regulator.

If the machine is good, new, tuned, and your skill is growing every day, then the adjustment will take you from 5 to 20 minutes.
By the way, all these tricks also work great when taming the settings of a household sewing machine with a vertical shuttle.
05.10.2011
For correct thread tension, it is necessary that the sewing machine is set up very well in everything else. To do this, first perform the following steps:
Winding thread onto a bobbin
Each sewing machine has its own mechanism for winding thread from a spool to a bobbin. Typically, this mechanism is completely automatic and does not allow you to wind more than necessary.
Winding bobbin case tension
The spring that lifts the thread is twisted in such a way that the cap threaded with the bobbin, lifted by the extended end of the thread, does not allow the thread to unwind until you pull it sharply upward.
To do this, the upper thread is passed through the feed system - there it passes through the tension regulator, passes through the eye of the thread take-up lever, and after several staples into the eye of the needle.
After this, you can proceed to adjusting the thread tension.
Setting the thread tension
The highest quality and most beautiful stitching is obtained when the upper and lower threads are intertwined invisibly, in the thickness of the material. This is only possible with the correct thread tension settings.
The tension of the upper thread is adjusted using a mechanism on the front panel, and the lower thread is adjusted using the adjusting screw on the shuttle. Some computerized sewing machines automatically adjust the thread tension depending on the selected stitch and type of material.
Adjusting the upper thread tension
The tension is adjusted by tightening the screw, which compresses the disc-shaped washers. To adjust, you need to take a small piece of fabric that you will work with later (dangling loops are too weak or too strong a tension on the upper thread). If the seam is smooth, look at which side the knots of the plexus of the lower and upper threads are visible. They can be easily felt with a finger. When the thread tension is set correctly, they are not felt either from the bottom or from the top.
Correct thread tension setting
Correctly setting the tension ensures that the knots formed by the interweaving of the lower and upper threads will be located approximately in the middle of the fabrics being sewn.
Nodules form on the underside
If knots form on the underside of the fabric, the upper thread tension is insufficient.
Articles on the topic