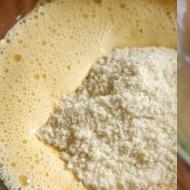
Crafts flowers from plastic bottles. Flowers from plastic bottles
If you think that this is not for you, that you have both hands “left”, you could never even make a craft for your child in the kindergarten, then do not rush to conclusions. You can create beautiful flowers from plastic bottles with your own hands in a matter of minutes. It's very simple and you probably have all the materials you need at home. In addition, such crafts are an excellent budget option for decorating the garden, for the home; such flowers are also suitable as crafts for children in kindergarten. So let's get started! We will tell you simple master classes for beginners.
- Before you start working with plastic containers, you must wash them thoroughly and remove any paper or plastic labels.
- To make your crafts more lively and different, it is better to paint the bottles. For this, it is best to take acrylic paints, but they will have to be fixed on top with varnish. It’s better to immediately purchase acrylic varnish with a colored base. You can also use spray paint.
- To avoid cutting yourself on the uneven plastic edges of the bottle or getting burned from the fire, and without it you cannot make flowers from plastic bottles, it is especially important for beginners to always use gloves.
- To make it easier for you to make good flower shapes, always draw them on cardboard first as templates. And then make plastic cuttings using them. To make an outline, use a marker, an awl or a thick needle.
Materials for creating flowers from plastic bottles
Of course, in order for you to know exactly how to make flowers from plastic bottles, you must know what you will need. There is nothing complicated here.
So, you will need:
- of course, there are many and different bottles to create different options;
- paints and brush for application;
- candle;
- pliers;
- wire;
- beads, beads or buttons for decoration;
- hot glue gun for adhesion of parts or thick threads;
- cardboard and scissors;
- marker, awl.
So let's get started.
DIY flowers from plastic bottles step by step for beginners
Method 1. Making simple, spectacular flowers.
To make such a flower you will need literally 10 minutes. By the way, you can create a lot of them, and then make a large bouquet by attaching the stems. They can also be used individually, for example, to decorate the surface of a fence or wall. You can create a whole panel of multi-colored flowers.
- So, first draw a flower on the cardboard. One of which will be larger, the other smaller. It is better to take different shades of plastic, as shown in the picture.
- Transfer the templates to the bottles using a marker and outline them. You can make a large flower from the bottom of a cut bottle. Then you just have to make cuts on both sides above each indentation on the bottom.
- The blanks are ready, take them with pliers and heat them over a candle. But don't overdo it. Be careful and use gloves.
- When the plastic becomes warm, bend the cut edges of the bottom of the bottle as shown in the figure. It will be a big flower.
- You simply cut out the small one and heat it slightly to give it a concavity.
- Flowers can be connected to each other using hot glue or thread. Decorate the middle with a beautiful button, bead or beads.
Method 2. Making daisies

- You will need white plastic bottles. Dairy products often have these. But choose them without ribbed walls.
- The bottom of the bottle needs to be cut off.
- To make daisies, you just need to cut out neat petals. To make them even, first draw a template on the bottle with a marker. Or cut first into two even parts, then into four and then into six. Then round off the edges of the petals. But it's easier to draw first. You need to cut the petals up to the lid.
- To make the daisy look believable, look for bottles with an orange cap, or find one separately, or paint it.
- Connect two bottles together and secure them with wire or thread, after making holes in the lid using a hot awl.
- You can make a wire stem for the daisies and decorate it with green leaves from bottles. To do this, again draw the templates, cut them out and shape them over the fire.
Method 3. Making Roses

- Draw patterns of seven colors, different sizes as in the picture. These are all components of one flower.

- Cut them out of plastic. Take different shades of bottles for each flower.
- In the blanks, make a hole in the middle with an awl to fasten the petals together.
- Next, heat each plastic flower over a fire so that the edges are deformed.

- Combine all seven colors into one, add a beautiful button or bead to the center.
- To make the stem, take a green bottle and cut it into a spiral. Then heat it over the fire and wrap it around the wire.
- Add leaves to roses.
Method 4. Making zinnias and chrysanthemums

- Cut the bottle in half.
- Next, cut it up to the lid into thin strips. We make 2-3 more of these blanks. You can take bottles of a smaller diameter to make the flowers look more voluminous. The neck of these blanks can be cut off.
- We heat the workpieces over the fire, twist thin strips in the opposite direction with a knife or scissors. We do this with all bottles.
- We insert one flower into another and secure them with hot glue. The center can be made from the lid, so the flowers will look more like zinnias. If left without it, the flowers will look like chrysanthemums.

- We make a stem from wire.
Method 5. Making sunflowers.

- We take bottles, cut off the bottom, you need two bottles for one flower. We do not throw out the bottom and paint it brown if it is not brown.
- We paint the bottles equally yellow and green.
Decorate your home flowers from plastic bottles Anyone can do it, because a huge amount of raw material for such crafts accumulates in every household. Packages of milk, mineral water, and household chemicals are thrown away almost every day, but maybe everything will change when you see what beauty can be created using such semi-finished products. It is these examples of beautiful works and lessons on how to create them yourself that our article today will be devoted to.
DIY flowers from plastic bottles
The advantages of food-grade plastic, which you will need to work with on crafts of this kind, are its safety for our health, as well as strength and durability. Still DIY flowers from plastic bottles They will be a long-lasting decor, the colors will not fade or fade, the components will not be deformed, they will not tear or break. However, this very strength of the material can also be considered a disadvantage, because to work with them you will need not only to cut the plastic with fairly sharp scissors and a knife, but also to heat their edges over a fire to make the surface non-sharp. All this makes such work unsuitable for children's creativity, especially when it comes to young children who may cut themselves or get burned at some stage.
In addition, try to carry out all stages of work associated with heating the plastic, gluing it or hot forming it in an open space, because the substances that are released from it when heated will be harmful if inhaled. If possible, for example, if you are doing this, then it is best to carry out this work outdoors, where the concentration of harmful substances will be minimal. If after all flowers from plastic bottles for the garden you will be creating a house, it is best to open the window and check the room well after finishing work. In addition, hand gloves are also a safety issue, as when cutting, the plastic parts can be sharp enough to cut the skin, this is certainly not a fatal cut, but very unpleasant in any case.
Flowers from plastic bottles for beginners
Simple examples flowers from plastic bottles for beginners, which will be shown in this section, show us where to start mastering this technique. The most basic option, which is worth considering in more detail, is to paint the bottom of an ordinary transparent container so that it looks a little like a flower.

In the photo you can see one example of such a craft, which children will be happy to repeat. But, as we said above, it is best not to trust them with all the preparatory stages associated with the formation of the workpiece, but to involve them at the decorating stage. You need to take a small container and cut off the bottom evenly, as low as possible. We don’t need this extra plastic anyway; it should be left for others. We carefully cut out the petals with scissors and our workpiece is almost ready. Now, to extend the work, you will need colored plasticine and paints. Using plasticine, you need to form the center of the flower, rolling it into a ball and gluing it into the existing recess in the center. This is not only a decorative technique, but also a place for fixing fasteners - a wooden skewer, which will help us stick the finished flower anywhere, be it in a flower pot or in a beautiful vase. After the flower is already confidently standing on its wooden stem, you can paint its petals using gouache or acrylic paints. Other examples that you can see in the photo flowers from plastic bottles step by step for beginners, are carried out according to the same simple principle, but if you want to decorate them not only with paints, but also to give the petals a more natural shape, you will have to heat them with a lighter or a special burner.
Under the influence of high temperature, the plastic will begin to melt and deform, and by controlling this process and rotating the workpiece over the flame, you can achieve a very interesting appearance. Using exactly the same melting, you can not only shape the petals, but also connect the parts together.

As an illustration, the creation process is shown DIY flower from a plastic bottle step by step. You can see in the photo which part of the container will be used as a workpiece - for the lower tier we take the bottom, and for the upper tier we cut off a part from the neck. In this case, we take a small, half-liter container, so our finished flower will turn out more compact and neat. It is most convenient to cut out the upper part according to a template using an even piece of plastic. Please note that you need to heat both one and the second part, you just need to keep the lower one over the fire a little longer so that the petals take on a finished look. The color, which would make the finished bouquet even more beautiful, is applied using a brush and acrylic or other quick-drying paint; due to the fact that the material is transparent, you can paint only one side of it. It is advisable to choose contrasting, bright color combinations for both parts, the ones shown in the example, pink and blue, look great together.
Flowers from plastic bottles: photo
Diversity flowers from plastic bottles, photo which have been successfully proven, gives them application in a wide variety of home decor areas. As it turns out, they have no fewer options than those, and you shouldn’t just limit yourself to flower arrangements. For example, balcony flower boxes filled with colorful crafts look very elegant; in spring and winter, this will be an excellent alternative to living plants. In addition, crafts can be made not only for installation in a vase, but also for hanging compositions, for climbing vines, which also look quite attractive.

The tandem looks great, which is made on the basis of a flower and, moreover, both of these crafts are made at the same time, using one single container. The daisies that you can see in the illustration also look interesting. They differ from the classic version in that you need to cut much more petals, paint them strictly white, and in the middle either place a yellow plastic lid from a kinder egg, or make a plasticine plug. The stem is generally attached simply - a hole is made in the lid (preferably initially green or painted green), a piece of wire is inserted inside and fixed and bent. Now, when you screw the cap onto the thread of the neck, the stem will be firmly connected to the flower.

For most flowers from plastic bottles master-classes and lessons on making are quite simple. But if you want to advance your knowledge a little further, hone your technique and craftsmanship, then you can end up with the same magnificent products as in the photo above. Please note that here are the very elegant compositions and unusual jewelry that can even be used as accessories and jewelry, as well as works that can even be framed in a beautiful frame and hung on the wall, they look so artistic. It’s hard to even believe that these works are based on the same principle of recycling unnecessary plastic.

I would like to consider one example of jewelry in particular, because such a bracelet can be a successful addition to an image for a party or children's party. It is made using many flowers, each one is formed separately, and then collected into inflorescences, and then into a bouquet. To save time, you can take colored plastic, then you will skip the long process of coloring all the petals.

How to make flowers from plastic bottles
Let's look at a few simple options, how to make flowers from plastic bottles. For the first lesson we will need small ones; the plastic in them is softer, easier to cut and will be easier to paint with an aerosol can. Each needs to be cut in half and cut into equally sized petals. You can decide on your own whether to round the petals or leave them straight; both will look beautiful.

When the transparent blank begins to take on the shape of the finished flower, it must be covered with a layer of paint. As mentioned above, it will be most convenient to use an aerosol can, since in addition to speed of application, this will also give us an unusual appearance of the elements. Since you will then collect them all into a single bouquet (in our case, attach them to a hoop), it is better to paint them in different shades, but stick to the same color scheme. Let us add that it is most convenient to attach plastic using wire; for this, small holes are made in each element through which a piece of wire is pulled. This same technique, by the way, can be used for the task of decorating the top edge of any fence with such decor.

One more example DIY flowers from plastic bottles, master-the class with which is in front of you. In this case, as a result of your work, you get an excellent water lily, which can be used to decorate water compositions.
Flowers from plastic bottles master class
Our review of the wonderful flowers from plastic bottles master class, in which we can simultaneously make both a vase and the bouquet itself, and the thing turns out to be very functional and attractive in appearance. And all due to an unusual approach to decoration, because the plastic surface will need to not only be painted in the color we need, but also decorated with a pattern and fine perforations, which we will achieve if we use a regular blowtorch.


In the lesson flowers from plastic bottles step by step, which is posted above, all the main stages of forming a vase are considered. It consists of two main parts - the lower flower, the bottom, gives stability, and the upper part, twisted plastic, becomes an excellent vase, where you can even, if desired, pour water and place a living bouquet.
Most liquids in modern stores are sold in plastic bottles, which in skillful hands can turn into unique decorations for a garden or city yard. Flowers made from plastic bottles look beautiful and aesthetically pleasing at any time of the year. To make them, you need a simple set of tools, a little effort and imagination.
Necessary tools
To make plastic flowers for garden decoration, you need a basic and affordable set of materials and tools.
Main material
The main material for work is plastic containers. The variety of their shapes and sizes will allow you to create dozens of different colors. As stems for flowers made from plastic bottles, you can use wire of various thicknesses or wooden skewers, which are wrapped with plastic strips or electrical tape.
To create large volumetric compositions, you may need plastic tubes, wooden blocks and slats, and dry tree branches. You can fasten the flower parts together using glue or a stapler. In addition, wire, fishing line and screws are used as fastening elements.
Painting plastic parts
To paint plastic flowers, you can use enamel, acrylic paints and colored varnishes, as well as aerosols for painting cars. You can use regular paint brushes. But in this case the paint will lie in stripes, which will remain on the finished product.
A more even, streak-free color can be achieved by applying the paint with a foam sponge. The disadvantage of this method is the length of the process over time. To obtain a rich color, it is necessary to apply several layers of paint, each of which must dry completely.
The most even coloring is obtained when working with aerosol paints in cans. It is preferable to carry out this work outdoors, since the dye has a rather pungent, persistent odor.
Set of tools for work
To create flower arrangements from plastic containers, you do not need special tools. The equipment available in every home will be sufficient:
- scissors;
- pliers;
- awl;
- stationery knife;
- stapler;
- wax candle;
- glue;
- screwdriver or screwdriver.
Thanks to such a simple set of tools and skillful hands, you can decorate a plot or yard to your surprise.
Precautionary measures
 In order to make flower crafts, sharp tools are used, careless handling of which can lead to injury. Therefore, this work should be done by adults or children under their supervision.
When working with paint, you must equip yourself with basic protective equipment: rubber gloves (protecting the skin of your hands), a gauze mask or a special respirator (preventing particles of the dye from entering the respiratory tract).
To create some types of floral plastic decorations, you need to work with an open flame. To prevent the possibility of accidental burns, all parts must be held above the flame using tweezers. Plastic material should not be allowed to ignite as this may cause a fire.
Garden floral wonders
Household or garden plots are an area where creative owners can bring their ideas and fantasies in the field of decoration to life. Beautiful flowers from plastic containers will make the area around the house brighter and more noticeable. So, you can make original decor for a fence, veranda or gazebo. Both compositions of small flowers and single bright buds of large sizes will look organic in the garden.
Decor for wooden surfaces
What do people pay attention to when approaching a private or garden house? Of course it's a fence. Flowers from bottles will help make it memorable and original. To make them you will need:
- bottles of the same size;
- scissors;
- acrylic paints;
- colored buttons;
- glue for plastic;
- screws and screwdriver.
The bottoms are cut off from plastic containers and given the shape of a flower. Transparent blanks can be painted.
The finished flowers are screwed to the wooden parts of the fence. The procedure for fixing crafts depends on the imagination of the master. You can close the screw caps using multi-colored buttons that are glued to the center of each flower.
You can decorate the fence with bright sunflowers. To create them you will need:
- two-liter bottles;
- yellow paint;
- green electrical tape;
- scissors;
- glue;
- metal or wooden rod.
To make sunflowers, it is better to use brown containers. The bottom is cut off from the bottle. The rest should be cut into large petals and painted yellow. When the paint has dried, you can begin assembling the product. Glue is applied to the workpiece from the inside and the brown core is glued.
Two holes are made in the base into which a rod is inserted. The unpainted part of the flower and the rod must be wrapped with electrical tape. Leaves can be made from a plastic folder, and also secured to the stem with electrical tape.
Flowers for a flower bed
It’s quite easy to create a bright, beautiful flowerbed in your garden that will delight owners and passers-by all year round. To do this you will need a lot of multi-colored plastic containers, imagination and some free time.
Garden daisies
Daisies for flower beds can be easily made from white plastic bottles, which are usually sold in dairy products. To create one chamomile you will need:
- three bottles;
- wooden sticks;
- green paint;
- scissors;
- glue.
 First, the sticks are coated with green paint and left to dry. Then blanks from bottles are prepared. The bottom and neck of two containers are cut off. The diameter of the upper hole should be slightly larger than the size of the neck of the third workpiece, from which only the bottom is cut off. The height of the parts differs by 1 cm. 8 petals are cut out of plastic.
Flower assembly begins with the formation of a bud. To do this, two more blanks are put on the neck of the first part. They can be fixed with glue. Then you need to bend the petals. A yellow or orange cap is screwed to this volumetric blank.
A hole is made in the center of the green lid and a prepared wooden stick is inserted. The edges of the lid are covered with glue and connected to the bud. Beautiful garden chamomile is ready!
Bright tulip
Unusual multi-colored tulips can be made in several ways. To create this flower you will need:
- plastic containers;
- paints;
- glue;
- scissors;
- wooden skewers;
- yellow details from chocolate eggs.
Work should begin by preparing the stems. Wooden sticks (skewers, Asian food sticks, fireplace matches without sulfur) are painted green. A dry stick is connected with glue to half of the yellow part.
Flowers can be made from both the bottom and top of the bottle. Pre-selected containers are made in different colors. To do this, they use the internal painting method: pour a little paint inside the bottle, close the lid and slowly turn it around its axis. After uniformly covering the entire inner surface of the container with paint, open the lid and wait for the workpiece to dry completely.
The painted container is cut into two parts and their edges are cut off in the form of sharp or rounded petals. A hole is made in the center of the buds and a prepared stem with a yellow core is inserted into it. To securely fix the stem, the edges of the hole are covered with glue.
Long, sharp leaves are cut out of a green bottle and attached to the stem with glue.
Unusual lilies
White or painted lilies will be a wonderful addition to the floral design of a city flowerbed or summer cottage. You can make this beautiful delicate flower from white or transparent plastic bottles. To work you also need:
- wire;
- acrylic paints;
- scissors;
- awl;
- glue;
- wax candle.
The top part of plastic containers is cut off and the lids are unscrewed. The necks are cut into 6 round petals. White bottles do not need painting.
Transparent ones can be painted white or pink. Two-color buds look very beautiful.
Two holes are made in the lids using an awl. A wire is inserted into them and its ends are twisted. The green bottle is cut into strips 5-6 wide, which are heated over a fire and wrapped around a wire.
The core of the lily is made from a strip of plastic cut into fringes. It is slightly heated over a flame and rolled into a roller. The resulting stamens fluff up and turn yellow.
After all the elements have completely dried, they begin to assemble the flower. The lid with the stem is screwed to the neck. The core with stamens is glued inside.
Decor for artificial ponds
Many garden plots have small artificial lakes. They are decorated with pebbles or figurines, or they can be decorated with plastic flowers.
Water lily
A delicate water lily that will please the eye can be made from an ordinary plastic bottle. To create a beautiful white three-dimensional flower you will need:
- white plastic bottles (4 pcs.);
- five-liter containers;
- acrylic paints;
- scissors;
- tweezers;
- glue;
- source of fire.
Creating a flower begins with preparing the painted parts. Cut a leaf from the bottom of a large container and paint it green.
The top of one of the white bottles is cut off and given the shape of a flower. Take the workpiece with tweezers and heat it a little over the fire so that the petals bend inward. Then the flower is painted. A strip is cut from the middle part of the container, cut into a fringe and rolled into a roll. Its end is sealed over a candle. The stamens are painted yellow with spray paint.
The top part is cut off from three white bottles and the neck is trimmed so that the elements can be placed on the yellow core. The plastic is cut into sharp petals, slightly bending them in the middle.
The petal blanks are placed on the base, fixing each with glue. After the glue has completely dried, the petals are slightly bent. The stamens are glued to the center. The flower is attached with glue to the leaf.
Glowing water pod
A simple flower in the form of a yellow capsule with candles in the center looks original. It is made from plastic bottles with a volume of 1.5 and 5 liters. Cut off the bottom of a one and a half liter container and cut out a flower with five petals from it. It is painted yellow on the outside. A sheet is cut from the bottom of a large bottle, the edges of which are heated and bent into low sides. The finished element is painted green.
The parts of the egg capsule are glued together with glue. Place a small candle in the flower, securing it with double-sided tape. The spark plug can be easily replaced as needed.
By creating crafts from plastic containers, you can not only decorate your garden or flowerbed in a beautiful and original way, but also help clean up the environment.
By involving children in this activity, you can develop their imagination and creative thinking, and develop a caring attitude towards the environment.
Modern designers use everything in their work, so if you want to learn how to make flowers from plastic bottles with your own hands (step by step for beginners), then you can also be called partly a designer. Well, or at least just an original creative person.
The process itself is not too complicated, but there are some nuances. Plastic is not plasticine, you can’t just give it a shape, it needs heating. So let's start with safety precautions.
Precautions during operation
As already written above, the plastic will have to be heated. For this you will need a very ordinary candle. Do not use a lighter, because leaving it lit for a long time can lead to overheating and explosion.
Be sure to cover your work surface with thick paper. Plastic can melt when heated, and drops of frozen plastic from tables are usually scraped off along with the paint, forming ugly burns.
By the way, about burns. Be careful - drops of plastic and wax from the candle can fall not only on the table, but also on your hands. Do not wear rubber gloves, otherwise you may get double burns. It is better to carefully monitor the process and the resulting drops.
Also, do not forget about safety precautions when painting products - use a respirator when working with spray paint.
The room in which you are going to make crafts should be well ventilated. In general, it’s better to do it outside.
Tools for work
You will need for work:
- Plastic bottles of different sizes
- Sharp scissors
- Construction (large stationery) knife
- Candle
- Lighter or matches
- Wire
- Beads and large beads
- Glue, electrical tape, awl
- Paints
Scissors should be tough with sharp noses and good sharpness. Choose PVA glue or something similar, but with good tenacity. There is no point in using glue - it hardens very quickly, and the product cannot always be folded as expected right away.
Let's move on to crafts
Now let's go directly to the instructions on how to make flowers from plastic bottles with your own hands (step by step for beginners).
Before you start cutting out the bottles, make stencils of the petals and other cut-out parts from cardboard, this will make it easier to mark the cut-out parts. Neither a pen nor a pencil sticks to the plastic, so it is best to mark the boundaries of the cuts with a needle or awl. You can warm up the tip a little, then clearer marks will remain.

After all the necessary parts have been cut out, they need to be fired and smoothed. To do this, the edges are heated with a candle. After heating, the edges not only become smooth, but also slightly wavy, giving the product a more natural look.
Clivia is considered the easiest flower for beginners to grow. You don't even need to cut anything to make it. Cut off the bottom of the bottle. Cut the top one into 6 approximately equal strips up to the neck. The top of the strips is slightly rounded. And treat each petal with a candle.
 Now make a core out of the beads. To do this, beads are strung in one row on one end of the wire, and then the second end is passed through all the beads except the last one in the reverse order. Simply put, the wire is folded in half and a bead is hung in the middle between the halves. And the rest are strung on both ends at once.
You can use glue to connect the core to the flower. But it would be safer to make several small holes in the lid with a hot awl, thread a wire through them and twist them from the outside.
The flower stem can be made from narrow bottles, such as shampoo bottles. Several bottles are connected together into a stem using wire and electrical tape. Then the flower is also attached to the stem using electrical tape.
Now the structure can be painted, dried and installed in the garden!
Video: DIY flowers from plastic bottles step by step for beginners
These are very simple, but quite cute flowers from plastic bottles that you can make with your own hands, and step by step for beginners. With a little practice, you can create masterpieces like rose bushes or miniature sakura, violets or tulips. The number and shapes of plastic crafts are limited only by your imagination!
The trend of rational use of household waste has recently become increasingly popular, especially with regard to plastic containers. From plastic bottles you can make almost the entire country house interior and more with your own hands. One of the main advantages of this material is its long service life, and it is also very elastic. Don’t forget that plastic bottles are an affordable material that every owner or housewife always has in stock.
Cheap and cheerful - we make flower beds from bottles
Plastic containers are an ideal option because they have a great advantage over wood and even metal. Wooden fencing in flower beds or flower beds dries out over time or rots under the influence of moisture and sun. Even metal curbs are susceptible to corrosion and require periodic maintenance, such as regular painting.
What about plastic? It does not lose its shape and does not collapse for a long time. This means that such a flower bed will last for more than one season or even one year, and it also requires absolutely no maintenance. Even if a “breakdown” occurs, the required “element” can always be found in the pantry and easily replaced, without resorting to long, tedious shopping trips to find a suitable fragment.
So, what can you make from plastic bottles with your own hands?
Bottle borders
 If you need to fence a flower garden, plastic containers of different sizes will do the job perfectly. This will not only limit the space and prevent the growth of perennial plants, but will also retain moisture and prevent the appearance of weeds.
The shape and size of the flowerbed depend only on the imagination of the summer resident: it can be either equilateral or in the form of some kind of animal or plant. You can also use bottles to break the flowerbed itself into segments.
Even a child can build a bottle border (with the help of adults, of course):
- The first step is to draw the contours of the flower bed with a sharp object or sprinkle sand on the site.
- Remove the labels from the bottles, wash them, pour sand into them and screw on the cap. If this is not available, you can use ordinary soil or water. This is necessary for stability, since empty containers will quickly fall out of the fence.
- Dig a groove along the outlined contour so that the bottle can be deepened into it by about 1/3.
- Place the filled bottles in the groove with the neck down, as close to each other as possible, and cover with soil.
For visual effect, you can use bottles made of different colored plastic (green, white, brown).
 Some summer residents do without digging in bottles. For example, bottles without a bottom are simply inserted into each other, forming a circle. The finished structure can be “put on” or taken into a ring around the trunk of a tree. To secure the curb, it must be pressed tightly to the ground with arcs.
Multi-tiered flower bed
 If you really want to have a flower garden, but there is too little space, you can make it yourself from plastic bottles. The principle is the same as when constructing a border, only after laying the first tier it is necessary to fill it with nutritious soil, and only then lay out the next floor.
When planting plants for the lower tier, it is better to choose moisture-loving specimens, since when watering the water will flow down.
Mini flower beds
 Beautiful and useful crafts for the garden can be made from 5-liter plastic bottles. They will serve as miniature and cute flower beds, for example, in the shape of everyone’s favorite piglets.
 Group compositions in the form of trains with flowers look no less impressive.
 And if you sow lawn grass instead of flowers, the large bottle turns into a cute hedgehog with green spines. All that remains is to attach the eyes and nose.
 Those who are not afraid of small rodents will like cute mice from small (liter) bottles. They are good for planting petunias.
Flower pots and flowerpots
 With a little imagination, plastic bottles can easily be transformed into small decorative pots for flowers or herbs. You can make them even or cut them to fit a marker in the shape of a face. Such flowerpots will look great not only in a garden gazebo, but also on a windowsill in a house.
 But if you put a fabric cover on the cut bottle and attach ropes, you will get elegant flowerpots for the summer veranda.
 The easiest way to make hanging pots is to cut out fragments of the walls on both sides of the bottle, and secure a rope under the neck for hanging. Compact, low-growing plants can be planted in such flowerpots.
Making a beautiful garden path
Paths made from plastic containers are especially popular among summer residents. The strength of such a path depends on the laying method and what part of the plastic container serves as building material:

Paths made of plastic bottles become very slippery in winter.
Fun playground - decorating a place for children to play
Caring parents always strive to provide their children with a place to play in their dacha, where the children can while away the time while the adults are busy in the garden. Of course, it should not only be safe, but also colorful so that the kids will like it. With the help of plastic bottles it is easy to decorate the playground by making a variety of plants and animals. Regular paint will help give them brightness.
In the shade under a palm tree
 What is a children's playground without a sandbox? And where there is sand, a palm tree must “grow”. For the tropicana you will need green and brown bottles for the trunk and leaves, respectively.
Before you begin assembly, you need to make sure you have a solid base. For example, fix a metal pin in a concrete screed, and it should be quite long so that the tree becomes tall and children can walk freely under it.
When the base is fixed, you can start “growing” the palm tree:
- cut off half the bottle (the top and neck are not needed) and form a jagged edge;
- Make a hole in the center of the bottom, string the blanks onto the base pin, bending the teeth to the side for a more natural look;
- cut off the bottom of the green bottle and make straight cuts along the entire contour to the place where the wall meets the neck (if desired, the branches can be made into shapes - cut into 4 parts and make teeth on each one);
- string fragments of the branch onto the base;
- firmly attach the finished branches to the top of the stem (by welding or construction cords).
 If after assembling the palm tree there are still a lot of green bottles left, you can use them to make a small (or large) Christmas tree. Remove the bottom of the bottle and cut it into long narrow strips right up to the neck. Trim the edges of the strips to resemble thorns. String the leaves onto the base.
Such a Christmas tree will look great on the site in winter, especially under the snow, and will also help out on New Year's Eve those who, in a hurry, did not have time to buy a living tree.
Guests from a fairy tale - funny animals
 And of course, there must be toys. Children often take their old favorites outside. With the help of plastic bottles, you can easily diversify the “zoo”, creating real masterpieces - from the fairy-tale Frog Princess and Goldfish to modern cartoon characters.
 Take, for example, a handsome cat, painted with black and white paint. Or you can use brown beer bottles and you will get a brown cat, also beautiful.
Form a head from two bottle bottoms (connect them), and the curves on the bottoms will indeed look like a real head. On one of them, paint eyes, eyebrows and mustaches with white paint, and a neat tongue with red paint. Insert small cut out ears on top. For the body, string the same short-cut bottoms onto the base, and close the body last. Melt the edges of the bottoms. Apply white paint along the melted contour of the ears and body fragments, and make a white spot on the chest on the front bottom.
Glue the head and legs - the top parts of bottles with elongated necks will be useful for them. Cut them to the place where the bottle expands, cut the edges with sharp teeth and build legs from 4-5 parts, putting them on the base wire. Screw the plugs onto the upper necks and use them to glue the legs to the body. For the tail, take a long wire and string the narrowest parts of the neck onto it, but without the plugs. To make the tail fluffy, cut the edges into thin strips.
 Beautiful animals are also obtained from large 5-liter containers. With the right combination of bottles of different sizes and with the help of bright colors, you can place a zebra, horse, cow, donkey and even a giraffe on the site.
Flowers for my daughter
 In the sandbox, children not only make Easter cakes. Little girls love flowers very much and often collect dandelions on the lawn (or in their mother’s flowerbed) to plant them in their sand garden. But you can make a whole greenhouse of flowers from bottles, and little girls will be happy to take part in making the simplest options. Chamomiles, cornflowers and tulips will decorate the sandbox, especially since young flower growers will be able to repeatedly “transplant” them from bed to bed without harm to the plants or mother’s nerves.
For flowers you will need:
- wire for the stem;
- straight parts of bottles for cutting leaves out of them;
- necks or bottoms for the inflorescences themselves;
- dye.
 Adults can make more complex versions. Plastic roses or poppies will decorate not only the playground, but also the flower bed.
Plastic design for garden
Plastic bottles have a wide range of applications. So, if small animals and birds look appropriate in flower beds and playgrounds, then larger animals can be placed in the garden, among trees and shrubs. They will give the garden a unique look and enliven it.
Amazing garden sculptures
Representatives of large birds made of plastic look almost alive. Using multi-colored paints you can achieve a stunning realistic effect. To make them, you just need to master the technique of cutting feathers from the sides of bottles and prepare a frame on which they will be attached.
The following will look very impressive in the garden:

In the garden you can place sculptures of not only birds, but also animals of a large enough size so that they do not get lost against the background of tall trees.
 Among the greenery, a bright spot will be a white sheep, which is quite easy to make if you have 2 liter bottles and several 1.5 liter bottles lying around in the pantry:
- Cut the necks of two 2 liter bottles and put them on top of each other - this will be an elongated head. Cut out long ears from the third bottle, roll them up a little into a tube and attach them to the head in appropriate places with wire (or glue). You can draw eyes or glue two corks.
- For the body, insert the whole bottle with the neck inside into the cut-off top. Make 3 more such blanks and attach them to the first one on the sides and top, thus giving the sheep the desired “waist” volume.
- The neck will be a whole two-liter bottle, which should be attached to the body at an angle of approximately 120 degrees so that the cork is on top.
- Place the head to the neck (on the plug).
- For the legs, cut off the top of a two-liter bottle and insert a whole bottle of a smaller volume (1.5 l) into it. Make three more such blanks and attach the legs to the body with the wide part up.
- Make a fleece from the cut bottoms of two-liter bottles, fastening them together, and put them on the body. Grip the edges of the fur coat under your belly.
- Paint the sheep with white paint and draw black eyes.
Caring for birds
Plastic bottles can be used not only for decorative purposes, but also for the benefit of the garden. After all, it is always inhabited by the summer resident’s little helpers - various birds that collect pests from the trees. In the warm summer they have something to eat, but in winter it becomes more difficult to get food. That’s when the feeders hanging around the garden will come in handy. And if you involve children in the process, you get a double benefit: the children get an interesting activity and pleasure, and the birds get a cozy house with grains.
 The simplest ones can be made from large 5 liter plastic bottles by simply cutting large arch-shaped holes on both sides.
To prevent birds from injuring their paws on the sharp edges of the bottle, they must first be melted or covered with electrical tape.
For those who rarely visit their summer cottage in winter, a feeder that fills automatically will come in handy.
 You can make it from a bottle and two wooden spoons:
- make two holes in the bottle opposite each other, with the second one located slightly lower;
- unfold the bottle and repeat the procedure on the reverse side;
- insert the spoons crosswise into the holes.
After the bottle is filled with food, it will be poured through the holes into the spoons as they are emptied.
A cozy place to relax using improvised means
Not only birds, but also the owners themselves should have their own secluded corner among the greenery, where on warm summer evenings you can happily drink a cup of tea, inhaling the aromas of nature. Many people prefer to place it in the garden. They are very beautiful, you can’t argue with that, but they require certain financial investments. But it’s cheap and cheerful to make from plastic not only a recreation area, but also to completely equip it.
Alcove? Easily!
A gazebo is one of the largest-scale garden crafts made from plastic bottles. But a plastic gazebo has two big advantages:
- it is easy to assemble;
- will last for more than one year without damaging the material.
Perhaps the only drawback of the building is the presence of a large number of bottles, which need to be stored somewhere during the collection process.
What the gazebo will look like depends only on the desire of the owner, and, accordingly, on the availability of “building materials”:

Practical curtains for the gazebo
In summer gazebos there is a lot of fresh air, but, unfortunately, also dust. Ordinary tulle requires frequent washing, while a plastic curtain does not collect as much dust, and you can “wash” it without even removing it - just spray it with water from a hose (of course, if such a curtain is not hanging in the house). 
For dreamy and romantic housewives, delicate curtains made from the bottoms of plastic bottles strung on a base are suitable. 
Energetic people who love bright colors are more suitable for cork curtains assembled according to the same principle.
garden furniture
 A table, ottoman, armchair and even a sofa in a gazebo can also be made from plastic bottles. The old one from the house is also quite suitable for relaxing in the fresh air, but it, like the curtains, will eventually become a collection of dust. In addition, it is quite difficult to take a wooden sofa outside, because such furniture is quite bulky and heavy. But rearranging the plastic chair will not be difficult.
Assembling the furniture is not difficult - the bottles just need to be placed tightly and connected together with tape, giving the desired shape. For ottomans, knitting or sewing a cape - no one from the outside will guess what they are actually made of.
 Leatherette covers are more suitable for a sofa.
Unbreakable chandeliers for the garden
 If you are planning an evening tea party, you should definitely go to the gazebo. To decorate the light bulb, you can cut the bottle into two parts and make a simple lampshade from the upper half and paint it or cover it with colored thread.
In plastic chandeliers, it is better to use energy-efficient light bulbs - they do not heat up so much and will not melt the material.
In more complex versions, chandeliers are assembled from fragments of leaves or flowers cut from multi-colored bottles. 
Gardening supplies for gardening
In order for a summer cottage to look beautiful and tidy, it is necessary to take care of it all the time - weeding, collecting fallen leaves and small debris. To do this you will need tools. Of course, you won’t be able to make a hoe or rake out of plastic, but simpler ones are quite possible.
Craftsmen have long known how to use plastic bottles to benefit themselves and save the family budget. After all, if the scoop suddenly breaks, you no longer have to run to the store for a new one. From household waste, which is found in every home, a lot of useful things are obtained at no extra cost:

Garden cares
From plastic bottles you can make useful things not only for the garden, but also for the vegetable garden. These can be either small crafts in the form of, or larger-scale structures such as greenhouses.
Greenhouses for seedlings
 Most summer residents grow seedlings of garden crops on their own. Some do this in apartment conditions, but better quality seedlings are obtained from greenhouses - there is enough heat and light.
We can’t even talk about cost, but as for durability, plastic bottles will certainly last longer than film shelters or glass structures.
To increase the service life of greenhouses made from plastic bottles, it is advisable to place them on a foundation and use a metal profile for the frame.
The simplest version of a greenhouse involves constructing walls from whole bottles that are placed on top of each other.
 It will take a little longer to tinker with a greenhouse made of plates, but it will turn out warmer. In this case, you need to cut out even parts from the bottles and fasten (sew) them together in the form of a canvas. Use ready-made canvases to assemble a greenhouse.
Watering "systems"
 For gardeners, watering is no less pressing issue than having a greenhouse. Instead of ready-made watering systems in the garden, you can use. They must either be hung above the bush, having previously made holes in the lower part, or dug into the ground.
 In addition, the bottle makes a good sprinkler - you just need to make small holes in it and connect it to a watering hose.
Getting rid of pests
A repeller made from a plastic bottle will help drive away the gardener’s worst enemy, the gardener, from the property. It not only plows up the beds, digging its tunnels, but also damages the root system of plants in the process, depriving gardeners of the future harvest.
 If you cut the side walls of the bottle, bend them and put the container on a steel rod, when there is a gust of wind, the bottle will spin and make noise. The sound will go into the ground through the rod and deprive the mole of the desire to manage in this noisy place.
The list of things you can make from a plastic bottle with your own hands is quite long. These are just a few crafts that make life easier for summer residents. Agree – it’s better to get the most out of bottles than to pollute the environment. Take care of nature and work with pleasure!
21 ideas for using plastic bottles - video
Articles on the topic