Do-it-yourself canopy made of wood. Do-it-yourself wooden canopy Decorative fastenings of wooden canopy pillars
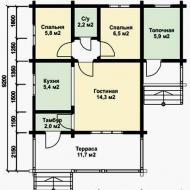
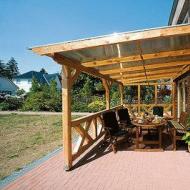
In small complex areas, in order to save space and for greater stability of the structure, shed canopies are used, which serve as an extension to the house. This type of structure is very easy to install, does not take much time and money to install, which explains its popularity. How to install shed canopies attached to the house, a photo depicting the stages of installation work, we will consider further.
Important! Prior to the start of all installation work, it is necessary to design the future appearance of the structure: calculate the optimal angle of inclination, length and width parameters, the possibility of connecting communications, determine the location of the fastener relative to the side of the building, and select blank materials for the roof and frame.
Also, before you attach a canopy to the house, you need to decide on its purpose. If it will be used for household needs (storage of inventory, materials, outdoor study, car parking), there is no need to spend money and time on guessing the original design. A canopy patio for relaxation involves the choice of more expensive materials and interesting design solutions for the exterior of the structure.

Attention! For an example of installing a shed canopy attached to a house, we will choose a wooden structure with a polycarbonate coating.
- has good indicators of strength, moisture and frost resistance;
- elastic, affordable, has a wide range of colors;
- transmits light, but blocks ultraviolet;
- able to withstand significant loads under the weight of snow;
- durable.
Important! The load level of the roof under the weight of snow also depends on the angle of inclination at which the canopies attached to the house will be attached. The layout of the rafter beds (wooden stiffeners) relative to the roof, due to which the angle of inclination is regulated and the strength of the installation of pitched roofs depends, is visible in the photo below. The desired option is selected taking into account the climatic conditions of the region.

shed roof scheme
Canopy installation steps:
- dismantle the soil with a thickness of 20 - 30 cm, allocate a zone for wells, the perimeter of the resulting area should be 10-15 cm smaller than the size of the future roof;
- dig holes for the installation of structural supports with a depth of 30 cm and an interval of 1 m, fill the bottom of the wells with crushed stone, cover with waterproofing, place and fix the supports in them, pour concrete;

- align the supports with a level, make notches 4 cm deep at their tops to install the support bar;
- on the wall of the building and on top of the supports, an upper and lower support bar with notches for the rafters is installed and fixed with screws, which determines the angle of the roof;

installation of support bars

installation of support bars
- on the support strips with nails hammered at an angle of 50 °, rafters with ends cut at an angle are mounted;
- a crate is installed perpendicular to the rafters, with an interval of boards of 10-15 cm, on top of which polycarbonate is attached.


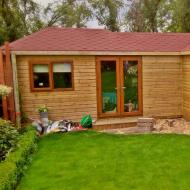
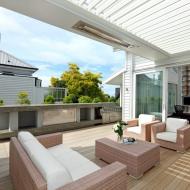
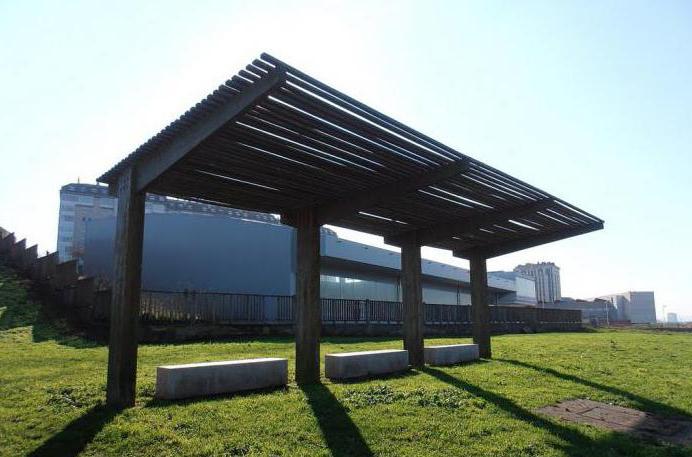
In the process of further design work, depending on the imagination of the owner, beautiful canopies are obtained attached to the house, intended for recreation. Such works include the installation of wooden trellises around the perimeter of the structure, the use of original lighting, greening the surrounding area, partially glazing, installing flooring in it, decorating it with furniture, etc.

finished beautiful canopy
Important! As a result of decorative finishing works, a canopy should appear, which is a single architectural ensemble with the buildings already on the site.
How to attach a canopy to the house: a step-by-step instruction
In small complex areas, in order to save space and for greater stability of the structure, shed canopies are used, which serve as an extension to the house.
Sheds attached to the house: photos, varieties, installation stages and design features
An important part of the exterior of a country house is a canopy. It is designed to protect part of the yard from precipitation and ultraviolet rays, and also performs a decorative function. A small area, covered with material from above, is a canopy attached to the house. Photos of such structures can be seen in this review. In this case, the supports of the structure are displayed at the desired height. Attaching to the main building involves attaching one side of the structure to the wall of the house.

Hinged design allows you to create a great outdoor seating area
The choice of materials for the construction of canopies
Sheds attached to the house, you can do it yourself. The photo shows the main stages of installation. The frame of the structure is often made of profiled pipe or timber. A similar design adjoins the wall and takes on the load from the snow accumulated on the roof.

The attached structure can be made of very durable and massive materials.
The roof is usually covered with profiled sheet, slate or galvanized material. The metal for the frame structure has ductility and strength. It suits different styles. Such structures can be built with your own hands.

Extensions are distinguished by original design
The frame system made of wood is wonderfully combined with other materials. The tree suits most architectural solutions. Before use, this material should be treated with protective preparations. Polycarbonate awnings attached to the house are becoming increasingly popular, photos of which can be viewed on the Internet.

Polycarbonate is easy to assemble and a variety of colors
Polycarbonate enjoys the following benefits:
- plastic is durable. For him, mechanical impact is not scary;
- light weight of the material;
- polycarbonate transmits light well;
- canvas flexibility.
Helpful information! When purchasing a construction kit for self-assembly, it is necessary to check the integrity and strength of all connections.

Convenient structures made of this material can improve the appearance of the main building and cover the area from prying eyes.
Sheds attached to the house: photos and design features
Sheds attached to the house, as shown in the photo, can be of two types. These are console models and canopies on supports. The console version can be of any length, but its width should not be more than two meters. Support structures can be used for various purposes.

Awnings on supports are highly durable
Canopies can have different purposes:
- extension of the veranda, which is used as a recreation area;

The veranda is especially appreciated in open areas where there are no trees.
- terraces are larger and can even be located on the second floor of the building. Such structures can be single-sided or double-sided;

The terrace can be much more spacious than the veranda and have an unusual shape.
- car awnings;

An extension for a car can cover most of the yard area
- various awnings: with posts, retractable or basket.

Functional folding awning
Sheds and awnings for terraces and verandas. Examples of different types of awnings and awnings, as well as useful installation tips in a separate publication of our portal.
Features of wooden canopies attached to the house: photos and design solutions
Often homeowners choose timber sheds. Such structures have an excellent set of characteristics:
- are easy to erect;
- withstand a long stay in the open air, especially with proper processing;
- are characterized by safety for human health;
- have an affordable price.
Helpful information! For comfortable use of the canopy, it is worth taking care of conducting light and installing lighting fixtures.

Wooden structures convey a rural flavor and are massive
Options for canopies attached to the house from corrugated board: photos and design features
The awning from a professional flooring can be carried out in various configurations. Single-pitched, gable and arched structures are created from corrugated board. In addition, the construction of this material has the following features:
- ease of manufacture;
- saving money;
- long operational period.
Important! A corrugated board canopy is mounted only with galvanized self-tapping screws that have sealing rubber.

Extensions made of corrugated board are reliable and durable
Create a project
When choosing a design project, it is worth deciding on the following parameters:
- dimensions and purpose of the structure;
- plot size;
- snow and wind loads;
- snow depth and expected annual precipitation;
- structural features of the main structure.

A pre-created project allows you to choose the best solution and select high-quality material
Before installation work, a drawing is required. Based on the size of the building, the required amount of material is determined.
Helpful information! When creating a canopy for a car, it is worth considering the passage of a car with a load.
Preparatory work
Before the planned canopies attached to the house are created, the photos of which can be viewed on the website, it is necessary to carry out preparatory work. For this, a suitable site is marked out, and trees are uprooted on it. The clean area is leveled. At the same time, sand and gravel are poured.

Some solid sheds require a foundation
Deepenings are drilled under the supports of the canopies. And at this stage, it is worth considering laying the cable under the lighting sources. A certain spacing of supports is selected. It depends on the severity of the roof and the frame part.

The number and arrangement of racks must be calculated in advance
Racks are lowered into the prepared pits, which are poured with a concrete mixture. Pillars are set according to the level.
Important information! If groundwater is located close, then the ends of the pillars must be additionally waterproofed. Metal supports are pre-treated with a primer.
How to make a polycarbonate canopy attached to the house: photos and installation steps
After 12-15 days after the complete hardening of the concrete, you can start assembling the structure. Brackets are mounted on the wall, and then a cross beam on top.

Assembly of the structure requires the preparation of special tools
Creating a crate
Top binding is in progress. The end parts of the racks are connected with the help of a transverse beam and with each other. In this case, parallel stacked profiles are used. The metal frame system is welded together, and the wooden frame is pulled together with steel corners.

The crate is attached to the main beam
Welding areas are cleaned, treated with a primer and painted. The rafters are mounted with transverse parts in increments of 600 mm. The structure is attached to the supporting beam using steel corners. The crate is laid across the rafters and mounted with self-tapping screws.
Roof installation
Sheets of roofing material are cut to size. Then they are attached to the crate. Pre-holes for self-tapping screws are made in polycarbonate.

Roof installation may require special insurance
To facilitate the drainage of water, the cells should be directed downwards. When working with plastic, do not forget to leave gaps between the panels. Hole sizes should be made with a margin of 2-3 mm. There are some features of the installation of roofing from other materials.

Roof elements are attached to the crate
Wooden beams can be used as beams. Over time, cracks may appear in the material, which will reduce the rigidity of the structure. After the installation of the beams, transverse boards are installed, and then the metal tile is fastened. Installation of this material is made from the bottom sheets. It should be borne in mind that there should be an overlap of the upper sheets on the lower ones.
Helpful information! After the installation of the roof, the installation of drain gutters is carried out. To do this, the required length of the gutter is measured and the excess metal is trimmed with a grinder.

In some cases, it will be difficult to install the roof alone
Helpful Hints
After installing the main extension, you can make a platform. The easiest way is to fill the area with gravel. To do this, the turf is removed, the curb is dug in and rubble is poured. Then it must be well tamped.

Stylish and durable coating increases the comfort of using the structure
You can also make a platform paved with paving stones or paving slabs. The equipment of the site with the help of concrete will be inexpensive.

A high-quality site allows you to increase the usable area of the yard area
With the help of improvised material and tools, you can create a beautiful canopy with your own hands. Such designs will allow you to build a great place for a family vacation or reliable protection for a car and garden tools.

A beautiful canopy can become part of the exterior of the building
Sheds attached to the house: photos and installation secrets
Sheds attached to the house, photos of which can be seen in this review, are of different types and can be done independently using a wide variety of materials.
How to make a canopy to the house with your own hands quickly and cheaply

Due to the ease of installation and the low cost of polycarbonate, any backyard or summer cottage can be decorated with a gazebo or a canopy next to the house, as well as cover a terrace or simply create a corner for relaxing in the garden.
But the following materials are often used in work:

Drawing for a wooden structure: 
Canopy in the corner of the house: 
Folding canopy, rather complex design: 
Portable construction as a tent: 
You can also build a multifunctional and multi-tiered shed on the plot, under which you can not only store the car, but also use it as a playground for children, a place where you can just relax with your family or in the company of close friends. At the same time, they completely ignore the vagaries of nature and do not worry that unforeseen precipitation can spoil the mood of vacationers. 
Porch protection: 
Fast and inexpensive installation
It takes very little time to install the canopy structure. Moreover, its cost is quite affordable for a family with an average income level.
To assemble it, you will need racks made of round or shaped metal pipes. Farms for overlapping are made of a profile pipe of a smaller section. And monolithic or cellular polycarbonate for roofing.
- The support posts are welded to metal plates installed in pre-filled foundation columns, or simply lowered into dug holes and poured with concrete.
- The floor forms are welded by electric welding and mounted on support posts. Their fastening to the racks is also carried out using electric welding.
- Polycarbonate sheets or a metal profile are attached to the trusses themselves using special self-tapping screws equipped with thermal washers.
Advantages
The type (cellular or monolithic) and the thickness of the polycarbonate used to cover the canopy depends on the complexity of the design and the area of \u200b\u200bthe canopy for a house or a garage building. But in any case, the canopy will be quite light.
Low cost, quick assembly and a rather aesthetic appearance, brought polycarbonate and metal profile canopies wide popularity among owners of summer cottages, as well as among owners of prestigious country cottages. After all, a well-built canopy can be an addition to any architectural ensemble as an ornament, or an independent structure.
- Small specific weight.
- High impact strength.
- Increased fire and heat resistance.
- High sound insulation.
- Resistant to aggressive weather conditions.
- Durability.
- Wide design possibilities.
Cellular or monolithic polycarbonate, today is a material that can be freely used on a personal plot to cover a gazebo, car shed, veranda, instead of glass for greenhouses or greenhouses. City services use it to build stops for passenger transport.
This material, as a glass substitute, has high performance properties and is completely environmentally friendly. Polycarbonate goes well with light metal frames, emphasizing their lightness and modern shaped look.
When using polycarbonate, it does not require special attention. To maintain its condition, it is enough to wash off the dust from it with a jet of water, and, if necessary, simply renew the metal structure by painting.
More about corrugated board
There are three types of buildings: 
This material has the following characteristics:
- Ideal for fire safety.
- Does not contain substances harmful to humans and animals.
- Strength and durability.
- Temperature fluctuations or aggressive environmental influences are not terrible.
- Ultraviolet is not terrible. Moreover, protective paints will retain their colors for a long time.
Of the shortcomings, only the complexity of some designs is distinguished. Because for the arch on the roof it is necessary to bend the supporting profile into an arc. Without the necessary equipment, iron cannot be given such a shape, and, faced with such a problem, cellular polycarbonate is preferred. Roughly, such a drawing: 
Multifunctional extension to the house
Canopies made of polycarbonate with a transparent roof are very popular today among motorists. These elegant and rather attractive lightweight structures are designed to protect cars from direct ultraviolet rays of the sun, which adversely affect the paintwork.
They also protect the car from the effects of precipitation in the form of snow, hail and rain. Such a canopy, built on a personal plot or cottage, can completely replace an expensive capital garage. By increasing the area by several meters, you can not only keep the vehicle dry, but also take care of a modest playground for children's games.
Estimated cost
Small turnkey constructions for the central region will cost the owners of cottages or cottages in the amount of 60 to 70 thousand rubles.
And the areas covered by such a roof for an area of up to two cars cost about 130 thousand rubles.
These are advertised prices from popular companies, so all work is done in a day or two and corresponds to the selected projects.
Due to the ease of installation and the low cost of materials, any backyard or summer cottage can be decorated with a canopy over the pool or playground, cover the terrace or just relax in the garden. All these buildings, covered with transparent polycarbonate or metal sheet, will acquire a more attractive and elegant look, where you can spend your time comfortably.
But more attention should be paid to canopies coated with polycarbonate. They are simple frame structures that can be quickly and easily mounted both right next to the living space and on the site. Polycarbonate, being a rigid, but at the same time flexible material, allows you to mount canopies of the most intricate shapes.
A very inexpensive canopy option
In the video below, the process of making a quick and very cheap canopy. True, commentators quite rightly noted that this option is not for the middle lane and will not withstand even an average snow load, and the service life of such a canopy will be no more than a year.
How to make a canopy to the house with your own hands quickly and cheaply
What kind of canopy in the courtyard of a private house can be made with your own hands cheaply and quickly? Consider all materials and designs that will save and at the same time
Canopy attached to the house: photos of different types and configurations of canopies
Country housing in the modern view is a combination of privacy, peace and closeness to nature. A place for a recreation area is immediately laid in the project of a good cottage. It can be a patio, a gazebo or a shed attached to the house: you can see photos of the sheds in our gallery. Ancillary structures of this kind decorate the estate and expand the useful area of \u200b\u200bhousing.

Canopy on metal supports with a sloping roof
Materials for the construction of canopies
Frames for attached structures are mainly made of wooden beams or profiled steel pipes. But often brick, stone, asbestos-cement pipes filled with reinforced concrete are used for these purposes. It all depends on the purpose of the canopy and the expected load on the frame.
A canopy attached to the house (photo can be found on the Internet) adjoins the wall, taking on the weight of snow rolling down from the roof. To withstand such serious loads, the base of the extension must be strong enough.

Canopy with high polycarbonate gable roof
The roof of the annex is usually covered with slate, profiled sheet, galvanized iron. But today the construction market offers a more interesting alternative - a polycarbonate canopy attached to the house. Photos of such structures confirm that fiberglass is ideally combined with frames made of any materials. For canopies, cellular sheets 6-8 mm thick are used.

Massive stone columns are equipped for the canopy.
The main advantages of polycarbonate:
- strength. Plastic is 200 times stronger than glass. He is not afraid of hammer blows, hail, stones;
- light weight. The material is 20 times lighter than glass. This allows you to create voluminous, but lightweight structures, reduces the complexity of work and the cost of construction;
- transparency. Thermoplastic of different thickness transmits from 80% to 95% of natural light;
- flexibility. Cellular polycarbonate is the only translucent material that can be bent at low temperatures. The main thing here is to take into account the permissible bending radius and the direction of the internal channels.

Polycarbonate canopy over plastic doors
It is also important that the transparent polymer is easy to process. It can be drilled, cut with a saw, grinder, electric jigsaw.
Helpful advice! Dfor canopies you need to take polycarbonate with UV- protection, otherwise the material under the sun will quickly become cloudy and lose flexibility.
Canopy attached to the house: photo designs
Canopies attached to the house (there is a photo on specialized resources) are divided into two groups: canopies on consoles and awnings installed on capital supports.

Sliding canopy structure with steel rails
Console models can be arbitrarily extended along the facade of the building, but should not exceed 2 m in width so that the wind does not tear them out of the wall. The purpose of such products is to protect doors from the sun and precipitation, as well as to improve the appearance of the building. Forged and carved canopies in an ensemble with the entrance group can transform the facade.

The canopy is covered with a soft roof
Support canopies are designed for the following purposes:
- arrangement of a place for summer recreation;
- protection from precipitation of the area in front of the entrance, the pool, the passages around the house;
- car placement;
- awning over the barbecue area;
- canopies for household needs.
The use of polycarbonate allows you to create roofs of various configurations - single-pitched, double-pitched, pyramidal, arched, concave and convex with a small bending radius. Canopy design can be improved by using colored or tinted fiberglass.

Wooden beam canopy
Project development
When planning the installation of a canopy attached to the house, photos of finished projects must be viewed in advance. The choice of design depends on several criteria:
- purpose and intended dimensions of the object;
- the total area of the site;
- wind and snow loads;
- annual precipitation;
- snow depth;
- the condition of the walls and foundation of the building;
- house construction;
- the availability of materials, tools and fasteners, as well as building skills, if the work is carried out on their own.

Canopy with ceiling light
Next, they make a drawing of a canopy attached to the house (photos confirm this), putting down the actual dimensions of the height, length and depth of the structure. Based on this, determine the amount of material to create the frame and roof.
Standard carport dimensions:
- 250×500 cm for a car up to 4 meters long;
- 350×660 cm for SUVs and cars over 4 m long.
Helpful advice! A car with a load on top must freely drive under a canopy. But if the roof height exceeds 230 cm, precipitation will inevitably fall on the car. There is a way out - you need to change the angle of the roof.

Attached carport
Preparatory work
If all of the above aspects are taken into account, you can begin to prepare the site for construction. The marked area is cleared, trees and shrubs are uprooted. The existing sod is removed to the depth of root germination. The cleaned area is leveled by pouring sand or small gravel, and rammed.
 Peaks and canopies over the entrance: photos that impress with style. Original and practical canopies and canopies over the entrance: styles and shapes. Color solutions and benefits. Canopy over the porch.
Under the supports of the canopy attached to the house (the photo clearly demonstrates this), pits are drilled with a section of 20 cm, a depth of 50-60 cm (to dense soil). At this stage, it is necessary to provide for laying the cable under the lighting fixtures. The pitch of the supports depends on the area of the extension, as well as on the material of the frame and the severity of the roof. The heavier the structure, the more often the step of the pillars (on average, every 1-1.5 m). The advantage of such a base is that it does not need to be joined to the main foundation of the building.

A bucket of rubble is poured into the finished recesses, vertical racks are installed in them and poured with concrete. Each pole is leveled. The second option is that embedded parts with brackets are concreted in the pits, and the pillars are already fixed in them.
Before installation, materials should also be prepared: the tree is impregnated with an antiseptic, varnished or painted in the selected color. Lumber is chosen dry and necessarily sanded, otherwise woodworms will quickly start up under the bark.

Canopy on wooden supports
Helpful advice! EIf the house is in a lowland, the ends of the wooden supports are additionally waterproofed (wrapped with a polyethylene or roofing felt shirt, poured with hot bitumen).
Metal racks must be coated with a primer, which contains zinc phosphate. And it is better to immediately purchase a galvanized or aluminum profile.
While the concrete in the pits is gaining strength, you can arrange a floor covering for a canopy.

Canopy with tempered glass
Installation of a polycarbonate canopy attached to the house
Having endured a certain time for the concrete to set (10-15 days, depending on the air temperature), we begin to assemble the structure. First, several brackets are attached to the outer wall of the house, where the polycarbonate canopy will adjoin. A load-bearing cross beam is mounted on them.

Polycarbonate canopy attached to the house
Canopy crate
Next is the top trim. The ends of the concreted vertical pillars are first connected to the cross beam, then to each other. This is done using parallel stacked profiles. If the frame is metal, the parts are welded, if it is wooden, they are pulled together with steel corners. Welding seams are cleaned, primed and painted.

Installation of the cross bar and frame
The rafters are attached to the crossbars in increments of 60 cm. The connection to the supporting beam attached to the wall is carried out using steel corners. The crate is laid across the rafters, with a distance of 30 cm, and fastened with self-tapping screws. Beam diameter for frame:
- Racks - 120 × 120 mm.
- Cross beams - 100 × 100 mm.
- Rafters - 70 × 70 mm.
- Lathing - 50 × 50 mm.

Arrangement of crates for a canopy
Section of the steel profile for the frame:
Roof installation
Fiberglass sheets are cut to size and screwed to the crate, having previously drilled holes for fasteners in them. In this case, it is necessary to ensure that the plastic cells are directed downwards - to drain condensate. Self-tapping screws must have a rubber thermal washer. The sheets themselves are interconnected by an H-shaped profile.

Laying polycarbonate on the crate
When blocking a polycarbonate canopy attached to the house (photos can be seen in various magazines), you must follow the rules for pairing compression seams. Simply put, you need to leave small gaps between the panels so that the polymer can expand unhindered when heated. The dimensions of the holes for fasteners should also have a margin of 2-3 mm. The protective film is removed from the sheet after installation is completed.

Completing the canopy installation
The finished canopy does not require special care. It is enough to wash the plastic with clean water from time to time so that it will serve its 50 years without fail.
Canopy attached to the house: photos of different types of canopies
Canopy attached to the house: photo of cantilevered canopies and supporting structures. Installation of a canopy made of polycarbonate, pouring piles, installing a frame, roofing
If you decide to equip the territory of a suburban area, you must allocate space for one or more cars, which will depend on your wishes. If you build a carport, you can complement the stationary building and eliminate the need to drive the car into the garage. However, initially it is important to determine the features of the structure so that it does not clutter up the space too much, but is convenient to use.
Design choice
Wooden ones that you can build yourself can have different design features, sometimes they are made stationary, sometimes they are attached to the main building. In order for the building to create, together with other buildings on the site, a single architectural ensemble, the same finishing materials can be used during construction. If you want to make the structure as stable as possible, then the pillars must be concreted; as an alternative solution, they are installed on a pre-prepared concrete platform.
When planning design features, you should calculate the number of cars that can be on the site at the same time. It is important to take into account the moment that friends can come to visit you. If it is planned for several parking spaces, then the poles should be located around the perimeter of the site, and the distance between them should be 1 or 1.5 meters.
Size selection

Masters begin to build wooden sheds only after they manage to determine what dimensions the building should have. If your car is 4 meters long, then the canopy will have dimensions equal to 5x2.5 meters. If you have to park larger cars like jeeps or minivans, then the dimensions of the canopy should be increased to 6.5x3.5 meters. The height must be calculated taking into account the height of the vehicles, as well as the possible load on the trunk. But it is not recommended to make the pillars too high, since in this case the roof can loosen with strong gusts of wind and snow loads. In addition, such wooden canopies will not save the car from oblique precipitation. If you still plan to build a structure whose height should be more than 3 meters, then it is important to provide for the presence of powerful transverse beams that will cover the entire canopy around the perimeter. This will increase the strength characteristics of the structure, and it is recommended to make the roof gable, since this option is considered more reliable.
Stages of construction: laying the foundation

Wooden canopies begin to build from laying the foundation, for this you have to choose a place to place the structure. It is best to prefer a site near the garage, along the garden or garden, as well as in front of the gate. This will allow you to use the canopy not only to accommodate the car, but also, if necessary, to store crops, garden equipment or firewood.
If you decide to make a wooden one, then it is best to choose a place for it at some elevation, this will eliminate the accumulation of sewage during natural precipitation. For the same along the perimeter, it is necessary to prepare drainage ditches, which are covered with gratings after all manipulations are completed.
Work methodology

To equip a lightweight structure, a pile-screw or column foundation should be used, however, technology can be used that provides for the installation or deepening of support pillars. To lay such a foundation, the number of supports must be calculated in advance in order to prepare a hole a meter or more deep for each of them. After the supports are installed, it is possible to increase the strength of the structure, for this, transverse cutting boards are fixed to the bottom of the pillars, after which the entire system is concreted.
For reference

When building a wooden canopy with your own hands, it is important not to forget about some of the nuances, for example, about protecting the elements from decay. To do this, the wooden components are treated with an antiseptic composition.
Working on the frame

At the next stage, you can proceed with the installation of vertical racks. In order to ensure a uniform slope of the supports along the entire length, longitudinal beams should be installed, the position of which is checked on the first two elements. Then install the supports, which are located opposite each other. The angle of inclination of the longitudinal components, which are laid in the grooves of the upper ends of the supports, should not be more than 3%. Whatever type of roof you choose, you have to lay the truss system, it is installed on supports, and then fixed on the longitudinal beams. Between these components you need to maintain a distance of 70 centimeters. Along the edges, the located rafters are laid on a beam with a deviation from the edge of 10 centimeters. This will leave room for the gutter. It is recommended to connect the wooden elements of the frame system by cutting at the ends of the beams of the interlock joints in half a tree.
Roof installation
Wooden canopies, the photos of which are presented in the article, will allow you to understand what design features the building you will be building should have. The next step will be the laying of the roofing, which is installed on the lattice frame. Among the most common covering materials, corrugated board, wood and polycarbonate should be distinguished. The main advantages of the latter are low cost, excellent performance and ease of installation. When installing cellular polycarbonate, it is important to monitor the perpendicularity of the location of the channels of the sheets with respect to the surface of the earth. This will ensure free evaporation of moisture. If you want to make a roof from wooden boards, then initially they need to be protected with a water-repellent composition, which will extend the life of the system.
Some nuances of the work
The design of a wooden canopy may have individual parameters, which are recommended to be chosen by the master himself. The purchased roof sheathing material is laid after you manage to measure the length, taking into account the overhang of 20 centimeters. If you decide to choose a profiled flooring, then its fastening is carried out with galvanized self-tapping screws, which are equipped with soft washers. It will take about 8 pieces per 1 square meter. The same technology should be followed when attaching slate, one sheet of which will take 11 roofing nails. When a wooden carport is made for a car with your own hands without the use of other materials, you can use an edged board as a covering material, which fits as tightly as possible, it should be well adjusted to the frame system. Do not forget about the design of the floor, for this you can use a concrete screed, sandstone or crushed stone, as well as an edged board, which is installed on fairly strong logs.
Conclusion
Drawings of a wooden canopy can be made by you yourself, after that you can proceed to the choice of wood species. It is best to use pine, which is distinguished by its durability and natural beauty. Its weight is small, so it will be very easy to work with it. For construction, you can use freshly planed boards, the main thing is that they do not have bark. The recommended section is 75x75 millimeters, part of the beam can be installed on the ground, having previously treated it with bituminous mastic. If you decide to make a wooden canopy yourself, then you can prepare the wells for the supports with a shovel or a hand drill, but it is important to place the future elements strictly in one line, for this you should use pegs and a cord.
If initially in the project you did not provide for a veranda or terrace, a very convenient thing, and simply necessary in a hot climate, then you may well fill this gap by building an additional canopy to the house. With modern construction equipment and the availability of materials, you can do the job yourself. Regardless of whether you will use metal beams or a wooden crate for impromptu.
Canopy to the house
Although constructively, each canopy to the house very similar to all the others, but still, before construction, it is customary to distinguish them according to their future functional purpose, the arrangement of the foundation and the calculated strength of all supports depend on this. The need to cover a certain area with a roof arises when you plan to make a summer kitchen next to the house, an additional fully glazed gazebo for autumn-spring tea parties. Or maybe you want to protect your car parked on the street from rain and snow, or you want to protect the porch and front door area. A canopy may be needed even when the living room on the ground floor is on the sunny side of the house and gets very hot during the day. It is the canopy, like a hat visor, that helps to solve this problem and improve the microclimate in the room.
Before building, you will need to visualize your project, fit the building into . We are not talking about the use of special computer programs, such a visualization can simply be drawn with colored pencils, but this technique will allow you to most clearly determine not only the size, but also the material that you will use for construction.

Canopy adjoining the house, can be made of several basic materials: it is metal, wood or brick (we are talking about brick supports on which the flooring is already arranged). If we talk about this topic 15-20 years ago, then almost every master would advise making a metal welded structure, covering the roof with profiled sheets or tiles. Today, new favorites are emerging among building materials that have won a considerable segment of the market for such buildings. We are talking about transparent polycarbonate, which is many times stronger than glass, able to withstand the strongest loads of precipitation and wind, without deforming or cracking, while letting in a lot of sunlight. Now to know, every self-respecting builder should know.

Polycarbonate can be bent, making the roof of the most bizarre shapes, plus, its installation is not difficult due to the light weight of the material, it can be processed with a standard set of tools, cut, sawn, drilled. Compared to traditional roofing, polycarbonate has only one drawback - its cost. But, of course, if you don’t spend it on construction, but use it for such a necessary and useful thing as building a canopy for many years to come, then it would still be better to fork out. You should not just save on it by buying ordinary polycarbonate, without a special coating that protects the material from ultraviolet rays. Otherwise, after the first season, cloudy spots may appear on the surface, and it will become brittle.
Canopy in front of the house
By design canopy in front of the house it can be both installed on capital supports and cantilever. If everything is more or less clear with the supports, it is they who are most often meant, then the console varieties are more likely to be attributed to the process, because the console is attached directly to the house. The maximum size of such a visor is 2 meters, but is it so small, is it only possible to cover the porch and the front door with a small canopy?

In fact, cantilever structures allow you to get a large enough terrace for relaxing around the perimeter of the house, especially at a time of the day when a two-meter panel or roof additionally receives maximum shade. In addition, today on the market you can find many offers of sliding cantilever structures, which, if necessary, you can push even further, and after use, remove them to their original dimensions. Just remember that the two-meter limit is not made out of the manufacturer’s harm, but for maximum wind protection of the structure. If the visor is longer, then there is a risk that in a strong wind it will simply be pulled out of place, damaging the wall of the house to which it is mounted.

The canopy is large, long and wide, under which the car can hide, and the whole family can arrange gatherings, of course, it cannot have a console structure. It is not worth saving, you need to equip strong, capital supports on which a full-fledged roof will lie, and the junction of the canopy with a residential building is closed during roofing. Of course, the budget for such a building will be much higher, but given the above, you will be able to make your family happy with a useful room for a long time.
Wooden shed to the house

The design features of a residential building may require special design solutions from you. And if you did to a wooden house, then it’s worth doing all the same and wooden shed to the house, let it be somewhat more expensive and troublesome to operate. After all, wood, as a material, has that special charm that still has a significant impact on the minds of cottage owners. And if, ceteris paribus, you show them a choice of a metal canopy or a wooden one, then the majority will vote for the second option.

The peculiarity of working with wood is that the room is outdoor, which means that the wood will be subjected to serious atmospheric loads. Especially if your site is in a lowland or swampy area, then you will need to additionally process each support that is to be installed according to the project. Building a structure is not much different from the process,. You need to start with a project, calculate the future weight of all the supports and the roof, in order to determine the foundation and the number of beams.

Separately, it is worth mentioning the options for such crafts for giving, which do not provide for a solid roof on top. Such buildings are made near modern townhouses and cottages; due to their low weight, they are not at all difficult to build and do not require such careful preparation and miscalculations. Upstairs, on the strapping beams (Mauerlat), they simply lay the transverse beams, which will give down quite a lot of shadow. This design came to us from the architectural style of the Mediterranean region, where there is not much rainfall, but in a hot summer you want not only protection from the sun, but also air movement. If you want to get more shade, then it is easy to twine such a roof with grapes or other climbing plants, or pull fabric panels on top, which will be easy to hang up and take off.
Canopy adjoining the house
So, let's assume that the project shed attached to the house, you are ready, and you may well begin construction work. It is necessary to mark the places for the pits of future supports, their diameter is about 20 centimeters, and the depth is 50-60 (in any case, up to dense soil, be guided by your natural conditions). In each such pit, up to a bucket of rubble is filled up, and then supports are inserted. You can also use special fasteners that are mounted inside the pit, and the beams are already attached to this fastener. The ultimate goal is to concrete supports that are evenly positioned inside the hole, whether they are wooden beams or metal pipes. Note that the bars are necessarily treated with special means, antiseptic impregnations, and pipes and profiles should be bought either aluminum or galvanized, which are not susceptible to rust, but when buying ordinary iron ones, it is better to cover their entire surface with a special primer.

Before equipping the site in the perimeter between the supports, it is worth laying electrical wiring and, if necessary, a water supply and sewerage system. After that, the floor is either poured with a concrete screed, or paving slabs, decking are laid, or sand and gravel are simply covered (for example, if you are just making a parking space for a car). After the concrete screed has dried, you can begin to assemble the main structure.

Work should start from the wall of the building, to which one side of our future canopy will be attached. Special brackets are hung on it, on which the transverse beam is mounted, it is she who will take on all the load-bearing loads of the entire structure. After that, you can proceed to the crate.
Canopy in front of the house

Formation of the crate canopy in front of the house begins with the formation of the upper trim, which will become part of the future roof. On the ends of those supports that we previously installed and concreted, transverse bars are laid, with which you need to connect all the support pillars into a single system. That is, the perimeter is first connected, and then (depending on the size of the canopy and the number of supports), and then the internal beams are laid, parallel to each other. For a metal profile, the connection method is welding, and wooden beams must be pulled together with special corners. Do not forget to check the evenness of the corners and surfaces with a special level. On the profile, weld seams are processed, they must be cleaned well, and then covered with a layer of protective paint.

Polycarbonate is cut to the size you need - this is the distance between adjacent beams with a small margin for the seam. But in fact, you can use a sheet of exactly the size that it will be convenient for you to mount, that is, you can even mount it through a row. Cellular polycarbonate has small cells on one side to remove moisture from condensate, make sure that all sheets are placed cells down. The sheets are interconnected using a special H-shaped profile, which will allow the seams to be neat and airtight, but the material must be fixed in the beams with special self-tapping screws with rubberized thermal washers. It is not necessary to connect the sheets very tightly, tightly, as the material will expand with increasing temperature. Be sure to leave a certain gap for the compression seam.
Sometimes the farm may need a large wooden shed measuring 6 by 20. This can be a shed for parking several cars in order to close the production site or the storage of building materials. Sometimes it can be just a canopy attached to the house and stretching along the entire wall in order to simultaneously close the passage, driveway, parking lot, recreation area or equipment storage area. If the canopy is attached to the house, then the most convenient roof structure with such dimensions is a shed.
The choice of building material
To create a solid and reliable structure of this size, you will have to spend money on structural elements. You will need:
1. Support pillars with a cross section of at least 150 by 200,
2. beams of the same section (their number depends on the length, the beams will have to be spliced),
3. rafters with a section of at least 100 by 150, preferably 200 by 100, depending on the snow load of the region. The step between the rafters must be calculated based on the material of the roof. If a polycarbonate roof is planned, then the step should be made more frequent, 0.7 m. When covered with a profiled sheet, the step can be increased.

The minimum slope of the slope should be at least 12 degrees, and preferably more, so that the snow calmly descends from the roof. Roofing material must also be taken according to financial capabilities, preferably not rough, so that it does not slow down the sliding of snow.

A minimum slope is created by building walls opposite each other of different heights. For example, to create a slope of 12-13 degrees, the length of the supports should correspond to 3.7 m at the point of attachment to the house and 2.6 m at the bottom of the opposite row.
Support device
When marking the site for a canopy, it must be taken into account that the removal from the outer side of the roof should be equal to 20 cm. Based on this, along the wall to which the canopy will adjoin and, on the contrary, the installation sites of the supporting pillars are marked. For example, you can take a step between the pillars of 3 meters. Concrete foundations must be poured under the supporting pillars. The support post can be immersed in concrete, having previously treated it with anti-rotting impregnations and wrapping it with dense polyethylene. You can use embedded parts - anchors. Anchors can also be dismantled and sunk directly into concrete. To create a concrete base, a pit 90 cm deep is enough.

Mounting options for supports

The easiest way to install dismantled anchors.
The supports are screwed to the anchors with anchors. First, a row is mounted near the wall of the house. Then the second outer row of supports is installed. The supports must be installed strictly opposite each other, strictly vertically and aligned to the required height, taking into account the planned slope. That is, the supports near the wall should be higher than the outer ones.

The calculation of the height of the supports is based on the required slope.
Frame device
Supporting horizontal beams are attached to the supporting pillars. You also need to start work from a row away from the wall.

Beams must be checked for horizontal.
The beams are laid on the supporting pillars, spliced together with metal plates. After the horizontal is checked by the level, the beams are fastened with self-tapping screws to the supporting pillars and with the help of fasteners to the wall of the house.

Beams are additionally attached to the wall.

Beams can be fixed with self-tapping screws or fasteners.

On top of the beams, you can immediately fix the fasteners for the crossbars.
To create a more durable structure, on the opposite side, the beams are additionally reinforced with spacers in both directions at an angle of 45 degrees from each support column. The spacers are also fastened with self-tapping screws.

Installing spacers will increase the strength of the structure.
You can mount the crossbars with self-tapping screws, or you can use metal mounting brackets. Beams are mounted first from the edges, then in the center, then the rest.

The offset should be at least 20 cm. Lastly, an end board is stuffed onto the ends of the boards.

End board installation.
For greater strength, you can strengthen the extreme beams with rafter legs. To do this, a beam is attached to the supporting pillars from the side of the wall at the level of the end of the pillars of the opposite side at an angle of 45 degrees, which will hold the rafters and roof in winter, with excess snow weight.

Roof device
Roof installation technology will depend on the material chosen. Profiled sheet, for example, is mounted directly on the bars.

The profiled sheet is overlapped, fastened with self-tapping screws. At the junction with the wall, an aluminum pressure tape is attached with self-tapping screws, and the space between it and the wall is filled with sealant.

The space between the two profiled sheets must also be filled with sealant. To connect polycarbonate sheets, an additional crate is mounted.

The step of the lathing depends on the material of the roof.

The roof is also mounted with self-tapping screws.
Combined awnings
For regions with significant snow and wind loads, combined canopies are more suitable. Such structures may use rails as support posts, pipes, or brick posts. Metal trusses can be installed. The crate is made of wood.
Do-it-yourself wooden canopy 6 by 20
A single-sided canopy made of wood, even large sizes, can be made with your own hands. Calculation, correctly selected materials and accuracy will be required.
Construction of houses

It is difficult to imagine a modern country house without a canopy. This architectural design performs two important functions. First, it protects the building from rain and sun. Secondly, it is an excellent means of decorating the facade of the house. Hardworking and inventive owners of summer cottages have come up with a lot of ways to equip an additional roof over their heads, which can be made from improvised materials and have a wide variety of shapes.
Varieties of canopies
The classification of canopies is extensive. Depending on the design features, they are:
- inclined (two-slope or single-slope);
- straight;
- multifaceted (in the form of curved arches, domes, pyramids, polygons, arcs).
Depending on the location, the canopies are divided into:
- detached, erected away from the main building (carports, landscape canopies);
- attached. They are erected above the entrance to the house or above the open veranda;
- built-in. They are an integral part of the architectural ensemble. Most often they are built into a barbecue area or into an existing building;
- decorative. Serve as a garden decoration.
If we talk about materials, then the canopies are stone, wooden, polycarbonate, combined.

A wooden canopy is the most popular variety, because it is easy to perform and does not require special expenses when arranging. Anyone can build such a structure if they wish.
DIY wooden canopy
Puzzling over the problem of how to build a wooden canopy and do not know where to start construction work? The first step towards the realization of the cherished goal is the development of the project.
Project development
Projects of wooden canopies are designed to analyze the existing conditions. Especially if the design will be attached to an already finished building. Information about the foundation and front wall of the house is extremely important, as well as climatic conditions (wind load, snow thickness in winter, cardinal points in the place chosen for construction).

In addition, it will not be superfluous to think about decor elements, types of roofing materials that are preferred in one case or another, choose the shape and size of the canopy. The more detailed your project is, the easier it will be to put it into practice. Exact figures will help to correctly calculate the amount of required consumables. The easiest way is to make a wooden canopy over the porch, which will be reliable and stable.
When developing a project, the working dimensions of roofing materials should be taken into account. Lay slate sheets overlapping on the ground across and along the waves. Only after obtaining the exact dimensions of a clean roof, you can get down to business.
Rack installation
The design of a wooden canopy can be made from any wood, but the best way to cope with the duties assigned to it is pine. It is beautiful, durable, lightweight and able to organically fit into any exterior.
The tree can be just sawn, the main thing is that there is no bark on the bars. The recommended section is not less than 75x75 mm. The part of the timber installed on the ground is treated with bituminous mastic before installation, which protects against the negative effects of moisture. The pillars are installed at a distance of a meter from each other, so that the roof hangs at least 200 mm along the front, and 50-100 mm along the sides (along the waves).

With a hand drill or a shovel, we prepare wells located in one line, 500 mm deep. Do not forget to check the diagonals of the canopy - they should be the same. Using a plumb line or building level, we install rails. Strictly vertical. For fixing, we use auxiliary bars, which can then be removed without problems.
The free space is filled with concrete or crushed stone. The second option is more profitable. Crushed stone costs nothing, does not require complex batches, and it “holds” just fine. After installing the pillars, they must be cut in height with a bevel corresponding to the slope of the plane so that the rafters lie on the upper ends of the timber. Using a chopping cord or a hydraulic level, we get a horizontal line.
The height of the racks at the bottom of the slope should not be lower than 1800 mm. However, if you are planning a rack or table in this part, then this indicator can be made smaller.
Installation of rafters
Further, the device of a wooden canopy passes into a simple, but requiring utmost care, stage - the installation of a truss system. Rafters are bars with a section of 150x50 mm. Such strength will be quite enough to cover a 6-meter span. Subject to the slope and estimated weight, of course.

The distance between the rafters is about 1 meter. One side is attached to a wall or support board, mounted in advance, and the other lies on the racks, passing the line at the site of the planned overhang strictly perpendicular. To connect the components of the truss system, wood screws or steel corners are used. Fastening to a mineral base, for example, a brick wall, is carried out by means of corners, consoles, dowels or metal anchors.
We carry out the crate
On top of the rafters (perpendicularly) a crate is performed. It is better to use an edged board with a width of 160 mm and a thickness of 30 mm. The boards are distributed along the axes at a distance of 900 mm.
The boards should fall under the joints and the middle of the slate sheets (size 900x1800 mm). The last and first lines should be along the edges of the slope. It is necessary to fasten with self-tapping screws.
We lay slate
The wooden shed for the dacha is almost built. You can start laying the roofing. The slate is screwed along the top of the wave with galvanized self-tapping screws equipped with a melted head. Experts advise putting special plastic washers under the heads. An average of 11 self-tapping screws is required per sheet. If there are no washers, then they can be replaced with "Ranilov screws" or fasteners with a press washer.

Slate manufacturers often complete the product with trapezoidal or round gaskets, which allow you to securely fix the screws without disturbing the waveform. Slate sheets are mounted from the bottom up. The rows overlap each other by 100 mm. For reliability, it is better to make the front and side overhangs minimal (50-100 mm). If necessary, the slate is cut with an ordinary grinder with a diamond wheel.
Important nuances of work
Wooden elements require treatment with compounds that protect against precipitation, mold, fungus and create an eye-catching decorative effect. Impregnation can be both colorless and tinted.
Now you know how to make a wooden canopy. There are only a few points that require immediate consideration. Pay due attention to the floor. Simple dumping from large gravel, flooring boards, sandstone cladding, concrete screed - the choice of how to create "soil" is up to you.

Take care of the presence of light and a couple of sockets under the canopy. The functionality of the finished structure will be added by a brazier, a cooking stove, a barbecue. Decor variations will depend only on your preferences - you can age the wood, decorate with climbing plants, wooden shelves, handmade vases. Think, try and realize the dream of a corner of coziness and comfort in the bosom of nature.
Wooden canopy: photo


Do-it-yourself wooden canopy, Construction Portal
Construction of houses It is difficult to imagine a modern country house without a canopy. This architectural design performs two important functions. First, it protects the building from rain and sun.
Wooden canopies of various modifications
Wooden canopies give a modern style to the house, cottage. They protect cars from paint fading in summer and in winter there will be no need to dig the car out of the snow. You can choose a canopy model from the catalog or offer your own version. Ask us and we will design a wooden canopy for your house ourselves. We take into account the preferences of the client when designing. Hinged structures made of wood are mounted to the house or installed on mortgage supports.
To prolong the service life of outdoor wooden structures, we treat wood with antiseptic agents. When assembling a wooden canopy, we use well-dried wood. The wooden elements of the canopy are covered with high-quality varnishes and paints in several layers. Such complex processing protects the structure from decay and fire.
Wooden carport
We produce wooden carports of arched and pitched shape. In 2015, rack-shaped awnings made according to the principle of closed-type blinds were popular among our customers. They protect the interior from wind and direct sunlight.
We use the following types of wooden canopy coating:
- Cellular (cellular) or monolithic polycarbonate (thickness from 6 to 16 mm);
- Metal tile or metal profile (profiling);
- Soft roof;
- Triplex (laminated glass).
Wooden canopies - advantages

High strength, easy and fast assembly

Wooden awnings can be built into almost any structure

Eco-friendly, classic style.
In order for the wooden canopy to serve for a long time, our company prepares a frame for the future construction only from the highest quality raw materials for assembly, such as glued laminated timber, reinforced LVL timber. This allows the canopies to withstand long-term horizontal loads, and also provides extremely high resistance to fire, moisture and aggressive compounds.
Such opportunities are due to the requirements for wooden canopies, because. most of them are used in country houses, dachas, public places with a specific theme.
As a roof, it is possible to use translucent glass - triplex, tempered glass, tinted glass, polycarbonate.
Wooden canopies of various modifications in Moscow and Moscow Region
The Wood-Glass company qualitatively and quickly produces and sells wooden canopies of various modifications in Moscow and Moscow Region. Production, installation.
How to build a wooden canopy with your own hands - four step by step instructions
Popular wooden canopies in various versions are found in summer cottages and house adjoining areas. As a rule, home craftsmen make light temporary structures on their own, but the capital structure has to be ordered from craftsmen. Knowing the basic techniques, stages and nuances of construction, you can not be afraid to experiment and boldly take on the implementation of the project you like. Each of the proposed options will not be difficult to "adjust" to fit your size and needs.

General requirements for wooden canopies
To ensure the strength, reliability, ease of use and beautiful appearance of a wooden canopy during its construction with your own hands, you must be guided by the following rules:
- The erection of support posts is best done from round logs (10-20 cm in diameter), profiled or glued beams (10-15 cm in section). To create a rafter system and a small visor, bars 6 * 6, 6 * 4, 5 * 5 or 4 * 5 cm are suitable.
- The selection of roofing material is carried out taking into account the slope of the slope and the design of the truss system:
- polycarbonate - does not weigh down the structure and is suitable for decking of various configurations;
- corrugated board - an inexpensive option for organizing a shed and gable roof of a wooden canopy in the yard;
- soft tile - requires a continuous crate, the material is convenient for finishing the hipped and domed roof of arbors.
- The canopy must be sloped for rapid rainfall. The minimum overlap angle is 5-10%.
- The dimensions of the structure are determined taking into account the functionality of the hinged structure:
- arrangement of a place for recreation - 2 sq. m per person
- the optimal size for decorating a gazebo with a barbecue is 4 * 6 m;
- creation of a canopy for a car: the width of the platform is equal to the width of the car plus 1 m, the length of the platform is up to 6 m;
- terraces attached to the house, as a rule, are made along the entire length of the adjacent wall;
- canopies over the porch should overlap the steps by 30 cm on each side;
- the height of any canopy in the yard made of wood is at least 2 m, optimally - 2.5 m.
Important! Before installation, all wooden structural elements must be treated with antiseptic and refractory impregnation.

Making a shed canopy at the wall of the house
Wall wooden canopies made of timber with one edge are fixed to the facade of the house, and with the other - to the supporting pillars. Some designs do not have a horizontal beam on the wall of the building. In this case, the entire load of the floor rests on the vertical supports placed at the corners of the canopy.

Development of a drawing and preparation of materials
When designing a single-slope structure, it is necessary to schematically display the main parameters:
- the width of the projection of the roof on the ground, taking into account the overhang over the strapping beam of 30 cm;
- slope angle;
- the height of the rafters at the top (2.9 m) and bottom point;
- the length of the supporting pillars, taking into account the recess in the foundation, is at least 0.5 m;
- the installation step of the support beams is about 2.5 m;
- rafter spacing - 60 cm.
Based on the design sketch, the material consumption is calculated. To create a wooden canopy in the country with your own hands, you will need:
- bars for racks - 90 * 90 mm;
- wall bearing beam - 50 * 150 mm;
- boards for rafters - 50 * 150 mm;
- polycarbonate sheets.

Calculate the roof area for polycarbonate sheathing as follows:
- Draw a triangle: one leg is the length of the canopy, the second is the difference between the heights of the structure near the wall and at the end of the roof.
- Using the Pythagorean formula, determine the hypotenuse - this will be the width of the canopy.
- Knowing the parameters of the roof, it will be possible to calculate its area and calculate the consumption of polycarbonate.
Before making a canopy, wooden elements must be prepared:
- Lay out the lumber and dry it in the shade for five days.
- Clean the surface of the wood with a grinder or sandpaper.
- Treat beams and boards with bactericidal impregnation. After drying, the wooden elements are ready for installation.
Installation of the carrier beam and vertical racks
- On the wall of the house, apply markings for mounting the beam.
- Fix the bearing support along the entire length with self-tapping screws to the wall.
- To strengthen the structure of the beams, you can make a beam-holding mechanism in the form of a triangle.

Installation of support posts under canopies from boards and logs is carried out in three ways:
- fixing the beam directly into the formwork;
- using formwork and thrust bearing;
- by fixing the thrust bearing to an existing concrete or wooden base.
The choice of option depends on the massiveness of the structure and the existing foundation. For a small canopy, the first method is suitable:
- Dig holes for the support bars 90 cm deep.
- Fill the pits with crushed stone by 10-20 cm.
- Cover the lower part of the beam-pillar with roofing material.
- Install the posts, level them and pour concrete.
- Fix the support beams with boards and leave for a week until the foundation is hardened.
The construction of the truss system and battens
Fastening the beam to the supporting posts can be done in different ways: by reinforcing the truss structure with diagonal bars, fixing with long screws or metal plates.
High reliability is provided by a combination of several methods:
- Cut grooves in the racks.
- Insert the carrier beam into the groove and secure with fasteners.
- When the support is installed along the entire length of the canopy, mount the corner jumpers.

- Apply markings for cutting grooves on the bars under the crate.
- At the edges of the boards, prepare holes about 4 cm deep.
- Put the bars on the supporting beams.
- Fix the installation with metal corners.

Fastening roofing material
Consider step by step how to build a wooden canopy using polycarbonate. To fix the roofing material, thermal washers with self-tapping screws, connecting and trimming profiles are used.
- Cut the polycarbonate plastic so that the joints of the sheets fall on the crate. The cut is made between the stiffeners.
- Stick sealing tape on the ends of the canvases.
- At the points of attachment to the carrier beam with a drill, make holes in 30-40 cm, the distance to the edge is 4 cm.
- To the wooden frame, polycarbonate is fixed through the seal with self-tapping screws with a washer.
- The second sheet is connected to the first one by means of a connecting strip placed along the roof lathing.
- Finishing corners is done with corner profiles.

Some leave the roof open and plant loaches near the site, which grow and create a natural tent. Photos of open wooden canopies to the house clearly demonstrate the attractiveness of the design.
Four pole pergola for patio
Pergola is a spectacular decoration and a practical element of landscape design. You can build a simple model with a flat roof from inexpensive materials: pine beams and beams. Consider the technology of creating a canopy under the patio with dimensions of 2.6 * 3 m.
Necessary materials and tools
Before you make a wooden canopy with your own hands, you should assess the condition of the site and decide on the installation site. It is advisable to lay out the area under the patio in advance with paving slabs, natural stone or decking boards. You can equip a canopy on the country lawn.

To make a pergola you will need:
- 4 beams 100 * 50 mm, 4 m long - horizontal bearing supports for attaching the crate;
- 9 beams 100 * 50 mm, 3 m long - for the crate;
- 4 beams 100 * 100 mm, 3 m long - supporting vertical beams.
To work at hand you need to have:
- electric jigsaw or hand circular saw;
- drill and drill bits for wood;
- chisel and hammer;
- level, cord and plumb;
- square, tape measure and pencil;
- means of milking wood processing;
- Portland cement brand M-400 - 4 bags;
- fasteners (nuts, bolts and washers).

Fixing racks and assembling the roof
Pergola assembly sequence:
- On the site with pegs and a rope, mark the location of the support bars according to the dimensions of the future canopy. You should get a rectangle 2.6 * 3.0 m. Check the evenness of the diagonals.
- At the marked points, drill holes under the bars with a depth of 50 cm.
- Prepare beams and beams:
- cut the edges of the vertical supports obliquely, measuring 5 cm in width and 12 cm in length;
- cut horizontal beams in the same way;
- at the ends of the bars under the crate, prepare spikes measuring 9 * 5 cm;
- treat the wood with protective impregnations and paint with paintwork materials.
- Install the support beams in the pits and align them in height with a level and a cord.
- Pour the wells with cement mortar and leave it to fully set.
- Mount the horizontal beams on the shelves of the supports so that they protrude beyond the edges by 40 cm. Drill holes through and fasten with screws and nuts.
- Apply markings for the arrangement of nine transverse beams
- Fasten the crossbars with long screws.

Pergola decor elements
Strongly climbing plants are suitable for shading the canopy: grapes, hops, wisteria, clematis, actinidia, Chinese magnolia vine and wood pliers.

To hide from the scorching sun, the pergola is covered with a fabric tent on top, and the sides are decorated with a thick curtain. For comfortable evening gatherings, lamps are installed.


A patio with a canopy is designed as a seating area. It is appropriate to use soft sofas, poufs, armchairs, pillows and hammocks. Textiles and flower pots give special comfort.

Creating a multifunctional gable canopy
When building a canopy made of wood for a large area, it is advisable to install a gable roof. The building can be used as a parking lot, a summer kitchen or an open warehouse.
Preparatory measures: design calculation
The dimensions of the awning are determined based on its functional purpose and the area of the site. When creating a parking lot, it is necessary to take into account the dimensions and number of cars, when building a wooden canopy over the barbecue with your own hands - the size of the barbecue, the need for a chimney and placement of additional furniture on the site.

An example of calculating the design for 9 * 7.5 m:
- The plane of each slope is 5 * 7.5 m, that is, the total roof area is 75 square meters. m.
- Supports - wooden beams mounted on concrete formwork and thrust bearings. The diameter of the concrete pillars is 30 cm. Each support is able to withstand a weight of 1 ton. Taking into account the snow loads of the region and the gravity of the roof, under a canopy of 68 square meters. m will need to install 8 supports.
- The immersion depth of concrete supports is 1.5 m.
Installation and commissioning technology
The order of work can be divided into the following stages.
Stage 1. Installation of supports:
- Make holes with a hand drill or drilling rig.
- From paper pipes, make formwork for poles, rising 40 cm above ground level.
- Prepare concrete and pour columns.
- Insert brackets with a section of 15 cm into the "fresh" concrete.
- After 3 weeks, fix the prepared bars in the support posts.

Stage 2. Structural tying:
- On the racks, fix the beams of the carrier strapping (double boards 30 * 4 cm). Bolts are suitable for fixing - 1 cm in diameter.
- Add a second carrier board, tighten all parts with bolts.
- Make reinforcement - fix the braces from the bars 10 * 10 cm.

Stage 3. Rafter system:
- Assemble the roof trusses in the form of a triangle from boards 10 * 4 cm. It is better to do the work on the ground.
- Install intermediate veins from the board - this will ensure the rigidity of the system.
- Fasten the trusses to the supporting beams every 80-90 cm.

Stage 4. Roof sheathing:
- Finish the ends of the roof with a board or plywood.
- Lay OSB sheets 1.2 cm thick on the farm.
- Attach waterproofing material.
- Cover the roof with corrugated board or metal tiles.

Stage 5. Installing a drainage system:
- Attach the hook-holders along the perimeter of the flooring, providing for a slope towards the drainage system. Installation step - 50 cm.
- Mount the pipe on the holders.
- Cut a gutter at the drainage site and install a funnel.
- Use the elbow to set the direction of the pipe.
- Mount clamps on pipe joints.

Assembly diagram of a simple canopy over the porch
The easiest way is to make a wooden canopy over a gable type porch with your own hands. First of all, measurements are taken and transferred to the drawing. Schematically it is necessary to display:
- visor depth;
- slope length;
- the width of the crossbars;
- the distance between the lower points of the two slopes.

- To make rafter corners from beams, the ends of which are beveled at 45 °.
- Assemble vertical support structures from two perpendicularly spaced beams and jibs.
- Fix the load-bearing beams to the wall on the sides of the porch.
- Attach rafters to the wall above the front door with an emphasis on vertical bars.
- After installing all the rafters, install the crate and ridge beam.
- From below, sheathe the roof structure with thin beams, and lay a metal tile on top of the crate.

A photo of the construction of a wooden canopy over the porch illustrates the stages in detail.
Do-it-yourself wooden canopies: four step-by-step instructions and photos of different options
How to build a wooden canopy with your own hands. Step-by-step instructions for building a wood shed against a wall, over a porch, for a patio, and in a yard. Photos of different
What is the secret of the popularity of polycarbonate awnings? Why is this material chosen more often than others? Is it really just a matter of low cost, or are there other features worth knowing about? How not to make a mistake when choosing a canopy to the house for the first time? What might this design look like, and why is it needed at all? We have prepared for you all the necessary information about polycarbonate awnings and canopies, and also selected 50 of the best photo examples!
Book a canopy?

At prices there are promotional carports - turnkey carport 3.6 x 6.3 = 63.000 rubles!!!
carport for 2 turnkey cars 5.7 x 6.3 = 128.000 rubles!!!
The necessary welding is carried out in the production process using shielding gas, which ensures high quality welded joints.
Also in the factory painting is carried out. High-temperature drying of the painted layer ensures high strength and quality of the protective street coating.
The strength of our structures is ensured by correct load calculations (all calculations comply with the current standard).
The terms of production and delivery of the ordered structures are within 2 weeks. Installation of the structure takes one to two days.
| Canopy No. | roof canopy size, w*d | size on the extreme racks, w * d | 3d sketch with dimensions | covered area | canopy price, including installation and delivery (turnkey) | |
| canopy width 3.4 m. | ||||||
| 3 | 3,4 * 5,3 | 3,0 * 5,0 | 18 | 61 490 | ||
| 4 | 3,4 * 6,3 | 3,0 * 6,0 | 21,6 | 69 190 | ||
| 5 | 3,4 * 7,4 | 3,0 * 7,1 | 25,2 | 77 990 | ||
| 6 | 3,4 * 8,5 | 3,0 * 8,2 | 28,8 | 82 390 | ||
| 7 | 3,4 * 9,5 | 3,0 * 9,0 | 32,5 | 92 290 | ||
| canopy width 4.4 m. | ||||||
| 16 | 4,4 * 3,2 | 4,0 * 2,9 | 14 | 46 090 | ||
| 17 | 4,4 * 4,2 | 4,0 * 3,9 | 18,5 | 60 390 | ||
| 18 | 4,4 * 5,3 | 4,0 * 5,0 | 23,2 | 71 390 | ||
| 19 | 4,4 * 6,3 | 4,0 * 6,0 | 27,7 | 80 190 | ||
| 20 | 4,4 * 7,4 | 4,0 * 7,1 | 32,4 | 92 290 | ||
| 21 | 4,4 * 8,5 | 4,0 * 8,2 | 37 | 104 390 | ||
| 22 | 4,4 * 9,5 | 4,0 * 9,0 | 41,7 | 115 390 | ||
| 23 | 4,4 * 10,6 | 4,0 * 10,0 | 46,3 | 120 890 | ||
Why do people choose polycarbonate
Let's look at what this material is. Polycarbonate is a hard polymer plastic. It is widely used not only in construction, but also for the production of lenses, CDs, computer parts.

May be:
Cellular polycarbonate is several thin plates interconnected by jumpers. In cross section, the sheet is divided into cells, and the air in them provides good thermal insulation properties of the material.

Monolithic polycarbonate is a solid sheet of polymer without voids and cells. This is a versatile building material that has excellent light transmission and can replace ordinary glass.
Among the advantages of the material it is worth highlighting:
- Affordable price. Polycarbonate is cheaper than metal, glass and wood.

- Light weight for easy installation. Cellular polycarbonate is 16 times lighter than glass.

- Fire safety. Non-flammable and does not contribute to the spread of fire.

- Resistance to temperature changes. Polycarbonate perfectly tolerates operation in the temperature range from -40 to +120 degrees Celsius.

- Reliability and durability. Properly made canopy from this material will serve you for decades.

- Flexibility and plasticity. You can create designs of various design forms.

- Variety of colors. Polycarbonate is produced in all possible colors, which makes it possible to choose a material that fits perfectly into the style of the building.

- Ease of care. To clean the coating of the canopy from pollution, you will not need expensive detergents. It cleans up well with normal soapy water.

It is not surprising that with so many useful properties, polycarbonate is so popular as a material for building canopies. Let's figure out what a canopy to the house can be?


Canopy over the entrance
The canopy above the entrance protects the porch from rain, snow and other adverse factors. It can be attached to the building on suspensions or installed on additional supports. The frame material is wood, steel or aluminium.

Sheds made of polycarbonate on a forged frame look very beautiful and interesting. Floral motifs, complex geometric shapes of forged elements give the appearance of a visor of luxury and chic. Such designs fit well into the style of old buildings and classic private houses.

The polycarbonate canopy over the entrance not only perfectly fulfills its main function, but also serves as a harmonious addition to the exterior, and in some cases a bright accent that can completely change the visual perception of the appearance of the house. Due to the variety of colors, the material can be perfectly matched to the color of the building.


carport
The advantages of building a carport to the house are obvious:

When designing such a structure, the dimensions of your car are taken into account, and such a part of the building is selected that is convenient to drive up to.


Cozy terrace
A common option for installing a polycarbonate canopy to the house is to create a terrace for summer holidays. It can be placed directly in front of the main entrance or on the side of the building. Tables and chairs are installed, the high fire safety of the material allows you to place a barbecue on such a terrace.

And this is another example of how a variety of colors allows you to make the perfect design for your taste. It is very pleasant to be under a completely transparent roof during a warm summer rain. They say that the flowing drops of water can be watched endlessly. The tinted coating protects from bright sunlight and ultraviolet rays. An interesting lighting effect is created by bright sheets of colored polycarbonate.


Wood is an environmentally friendly natural material that has a pleasant smell.
Where to order a canopy?
There are people who do not trust the masters in anything, believing that it is easier and cheaper to do it yourself. But this option is good only for those who are professionally engaged in construction, clearly know the whole technology of the process, and besides, they can buy materials from friends cheaper than in a hardware store or on the market. What are the risks for others?

That is why you should trust professionals! The Canopy Master company has been engaged in awnings, canopies, arbors and greenhouses for 12 years. We have hundreds of successfully completed projects in our arsenal, the quality of which is confirmed by their service life.
The best craftsmen, who not only know and love their job, but also treat it with the utmost responsibility, will make you a custom-made canopy in just 2-4 weeks. You will be pleasantly surprised by the daily help of a competent person who will answer all your questions.
Do not waste your time and energy in vain. By ordering the product today, you can enjoy a great vacation in the near future.

Message
sent.
Related Articles