How to make a canopy for your house with your own hands quickly and cheaply - design and installation. Carport - short and clear instructions for creating it yourself (80 photos) How to make a carport for an extension
The local area always remains an implicit continuation of the living space of the house. From spring to late autumn, children and adults spend more time on the area in front of the house than in the room itself. If you're lucky with the weather. The problem of dependence on the whims of nature and climate can be solved quite simply with the help of a canopy attached to the house. Actually, the volume of work itself to make a light extension is not much; much more time has to be spent studying photos of canopies attached to the house. I would like to choose the best option, especially since there is plenty to choose from; as practice shows, a person’s imagination in the field of extension design is almost inexhaustible.
What kind of canopy should a house have?
If you start making a canopy, then only in the form of a full-size roof attached to the house. It will not be possible to get by with a small canopy over the porch area or elongated overhangs of the roof slopes; there will still not be enough space under the improvised roof, so it is better to immediately choose a normal stationary structure with a shading area of at least 12-15 m2. The larger the canopy, the better; sometimes even 30 square meters are not enough to accommodate everyone, and at the same time hide a car, building materials and harvested crops.
In order for the construction of the building to be reliable and convenient, experts advise adhering to a few simple rules:
- Be sure to make the canopy attached to the house. Using one of the walls of the house as a support allows you to save on material and at the same time ensure high rigidity of the protective structure;
- A canopy attached to a house must have at least two free passages to ensure air movement in the shaded area. Any, even the most beautiful structure, placed in a corner, closed on three sides by a solid fence in the summer, automatically turns into a “sauna”.
- The best materials for an attached canopy are polycarbonate sheets, corrugated sheets, profile pipes, wooden beams and natural stone.

These materials, especially wood and polycarbonate, are considered the best option for any protective roofs and canopies. Approximately 80% of all structures attached to the house are made of metal and timber, and only 15-20% of attached sheds are assembled using supports made of stone and red brick.
In theory, a protective canopy for a garage or bathhouse can be built from any material. But you need to be a real professional to be able to make beautiful canopies attached to the house, made of concrete, asbestos-cement slate, sand-lime brick and roofing felt.
The canopy, which is schematically attached, is a cantilever-support structure, one edge of which rests on the wall of the building, and the other on vertical support posts. Unlike the porch canopy, the size and weight of the protective roof are too large to attempt to secure it only by cantilever pinching, so you have to put up with the inevitable presence of two vertical posts.
How to properly design a canopy attached to a house
With all the freedom of fantasy and imagination, design development and planning the construction of a canopy attached to a house is always carried out in compliance with certain rules:
- A canopy attached to a house should look like an organic continuation of the main building, so usually the style and shape of the supporting structures are selected so that from the outside the extension looks like one with the frame of the house;
- According to the same criteria, the material for the canopy and color schemes, one has to take into account even the color and nature of the covering of the area under the canopy, the presence of a porch group and even shading from nearby trees.
Important! The height and width of the attached canopy must correspond to the size of the building and the actual needs for shaded areas.
A canopy attached to a house that is too high and has a large roof area may be too heavy for the walls of the building and create certain problems with removing snow cover and rainwater.

In heavy rain or hail, a polycarbonate canopy attached to a house sounds no worse than an orchestra of drummers, so you have to pull up a protective mesh or use arched roof structures.
Options for attached flat roof sheds
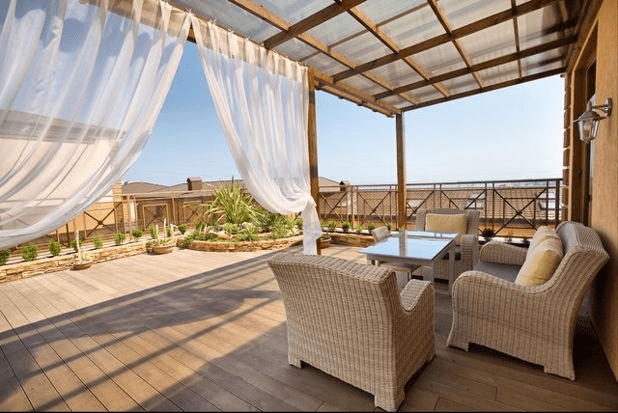
The polycarbonate canopy attached to the house is very popular among structures with a flat pitched roof, photo.
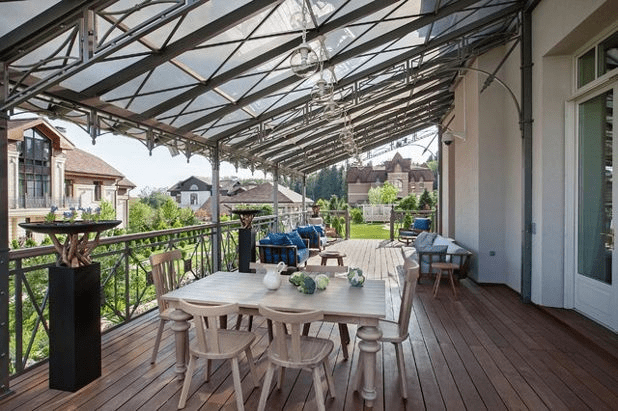
A simple frame structure made of aluminum profile, attached to the facade of the house, perfectly protects the site from the sun and at the same time does not shade the premises of the first floor. This is the so-called evening canopy, the main purpose of which is to protect from rain and provide maximum light in the evening. It is used as a coating with a high light transmittance. A similar structure can also be attached to the sunny side of the building, but in this case it will be necessary to use a sun protection net or tinted film.
To protect from the sun, you can use translucent milky polycarbonate, which removes ultraviolet radiation and gives soft diffused light as in the photo.
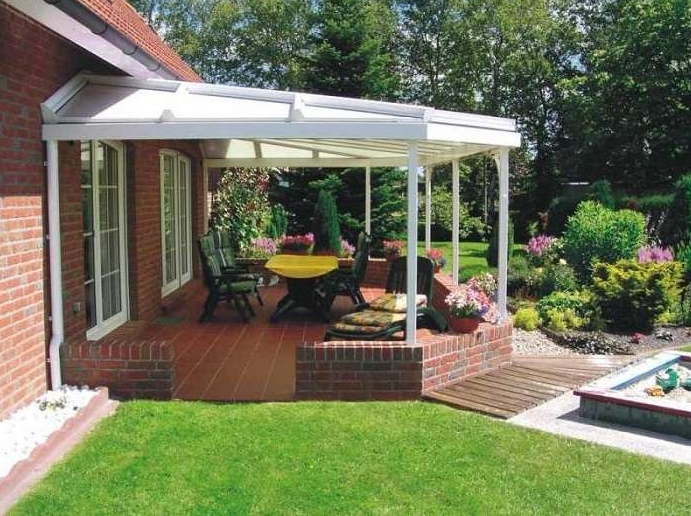
The designers of the attached canopy were able to accurately guess the color and shape of the roof. The white color matches the red brick walls perfectly. The thin lines of the roof profile pipe go well with the white window frames.
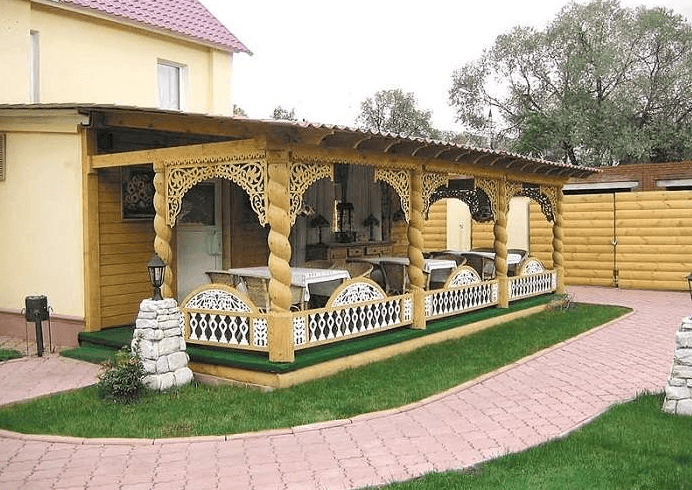
The easy-to-manufacture design of an attached canopy with a flat roof makes it quite easy to connect with the roofing and overhangs of a house or summer kitchen. The wooden canopy attached to the house photo becomes an organic continuation of the interior, and carved patterns on the racks somewhat enliven the appearance of the extension.
With the help of a canopy attached to a country house, you can easily solve the problem of evening relaxation. A structure made of rough massive timber, covered with ondulin, replaces both a summer terrace and a gazebo at the same time, and the presence of a fireplace provides comfortable conditions for relaxation even on cold autumn evenings.

The deliberately rough style of awnings made of huge beams and logs is quite popular for houses and buildings made of wood. Massive posts and floor beams combined with a polycarbonate slate roof only enhance the impression of the attached canopy.

The use of massive timber allows you to make canopies attached to a house made from corrugated photo boards bright and expressive. If you simply weld a metal frame from a corner and cover it with corrugated sheets, then the attached structure will look too much like a garage. Varnished wood and windows on the roof automatically give the appearance of a full-fledged recreation area.

If the attached canopy is planned to protect a fairly large wooden terrace, a more elegant option would be a roof with a regular size of timber, covered with smoky-colored cellular polycarbonate.
The versatility of wood is so great that an attached shed can be made without any roofing at all. The sheathing slats provide at least fifty percent shading of the site.
The idea of an additional canopy attached to the house is ideal for small country houses. An additional pitched roof and a huge wooden terrace allow you to at least double the usable space of the dacha.

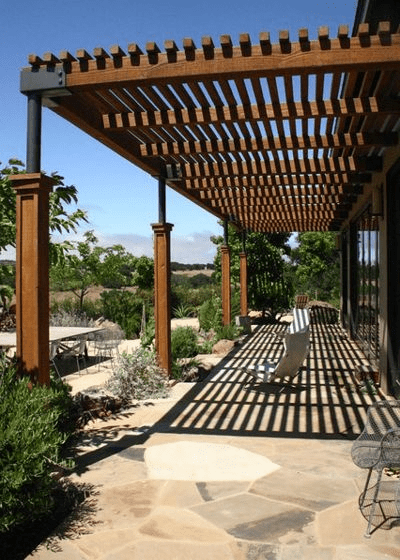
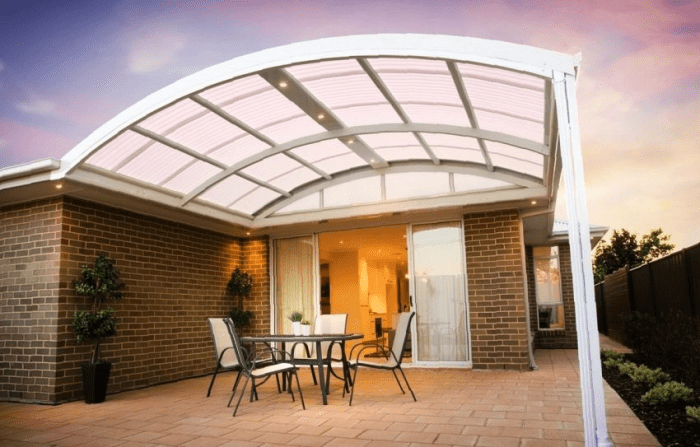
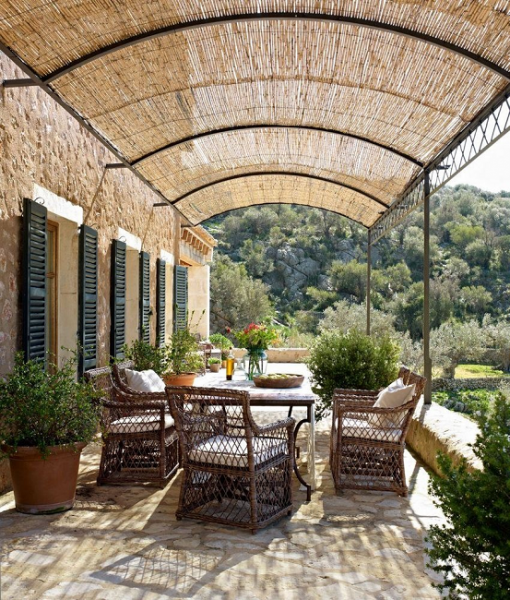
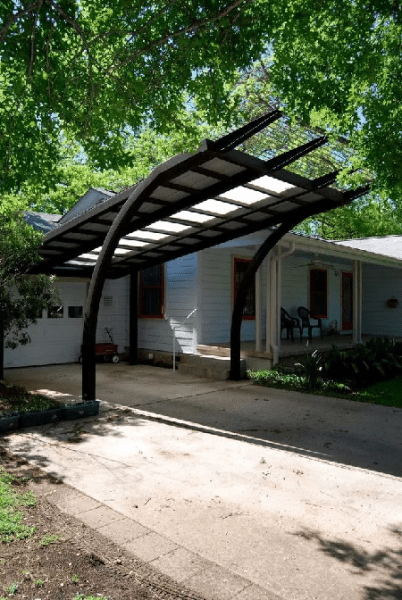
Structures with arched and profiled roofs
Unlike structures with a flat roof, models of an attached canopy with an arch are much more difficult to build for two reasons:
- Firstly, it will be necessary to make at least an approximate calculation of the stability of the arched roof, otherwise the structure will either be too heavy to be mounted according to the attached scheme, or unstable and then there is a risk of collapse;
- Secondly, to make a curved base for the sheathing, you will have to look for a professional bending machine, since it is difficult to make 10-15 arcs of the same curvature on a homemade machine.
But what cannot be taken away is that, despite all the difficulties, an attached canopy with a domed or arched roof looks much more impressive and spectacular. In the wake of the increasingly popular fashion for asymmetrical shapes, you can assemble an attached version of a protective dome supported on two walls at once.
The roof arches are bent according to the usual pattern, and to give an asymmetry effect, plastic overlays with a variable profile section are used.
The simplest version of an attached shed can be made from two-inch steel pipe in one day. The frame is welded from arcs and installed on vertical posts made of a 70x70mm square. True, to ensure the stability of the attached structure, the openwork supports had to be embedded in brickwork, lined to match the walls of the house. Reed or any similar plant is used as roofing. As a result, the roof has excellent air permeability even at 90% shading.
In order to emphasize the graceful curved profile of the canopy, the attached roof does not have to be bent into the shape of a church dome. It is enough to make only a small smooth transition of a large radius to get rid of the boring flat roof.
A serious advantage of curved roofs over flat ones is the increased rigidity of the curved tubular profile. If for an attached flat roof you have to install supports just a couple of meters from the wall of the house, then for structures with curved arches the supports can be placed 3 or even 4 m from the wall.

In addition, an attached frame with an arched or curved roof can withstand bad weather much better, especially heavy snowfall or gusty winds.
Not only roof rafters can be curved; supports and struts can also be made in a curved line. As a result, an ordinary flat roof made of corrugated sheets, attached to a house on crooked supports, attracts attention with a new design.
There is one more trick to this design. The author made a roof covering with an insert made of milky polycarbonate. As a result, we managed to get rid of the disadvantage of all canopies - the monotony of lighting. Well-lit areas and areas with complete shading appeared under one roof. Such a solution will come in handy if you have to perform any delicate work, for example, repairs or assembling parts.
Conclusion
An attached frame can only be installed on buildings with brick block or log walls. Frame buildings, timber houses, walls made of foam concrete and wood concrete can be used as support for an extension only if embedded power elements were previously installed in the building frame, transferring the weight from the attached canopy not to the frame, but directly to the foundation. Otherwise, the roof may cause cracks and breaks.
It is impossible to imagine a private house without a canopy; there must be one at least over the porch. This structure serves two functions. First of all, it protects from precipitation and sun, and secondly, it is an element of decoration of the entire building. A lot of options have been invented for how to attach a canopy to a house, using various materials. We will talk about this, and also consider the stages of building a canopy with your own hands.
What types of canopies are there?
Sheds attached to a house can be classified according to various criteria, for example, by shape and design, by materials of manufacture, as well as by their purpose. Based on their design features, canopies can be divided into stationary and sliding. Stationary canopies are structures whose elements are welded or securely connected with bolts and screws without subsequently unscrewing them.
Sliding canopies are distinguished by the fact that their mechanism allows you to extend the roof whenever you want. This is done mechanically using a cord or automatically using a control panel. Retractable awnings have a fabric roof and are often called awnings. They are easy to attach to the wall of the house with your own hands.

According to their shape, all canopies near a private house can be divided into:
- single-pitched;
- gable;
- arched

To cover a large area near a private house, for example, above a terrace, it is better to erect lean-to and arched canopies. The design of a lean-to canopy is simple, and therefore should not cause difficulties when building with your own hands. For an arched canopy, you can generally buy some of the elements ready-made; you just have to assemble the canopy, like a Lego set.
A gable canopy is more suitable for a small canopy over the porch to the house. Such a visor will be reliable. Snow will not stay on it in winter.
As for materials, both wooden beams and metal pipes are used to make the frame of the canopy and its supports. And sometimes stone or brick columns are erected for the canopy, which gives the structure majesty and scale.

The roof is made of metal tiles, corrugated sheets, polycarbonate, euro slate. The material is selected the same as the roof of a private house, so that the entire structure looks in the same style. A metal canopy will be more reliable, but it is also more expensive than a wooden canopy. A wooden canopy will look better next to a wooden house, so be sure to take this into account when building. And if you need to create an arched canopy, polycarbonate is suitable, because only it has good flexibility.
And finally, the purpose of awnings for a house can be different. Small awnings are designed to protect the porch from precipitation. A canopy can be built to create a cozy terrace. Often carports are built near a house for a car; this happens if the yard area does not allow the construction of a separate one.

Stages of construction of a canopy from corrugated pipes
It will be difficult for an unprepared person to build a canopy for a house, but in principle it is possible. First you need to decide on its size and choose a design. It is easier to build a lean-to canopy; you need to make a sketch of it and put down the main dimensions. Let's look at everything using the example of a canopy measuring 5x4 m.

Collecting materials
The design of this canopy includes support posts and beams, purlins, roofing and fastening elements. Therefore, to make a lean-to canopy, you need to purchase the following materials:
- profile pipe 80x80x2 mm, length 3 m - 3 pieces;
- profile pipe 80x40x2 mm, length 5 m – 1 piece;
- profile pipe 40x20x2 mm, length 4 m - 9 pieces;
- profile pipe 20x20x2 mm, length 5 m - 4 pieces;
- side truss 25 cm high and 5 m long - 1 piece;
- metal junction strip;
- corrugated sheeting 6 m long - 4 sheets;
- self-tapping screws;
- primer for metal;
- concrete mixture and crushed stone.
Don’t forget about all the tools, prepare a tape measure, a level, a grinder with discs for cutting metal, a welding machine, a container for mixing concrete, a shovel.
Foundation and supports
Installation of supports under the canopy begins with clearing the area and marking the area. Metal poles must be installed at a distance of 4 meters from the wall of the house and at a distance of 2.5 m from each other. Therefore, on one straight line it is necessary to dig holes 1.2 m deep and 1.5 shovels wide. A sand-crushed stone cushion, approximately 15-20 cm, is poured into the bottom of the pit, on which supports are installed. The supports must have thrust bearings so that over time they do not begin to fail.
So, support pillars made of 80x80 mm profile pipe are fixed strictly vertically and filled with concrete, which hardens and gains strength in about a week. At this time, you can concrete the area under the canopy, if it is not already concreted. You can use paving slabs or asphalt instead of concrete.
Frame and roof
To make a frame, you need to be able to work with a welding machine or invite a specialist to do this. But before starting welding work, it is necessary to secure a longitudinal support beam 80x40 mm on the load-bearing wall of the house using bolts. It needs to be mounted at a height of 2.5-2.6 m to ensure water flow.
Next, they take the finished side truss and, together, install it on vertical supports, and then weld it. The next stage is creating the sheathing. Pipes 40x20 mm are laid on one side on the truss, and on the other on the transverse beam and are also welded. The distance between the pipes should be approximately 60 cm.
A purlin is made on top of the support pipes for structural rigidity. To do this, you need to lay 20x20 mm corrugated pipes at an equal distance from each other and weld them. After all welding work is completed, you need to clean all welding places and treat all the metal with a primer. If the pipes are galvanized, then it is enough to coat only the welding points with a primer. At this point the frame for the roof will be ready.
The corrugated sheeting is laid in the direction of the slope, overlapping. It is necessary to leave an allowance along the edges of the roof to completely cover the metal frame.
An abutment strip is attached between the wall of the house and the roof; it will prevent water from entering the gap. A gutter can be made at the bottom edge of the slope if necessary.
How to build a canopy out of wood
Agree, working with a welding machine is a serious problem for about half of the people, and metal profiles are expensive nowadays. It’s much easier to collect all the available lumber in the barn, buy what’s missing, and attach a simple but quite practical wooden canopy to the house. Under such a canopy you can rest no worse than under a structure with a metal frame, and maybe even better.
The first thing you need to do is generate an idea and sketch a sketch. We think that after reading the first paragraph of this publication, there will be no problems with ideas. And everyone can also draw a sketch, even if it is not a very beautiful drawing, the main thing is that it is understandable. But problems may arise with the drawing; not everyone will do it correctly. However, a wooden canopy for a private house is quite simple in design and you can do without a drawing at all, the main thing is to calculate everything correctly and paint the material.
We prepare everything you need
Having drawn a sketch and put down all the necessary dimensions of the building, you can begin to calculate the material. We expect to make a wooden canopy with our own hands, 2 m wide, 6 m long and 2.4 m high, and for it we will need the following material.
- Beam 150x150 mm, 2.4 meters long – 4 pieces, which will go to the vertical supports.
- Two long (6 m) boards 150x50 mm, which we decided to use as longitudinal beams.
- Boards 150x50 mm, length 2.5 m – 7 pcs. to the rafters.
- Six-meter boards 100x25 mm - 7 pieces will be used for the sheathing.
- Metal mounting bracket and long screws and bolts. With their help we will fasten the load-bearing elements of the structure.
- 3 six-meter sheets of corrugated sheeting 0.9 mm, width 1000 mm.
- 4 thrust bearings for anchors of vertical supports, mounting width 150 mm.
- Bolts with washers and nuts for thrust bearings, special self-tapping screws for corrugated sheets.
- Primer for wood processing.
- Cement 4 bags, sand 3 bags, crushed stone 1 bag.
- A piece of roofing felt 2x1.5 meters.
In addition to the material, let's take a tool: 
- screwdriver;
- drill;
- hand saw;
- perforator;
- furniture stapler;
- a set of open-end wrenches, a set of screwdrivers;
- bayonet shovel;
- trough;
- bucket;
- pencil, building level, ruler;
- laser tape measure;
Assembling the frame and roofing stele
Let's start construction. To make the frame of a wooden canopy for a private house, you need to prepare the site and make anchors for the vertical supports. Without preparation, the construction of even such a simple structure is impossible. We clear and level the area in front of the wall of a private house, install cast-offs, and pull the rope to determine the boundaries of the area under the structure.
For your information! In order to properly level the area under the canopy with your own hands, it is necessary not only to remove debris and foreign objects from it, but also possibly excess soil.
Next, using a laser tape measure, we carefully measure the site and mark the locations for installing anchors. We dig 4 holes to a depth of 1.5 meters, approximately 40x40 cm wide. We line the holes with roofing felt, fastening the pieces of material with a furniture stapler. Fill the molds with concrete mixed with small crushed stone. We still install the thrust bearings in the wet concrete so that the fasteners stick out strictly vertically (you need to check with a level) and wait until the concrete hardens. Next we do the following.


In conclusion, we note that when making a house with a canopy with your own hands, you must balance your desires with your capabilities. You can plan a beautiful steel wall canopy with a glass roof like your neighbor’s, but at the same time do not have the funds to implement the project. Or you can build a canopy with your own hands from scrap lumber for pennies and be happy. Good luck!
Good afternoon - today I have prepared a BIG and NECESSARY article to help everyone who has seriously set out to make a wooden canopy adjacent to a private house with their own hands. That is, I will tell you step by step what simple steps (and they are really simple) consist of building a canopy against the wall of a house. We will make wooden sheds with a polycarbonate roof. We will look at different design options for the same canopy model for a house - that is, we will learn how to create different canopy designs based on one drawing - for any home, for any needs. And after reading the article you will not only LEARN how to make canopies, but also YOU CAN implement any design wooden canopy for a private house.
After all, when you understand the ESSENCE of the design, you will be able to modify this design according to your creative imagination. And who knows, maybe you will even earn a living later as a master of attachment work.
We will consider the following questions in turn.
- The canopy to the house is his basic elements
- How to change the design of basic elements- and get different canopy designs for your home.
- How step by step make a canopy with your own hands.
Let's first look at the classic wood canopy.
CLASSIC SHAPE
CANNOT TO THE HOUSE
So, here (photo below) is a sample of what we will learn to do with our own hands. We see a classic lean-to canopy against the wall of the house. Such a canopy for a house can be made not only at a blank wall - exactly the same canopy structure can be made at the front entrance of the house, in the back yard for gatherings and anywhere, it doesn’t matter, the principle is the same.
GENERAL PRINCIPLE FOR ALL CANNOS the fact that with one edge the canopy is attached to the wall - and with the other edge it stands on support pillars. That is, the canopy to the house must have two types of support - on poles and on the wall.
This is the essence of all outbuildings... however making holes in the wall in order to nail a support beam to it is NOT MANDATORY - below you will see models of canopies where the fasteners do not need to be driven into the wall, but you can install the same SUPPORT POSTS near the wall of the house as on the outer edge of the canopy. So, if you don’t want to make holes in a beautifully plastered wall, don’t rush to leave the article, there will be canopy options for your case too.
4 STAGES OF CREATING A CANOPY
(common to all designs)
The essence of the construction any wooden canopy to the house - consists in four stages.
- Fastening first load-bearing beam on the wall (this is the first support of the canopy)
- We install support pillars at the required distance from the wall.
- Fastening second load-bearing beam on poles (this is the second support for the roof sheathing).
- We lay transverse boards on these supporting beams ( roof sheathing)

How exactly I will tell you how to implement all these stages a little later in the article. Now I want to start by showing you the VARIETY of front awning designs. And to prove to you that all these different-looking canopies near the house are MADE ACCORDING TO THE SAME PRINCIPLE... in exactly the same 4 stages.
I will show - and talk about the design of canopies - STARTING with the simplest ones - and ENDING with more complex versions of canopies... Complex not in the drawings, but only in appearance (in reality they are all simple).
So - let's take the simplest canopy for the house (it requires very few beams).
The simplest canopy for the house.
(CANOPY OPTION No. 1 - with material savings)
If you have few wooden beams, but have a task to make a canopy for the house from these small ones. Then you can make a simple design like this (photo below). A total of 5 beams are needed - 2 for support pillars + 3 for load-bearing beams.

Here, the load-bearing side beams are attached to the wall using METAL FASTENERS (the photo below shows what they are like). Such metal brackets are attached to the wall of the house and the ends of the two side beams of our canopy are inserted into them.

The roof in such a canopy attached to the house can be a sheet of polycarbonate (transparent or darkened) ... or the roof can be an awning-curtain that slides along a stretched metal string (and either moves apart like a tent or gathers against the wall like curtains). I talked more about such a curtain roof for awnings in the article

Let's take a more complex canopy... Although its complexity is purely conditional... The essence is basically the same - but this model is already close to the classic design of a canopy attached to a house. The most understandable drawing, without unnecessary elements. Only the basic elements...
- support pillars
- load-bearing beam on the wall
- load-bearing beam on support pillars
- roof sheathing beams (for laying polycarbonate sheets on them)

This is a classic- A BASIC part of any canopy. And starting from these basic elements, we will create a great variety of canopy designs for the house.
And to start from the very beginning, we must start from the BOTTOM... from the substrate, from the foundation on which our canopy will stand.
Wooden flooring under the canopy.
(flat wooden base)
Before making a canopy, we need to figure out what we want in the final version - A CANOPY ON THE GROUND (so that the support pillars are dug into the ground, into concrete)... or A CANOPY WITH A BOARD FLOOR (where the support posts are attached to a wooden flooring)?... Let's look at the canopy projects and understand our desires and preferences.
Here (photo above) you can clearly see that first the man laid a neat wooden flooring... And then he installed a canopy on it.
If you are making a canopy for gatherings in the shade on the back patio of your private home, then that's reasonable- make a comfortable wooden flooring.
Let's start with the fact that level the soil surface where there will be a canopy near the house.
After this we need to put on the ground sheathing our future wooden flooring...
And then the sheathing-base cover with boards(we nail them to the sheathing)
You can take long boards at full length (as in the photo below)

Or if our boards are short, then they can be laid out at random... in a checkerboard pattern (as in the photo below).

What to do if you need flooring, but the canopy is already on concrete.
Let's say you decided to make a country canopy... and you did... And now you want it to be under the canopy adjacent to the house there was a neat wooden flooring. So that the furniture can be arranged, put a rug. Here is a photo example of how this can be implemented. We lay the sheathing on posts (if you want to raise the flooring above the ground).

If the soil or concrete foundation in front of the house is uneven in height, then the support columns will be of different heights - for different soil levels - somewhere longer, somewhere shorter. Here you will need to clearly calculate height support columns - so that the beams lying on them are all at the same level - in the same plane.
After that, all that remains is to pave it all with boards - and your flooring is ready for the canopy adjacent to the house.
Here is another photo example of a high deck under a wooden canopy near a house. It is built on the same principle - support posts + sheathing + plank flooring. And (what I liked) the side planes of the flooring are sewn up here - special panels with holes for ventilation are nailed on all sides.

If you are making a canopy at a door high above the ground(that is, your house has a high foundation) - then the wooden flooring under such a canopy should also be high + a porch needs to be built into it to go down from this pedestal. This is just such a project for flooring under a canopy - for a house with a high foundation (photo below). A very picturesque picture - a side porch with flowerbeds on the sides and illuminated steps.

Concrete base
under a canopy near the house.
You can also make a BASE FOR A CANOPY in the form of a concrete blind area (regular or paved with tiles)
And here is the base for the canopy, which I really like - high concrete formwork
We cast a high side from concrete (or lay it out of brick) - we give this side an elegant cladding to look like rough stone. It turns out beautiful.
This option is also good if you have support beams of insufficient height... And such formwork will raise your wooden canopy to the level you need .


Here is a similar principle, where the support pillars of the canopy stand on rocky hills. This allows you to use even short cuts of beams in the construction of sheds.

Here is another example of a canopy, where support pillars that are short in length are used. The support beams were placed on specially built brick walls. The result is a canopy with short legs and a beautiful wall, which can then be decorated in an interesting way and covered with decorative stone. Place a bench and fireplace nearby.

Or such a stone wall-side for our wooden canopy can be decorated in an oriental style - create a fountain there, put flowerpots and pots with plants + stick night lanterns. And what you will get is not just a simple canopy near the house, but a magical corner where you can so comfortably retire or talk about good topics with a friend.

So, we have figured out the BASE for canopies... Now let's see what other canopies there are. And first of all, let's look at the canopy project, for which you do not need to damage the wall of the house.
CANOPY on 4 POSTS
without fastening to the wall of the house.
And remember, I promised to show a wooden canopy near the house, which does not need to be attached to the wall (no need to drill holes and spoil the elegant facade of the house). Here is this model - such a canopy stands on 4 support pillars (or more pillars are possible) ... and it is not attached to the wall - it simply adjoins it, that is, it stands close to it (see options for wooden canopies in the photo below)

And such a free-standing canopy near the house can be decorated with false columns. False columns are available at home improvement stores and can simply be wrapped around your regular wooden shed beams. That is, hide each supporting pillar of the canopy inside such an elegant Greek false column.

Now look at the powerful potential hidden in your new skill of “making awnings with your own hands”...
Large canopy
with a terrace on the second floor.
If you are the owner of a private TWO-STORY house, then why just make a canopy over the porch. Make a canopy along the entire facade of the house - place it on weight on powerful support pillars of thick section - and... MAKE A TERRACE ON THE ROOF OF THE CANNOT.
It's a good idea... Agree.

After all, this is the right idea. Since you have decided to make a canopy near your house... Then why not think about the future. Make a canopy right away on thick powerful beams-pillars. And then next year continue construction on the roof of your shed - attach a railing with balusters- and now you have the opportunity to sit high above the ground - with a cup of tea from a samovar on a wooden terrace made with your own hands. And remember that it all started with your humble desire to make some kind of canopy...

Just my advice: it is better to make similar structures on the south side of the house a (the north side is poorly lit and it is not advisable to additionally darken it with a canopy - there will be less light in the house and the walls will become damp).
... well, stop dreaming - it's time to DO.
So, as I promised - 4 simple steps. Each stage in itself is not difficult, everyone can do it. And all the stages together give a single result - THE CANOPY YOU DREAMED OF.
Making a canopy - stage one
canopy support ON THE WALL.
First, you need to decide AT WHAT LEVEL you need to make a hanging beam on the wall. This is important because...
If you want the canopy roof to be level (not sloped) so that you can walk on it, so that you can make a terrace on it in the future... then the level of your beam on the wall should coincide with the level of the beam on the pillars - that is, they should be at the same height from the ground.
If you are not planning any terraces on the roof of the carport - Do you want this roof to be sloped? so that the snow slides off it itself (that is, you need a canopy with a pitched roof), then you need nail the supporting beam to the wall HIGHER than the beam on the support pillars. Here in the photo below I show an example of this thought of mine. Where is the load-bearing beam near the wall (arrow 1) higher level than the supporting beam on the pillars (arrow 2). And due to this different height, we get a canopy with a sloping pitched roof.

Now, let's look at the ways in which this beam can be attached to the wall, or what other fasteners (besides the beam) can be used to attach the canopy to the wall of the house.
Method one - Support in the form of a beam.
We simply attach a horizontal beam to the wall (with self-tapping screws) - it will hold the roof of our canopy (we will lay our cross beams directly on it for sheathing the roof).

And so that you do not doubt the reliability of the beam fastening, you can attach a whole beam-holding mechanism to the wall - in the shape of a square (see photo with a red arrow below).

Method two - Vertical racks against the wall.
If you have obtained beams for the support pillars of a smaller diameter... and the load on the roof of the canopy is planned to be more serious (i.e. you want to make the roof sheathing also from heavy beams)... THEN you need ADDITIONALLY REINFORCE your supporting beam on the wall and also the supporting beam that lies on the pillars

We see that the load-bearing horizontal beam (attached to the wall) is reinforced additional vertical support bars(arrow 1). Thus, the canopy attached to the house does not rest its entire weight on the wall beam, but distributes its weight onto the wall posts and beams.
And the supporting vertical pillars from the other end of the pergola (i.e. those from the outer end of the porch) have diagonal short support beams, which hold the second load-bearing horizontal beam (arrow 2).
By the way (in the photo above), pay attention to WHAT THE SUPPORT POSTS STAND ON... They are based on metal bearings on a high thick metal leg, which is screwed into the flooring boards.
Here is another photo where the canopy has support beams right next to the wall of the house A. It’s safer this way: you don’t have to worry about the wall, in case the beam falls off the wall under the weight of time. Additional pillars against the wall will prevent this from happening.

The third method is support in the form of metal brackets.
We attach brackets-holders to the wall (stone or wood or brick)... This is how we see in the photo below... And we place our side cross beams on them (as on model No. 1 of the canopy from this article).

Important condition: Not every wall is suitable for such fasteners. If the wall is tiny, or made of porous material (foam blocks, for example), then the fasteners will not adhere well to the wall. And you must understand that heavy beams will sooner or later fall on the heads of your neighbors.
Therefore, consult with specialists. It’s better to choose the fastening method in which there is not a single bit of doubt - that is, the one where there are additional vertical posts along the wall that support a horizontal beam on the wall (see the second method).
Making a canopy - the second stage
install SUPPORT POSTS.
I described this stage in detail in the article. All 4 methods of installing poles are described there - both in the ground, and on a concrete foundation, and on a wooden flooring... And here I will only show a photo of the options for fastening elements for support poles. Or you can simply dig them into the ground (after tarring them and wrapping them in roofing material so that they do not rot in the ground).

Thrust bearings (or anchors) serve to protect wooden posts from rotting. U-shaped and T-shaped anchors are best suited for this purpose. They allow the beam to rise 2 cm above the surface. Be blown by the breeze and do not retain rain moisture.
If you bury your poles in the ground, it is better to use thrust bearings with long anchors (in the form of a reinforcement rod or pipe) - this way the metal part of the pole will be in the ground, and the wooden part on the surface.
And if you don't want to spend money on steel bearings. And just dig the pillars into the cement foundation the old fashioned way, then don’t be lazy before tar that part of the timber that will go into the ground. Resin will extend the life of the wood, protecting it from rot. Instead of tarring, ordinary roofing material is often used. They wrap it around the underground part of the timber, and tightly wrap this roofing material “swaddling” with metal wire. Place the end of the pillar wrapped in roofing felt in the hole and fill it with cement.
And also the support pillars for the canopy can be made OF BRICK MASONRY and lined with decorative stone. Like in the photo below.

Making a canopy - stage three
place the BEARING BEAM on the pillars.
You will decide for yourself how to place the beam on the pillars. I'll show you several ways to attach a load-bearing beam to support posts, and you choose.
Method one (beam on top of pillars)
We place the beam on top of the post and fix it with long screws (central photo) or metal plates (right photo).

To prevent the supporting beam from bending on the support pillars under the weight of the roof sheathing, it can be REINFORCED. To do this, add diagonal beams (see extreme examples in the photo) or add an extended beam in the center (central example in the photo below).
Method two (beam from above into grooves on support pillars).
We cut out a hole-groove in each support column. And we put our load-bearing beam into this groove. Naturally, this method is suitable if our beam has a side that thinner in size than the thickness of the support column.

Method two - instead of a beam there are 2 boards.
This method is remarkable because it saves material (boards are cheaper than beams). And in terms of endurance, 2 boards are equal to one beam. We fill two boards on both sides of the support post and together they act as a regular load-bearing beam - see the photo of the canopy structures below.

I described all these methods of laying load-bearing beams on poles (for the roof of a country canopy) in detail in the article “Canopy for a summer house - 10 WAYS to make it yourself.” So if something is not clear here, you can find additional explanations in this article on how to make a canopy at home with your own hands.
Making a canopy - stage four
canopy roof lathing
The first method is lathing over the beams.
Laying down the sheathing boards just on top on the beams. And fasten it with metal corners. Like in the photos of the house canopy below.
The second method is on the grooves.
We cut grooves in the sheathing boards. And we put these grooves on the supporting beam. The difficulty here is that the grooves at the ends of the boards must coincide with the beams (therefore, the boards must first be dragged up, laid out on the roof, marked with a pencil where the grooves will be cut, then removed, sawed out the grooves, and lifted onto the roof again).

Method two - joint to joint.
This method is also possible, but the sheathing beams must be adjusted to fit snugly to snugly in order to fit neatly into the metal holder ears.

Roof for canopy
(roofing felt, polycarbonate, slate, tiles)
The most beautiful type of roof is transparent polycarbonate. This way there will always be light under the canopy. Such a roof is required if this side of the house faces north, so that excess darkness does not accumulate under the canopy.

If the canopy is on the sunny side of the house, and you instead want to reduce the sun above your head and sit in the shade of the canopy. Then you can choose any opaque roof - cheap roofing felt and slate, or more expensive soft tiles, or chalkboard.

Important: Don't forget to provide waterproofing the joint canopy with wall. To do this, you need to buy and nail a small iron visor. As in the photo below.

An elegant addition to a canopy.
You can cover the space between the support pillars with panels with sheathing. They are easy to manufacture - a regular rectangular frame made of thin blocks - and a thin strip is criss-crossed onto them. You can plant vines next to such a sheathing - they will beautifully crawl up the pergola.
As a result, you will have a gazebo adjacent to the house. There you can put a table and benches for gatherings with friends and neighbors.

You see how interesting it is to make a canopy with your own hands... believe in your own hands... and continue to create beauty around you... This is very useful. Because when you are doing good things, there is no time to do bad or sad things... And if there is a lot of beauty in life, then there is no room for despondency.
Get busy living or get busy dying...
Take care of your health or take care of your illness...
Deal with fear or deal with courage
Engage in despondency, or engage in creating something new
We ourselves choose what to do... So let's choose to create something new and useful...
Because when we create something, we create ourselves. The best version of ourselves.
Forward. You just need to start... then continue... and then finish. It's simple.
If I weren't a girl... I would build this myself. But all I can do is inspire boys. Therefore, it’s up to you to build))), dear boys.
Good luck with your dacha construction.
Olga Klishevskaya, especially for the site
If did you like this article
And you want to thank the free author for this painstaking work,
then you can send any amount convenient for you
on his personal YaD wallet - 410012568032614
More articles-lessons on the topic
I also have a series of articles on the construction of wooden dacha gazebos - if you made a canopy with your own hands, then it will not be difficult for you to make a cozy gazebo for your dacha using the same principle.
Detailed articles-tutorials on gazebos are already ready and waiting for your love for timber and screwdrivers.
— gazebos with a flat roof.
— cubic arbors.

It is difficult to overestimate the importance of a canopy as a country house building. This simple structure will protect from the scorching sun in the summer heat, and in inclement weather it will block the rain. The answer to the question: how to make a canopy yourself is very simple - you just need to install supports and attach a roof made of one material or another to them. Even beginners can handle the work, and more experienced craftsmen can turn this structure into a real decoration of the site.
What types of canopies are there - types and classification
Before you build a canopy at your dacha with your own hands, you need to decide what purposes it will serve, and also whether it will be used year-round or only as a summer building. The choice of material and construction method depend on the answers to these questions.
All awnings are divided into two broad categories:
- Capital structures, thoroughly built from durable and wear-resistant materials.
- Temporary summer buildings that are easy to install and just as easy to remove at the end of the season.
According to the type of construction, sheds can be free-standing or in the form of an extension to the house. Free-standing structures are often used as outbuildings, to protect car parking areas from rain or to store firewood. They can also be adapted as a gazebo. Awnings attached to a house are often made on the south side to block the windows from the sun. Such extensions are also good as a summer terrace.
The supports for the structure are usually wooden beams, metal pipes or corners. The main difference in DIY country canopies is what materials are used directly for the roof. This can be slate, corrugated sheets, polycarbonate, tiles, fabric, tarpaulin and even such exotic materials as reeds.

This design will serve as a resting place


Capital structures for a personal plot
A building designed to last for many years must be made with the utmost care. The support pillars are firmly concreted and connected to the roof so that they can withstand any weather. What is the best material to use to make a permanent canopy in the yard? The answer is obvious - from materials that are designed for a long service life.
Canopy made of corrugated sheets - reliable protection

Parking for cars with corrugated roofing
Corrugated sheeting is ideal for making canopies. Since this material does not transmit light, it is used where shading is required. At the same time, do not forget that in summer the metal heats up in the sun, so metal profiles are not used for extensions on the south side of the house, so as not to get even more heat instead of coolness. Sheds made of corrugated sheets are ideal for protecting car parking areas, storing woodpiles and other household needs.

Metal profiles are used for capital structures
Steel pipes or angles are usually used as a frame, which ensures the greatest strength of the structure. Before making a canopy from a metal profile, it is necessary to study the parameters of these materials.
Corrugated sheets vary in sheet thickness and corrugation height. The higher both indicators are, the stronger the roof will be. For a canopy, it is better to use wall or load-bearing corrugated sheeting with a sheet thickness of at least 0.8 mm and a corrugation height of 35 mm or more. Wall material with a thickness of 0.5-0.7 mm is too soft for these purposes, and the roof will inevitably leak.

Drawing of a canopy for corrugated sheets or slate
Slate canopy - traditional solution
An alternative to a structure made of corrugated sheets can be a slate canopy. The undoubted advantage of a slate roof is that it not only provides deep shade, but also does not get too hot in the sun. Due to these properties, house extensions are often covered with slate. The disadvantages of this type of coating include the large weight of the structure, so the supports must be made strong and stable.
Slate is produced in different sizes, wavy and flat. To build a canopy for a house, as a rule, corrugated slate is chosen so that, in case of rain, moisture does not linger on the roof.

Polycarbonate canopy - a modern approach
Considering various canopy ideas for a summer cottage, home craftsmen are increasingly turning their attention to polycarbonate structures. Using this material you can create very beautiful, airy structures that let in sunlight. Polycarbonate canopies are often used to decorate terraces near houses and canopies over entrance doors. Due to its low weight, polycarbonate can easily cover large areas, for example, completely covering a yard or making a protective roof over a swimming pool.

Polycarbonate bends easily, which is why sheds with arched roofs are often made from it. Sheets of this material have a standard length of 6 or 12 meters, which is usually sufficient for the manufacture of even large-scale structures. A special connecting profile is used to connect sheets.

Canopy for the house: polycarbonate transmits light well
The popularity of polycarbonate canopies deserves to dwell on their manufacture in more detail. Supports for such a structure are installed using a 35x35 or 40x40 metal corner for the racks and a galvanized profile for the floors. Installation work will be greatly facilitated if the roof size corresponds to the standard sheet size.
To attach polycarbonate to the base you will need:
- polycarbonate;
- end profile;
- connecting profile if the roof consists of several sheets;
- self-tapping screws 40x60;
- thermal washers;
- core drill for making holes for fastenings;
- drill, screwdriver or Phillips screwdriver, tape measure, fine-toothed file.
Before you build a polycarbonate canopy with your own hands, you need to study photos of ready-made options, instructions for their manufacture and drawings. Only after all the stages of work become clear can you begin installation.

Scheme of an arched polycarbonate canopy
Construction sequence:
- The support posts from the corner are concreted into the ground.
- Install the profile or finished arches on the roof.
- The polycarbonate is laid in place. At a distance of 4 cm from the edge, holes are drilled with a diameter slightly larger than the diameter of the thermal washers.
- A thermal washer is inserted into each hole and the sheet is fixed with self-tapping screws, after which the fastening points are covered with lids from the thermal washers.
- An end profile is mounted at the ends to prevent moisture and debris from entering the internal cavities of the sheet.
Canopy made of metal tiles - a unified approach to the roof
Modern metal tiles look very attractive. The house and the shed look especially good if they are made in the same style and covered with the same roof. Typically, tiled canopies are made over the porch or near the house as a summer terrace.
It is best to use a material with a metal base thickness of at least 0.5 mm. Thinner shingles are cheaper, but they don't last long. Metal tile sheets have a standard size of 2200x1180 mm, this must be taken into account when designing the roof.
The tiles are laid on a wooden sheathing. The pitch of the beams in the sheathing is made equal to the pitch of the wave on the sheet. Fastening is carried out with self-tapping screws in a checkerboard pattern through one wave. Each subsequent sheet is laid overlapping the previous one.

Stylish tiled ensemble
Summer temporary awnings for a summer residence
Often at the dacha there is a need to make a temporary canopy from rain or sun. In this case, the simplest and most inexpensive materials come to the rescue, for example, tarpaulin or thick fabric. At the end of the season, such a structure can be easily stored until next year.
Canopy made of tarpaulin or fabric
Tarpaulin is perfect for a temporary summer canopy for a country house. It equally blocks both precipitation and the scorching sun. The tarpaulin is sold with ready-made holes and metal eyelets for fastenings.
- In order to make a tarpaulin canopy for the house, it is enough to attach a 50x50 mm block to the wall under the roof using dowels. The length of the bar is selected based on the size of the future awning.
- Having retreated the width of the tarpaulin, two wooden posts are dug into the ground with a height slightly less than the distance to the beam under the roof.
- Between the pillars and the wall of the house, three support slats are fastened with self-tapping screws so that a roof square is formed.
- The edge of the tarpaulin is tapped with a construction stapler to the underside of the beam on the wall of the house, and then additionally pressed with a narrow strip and self-tapping screws. The free edges of the fabric are tied with strong twine through the eyelets to the support rails.

The tarpaulin is easy to attach thanks to the eyelets
This design can be significantly reduced in cost by making a temporary canopy over the house from ordinary film. To do this, take the thickest film sheet, at least 150 microns thick. The edges of the canvas are wrapped around the support rails and secured with a construction stapler. Obviously, the service life of such an awning is short, but it is quite capable of serving throughout the summer.

From the film you can build a temporary canopy over the table from the rain
Fabric awnings and awnings are more often used in southern regions, where protection from the sun rather than from rain is important. The fabric creates a pleasant diffused shadow and allows fresh air to pass through well. There are special awning fabrics with acrylic, polyester, and Teflon impregnation. They are strong, durable, and easy to clean from dirt. A fabric canopy is constructed in the same way as a canvas canopy.

Fabric awnings serve as decoration and provide protection from the sun
Unusual canopy made of reeds
To give the site a southern flavor, you can install a canopy made of reeds instead of a gazebo. This structure looks very exotic. All that is required for such a construction is wooden or metal racks, slats for roof sheathing and a sufficient amount of dry, even reeds.

Exotic reeds
Stages of creating a reed canopy:
- The tops of the reeds with inflorescences are cut off, leaving only stems 1-1.5 m long. The dried reeds are tied into bundles with a diameter of 4-7 cm using soft wire.
- For a square building, four support posts are installed, and on them - a two- or four-slope roof made of slats. The sheathing should be thick enough so that the reeds do not sag.
- Cover the roof with a thick film, attaching it to the slats with a construction stapler.
- Begin to lay the reeds from the lower edge of the roof so that the stems protrude 20-30 cm beyond the slats. The bundles are placed close to each other, connecting them together with flexible wire or rope. Additionally, strips of reeds are screwed in several places with self-tapping screws.
- The second and subsequent rows of reeds are laid overlapping the bottom row.
The reed canopy creates cool shade and protects from rain thanks to the film backing. In autumn, the reeds are removed and stored in a dry shed so that they do not spoil.
There are a lot of ideas on what you can use to build a canopy at your dacha. Each owner will find a design to suit his taste and capabilities. You can also turn to professionals to get a finished project or completed construction.
Video: making a carport
You may need a variety of awnings at your dacha: over a porch, a bench, a barbecue and a tennis table, over a parking lot and a woodshed. They can be built from wood or metal profiles.
In this article we will offer you different options for inexpensive and easy-to-build shelters for the purposes mentioned. The main points and features of construction, both metal and wood, will also be mentioned here.


Varieties of the most inexpensive awnings for a summer residence. Construction Features
The options for canopies and shelters described below can even be made from used pipes or lumber left after repair.
Canopies over the porch
The simplest and cheapest option for building a country canopy with your own hands is a lean-to structure with an independent roof that does not require the installation of support pillars. It consists of several triangular trusses, which on one side provide fastening of the structure to the wall. The second side - the top - is the basis for installing the sheathing and roofing material. Such trusses can be assembled from either a metal profile or wood.
Note: The main advantage of an independent roof is that you do not have to change the design of an existing porch by installing support pillars on it. We also don’t forget about saving money on materials and time on installation work.
Drawing of a visor that does not need stands
The second option for a porch canopy at the dacha is a design with a dependent roof. Here one side is tied to the house, and the other rests on the posts. It will be cheaper and easier to make a lean-to structure, as in the photo. In essence, it is a square or rectangle with several lintels and two support pillars. It can be assembled in the same way as an independent roof, from wood or metal profiles.
This design has one advantage: the support posts can become a frame for mounting on the sides of the windproof panels. That is, if you wish, you can make the porch closed, completely or partially. Disadvantage - when building a canopy, you will have to allow additional time for the solidification of the columnar foundation under the support posts.

We make a canopy at the dacha with our own hands: photo of a building with a dependent roof
Canopy for a bench in the country
The most budget-friendly option for a dacha canopy over a garden bench is a tension one. It is assembled literally from scrap materials. Two pieces of profile pipe, preferably round in cross-section, are bent with a kind of hooks and concreted with straight ends behind the bench. A strip of thick fabric is pulled onto the hooks, which forms a canopy. If you take pipes that have already been used, then such a shelter will be practically free. The only drawback of the design is that the fabric roof will not protect from heavy rain.

How to make a canopy at your dacha for relaxation: building with a tension awning
A more expensive type of canopy for a dacha, but more “major” - polycarbonate on a frame made of metal profiles or wood. The easiest way to assemble a pitched roof is to assemble an arched, rectangular or square roof if you have a pipe bending machine. It is best to make awnings for a summer house from polycarbonate - the material is easy to install and does not require preliminary lathing of the frame. You can also use slate sheets - they are just the right size and, moreover, will be cheaper.

Simple awnings for a summer residence: photo of a polycarbonate canopy
Canopy for a tennis table and barbecue in the country
We have the following requirements for a canopy at the dacha for relaxation, located above the tennis table:
- Sufficient roof height.
- The distance from the table to the support pillars is at least 1 meter.
- Good light transmission of the roof.
The best option is a lean-to canopy with polycarbonate as a roofing material, with a simple frame. You can, of course, use slate or something similar, but in this case you will have to spend money on installing lighting above the table. This negates the financial benefit of replacement.
For your information: It’s hard to say which is more profitable, wood or metal profiles. It all depends on how important the aesthetic side of the issue is to you. If you just need a strong frame, and its appearance is a secondary matter, then it will be cheaper to use a simple beam. A beautiful rounded log will be quite expensive, even more expensive than a good profile pipe. The same applies to profiled timber - this pleasure is not cheap.
Tennis table cover
The main function of a canopy over a barbecue in a country house is to protect the fire from precipitation and wind. Therefore, the roof here should be either arched or gable. At the same time, there should be at least 40 cm from the container with coals to the edges of the slopes on one side and from 1 m on the other. The simplest option is a gable frame on four supports. It’s better to make a canopy for a barbecue at your dacha with your own hands from metal profiles or pipes. Wood is not very suitable here for fire safety reasons.

Option for a canopy at the dacha for barbecue or barbecue
Canopy for car and woodshed
An inexpensive and simple version of a carport for a dacha is a lean-to carport, one side resting on the wall or edge of the roof of the house, and the other on the posts. The design is elementary: 2-4 support pillars, a beam/beam connecting to the house and a rectangular roof frame with lintels. Any roofing material can be used:
- Slate or metal tiles - with them you can build a relatively inexpensive carport at your dacha with your own hands. This will require preliminary organization of the sheathing.
- Ruberoid roofing is the cheapest option, but it won’t last too long. In addition, you will have to make a hard substrate under it.
- Carports for cars in the countryside made of polycarbonate - the material is easy and quick to install and does not require lathing. But it will cost more than the first two options.

Carport at the dacha: photo of a lean-to attached structure
A little more difficult to construct and more expensive in terms of consumables is a free-standing carport in the country. It can be on a columnar foundation or without it at all, as in the photo. Here, each truss is immediately welded onto racks, and then the entire structure is assembled on horizontal sections of profile pipe. The advantage of such a canopy at the dacha is mobility.

Photo of a carport at the dacha: a gable building without a foundation
Note: There are not many options for building sheds for firewood at your dacha with your own hands. Here, in addition to the roof, in any case, you also need back and side walls that will protect the contents from precipitation. At the same time, there must be ventilation inside. Therefore, the optimal design here would be a gable roof, on four support pillars and with a number of intermediate ones. Additionally, the walls are covered with boards with small gaps between them.
Wooden woodshed
Wooden and metal canopies at the dacha: construction features
When building sheds, either wooden or metal, several main points can be highlighted:
- The construction of a columnar foundation, with or without reinforcement - it all depends on the dimensions of the building.
- Installation of support pillars. They are either concreted immediately or attached to a ready-made foundation.
- Assembling the roof frame on the ground.
- Installation of the roof on supports.
- Treatment with an antiseptic – for wood, treatment with anti-corrosion compounds – for metal. Antiseptic treatment for wood is very important, since the duration and trouble-free operation of the building directly depends on it.
Stages 2, 3, and 4 must be carried out under constant control by the construction level.
For your information: Even if the profile has an anti-corrosion coating, this protection will not be available at the welding points. Therefore, such points should be properly processed. First, we clean off the scale and go over the metal with emery, and then we coat the welding seams with an anti-corrosion compound.
After you have built a canopy at your dacha with your own hands, all welding seams must be cleaned and treated with anti-corrosion agent
Articles on the topic