What is the pitch of the columnar foundation. How to make a columnar foundation on your own
The name “column foundation” speaks for itself. This is a foundation consisting of several pillars buried in the ground in a certain order and connected into a single frame by means of a wooden (sometimes metal) frame or a reinforced concrete grillage.
Columnar foundations are mainly used for the construction of wooden (timber, log) or frame houses (no more than 2 floors), bathhouses, verandas and other outbuildings, as well as fences and stone fences. Less commonly, walls of one-story houses are erected on them from lightweight stone materials (cellular concrete, etc.), the specific gravity of which does not exceed 1000 kg/m³. It is not advisable to build heavier houses on such foundations, due to the relatively low strength of the pillars and the insufficiently large total area of the base.
The most important contraindication for choosing a columnar foundation is the high groundwater level. It should not be allowed to come closer than 50 cm to the bottom of the pillars. In addition, the pillars must be laid deeper than a layer of fertile unstable organic soil.
The advantages of a columnar foundation are savings in money and labor costs due to a reduction in the volume of excavation and concrete work, as well as the high speed of construction of the zero cycle. The main disadvantage is the unpredictable behavior of individual foundation pillars when the developer is frivolous in studying the properties of the soil on the site. This is especially true for foundations without a monolithic grillage.
 The most common mistake private developers make when constructing a columnar foundation is the lack of any, even approximate, calculation. The number of pillars, as well as the area of their bases, are taken “from the ceiling.” Almost all construction sites say the same thing - place pillars in the corners and at the intersections of walls, if necessary, add more on long walls so that the distance between them is from 1.5 to 2.5 meters. This is a normal spread! In addition, there is almost no word anywhere about the base area. But it is these indicators that determine whether your house will stand still or over time will begin to warp and shrink.
Calculation of a columnar foundation
I) First of all, it is necessary to explore the site for future construction. This is discussed in detail in the article. In addition to what is stated there, it is necessary to note the following: having decided to build a columnar foundation, it is imperative to do test drilling 0.5-0.6 meters below the expected depth of the pillars. If under the load-bearing soil you come across a layer of water-saturated soft soil (quicksand), then it is better to abandon the columnar foundation, because pillars under load can simply cut through the load-bearing soil and fail.
II) The second step will be to determine the load that the house and its foundation will exert on the load-bearing soil, in other words, calculating the weight of the house. Approximate specific gravity values for individual structural elements are given in the following table:

Notes:
1) When the angle of inclination of the roof slopes is greater than 60º, the snow load is assumed to be zero.
2) When calculating the foundation, the approximate weight of the foundation itself is added to the weight of the house. Its approximate volume is calculated and multiplied by the specific gravity of reinforced concrete equal to 2500 kg/m³.
III) After determining the weight of the house, we calculate the minimum required total area (S) of the bases of all foundation pillars:
S = 1.3×P/Ro,
where 1.3 is the safety factor;
P - total weight of the house including the foundation, kg;
Ro is the calculated resistance of the load-bearing soil, kg/cm².
The Ro value, also called the bearing capacity of the soil, can be taken approximately from the table below:

Note:
The calculated resistance values are given for soils located at a depth of about 1.5 meters. At the surface, the bearing capacity is almost one and a half times lower.
Having calculated the value of the total area of the bases of all pillars, we can now determine their required number depending on the diameter or cross-sectional dimensions. For greater clarity, let's consider a simple example.
An example of a simplified calculation of a columnar foundation
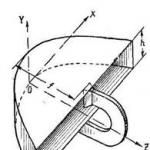
 Let's calculate a columnar foundation (on round pillars) for a small frame-panel house (see figure on the left) measuring 5x6 meters. The height of the 1st floor is 2.7 m, the height of the pediment is 2.5 m. The roof is slate. The load-bearing soil is loam (Ro = 3.5 kg/cm²). Freezing depth is 1.3 meters.
1) The area of all walls, including gables, in our case will be equal to 72 m², and their mass is 72 × 50 = 3600 kg
2) The house has a basement (floor of the 1st floor) and interfloor (between the 1st and attic floors) ceilings. Their total area is 60 m², and their weight is 60 × 100 = 6000 kg
3) The operational load is also present on the 1st and attic floors. Its value will be equal to 60 × 210 = 12600 kg
4) The roof area in our example is about 46 m². Its weight with a slate roof is 46 × 50 = 2300 kg
5) We take the snow load equal to zero, because The angle of inclination of the roof slopes is more than 60º.
6) Let's determine the preliminary mass of the foundation. To do this, you need to conditionally select the diameter of future pillars and their number. Let's say we have a drill with a diameter of 400 mm, let's take it. The number of pillars is preliminarily taken based on the condition - one pillar per 2 meters of the perimeter of the foundation. We get 22/2 = 11 pieces.
The volume of one column is 2 meters high (buried 0.2 m below the freezing depth + 0.5 meters above the ground): π × 0.2² × 2 = 0.24 m³, and its mass is 0.24 × 2500 = 600 kg .
The mass of the entire foundation is 600 × 11 = 6600 kg.
7) We sum up all the obtained values and determine the total weight of the house: P = 31100 kg
8) The minimum required total area of the bases of all pillars will be equal to:
S = 1.3×31100/3.5 = 11550 cm²
9) The base area of one column with a diameter of 400 mm will be equal to 1250 cm². Therefore, our foundation must have at least 11550/1250 = 10 pillars.
As the diameter of the pillars decreases, their number will increase and vice versa. For example, if we take a 300 mm drill, then we will need to make at least 16 pillars.
Having determined the minimum permissible number of foundation pillars, they are laid out along the perimeter. First of all, they are installed in the most loaded places - these are the corners of the house and the connections of external and internal walls. The remaining pillars are evenly distributed around the perimeter, if necessary adding a few more pieces to the resulting minimum number for symmetry. The main rule here is more is possible, less is not possible.
 Important Note: if the house has any lighter extension, for example, a veranda, the minimum permissible number of pillars for it is considered separately from the house. Obviously it will be less.
Often, when building heavier houses on soils with low bearing capacity, the number of pillars turns out to be very large, and in order to reduce it, it is necessary to significantly increase the diameter of the base. Simple earth drills are not suitable for this. This is where TISE technology comes to the rescue. It is discussed in the article.
Let us now consider the most common structural designs of columnar foundations
Bored foundation
 The pillars are created by pouring concrete into pre-drilled holes. Work on the construction of a bored foundation is carried out in the following sequence:
1)
2) Using a manual (mechanized) drill or a special drilling machine, wells are made 20-30 cm below the freezing depth.
Note: within the framework of this article, we do not consider shallow columnar foundations, which are used almost exclusively for small wooden outbuildings.
 3)
Cylinders are rolled up from ordinary roofing felt (according to the diameter of the holes) and wrapped with tape. They perform two roles: firstly, it is a permanent formwork for the pillars, and secondly, it is their waterproofing.
3)
Cylinders are rolled up from ordinary roofing felt (according to the diameter of the holes) and wrapped with tape. They perform two roles: firstly, it is a permanent formwork for the pillars, and secondly, it is their waterproofing.
If you have roofing material with sprinkles, roll it with the smooth side out. The worse the soil sticks to the surface of the pillars when freezing, the less tangential forces tending to pull the pillars out of the ground in winter will act on them.
4) Roofing felt cylinders are inserted into the wells. In the figure above you can see that the roofing material does not reach the very base, about 20 cm remains. This is not done just like that. Through the uncovered part of the pile, when concrete is poured, laitance seeps into the soil and further binds it. Moreover, depending on the type of soil, the bearing capacity of the pillar can increase up to 2 times. This increase is not taken into account in the calculation. It further increases the safety margin of the foundation. In addition, the pillars are better anchored in the ground.
5) A little concrete (20-30 cm) is poured into the well, and after a short pause, a reinforcement cage is inserted so that it does not sink under its own weight until it comes into contact with the ground. Then the entire column is poured to the top. It is not advisable for the reinforcement to touch the ground, because this leads to faster corrosion.
Usually the frame is made of three or four rods of working reinforcement A-III ∅10-12 mm, tied together with auxiliary reinforcement BP-I ∅4-5 mm. It is advisable that the reinforcement be no closer than 5 cm from the outer surface of the column.
If, after pouring the pillars, a monolithic grillage will be built on them, the working reinforcement is released from the pillars to the height of this grillage. If the pillars are made of wooden beams, then to fasten them when pouring concrete, a threaded rod (for example, M16) is inserted into the upper part.

Note: columnar foundations with a reinforced concrete monolithic grillage are described in the article.
At an air temperature of 15-20ºС, you can begin to load the columnar foundation after 4-5 days. This is due to the fact that after this period, the bearing capacity of the foundation is no longer determined by the strength of the pillars, but by the strength of the soil underneath them. In addition, you cannot quickly give the full design load on the foundation (walls, floors, roof, operational loads). While construction is underway, the concrete will “mature.”
IMPORTANT: You cannot leave a columnar foundation unloaded for the winter. The tangential forces of frost heaving can lift and warp pillars, and in different ways.
Columnar foundations made of asbestos, plastic or metal pipes

The pillars are created by pouring concrete into asbestos, plastic or metal pipes pre-installed in the wells. The work is carried out in the following sequence:
1) Based on the calculation, the foundation is marked on the site.
2) Using a manual (mechanized) drill or a special drilling machine, wells are made 20-30 cm below the freezing depth. The diameter of the wells is 10 cm larger than the diameter of the selected pipes. If you don't have a drill, you can dig holes with a shovel.
3) About 20 cm of concrete is poured into the well to increase the bearing capacity of the pillars, as mentioned above. After a short pause, first a rolled-up roll of roofing felt jacket is inserted into the well, which will protect the sand backfill from silting, then an asbestos, plastic or metal pipe and a reinforcement cage.

4) The gap between the pipe and the roofing felt jacket is backfilled with sand and concrete is poured into the pipe. Sand prevents the soil from freezing to the pipes in winter and their lifting by the tangential forces of frost heaving.
Note: Asbestos pipes do not have very high frost resistance, so quite often they collapse at the point of their entry into the ground due to saturation with moisture. To avoid this, it is advisable to cover the dangerous area with coating waterproofing.
Rectangular (square) pillars made of concrete, brick, blocks

Rectangular or square posts are made when there is no drill of a suitable diameter at hand. The holes are dug by hand with a shovel. This work is more labor-intensive and the volume of excavated soil is also greater than drilling.
The sequence of work is almost the same as in the case of pipes. The difference is that instead of pipes, pre-fabricated wooden formwork is inserted into the pits, or the pillars are laid out of bricks (blocks).
Backfilling is carried out after removing the formwork in 2-3 days. Brick pillars can be backfilled the next day.
Note: As mentioned above, backfilling with sand (non-heaving material) is done to prevent the pillars from rising in winter. But she has one drawback. When water (for example, rain) gets into the hole, the sand becomes wet and loses its load-bearing properties. In this case, the pillars become unstable in the horizontal direction. To avoid this, you need to be careful about draining water from the foundation: make the necessary slopes, blind areas and storm drains.
Often the pillars are made in combination, i.e. in the ground they are concrete, and above ground level they are laid out from bricks or blocks. This option is not suitable for the subsequent construction of a grillage. Its meaning, which is to manufacture one rigid frame, is lost.
There is another type of pillars - wooden ones, we will not focus our attention on them, because... They are currently used very rarely. Let us only note that for such pillars it is necessary to use moisture-resistant wood species (oak, larch, etc.) and before installation they must be protected from moisture (coated with waterproofing or wrapped in roofing material, or better yet, do both).
In the comments to this article, you can discuss with readers your experience in the construction and operation of columnar foundations or ask questions that interest you.
The foundation is the most important element of any structure: from a light garden gazebo to a capital multi-story country mansion. This is the beginning of the building and its foundation in the literal sense. The strength, durability and operational safety of the building depend on how correctly the foundation is selected, calculated and executed. The question of what type of foundation to choose arises even at the construction planning stage. The optimal solution in many cases will be to build a columnar foundation with your own hands: step-by-step instructions for performing the work can give a complete understanding of the principles of its design and the intricacies of the arrangement process.

Advantages and disadvantages of a columnar foundation
Self-calculated and self-equipped columnar foundations for frame houses and buildings without basements that do not exert strong pressure on the ground are easy to implement and relatively cheap.

According to reviews, columnar foundations have a fairly impressive list of advantages:

At the same time, columnar foundations have only two disadvantages:
Types of columnar foundation
Before proceeding with the detailed design and calculation of a columnar foundation, you should decide on what site, what type and using what technology the building will be erected on it. The choice of material for the columnar foundations and the depth of their placement depend on these factors.

Materials for building the foundation
The following materials can be used for foundation foundations:
- reinforced concrete;
- rubble concrete;
- blocks;
- brick;
- a natural stone;
- tree;
- pipes: asbestos or plastic.

Foundation depth
The depth of a columnar foundation is determined by its design, technological parameters of the structure and geological characteristics of the soil in the building area.
Based on their depth, columnar foundations are divided into three main types:

To build a columnar foundation with your own hands, step-by-step instructions are needed as the most detailed and visual aid.
In general, the design of a support-column foundation is a system of supports of the minimum possible cross-section, located at points of load concentration: in the corners of the building, at the intersection of walls, under load-bearing beams, partitions, under the furnace. To determine the number of free-standing columns, the distance between them is taken to be 1.5–2.5 m. To connect the foundation supports into a single structure, a grillage is made between them.

The height of the pillars above the zero mark is individual and depends on the design features of the grillage.
Calculation of a columnar foundation
The construction of a columnar foundation begins with calculations. Most likely, to perform the calculations yourself, you will need a program like “Foundation” or some other that can be found on the Internet and downloaded for free. To work with such programs you will need the following parameters:

The technology for constructing a foundation with columnar supports also requires additional data:
As a result of the calculations made, the following values required for installing a columnar foundation will be obtained:

Columnar non-buried foundation
A columnar, non-buried foundation on supports spaced at intervals of 1.5-2.5 m is used quite often. Such foundations can be erected on non-heaving and slightly heaving soils, despite the fact that the building (wooden or panel house, bathhouse, outbuilding, outbuilding or summer kitchen) has a small area and, accordingly, light weight. Moreover, if construction is carried out on rocky, coarse-grained or non-moving soil, this type of foundation can be installed under a fairly large house made of logs or timber. It is also possible to build a foundation on non-buried supports, provided that the influence of heaving forces on the structure is reduced. To do this, the soil under the supports is replaced with a sand cushion.

As a material for pillars, it is possible to use concrete, rubble concrete, sand concrete or concrete blocks for the foundation, the sizes and prices of which are very diverse. However, most often they take foundation blocks measuring 20x20x40. The price of such a foundation, as well as the number of blocks required for its construction, can be calculated independently or using an online “foundation” calculator. You can also make a columnar foundation from brick with your own hands, but it must be taken into account that the use of silicate or ceramic bricks with low frost resistance is unacceptable.

Work on the construction of a non-buried columnar foundation from ready-made blocks can be divided into several main stages:

When building a foundation using 20x20x40 blocks with your own hands, video clips and step-by-step instructions will help you understand the technology of work, understand the process and more accurately estimate financial costs.

Shallow columnar foundation
A shallow foundation is one of the most popular types of columnar foundation. The funds and effort required for its construction are minimal, and the range of applications for frame-type buildings is very wide.
As a basis for a frame house or a light bathhouse, a columnar foundation is often made using pipes as formwork for the concrete mixture. Since the reinforced concrete pillar will take the entire load, the material of the pipes does not matter much: both plastic and asbestos pipes, usually used for installing sewer networks, are suitable.
The diameter of the pipes depends on the load. For light buildings such as gazebos or extensions, 10 cm is enough; for log buildings, pipes of 25-30 cm are needed. The amount of concrete is ultimately determined by the diameter of the pipe. For 10 m of a pipe 10 cm in diameter, you will need 0.1 m3 of concrete, a 20 cm pipe will require 0.5 cubic meters, and a 30 cm pipe will require 1 cubic meter. The calculation was made taking into account the concrete base pad.

The scheme for carrying out work on constructing a columnar foundation from asbestos pipes with your own hands (a video of the process can be found on the Internet) is generally as follows:
- preparation of the construction site - removing debris, removing foreign objects, removing turf and leveling. Marking the perimeter of the future building, corners, internal walls and their intersections. Places for installing foundation supports are marked with pegs;
- Then, holes are made in the ground using a hand-held post drill. The depth of the well should be 20 cm greater than calculated: for the installation of a sand cushion;
- installation of a sand cushion with mandatory compaction and spilling of sand with water. After the final absorption of water, pieces of roofing material should be laid on the bottom in order to prevent moisture from the concrete mixture from escaping into the sand;
- installation of pipes in wells with a height reserve of at least 10 cm. Leveling pipes and securing them in wells using wooden blocks. If groundwater is close to the ground, the pipes must be coated with bitumen mastic to the ground level for waterproofing;

- then the base of the pipe, 40-50 cm deep, is filled with a thoroughly mixed concrete-gravel mixture (1 part cement and 2 parts sand, diluted with water to form a batter, combined with 2 parts fine gravel). Immediately after pouring, the pipe is raised to a height of 15-20 cm and left in this position until the cement has completely hardened. This is necessary to create a foundation that resists pushing out during soil heaving;
- after the concrete has hardened, the pipe should be waterproofed from the outside with roofing material and the well should be filled with sand, gradually poured and compacted;
- Reinforcement is placed inside the pipes, after which the remaining part of the pipe is poured with concrete;
- after the concrete has completely hardened - 2-3 weeks later - construction work continues. It should be added that it would be useful to waterproof the foundation with polymer or bitumen solutions.

Using the same scheme, it is possible to install a columnar foundation made of plastic pipes with your own hands. Videos and photos will help you navigate the intricacies of the work process, which is generally simple.
Columnar foundation with grillage
The grillage is a system of rand beams and strapping beams. It rigidly fixes the foundation, preventing it from moving in the horizontal plane or overturning the entire structure. In the presence of a grillage, the load from the structure is distributed evenly across all installed columnar supports, resulting in increased stability and resistance to destruction.
To facilitate understanding of the process, the necessary work is outlined in stages.

Preparation and installation of supports:
- In any case, the initial stage of preparation for the construction of the foundation is the arrangement of the construction site. After removing debris, etc. the turf and top layer of soil are removed along the perimeter of the future foundation;
- for supports it is necessary to dig holes 20 cm deep than the freezing level of the soil. The width of the pit should be 40 cm greater than the width of the wall, since 20 cm are added on each side for formwork and spacers;
- at the bottom of each pit, a 20 cm high cushion of sand-crushed stone mixture, spilled with water and well compacted, is made. The cushion is lined with roofing felt or polyethylene so that moisture from the concrete poured into the pit does not go into the ground;

- boxes for formwork are assembled from boards 20 mm thick;
- It is recommended to thoroughly moisten the formwork installed in the pits to prevent the absorption of moisture from the cement mortar and facilitate removal;
- After installing the formwork, a frame made of reinforcement is placed in the pits. The frame is assembled separately, from a rod 10-14 mm in diameter. The length of the rods is selected in such a way that when the concrete hardens, their ends protrude 30-40 cm above the ground level;
- the concrete mixture is poured continuously, in layers of 20-30 cm, leveling with a vibrator to avoid the formation of air bubbles;
- the formwork is removed after 3-4 days, the surface of the supports is treated with any suitable waterproofing mixture and the remaining part of the pit is covered with sand. Before backfilling, it is also possible to insulate the foundation with extruded polystyrene foam.

Grillage arrangement:
There are two options for installing the grillage: laying it on the ground or raising it above its surface. The advantage of the second method is the elimination of the effects of heaving forces:

Cost of work on installing a columnar foundation
The total cost of a columnar foundation is the sum of the cost of materials and the cost of the work itself. In most cases, it is significantly lower than the cost of other types of foundations, since almost all types of columnar foundations can be built with your own hands. Videos and photos, instructions and guides found on the Internet are also usually cheap or free.
You can calculate the cost of most types of columnar foundations yourself using special online calculators or programs. Many of them are quite easy to find on the Internet, free and have an intuitive interface.
The construction of a foundation on pillars is relevant for houses with lightweight wall structures. A columnar foundation for a house is made if wood, brick or frame products were used as the main material. The base can also be poured under a brick, but in this case deep recesses are made. A strong columnar foundation, compared to a strip foundation, is characterized by an inexpensive cost of work and increases the load-bearing capacity of a building on swampy, peaty, sandy soil, waterlogged or heavily frozen soils.
Differences between bases on pillars
The description of the fundamental basis according to SNiP 3.02.01-87, GOST 20522-75 and SNiP 2.02.01-83 reports the following design characteristics:
- for the product, columns are used, buried 1.5 m into the soil (the average is 0.5 - 0.7 m). The top of the products protrudes by 0.2 - 0.5 m;
- the foundation on pillars is carried out strictly in the corners of the building, at the intersection of walls and interior partitions;
- construction with a heavy load requires reinforcement with additional supports 3 - 3.5 m long;
- the distance between the pillars varies from 1.5 to 3 m and depends on the mass, number of storeys of the house and type of soil;
- The grillage must be organized - it performs the function of distributing the load. In wooden structures, beams or logs with strapping are used. Brick buildings include grillages made of metal channels, beams, and a monolithic reinforcing frame.
Construction according to the design of a light columnar foundation is carried out taking into account regional climatic conditions and the operating mode of the structure.
Main types of bases on supports
The installation of a columnar foundation is justified for country houses, country frame cottages, bathhouses, gazebos, and outbuildings. When choosing material for supports, experts focus on the total mass of the structure. A dwelling or economic block made of heavy materials with a light foundation has risks of deformation - subsidence or curvature of the walls.  The modern classification of plinths made for poles provides for a similar technology. The differences lie in the type of material used to carry out the work.
Reinforced concrete monoliths
Monolithic concrete structures are durable and reliable, suitable for the construction of residential buildings. The bases are characterized by a density suitable for work on stationary soils. Building regulations allow a similar columnar foundation to strengthen wooden houses designed for 1 - 2 floors.
Brick plinths
Brick columnar foundations are common due to their durability and stability. A durable design is obtained if you use high-quality fired material. Activities for the arrangement of a two-story residential building can be carried out on dense soils, observing a support cross-section of 40x40 cm. 
Block structures
Foundation pillars made of rubble, rubble concrete, asbestos pipes or screw piles are comparable in strength and ability to withstand heavy loads to brick ones. Structures differ depending on the material used:
- do not work with rubble stone on hilly areas or on plastic soils - buildings lose stability and may collapse;
- rubble concrete compositions are placed in rows or concrete dough is poured into a rubble frame;
- asbestos pipes are selected with a diameter of 15 cm for wooden houses; for massive structures, the diameter increases from 25 to 40 cm. The pipe is also used as formwork for fastening reinforced piles;
- metal piles are screwed directly into the soil. The technique increases the stability of the building on dense or plastic soils.
Pillars are selected depending on the type of soil and the structure of the building - the foundation must be stable and reliable even under intensive operating conditions.
Technical parameters of materials for construction
When constructing a columnar type of foundation, it is necessary to carefully select materials - this determines the quality of the structure and the duration of installation activities. The modern market offers developers the following types of products: 
- asbestos cement pipes. The elements are easy and inexpensive to transport, but with the inexpensive cost of materials, there are significant costs for drilling holes.
- brick. The blocks are distinguished by their high price, long service life and good maintainability. When laying a foundation on soils prone to swelling, there is a risk of deformation.
- tree. Inexpensive material with minimal wear resistance. Supports can be damaged by insects and rot if preliminary preparation is not carried out - treatment with antiseptic, waterproofing and antiseptic compounds.
- reinforced concrete. Characterized by durability, strength, and optimal price. The disadvantage of the material is labor-intensive installation operations.
Having studied the specific features of materials, owners of private properties can choose the best option.
Foundation depth - classification features
Based on the deepening of the hole under the foundation, structures are divided into shallow and recessed. The selection criteria are based on the typology of soil for development:
- shallow options are built on sandstones and rocks with deep soil waters that do not shift under the influence of weather factors. Supporting elements are buried at a distance of 65-70 cm;
- recessed foundations are located 1.5 - 2 m deep in the soil. The structures are justified in regions with lands that freeze up to 50 cm and unstable mobile soils.
The standard distance between the support pillars for the foundation is 100 - 200 cm. 
How to calculate the design of a fundamental columnar base?
The construction of a columnar foundation with your own hands begins with its calculation. To calculate your project, you can use free online programs. You will need the following initial data:
- depth of support;
- the area in which the structure is located;
- approximate weight of the building, taking into account finishing, communications and furniture;
- total mass of the foundation;
- seasonal factors - wind and snow loads;
- type of soil, freezing area, location of groundwater level.
After carrying out simple operations, you will figure out how to make a base and purchase pillars with the required cross-section and load-bearing capacity.
Technology for arranging a plinth with a grillage
To pour a grillage-type columnar foundation, you will need to calculate the project. The snow load is 100 kg/m2, the internal filling is another 100 kg/m2, the bearing capacity of the soil is 0.5 - 0.6 kg/m2. The work will require step-by-step guidance from professionals, which is given below. 
Digging trenches
For home construction, drilling holes with a diameter of 15-20 cm, which is done with a garden drill, is justified. Further activities include:
- Reinforcement of holes with chain-link with small cells.
- Backfilling trenches with a mixture of M200 concrete and sand.
- Fixation of reinforcing bars in the center of the ditch with a protrusion of 10 cm.
To prevent the liquid cement composition from being absorbed into the soil, waterproofing made of roofing felt or polyethylene is laid.
Installation of supports
The optimal material for the pillars is a piece of asbestos cement pipe 10 cm in diameter. Reinforcing pins 12 mm in diameter are placed on the piece. The structure is installed on a construction “shoe”, filled with sand concrete and compacted. A small reinforcing rod is attached at the top for strength.
Re-drilling
The work is carried out after the concrete has set - after 5-6 days. The sequence of events looks like this:
- Using a drill, holes are made 30 cm in diameter with a recess below the soil freezing level.
- A pole designed for a load weighing 11 tons is inserted into the opening.
- The hole is filled with the excavated soil.
The soil mixture must be compacted. 
Grillage formation
The material for the grillage is concrete, wood or metal. An element is placed with a protrusion of 10 cm above the ground. The structure can withstand the load of small buildings made of timber, logs or frame products.
Classic foundation with columnar support
The algorithm for how to properly make a columnar foundation with your own hands is suitable for all support materials - stone, brick, reinforced concrete. The work has a strict sequence, on which the reliability and strength of the structure depends.
Preparatory tasks
Before concreting the supporting elements, you need to clear the area, remove the top turf layer of soil to a height of 30 cm. In the presence of clay soils, make a substrate based on gravel or sand. Preparation guarantees a flat surface where it is convenient to mark. Transferring the base diagram to the surface is carried out using pegs, rope and sand. 
Construction of pits
When preparing pits, there is one rule - strict axial location. Trenches are dug manually; for large-scale tasks, it is justified to rent an excavator. When removing soil, be guided by the following requirements:
- the walls of holes deepened by 1 m are not strengthened;
- increasing the depth involves the formation of slopes and the installation of beams with spacers.
- the actual depth of the pit is made 30 cm more than the calculated one.
The width of the hole is selected taking into account the availability of formwork and spacers.
Mounting the formwork frame
The formwork for a columnar foundation is made of planed timber 4 cm thick and 1.5 cm wide. Installation of chipboards, metal sheets or plywood with a moisture-resistant coating is allowed. The formwork for a columnar foundation is installed along the concrete line.
Performing reinforcement
To reinforce the foundation support, class A3 rods from 12 to 14 mm in diameter are used. Install the jumpers lengthwise, observing the horizontal direction and a step of 20 cm. As an alternative material, pins 6 mm in diameter are used. 
Pouring technology
Pouring work involves placing concrete dough into pipes. The mixture is placed in layers 20-30 cm high and compacted with a vibropress. Thanks to the use of hand tools, the composition becomes homogeneous - air comes out of it.
Waterproofing measures
To protect against moisture, an approach similar to that used to waterproof a strip foundation is used; cold or hot mastic is made with your own hands, membranes and roofing felt are glued on.
Execution of grillage
With the help of a grillage, the rigidity and stability of the structure is ensured. The simplest option for home construction is to make a prefabricated reinforced concrete belt. The tasks are carried out in stages:
- The jumpers are welded to each other using scraps of reinforcing pins onto mounting points.
- The formwork is installed, the reinforcement frame is fixed and filled with M200 cement dough.
- After the concrete has gained strength and waterproofing work has been carried out, the groove grooves are filled with soil and the floors are secured.
- To protect the basement, a brick fence (wall) is formed.
- Communication holes are made in the intake.
The decor inside the building is made of false panels or siding. To build an elevated grillage, a cushion based on sand or gravel 10-15 cm thick is organized. The design is justified on heaving soils to reduce groundwater level and raise the soil when the temperature drops. 
Non-buried types of foundations
A columnar, non-buried foundation is easy to do with your own hands - step-by-step instructions present the detailed stages of work.
Construction technology
A non-buried foundation on pillars or blocks is carried out in a strict technological sequence:
- The site is marked - cleared of debris, the drainage layer is removed, a cushion is laid and waterproofing is formed.
- The points for placing supports are determined - concrete blocks with parameters 20x20x40 cm.
- Small trenches are dug with the obligatory construction of a sand base.
- The supporting elements are mounted - for one column you will need 4 blocks of the specified dimensions. They are laid out in two rows, maintaining a checkerboard-shaped distance between the supporting pillars of the future foundation.
- The columnar foundation is being poured - the seams are treated with a dense cement-based mortar.
- The joints must be protected from moisture with bitumen mastic, roofing felt or glass insulation.
 The structure is built on non-heaving soils or soils with weak heaving and is justified for light buildings (wooden houses, bathhouses, utility blocks, outbuildings or summer kitchens). Activities on rocks are advisable when constructing log or timber houses. With reduced heaving, the base is made on a sand cushion.
How to make a shallow foundation?
Installation of a shallow columnar universal foundation is justified for frame structures. Plastic and asbestos pipes are used as formwork, and a reinforced concrete pillar takes the entire load of a light kitchen, bathhouse, house or gazebo.
Selection of pipe diameter
The parameters of the pipe sections are determined by the building load:
- lightweight buildings provide a diameter of elements of 10 cm. They will require about 0.1 cubic meters of concrete dough;
- log houses require products with a diameter of 25-30 cm. In the first case, 0.5 m3 of concrete will be sufficient, and in the second - 1 m3 of the mixture.
The above parameters are relevant for a concrete foundation substrate. 
Scheme of events
You can make a long-lasting columnar foundation with your own hands, because step-by-step detailed instructions include step-by-step work:
- The construction site is being prepared. It is necessary to remove debris and foreign objects, remove the turf layer and level the soil.
- The territory is being marked. Using a peg or rope, mark the configuration of the building - walls, corners, partitions.
- Using a hand drill, trenches are made at a depth of 20 cm. For the cushion, the depth increases.
- A concrete pad is being built. Crushed stone is poured into the bottom of the pit, and formwork for a concrete foundation is installed along the outer contour of the future building. Subsequent actions consist of the formation of a reinforcing frame. Horizontal elements are welded to the reinforcing bars.
- The concrete mixture is poured over the reinforcement in layers and pierced with a reinforcing pin.
- After the composition has hardened, holes are made using special equipment.
- Pipes protruding 10 cm are installed, leveled and secured with wooden beams. The close water level provides for waterproofing work.
- The base of the pipe at 0.5 m is filled with a mixture of concrete and gravel. For 1 part M500 cement you will need 2 parts sand and 2 parts gravel.
- After placing the concrete dough, the pipes are raised by 20 cm, fixed and left for 21 days until the material hardens completely.
- Waterproof the outer surface of the supports with roofing felt, fill the hole with sand, alternately pouring and compacting it.
When working with pipes, it is advisable to place a reinforcing rod inside and fill the pipe with concrete. Further activities are carried out only after the composition has hardened. 
Benefits of building a foundation on pillars
The advantages of installing a solid columnar reliable foundation include the following parameters:
- reliability – the service life of a residential building is extended to 100 years;
- versatility - structures are used on heaving, clay or dense soils;
- efficiency - the work has a low cost, and, compared to a strip or monolithic structure, the developer saves 2 times more money;
- absence of large-scale preparatory tasks, minimal costs for waterproofing;
- speed of installation activities - construction can be carried out independently;
- quick time to build a house, cottage or utility unit.
 The designs exclude the arrangement of a cellar, but are ideal for light buildings. For the purpose of organizing a subfloor, a do-it-yourself strip foundation is justified.
Building your own foundation on columnar supports requires the correct choice of depth, which depends on the distance the soil freezes. Experienced specialists recommend calculating the structure to prevent its deformation and cracking.
In the article we will look at the columnar foundation of a house and describe the columnar strip foundation (column foundation with a grillage). We will tell you in what cases the construction of a columnar foundation is most applicable. The structure of a columnar foundation, recommendations and errors when installing a columnar foundation are described in separate parts.
General information about columnar foundations.
The preparation stages and manufacturing technology for a columnar foundation and a strip foundation are in many ways similar. Therefore, it is not advisable to repeat general provisions typical for the manufacture of foundations (assessment of soils, freezing depth, presence of groundwater and communications, preparatory work, installation of formwork, pouring concrete, possible errors during design and construction) in this article. To get acquainted with them, just refer to the article.
Along with an overview of all options for columnar foundations, we will focus on foundations made of prefabricated concrete and reinforced concrete blocks.
A columnar foundation is a system of pillars located in the corners and at the intersections of walls, as well as under heavy and load-bearing partitions, beams and other places of concentrated load of the building. To create conditions for the pillars to work together as a single structure and to increase the stability of columnar foundations, to avoid their horizontal displacement and overturning, as well as to arrange the supporting part of the base between the pillars, a grillage (tied beams, rand beams) is made.
The main type of columnar foundations used in mass construction are monolithic reinforced concrete foundations.
As a rule, the distance between the pillars is 1.5-2.5 m, but it can be more.
With a distance between pillars of 1.5-2.5 m. The grillage is an ordinary reinforced lintel. At the same time, it is impossible to combine an attached terrace, veranda, or porch into a single constructive solution. These rooms must have their own foundation, that is, they must be separated by an expansion joint, since the load from the porch is not comparable to the load from the walls of the house, and accordingly their settlement will be different.
You can read more about the design of such a seam in the topic .
When the distance between the foundation pillars is more than 2.5-3 m, the grillage is made from a more powerful, so-called rand beam. The rand beam is made in the form of a monolithic or prefabricated reinforced concrete beam. It can also be metal (I-beam, channel, profile).
- for houses without basements with light walls (wooden, panel, frame);
- under brick walls, when a deep foundation is required (1.6-2.0 meters, i.e. 20-30 cm below the depth of seasonal soil freezing) and a strip foundation is uneconomical;
- when the soils during the operation of the building ensure that the settlement of the columnar foundation (at equal pressures of the pillars on the ground) is significantly less than that of a strip foundation;
- when it is necessary to eliminate as much as possible the negative impact of frost heaving on the foundation, because columnar foundations are less susceptible to this phenomenon.
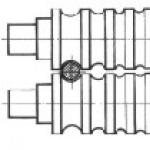
a - prefabricated-monolithic when the groundwater is located at the time of work below the base of the foundations;
b - prefabricated for any location of groundwater;
1. prefabricated reinforced concrete support column with a rod reinforcement cage;
2. the same, with a steel pipe core;
3. the same, with a rod reinforcement frame and a shell made of asbestos-cement pipe;
4. the same, with a core made of steel pipe and a shell made of asbestos-cement pipe;
5. Prefabricated steel pipe support pole;
6. backfilling with excavated soil;
7. base plate made of monolithic reinforced concrete;
8. base plate of prefabricated reinforced concrete foundation;
9. sand cushion.
Let's consider several points in favor of using a columnar foundation:
- If the cost of other types of foundations is 15-30% of the cost of the entire house, then the cost of a columnar foundation will be no more than 15-18%.
- Columnar foundations are 1.5-2 times more economical than strip foundations in terms of material consumption and labor costs.
- Columnar foundations have another positive quality, which is that the foundation soils under free-standing supports work better than under solid strip foundations, as a result of which the settlement under them at equal pressures on the ground is much less than that of strip foundations. Reducing the amount of settlement makes it possible to correspondingly increase the pressure on the ground by 20-25% and, consequently, reduce the total area of the foundation.
- The most dangerous forces acting on the foundation of low-rise individual houses are the forces of frost heaving. Therefore, almost all of the given options for constructing foundations are considered from the point of view of their construction on heaving soils. It is generally accepted that when building on heaving soils, the depth of foundations should be lower than the calculated depth of seasonal freezing. However, for lightly loaded foundations of small houses, heaving forces usually exceed the total load from the house acting on the foundation, as a result of which various types of deformations occur.
Therefore, when building houses without basements on heaving soils, it is better to build shallow or non-buried foundations. Let us explain their differences.
- Shallow foundations with a laying depth of 0.5-0.7 standard freezing depth are considered. For example, with a standard freezing depth of 140 cm, the depth of a shallow foundation will be 140x0.5 = 70 cm.
- Non-buried foundations- foundations are considered to be those whose laying depth is 40-50 cm, and is on average half or a third of the freezing depth.
For large freezing depths in heaving soils, anchor columnar reinforced concrete monolithic or prefabricated foundations are effective. Such foundations are insignificantly affected by frost heaving forces acting on the side surface, since the pillars are made with a minimum cross-section. If the foundation is built from stone, brick, small blocks, or monolithic concrete without reinforcement, its walls must be made tapering upward, this will save material and evenly distribute the load from the walls.
Additional measures to reduce the influence of frost heaving forces can be: covering the side surfaces of the foundation with materials that reduce soil friction, such materials are bitumen mastic, plastic lubricants (synthetic grease “S”, CIATIM-201, BAM-3, BAM-4), organosilicon compounds , epoxy resins, furan-epoxy composition, polymer films, as well as insulation of the surface layer of soil around the foundation. The feasibility and options for such insulation are outlined in the question.
Conditions under which columnar foundations are not recommended:
- in horizontally moving soils and soft soils, since their design is inherently insufficiently resistant to overturning. To absorb lateral shear, a rigid reinforced concrete grillage is required (its construction will negate the cost savings on the difference between columnar and strip).
- Their use is limited on weak-bearing soils (peat, subsidence rocks, water-saturated clay, etc.) and in the construction of houses with heavy walls (massive brick with a thickness of more than 510 mm, standard reinforced concrete slabs and blocks);
- If you have limited financial capabilities or limited time period for installing a plinth. If with a strip foundation the base is formed as if by itself, then with a columnar foundation, filling the space between the pillars with a wall (taking in) is a complex and time-consuming task;
- It is not recommended to install columnar foundations in areas with a sharp difference in heights (the height difference in the area under the foundation is 2.0 m or more).
Let's consider what materials a slab foundation can be made of, depending on the design of the house (primarily its mass and number of storeys):
- The stone foundation is made from rubble stone or medium-sized flagstone. It is advisable to select a stone of the same size, and the flatter it is, the better.
- It is advisable to make brick foundations from well-burnt red brick (black), preferably iron ore. Poorly fired bricks quickly collapse.
- Concrete foundations are made of heavy concrete grades B15-B25;
- Rubble concrete;
- Monolithic reinforced concrete (a monolithic foundation has increased strength and has the longest service life - up to 150 years);
- Ready-made prefabricated concrete and reinforced concrete blocks. In the prefabricated version, the poles are manufactured separately and mounted during installation.
- asbestos-cement or metal pipes filled with concrete mixture.
- concrete and rubble concrete - 400 mm;
- masonry - 600 mm;
- brickwork above ground level - 380 mm, and when tied with a pick-up - 250 mm;
- from rubble - 400 mm;

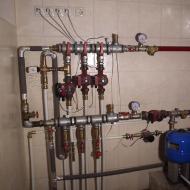
Photo of a columnar foundation for a small private (country) house.

Information about the depth of laying columnar foundation supports
It is necessary to pay attention to three main points when determining the depth of laying a columnar foundation:
- the depth of soil freezing in your area where the house is being built; (The best option is to lay the pillars below the freezing depth of the soil, thus eliminating deformation of the foundation)..
- determination of the type and composition of the soil (fixed soil or mobile, clay or sandy. The best soil can be sand, since water drains through it instantly and it has a high load-bearing capacity; it is impossible to build on silt and peat soils, it is necessary to arrange a partial or complete replacement of the soil to sandy);
- groundwater level (is there a pond or river nearby, if there is this indicates the presence of a high groundwater level, it is necessary to do waterproofing or drainage)
These factors must be taken into account in the house project you order.
Also, when calculating the foundation depth, the designer should take into account not only natural influences on the foundation, but also the following indicators:
- the weight of the future house;
- weight of foundation supports;
- the weight of the furniture in the house and the number of people who will live in this house;
- seasonal, temporary loads (snow).
It is advisable to contact a designer who has all the necessary data to carry out such calculations (groundwater level in your area, freezing depth, soil structure, etc.). The value of the designer's participation in the design process is that he will calculate the depth of the foundation with absolute accuracy (without excess depth margin). This will allow you to save on building materials and financial resources without compromising the quality and safety of your home.
Construction of a columnar foundation
In this section we will look at the technology for constructing a monolithic reinforced concrete columnar foundation as the most common type in private construction.
1. Preparatory work
Work must begin with cleaning the construction site. To do this, it is necessary to cut off the vegetation layer, preferably at least 2.0-5.0 meters in each direction from the planned location of the foundation. Its thickness is 10-30 cm, and it is not suitable for the base of the foundation. This soil needs to be cut and transferred to the vegetable garden or garden.
If the soil under the cut layer consists of sand mixed with small stones (gravelly sand, coarse or medium-grained sand), then it is used as the base of the foundation, regardless of humidity, groundwater level or freezing depth.
If there are clayey soils (clays, loams, sandy loams), then a sand-gravel cushion must be installed. The thickness of the cushion depends on the geological characteristics of the soil.
If you find peat or silty soils under the cut layer, then it is necessary to completely replace the base; in this case, you need to consult a geologist on the composition and design of the artificial base.
Garbage and all foreign objects are removed from the construction site.
After the construction site has been cleared, it is leveled. The mounds are removed and soil is poured into the existing holes. Control of the horizontality of the area is carried out with a level, which is installed on a 2-2.5 meter flat board or rail. Preparation ends with the delivery and storage of building materials to the site.
2. Foundation breakdown
The breakdown of the house plan on the site consists of transferring from the drawings to the land plot and fixing the axes and main dimensions of the foundation.
Before laying out the foundation of the house, pillars (cast-offs) are installed along its perimeter, at a distance of 1-2 m from the building. Wooden boards or slats are nailed level to the pillars on the side of the future walls of the house and parallel to them, on which the dimensions of individual parts of the pit (trenches and holes) and the foundation itself and future walls are marked. The accuracy of the center lines is controlled by accurately measuring distances with a tape measure. It is imperative to check the corners of a rectangular or square foundation; they must be strictly straight at 90 degrees. Be sure to check the mark of the bottom of the trench with a theodolite, at least at the corners of the house and at the points where the tapes intersect. It must correspond to the design (that is, if you decide to deepen the foundations by 1.4 m, then the bottom of the trench should be 1.4 m below the zero level of the house).
Check the correctness of the axes, their intersections, the angles must be strictly the same as on the house plan.
As mentioned above, pillars should be under each crosshair of the walls.
The pillow is poured generously with water and compacted using a hand tamper. To prevent water from escaping from the poured concrete, polyethylene or roofing felt is placed on the cushion.
4. Installation of formwork
For the manufacture of formwork, boards of any type of wood, 25...40 mm thick and 120...150 mm wide, are used, planed on one side (the planed part is installed facing the concrete). Lumber for formwork should have a moisture content of up to 25%. Wide boards for formwork, as a rule, are not suitable, since cracks appear during their installation. You can also use particle boards, metal structures, and waterproof plywood.
Wooden formwork is preferable to metal formwork, as it is lighter and has less adhesion to concrete. The disadvantages of wooden formwork include the possibility of its deformation and hygroscopicity. The formwork is installed close to the walls of the pit, strictly perpendicular to the base of the foundation, checking this with a plumb line.
In some cases, if the walls of the pit are dry and do not collapse, concrete can be poured without formwork. At the same time, polyethylene is laid around the perimeter so that water does not escape from the concrete.
You can also use asbestos, ceramic, and iron pipes in the form of formwork. Depending on the design of the building, pipes with an internal diameter of 100 mm or more can be used. Concrete is poured directly into the pipes, and they remain in the ground along with the foundation.
When installing wooden formwork, you must remember that the boards must be damp, for which they are well moistened. Otherwise (dry boards) will absorb water, which negatively affects the strength properties of concrete.

If it is possible to use ready-made panel formwork, then this is a plus. Such formworks have a large number of options for their installation, which is very convenient when constructing foundations with a large number of angles. Inventory formwork panels can be rigid or flexible, their length can be from 0.5 to 3 m.
5. Installation of fittings
The pillars are reinforced with longitudinal reinforcement with a diameter of 10-12 mm with a mandatory device, through 20-25 cm of clamps with a diameter of 6 mm. They are installed vertically and secured with clamps or annealed wire to prevent them from diverging to the side. It is advisable to ensure that the reinforcement extends above the top of the foundation (as shown in the figure) by 10-20 cm, so that the monolithic grillage reinforcement can then be welded to them.

Photo of columnar foundation reinforcement.
6. Concrete supply
Here everything is the same as in strip foundations, concrete is laid in layers of 20-30 cm with vibration using manual vibrators.

Photo of concrete being fed into the pillar formwork.
7. Grillage arrangement
The grillage can be made in the form of a monolithic or prefabricated reinforced concrete rand beam.
After completing the installation of columnar foundations, check the marks of the top of the columns and, if necessary, level them with a cement mortar of a 1:2 composition. After this, they begin to construct a prefabricated, precast-monolithic or monolithic reinforced concrete belt (grillage).
The installation of a monolithic belt will ensure proper longitudinal rigidity and stability of the foundation. Before installing the belt, the prefabricated jumpers must be securely connected to each other. To do this, the mounting loops are tied crosswise with twisted wire or connected by welding cuttings of reinforcement with a diameter of 8-10 mm. Then formwork is placed on top of the lintels, a reinforcement cage is installed, and M200 concrete mixture is laid.

Photo of the grillage arrangement for a columnar foundation.
The concrete surface is leveled and covered with any waterproofing material to protect it from atmospheric influences. After gaining strength and waterproofing, you can begin installing the floor slabs.
8. Pickup device
When installing columnar foundations to insulate the underground space and protect it from debris, snow, moisture, dust, cold air, etc. a fence is installed, a fencing wall between the pillars. The fence can be made of various materials, most often stone or brick.
To install a fence between the supports of a columnar foundation, it is necessary to make a concrete screed that will serve as its foundation. The concrete screed does not have a depth; it is placed on a sand cushion, which has a depth of 15 to 20 cm. To install a concrete screed, you will need formwork and a frame made of reinforcement, to prevent possible rupture of the screed due to soil movements.
Place the screed on the concrete screed. As in the plinth, technological windows are made in the inlet for supplying various communications. The pick-up is not connected to the supports, since uneven settlement can lead to the formation of cracks.
The height of the fence must be at least 40 cm. The degree of exposure to moisture on the walls of the house depends on the height of the fence; the higher the fence, the less exposure to moisture on the walls of the house. Also, a house with a low base looks squat; visually it may seem that such a house has no foundation and is built directly on the ground, but houses with a high base look much more attractive and reliable. In this case, the height of the supports must correspond to the height of the base. More details about the design of the plinth can be found in the article
9. Foundation waterproofing
Foundation waterproofing can be done in one of the following ways:
- Apply a layer of bitumen to the top of the supports and the fence. Lay a strip of roofing felt on this layer and again apply a layer of bitumen, after which you lay another strip of roofing felt;
- On the top of the supports and backfill, apply a layer of cement mortar, in which the ratio of cement to sand is 1:2. After you have leveled the mortar, sprinkle dry cement on top - the layer thickness is from 2 mm to 3 mm. After allowing the cement to “set”, lay a strip of rolled material (roofing felt or roofing felt).
How to perform such waterproofing, and with what materials, you can read in the article .
Important points when building a columnar foundation
- When constructing foundations on heaving soils, it is necessary to have a clear understanding that the construction of a house and its commissioning must be carried out in one construction season. Foundations built on heaving soils and left unloaded during the winter (without walls, ceilings or roofs) may become deformed. This is true for all types of foundations, but is especially important for columnar foundations, since each column behaves like a separate foundation (due to the absence of a single rigid frame, unlike a strip or slab foundation). Each pillar gives its own settlement, which in the future (after frost - in the spring) can complicate the construction of the grillage and walls.
- Unforeseen deformations can also occur when the built house is not used or heated in winter, and the depth of the foundation was designed for the thermal conditions of the heated house. A favorable time period for laying a foundation is considered to be the period of time when the soil “moved away” from the frost and groundwater descended to the lower layers. This could be the summer months and early autumn.
- If you have made the supports of a columnar foundation from monolithic concrete, then you should know that the “readiness” of the concrete is achieved after 30 days. During the entire “maturing” period, no loads should be placed on the concrete supports, and care should also be taken to ensure that the top layer of concrete does not dry out. To do this, you can cover it with film or roofing felt. To ensure that the concrete sets evenly, the supports should be moistened with water from time to time (two or three times a week, depending on weather conditions).
- To prepare concrete, it is best for you to use M400 cement. Fine gravel and coarse sand can be used for concrete filler.
An example of calculating components for preparing a concrete mixture:
- cement 20 kg;
- sand 50-55 kg;
- gravel* (crushed stone) 80-85 kg.
- If the composition of the concrete mixture is too liquid or, on the contrary, too thick, then the strength of the concrete structure is reduced by 25% of the strength of the same structure, during the manufacture of which all the requirements for the proportionality of the components were met.
What mistakes can occur when laying a foundation and how to avoid them
Many developers who decide to build a house on their own often make a number of mistakes when laying the foundation, which lead to varying degrees of damage to the foundation and walls of the house. These errors can be systematized as follows:
- An insidious defect of the foundation is the unevenness of its subsidence. This can occur for a number of reasons, which include:
- the foundation depth was not calculated correctly;
- the supports have different depths.
- The load on the foundation supports is uneven.
To eliminate this phenomenon, it is necessary to perform an accurate calculation of the systematic distribution of the load on the foundation. Do not forget to take into account the load on the foundation when adding a second level to the house (for example, building an attic);
- The material used was of low quality - the wrong brand of cement, sand that contained an admixture of clay, etc. Or a material, for example cement, has a long shelf life (it should be recalled that when stored for six months, its grade decreases by 25%, and when stored for a year or more by 35-50%);
- The load-bearing properties of the soil were not assessed correctly.
A correctly completed project by specialists and constant monitoring of construction by you or an independent expert will help you avoid these mistakes.
Estimated cost of a columnar foundation
Note from the editor: Prices in this article are as of May 2009. Be careful.
The cost of a columnar foundation is determined by the technology of laying the foundation and its depth and consists of the following components:
Prices for laying the foundation:
- installation of a sand base 100 mm thick - 80-100 UAH/m2 (or 10-13 US dollars);
- construction of a crushed stone base (depending on the fraction) - 80-100 UAH/m2 (or 10-13 US dollars);
- concrete preparation device (with a thickness of 10 cm); - 100-120 UAH/m3 (or 13-16 US dollars);
- laying reinforced concrete pads or blocks - 160-180 UAH/piece (or 21-24 US dollars);
- installation of monolithic reinforced concrete foundation walls - 1300-1500 UAH/m3 (or 179-198 US dollars).
Prices for masonry work:
- rubble foundation masonry - 300 UAH/m3 (or 40 US dollars);
- laying brick pillars - 250 UAH/m3 (or 33 US dollars);
- walls - 600 UAH/m3 (or 80 USD).
Prices for floor installation:
- installation of a monolithic reinforced concrete floor (formwork, reinforcement, concreting) - 1300-1500 UAH/m3 (or 170-198 US dollars).
Relationship between contractor and customer.
It would not be amiss to remind you that if the construction of a house is carried out by a construction organization (contractor), then the relationship between you should be built only on a contractual basis.
A construction contract is the main document of the relationship, which stipulates the terms of cooperation, the cost of work, the start and end dates of construction, etc.
The estimate is an integral part of the Construction Contract. It describes all types and costs of work and materials.
The work schedule must include deadlines for completing the work and payment terms for the stages of work.
The contract must also provide for design documents: architectural design of the facility, structural sections of the project and other documents necessary for construction.
For an overview of the types of foundations for a house, read the article.
Not so difficult to construct, inexpensive, and most importantly, a strong and durable columnar foundation can be erected with your own hands for any type of building. Usually, of course, such a solution is provided for small buildings made of wood, frame houses or foam block houses. But nevertheless, it sometimes occurs during the construction of rather massive brick structures. This especially occurs when it is necessary to lay the foundation quite deeply, which in the case of C will cost at least 1.5-2 times more.
In some cases, for a rather modest light building, the phrase “unnecessary luxury” becomes a kind of synonym for the phrase. And in reality this is so, since it is quite expensive, and in most cases it is possible to build a columnar foundation that will be no less strong and durable.
First you need to understand what a columnar foundation is. In itself, it is supports that are significantly deepened into the surface of the soil and protrude somewhat above the ground. It should also be noted that the upper level must be ideally the same for all supports. In addition, a mandatory requirement is to equip a grillage, which helps to distribute the load evenly.
It should be noted that there is a fairly wide variation in the materials used when making pillars, these can be:
- Tree
- Concrete
- Asbestos cement
- Rubble stone
- Brick
- Metal
Let's take a closer look at each type.
Wooden pillars for the foundation
Today, a material such as wood can rarely be found used for the manufacture of columnar foundations, which is due to its low durability.
In particular, it is used in the arrangement of small wooden buildings or in the construction of terraces. In this case, the diameter of each pillar should be 15-20 centimeters. Additionally, before being immersed in the ground, each support is treated with protective compounds that enhance resistance to moisture, corrosion and combustion. Additional waterproofing of the material is also provided; bitumen-based mastics are often used for this.
Brick columnar foundation
The next type is the arrangement of support pillars made of bricks. In particular, iron ore brick is widely used.

This material is used to construct shallow and shallow foundations, which are used during the construction of light buildings on hard rock soils. A prerequisite is that the pillars must be at least 38 centimeters wide (the pillar itself is square).
Concrete reinforced pillars
This option becomes the most common when arranging a columnar foundation, which is determined by its reliability. When considering the type of such pillars, it should be noted that they can be either monolithic structures or made from already prepared concrete blocks. The width of such a pillar should be at least 40 centimeters.
Pipe poles
And the last option is poles made of metal or asbestos-cement pipes. For the most part, the pipes themselves in this situation play the role of permanent formwork. Because the inside is reinforced and then filled with concrete.
Depth of columnar foundation
The calculation of the laying depth itself depends directly on the type of soil, in addition to the level of its freezing. Thus, it can be divided into two types:
- Shallow, the depth of which is 40 centimeters.
- Recessed, which is immersed in the soil 20-25 centimeters below the freezing level.
It should be noted that a buried foundation is quite often used in areas where the level of soil freezing reaches two meters, since the provision of other types of foundations in this situation is not possible. In this case, a columnar foundation is built in the standard way, laid 15-25 centimeters below the freezing level.

In this case, the optimal distance between the supports should also be taken into account, which also depends on the characteristics of the soil and ranges from one to two and a half meters.
Grillage
Considering the arrangement of the grillage, which is carried out after the full installation of the supports, in the case of using concrete, then strictly a month after the completion of the pouring work. It should be noted that either wooden or metal beams are used for it, which will subsequently act as a mortgage screw.
Quite often lately we have seen a monolithic concrete grillage, which is poured over the pillars into wooden formwork.

The grillage itself of a columnar foundation can be of two types:
- Low, i.e. be located directly on the ground.
- Tall, which protrudes at least 35 centimeters above ground level.
Arrangement of basements
It also becomes a rather important factor; in turn, the lack of possibility of arranging basements becomes a disadvantage. In some individual cases, fences are provided between the pillars to organize the fencing of the space. They are made of brick, and a rather important condition is the absence of connection with supporting structures, in order to avoid damage to their integrity.
It is also necessary to equip high-quality insulation and ventilation to ventilate the basement. But such implementation is possible only in individual cases, since quite often the construction of buildings on this type of foundation is carried out with the building being raised to a height of 1-2 meters.
Calculation of a columnar foundation, diagrams and drawings
Initially, it is necessary to carry out a full calculation and draw up design documentation. The best solution would be not to do this yourself, but to entrust this issue to specialists.
An approximate diagram of a columnar foundation looks like this:
Initially, a full calculation of the foundation is carried out, which will ultimately make it possible to calculate the number of required pillars, their dimensions, depth, and installation locations.
To obtain the most accurate data, you will need to fully examine the soil, finding out its type, level of freezing and other characteristics. If you carry out such a calculation yourself, it is recommended to use online calculators.
All data obtained during the study and calculations are entered into the design documentation.
So, it’s time to directly consider the technologies for constructing a columnar foundation
Do-it-yourself support-column foundation: step-by-step instructions
This type of foundation is a purely columnar structure with a grillage. The arrangement of such a load-bearing element is most appropriate for the construction of light structures on sandy soils.
All work is divided into several stages, including:
- Carrying out earthworks.
- Construction of foundation pillars.
- Arrangement of the grillage.
Let's move on directly to the start of work.
Excavation
The first stage is carrying out excavation work. Initially, you should prepare the area. To do this, excess soil is removed and the surface is leveled.
Particular attention is paid to clay soils; in this situation, it will be necessary to remove a fairly large layer of soil, and then arrange a layer of sand.
The next step is to mark the area. Pegs and construction thread are used. With its help, markings are carried out in accordance with the working drawings. The thread is pulled into two strips parallel to each other, and the distance between them should be the size of the supports and, accordingly, the grillage. Particular attention must be paid to the corners; they must be absolutely even (i.e. 90 degrees). In addition, markings of walls, their intersections and junctions are carried out.
Based on the working drawings, in the places where the pillars should be installed, wells are constructed using a drill. Its diameter can range from 15 to 40 centimeters. At the same time, if the depth of the pillars is more than a meter, then it is necessary to carry out additional fixation of the soil to avoid crumbling. In our case, in addition to arranging the pits manually with a drill, it will be necessary to bring them to a square shape for laying pillars.
After which the bottom of the well is filled with sand, its layer should be approximately 10 centimeters. Next, a control verification of the location of the wells relative to the axes and their evenness is carried out.

The last step of such preparation will be pouring a layer of concrete of 10-15 centimeters, which will serve as a solid foundation for arranging this type of foundation. You can start working immediately after the concrete has completely dried, which takes 28-30 days.
Construction of a columnar foundation
Now let's move on to construction. In this case, brick will be used to construct the pillars.
So, we lay out the basis on which we will be equal. It is made in the form of a square with parameters of 38*38 centimeters. Then we lay out the pillar itself on it, up to 50 centimeters above the ground.
We form the pillar itself with a contour, so that there is free space inside. Next, reinforcement is carried out, with at least 1-2 rods tied together and inserted inside (ideally, this is 3-4 rods). After installing the frame, the space is filled with concrete.
After the concrete center has completely dried, it is necessary to waterproof the supporting structure. It is also necessary to check that all pillars are at the same level. After which the trenches are filled with soil.

In addition, thanks to its unique technology, the installation of a columnar foundation can be carried out using asbestos-cement pipes. Installation is carried out as follows:
- The pipe is lowered into the prepared well and then filled with concrete.
- The next step is to raise the pipe a little to allow the concrete to spread. This gives a good foundation and hold.
- The next step, not reaching 10-15 centimeters from the edge, is to fill the pipe with an additional portion of concrete.

Grillage arrangement
Now we move on to arranging the grillage. It can be done using wooden beams. In this case, each of them should rest on the pole with its edge, and also be linked to another beam.

In addition, reinforced concrete grillage is often used. In this case, a wooden formwork is installed on top of the pillars, and reinforcement is provided inside it, the same type as for a strip foundation. Then it is filled with concrete.
Do-it-yourself columnar foundation: video instructions
Conclusion
First of all, it should be noted that there are significant savings when constructing a foundation of this type. Since you can complete it yourself in a few days, it will require less materials than when constructing other types of foundations. In addition, there is no need to hire construction crews.
A little advice: it is better to complete the construction before the onset of frost, or use concrete slabs, since it is unacceptable to leave the foundation unloaded for the winter. This may entail pushing the pillars out of the ground, as a result of which the foundation will need to be completely redone.
As for buildings, this type of foundation is suitable for building garages, terraces, small and light houses. That's all, you can also familiarize yourself with the technology of constructing other foundations and understand their types in our other articles.
Articles on the topic