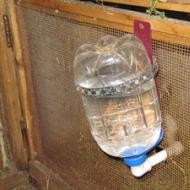
A simple way to protect water from freezing in a drinking bowl (without using electricity). Making drinking bowls for chickens
Freezing water in the drinking bowl is one of the biggest problems when raising chickens in winter. If you have electricity in your coop, the easiest way is to use a device to heat water in the dog bowl. These warmers are easy to use, easy to recharge and clean. With their help, you can quickly and safely heat water to temperatures above zero. It’s a little more difficult if there is no electricity in the chicken coop. But I'll tell you how easy it is to keep water ice-free using just a rubber bath and an old tire. Don't believe me? But it's true!
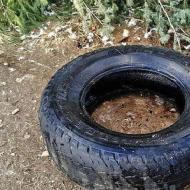
How to make a drinking bowl from an old car tire
 It turns out that a drinking bowl can easily be made from an old car tire. All you need to do is simply fill the inside of the tire with foam, beads, or other insulating materials. After this, set the tire in the sun, add some scrap wood, bricks or paving stones to the center (or more packing material) to raise the rubber tub slightly off the ground - it should be level with the top of the tire. Then place the bathtub in the tire and fill it with water. By using the sun's heat, which is absorbed by the black surface of the tire and tub, you can keep the water from freezing much longer than in a regular rubber tub. And much longer than in a traditional drinker, which has less surface area.
And one more tip: put a few table tennis balls in the bath. Even the slightest breeze will cause the balls to sway, creating small waves on the surface that will prevent ice from forming.
![]() Fill the inside of the tire with foam, beads, or other insulating materials.
Fill the inside of the tire with foam, beads, or other insulating materials.
 Add some scrap wood, bricks or pavers to the center (or more packing material) to raise the rubber tub slightly off the ground.
 Place the bathtub in the middle of the tire and place it in the sun.
 Fill the bathtub with water.
 Now your water will not freeze!
 Even small chickens find it convenient to drink from such a drinking bowl, and sometimes even climb onto the tire.
 The ducks really like the new waterer.
 If you are concerned about water collecting inside the tire, make a few holes in the bottom of the tire using a long nail and a hammer or drill before you start using the drinker.
 During the two weeks that I used my device, the weather was not at all conducive to testing it sufficiently. However, on one particularly cold day, the water in this drinking bowl remained unfrozen, whereas ice crystals formed in an ordinary rubber bathtub. I left the water in my new water bowl overnight and it didn't freeze by morning, even though the temperature dropped below zero overnight.
An additional advantage of such a water bowl is that it is more difficult for ducks to muddy the water in it and it is inconvenient for them to jump into the bathtub to swim.
Winter chicken coop - video
Drinking bowl for chickens It can be anyone, everyone chooses according to their means. But every drinking bowl for chickens becomes a problem for the farmer in winter when the temperature drops and the water freezes. The owner has to break out ice every day or carry drinking bowl for chickens warm and defrost.
For 7 years, this is exactly what we did every winter! Tired of it!
The idea came up to heat the water using an incandescent light bulb. And as always, it turned out that the wheel had already been invented by someone before us :) And they even left feedback on what to heat up drinking bowl for chickens it is possible and even necessary!
Drinking bowl for chickens
Heating water in a chicken coop in winter
This is what my dear husband made with his own hands.

Replacing the heating bulb

When creating heating DIY chicken drinkers not a penny was spent! Apart from buying a light bulb.
I love projects like this :)
Materials and devices for manufacturing.
They scraped the bottom of the woods, swept the ambergris - and found:
- scraps of galvanized sheets,
- cord with a base from an old chandelier,
- manual riveter (can be replaced with bolts)
- scrap metal profiles (for fastening drywall) - for corners
- 40 watt light bulb
Making a box for heating a drinking bowl for chickens

- The sheets were cut to size and bent using a hammer and mallet.
- I cut out small rectangles from a metal profile and drilled holes in them.
- Bent it into corners to secure the walls of the box.
- — 6. Connected THREE walls of the box using a riveter. You can use regular bolts instead. But we have few of them in stock, but there are many rivets, and they are cheaper.
Attaching the cartridge to the wall of the box


Fixing the 4th wall with a light bulb

Drinker for chickens in winter

Here you can see our location of feeders, drinkers and perches. Very pleased with our new ones trays for collecting litter! We've never had it so clean!
And if you are interested, here I will show you all the stages of construction with step-by-step photographs.
There have been no severe frosts this year yet. The heating in the chicken coop has never been turned on. So the temperature inside is almost the same as outside. The lowest was -8 0 C.
Heating drinking bowls for chickens turned on every night when the temperature dropped to 0 0 C.
A light bulb larger than 40 watts has not yet been screwed in. We think in frosty weather -20-30 0 C you will need “one hundred square meters”. We ourselves couldn’t believe that everything was so simple, but...
ADDED 01/30/16 THERE WAS FREEZES DOWN TO -20 0 FOR A WEEK. The light bulb was not changed, and the “magpie” remained there. Everything is working!
THE WATER IN THE CHICKEN WATER DOES NOT FREEZE!
And the water doesn't freeze now, and We learned how to feed fresh greens to chickens and goats ourselves all year round, and before they only shelled out money for vitamin baits, and replaced buckets that had burst from the frost. Beauty! I am very pleased!
The heating box itself, in the cold with the light on, feels a little warm to the touch, but this is enough to keep the water in a liquid state, preventing it from freezing. You don’t have to worry about the plastic of the drinker itself; it won’t melt.

The hole in the middle of the box was NOT originally intended, it just happened because... I made it out of what I had. But because of it, this unusual effect turned out - a night light :) I hope the chickens like it :))
A roof was made on top of the drinking bowl at an angle of 45 0 so that the chickens would not fly onto it. They didn’t drop it or shit in their water. It seems like a small thing - but until they did it, the drinking bowl was lying on the floor every day, and the water was spilled!
Now all that remains is to come up with a similar watering bowl for the goat's coop, otherwise I have come up with an idea, but I still don't have enough imagination on how to water them in winter. They always turn everything upside down! Maybe you have any suggestions? How do you cope in winter? Tired of defrosting a bunch of buckets!

Here's another heating option water in drinking bowls for chickens. Perhaps simpler. Made from a biscuit tin. Source
When giving drinking water to chickens in open bowls, the birds spill the water and overturn the bowls, and changing them throughout the day is troublesome for the farmer. Installing special drinking bowls will protect drinking water from contamination and splashing and ensure its continuous supply to chickens.
Making drinkers with your own hands will help you save money and adapt these drinkers to the specific conditions of keeping poultry.
Regardless of the design and manufacturing method, drinking bowls for chickens made independently must meet the following requirements:
- Convenient for use by birds;
- Availability of protection against pollution and water spillage by chickens;
- Material safety;
- Reliability of the design;
- Possibility of washing the drinking bowl from sediment.
Open drinkers are usually located at the back level of adult chickens to provide them with ease of drinking and prevent them from swimming in drinking water.
The structure should not have sharp edges or protruding nails that could injure birds.It is important to remember that drinking bowls must be made of lightweight durable materials and firmly fixed in place in the chicken coop so that the chickens cannot tip over or damage the drinkers. Glass containers should not be used in the design due to their heavy weight and the risk of breaking.
For plastic parts of the drinker that come into contact with water, it is advisable to use food-grade plastic; in particular, it is not recommended to use containers for paints or varnishes for storing water, since these containers are made of plastic, which releases substances harmful to birds into the water.
Types of drinking bowls
Depending on the mechanism for supplying water to birds, the following main types of drinkers are distinguished: 
- Nipple;
- Vacuum;
- Cup;
- Siphon.
The main advantage of nipple drinkers is that the drinking water in them is completely protected from debris or spillage, and chickens drink through special nipple valves, grasping them with their beaks and sucking out the water.
Drip drinkers are a type of nipple drinkers with an attached drip tray. The disadvantages of this type of drinkers include the need to install a significant part of the nipple valves in order to avoid crowding of chickens in line for drinking.
Vacuum drinkers are very easy to make and do not require the purchase of nipples, but they are more suitable for chickens than for adult birds.Cup drinkers are more difficult to make yourself, but they are more reliable than vacuum ones and are suitable for a large number of chickens.
Siphon drinkers work on the principle of communicating vessels and allow them to be filled with water without going inside the chicken coop, but they require periodic cleaning of debris.
Depending on the type of water supply, drinking bowls can also be:
- Automatic;
- With manual feed.
Automatic drinkers only require regular changes of water in the tank, ensuring that the drinking bowl is filled at the required level due to the design features. These include vacuum and cup drinkers. In siphon and nipple drinkers, the water supply is regulated by the farmer and the chickens themselves, respectively.
 One of the profitable types is the production of fuel briquettes.
Laying hen nests can be made in a variety of ways. Each of them is described in detail in.
Red-capped chickens were bred in Great Britain and are now a rare breed. You can find out more information about these birds.
Manufacturing procedure
When choosing the type of drinking bowl, it is important to take into account the availability of materials on the farm for its manufacture or the possibility of purchasing them. Some designs may have several implementation options, for example, vacuum and siphon drinkers can be made from a plastic bottle, while nipple drinkers will require harder plastic.
Nipple drinker
To make a drinking bowl of this type, you will need the following materials and tools:
- Nipples (one per two individuals);
- A piece of water pipe 1-2 meters long and 50 mm in diameter;
- Drill according to nipple diameter (standard 9 mm);
- Swordsman for cutting threads in plastic;
- Pipe plugs;
- Rectangular pipe connection adapters;
- Fastening clamps and hooks;
- Thin rubber gaskets;
- Drop eliminators (if necessary);
- Water shut-off valve in the pipe;
- Plastic tank 15-20 liters for drinking water.
The number of connecting adapters must be determined depending on the design of the chicken coop and the method of supplying drinking water. Water can be supplied:
- Settled;
- Flow-through.
In other cases, it is better to use a water tank, but it is important to remember that it must be removed and rinsed periodically.
A schematic diagram of a nipple drinker is shown in Figure 1.

Procedure for making a nipple drinker:
- Draw up a diagram of the location of pipe sections with nipples;
- Drill holes in the pipe with a drill every 0.2 m;
- Make nipple threads with a swordsman;
- Screw the nipples into the holes, laying waterproofing gaskets between them and the pipe;
- Arrange the pipe sections in the chicken coop according to the diagram, attaching them with fastening clamps to the wall of the chicken coop;
- Connect the pipe sections using adapters to each other and to the vertical section in the center of the structure; a water tank will be connected to the upper end of the vertical pipe;
- The vertical section of the pipe must be cut in half and connected tightly;
- A tap should be installed above the sealed connection to shut off the water before removing the tank to remove sediment and mold;
- Screw the hooks for attaching the tank to the wall of the chicken coop at a height of ¾ of the calculated height of the tank, counting from the connection of the tank with the vertical pipe;
- Hang the tank on the hooks;
- Attach drip trays to the nipples;
- Fill the tank with water and open the tap.
Drip pans are small plastic cups for collecting water (Fig. 2) and are installed to prevent falling drops of drinking from getting the coop flooring wet.

The pipe pattern may be broken, for example, when located in the corner of the chicken coop, but all pipes should be located at approximately the same height (25-30 cm) so that the chickens can reach the nipple with their beak.
Immediately after screwing in the nipples (before installing plugs and clamps), pipe sections should be thoroughly clear of plastic sawdust, since pockets of water blooms can form on them in the pipe.
The nipple drinker tank should be rinsed and cleaned periodically as shown in step 8, turning off the riser valve before removing the tank to prevent water from leaking into the coop.
Vacuum drinker
A vacuum drinker is an inverted container of water, lowered upside down into a drinking bowl. Water is held in the container due to the difference in air pressure in it and atmospheric pressure on the water released in the bowl. Thus, the water in the bowl automatically rises as you drink it to the level of the edge of the neck of the container (tank).
This type of drinker is the easiest to make. For a vacuum drinker you will need:
- Plastic tank with a volume of 5-10 liters with a narrow neck;
- A bowl or plastic basin 10 cm high (for adult chickens) and 2-3 cm for young chickens;
- Tank mounts;
- Screwdriver or screwdriver;
- Self-tapping screws for fastening.
A plastic bottle or any other household container can be suitable as a plastic tank, but it is important to remember that the neck of the container should be smaller in diameter than the bowl.
Installation of a vacuum drinker occurs in the following stages:
- The location of the drinking bowl is determined (near one of the walls of the chicken coop);
- Mountings for the tank are screwed to the wall with self-tapping screws at the calculated height;
- Drinking water is collected in the tank;
- A bowl is leaning against the hole in the tank;
- The tank with the bowl must be quickly turned over to avoid spilling water on the floor of the chicken coop;
- The tank is fixed with fastenings.
The height of the bowl can be changed, depending on the age of the bird, by placing plywood plates under the bowl. The tank mounts should be installed so that the tank can be easily removed for rinsing and refilling with fresh water.
If you drill an additional hole from the top in a hard plastic tank, the process of adding water will be greatly simplified, since you will no longer need to remove the tank from its mounts.
Tanks for vacuum drinkers with ready-made holes can be purchased at construction markets.
It is important to remember that if there is no top hole in the tank, its volume should not exceed 20 liters, otherwise it will be difficult to change and rinse such a tank.A vacuum drinker with a hole at the top does not have to be installed near the wall of the chicken coop; it can be installed on a stand either in the center of the chicken coop or in.
Siphon drinker
This drinker requires regular addition of water, but is very easy to install and allows you to pour water from outside the chicken coop. To make it you will need:
- Flexible tube with a diameter of 3-8 mm with a shutter (faucet);
- Container for water;
- Drinking bowl;
- Fasteners for tank and tube;
- Drill according to tube diameter/
Any rubber hose or medical rubber tubes for a dropper will be suitable as a tube.
Procedure for installing a siphon drinker:
- Drill a hole in the wall of the chicken coop at a distance of 30-50 cm from the floor;
- Insert a flexible tube through the hole so that its inner end drops almost to the floor, and the shutter is located outside the room;
- Secure the water tank to the outside of the chicken coop using fasteners; the bottom of the tank should be 5-15 cm above the hole for the tube;
- Attach the outer end of the tube with the valve hermetically to the bottom of the tank;
- Attach the inside of the tube to the wall of the chicken coop with fasteners;
- Place a drinking bowl against the wall;
- Place the inner end of the tube in a bowl;
- Fill the tank with water.
To fill the bowl with water, open the shutter from the outside and wait 10-20 seconds, then close it. The farmer should determine the exact filling time experimentally.
The bowl should be small in size and fit tightly to the wall with fasteners to prevent chickens from turning it over, but at the same time it should be easy to remove to clean out any debris that has gotten into it.
You can combine a siphon and vacuum drinker into a single design if you use a tank closed at the top to provide a pressure difference, then to fill the bowl you will not need to open and close the valve on the tube every time, but use it only when cleaning the tank from mold.Cup drinker
To make a drinking cup you will need the following materials:
- Plastic cup with a capacity of 200-250 ml;
- Plastic water tank;
- Sections of water pipe with a diameter of 50 and 20 mm;
- Pipe plugs;
- Unclamping spring 5 cm high and 20 mm in diameter;
- Silicone gasket;
- Drill 5 mm;
- A short steel rod with a diameter of 4 mm and a length of 5-6 cm;
- Pipe fasteners;
- Wood screws;
- Plywood spacers 2 by 2 cm.
The size of the plastic cup should be selected depending on the number of chickens.
Up to 5 birds can drink from one wide cup with a diameter of 25 mm at the same time, so for 20 birds you will need at least two drinkers, provided that the birds take turns drinking.A schematic diagram of a cup drinker is shown in Figure 4.

The principle of its operation is such that when the drinker is empty, the spring expands and a gasket comes out from the hole between the connection of the wide and narrow pipes, and water flows into the cup from the tank from above. When the cup is filled with water, its weight increases and compresses the spring, blocking access to water with a silicone gasket.
Procedure for making a drinking cup:
- A fastener is attached to the cup using self-tapping screws with spacers so that a through hole can be drilled in it in a horizontal plane to rotate the cup as shown in Fig. 4;
- A piece 20-25 cm long is cut from a pipe with a diameter of 50 mm;
- A plug is installed on the pipe section, in which a hole with a diameter of 20 mm is carefully made in the center;
- The burrs of the plug should be directed towards the inside of the pipe;
- The necessary slots are made in the pipe to secure the axis of the movable cup;
- A 50 mm piece of pipe is fixed in the floor of the chicken coop or aviary with the plug facing up;
- A spring is installed in the pipe;
- The gasket is glued to the cup fastener with waterproof glue;
- The cup is installed on an axle (steel rod);
- A pipe with a diameter of 20 mm is hermetically soldered to the top of the plug;
- A narrow pipe connects above to the water tank.
- Water is supplied to the system.
It should be remembered that the cup fastener must allow water to pass into it and have a hole the same size as the silicone gasket.
It is best to make a hole in the plug using a piece of iron (for example, fittings) of a suitable diameter heated over a fire. To remove and clean the tank, a tap and a sealed disconnecting clamp must be installed in the narrow pipe, as in a nipple drinker.
Before installing a cup drinker, you should accurately determine the number of movable cups depending on the number of chickens. When installing several cups, you should outline a plan for their location and connect all the narrow tubes extending from each wide tube with a cup fixed in the floor using connecting adapters with one common pipe leading to the water tank.
From a plastic bottle
With a small number of chickens, a simple and economical way would be to install a drinking bowl from a plastic bottle. This drinker does not have an automatic water supply system, but its manufacture is much simpler compared to the design options described above.
For installation, you need to take a plastic bottle with a volume of one and a half or two liters and cut oblong holes in it 3-4 cm long and 1.5 cm wide. Such a drinker should be installed horizontally at a height of 15-20 cm from the floor of the chicken coop, away from the perches to prevent rapid contamination water for chickens. The bottle cap must be tightly closed.
In the simplest version, fresh water is poured into the drinker directly through the drinking holes, but you can combine this design with other types of drinkers to automatically supply water, for example, by lowering a siphon drinker hose into one of the holes.
When installing several bottle drinkers, they can be filled from one common open tank using tubes with plugs (siphon type) or hermetically connected to a tank tightly closed at the top (vacuum type).
So, when making drinking bowls for chickens, it is important to take into account the number of birds and the design of the chicken coop, as well as the ability to regularly maintain the created structure. Careful selection of materials and processing of metal burrs during installation will create a reliable design and prevent chickens from getting hurt.
Chickens, like other animals, need proper and careful care, because they bring us eggs and meat. Breeding healthy chickens is not complete without water and balanced feed. When the population of laying hens is impressive, it becomes necessary to install an automatic waterer for chickens. She will give the daily requirement for the chicken. A high-quality automatic drinker does not allow the container to tip over and get the chicken wet.
In our article we will talk about the types of drinking bowls, what requirements apply to them and help you make a drinking bowl with your own hands.
A good automatic drinker should please the farmer with its convenience, durability, clean water and safety. Let's take a closer look here:
- For greater convenience, the drinking bowl is filled automatically from the water supply. The most important thing is that it does not bother the farmer with constant supervision;
- To prevent chickens from accidentally damaging the drinking bowl and leaving their “colleagues” without water, it is worth making it durable and resistant to attacks;
- clean water along with nutritious feed is essential for healthy chickens. When liquid is served in portions, harmful microorganisms are not diluted. Therefore, drinking must be protected from the influences of the surrounding world;
- It is also important to secure the device so that the edges of the self-drinker do not injure the chickens and do not release harmful substances - the best material is high-quality food-grade plastic, which can be easily washed off from sediment.
Fluid consumption directly depends on the ambient temperature, the type and humidity of the feed, and the age of the laying hens. The average amount of water required for a healthy individual is at least 500 milliliters per day, which is twice the amount of food.

In northern regions, drinking bowls must be protected from freezing. This problem can be solved by manufacturing and installing a small heater under the drinking bowl tank.
Main types of self-drinkers for chickens
According to the principle and scheme of action, automatic drinkers are:
- with nipple mechanism,
- with water bowls,
- with siphon principle (vacuum),
- ordinary drinking containers.

Simple containers do not require much effort and time to maintain. Usually these are simple plastic basins and zinc troughs. Each chicken tries to knock over such containers or even plunge into the drinking bowl. As a result, the hen gets wet, spoils the water with her paws and makes it unfit for drinking.
A wet chicken loses heat and gets sick. Frozen birds may die.
Making a drinking bowl for chickens with your own hands
Drinkers with nipples
The main principle of such an automatic drinker is that liquid is supplied when the chicken triggers the nipple mechanism. Thus, water does not stagnate and is supplied fresh gradually, which reduces its consumption. It is also used to feed barely hatched broiler chickens.
There are several types of such drinkers:
- conventional ones, in which the mechanism operates at an angle of 90 degrees;

- rotational, in which the mechanism operates at any angle;

- with a drip eliminator, in which a small bowl is installed under the flowing water;

- with fixation on the pipe, looks like a regular drinking bowl, sometimes with a drip eliminator, the locks are attached to the pipe.

To make a nipple self-drinker, you need a plastic bulk bucket. The required number of holes with a diameter of 9 mm is drilled. Nipples are screwed into them, the drinking bowl itself is suspended to the required height and filled. Among the advantages, we note the fast production. But the disadvantages are impressive - independent replenishment of liquid and frequent washing. This self-drinker is suitable for a small number of birds.

It is better to build a drinking bowl with drip eliminators. This design is connected to a water supply or a large tank. It is more difficult to install, but will provide good water for large livestock.
For assembly we need:
- PVC pipe with a square cross-section, size 22 mm;
- nipples (one 25-35 cm pipe);
- fitting for round pipe;
- drop eliminators, one per nipple;
- flexible hose;
- stub;
- 9 mm drill;
- 3 clamps;
- 28.6 mm (1/8 inch) radius tap.

For young hens and chicks, it would be much better to use a nipple brand “360” (circular, working 360 degrees). This will allow the chickens to drink water comfortably, and the farmer will not have to change the height of the drinker when the chickens grow up. For adult chickens, “180” (working from vertical pressure) is suitable.

Step-by-step instructions for assembling a nipple drinker for chickens
| Step | Image | Description |
|---|---|---|
| 1 |  | We securely fix the pipe. |
| 2 |  | We mark the pipe for the holes for the nipples. Don't forget about the gap of up to 35 centimeters. |
| 3 |  | Using a drill or screwdriver, we drill holes according to our markings. |
| 4 |  | After drilling you should get round holes. |
| 5 |  | Next we use a tap, we use it to cut threads in the holes. |
| 6 |  | After applying the thread, remove the chips (from the inside too). |
| 7 |  | We screw the nipples into the marked holes. |
| 8 |  | Fix the pipe vertically. |
| 9 |  | We apply threads to both edges of the pipe. |
| 10 |  | On one side, install an adapter for the hose into the cut thread. |
| 11 |  | We install a plug on the back side of the pipe. |
| 12 |  | We prepare drip eliminators under the nipples. |
| 13 |  | Install - put it on the pipe and snap the mechanism into place. |
| 14 |  | We fasten the resulting structure to the wall of the poultry house with clamps. We connect the other end of the hose to a vertically located or low-pressure liquid source. |
To prevent the structure from leaking, we treat all joints with FUM tape.
Video - Assembling a nipple drinker with your own hands
Installation of a drinking cup

It is usually installed outside the cages or poultry house. This design does not take up much space, can be installed on any frame, is very convenient for the farmer, and the hens are provided with moisture.
The main advantage of this self-drinker is its simplicity. It is easy to maintain, quickly and reliably installed, and saves clean water. The material usually used is high-quality PVC hose and food-grade plastic - all to preserve water quality and reliability of the design.

To create such a system you will need:
- flexible hose with a diameter of 10 mm,
- drinking bowls for a 10 mm hose (one for ten chickens),
- clamps,
- rail or pipe for the frame,
- threaded fitting for hose.

Assembly order:
| Step | Description |
|---|---|
| 1 | We install the rail along the length of the structure, or use a metal corner. |
| 2 | We lay a hose along the length of the poultry house and plan the location of the drinking bowl. |
| 3 | If there is not enough space for an automatic drinker, then we lay a second hose. |
| 4 | We outline places for cutting the hose for future bowls. |
| 5 | We cut the hose for the tee to connect both hoses into one system. |
| 6 | Having connected the hoses, cut the hose in the designated places and install it between the ends of the bowl. |
| 7 | We fasten the drinker to the frame with clamps. |
| 8 | On the last bowl, we leave the outermost fitting closed, so the water will not escape. |
| 9 | We connect the system to the water source with a fitting. |

Siphon drinkers
A siphon-based drinker is often called a vacuum drinker. It looks like an inverted water container, with a bowl underneath. The container is located just below the sides of a large water bowl. With this design, nothing spills, and the bowl constantly fills under its own weight. This option is convenient if it is difficult to install water supply nearby. This is also the disadvantage - you need to replenish the water supply manually.

The first version of a vacuum drinker
A siphon self-drinker can be made from a three-liter jar, two small wooden sticks 10-12 cm long and any bowl.
Now in more detail:
A regular siphon drinker is ready. As you drink the water, it will fill the bowl to the same level.

The second version of the vacuum drinker
The second version of the drinking bowl will be no less difficult.
For it we will need:
- two bottles of different sizes with caps. We used 5 and 3 liter bottles;
- a drill with a drill of 5 mm diameter, or a large awl;
- bolt with nut 6 mm.
| Step | Description |
|---|---|
| 1 | Cut off the neck of a large bottle for a saucer. |
| 2 | We connect the lids with their centers facing each other. |
| 3 | Use a drill or an awl to make a hole in the lids. |
| 4 | We screw the bolt into them and thread the nut. |
| 5 | In a smaller bottle, make a hole as close to the neck as possible. |
| 6 | We fill the smaller bottle with water and screw on the cap. |
| 7 | We secure it from tipping over, or place it behind the mesh of the poultry house. |

Video - How to make a drinker from a plastic bottle
Simple drinking containers
We talked briefly about simple containers earlier. But it is worth finding out what they are based on.
The name speaks for itself; these are the simplest designs. We pay for simplicity by constant monitoring of watering, breeding of harmful microorganisms and pollution.
Let's briefly list the popular types.
Container from a sewer pipe
Everything is quite simple: the pipe is connected to a water source and closed with a plug at the other end. Holes are marked and made in the pipe itself, as shown in the photo. We advise you to clean the edges of the cut holes for the safety of the chickens. But you should monitor the water level in the pipe and prevent spillage.

Nipple single drinker
Suitable for a small family of laying hens. All we need is a bottle (1-5 liters) with a hole drilled in the cap and a “180” nipple inserted into it.

Siphon single drinker
As in the previous case, a bottle and a metal profile are used. This type of drinker is located behind the cage or poultry house.
It is constructed quite simply: the metal profile is bent from the edges according to the saucer principle, riveted, the bottle is fixed in a vertical position just below the edges of the profile, thus the vacuum principle is activated.

People have been raising chickens since time immemorial. For some it is a business, for others it is an activity for pleasure, for others it is a desire to provide only themselves and their family with dietary meat and eggs.
But to achieve results, you need to work hard, as anywhere else. If you or your family live in a rural area or have a summer cottage, then you can do a lot yourself for your own pleasure and to save money.
A drinking bowl is an indispensable and necessary item in raising any poultry. You don't have to buy it. All or part of it is made with one’s own hands from available materials.
There are general requirements for them that need to be taken into account if you intend to make them yourself:
- she must be easy to use. The water container must be easy to fill, if necessary manually or via the plumbing system. You should also immediately think about free access to the bottom of the container. For example, if you use a 200-liter barrel with a 10 cm cap as a tank, it will be easy to fill, but impossible to wash or clean from the inside;
- safety requirement. Includes the use of quality material to produce. If the container and pipes are metal, they are made of stainless steel. If you choose plastic, PVC, or other plastic, its substances cannot be toxic or harmful to the bird. The material must not react with water-soluble drugs;
- she should not get dirty long term. The bird should not bathe in it or otherwise litter it. To do this, open areas of water are minimized in area;
- they are made sustainable resistant to overturning or well secured (depending on the design) and durable (material, design);
- their design must optimally perform its function - from it the bird must drink freely, no problem.
Homemade nipple drinker
If your goal is to design a nipple drip drinker, you need the following:
- nipple;
- dropletrvitel;
- pipe(water flows through it) with a plug and outlet;
- capacity for water (if it is not taken from a water supply with a regulator (if it comes under pressure).
If we take it directly from the water supply system, we don’t have to place the container. But settled one is preferable. Therefore, as an example, we consider the second design option. We attach a PVC pipe of the required length to the tank at a distance of 5-10 cm from its bottom.
If one is not enough, we extend it from several using connectors. We drill holes in the pipe at equal distances for the nipple and separately for the drip eliminator.
 Nipple connection
 Note: a hole must be drilled for each nipple separately. If we use a drip catcher, it is installed next to the nipple.
One end crimps the pipe, the other has the shape of a spoon, in which water from the nipple accumulates while the bird drinks. You can buy a drip catcher or make it yourself from a plastic bottle.
You can do it yourself in another way
You need to take any container with a capacity of 10-30 liters and nipples - 4 or 5 (depending on the diameter of the bottom). First we drill holes for the nipple.
 Drinking bowl from a container
 There are nipples that operate 360 degrees, and others that operate 180 (up and down).
Do-it-yourself vacuum variety
This design is used mainly for chickens. It supplies water using a vacuum, which constantly flows from the container when it is needed, that is, until the poultry drinks it. Then the container is filled again.
We make it from 5 liter plastic bottles
It’s not difficult to make a vacuum-type structure yourself. In this case, you do not need to buy anything additional, as in the option described above.
Option #1
For this we will need: One plastic bottle for 2.5 liters and one for 5 liters and 2 screws.

Attention! When making this type of vacuum design, it is necessary that the sides of the 5-liter part of the bottle are located above the hole for water leakage.
Option No. 2
A drinking bowl can be made from a 10-liter plastic bottle using a simplified design. It is also suitable for 5-liter.
First, we make a 6-7 mm hole in a 10-liter bottle at approximately a distance of 5 cm from the bottom. But the distance will directly depend on the vessel in which you place the bottle. If it is deep, then the hole is made higher.
 Option with bottle and vessel
 Next, we place it filled with water in a container. It will stop flowing from the bottle as soon as its level reaches the hole. You can fill the bottle on the spot by unscrewing the cap from the top. This is also a type of vacuum feeding system.
Important! The bottle is hermetically sealed with a lid.
Pipe sippy cup for chickens
 Construction of a pipe sippy cup
 An open type drinking bowl is made from a plastic sewer pipe with a diameter of ten to fifteen centimeters. To do this, several rectangular holes 25-35 centimeters long are cut in the pipe. In this case, the first and last holes are made at a distance of 10-20 cm from its edge.
The distance between the holes must also be 10-20 centimeters. They are cut with a grinder or other tools. The edges are cleaned to avoid possible scratches and cuts.
Tees with plugs are installed on the edges of the pipe. When you need to add water, remove the inlet plug, pour it out - the drain plug. You can connect this type of structure to an existing water supply network, fill it with water if necessary, and then turn it off with a tap. This will allow you to fill it without effort.
In a chicken coop for roosters and laying hens, it is secured with clamps of the same diameter as the pipe. They are fixed in such a way that the pipe is raised 15-20 centimeters from the floor (ground). Install it at a slight slope (1-2 degrees) to flush the pipe, and the contents drain by gravity.
Water in such a design quickly becomes dirty and loses freshness; the pipe is often washed. To do this, install not a plug, but a drain valve, on the tee at the other end of the pipe. This makes it easier to work with the drain.
For information: This type of design is not suitable for chickens as they may choke or drown.
Drip model for chicks
It is preferable to install a drinking bowl for chickens either of a vacuum type or of a nipple type. If you choose the first option, make sure that the chickens do not choke in the vessel into which water will flow from the bottle, that is, that the sides of the vessel are not high.
 Diagram and design of the sippy cup
 If their population is small, buy a vessel for a homemade vacuum drinker (in the form of a saucer and turn a glass jar onto it).
Chicks in the first days of life are defenseless. If they are raised separately from the hen, people care about their safety. As chickens age, they become more active. This means that the drinker needs to be well secured to avoid the danger of it overturning and injury to young animals. In addition, due to accidentally spilled water, the litter becomes wet, which leads to illness in the bird.
Important! In no case should you place a simple vessel for chickens, especially with high sides - the likelihood that they will choke or drown increases.
You can use a design version of a nipple drinker. Then it is important to secure it at the level of the chickens’ heads.
Let's compare the types of water dispensers for birds
Nipple: easy to use, safe, retains clean water for a long period of time, does not tip over. More suitable for adult birds. The central pipe can be connected to a large container that acts as a reservoir.
They are also connected to an existing water supply. Among the disadvantages, one can note its high cost, since almost all the components of this type of structure will have to be purchased.
Vacuum: convenient, pollutes water more than the nipple type, is safe if it is well fixed, does not require any money to manufacture, and is easy to make yourself. More suitable for chickens.
Disadvantages: if you do not secure it sufficiently, there is a possibility of it toppling over; you must constantly pour water into the container. If its volume is small, this should be done often.
Pipe drinker: convenient, more used for adult livestock, durable, resistant to tipping over, provided it is well fixed, it can be used to feed a large number of heads, it can be connected either to a tank or to a water supply system.
Disadvantage: not suitable for chickens, the water in it quickly becomes dirty.
It is better to choose what type of drinking bowl to make with your own hands, based on the availability of available materials and financial capabilities.
Articles on the topic