Growing mushrooms using intensive oyster mushroom technology. Growing oyster mushrooms in a home basement
How to grow oyster mushrooms at home? Using a certain technology. Then you won’t have to spend money buying mushrooms. And you will certainly be able to safely eat them without fear of getting poisoned.
Where to begin
You always need to start by getting acquainted with the experience of other people, so to speak - studying the hardware. There are many articles and videos about growing oyster mushrooms at home. After review you will need:
Two rooms. One is directly for cultivation, the second is for the incubation period. It is allowed that this will be one room. Then you need to strictly observe the temperature regime and regulate the level of air humidity.
- Nutrient substrate. Sold ready-made, packaged.
- The mycelium itself. Pay special attention to the expiration date.
- Fan. The most common, everyday one.
- Antiseptic. Rubbing alcohol or chlorine solution.
- Rubber gloves, gauze bandage for the face, sharp knife, thick plastic bags.
Naturally, you have to be patient (the process takes more than one day) and the desire to taste the oyster mushrooms grown with your own hands.
Premises requirements
To grow mushrooms at home, you need to allocate a separate room. It doesn’t necessarily have to be a bedroom or living room. Basement, cellar, barn, garage - it's all perfect. For the incubation period, the temperature should be maintained no higher than 24-26°C, air humidity no more than 70%.
Separately, it is necessary to say about cleanliness. There is no need to wash every centimeter with bleach. It is better to treat with a sulfur-smoke bomb or simply whitewash the walls with lime with the addition of copper sulfate. Then no foreign mold will infect the mycelium.
The most important condition is that all ventilation holes must be covered with fine mesh. Mushroom flies try to fly to the scent of mycelium and ruin the whole idea from the very beginning.
For the period of germination and harvesting, the air humidity in the room should be at 80-95%, temperature - no higher than 18°C.
Advice. A basement or cellar is the most optimal premises. In such places there is always high humidity, and the temperature can be increased with an ordinary heater.
Preparing the substrate for oyster mushrooms
As a nutrient medium for growing oyster mushrooms at home, you can use any available substrate, as long as it contains cellulose. This is what the mycelium feeds on. Experienced mushroom growers use sawdust, small branches or shavings. For beginners it is best to use:

- barley straw
- sunflower seed husks
- corn stalks, leaves
- wheat straw
- buckwheat husk
- shelled corn cobs
First of all, you need to carefully sort through the prepared raw materials. The mass must be clean and dry. The presence of mold or the presence of only the smell of rotting already indicates that the raw material is not suitable for growing oyster mushrooms.
After selecting the mass, it is necessary to treat it thermally for reliability. This will get rid of harmful bacteria, insect larvae, and at the same time moisturize it. To do this, pour raw materials into a metal container and fill with clean water. Heat to a boil, cook for about 40 minutes. Then leave for 3 hours.
As soon as the temperature of the mass drops to 24-26°C, you can begin planting.
Advice. For best results, add a little fresh yeast to the raw material before planting. Approximately 50 g per 15 kg of total weight.
Planting material
It is very difficult to prepare good quality mycelium on your own. Therefore, it is better to buy it in seed stores or from oyster mushroom growing enterprises. How many grams will it take? It's very easy to calculate. For 10 kg of raw materials you need about 400 g of mycelium.
First of all, before purchasing, you need to carefully examine the package with planting material. Gray or black spots, a distinct smell of ammonia are signs of incipient mold. Such mycelium is not suitable for planting. The color of the vegetative body of the mushroom should be from bright yellow to orange.
Advice. If the mycelium was purchased in advance, then it must be stored in the refrigerator until planting, no more than 9 days. A temperature of 3-5°C is the most optimal.
The most crucial moment
The substrate has been prepared, the planting material has been purchased and has already rested for a day at room temperature. Take a deep breath, you can begin.
The most important thing is that there should not be the slightest draft in the room. Fungal spores are very volatile. The slightest breath and then you can find oyster mushrooms in places completely unsuitable for them.
All instruments must be disinfected. Knife, thick bags, hands. You can wash thoroughly with laundry soap or wipe with aseptolin. Hands can be additionally protected with gloves. They also need to be treated with an antiseptic. Be sure to wear a gauze bandage. Getting fungal spores into the lungs is not a very pleasant event.
The process itself:
- The mycelium is crushed without opening the bag.
- Raw materials are poured into the bottom of the prepared plastic bag.
- The vegetative body of the oyster mushroom is laid out in a thin layer on top.
- Repeat layers to the very top.
- The bag is tied tightly.
To make mushrooms germinate faster, it is advisable to place the planting material closer to the walls of the bag than to the center.
You can do it even simpler. Pour the raw materials into prepared bags and make small slits with a knife. Mycelium is placed in them, then sealed.
Advice. Don't take huge packages. Anyway, oyster mushrooms will only grow from the outside. The most optimal size holds about 5-8 kg of the finished mixture.
Incubation period
So, the bags are filled, tied, and await their fate. Which? Warmth, darkness, calm. The temperature in the incubation room should not exceed 18-20°C. The substrate becomes very hot and the vegetative body may die. You cannot ventilate the room; the carbon dioxide released is very important for the germination of oyster mushrooms.

What to do? Fan! It will save the situation, help cool the packages, and does not create drafts.
A day after laying, the previously made incisions are opened. If the mycelium was laid in layers, then it is imperative to make cuts with a sharp knife. Vertical ones are 2-3 cm high, horizontal ones are about 0.5 cm wide, the distance between them is 10-12 cm.
The packages should not be close to each other. Leave a free space of at least 7-9 cm between them.
Incubation time depends on the variety, ranging from 16 to 24 days. Detailed information can be obtained from the manufacturer, or read on the packaging.
It is important to periodically enter the room and inspect the bags. The appearance of black spots and an unpleasant odor indicates that the instruments and materials were not sufficiently disinfected. Normal condition - light, almost white color of the contents, characteristic pleasant aroma of mushrooms.
Advice. The inspection is carried out as quickly as possible. Any light is now undesirable for mycelium.
First fruiting. Important aspects
It is important not to miss the moment when the oyster mushroom rudiments appear. They are visible to the naked eye. There are gray tubercles on a white background. In the meantime, the packages with mushrooms are transferred to another room, or the conditions in the same room are changed:
- The temperature is reduced to 10-18°C.
- Increase air humidity to 90-95%.
- Place artificial lighting with fluorescent lamps for at least 8 hours per day.
- Be sure to ventilate the room. At least 4 times a day.
The main factor for the first fruiting period is humidity. However, oyster mushrooms should not be watered. They may rot before reaching their full size. The ideal way out of the situation would be to frequently spray the walls, floors, and spray water in the air. Make sure that water does not get on the mushroom caps and bags.
Advice. If you need light-colored oyster mushrooms, then keep the temperature at 12°C. To obtain a dark cap, the temperature is raised to 18°C.
Second fruiting
After the first harvest is harvested, the mushroom blocks are not thrown away! Oyster mushroom produces up to 5 harvests from one planting. The mycelium rests for about 12 days, then pleases with a new portion of healthy delicacy. It is very important not to change conditions during breaks between harvests. Then one block can bear fruit for up to 4 months.
What if there is no separate room?
How to grow oyster mushrooms at home if there is no separate room? Yes, it’s also very simple! When did something stop a Russian person if he needed it? There is no basement, which means growing on stumps is a completely alternative option.

For this you will need:
- Smooth stumps of non-resinous tree species.
- Planting material.
- A secluded place in the garden with good shade.
- Burlap, film.
- Enthusiasm is welcome.
The wood must be healthy, without mold, rot or rot. It is advisable that it sit for no longer than 10 months before use. The logs are soaked in clean water for 3 days, pressing under pressure so that they do not float.
Then holes are made in the wood, preferably with a drill. The diameter is about 1-1.5 cm, the depth is about 5-7 cm. Planting material for oyster mushrooms is poured inside and the holes are plugged with moss. If you don’t have a drill at hand, then simply cut off the top end of a 5 cm thick log and apply the vegetative body. The resulting cut is placed on top. For reliability, you can strengthen the structure with nails.
The procedure is carried out in March. Before planting the logs in the garden, they are folded into a pyramid and covered with burlap and film. Periodic ventilation and regular inspection for mold are the key to success. After some time, the mycelium will completely entwine the wood, and the stumps will turn white.
With the onset of warm weather (mid or late May), the logs are planted in the garden. Choose shaded places: under trees, grapes, on the north side of buildings. The stumps are installed vertically, buried 12-15 cm into the ground. You can put wet leaves or soaked old barley grains at the bottom of the holes.
Caring for logs consists only of carefully watering the soil around them if the weather is dry and hot.
If the technology is followed, the first harvest appears from the end of August. Lasts until mid-November depending on climate and weather conditions. For the winter, the logs are covered with spruce branches or covered with leaves. Ideally - birch. They disinfect well and prevent the mycelium from rotting.
Of course, this method is not suitable for industrial cultivation of oyster mushrooms, but for home use it is very good. You can get good yields at low cost. The only negative is seasonality. Oyster mushrooms do not grow under snow in winter.
Advice. Such logs with clusters of oyster mushrooms can become an original decoration for the site. They can be prepared as much as there is enough free land. There will be enough mushrooms for yourself and relatives and for sale.
A few nuances
- All work on cultivating oyster mushrooms is recommended to be carried out in a gauze bandage. Mushrooms produce large amounts of spores, which can lead to allergies.
- When harvesting, oyster mushrooms are twisted out of the substrate by hand. When cutting with a knife, you can infect the mycelium with putrefactive bacteria, then you will have to forget about the next harvest. The remaining roots of mushrooms also harm the mycelium. A large amount of moisture is lost through them.
- If the slightest sign of mold appears in one of the bags, you must immediately remove it from the room so that the others do not become infected.
- Spent substrate is an excellent fertilizer; it would be a shame to throw it in the trash. Taking it out to the garden or pouring it out in the garden is the right decision. By the way, the remains of mycelium next year can produce a small harvest of oyster mushrooms if you pour the mixture somewhere near a pond or under trees.
- When grown indoors, the most productive are the first two waves of fruiting. On logs, the second and third years of cultivation are the most prolific.
Growing oyster mushrooms yourself at home is a very real thing. Just follow the instructions and enjoy the result!
Video: technology for growing oyster mushrooms
If you decide to grow mushrooms yourself, it is better to start with oyster mushrooms. Growing these mushrooms at home does not require studying complex theoretical information or special skills. Oyster mushrooms are not as demanding as other species (for example,). Another argument in their favor will be high productivity. From them you can prepare many delicious dishes, the taste of which will not leave anyone indifferent. Let’s figure out what are the ways to grow oyster mushrooms and how to cope with the difficulties that beginners encounter.
Growing methods, their pros and cons
There are two ways to grow oyster mushrooms at home - extensive and intensive.
Positive aspects of the first method:
- it does not require the creation of special conditions, since ripening requires a natural environment;
- for the same reason, the extensive method does not have to spend a lot of money;
- In addition, in this case the mushrooms do not need constant observation.
But there are also negative points:
- the appearance of the crop depends entirely on the time of year and suitable weather;
- the ripening period is quite long;
- due to the impossibility of control, it will not be possible to turn this hobby into a business and grow mushrooms at home for sale.
With intensive technology, the conditions for growing are created by the mushroom grower himself at home.
Advantages of the intensive method:
- the ability to control the time of harvest;
- You can also regulate the amount of harvest - when using this method there will be more of it;
- Thanks to this, it is possible to sell mushrooms and compensate for costs.
Some cons:
- you will have to put in more effort and spend a lot of time planting;
- Cash investments will also be required to create the necessary conditions for the house.
With the intensive method, the mushrooms ripen in the basement or other suitable room.

Selection of mycelium
First of all, you need to purchase “seeds” - in mushrooms they are called mycelium. Recently, this has been much easier to do - there are many online stores with mail delivery throughout the country. But there are also local companies. Beginning mushroom growers who fear failure need only purchase one kilogram of mycelium. The result will be about three to four kilograms of mushrooms. You can purchase the material in advance. The mycelium can be stored in the refrigerator for up to two months, but should not be placed in the freezer. The mycelium is not allowed to come into contact with the skin, so when opening the package, do not forget to wear gloves.
When purchasing, pay attention to the following recommendations.
- Check reviews for a store or individual seller.
- Even if you are an experienced mushroom grower, purchase a small amount of planting material from a new supplier for the first time.
- Study all the information about the selected variety, the time of mycelium fouling, and resistance to mold.
- Check the expiration date on the packaging.
- Immediately after delivery, check the temperature of the mycelium - it should be about +20 degrees Celsius.
- There should be no black or green spots on the mycelium.
- The color of the “seeds” is bright orange, interspersed with yellow.

Growing on stumps
If you are a beginner and are not yet ready to invest a lot of effort and money in growing mushrooms, try the extensive method.
To plant oyster mushrooms this way, you don’t need a lot of materials.
- Stumps that are on the site of your house. But they can be sown only at the end of April or beginning of May, when a constant high temperature has established.
- Trimmings from deciduous trees such as beech or aspen. They should be no more than half a meter in height and fifteen centimeters in diameter.
Carefully check each stump - there should be no mold on them.
If the wood is dry, soak it in water for several days. Only in such conditions can the mycelium develop.
The technology is as follows:
- drill or cut out six-centimeter recesses in the stumps (they should be staggered);
- the mycelium is placed in these holes;
- then they need to be covered with moss;
There is another way - you need to saw off a two-centimeter thick disk from the top of the stump. Apply a layer of mycelium to the cut. Cover with disk. For strength, nail it down.
After sowing, stack the logs on top of each other in a room where the temperature is maintained at +15. Leave them there for three months, covered with film or thick cloth. By the end of the period, a white coating will appear on the stumps. This means it’s time to “plant” them. To do this, dig holes in the ground at a distance of half a meter and fill them with wet leaves. Hemp is placed in them - to a depth of fifteen centimeters. The soil around them should always be moist.
The harvest will appear at the end of summer. You can collect it throughout the fall. For the winter, the planting should be protected by covering it with straw.

Preparing to grow in the basement
To grow oyster mushrooms intensively at home, you will need to prepare a basement that meets the following requirements:
- it must maintain a temperature of +15 degrees;
- a good ventilation system is needed in the basement;
- its depth can reach five meters;
- you need to create bright lighting;
- there must be a source of clean water in the basement.
Other types of premises are also suitable:
- cellar;
- poultry house;
- greenhouse;
- garage;
- cowshed
The main condition is that this basement should not be adjacent to the living rooms of the house, as spores can cause allergies.
The next important condition for obtaining a harvest is a good substrate. This is a nutrient medium through which mushrooms will grow. To prepare it you can use:
- buckwheat husk;
- wheat straw;
- barley straw;
- corn cobs.
Grind one of these materials or a mixture of them. Fill it with warm (up to twenty-five degrees) water for twenty minutes. Stir the mixture periodically. Drain this water and fill the container with hot water (not boiling water). Cover with something heavy and leave for five hours. Drain the water, squeeze out the substrate (remaining liquid can cause mold) and add nutrients (urea and superphosphate).

Planting in the basement
In this growing technology, not only the place and basis for planting are important. The vessels also need to be prepared. Usually oyster mushrooms are grown in bags. At home, regular garbage bags of as large a volume as possible are also suitable.
Make holes in them at intervals of twenty centimeters. The mushrooms will come out through these holes.
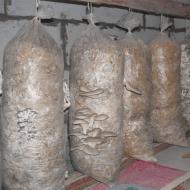
The bags need to be filled with substrate and mycelium. The bottom layer should be the substrate - pour fifteen centimeters of the mixture. Sprinkle it with a layer of mycelium. Alternate them, filling the volume of the vessel by 2/3. The bags need to be moved to the basement and placed on top of each other or hung from the ceiling.

Planting care
In the first days of growing oyster mushrooms, it is most important to maintain suitable conditions.
- The temperature in the bags will increase, but it is important to ensure that it does not reach +30 degrees (when growing at home, in a small basement, it is enough to use a fan for this).
- Keep flies out of your basement.
- After three days you can turn on the lighting.
- The humidity in the basement should be about 95% (for this you need to spray the walls and floor with water, but not the oyster mushroom plantings themselves).
When collecting oyster mushrooms you also need to follow some rules.
- They should not be cut, but twisted out of the substrate.
- After harvesting the first harvest, it is important to maintain the same conditions in the basement for two weeks, then another batch will soon appear.

Conclusion
Oyster mushrooms are the most suitable mushrooms for growing at home. They do not need special care. Conditions for their development are easy to maintain even at home.
There are two ways to grow them. One of them requires less effort, but the result will be a long wait for the harvest. For the other, you need to prepare the room, but thanks to this you will quickly get a large number of mushrooms.
Choose the method that seems most successful to you and feel free to start planting. In this case, you will be satisfied with the result.
- Date: 05/23/2014
- Views: 1151
- Comments:
- Rating: 42
Growing oyster mushrooms in a home basement
Many people believe that cultivating mushrooms at home is almost impossible. But this point of view is incorrect, because growing oyster mushrooms in the basement does not require a significant investment of time or effort. And you can get a lot of advantages from such an unusual hobby.
Oyster mushroom is unpretentious and always produces a good harvest.
- This mushroom is not at all whimsical. The temperature in the room where it will grow should be maintained in the range from +9°C to +30°C with air humidity in the range of 80-85%.
- Oyster mushroom is a very high-yielding crop. 330-500 mushroom blocks can be placed per 100 m2. And from one block a harvest of 2.5-3 kg of mushrooms is harvested up to 10 times a year.
- These mushrooms do not require significant or labor-intensive care. And one person can easily look after the mycelium.
If you decide to grow your own at home, you can not only provide your own family with this useful product, but also build your own, albeit not too large, but profitable business.
Basement preparation
Any basement with the necessary microclimate is suitable for growing oyster mushrooms. It must be remembered that the strains of this fungus, which are now common on the Russian market, do not bear fruit at temperatures above +25°C. Therefore, you do not need to build a special greenhouse.
The following conditions must be met in the basement:
- the air temperature should be maintained in the range from 15°C to 20°C;
- air humidity is not lower than 80% and not higher than 95%;
- Good ventilation and proper lighting must be established.
All these conditions are easy to provide in an ordinary home basement.

For normal growth of oyster mushrooms, the basement temperature should be within 15-17 degrees and 80% humidity.
For the normal growth and development of mushrooms, the balance of humidity and air temperature is very important. Remember that under the same indoor conditions, the lower the temperature, the higher the level of moisture saturation in the air. For example, at +20°C the humidity is 90%. If the temperature drops to +19°C, then the humidity rises to 100%. And when the air warms up to 21°C, the humidity level drops to 82%. Therefore, effective cultivation requires compliance with certain standards.
Such conditions require special thermal and waterproofing of the basement. But this does not require converting it. It is enough to use a suitable covering material. Experts recommend spreading straw or wrapping paper on the floor and covering the concrete with a thin layer of soil or sand. It is only necessary to change damp material in a timely manner.
Mushrooms require low levels of carbon dioxide in the air for normal growth. Centrifugal fans will help provide optimal conditions for growing oyster mushrooms.
A mushroom plantation requires neither windows nor natural light. It is necessary to equip the basement with fluorescent lamps (so-called fluorescent lamps).
Return to contents
Single-zone or multi-zone growing technology?

Mushrooms do not require light when growing.
To effectively cultivate mushrooms, you may need one or several rooms at once. It depends on what cultivation technology is used in a particular case.
If, after grafting, that is, the introduction of microorganisms into the nutrient medium (inoculation), the blocks with mushrooms are constantly in the same room, then the development of mycelium (mycelium) and fruiting occur nearby. This is called single-zone growing technology. With multi-zone technology, the germination of mycelium in the substrate occurs in one compartment of the room, and the mushrooms bear fruit in another.
Both growing methods have their advantages and disadvantages. Single-zone technology allows you to save useful basement space (no additional room is required for mushroom blocks). But then there is a need for additional equipment to change the temperature, degree of illumination, air humidity and the level of carbon dioxide in it.

With a multi-zone solution, it is necessary to equip several rooms. But the conditions in them will be constant. In this case, you will need one zone for germination and one zone for fruiting.
For normal development of mycelium, a higher temperature is required than for fruiting. But light and additional ventilation are not needed by the mycelium.
It is also necessary to take into account that during the growth of oyster mushroom mycelium, a significant amount of heat is released. And if you arrange the blocks correctly, you can save a lot on heating, when additional heating is needed only in the first few days of germination. The optimal arrangement of blocks is considered to be one in which up to 200 kg of substrate is placed on each 1 m 2 of floor.
Return to contents
Preparing for sowing mycelium
You can plant mycelium in 2 ways: in ordinary construction polyethylene bags or on artificial stumps located in specially prepared shelves.
To prepare the stumps, you will need pieces of logs from any hardwood species. Low-grade wood will also work. Usually they take logs up to 1.5 meters long and 10-15 cm in diameter. Before sowing the mycelium in the stumps, cuts are made at a distance of 30 cm from each other and about 5 cm deep.

The frame of the growing shelf is assembled from scraps of metal pipes, corners or wooden beams. The structure consists of 4 vertical posts and 3-4 shelf frames on which artificial stumps are laid. The length of the side of the frame should be approximately equal to the length of the harvested logs, that is, 150x150 cm. The shelves are located at a distance of 30 cm from each other. The lower shelf rises above the floor to the same height
But the easiest way is to use construction bags measuring 35x75 cm or 35x90 cm. They do not require additional processing; you can place them in the basement in a way that is convenient for you.
Before sowing the mycelium, the bags are filled with pre-prepared substrate. It uses fresh sawdust (necessarily from deciduous trees) or sunflower husks. The substrate must meet the following requirements:
- the smell of fresh wood or sunflower should be felt;
- the color of sawdust can be from white to deep yellow;
- The moisture content of the mixture should not exceed 30%.
To fill 1 bag measuring 35x75 cm you will need 2.5 buckets of dry filler.

Before filling the growing bags, the substrate must be pasteurized, that is, treated with organic additives specially designed for this purpose. But you can do without expensive funds. For this you will need slaked lime. It must be taken in a ratio of 1% to the total mass of the substrate in the bag. The lime is mixed with the filler, then soaked in a suitable container (without removing the filler from the bag), pouring hot water for 2.5-3 hours so that it completely covers the substrate.
The bags are removed from the water, suspended, allowing the water to drain. The finished filler should be slightly damp, crumble easily and not stick to your hands.
Return to contents
Preparation and sowing of mycelium
The mycelium is purchased as needed, because its shelf life is only 5 days at temperatures from +15°C to +25°C. To form one oyster mushroom block, 200-285 g of mycelium is required (depending on the type of strain).
Before sowing, the mycelium can be fertilized with special organic additives, which will help increase the yield by up to 30% and shorten the growing period. They are added strictly following the manufacturer's instructions. But usually powders are added at the stage of processing the filler for bags, and solutions are added immediately before sowing the mycelium.

Mycelium is an underground organ. Its popular name is “mycelium”.
Before sowing, be sure to wash your hands and disinfect your gloves. Remember that growing mushrooms requires strict sanitary rules.
If the mycelium was stored in the refrigerator, then it must be removed from there 3.5 hours before sowing. The temperature of the mycelium should be approximately equal to room temperature.
Mycelium is added to the prepared substrate in a ratio of 2.25% per block, that is, approximately 190 g per 9 kg of filler. The substrate with the mycelium is compacted tightly so that there are no voids. The bag is tied tightly and left in a clean and warm room for 27 hours.

Mycelium grows at temperatures from +16°C to +22°C.
Mycelium grows at air temperatures from +16°C to +22°C. Approximately 1.5 days after sowing, characteristic whitish spots appear under the surface of the bag. For normal development of oyster mushroom mycelium, the temperature of the block should not exceed +29°C (optimally – + 25°C). If the temperature rises higher, the room must be cooled.
After 5-8 days the substrate becomes brown, and by 10-12 days the block becomes completely white. Mushrooms germinate in 14-16 days.
Oyster mushrooms are bred not only by sowing the mycelium, but also by using the caps of old mushrooms. But this method is unreliable, and it will take you at least 1 year for a new crop to appear.
Return to contents
Growing and collecting mushrooms
When good growth of the mycelium is noticeable to the naked eye, cuts are made in the bag crosswise (the length of the cuts is approximately 2.5 cm). One mushroom block requires approximately 11 holes. During this period, it is best to place the mushroom blocks approximately 10-30 cm above the floor level. This way, carbon dioxide and pests accumulating below will not reach the oyster mushrooms.
When mushrooms form, abundant watering is necessary. It is best to carry it out using a spray bottle. To supply water inside the bag, you can punch additional holes in the block or water through the slots already made for the growth of oyster mushrooms.
The main sign of a ripe mushroom is the formed hymenial plate.
The best way to humidify the air to effectively grow oyster mushrooms is to use a high-pressure diffuser at the beginning of the air duct into the basement. In winter, if possible, use steam. You can also increase the humidity inside the room by watering the floor, but you should not abuse this method.
The main sign of a ripe mushroom is the formed and elastic hymenial plate (the inner side of the cap). In this case, the edge of the oyster mushroom should still be bent down. When the edge is straightened, spores are released and the mushroom loses weight. Therefore, it is worth harvesting a little ahead of time.
When picking mushrooms, you need to pull them out of the substrate, and not cut them off. Leg sections are an ideal place for green mold (Trichoderma) to develop.
You can grow up to 4 shoots on one block. As a rule, the 2nd shoot is the largest. But after the 4th harvest, the substrate should be completely changed, even if the mushrooms continue to grow. Along with the fungi, pathogenic microorganisms also multiply and can infect the entire basement.
Be sure to carry out all work wearing protective glasses, a mask and gloves. Taking these precautions will help protect not only your oyster mushrooms, but also your health.
Growing mushrooms at home due to various factors is gaining unprecedented popularity. The leader among mushrooms grown at home is oyster mushrooms. This is no wonder, since it is the simplicity of the technology, the productivity and the pickiness of oyster mushrooms that makes them accessible to everyone. Following the recommendations and instructions, anyone can easily, using only available tools and materials, collect up to 3 kg of harvest from each kilogram of the original mycelium. The symbiosis of the right room, the quality of the mycelium and the substrate is the key to successfully growing oyster mushrooms at home.
Where to grow oyster mushrooms, choosing a room
Growing oyster mushrooms at home, of course, should begin with solving a banal but very important issue - choosing the location of the mushrooms. When choosing, you should take into account that in their natural habitat, almost all mushrooms, and oyster mushrooms in particular, grow most actively in places with good air exchange. Moreover, the humidity of growing areas, as a rule, exceeds 50%.
 Thus, growing mushrooms at home should be organized in premises that can recreate the natural environment. Such a room can be a greenhouse, a barn or a basement - this type of placement is the most popular, but in real conditions the choice will be individual and will depend only on the room’s compliance with the following requirements:
- The room humidity level should be in the range from 70 to 90%;
- During the first three weeks, the bags with mycelium should be hidden from sunlight;
- After the first fruit buds appear, bags with oyster mushrooms should receive artificial or daylight for at least 8 hours daily;
- The air temperature in the room should not be lower than 20 degrees, but not higher than 30;
- Throughout the entire period, the technology for growing oyster mushrooms at home requires good ventilation.
Important! The chosen premises are the basis and guarantee of productivity. The approach to solving this issue must be extremely serious, since non-compliance with any of the presented requirements can not only reduce the speed of growing the mushroom crop, but also eliminate it altogether.
How to grow oyster mushrooms, preparation and processing of substrate
Before you start growing mushrooms, you should understand how to grow oyster mushrooms and what the final result depends on. One of the fundamental points is the preparation and processing of the substrate, which is essentially nutritious soil for growing oyster mushrooms. As with other stages, any mistake in the preparation stages can affect the yield, which is why it is recommended to follow simple rules and tips.
The sale of mycelium is carried out by many specialized stores and even individual companies directly involved in the cultivation of oyster mushrooms. It is the purchase from such manufacturers that is most desirable for a novice mushroom picker. In accordance with the requirements and technological features on a mass scale, mycelium, as a rule, is not used for more than a year, but during this period it is not completely developed, that is, it produces a significant harvest. Such mycelium has already been developed and bears fruit, and its cost is significantly lower than new mycelium.
 The volume of purchased mycelium should be determined depending on the desired yield - with good care at home, it is possible to get up to 3 kg of oyster mushrooms from each kilogram of mycelium. Keep in mind that bags for growing oyster mushrooms can produce up to three harvests in a short period. Basing the choice of mycelium when purchasing on any indicators is quite difficult due to the lack of many obvious evaluation factors, which is why it is important not only to pay attention to the size of the mycelium and its extensiveness, but also to make a choice in favor of a trusted supplier-seller.
How to make your own substrate
 The modern market is replete with a variety of substrates for growing various plants and mushrooms. However, some mushroom pickers invariably choose a substrate made with their own hands. Such a basis, of course, better takes into account the individual characteristics of climate, care and living conditions, but it is worth understanding that the effectiveness of its use depends on the correct component composition, which, in turn, requires skills and knowledge.
Like plant soil, substrates for growing oyster mushrooms must contain a high-quality base and mineral composition. It is extremely important that the chosen base - sawdust, husks, straw, etc. - is clean and pre-treated. It is strongly recommended to avoid using chemically treated bases - it is worth remembering that oyster mushrooms are grown for consumption, so environmental friendliness and safety must come first.
Making your own substrate is a fairly simple process, consisting of only three steps:
- Disinfection of the selected base through thermal and/or chemical treatment;
- Grinding the substrate to fractions no larger than 4-5 cm in size and repeated heat treatment for two hours;
- Spin.
Did you know?In addition to eating, oyster mushrooms have found use in traditional and folk medicine. Thus, in folk recipes of eastern countries, oyster mushroom is an almost integral part and is positioned as a panacea for many diseases.
Substrate preparation
 Preparing the substrate for growing oyster mushrooms begins with a banal, but extremely important choice of raw materials. The best germination and yield results are achieved in a substrate made from wheat or barley straw, sunflower husks, crushed corn cobs and its stalks, and buckwheat husks.
Important! In practice, a substrate based on sawdust or shavings of various types of wood is often found, but growing oyster mushrooms at home on a similar basefor newbies– A rather complex process that also requires a more painstaking approach.
Already at the first stages of preparing the substrate, it is strongly recommended to fully check the selected raw materials for cleanliness and the absence of mold. The next stage is grinding the raw material base into small fractions with a total size of no more than 5 cm.
To completely prevent contamination of the substrate by all kinds of harmful organisms, which is certainly unacceptable in the context of further consumption of grown oyster mushrooms as food, it is strongly recommended to heat treat it. Moreover, this procedure will also increase the moisture content of the raw materials to the required level.
The processing process consists of several steps:
- Placing purified and crushed raw materials in large-volume metal containers;
- Filling the substrate with a large amount of water (in a ratio of at least 1:2);
- Cooking the substrate for 2-2.5 hours until the raw material is completely softened;
- Drain the remaining water and cool the substrate to a temperature of 30 ° C and spin it completely.
Important! Overmoistening the initial base, despite the dependence of oyster mushrooms on moisture, will certainly make the resulting substrate unsuitable for growing mushrooms at home. So, when squeezing raw materials in your hand, only a small number of drops are permissible.
The process of forming mushroom blocks
Mushroom blocks are a kind of bed in which oyster mushrooms are grown. As a rule, a plastic bag is chosen as a “container” for the block. It should be noted that the bag must be disinfected or heat treated. An effective treatment method is washing with a bleach solution. The optimal bag volume should be at least 5 kg.
After disinfection of the substrate used and the container for it, the formation of mushroom blocks begins - layer-by-layer filling of the bag with substrate and mycelium. Based on the recommendations of experienced mushroom pickers, for every 5-6 cm layer of substrate there should be about 0.5 cm of mycelium. It should be noted that the first and last layer in the bag must certainly be a substrate.
After filling the mushroom block, the bag is tied tightly at the neck. The final stage - perforation of the blocks - consists of cutting small holes at a distance of 10 cm from each other. Moreover, it is best to do them in a checkerboard pattern.
How to properly care for oyster mushrooms
As a rule, growing oyster mushroom mycelium at home is not difficult at all - it is enough to create the proper climatic conditions and properly care for the mycelium during the ripening period, following the recommendations.
Maintaining climatic conditions, incubation period for oyster mushroom ripening
 Starting from the first days of growing mushrooms, you need to decide at what temperature the mushrooms grow in the created conditions - the temperature should be constant (within 20 – 30 °C) and not change by more than 1-2 degrees. Exceeding the upper temperature limit certainly causes heat shock in the oyster mushroom mycelium and kills future mushroom shoots. A drop in temperature also has a detrimental effect.
Along with the temperature regime, growing mushrooms at home must be accompanied by a constant level of humidity. Fortunately, even novice mushroom pickers without experience in growing oyster mushrooms have access to automatic systems for maintaining moisture through irrigation. The incubation period for ripening under optimal conditions usually takes about 20-25 days.
Did you know? The color of the oyster mushroom cap depends on the growing conditions created. Thus, the selected and constantly maintained temperature is about 20°C will allow you to get a light hat, and 28-30°C – dark. However, this in no way affects the taste.
How to care for mushrooms during growth
 Caring for mushrooms, despite its apparent complexity, is quite simple and does not require special skills or tools. The main requirement is to maintain conditions of detention. During the incubation period, the room should not be ventilated, since the carbon dioxide released autonomously creates the most favorable conditions and slightly increases the moisture level.
This method differs in the composition of the substrate used and the possibility of obtaining mushrooms in a closed room (greenhouse, illuminated basement) under controlled conditions. It has a shorter cycle (2–2.5 months) and, in our opinion, is suitable for household plots, household plots and garden plots.
The intensive method of growing oyster mushrooms, proposed in Hungary, was significantly improved by our researchers. They found that the oyster mushroom and the closely related Florida oyster mushroom, recommended for intensive cultivation, grow well on various plant materials: straw, sunflower husks, cotton tow, corn cobs and their cobs, reeds, chaff, etc. (in nature Oyster mushrooms do not occur on these substrates due to competition with molds, which outstrip it in development and even suppress it).
There are two known methods for intensively growing oyster mushrooms - sterile and non-sterile.
Sterile method(the first industrial method of growing it) consists of placing the moistened nutrient medium in an autoclave, sterilizing it, and then introducing the mycelium into the substrate. In this case, competitive microorganisms die, and the oyster mushroom mycelium develops freely. This method gives good results, but is unsuitable for farmsteading: it requires maintaining sterile conditions during the entire cultivation period or adding a so-called microbiological additive (consisting of a complex of bacteria that prevents the development of mold fungi, but not oyster mushrooms) to the sterilized substrate. Such a microbiological additive is not yet produced here and is patented only in Hungary and France.
At the end of the 1920s. was developed non-sterile method growing oyster mushrooms, in which only pasteurization (steaming) of the substrate is necessary, and all other processes take place under non-sterile conditions. This method does not require the introduction of a bacterial additive, but it must be used with mandatory observance of sanitary conditions that prevent molding of the substrate, the introduction of mold fungi and their development.
The non-sterile method is quite accessible to amateur mushroom growers, and there is already experience in its use. With some caution, it can be tested at small mushroom growing enterprises. We will dwell on this in more detail. (Commercial, or industrial, cultivation of oyster mushrooms, based on a non-sterile method, includes a number of complex technological techniques and requires special equipment and training of specialist technologists).
It should be noted that the non-sterile method still does not provide a 100% guarantee of obtaining a good, stable harvest: there is always the threat of molding of the substrate. Therefore, it is still better for amateur mushroom growers to grow oyster mushrooms on a small scale, then it is easier to carry out preventive measures.
As a substrate for growing oyster mushrooms, you can use agricultural waste: straw of cereal crops (wheat, rye, barley, oats, millet), husks of sunflower seeds, stalks and cobs of corn, chaff, sawdust, shavings, etc.
It is necessary to ensure that this waste is not affected by mold, otherwise it will become a source of infection.
Moistening and mixing the substrate for growing oyster mushrooms in an intensive way.
The waste listed above can be mixed in different proportions, which allows amateur mushroom growers, on the one hand, to experiment and, on the other hand, to rationally use waste from their farmstead.
The substrate is crushed to the size of large sawdust (you can use a straw cutter). Then 2% (by weight) of ground limestone, 2% gypsum, 0.5% urea, 0.5% superphosphate and water (up to a moisture content of 75%) are added to it. To speed up fruiting and increase the yield, additional grains or bran are added. All these additives should make up no more than 10% of the substrate weight.
After this, the substrate is pasteurized. Pasteurization is carried out by keeping it for 2–3 hours at a temperature of 80–90 °C in containers suitable for drying, with stirring. You can also treat the substrate with steam in a small room, maintaining its temperature at 55–60 °C for 12 hours.
Amateur mushroom growers who grow oyster mushrooms in small quantities can treat the substrate by pouring boiling water over it in containers and keeping it covered for 2–4 hours.
Then the water is drained, the substrate is dried to the required humidity (70–75%) and the mineral additives listed above are added.
Another way to pasteurize the substrate is to fill it with bags (mesh, plastic or burlap) and place them in containers where steam or hot (80–90 °C) water is supplied. Processing time – 6–10 hours.
Essential for all methods is the heat treatment of the substrate to eliminate competing molds. In general, different options for preparing the substrate for growing oyster mushrooms using this method are possible.
After heat treatment, the pasteurized substrate should be gradually cooled and then transferred to the planting site. To grow oyster mushrooms, the substrate can be placed in plastic bags, boxes, flowerpots and other containers, the sizes of which can vary; the optimal dimensions of bags or boxes are 40 x 40 x 20 cm. The amount of substrate should be such that it does not dry out too quickly - 5–15 kg. The substrate is slightly compacted. It is very important to keep it clean when placing it in containers for growing mushrooms.
Planting of oyster mushroom mycelium is carried out after cooling the substrate to 25–28 °C. The mycelium is introduced, evenly mixing it with the substrate, to a depth of 10–15 cm at the rate of 5–7% of the substrate weight: with a lower mycelium content, the overgrowth of the substrate is delayed and there is a danger of the spread of competing molds.

You can add grain mycelium to the pasteurized cooled substrate before filling the growing containers with it. In this case, the pasteurized substrate is evenly mixed with sterile mycelium (the same 5–7% mycelium by weight of the substrate), and then the mixture is placed in containers for growing mushrooms. In this case, faster and more uniform overgrowing of the substrate is ensured. With this method of introducing mycelium, it is especially important to maintain cleanliness in the rooms where this procedure is performed.
Oyster mushroom mycelium grows and develops well at a temperature of 20–25 °C and a relative humidity of 90%. Light is not needed at this time. After 3–5 days, the surface of the substrate should be covered with a whitish layer of mycelium. After 8–10 days, with strict adherence to the technology, the entire substrate will first acquire a light brown color, and then intertwine with white hyphae of the mycelium, which will indicate the beginning of its maturation.

When the mycelium grows, it is necessary to measure the temperature in the thickness of the substrate 1–2 times a day. When it rises to 28 °C or more, the room should be very well ventilated.
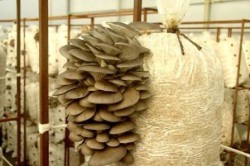
By the end of the mycelium maturation period, which lasts approximately 20–30 days, the substrate intertwined with mycelium turns into a dense, homogeneous block. These blocks are transferred in plastic bags or other containers to the so-called growing room, where the temperature is maintained at 12–15 °C and light is provided. You can leave the oyster mushroom culture in the same room if it is possible to ensure a decrease in temperature and access to light. Oyster mushrooms bear fruit better when the blocks are arranged vertically, so they are usually placed in stacks 80–100 cm high and 40–60 cm wide (you must first remove the blocks from plastic bags). Between blocks in stacks, a free space of 90–100 cm wide is left for ease of care and harvesting. The method of laying the blocks depends on the room.

Placing blocks for growing oyster mushrooms on racks with vertical hanging.
Blocks from plastic bags do not need to be removed, but then, in order for mushrooms to form on all sides of the block, holes with a diameter of 1–2 must be made in the bags at a distance of 3–4 cm (according to other experimental data – 10–15 cm) vertically and horizontally cm or make vertical or cross-shaped cuts in the film to release the resulting fruiting bodies. Some mushroom growers mount elongated blocks in plastic bags vertically on metal rods or hang them in rows. In boxes and flowerpots, mushrooms appear on the upper, open surface of the substrate. The boxes can also be installed on the end, so that the mushrooms form as if on a vertical wall.
To stimulate fruit formation during this period, you can keep the substrate permeated with oyster mushroom mycelium for 2–3 days at a temperature of 3–5 °C. This procedure is best carried out before transferring the substrate overgrown with mycelium to the growing room. However, this technique is optional.
The air humidity in the room during fruiting should be maintained within 80–100%. To do this, at a temperature of 12–16 °C, 1–2 waterings per day of the floor and part of the walls of the room are sufficient. If it turns out that the block removed from the plastic bag has dried out a little from the surface, then it can be slightly moistened with a watering can or hose with a sprayer.
In recent years, the technology for growing oyster mushrooms has become widespread, when the blocks are not removed from the bags and the premises are practically not watered, since the substrate contains a sufficient amount of moisture for the formation of mushrooms. Moisture is well retained under the film. In this case, watering in the room is carried out only if the air temperature rises above 18–20 °C to reduce it.
During fruiting, excess amounts of carbon dioxide accumulate in the premises, which must be removed through ventilation.
During the maturation of the mycelium, lighting in the growing room is not necessary for the first 5–6 days: the main processes occur in the dark in the thickness of the substrate. However, with the appearance of the rudiments of fruiting bodies, it is necessary to create optimal illumination (70–100 lux for 6–10 hours a day).
In a small dark room (basement, barn) use a fluorescent lamp or ordinary sunlight, but shaded. Light affects the structure of oyster mushroom fruiting bodies: the mushroom stems are shortened; the caps, which were initially whitish in color, begin to darken and become brownish-gray; As the caps mature, they quickly increase in size and lighten again.
Mushrooms should be picked (preferably cut) with their stems down to the base to prevent rotting of the blocks. 2-3 weeks after the first harvest, a second wave of mushrooms will appear. Caring for the blocks at this time remains the same, and the lighting system is turned on when the primordia of fruiting bodies are formed.
Practice shows that up to 75% of the crop is harvested in the first wave, and in total, under optimal conditions and a good substrate, in two waves the mushroom harvest will be approximately 25–30% of the substrate weight. This is economically beneficial, especially since oyster mushrooms are well stored, transportable and do not spoil at low temperatures.
After the second wave, it is advisable to replace the blocks with new ones overgrown with fresh mycelium. The fruiting blocks can be used as roughage for livestock and a feed additive for poultry.
Little is known about the pests and pathogens of oyster mushrooms. Common pests include fungus flies, as well as ticks and mosquitoes. Diseases, often of bacterial origin, appear after fungi are damaged by pests.
An affordable way to disinfect a room where mushrooms are grown is to spray with a 2–4% solution of bleach or formaldehyde. After this, the room must be closed for two days, and then ventilated for 1–2 days. This treatment must be carried out before each use.
Growing mushrooms: oyster mushroom, champignon, shiitake
Previous page -
Articles on the topic