How to sew a cracker out of fabric. Textile vases, candy bowls. Master classes
So, as promised, I’m showing you my tutorial on sewing a candy/sugar bowl.
It all started when I embroidered a cupcake on linen canvas.

For the cupcake I used antique Japanese melange blue thread.

These threads have a story. I got them from a grandmother who was a needlewoman. It so happened that I had never met her and knew absolutely nothing about her. But, I was lucky enough to become the owner of all her handicraft supplies. When I still lived with my parents, our neighbor Aunt Sveta often came to see us and knew that I really loved embroidering. And she also had friends who didn’t know what to do with their grandmother’s big bag of thread. They wanted to throw it out. But Aunt Sveta didn’t let them throw it away and brought the whole bag to me. You can’t imagine how much there was there... Various unfinished embroideries, and rags with printed patterns, and a lot of new (in the sense of not started or even printed) skeins of Leningrad floss. And skeins of Japanese melange (the manufacturer and a bunch of other hieroglyphs are printed right on the packaging) - I really like these threads!
But the quality of the Leningrad floss leaves much to be desired... The threads are thin and without shine (dull). Now the threads are not at all the same - much better quality. That's why I rarely use those old threads. But if it suddenly turns out that exactly this shade is needed, then I print out a “new-old” skein and embroider with it. In general, I carefully store and use all of my grandmother’s stock (unfortunately, I don’t even know her name)!
Let's continue. I embroidered a cupcake. I cut out a square piece (13x13cm) from the embroidered canvas and sealed it with dublerin.

I prepared all the necessary materials: a rag with an embroidered motif, pieces of plain linen, a piece of linen with a pattern, 2 types of lace and bindweed in two shades (+ another piece of padding polyester and a patch).

I sewed blue bindweed onto the canvas with the cupcake.

I cut everything by eye! I sewed a linen rectangle on both sides (along the width of the square).

Then, I sewed long rectangles on the other sides.

I trimmed off the excess fabric. The result was a square 30x30cm.

I stitched blue lace onto the square, thereby marking the center of the future candy/cracker bowl.

I cut out a 30x30 cm square from linen with a pattern. I also cut out padding polyester of the same size. I connected them with pins.

I stitched on a blue bindweed and a patch.

Next, onto the square with the cupcake, along the intended fold, I basted future ties made of dark blue lace. This square was covered with a square with a patch (face to face). I stitched around the entire perimeter, leaving room for turning. I turned it inside out, straightened the corners well, and sewed up the hole with a hidden seam.

I ironed the resulting “napkin” thoroughly.
Christmas is coming - a very solemn and joyful holiday. For this holiday, we decorate our apartments with garlands and tinsel, and take beautiful dishes out of the closet. You can make unusual things yourself - they add bright touches to the interior. For example, you can sew a festive candy bowl.
Materials and tools for the master class "Festive candy bowl"
red fabric with a themed holiday pattern, checkered fabric, padding polyester, green ribbon, red ribbon with snowflakes, threads, scissors, ruler, pins.
Instructions:1. Cut out a square measuring 22 x 22 cm from red fabric.

2. Cut out a small square measuring 11 x 11 cm from red fabric.

3. Cut out a square measuring 22 x 22 cm from checkered fabric.

4. Cut out a square measuring 19.5 x 19.5 cm from padding polyester.

5. Line small squares on the larger red square (it’s convenient to do this with a piece of soap - after ironing it disappears), put a square of synthetic padding under it and pin these squares with pins as shown in the photo (or sweep them with threads).

6. This is what the chipped squares look like from the other side.

7. Sew the squares using a sewing machine along the marked lines.

8. In the center of the square cut from the checkered fabric, sew a small red square. We will sew it on using a sewing machine using a zigzag seam.

9. Sew a red ribbon with snowflakes along the edge of the red square.

10. Take a green ribbon and cut eight pieces of 16 cm long from it.

11. Sew one end of each ribbon to the edge of the red square as shown in the photo.

12. Fold the red square (with ribbons sewn to it) with the right sides together with the green square (with the red square sewn to it) and sew along the edge, leaving a small hole for turning it inside out.

13. Turn the sewn squares right side out, straighten them and smooth them with an iron. Sew up the hole by hand.
All that remains is to fill it with sweets and put it on the table.
Now I sit on the Internet from morning until I get tired of sitting. Still, a cast on my arm is an unpleasant thing. But if someone thinks that this can completely immobilize me, they don’t know me at all)). Yesterday, while browsing blogs, I came across a video with vases. Charming, aren't they? But for some reason I began to think that I could make more petals.

 I took two A4 sheets. I cut out the squares, placed them on top of each other offset, trimmed them and glued some joints. I made all the vases using this pattern. Just by eye, a little more, a little less and average.
I stitched along the outline with a fine stitch. You need to leave a small area for turning inside out. Inside there is synthetic padding. Steamed, ironed. Turn out all the corners thoroughly - I use a sushi stick for this.
The place through which I turned it inside out was sealed with a few drops of PVA. Iron it again thoroughly. There were decorative stitches along the edge.

I sewed the petals at an angle of 30 degrees. ALL!
I’m happy that I managed to sew at least a little))))


Textile candy bowl with embroidery.

Good day!
I bring to your attention a master class on sewing a useful and pleasant thing - a candy bowl.
We select the materials we need: embroidery, main fabric, companion fabric, interlining, padding polyester, ties.

We calculate the size of the candy dish, do not forget to take into account the seam allowances (mine are 1 cm). For convenient calculation, I recommend drawing the desired model on a piece of paper and labeling all the details in centimeters, then it will be easy to calculate everything. My finished candy bowl is 25*25cm, the walls are 5cm wide, that is, the bottom is a square with a side of 15cm.
We cut out the parts we need and glue them with non-woven fabric.

We cover the embroidery with strips of companion fabric. In order not to make mistakes with the calculations, I first sew and then trim off the excess fabric. Sew on two opposite sides, iron the seam, and then sew on the other two opposite sides, also trim off the excess and iron.

Now the bottom of our candy bowl is ready, it looks like this.

We sew on the following strips, these will be the walls of the candy bowl. Sew on two opposite sides, trim off the excess, and iron.
Then the face can be steamed well and our square face piece will be ready.

Now we align the top and bottom parts, cut out the padding polyester, iron it well so that it becomes flat.

We fasten the ties along the fold line (fold your future walls together and where they meet, sew the ties). We secure the padding polyester to one.

Sew the top and bottom to each other (at this stage you can round the corners if desired), leaving an opening for turning inside out. We cut off the seam allowances (only!) of the padding polyester close to the line.

Turn inside out to form corners

Now we sweep all sides, carefully forming all the folds. And we iron it thoroughly and steam it, so it will be more convenient to give the finishing line.

Now, we put a finishing stitch along all the seams, carefully ironing them one last time.

We tie the corners and admire!

I will be glad if MK is useful to you!
I wish you patience and inspiration! And may everything work out for you!


For the first time I saw photos of such candy bowls in a Japanese magazine. I don't know why, but I really like sewing them! Simplicity, originality and practicality - perhaps that’s what it’s all about. And now all my loved ones have such baskets :) Not only candy, cookies or bread, but also all sorts of little things will look good in them (for example, I temporarily store woolen beads here). Accumulating my own experience and the experience of other needlewomen, I have prepared a detailed master class on sewing candy bowls for beginner craftswomen.
Sewing materials: matching fabrics, interlining, synthetic padding, ribbons or cords for ties.
How to do:
1. The size of the finished candy dish is 25*25 cm when unfolded, the size of the bottom is 15*15 cm. Taking into account the allowances, we cut out the details: the main one is 27*27 cm, 2 sides are 7*17 cm and 7*27 cm and the bottom is 17*17 cm .
2. Sew together the parts of the bottom and short sides, iron the seams. For accuracy, you can draw auxiliary lines for stitching on the bottom; the size of the bottom after stitching should be 15*15 cm!


3. Sew on the long sides and iron the seams. We got two parts measuring 27*27 cm (solid and patchwork). We seal them with non-woven fabric.

4. Measure out 8 pieces of cord or ribbon for the ties and sew them by hand to the very edge:

5. Now you need to make sure that the vase acquires the necessary rigidity and holds its shape well. Since my padding polyester is not very dense, I played it safe and cut out 2 parts. If the padding polyester is thick and dense, then one is enough.
And now a little trick: in order for the padding polyester to turn from loose to dense, you need to steam it properly with an iron. We do this through the fabric at maximum mode.

We assemble the candy bowl as follows: padding polyester, parts of the candy bowl with the right sides facing inward (don’t forget to straighten all the ties), padding polyester again. If desired, the edges of the napkin holder can be rounded, I like it better this way. We fix the sandwich with pins and stitch it, leaving room on the side for turning it inside out. We secure the beginning and end of the seam with a reverse stitch so that it does not unravel during turning.
We cut the padding polyester close to the line and carefully turn the candy bowl inside out.

6. Straighten all corners, iron and sew up the hole with a hidden seam.

7. Place a finishing stitch along the edge and along all seams. I also quilted the side walls and the bottom:

This is what it looks like from the back:

8. We tie the corners and admire them. If the ropes are too long, cut them to the desired length.

I hope my master class was useful to you. Happy creativity everyone!
PO did you like the article? Tell your friends about it using social buttons. networks! To always stay up to date with new articles, subscribe to
Master class on sewing a textile bread box made of denim and cotton with a bright print.
Hand-sewn homemade interior items made from natural materials will help create a cozy, warm atmosphere in the kitchen. With the help of our master class you can sew from denim and cotton with funny lambs.
- a piece of dark blue denim fabric 0.3 m wide 1 m;
- a piece of cotton fabric with a bright print, 0.3 m, 1 m wide;
- non-woven or double-lined 0.3 m;
- padding polyester 0.3 m;
- dark blue threads for denim and light beige threads for cotton fabric;
- two wooden buttons in the shape of hearts;
- decorative patch;
- pins, ruler, scissors.
We sew a bread box:
1. Before cutting, natural fabrics are usually washed and then steam ironed to prevent further shrinkage. Prepare a pattern for the bottom, place it on the denim and cut out the part with an allowance of 1 cm. Place marks according to the pattern.


2. Fold the flap in half and cut out a transverse side piece 10 cm wide and 29.5 cm long on one side from the fold, and 30.5 cm on the other.


4. Cut the side part from cotton and synthetic padding to a width of 13.5 cm and a length of 31 cm on one side and 32 cm on the other, as shown in the photo.

5. Glue denim parts with doublerin or non-woven fabric to give the product additional rigidity. You need to iron with an iron without steam in the “cotton” mode through a thin cotton fabric, paying special attention to the edges of the parts.


8. Connect the bottom and the side piece along its short side with a stitch. To make it more convenient to control the distribution of fabric on the circles, you need to stitch from the bottom.


11. Baste cotton and padding polyester pieces together to avoid unevenness on the fabric during stitching. In the center of each part, at 45 degrees to the grain thread, draw two lines intersecting at right angles. Then sew lines along these lines with a stitch length of 3 mm.

12. Set the needle on the sewing machine to the extreme left position and sew parallel lines at intervals of 1 cm. To make the stitch neat, the fabric should not be pulled or seated, you need to move from the center to the edges and change the direction of each line. Quilted parts cannot be ironed, as the padding polyester becomes flat from a hot iron.


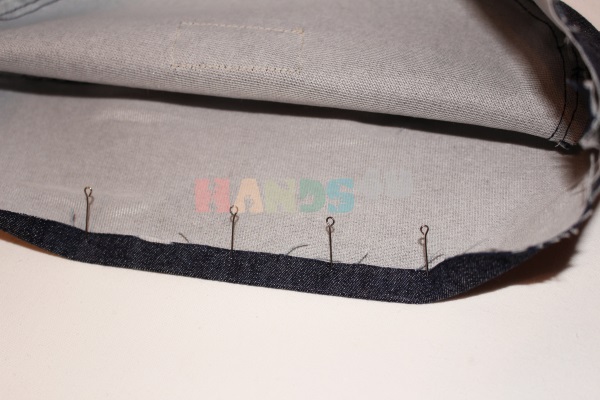
14. Then sew the side piece into a ring and stitch the short side to the bottom. Make notches along the circles.


16. Place the inner part of the cotton breadbox into the outer one made of denim. Using a blind stitch, sew both parts along the bottom seam line.


Articles on the topic