Wood crafts. How to make wooden puzzles - several interesting options
Puzzle activities develop children's attention, memory, imaginative and logical thinking, and communication skills. Challenge: Take the puzzle apart and then put it back together. A puzzle can be both an interesting interior detail and a wonderful gift. Our puzzles are an excellent leisure option for all lovers of smart and fun entertainment. The puzzles are made of natural material - wood.
Interest in mysterious objects, things and places associated with some secret has remained among people at all times. Today we will talk about one curious toy that can still be found in the old settlements of Pomors on the shores of the White Sea. During the long polar night, in their free time from hunting and fishing, men’s favorite pastime was carving household, household and church utensils, children’s toys and puzzles from wood.

The puzzle in question looks like a small box in the shape of a cube. In ancient times, some valuable thing was hidden inside the cube, and in later times, peas or pebbles were simply poured into the box, a handle was attached, and the hiding place turned into a rattle toy. Such a rattle, made about two hundred years ago, can be seen in the Zagorsk Toy Museum. To the uninitiated, the box looks inseparable and attempts to get to its contents lead nowhere. All six planks that make up the cube fit tightly together and cannot be taken apart. Although there is an emptiness inside the cube, it is completely unclear how anything can be put there. The secret is small, but it’s not easy to figure out. We will first talk about how to make our own hiding cube.
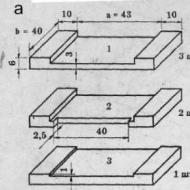
The blanks for the puzzle are six bars measuring 65x40x6 mm. Their production must be taken seriously. Every detail must be made very carefully and precisely. Be sure to choose a dry tree, otherwise after a while the puzzle pieces will begin to dangle and the secret of the cube can be easily solved. After each element is made, it is sanded with sandpaper so that all surfaces are smooth. Bar 3 is done last. Before cutting a groove in it, you need to put the five bars made together as shown in the figure. Then you should measure the grooves between elements 1 and 2, into which bar 3 should fit. Depending on the resulting dimensions of these grooves, you should change the dimensions of bar 3 and fit it in place. It is important that bar 3 fits into the groove with little force, and at the end of the stroke it snaps onto element 2.
It doesn’t matter if you don’t have boards of the specified sizes. You can make a cube from any planks. Just keep in mind that the size of the cache and the entire cube depend on their width. Let the width of the block be 6 mm. Then the length of the groove a in the workpieces is calculated by the formula a = b + 3 mm. The remaining dimensions can be left as in the picture.
Now about how to disassemble the cube. The secret lies in element 3, which acts as a latch. To open the cache, you need to click on this element up, and then slide it inside the cube.


Materials and tools:
Square rail
This puzzle was designed by the famous admiral Makarov, the leader of two trips around the world.
Prepare six identical blocks from the slats. There is no need to make any cuts on one of them (I). On the other, you need to cut a groove with a width equal to the thickness of the block and a depth of half this thickness (II). On the third block, two grooves are made: one is the same as on the previous block, and next to it, retreating half the thickness of the block, the other is the same deep, but twice as narrow (III). 
The remaining three blocks will be the same; on each of them two cutouts are made: one with a width of two thicknesses of the block and a depth of half the thickness: the other, on the adjacent surface (for which the block is turned 90°), with a width of the thickness of the block and a depth of half the thickness ( IV, V, VI).
Now complete the puzzle. Take two bars of type IV, V, VI, fold them as shown in the pictures. Insert a type III block into the resulting “window”. Holding all three bars so that they do not move apart, insert the remaining block of type IV, V, VI from above so that its thin part fits into the gap b. A Type II block should be placed next to this block; turn it back with the groove up and insert
an open “window” on the side a. Consider the figure formed by five bars. Between the two bars that you put together at the very beginning, a square “window” has been preserved. If the remaining block of wood (solid, without cutouts) is inserted into this “window”, then the entire structure will be firmly connected.


Materials and tools:
strip with square cross-section (e.g. 1 cm2)
Cut three bars 8-9 cm long from the rail. In the middle of one of them, make a cutout so that a jumper with a square cross-section is formed. The thickness of the jumper should be equal to half the thickness of the block (0.5 cm2). Process the second block in exactly the same way, but cut off the corners of the jumper and then turn (using a file) its cross-section from square to round.

In the third block, cut a transverse groove 0.5 cm wide and deep, then, turning the block 90°, make a second groove of the same size on the adjacent surface (c).
The puzzle is ready. Collect it.
Holding a block with two grooves vertically, insert a block with a round jumper into the groove, then insert a block with a square jumper 90° counterclockwise into the second groove, and the puzzle takes the form of a solid, non-scattering figure.


Materials and tools:
Wood plank
From a wooden plank, the width of which is three times the thickness (for example, thickness 8 mm, width 24 mm), saw off three identical pieces 8-9 cm long. In each, in the middle, cut a rectangular recess-window with a jigsaw, corresponding according to the cross-sectional dimensions of the plank you took.
It is necessary that the bar just enters the recess-window, with some, perhaps even effort. Therefore, it is better if the window is initially slightly smaller than needed, and then using a file you bring it to the required size.
You leave one of the three parts you made unchanged, and in the other two you make a cut on the side, the width of which is exactly equal to the thickness of the plank (or, what is the same, the width of the window). Thus, these two parts have a T-shaped cut. 
The puzzle is ready. Now you can assemble it. Insert one of the strips with a T-shaped cutout into the window of the part that you made first, push it forward so that the end of the side cutout becomes “flush” with the surface of the strip. Now take the third piece (also with a T-neck) and slide it onto the window placket at the top, with the side cutout facing back. Lower it down until it stops, then push down (also all the way) the first bar with a T-shaped cutout, and the puzzle will take the form shown in the figure placed in front of the problem.


Puzzle "Pig"


The first time I saw such a puzzle cube was in my training, when one of the students brought a Rubik's snake cube and invited me to solve this miracle of the thought process, using sleight of hand without any cheating.
Why without fraud, but because I remember one of my childhood stories with a Rubik's cube. One day my parents gave me a regular 3x3 Rubik's cube. After turning and twisting the cube, one color came together with ease. But it was impossible to collect all the colors at once. That's when I decided to cheat the puzzle a little. I decided to do it this way: peel off all the colored rectangles and stick them by color on each side of the Rubik's cube. This idea was a fiasco, since the rectangles were glued so tightly that when they tried to peel them off, the plastic could not stand it, and one of the rectangles cracked. Apparently the glue used was not Chinese)
I decided not to destroy this puzzle, especially since the thing was alien, and I had already matured a little.
As they say, beginners are lucky; after thinking and turning the puzzle for an hour, this figure turned from a clumsy snake into a perfect cube. And most importantly, I did not remember the assembly process, and when I tried to repeat my achievement, I was never able to do it.
I twisted and turned this snake for almost a week, but it’s time to recognize the honor, I need to give it to its rightful owner, and admit that the puzzle won the first round.
But somehow it’s not manly to give up in front of some piece of wood, and I decided to buy myself this miracle of the Chinese industry of puzzlers and twisters.
It was found very easily in online stores, on Aliexpress. I placed the order through a friend’s account, so I don’t remember which seller I ordered from. But here is the same cube as I ordered, and many other puzzles.
I waited for a parcel with a cube for almost 2 months.
But here is my puzzle.
Let's take a closer look at the mind-bending piece of wood.
The Rubik's Snake Cube features 27 small wooden cubes in alternating white and green colors. The size of each cube is 15x15x15 mm, although there is a small deviation of 0.5-0.7 mm. But this is tolerable, it’s not a space unit that is being developed. The total size of the assembled cube is approximately 4.7x4.7x4.7 cm, although the product description indicates the size is 6.4x6.4x6.4 cm, and the color I received was white and green, although on the seller’s page it was white and black.

All the cubes are connected to each other using an elastic band that runs either along the axis of the cube, connecting opposite faces, or diagonally, connecting two faces with a common edge. You can see all this in the photo below.


The cubes are polished on four sides, but the cut on both sides is very sloppy. These cubes were apparently obtained from one long parallelepiped by cutting off equal parts. And it was precisely in the cutting places that the surface was not polished.

The elastic band connecting the cubes together is quite strong. The top is covered with a fabric braid. I stretched it with force to the limit until the rubber stopped stretching due to being held by the fabric braid, it didn’t even seem to crack) But it’s better not to engage in tug-of-war, or rather a cube puzzle)

Well, now it’s time to start solving, or rather, assembling the puzzle. As it turned out, this is not an easy task, and the fact that I was once able to assemble this cube quite quickly did not mean anything.
But giving up was not my plan.
And after much assault, the Rubik's cube-snake puzzle was mastered.
Well, now a little explanation with photos of the stages for those whose nerves can’t stand it and you want to know a few tips on assembling the cube.
We begin to assemble from the side that looks like the letter “P”.

Place the letter “P” on the plane, then place three cubes vertically upward.

Now we turn our snake in the opposite direction, and on top of the already finished letter “P” we put another one of the same kind.

Next, we lower the three cubes located in a line down from the outside, so that they close the letter “P”. Now we have a well. 
We fill this well with the next three cubes.

Well, now, we simply close the void with the remaining cubes and get an assembled Chinese transformer cube-Rubik-snake.

Now I remember the assembly process, and I assemble this puzzle in about 20-30 seconds.
There are other ways to assemble such a cube on the Internet, but I gave an example of exactly the way I assembled it.
Despite the fact that the text of the review contains explanations on how to defeat this cube, I still advise you to be patient, take your time, and try to solve the cube yourself.
Firstly, your self-esteem will increase, and this is important, since we are all selfish at heart, and we love it when we succeed at something.
Secondly, solving puzzles forces your brain to move, and then, in real life, it will be easier for you to find a way out of non-standard situations.
Thirdly, puzzles are created to be solved, and the solution should not be completely easy, otherwise interest will be lost.
Finally, I wish everyone that you have difficulties only when solving puzzles, and in a real life situation you always easily find a solution to any questions, and always emerge victorious from any difficulties and puzzles, and preferably without subsequent puzzles.
Develop your MEGA-BRAIN and be healthy!
Gray matter to everyone, and more, and let no one leave offended)
To begin with, we assemble a cross on the top edge. To do this, we look for the edge with the largest rectangle. Rotate the face on which the element is located to the right so that the edge is at the bottom.

There is an option when one of the parts is on the opposite edge. Then you need to turn the front part clockwise, the top counterclockwise, and the right side clockwise.

The remaining ribs are assembled in the same way.
Corners with details
We put the corners with the details in place.
At each corner there should be a rectangle from smallest to largest.
We make this combination:
- bottom – counterclockwise;
- bottom - clockwise.

Middle layer
We put the ribs of the middle layer in their places.
The cube should be turned over so that the unassembled side is on top. The outermost parts that protrude beyond the boundaries of the cube must be kept on top until the end of the assembly.
On the top edge you need to find the largest rectangle and place it on the corner. There may be two options:
The edge should go down and to the right. This can be done using this combination:
- The upper part is clockwise;
- right side – clockwise;
- top - counterclockwise;
- front part - counterclockwise;
- top – clockwise;
- the front part is clockwise.
In the second case, take the cube with the desired part with the center towards you. The edge should go down and to the left in this way:
- Top – counterclockwise;
- top – clockwise;
- the left side is clockwise;
- top – clockwise;
- the front part is clockwise;
- top - counterclockwise;
- the front edge is counterclockwise.

Sometimes the required edge is not on top, but in the middle layer. It must be removed from there using any upper edge, using the combination for the first case.
Upper cross
At the top, find the parts that are assembled correctly. They should form a cross. It may turn out that there is a central piece on top without a line, corner or cross. If there is a three-piece corner, it is important that it faces to your left. If it is a line, it needs to go from right to left.
To make the top cross, do the following combination:
- The front part is clockwise;
- top – clockwise;
- right side - counterclockwise;
- top - counterclockwise;
- the front part is counterclockwise.

Rib collection
Turn the top so that two of the four ribs are the same size (preferably squares) and are at an angle to each other. If you can’t do this, do the following combination from any position:
- the upper part is clockwise;
- right side - counterclockwise;
- top – clockwise;
- the right side is clockwise;
- the upper part - twice clockwise;
- the right side is counterclockwise.
Take the cube so that the right edges are facing away from you and to the right. Arrange the two remaining edges as follows:
- The right side is clockwise;
- top – clockwise;
- right side - counterclockwise;
- top – clockwise;
- the right side is clockwise;
- top edge - twice clockwise;
- right side - counterclockwise;
- the upper part is clockwise.

Assembling corners
Find an element on the corner that is the same size as the part on the middle layer, but is rotated incorrectly. Take the cube with this angle towards you. Place the remaining corners in their places with the following combination:
- The top edge is clockwise;
- the right side is clockwise;
- top - counterclockwise;
- left side – counterclockwise;
- top – clockwise;
- right side - counterclockwise;
- top - counterclockwise;
- the left side is counterclockwise.

The combination should be repeated several times.
Last layer
If some corners are turned correctly, select the one that still needs to be turned. It should be facing towards you and to the left. Do the combination 2-5 times:
- The right side is counterclockwise;
- bottom – counterclockwise;
- the right side is clockwise;
- bottom - clockwise.
The combination is done several times until the first corner is correct. Then turn the top edge counterclockwise. There will be another corner in front of you that needs to be turned around. Do the combination again. And so with all angles. The lower parts may get tangled, but they will fall into place as you go.

The main thing in this step is not to change the position of the cube.
All photos from the article
Puzzles are known to develop intelligence, thinking and attentiveness well, so they are recommended for children to solve. True, some of them are not easy to cope with even for adults, who are also not averse to “twirling in their hands” funny details. In this article we will look at how to make some DIY wooden puzzles that will be fun for both children and adults to play with.

General information
First of all, it should be said that making wooden puzzles with your own hands is no less exciting than solving them. Moreover, there is nothing complicated in their manufacture, so anyone can cope with this task.
The only thing is that for this you will need a simple set of tools that every home craftsman has:
- Jigsaw (preferably a jigsaw);
- Chisels;
- Electric drill ;
- Files and needle files;
- Sandpaper.
Advice!
To simplify the task and avoid mistakes in the process of making products, you first need to make drawings of wooden puzzles with your own hands.
As for materials, the most often required are:
- Small boards;
- Bars;
- Sheets of plywood;
- Wood varnish.
Even if these materials are not at hand, they can be purchased at a hardware store. Their price is usually low.

Manufacturing
There are so many options for wooden puzzles for children and adults. Next we will look at the most popular and common of them, which are easy to do yourself.
To make this puzzle, you will need a rail whose width is three times the thickness, for example, if its thickness is 8 mm, then the width should be 24 mm.
The product is made as follows:
- A rail of suitable parameters must be cut into three parts of equal length.
- Next, in each plank you need to cut out a cutout corresponding to its cross section using a jigsaw. As a result, the strips should fit into this hole with little effort. Therefore, it is better for the window to be slightly smaller; in this case, you can bring it to the required parameters using needle files.
- You need to make a cut in the two slats on the side, the width of which should be exactly equal to their thickness. As a result, a T-shaped cut should be obtained in two parts.
- At the end of the work, the parts need to be sanded and varnished.

This completes the puzzle making process.
Now you need to assemble it by following these steps:
- One of the parts with a T-shaped cutout must be inserted into the window, and it must be advanced so much that the end of the side cutout is “flush” with the surface of the strip.
- Next, you should take the third part and put it on top of the bar with the window until it stops.
- After this, you need to push down the first plank with a T-shaped cut all the way.
As a result, the puzzle takes on the appearance of a single piece.

Crossroads
To complete this craft, you will need a 1 cm square block.
The instructions for its manufacture are as follows:
- You need to cut three bars about 8-9 centimeters long from the slats.
- In the middle of one of them, you need to make a cutout 1 cm wide so that you end up with a square jumper with sides of 0.5 cm.
- The second part should be made in exactly the same way, only the jumper should turn out not square, but round.
- In the third block you need to cut a groove 0.5 cm deep and wide.
- Then the same block must be rotated 90 degrees, and another similar groove must be made on the adjacent surface.
- Next, all parts should also be sanded and varnished.

This completes the wooden puzzle.
Now it needs to be assembled as follows:
- Holding the block with two grooves vertically, you need to insert a part with a round jumper into it.
- A square puzzle is then inserted into the second slot.
- After this, the block with a round jumper must be rotated 90 degrees counterclockwise, after which the product will take the form of a non-scattering solid figure that is not easy to disassemble.
Note!
In order for all the workpieces to turn out to be of high quality, they must be made from dry wood.
Makarov's puzzle
This craft is more complex, so before you start making it, it is advisable to complete a drawing. It must be said that DIY drawings of wooden puzzles do not have to be done to scale with high accuracy. The main thing is to indicate on them all the dimensions in millimeters and the main design features of the product.

To complete the Makarov puzzle you will need the same rail as for the product described above.
It is performed as follows:
- First you need to cut the wooden slats into six equal pieces. One block should be immediately set aside without making any cuts on it.
- On another block you need to make a groove 1 cm wide and 0.5 cm deep.
- On the third block you need to make two grooves. The first is the same as on the previous part, and the second is at a distance of 0.5 cm. It should be the same depth, but twice as wide.
- The remaining three parts are made in the same way - two grooves are made on each of them. The first groove is cut 2 cm wide and 0.5 cm deep. After this, the block must be rotated 90 degrees and, as shown in the diagram, a groove 1 cm wide and 0.5 cm deep must be made.
- Finished parts need to be processed and varnished.
The product is assembled as follows:
- The last two bars need to be folded as shown in the diagram.
- A third block is inserted into the resulting window.
- Next, holding three bars, you need to insert the last sixth bar, as shown in the diagram.
- Then the second block should be turned with the groove up and inserted into the open window “a” formed.
- After this, the block without a cutout is inserted into the window formed between the first two folded parts. After this, the structure will be tightly connected.
It should be noted that without a diagram, it is difficult to assemble this puzzle even for adults.

In the photo - a cube in a cube
Cube in a cube
A cube within a cube is called a carpenter's puzzle, since it is different from all the products described above. This design is a hollow cube with round holes, inside of which there is a small cube. Moreover, it is impossible to pull out the latter.
When you see such a puzzle, the thought comes that the large cube was glued together unnoticed, because otherwise it is impossible to place the cube in it. However, in reality everything is much simpler.
A wooden cube puzzle is made in the following way:
- First of all, you need a cube with a square cross-section. It must have the correct geometric shape, since the success of the entire operation depends on this.
- Then on each side of the cube you need to mark the center. To do this, draw diagonals.
- Next, a recess of several millimeters is made in the center with a Forsner drill.
- After this, you need to draw a square in the resulting circle. With its help, you can determine the drilling depth at which all circles will intersect.
- Then the workpiece is fixed and a hole is drilled on each side to a previously determined depth. In order not to spoil the part, you should go deeper on each side evenly, turning the cube over and over again.
- As a result, inside the cube you will get a small cube connected by thin partitions to a large one at eight points.
- After this, the partitions must be cut with a knife. Thus, you will get two figures independent of each other.
- Finally, the product must be varnished. The dipping method is usually used for this.
You can play this kind of puzzle on your friends, for example, by inviting them to pull out a small cube for a bet, after all, it somehow got there?

Cube-cache
Another interesting puzzle - a cube made of wood represents a hiding place. In essence, this is a box that at first glance seems completely inseparable. However, in reality it consists of six parts, not secured to each other by glue or anything else.

To make this design you will need 6 planks 63 mm long, 40 mm wide and 6 mm thick. From these boards you need to cut out three parts with a jigsaw:
The most important thing in the manufacture of this product is to achieve the most accurate dimensions of all parts. After their manufacture, it is necessary to sand them with sandpaper to obtain a smooth surface.
It should be noted that the manufacture of the third part must be done after assembling all other structural elements. It must be adjusted so that it fits tightly into the groove between elements 1 and 2.
The whole secret of the puzzle lies in element 3, which works like a latch. To disassemble the cache, you need to click on it and slide it inside the cube. If all the parts are made correctly, then when assembled the structure will have no backlashes and is a solid structure.
Conclusion
We looked at the process of making some of the most interesting wooden puzzles. All of them are quite simple to make, and at the same time they are not only fun games, but also excellent souvenirs.
From the video in this article you can find some additional information on the topic discussed above.
One of the popular toys of our time is the Rubik's snake. The puzzle became a hit back in the last century. But even today it has not lost its relevance. The design of the toy consists of isosceles triangular prisms - there are 24 of them in total. They are connected by rotating hinges. The snake puzzle develops perseverance, spatial thinking, imagination, logic and fantasy. It captivates both adults and children. In this article we will introduce you to Rubik's snakes and tell you how to collect various shapes.

For fans of the Rubik's puzzle, creating a ball is the most common shape. You can start assembling not only from the end of the toy, but also from its middle. In this case, there is no exact assembly algorithm. Either way is correct.
The addition scheme is as follows:


Watch the algorithm for assembling a snake into a ball in our video.
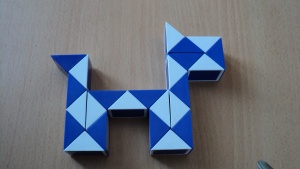
Collecting the dog
Here is a snake puzzle; instructions for the pieces accompany each description. Now let's talk about how to fold a dog. After assembly, the child will be happy to play with it.

Teach your child to create different shapes from a snake cube. By putting together a puzzle, he will not only have an interesting time, but also benefit it. Adding various shapes trains memory and attention. Pay attention to the dog assembly diagram.


Video instructions for the algorithm for adding a cute puppy.
Cute kitten
Professor Rubik developed his idea with the goal of developing logical thinking and fine motor skills. The mechanism of the toy is designed in such a way that it can be folded into different shapes: dog, cat, swan, bat, ball, and so on. Over 50 interesting animal figures are collected from the snake. There are no algorithms for this, only human imagination.
Almost every child loves kittens. You have a unique opportunity to make a cute pet out of a cube.

This is the kind of original cat that a snake puzzle can assemble; the diagram of the figure is shown in our video.
Cobra
As already mentioned, the Rubik's puzzle helps develop skills. Having such a toy at hand, you will spend your leisure time interestingly not only at home, but also during your lunch break at work, during a break at school, in transport, relaxing in the park, etc. The snake takes second place after the Rubik's cube.
The Hungarian inventor developed it for those people who have never succumbed to the cube. The difference between them is that the snake does not have an addition algorithm. That is, the result can be anything. Mathematicians have calculated that the rotation mechanism of the puzzle makes it possible to assemble over 90 quadrillion combinations, which include flowers, plants, animals, furniture, objects, buildings, birds, etc. A person determines for himself which forms to collect - complex or simple.
The Cobra figure is not considered difficult. Try folding it using the video instructions.
Elephant
By turning the snake mechanism you can assemble interesting figures. At first glance, it seems that assembling combinations is not difficult. In fact, it’s easy to twist a snake, but to create an accurate figure, you need skills and abilities. The elephant is the largest animal. But with the help of a snake you can assemble it.

Detailed instructions are provided in the video. Take the snake in your hands and start creating an eared elephant.
Rocket
Boys will be interested in assembling a rocket. Children need such educational games. Essentially, they make toys for themselves with their own hands. This includes puzzles. The snake is designed in such a way that the child develops during play and learns new skills without knowing it. Assembling a puzzle is also useful for adults. Over the years, memory deteriorates, and any thought processes activate the convolutions.
It is better to start learning with simple figures. First, try to assemble a rocket.

It should be noted that with the help of a snake you can fold a variety of aircraft, for example, this one.
It all depends on the difficulty level. If desired, you can add several more types of rockets.
Let's talk about the benefits of the Rubik's snake. This puzzle combines play and learning. During the assembly process, the child develops analytical and imaginative thinking. He perceives the world in a new way. It is these qualities that will help the child adapt in adulthood.
We invite you to watch a video with instructions for assembling the rocket.
Psychologists are convinced that the specific results that a child achieves independently have a beneficial effect on his overall mood. He begins to believe in himself, becomes bolder and more active in any actions. The child's self-esteem rises. Finding the right solution improves math skills. Therefore, develop your child and develop yourself. Watch the video to see what other shapes you can make with the snake puzzle.
Articles on the topic