Ideas for arches from the hallway to the kitchen. Installation of plasterboard arches in the hallway
Unlike the usual interior doors, drywall arches look solemn, visually raise the ceilings and expand the space of the apartment. The plasticity of this building material allows you to cut out oval reliefs and all kinds of smooth curves from it, which complement the interior so beautifully. A variety of plasterboard arches, their features and design functions will be discussed later in the article.
Features of drywall arches in the interior
Plasterboard arches are three-dimensional structures that decorate the openings between rooms in private houses, apartments, cafes, galleries, theaters, educational institutions and temples. They can be of different diameters, narrow or occupying almost the entire wall, simple or unusual shapes.
The basis of the arch is a metal frame to which a curved drywall is attached. To give the material a shape, factory processing is used (production of arched blanks of the GKLA brand), as well as dry and wet bending of initially even sheets. In the first case, cuts are made, in the second, drywall is impregnated with water, bent and dried under pressure in this form.
The positive aspects of drywall arches are their aesthetics, ease of installation and low cost (compared to concrete, brick, wood). Among the shortcomings can be noted low resistance to moisture. In some cases, the disadvantage may be that the arched opening in the wall remains open, which means that drafts, extraneous sounds, smells, and light will penetrate through it.

What are the forms
Reminiscent of ancient temples and Renaissance palaces, vaulted passages add elevation to the interior. They are great for visual zoning of hallways, corridors, landings, living rooms, reception rooms. A large number of geometric shapes that can be given to drywall provides an opportunity to choose the perfect option for any type of interior.
Round arches made of drywall
Round and semicircular arches will harmoniously complement the classical, Greek, Byzantine, and Victorian style. They should be decorated with plaster moldings, golden or silver ornaments, and make the side parts in the form of columns. The finish should be plain, white or a color very close to it.


Rectangular plasterboard arches
Such portals are very similar to doorways. It is a good choice for a minimalist and modern interior. They can be part of partitions with shelves located on the sides, and if necessary, even closed with sliding screens.

Elliptical drywall arches
Plasterboard arches, the upper part of which is made in the form of half a horizontal ellipse, are suitable for rooms with low ceilings (from 2.5 m). They successfully fit into such styles as modern, provence, loft, country - you just need to find the appropriate frame.


Arabic / Oriental drywall arches
The eastern openings look like pointed domes. This type of arches is typical for India, Turkey and all Muslim countries. As an addition, jagged and wavy reliefs, complex miniature patterns of saturated colors are possible.


Trapezoidal plasterboard arches
Arches with geometric angles look good surrounded by wood and stone, because these materials do not allow smooth bends. They are especially good for country houses, offices, pubs and libraries.

Figured plasterboard arches
Fantasy soft reliefs can be the highlight of the interior, made in a futuristic, romantic or playful style. By the way, a drywall arch can not only decorate an opening in the wall, but also serve as a decorative frame around a niche.


Finishing plasterboard arches
After giving the drywall arch the desired shape, applying the base putty and primer, its appearance can be significantly improved with the help of decor. There are a great variety of finishes, and among them you can choose any that suits the price and aesthetic qualities.
Painting
Alkyd enamel will help to achieve a glossy effect, and water-based and water-dispersion compositions will provide a matte surface.


painting
To apply drawings on the arch, you can use stencils, and if you have artistic talent, you can make them by hand. Techniques and materials in this case are limited only by the imagination of the master.

Stucco and PVC decor
Stucco molding, as well as inexpensive polystyrene products in the form of all kinds of shapes and lace, will help to instantly decorate any arch. Due to their low weight, they are easily glued to the plasterboard base.


Wallpaper
Wallpapering is one of the most affordable ways to finish arched structures. It will only take more skill and accuracy than on flat walls - so that no seams are visible.

Decorative rock
Natural or artificial stone will perfectly frame the opening, giving the interior a luxurious and complete look.


wood veneer
The unique pattern of a cut of expensive tree species on a drywall arch will make a simple interior an elite one with minimal financial costs.

Stained glass, glass, mirrors
Decorative cutouts can be filled with translucent or reflective inserts. This design looks elegant and creates a beautiful play of rays.


How to make a drywall arch with your own hands
To perform the installation of the arch, you will need the appropriate materials:
- drywall (it is better for beginners to choose an already curved arched one (GKLA);
- metal or wooden profiles, plywood;
- self-tapping screws, dowels;
- putty, primer.
From the tools, you should prepare measuring instruments (carpenter's square, tape measure), a large compass, a pencil, a drywall knife, scissors for cutting metal, a screwdriver, fine-grained sandpaper for polishing edges, a spatula, personal protective equipment.

Stages of work
1) Design. Based on the parameters of the room, the design idea, it is necessary to accurately determine the dimensions and relief of the future structure.
2) Calculation of materials. It is better to take more drywall and consumables than required. So in case of accidental damage, it will be possible to safely continue installation.
3) Cutting and fixing profiles. As a result, you should get a kind of frame that fits in width. They must first be attached to the concrete wall with dowels, and then fixed with self-tapping screws. The optimal distance between the screws is 10-15 cm.
4) Cutting drywall blanks, giving them a curved shape. You can clearly see this process in the video.
5) Frame sheathing. The diameter and length of the screws should be selected depending on the thickness of the sheets. Their caps after screwing should be flush with drywall, so as not to create unnecessary irregularities.
6) Strengthening the structure. To do this, a curved metal profile is attached to the outer edges of the arch.
7) Alignment. At this stage, you need to smooth out the roughness, putty the surface and prepare it for finishing.

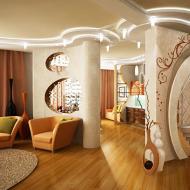
Drywall arch design - photo
Our gallery presents the most interesting and striking examples of how plasterboard arches can look in the interior. For convenience, they are grouped into different types of premises. After looking at the pictures, you will certainly find inspiring design options for yourself!
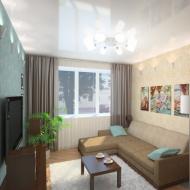
Drywall arches in the living room


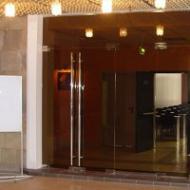
Plasterboard arches in the hallway / hallway


Arches are among the oldest decorative elements. Sultans, kings, kings, pharaohs and padishahs decorated their chambers and palaces with them. This technique made it possible to visually expand the space in the room or conditionally divide the room into separate zones. In modern realities, arches perform a stylistic function, perfectly complementing the overall design of the room. Especially appropriate in the hallway, because. the guests who have come stop looking at the design of the corridor area and begin to form their opinion regarding the design of the house from there. Therefore, it is very important to surprise them with non-standard decor from the very beginning.
What are the types of arches?
In form, they are classic, in the style of "modern", in the style of "romance", and in the style of "portal". Most often, the design of the arch in the hallway is performed in a standard classical style. Because it fits almost any room design, and plus - it is very easy to implement. The Art Nouveau style is perfect for decorating an office or living room, because it has strict lines and resembles a part of an ellipse. The portal style is very similar to a regular doorway, without a door. If you install such an arch correctly, it will turn out very beautiful and interesting.

According to the method of construction: plasterboard, stone, plastic, MDF, concrete, brick, wood and decorative metal. The simplest and most convenient option is drywall arches in the hallway. The procedure for their installation and installation is quite convenient and simple. Drywall, in comparison with other materials, does not require much effort. It quickly forms the necessary arched shape and retains it for many years.

In addition, you can use other types of arches to decorate an apartment, in particular, such as: trapezoidal arches, Persian, transoms, lancet, horseshoe-shaped, semi-arches, Renaissance and Tudor style. The choice of a particular type is influenced by three main factors:
- color scheme and general style of the room;
- ceiling height and room dimensions;
- purpose of the room.

If you want to get a really decorative arch in the hallway with good decoration, then you need to take into account all of the above factors and, based on them, choose the most suitable type of arch from all the options in the photo.
Do-it-yourself arch in the hallway
Independent creation of a drywall arch and its further decoration is not a difficult task. The main thing is to follow a clear procedure, have all the necessary materials and tools at hand, and also be careful and attentive at every stage of installation. As a result, the design of the arch in the hallway will look very beautiful and attractive.
Solving zoning problems

An arched opening is sometimes erected not only for beauty, but also to solve certain problems in the layout of the house. With its help, you can conveniently combine a kitchen room with a corridor, a corridor with a hall, an entrance hall with a living room. The arches between the hallway and the kitchen are also very comfortable and aesthetic. With the advent of such an element of decor, a large space is formed and the visibility of the room increases. The room seems much larger than it actually is.
One way to increase living space is to remove doors. But it is not always possible or willing to destroy the walls. Then the former doorway is made out in the form of an arch. Another option for using arched openings is to divide a long corridor into zones, breaking up too simple geometry. When repairing on their own, drywall arches are most often made: they are the easiest to do with your own hands.
Types of arches
Interior or corridor arches can have a different shape. They differ mainly in the shape of the upper part and sometimes in the way they are connected to the vertical parts. Their main types are shown in the photo.
This group lacks one of the most popular lately - the semi-arch. They have a rounded corner on one side only, on the other it remains straight. Hence the name - semi-arc. It looks good in modern interiors: minimalism, hi-tech, maybe in art deco.

The classic is distinguished by the correct shape of the top. This is strictly a semicircle, the radius of which is equal to half the width of the doorway. This view looks good with an opening height of at least 2.5 m. It fits well into any interior, but looks best in a long corridor, or instead of the front door to the kitchen.

The arched opening in the Modern style is distinguished by a small radius of curvature and a sharp transition at the junction with the vertical components of the opening. It looks good if the walls and ceiling have a more or less simple design. Looks great on the site of the former balcony door, good at the entrance to the office.

The arch of the “Romance” style is rather just rounded corners (mostly masters call it that). It looks good with a large width and not the greatest height.

The "romantic" shape is good with a large width and small height
The shape of the "ellipse" is very close to the "romantic". It differs only in greater curvature in the middle part. Also suitable for low and wide openings. It just looks a little softer.

A trapezoid is a non-standard design consisting of broken lines. It is hard to play up in the interior, therefore it is used infrequently: for some non-standard designs.

One of the design options is a trapezoid
It is very similar to a regular opening, but in fact it is, only without a door leaf. For greater originality, it is often accompanied by wooden carved elements in the form of columns on the sides. In this form, it is good for classic interiors, as well as ethnic style - Greek or Roman, depending on the type of columns.

For decoration in modern styles, another example is used - next to the main arch, smaller portals are located. This technique allows you to "beat" a simple form.

Another version of the arch "portal"
Before you start making an arch, you need to decide on its parameters. select the type, and then the options: where it will start from, and what the radius of curvature will be. It can be a really sharp bend, or it can just be some rounding of the corners.

To understand how your chosen shape will look, you can cut a template out of cardboard and attach it to the doorway. Rate the effect. If everything suits you, you can make a blank according to this template. But only one - for one of the sides of the opening. The second must be done in place, otherwise it will turn out crooked.
Step-by-step instructions with photos: the fastest way
Do-it-yourself drywall arches are made in different ways. This takes the minimum amount of time. Having decided on the form, we proceed to installation. On the prepared opening - cleaned of peeling plaster and relatively leveled, we fix the frame according to the size of the future arch. It is made from a profile for drywall or a dry wooden block of a suitable size. Sometimes, if the wall is narrow, you can only pick up wood.

To begin with, we cut out a rectangle from drywall according to the size of the future arch, find its middle, mark it, and then temporarily screw it into place. We retreat from the edge of 12.5 mm - the thickness of the drywall sheet. If the adjacent walls are already plastered, add a couple more millimeters to the putty so that the surface can be leveled.

Now we take a piece of a profile or a hard corner, set aside half the width of the opening from one edge. At this place in the corner we make a hole, insert a carnation into it. We stick this nail into the middle of the doorway marked by us earlier on the sheet. It turns out a kind of compass, with which it is easy to draw a perfect line.

Arc delineator
By changing the height of the mount, you can get a more or less high arch. If you need a flatter curve, increase the length of the "compass".

Having removed the sheet, we cut out the arc along the outlined contour. This can be done with a special drywall file, a metal saw with a fine tooth for a smoother edge, a jigsaw (there will be a lot of dust). If the cut is not very even, we level it with sandpaper fixed on a grater. With this device we achieve a perfectly even curve of the shape we need. The cut out fragment of the arch - the side wall - is again fixed in place.

If everything is even, there are no distortions or irregularities, on the other side of the opening we attach the same drywall sheet as a few steps earlier - a rectangle or a square - depending on the shape. It must be fixed strictly vertically. Now transfer the shape of the arch to it. We take a square, at a right angle and with one side we press against the drywall, on which we transfer the arch, with the other side - to the arch. Having set the square perpendicularly, we mark a point with a pencil. We make such points along the entire arc. The more often they are made, the easier it will be to draw a line and the match will be more accurate - there will be less grinding.

Why is it so difficult and not just to make a copy of the first sheet? Because few openings are symmetrical. As a result, it is very problematic to install the second sheet so that the lines of the arch coincide.
Having noted all the points, we remove the sheet, draw a line, cut it out along it. We mount in place. Now again we take a trowel with sandpaper and now we level both edges until they completely match. One point - the trowel should be wider than the opening so that both walls of the arch are captured in one pass.

We measure the length of the arc, cut out a piece of the profile of the same length, make notches on the walls every 3-4 cm. This tape will need to be fixed along the arch of the arch from one side and the other.

We fasten it to self-tapping screws, carefully, pressing the profile and holding it with a bar, and not with your fingers: it is elementary to get into your fingers with a self-tapping screw. By the way, you need to work with a cut profile with gloves. If not, you will cut your hands for sure.

By the way, the back of the profile can be set along the edge - it’s easier to work, and then the joint will still have to be sealed. Screw the strip to the other side in the same way.

This is a bottom view - profiles are attached to the sides
There is a second way to attach the profile - to put it on a quick-setting universal glue, such as liquid nails. This method is acceptable if the width of the opening is small. With a large thickness of the arch, the adhesive may not withstand the mass of drywall, which will be attached from below.
The next step is to attach the jumpers. First, the depth of the arch is lost, 1-1.5 cm is subtracted from it. This will be the length of the jumpers. Cut pieces of a profile of this length.

Jumpers are cut from the same profile
In the places where the jumpers are attached, the “petals” are cut off, the prepared fragment is installed and fixed. It should not rest against the walls, it is located approximately 5 mm from the back. Jumpers are needed to make the design more rigid, otherwise it “walks” when pressed.

Next, from the drywall, you need to cut a rectangle that will cover the structure from below. Its width is determined simply - from the outer edge of one sheet of plasterboard, to the outer edge of the second sheet. The length is measured with a flexible tape (it can be tailor-made) or a tape measure with an assistant. We fasten this sheet with screws to the arch frame. The sheet has to be bent, and how to do this, read a little lower - towards the end of the article.

Arched opening made of drywall: the second method (photo report)
This method is good if the thickness of the partition is small: try attaching the profiles if the gap between them is several centimeters, and then attach the jumpers. It all starts the same way: the first wall of the arch is cut out, fastened and transferred to the second sheet.

After the width of the gap between the two sheets, wooden crossbars are cut out, which are attached along the edge of the arch to self-tapping screws.

The cut-out strip of drywall is fixed, starting from one side. To make it more convenient, you can fix it with clamps, since the thickness of the wall is small. When attaching the strip, you can focus on the screws with which the bars were screwed. That way you'll hit the crossbar for sure.

Then it remains only to fix a special perforated corner along the corner and level the irregularities.

A corner is attached along the vault of the arch, everything is puttied

It is also more convenient to level the dried putty along the arch of the arch with the entire plane of sandpaper fixed on a grater. It is unpleasant that dust falls into the eyes, so it is almost impossible to work without glasses.

How to make an arch instead of a door: the third method - typesetting
Another way to make drywall arches with your own hands is stacking. The vault is broken into segments and assembled from pieces that create close to the required curvature.

They are attached to putty, diluted with a mixture of PVA and water. Such a batch dries quickly, so first we cut the plates and try them on. It can be folded on the table, only the vault will turn upside down, but it will allow you to evaluate how correctly the plates are assembled.

Then the plates begin to be attached to the opening, for reliability, periodically reinforcing with self-tapping screws. Washers are placed under the heads - so as not to push through the cardboard. Remove excess putty immediately. If it gets stuck, it's impossible to tear it off. The finished surface is primed to improve adhesion (adhesion), and then puttied, leveling the arch. To make it easier to display, you can use a template attached on both sides.

Making sharp bends using this technology is not easy, and for rounded corners and semi-arches it is a great way to do without profiles.
How to bend drywall
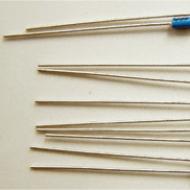
One important detail: standard wall drywall does not bend well. For curved surfaces, a thin one was specially invented - 6 and 6 mm thick. This bent part is easier to make from it. With a slight curvature, such a thin sheet can be bent easily and without tricks. If there is no desire to buy thin GVL, there are two ways to bend the standard one.
First- take a needle roller and roll the cut segment well on one side. You need to roll with effort so that the plaster breaks. Then the leaf is wetted with water and left for two to three hours. After such procedures, it should bend well. Take it, fix it on one side, and gradually pressing it against the arch frame, bend it, screwing it gradually along the edges with self-tapping screws. The method is not bad, only with a lack of experience and insufficient processing of gypsum, the sheet may burst. You will either have to mask the gap later, or start over.

Second way to bend drywall: on one side, make notches with a knife about every 4-5 cm. The notches should cut the paper. Such a strip is also gradually fixed, breaking the gypsum as necessary. It bursts along the incision lines from a light pressure.

Related videos
The entrance hall is the place where a person will get, just stepping on the threshold of the apartment. We can say - this is the face of the home, which creates the first impression. Therefore, people try to make this room in the original design, and, if possible, add an arch to the interior.
The role of the arch in the hallway
Before installing and designing the structure, you need to understand what role the arch plays in the interior of the hallway. This design element can perform a number of functions:
- This is a separate element of decor. The arch in the interior of the hallway looks unusual, thanks to which it will add freshness to the design of the room.
- Zoning. With this decor element, it is easy to designate the hallway area and separate it from the corridor or adjoining room. The design acts as a substitute for a bulky interior door, which occupies part of the hallway area.
- Thanks to the competent and organic location of the arch in the interior of the hallway, you can correct the shortcomings in the layout of the apartment or eliminate them. If the room is small in size, then this element will increase the space both visually and actually. And if the hallway has a low ceiling, then the rounded arch will visually give it height.

All this makes the arch indispensable in the interior of the hallway.

Materials for manufacturing
The arch in the hallway can be made from various materials. The main criteria here are: quality, price and service life.

There are several types of material that are preferred in the manufacture of arches in the hallway:
- Drywall.
- Gypsum.
- Tree.
- Plastic.
Among these materials, drywall is very popular. This is due to its practicality. It is quite easy to work with this material, it has the necessary strength, it is resistant to moisture. It can also be used to create structures of almost any shape.

In second place in popularity is fiberboard. The material does not have such popularity as drywall for several reasons: it has less strength, is susceptible to moisture, and is more difficult to process.

Another manufacturing option is gypsum. Making a structure from this material is a creative and painstaking task. However, this method allows you to create arches of almost any shape. And with the help of gypsum, you can create relief and textured elements that will carry a decorative function. That will avoid additional processing.

The solid wood arch is the most expensive, but at the same time a chic option. Thanks to the solid array, the design will look very rich, powerful and reliable.
Advice ! It is better to entrust the manufacture of an arch from solid wood to a master with experience in the manufacture of such decorative elements.

The plastic version attracts with its affordable price and practicality. This material is moisture resistant and easy to clean. However, the plastic arch does not fit all interior styles.
Attention ! The plastic construction is a fragile mechanism. Under mechanical stress, the plastic may burst or crack.

Drywall arches
Drywall is easy to use. Therefore, this material is most often used to make drywall arches in the hallway. It can complement the design of the room or hide its shortcomings. The design can be additionally equipped with an LED strip. This will add lighting to the room and emphasize this element of decor. In places where mirrors are installed, it is better to make structures from drywall in the Avant-garde style. Such design elements are equipped with additional shelves and ledges.

Advice ! For hallways made in a classic style, it is recommended to make a symmetrical rounded arch. It is desirable that it be with a transom or glass inserts. This option is ideal for rooms with low ceilings.

If desired, a drywall arch in the hallway can be made independently. To do this, you need a number of materials:
- 2 sheets of drywall for the arch.
- 1 sheet of drywall for finishing the inner frame of the arch.
- Metallic profile.
- Roulette.
- Perforator, screwdriver.
- Electric jigsaw.
- Reinforced tape, pencil, screws.
- Putty and finishing tools.

Using a tape measure, openings are measured, after which materials are purchased. The opening must be cleaned of everything: old wallpaper, paint. According to the results of measurements, marks are applied to the drywall sheet, according to which the necessary piece for the structure is cut out. Then three metal fasteners for the arch are cut off. Using a screwdriver and self-tapping screws, the fasteners are mounted on the inside of the opening. Plasterboard sheets are attached to them.

Advice ! For greater structural strength, the screws should be screwed at a distance of 10 centimeters from each other.
The most difficult stage in the manufacture of drywall arches is the installation of a metal profile. In order for the internal frame of the structure to turn out to be of high quality, it is necessary to measure the length of the arch. Then you need to properly bend the metal profile. To simplify the work, it is necessary to make cuts every 2 centimeters on the sides. It is not necessary to cut the profile in the central part. This part serves as the base.

Then a curved drywall piece is made. It is needed to complete the design of the arch. In order to make it easier to make an arc, drywall can be slightly moistened with a spray bottle. But this must be done carefully. Then we fasten the resulting element with self-tapping screws to the profile. After the metal profile was fixed, drywall sheets were sewn to it with self-tapping screws, it is necessary to seal all the seams and small inconsistencies with putty. After filling the structure with fine sandpaper, you need to remove all the bumps and flaws.
Arch styles in the hallway
The design of the arch in the hallway should be in harmony with the rest of the elements of this room. Otherwise, this element of decor will fall out of the general ensemble, which will negatively affect the interior. The overall style of the structure depends on its shape, but there are other nuances. The arch is finished with wood if the interior is made in a classic or English style. If rococo or baroque styles prevail in the hallway, then forging elements or stone should be present in the design. The ideal option in this case would be the manufacture of gypsum.

In the case of decorating a room in the avant-garde, hi-tech or modern style, glass, metal or plastic elements should be used.

With the help of additional decorative elements, you can emphasize the style of the hallway arch or set the main direction in the interior of the room.

Custom design
One of the original solutions in the design of the arch in the interior of the hallway is a non-standard cut finish. Thanks to decorative stone or tile, you can make the cut of the structure more interesting. Imitation of brickwork will make the interior unique. The opening can also be made mirrored. Another option is stained glass.

And if you want to add texture to the slices, you can use mosaics or decorative plaster. To design the passage, the materials from which the cut was made are used. If the passage was made of gypsum, then gypsum columns will be a great addition. The structure, made of solid wood, will look great with carved frames or columns. But you can combine decorative elements and arches from different materials.
Advice ! A slice of gypsum can be decorated with a decorative stone. It must be laid out on both sides along the perimeter of the arch.

An important element in the design of the arch in the hallway is the backlight. Thanks to it, a more cozy and comfortable atmosphere in the hallway is created. The passage through the arch will become more convenient. The lighting in the design of the arch in the hallway will add light to the room, give the interior a zest and create an unusual atmosphere. In structures made of gypsum, it is easy to mount several lamps. If the arch is made of plastic or with glass elements, then the LED strip will emphasize their advantages. For stone decor elements, lamps in the form of street lamps are perfect.

The arch in the design of the hallway plays not only the role of a door substitute, but is also a unique decorative element.
Over the past years, designers have come up with many interesting solutions for non-standard interior decoration.
Some of them have become quite popular and today they are used by a huge number of people.

One of these inventions is the arch in the hallway, thanks to which the interior of the room becomes much more interesting.

Types of arches
In the process of manufacturing arched openings, it is customary to use a material such as drywall.

It is quite easy to operate, but at the same time it has quite an enviable strength, so we can say with confidence that the choice of material is completely justified.
Using a metal profile complete with drywall sheets, you can achieve the creation of such a design, which is shown in the photo of the arch in the hallway, presented to your attention below.

However, this is far from the only non-standard solution; there are several types of arches that are also original:

In the Art Nouveau style - they are designed using an ellipse as a basis, so the designs have a more elongated shape.

It is recommended to use it for installation in rather narrow openings, since visually the product will stretch them and raise the ceiling. Gothic - plasterboard arches in the hallway can not only reflect modernity, but also bring a touch of antiquity to the design.

This will be a particularly relevant solution for hallways, in which the ceilings are quite high, and the room itself is more like a long corridor. To decorate this arch, two curved planes are used, which are connected at the highest point.

Romantic - this design of the arch in the hallway is especially popular among young couples who seek to decorate the interior with the addition of romantic notes.

Their shapes can be very different, but the most common are rounded corners or straight lines that change the silhouette of the opening to a streamlined one.

In addition to the above types of arches, there is another type that can often be found in houses whose owners, although they are adherents of the modern style, prefer to leave some details classic.

The basis of classical arches is always a circle. That is why they fit very well into any style, and also have the ability to decorate even a not too large opening.

The most interesting design solutions
Designers say that to create a unique interior in the hallway, you just need to choose the right combination of finishing materials for decorating the arch.

And since the arches in the interior of the hallway occupy a central place, it is worth paying special attention to the way they are designed.

The combination of a curved arch shape with glass will look very good. This will not only make her design more interesting, but also add more light to the room.

This solution is especially relevant for hallways in which there is not enough natural light. It is not necessary to use plain transparent glass. You can diversify the design somewhat by using a stained glass window.

If the rooms in your house are decorated in a classic or baroque style, you should especially seriously think about how to decorate the arch in the hallway so as not to spoil the overall design.

The most optimal solution is to decorate the arch with stucco molding. With it, you can not only beautifully design the design itself, but also hide the existing flaws that can ruin a presentable appearance.

In any interior, designs sheathed with clapboard look great. We draw your attention to the fact that the decorative arch in the hallway can be either wooden or laminated.

It all depends on your preferences, since both types belong to the category of strong and durable enough.

There are many other options that may also suit you. However, it is always worth remembering that the design of the arch in the hallway is a laborious process, on which the completeness of the interior of the entire room depends.

To achieve the best result, you should approach the work responsibly and carefully. After all, this is the only way you will be able to create an interesting and, at the same time, unique design that will characterize you as a person with taste.

Photo arches in the hallway


Related Articles