Flowers from plastic bottles for the garden with their own hands. Crafts from plastic bottles with your own hands - step by step instructions (photo)
Master class on needlework. Clivia from plastic bottles
Relevance
People have long used not only ready-made, natural materials, but also create completely new ones that do not exist in nature. These include plastics.
The group of these materials is perhaps the most common, because it is from plastics that our industry today produces a huge number of different products. They are different in purpose, shape and color.
Products made from plastic bottles are very popular in everyday life and for decorating a home and a garden plot. Plastic bottles have firmly established their positions in our daily life. The life of plastic bottles is not limited to single use, they are capable of more. So that bottles do not litter the environment, I want to show how you can give a second life to plastic bottles. Crafts from plastic bottles amaze with their diversity. A plastic bottle is a second life, which will be much brighter, more diverse than the previous one, and will be the main material when making a bouquet. DIY crafts from plastic bottles will decorate your garden plot, flower garden and will delight your eyes.
Plastic bottles from various drinks are mostly green or transparent. Products made from them are original, light and modern. There is no limit to imagination and creativity.
Work on the manufacture of products from plastic bottles contributes to the development of the muscles of the hands, improves the eye, consolidates labor skills and skills acquired when working with other materials. This is due to the typical nature of work operations that are characteristic of all types of labor.
The master class is designed for experienced needlewomen and beginners.
Target: to acquaint teachers, educators, parents with this type of creativity, and also show how you can make clivia from plastic bottles and decorate the site with them.
Tasks:
Develop a product manufacturing plan;
Draw attention to this type of arts and crafts.
The leading idea is to decorate the garden plot with flowers from plastic bottles, to give yourself, people joy and good mood.
Plastic bottles are a wonderful material
Cheap and available: you can get it at any time;
You can give the desired shape by processing over a candle;
Products can be painted with alkyd, acrylic spray paints.
This is interesting
Clivia belongs to the Amaryllis family. Clivia is native to the humid subtropical forests of South Africa. These are perennial herbaceous plants with long, rosette leaves. Bright orange, yellow or red clivia flowers are collected in inflorescences. On one inflorescence there can be 2-3 dozen bell-shaped flowers that bloom gradually and last a long time. There are several flower arrows on one plant. Shiny, long, dark green leaves are also very beautiful.
The most beautiful decorative-flowering clivia plant is distinguished by its simple beauty. There is nothing superfluous in this flower. It is beautiful in any period, whether it is flowering or rest. Clivia, blooming, transforms itself and transforms the entire surrounding space with the abundant rich beauty of multiple large and very bright inflorescences. It seems that clivia is a messenger from a country where spring and orange-yellow mood always reign!
Occupational Safety and Health
Hazards at work:
Hand injury with scissors, awl;
Painting the product with paint;
You can get burned while working on a candle.
What to do before starting work:
Put tools and materials in the place provided for them.
What to do while working:
Be attentive to work;
Put the scissors on the right with closed blades and rings forward;
It is better for seniors to cut plastic bottles, as difficulties arise, especially at the very beginning of work (it is difficult to pierce a bottle). Across and along the bottle, the material is cut with scissors quite easily. The most difficult to process are the bottom and neck of the bottle, here you need to work especially carefully so as not to injure your hand;
Work carefully on the candle so as not to burn yourself;
Work in a well ventilated area.
Tools and materials
Plastic bottles of green (5-6) and transparent color (7),
Scissors;
PVA glue;
Clay Master;
Acrylic, alkyd aerosol paints (red, yellow);
Candle with a diameter of 2 cm;
green insulating tape;
Wire of different diameters;
Large beads of two colors;
Oblong and round beads;
Thick threads (iris).

Stages of making a bouquet of flowers
Core manufacturing
1. Make 7 pistils and 42 stamens from large beads, beads.
To make a pestle, take a thin wire 20-25 cm long, string a green bead on it, bend the wire in half and string 22 large green beads on both ends.
To make stamens, take a thin wire 20-25 cm long, string an oblong bead on it, bend the wire in half and string 19 blue (white) beads on both ends.

2. To collect one flower, you need to take 1 pistil and 6 stamens. Attach the pestle with threads to an aluminum wire 20 cm long, lubricating the wire with PVA glue, and distribute the stamens evenly around it and fasten them with a thread.

flower making
1. For 7 transparent bottles, cut off the top.
2. Cut each part into 6 equal strips to the neck. Cut petals from each strip at the top, rounding the top.

3. Process each petal over a candle, giving a rounded shape to the petals. First work between the petals, and then the edges of each petal, pressing the other petals with your fingers.


Good day to all!
Summer is coming and along with preparing your summer cottage for the garden season, you need to take care of its design.
The use of old and unnecessary things has become not only popular, but also environmentally friendly. Used car tires, corks, plastic bottles - from all this you can create very interesting and unusual creations.
If you have accumulated a lot of plastic bottles, then why throw them away, let alone burn them (each burned bottle increases the amount of harmful carcinogens in the atmosphere). You can make a lot of interesting crafts out of them, which is what most gardeners do. In this article, we will see what can be done from this material.
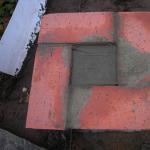
Let's start with the simplest. If you do not need any figures on the site, then making flower beds will be just right.

Such a wonderful border can be made by digging inverted bottles into the ground. You can paint them, or you can leave them like that. You can make it even more interesting. If they are cut in half and dug not upside down, but down, and pour earth into the free space and plant some kind of flower. Then you will get a border not only from bottles, but also from flowers.
If you insert the cut plastic container into each other, you get another version of the border that does not need to be dug in.

The next photo shows a two-tiered flower bed. If desired, you can make a few more tiers.

In general, there are a lot of options. The main thing is to show imagination.
From corks from plastic bottles, you can make a path on the garden plot.

If you decide to make interesting crafts, then the examples given here may help you realize your ideas.

A wonderful craft that uses additional materials in the form of old shoes and fittings.
And this photo shows the original design of the sofa made of plastic bottles.

If you want your garden to look like a house somewhere in the tropics, then you can "plant" such palm trees.

By the way, you can fence with plastic bottles not only flower beds, but also make beds.

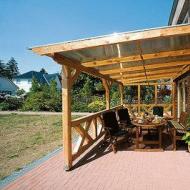
Also, if there are a lot of bottles, then whole structures can be made from them, like this gazebo.

You can also make a fence of your site from bottles. For example, here is a fence.

It will be very interesting to decorate the summer veranda at our dacha, having made both furniture and elements of room decor.

Well, if you have a river or some other body of water nearby, then such a boat will be a must.

The most traditional thing that can be made from plastic bottles, and that many safely do, is a bird feeder. Five-liter containers are well suited here.

If you are an amateur gardener and make alpine slides, then a Mexican-style slide decorated with cacti will suit your taste.

And, of course, flowers. This handmade product is created from almost any material. Paper flowers - origami, are most often made for holidays or any other events. Silk or satin flowers. Plastic also works well for this purpose.

With such flowers you can decorate the backyard, and put in a room in a vase.

There are a lot of options for making such crafts - it all depends on the imagination and possibilities. Some of these options will be discussed below.
How to make flowers with your own hands (step by step instructions)
Plastic bottles can also be used to make decorative flowers. There are a lot of options for such crafts, here we will consider the most common ones.
In the first version, such a craft is done.

To make such a flower, take a bottle and cut off the top and bottom of it. As a result, we get three blanks.

Now we take the upper part and make cuts from the bottom - to the neck, so that we get flower petals and stamen filaments.

Their number may be different. Thin strips will be sepals, which must be bent to the sides and twisted with a knife or scissors.

In the same way, we bend and twist wide strips that will be petals. Only the stamens will remain at the top. As a result, we get the following construction.

To make the flower look more beautiful, you can paint it with nail polish. You choose the color which will look best.

From the bottom of the bottle in a similar way, you can build the same flower. There is no need to twist the cut out parts.

Another interesting and simple way to make flowers. Multi-colored bottles, corks from them and wire for the stem will be used here.

From the bottle here we need the bottom. Carefully cut it off and cut out the petals.

A wire is threaded into the middle of the flower and secured from the outside with a loop.

A lid is glued in the center of the flower. The result is a flower, but still with a wire stem. The next step is to make the stem.

To do this, cut off a strip of about half a centimeter wide from a green bottle.
We wrap the stem with this strip. In order for the plastic strip to wrap well, it must be heated with a lighter.

From the same green bottle we cut out the leaves and attach them to the stem in the same way.

Thus, plastic flowers are ready.
This flower making is very simple. On the wire, which serves as the basis of the flower, we string the circles cut from the bottle.

They can be made in different colors. And decorate, then, even a flower bed in the garden.

If you use the bottom of the bottle, then you can make this kind of flower.

And, I want to give a photo scheme of another interesting product.

Everything is simple here too. We make a pattern of petals, according to which we cut a blank from a red bottle. Cut out the green leaves. We give red blanks by heating a different shape. The diagram also shows that small denticles can be cut along the edges with scissors. That is, make the flower terry.
After that, the finished flower petals are attached to the wire. She herself is wrapped in a strip of green color (as in the version above) and leaves are attached. As a result, we get a finished flower.
We make pots and vases for flowers in the country (a master class for beginners)
Since we talked about making artificial flowers earlier, how not to forget about real ones and not make a pot or vase for them. In it, however, you can put, however, an artificial flower made right there.
I would like to start with the simplest option. Probably, few people would have guessed about it, it is so simple to manufacture. Here we only need a bottle and an unnecessary CD.

Cut off the top of the bottle. The size of this part depends on what will be planted in the pot. We leave a cork on the neck. Having smeared glue on it, we glue this part to the disk. The vase is almost ready. For "prettyness" we paint it either in one color, or paint it. By the way, the lower part left over from the "halving" can also be used as a pot.

In the next version of the flower pot, the upper and lower halves are combined together.

If you cut off the lower part of the bottle, it stands well, and then glue a cork nose to it, make eyes, then you can get such a decorative pot.

Another very simple option for making a vase for flowers from a bottle. This option is well suited if you decide to decorate the wall with flowers such as petunias. To this end, we cut out the side wall of the bottle, make holes through which we pass the rope.

To keep the bottle, we make knots at the bottom on which it will hang. Having poured earth and planted our favorite flowers, we will get such beauty.

Similar pots can be made differently. We cut off the upper part, close it with a cork, paint it as it should. After that, we fill up the ground, plant the plant and hang it where necessary.

Watch this step by step video tutorial, you will love it!
Here are such wonderful vases you can cook. If you have some idea of your own, according to which you made a craft, then be sure to share it with readers in the comments at the bottom of the article. Maybe someone else would like to do something similar.
Beautiful zoo in the country from bottles
Many people are now striving to make beautiful sculptures on their site. This is due to the fact that the majority come to the dacha not only to stand in the garden all day, but also to take a break from the city. And if your cottage is beautifully decorated, then the rest will be good.
Most often, figurines are made in the form of animals. Making such crafts is quite easy, and the material is always at hand.
Looks good on the stone is such a frog princess.

You can make such an African composition.

To make your vegetable plantings look attractive, put such a wonderful donkey among pumpkins or zucchini with eggplant.

Or such a cunning fox.

If you show imagination, you can even put penguins in your garden.

There is no need to talk about our traditional forest and cartoon animals, such as these bunnies. The kids will surely love them.

If you collect several bottles of different calibers, then you can settle a family of pigs somewhere under a bush.

Previously, it was said about a donkey craft, which, if placed among vegetables, you can decorate a garden bed with this craft. And if you attach a cart in the form of a vase of flowers to it, you get a street flower bed.

Good luck in making wonderful crafts and creative success!
Plastic jewelry has the following advantages:
- They can stay in an open area for a long time without losing their decorative appearance. Plastic is not afraid of rain, sun or wind.
- This material is practically free, because you can accumulate plastic bottles at home, and then make jewelry out of them at no extra cost.
- Plastic is a malleable and easy-to-handle material. You can easily learn how to work with it and create a wide variety of decorative elements.
How to decorate the area with plastic flowers
Large large flowers (bells, daisies, daylilies) look very impressive on the plot.
If the petals are made of plastic mesh, they will turn out to be more airy and light.
Flowers can be placed singly in a garden bed, flower bed, next to rocky paths, on green lawns or lawns. You can make compositions of several colors. The hedges around the garden look original.
Plastic flowers serve not only as a decoration, but also as a good protection for plants from the scorching sun, as well as from uninvited birds on the site.
How to make flowers from plastic bottles
It's not hard at all to make them. The most important thing is to prepare all the necessary materials in advance and act according to the instructions.
For work you will need:
- Materials - plastic bottles (the more you take, the better). It is recommended to prepare bottles of different sizes, shapes and colors. Prepare beads, beads, buttons, wire or metal rods.
- Tools - scissors, knife, markers, felt-tip pens, lighter or candle, pliers, tweezers.
Plastic jewelry is wonderful because you can not be afraid to experiment with them.
We will tell you just a few simple examples of creating original jewelry. You can come up with something of your own.
Here you will find recommendations for .And read about the Japanese camellia flower, planting and caring for it.
Poppy made of plastic
Small flowers look very impressive. From them you can make a beautiful composition for the garden:

Flat flowers from the bottom
Procedure:


We paint flowers with paints and decorate with beads or other items
bells
For manufacturing, you will need a lot of small bottles (volume 0.33, 0.5 or 0.6 l.):

Cooking bell petals
- We take a bottle, step back from the cap 6-8 cm and carefully cut it into two halves. For further work, we need halves with lids.
- We put the bottle with the cap down and cut out the bell petals from above in a circle.
- The stems can be made from metal twigs, and the leaves can be cut from plastic. Leaves are attached to each twig. You can make small twigs out of wire, fasten them to the stem with pliers, and then fasten a few bells.
- The bells are easy to attach. Make a hole in the cork, thread a twig and make a knot inside so that the flower does not come off.
- Paint the stems, leaves and twigs green, and make the bells blue or white.
It is better to place bells in several pieces per stem.

Relevance
Products made from plastic bottles are very popular in everyday life and for decorating a home and a garden plot. Crafts from plastic bottles amaze with their diversity. A plastic bottle is a second life, which will be much brighter, more diverse than the previous one, and will be the main material when making a bouquet. DIY crafts from plastic bottles will decorate your garden plot, flower garden and will delight your eyes.
Plastic bottles from various drinks are mostly green or transparent. Products made from them are original, light and modern.
Work on the manufacture of products from plastic bottles contributes to the development of the muscles of the hands, improves the eye, consolidates labor skills and skills acquired when working with other materials. This is due to the typical nature of work operations that are characteristic of all types of labor.
The master class is designed for experienced and beginners.
Target: to acquaint teachers, educators, parents with this type of creativity, as well as make a bouquet of plastic bottles and decorate the site with it.
Tasks:
Develop product design
Draw attention to this type of arts and crafts.
The leading idea is to decorate the garden plot with flowers from plastic bottles, to give yourself, people joy and good mood.
Plastic bottles are a wonderful material
Cheap and available: you can get it at any time;
You can give the desired shape by processing over a candle;
Products can be painted with alkyd, acrylic spray paints.
Occupational Safety and Health
Hazards at work:
Hand injury with scissors, awl;
Painting the product with paint;
You can get burned while working on a candle.
What to do before starting work:
Put tools and materials in the place provided for them.
What to do while working:
Be attentive to work;
Put the scissors on the right with closed blades and rings forward;
It is better for seniors to cut plastic bottles, as difficulties arise, especially at the very beginning of work (it is difficult to pierce a bottle). Across and along the bottle, the material is cut with scissors quite easily. The most difficult to process are the bottom and neck of the bottle, here you need to work especially carefully so as not to injure your hand;
Work carefully on the candle, do not burn yourself;
Work in a well ventilated area.
Tools and materials
Plastic bottles of green (5-6) and transparent color (7),
Scissors;
PVA glue;
Clay Master;
Acrylic, alkyd aerosol paints (white, blue, red);
Turquoise enamel;
Candle with a diameter of 2 cm;
green insulating tape;
Wire of different diameters;
Large beads of two colors;
Oblong and round beads;
Thick threads (iris).
.jpg)
lilies- wonderful, beautiful flowers,
They have been growing on the ground for hundreds of years,
Symbol of power, tenderness, purity,
There is no ancient flower in the world.
About them in the old days, legends, myths were composed,
Songs and poems were dedicated to them,
In each country they were revered in their own way,
Lilies are flowers of hope and love.
Where these flowers came from no one knows
Maybe they were sent to us by their deities from heaven,
Lilies successfully live on earth,
They give people beauty and a miracle of miracles ... Lyubov Petrova.
Stages of making a bouquet of flowers
Core manufacturing
1. Make 7 pistils and 42 stamens from large beads, beads.
To make a pestle, take a thin wire 20-25 cm long, string a green bead on it, bend the wire in half and string 22 large yellow beads on both ends.
To make stamens, take a thin wire 20-25 cm long, string an oblong bead on it, bend the wire in half and string 19 blue (orange) beads on both ends.

2. To collect one flower, you need to take 1 pistil and 6 stamens. Attach the pestle with threads to the aluminum wire, lubricating the wire with PVA glue, and distribute the stamens evenly around it and fasten them with a thread.

flower making
1. Take 7 transparent bottles and cut off the top of them.
2. Cut each part into 6 equal strips to the neck. Cut out petals from each strip, cut off a corner on the right side from the middle of the upper part, then slightly rounding on the left.


3. Process each petal over a candle, giving the desired shape to the petals. First work between the petals, and then the edges of each petal, pressing the other petals with your fingers.


I hope that after this article you will look at plastic bottles not as garbage, but as a source of inspiration! Tulips, poppies, roses, orchids. And all this is still stored in PET containers. But as soon as we learn how flowers are cut, we will turn the jars into a beautiful decor!
I picked up models that are simple enough that a beginner can make them. It will be great if you not only use the tips from the article to decorate your yard and garden, but also send photos of your work! I am sure that everything will work out for you, and the decor of plastic bottles will remind you and your family and friends for many years that you are a talented person!
Do-it-yourself flowers from plastic bottles - a step-by-step master class for beginners
Some models are so magically beautiful that it seems that they cannot be repeated! But in fact, everything is very simple. And I'll show you a simple diagram of these original colors.
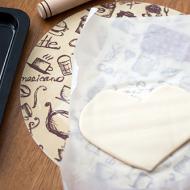
Cut off the bottom of three two-liter bottles. We cut out volumetric parts from the bottom that are curved outwards (they are around the legs).
The shape of the parts should be like a droplet.

At the "droplet" we round the corners. And we make an incision in the middle of the top line, so we get the shape of a heart. This is the rose petal!
We process all the edges of the petal over the fire of a candle. They are bent and a more believable shape is obtained, like a rose. We bring it not to the top of the flame, but to the bottom, where the temperature is lower.

We take one of the petals. Fold it in half. And then we bend each side to the middle line - we get a tube, the basis for the bud.

Glue a petal to this blank.

And so we glue the middle with petals on three sides. We glue them with "backs", sides that are curved.

Glue the next row of petals on the reverse side.

And the last row is again glued with the backs. So we got the volume and splendor of the workpiece.

The edges of the petals can be lightly painted in any of the colors. So the rose will no longer be transparent. It will take shape and volume!

If you get neon-effect glue, apply it to the very edges of the flower so that it glows in the dark.
 Do-it-yourself flowers from plastic bottles - a step-by-step master class for beginners. Author https://www.youtube.com/watch?v=-7EPwoiMhtE
 How to make flowers from plastic bottles with your own hands for the garden
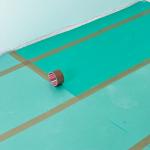
I wanted to show you how to make a flower for a garden from leaves. This is a cross between calla and dieffenbachia: large leaves on thin stems. Looks very elegant and attractive.
Cut off the top and bottom of 2-3 green bottles. Cut the pipe in half. So we get the "canvas".

Cut the fabric into rectangles. Fold the rectangles in half lengthwise.
From each rectangle, cut out a leaf on a long stem.

Leaf and stem are approximately equal in length. The shape of the leaf is similar to a droplet or a heart.

3 more blanks should be narrow, no more than 1 cm wide. One of the blanks must be twisted with a tourniquet.

We paint all the blanks from the spray can to get a more saturated color. We begin to assemble the structure.
In the middle is a twisted blank and 2 thin leaves. Tie them tightly with green tape.

We place the leaves around this middle and tie them with a ribbon.
When all the sheets are tied around the middle, we bend them so that the design becomes more magnificent.

We place the craft in a pot with foam. We mask the top of the foam with a green cloth.
It remains only to find a place in this “flower” itself.
 How to make flowers from plastic bottles with your own hands for the garden. Author https://www.youtube.com/watch?v=UaTciCNerQg
 New ideas for flowers for the garden and garden from bottles + schemes
This flower can decorate a pond or the area around it. What if there is no pond? It's easy to create! You can plant blue plastic bottle caps on concrete!
We cut the bottle in half. The part where the neck is cut into 8 strips.

Bend the strips 90⁰.
We make the edge of each strip look like a leaf, cutting off the corners.

We cut the edge of the second part of the bottle with sharp, shallow (2.5-3 cm) teeth.

Cut off the bottom of another bottle. And we make exactly the same incisions-teeth in it.

We need the middle of the second bottle. We cut it along, we get a rectangle.
Color the first piece green. The other three are in red and orange. Assembling the flower design. We twist the rectangle into a tube. We pass it through the neck of the first part.

We glue the bottom of the second bottle to the bottom of this tube.

We glue the lower part with the bottom from the first bottle on top of the structure to the green part.

A very simple model, which is within the power of a beginner. At the same time, the flower turned out elegant and large. By the way, for coloring you need to choose a paint that is waterproof so that it is not afraid of rain and moisture.
 New flower ideas for the garden and bottle garden. Author https://www.youtube.com/watch?v=L56LZZHYf8k
 The second version of the flower from the neck of the bottle. We make 7-8 rounded petals on the top of the bottle, bend them.

Glue tissue paper or toilet paper onto PVA glue. If there are irregularities, this is even a plus, there will be a more interesting texture of the flower.

We glue the petals on both sides. When the glue dries, paint with a beautiful waterproof paint, you can acrylic. If you plan to keep the flower in the open air, then you need to cover it with 2-3 layers of varnish.

We fix the wire in the lid by bending it into a loop.

We twist the cap, glue 3 cotton swabs and a pom-pom in the middle of the flower.

Flowers are ready to decorate your garden.
 Author https://youtu.be/LlwlX2AGbkU
 Here are some more beautiful flowers from shampoo bottles. Petals are cut out, the edges are processed over the candle, we bend the petals a little after heating to get a wave at the edge and in the middle along the petal.

Using hot glue, we collect a flower from 2 rows of petals - 4 large overlapped, inside a circle of 4 small overlapped glued.

It remains to glue the stamens. You can buy them, or you can make your own. To do this, put a drop of hot glue on the edge of the wire and dip it in sparkles. It can also be made from PVA, but it will take a long time to dry.
 Beautiful flowers from bottles. Author https://youtu.be/9_WHmwKQQCg
 See what kind of curtain you can make from bottle bottoms. We cut the bottom along the concave lines on the bottle, round the petals. We process the edges and the flower is ready.

Another incredibly beautiful and simple flower from the site. We cut off the bottom of the bottle, form the petals and twist the edges with a candle.

We tint it with paints or varnish.

From the middle part of the bottle we cut out a flower with five petals of a smaller diameter.

Color it in a contrasting color.

With a heated screwdriver, we make a hole in the middle and thread the bead on the fishing line.

We also pass the fishing line through a large flower and fix it with hot glue.

And here is a real palm tree from a green bottle.
And here is an incredibly beautiful and lush flower.
Here are some more beautiful and simple flowers from the bottoms. It looks very cool when there are a lot of them.

And how do you like this idea?

Instructions for creating a tulip
Let's make a whole bouquet of tulips. And plastic bottles will be the most suitable material for creativity for us! It is easy to cut out details from them, assemble structures and paint them in the desired color.
In a half-liter bottle, cut off the neck and bottom. Cut the tube lengthwise.
In the resulting rectangle, we make deep cuts, leaving 1.5-2 cm. we make incisions every 0.3-0.5 cm.
From the bottom we cut out 3 voluminous petals. We give them the shape of a droplet.
We heat the bases of each petal and glue them together.
We cut off a thin strip from the middle part (only of another bottle). Fold it in half. This is the stem of a tulip.
Cut out 4 small leaves.

Glue the bud to the stem. And under the bud we place the leaves.

We color the flower. The bud is red. If necessary, then the stem and leaves in green.
We collect all the flower blanks and drag them with the fringe that we did at the very beginning.
Glue the neck to the bottom. It turns out a stable flowerpot. We insert our bouquet into the neck.
Very simple and incredibly beautiful! Tulips can be made in different colors. Fasten their petals at different angles so that it seems that some tulips are blooming.

Poppy from a plastic bottle with a candle
Poppy is a very delicate flower. But, if we cut it out of a bottle, it will stand for many years in our country house, decorating its landscape. And the fire of a candle will help to give the desired shape to the leaves and petals.
We cut out the details according to the patterns: flower, leaves, sepals. Cut out another round core. And we also need a thin long strip, on which we will make cuts along the entire length.
It is best to cut parts from cans that match the color scheme of our parts. If we did not find suitable colored bottles, then we will color them. Only this needs to be done after we heat up and assemble the parts into a single structure.

We heat the sepals and petals over the candle flame. So we give the desired shape to these details.
We wrap the wire with a long strip with a fringe, but not to the top. At the very top, where the flower will be, leave 2 cm of bare wire. To fix the plastic, do it over the candle.
We also make small cuts along the edges of the leaves. We shape the leaves by heating them over a candle.
We connect the leaves with the stem, heating the plastic over the fire.
We make a hole in the middle of the sepal and put it on the bare edge of the wire.
We plant a flower in the same way.
We cut the edges of the core with a fringe. We warm over the fire so that these edges “fluff”.

We put the core on the wire. We bend the edge of the wire, fixing the details.
Glue red and green circles on top of the wire.
It turns out very beautiful and, like a real poppy! You can choose the size of the flower yourself, from miniature to huge.

Another version of poppy from a bottle is simpler, but no less beautiful!

How to make DIY tulips from PET
Now I will show you how to make a bouquet of tulips that have blossomed. It turns out very original, I can’t even believe that it’s so simple! From only one blank, we will now make a bud!
Cut out a square.

From 4 parts we make cuts to the middle, leaving 0.5-1 cm each, no more!

The edges of the resulting 4 parts are rounded off.

We heat the blank over the candle, shaping the flower so that it looks like a tulip.

To do this, first we process the edges over the candle, then we hold the middle of the flower over the candle so that it gathers into a bud.

We connect a little petals, overlapping one on top of the other and slightly warming over the fire.

We hold the middle inside the flower for a very short time over the fire so that it turns black.
Cut off a long strip 0.5 cm wide.

We heat it over the fire and wind it in a spiral.

Cut off one end in a wedge shape. We warm the sharp corner over the fire. So we make a stronger corner.
We make a hole in the middle of the flower blank. We put the wedge into the hole of the bud. We fix with glue.

We cut off the neck and part of its height in a two-liter bottle. We cut the height, until it narrows to the neck into 5 strips.
In each strip, we round the edges to get the shape of a leaf.

Over the fire, we shape each sheet, straightening and stretching them with our hands. Bouquet is ready.

We put flowers in it. We lower the workpiece into a pot. We fasten the structure with cement mortar: pour it into a pot.
Such a bouquet is not afraid of rain, snow, or the scorching sun. It will last for many years in our garden.
 How to make DIY tulips from PET https://www.youtube.com/watch?v=Vtrsj0e3-gA
 Master class for beginners on creating a peony
In fact, a peony is very easy to make if you have templates for cutting. Yes, even without them, you can cut the workpiece into thin strips, 1.5-2 centimeters each, round the edges, as in petals, and design a peony with this detail.
We cut out blanks of different diameters according to 3 templates.

We give the petals of the blanks a shape over the fire of a candle.
We color the blanks.

We glue the blanks one into the other (according to the diameter). Glue the beads into the middle. 
Here the flower is ready! If you want to plant it on a leg, then heat a thin strip from a plastic bottle over a fire (stretch the strip slightly). Get a stem. You can glue the cut out leaves to it. Color this blank green and connect with a flower.

Source
More options for peonies and peony roses.

Orchid from a plastic bottle - step by step instructions
Even such beautiful flowers as orchids are easy to make from such waste material as bottles! To do this, you can use multi-colored containers, or you can paint the craft after molding.
We cut out the details of flowers and leaves according to the templates.

If necessary, we paint certain parts.
We make a hole in the middle of all flower blanks.
We string them on a wire or a toothpick. But it is better to do this with half an ear stick so that the thickened part with cotton wool is on the front of the flower. We fix everything with glue.
Glue the details for the buds onto the half of the ear stick.
We attach cotton swabs to the wire. We attach this wire to a large wire that serves as a stem. We place the flowers in order along the entire stem.

We wrap the large stem and small stems with teip tape.
We fix the cut sheets of the orchid with glue at the very bottom of the structure.
We plant the flower in a pot. We fix with stones, cement or other material.
Such a pot with an orchid will decorate the garden or it can be installed at the threshold of the house.

Source
Video and how to make a lily, chamomile, bells, lotus, daffodils
Of course, the choice of crafts with different colors is huge. And all because plastic bottles are a great material. Here I made a small selection of videos for different colors. If you wish, you can use different colors for crafts, choose different sizes and ways of fastening. For example, some flowers can be "planted" right around the garden, like a kind of fence. Arrange compositions from others. And the third to mask the walls of unattractive buildings. And at the same time, only flower buds without stems can be used.
Bell
chrysanthemums

See how beautifully you can beat an old stump or tree trunk.

Tell your friends about the collection and be sure to help them subscribe so that they become regular visitors to the site, can discuss various topics with us and create masterpieces for home and garden!
I honestly admit that I used to be skeptical about crafts from a bottle, but after looking at these earrings, I changed my mind.

Related Articles