Infrared photography: theory and practice. Infrared photography on black and white film Infrared photography filter how to shoot
Test: Alexander SLABUKHA, Sergey SCHERBAKOV
Before us are two filters through which nothing is visible. More precisely, through one of them, which has a dark red, almost black color, you still manage to make out something. This is the infrared filter B + W Infrared Dark Red 092, manufactured by Schneider Optics, a subsidiary of Schneider-Kreuznach.
If there was only one filter, this material most likely would not have appeared. Cokin 007, Hoya R72, Heliopan RG715 - these filters, presented on our market for a long time and already fully mastered by photographers, are practically analogues of the "ninety-second". And in this regard, it is unlikely that any surprises should be expected from B + W 092.
But from the completely black B + W Infrared Black 093, and this is the second filter under consideration, surprises are quite possible. Their reason is in the spectral characteristics of this filter in relation to artistic photography, which are fundamentally different from the characteristics of B + W Infrared Dark Red 092.
The B+W Infrared Dark Red 092 filter blocks visible light up to a wavelength of 650 nm, transmits 50% at 700 nm. From 730 to 2000 nm transmits more than 90% of the radiation. Recommended for artistic photography on black and white infrared materials. Exposure magnification for different materials can be 20-40x.
The B+W Infrared Black 093 filter blocks visible light up to 800nm and transmits 88% at 900nm. Designed primarily for scientific photography. Rarely used in fine art photography due to the catastrophic drop in light sensitivity of general purpose black and white infrared films.
In short, filter 093 transmits only infrared radiation, while in the passband of filter 092 there is a certain portion of the visible spectrum, which can be captured, for example, by digital camera sensors.
The filters are available in round threaded frames with diameters from 30.5 mm to 77 mm. True, you will not find such an abundance in Moscow stores, and the presented assortment is usually limited to the most popular diameters, ranging from 58 mm and above.
Filters with a diameter of 72 mm were received for testing. Frankly, we would like 77 mm to work with professional fast zooms (recall that these lenses, as a rule, have just such a connecting thread for filters). A way out, however, was found - a transitional lowering ring 72/77 mm.
Whether there will be vignetting from the filter frame or not depends on the design of the lens frame and its focal length (more precisely, the angle of view). The only lens where we observed vignetting was the Sigma 10-20/3.5-5.6 EX DC HSM (for DSLRs with an APS-C sensor). But even at 10-12 mm focuses, only slight cutting of the corners of the frame was observed, and starting from f=13 mm it completely disappeared.
cameras
The fact that the tested filters are threaded, and of a large diameter, also predetermined the choice of the type of test chamber - a reflex one with interchangeable optics. And although we still filmed a clip of infrared black-and-white film, the main testing tool was a digital camera.
On the Internet there is information about the suitability of a digital camera for infrared photography. The matrix itself is sensitive, sometimes even very significantly, to infrared radiation. But before the digital sensor there is a filter (internal IR cut filter), which delays this radiation. And on what are the spectral characteristics of the matrix and this filter, it depends on how suitable a particular camera is for infrared photography. However, we somehow cannot believe in the absolute unsuitability of modern DSLRs ...
We chose Nikon D50 and Canon EOS 350D as test cameras. It is believed that the first is well suited for infrared photography, and the second is not very good.
The main part of the shooting was done with Nikkor AF 24-120 / 3.5-5.6, Tokina AF 20-35 / 2.8 and Tokina AF 80-400 / 4.5-5.6 lenses on a Nikon D50 camera; EF-S 17-55 / 2.8 IS USM and EF 28-105 / 3.5-4.5 II USM - on the Canon EOS 350D.
Focusing
Despite the fact that with the 092 filter installed, the picture in the viewfinder is barely visible, the autofocus system of both cameras turned out to be efficient. In conditions of sufficient lighting, for example, during the day in nature, the cameras quite clearly focused on the object (only it was hardly visible in the viewfinder).
Does it follow that you can rely on camera automation? The answer will be this: depending on which camera, and even then not always. The point is that in the infrared part of the spectrum the focal plane is somewhat shifted, i.e. the lens draws a sharp image slightly in the wrong plane than for the visible part of the spectrum. And autofocus is set to work in the visible range.
Here, however, there are some nuances. So, the Nikon D50 camera without and with the 092 filter installed focused strictly at the same distance. This means that frames shot with autofocus through this infrared filter will be out of focus.
With the Canon EOS 350D, the picture is different. With the filter on, it autofocused at a slightly closer distance, the pictures turned out to be quite sharp, so manual focus correction can be omitted. As practice has shown, when using the Canon EOS 350D, the correction scale for shooting in the infrared range is suitable for a strong 093 filter, and for the 092 filter, the mark should be moved about twice as close to the usual focus mark in the visible range.
Speaking of focus correction, we mean the following. Sometimes on the frames of lenses, more precisely on the distance scale, one or more (in the case of a zoom lens) marks additional to the main one are applied. Their purpose is to correct the focus of the lens in such a way that after installing an infrared filter, the image in the focal plane of the camera remains sharp. Proceed as follows. First, without a filter, focus on the object - automatically or manually. Then, having installed the filter and switching the camera's autofocus to manual mode, shift the meter scale of the lens so that the focusing distance opposite the main mark moves to "infrared".
When working with the 093 filter, you have to do just that. And although cameras were sometimes able to focus through such a black filter, it’s still worth recognizing that autofocus systems are not designed to work with it.
Performing this focus correction with the 092 filter, every time we got crystal-sharp infrared images on the Nikon D50, and at full aperture. Under exactly the same conditions, the image with the 093 filter turned out to be slightly soapy.
But what if there are no infrared focusing marks on the lens (as a rule, these are budget inexpensive lenses)? You need to try on your own in a practical way to determine at least approximately the necessary movement and greatly aperture the lens. Aperture, however, will noticeably lengthen shutter speeds, and they are already large with infrared shooting. If not long-term.
exposition
Shooting with infrared filters requires an increase in exposure, in practical terms, the shutter speed worked out by the shutter. For filter 092 this increase is significant, for 093 it is very significant.
The Nikon D50 metering works quite accurately through the 092 filter, while the exposure increase is about 5-6 stops, which is very good. Let's call this exposure the base exposure for infrared photography. But even if the camera's metering worked with the filter inaccurately or didn't work at all (as with 093), it's not difficult to find the base exposure, at least from the image's histogram - it should be "good". By the way, having found the discrepancy between the base and normal exposures (i.e. for shooting in the visible range of the spectrum) in EV steps, you can not use the camera exposure system, but measure with an external exposure meter.
The metering on the Canon EOS 350D also works through the 092 filter, but the pictures come out dark (heavy underexposure), and an additional 4-5 steps need to be added. In this case, the total increase in exposure to the base is 10-11 steps.
Compared to 092, filter 093 will require an increase in exposure by another 4 steps. Thus, when shooting through it, you will have to increase exposure: for Nikon D50 by 10 stops, for Canon EOS 350D - by 16 (!).
What are the 16 steps in practice? Let's say on a sunny day at ISO 200, your shutter speed at f/5.6 could be 1/2000s. An increase of 16 steps lengthens it to ... 30 seconds! And in cloudy weather with poor lighting, the score will go to minutes. So working at high ISOs (at the same time, shutter speeds will be shorter) is a necessary measure for a Canon camera, but this does not benefit the image. Long exposures and high ISOs are exactly the reasons that make it difficult to shoot infrared Canon EOS 350D.
When shooting through the 092 filter, we would recommend not limiting yourself to the basic exposure, but taking an additional 2-3 frames, increasing the shutter speed by one step each time. In this case, the picture on the camera's LCD screen will look just awful, and the histogram will show strong overexposure, but it is still desirable to make these additional “defective” frames. Why - we will tell a little later.
Treatment
Shooting with both filters results in highly colored images. For 092, the predominant shade is red-orange, for 093 - red-violet. In any case, most outdoor shots with a Nikon camera were just that. (The hue depends on the spectral composition of the lighting, the characteristics of the infrared filter, the characteristics of the internal cut filter and color filters on the sensor, as well as the color interpretation algorithm of the camera processor or computer program.) Therefore, strong white balance correction is inevitable, and it is better to do it in a RAW file. We used Adobe Camera Raw (ACR) and Pixmantec RawShooter 2006 (RS 2006) converters.
When converting the image to black and white, the 093 filter turned out to be almost completely problem-free. It is enough to set the white balance with an eyedropper, and the image becomes monochrome gray (or almost so). Yes, it is sluggish, the contrast is greatly reduced, but it is easily corrected directly in the converter or later in the editor. In short, filter 093 is an easy and fast conversion of an infrared image to black and white.
The same cannot be said about the 092 filter. In this case, the picture will not turn out to be pure black and white. The reason is that this filter, in addition to infrared, also passes part of the visible part of the spectrum, so the image in the picture is a combination of normal and infrared. So in the converter, despite the fact that the picture will look like color, you need to create a good base in order to get a visually pleasing infrared effect later in the editor. In a word, you have to tinker.
How to distinguish a regular black and white photo from an infrared one? First of all, according to the tonality of green vegetation - it becomes light gray and even almost white. That's right - the green reflects infrared radiation well, and therefore should look light. Such highlighting in the picture is called the wood effect, but this has nothing to do with the tree. (In fact, the effect is named after the famous experimental physicist who used ultraviolet and infrared imaging in his research - Robert Wood / Robert Wood).
As we have noticed, some images were converted to a black-and-white infrared image quite easily, while others were quite troublesome. In terms of the distribution of tonalities, the image differed from the usual black and white, but it did not look much like infrared either. It is clear that the infrared component of the picture is somehow distributed over the RGB channels of the image. It is important to be able to find this information and extract it most effectively.
In the images taken by the Nikon D50, in most cases, the infrared signal was in the blue channel of the image, sometimes in green and very rarely in red, or in all three at the same time. (For other cameras, this relationship may remain, but may be different, so study your model.)
In order not to stretch the “weak” blue channel, we advise you to take several takes when shooting, increasing the exposure relative to the base one. Overexposure in 2-3 steps will be quite enough.
With such a supply of source material, the procedure for converting images taken through the 092 filter is greatly facilitated. You need to select the frame with the best blue channel and "pull" this channel, not paying attention to the others. This is the general scheme, the details in each case may vary.
And further. Initially, a good fullness of the "infrared channel" (for example, blue) will require less of its transformations in the converter, and therefore, there will also be less noise and artifacts in the final image. For example, we received absolutely clean, noise-free infrared images, although the original color frame looked more like a frank marriage.
So the time spent on shooting duplicates is fully justified.
Conclusion
Which of the considered infrared filters should be preferred? For photographers still sticking to film, this is unlikely to be B+W Infrared Black 093. It requires films that are sensitized far into the infrared region.
But the same filter allows you to quickly (if you do not take into account very long shutter speeds when shooting) and easily get digital black and white photographs.
Filter B + W Infrared Dark Red 092 can be considered universal, suitable for film and digital photography. And some of the hassle that may arise when processing shots taken with it is more than offset by operational advantages - a working camera automation and shorter shutter speeds when shooting.
F&V
If you close your eyes and bring your hand to your face, you can feel its warmth. When we open our eyes, we see the hand with our own eyes. Although both of these phenomena have been known to man for thousands of years, the fact that they are based on a common principle - radiation, we understood only relatively recently, in fact, simultaneously with the advent of photography.
The warmth felt by the skin is the so-called. far infrared radiation (conditionally from micron to millimeter wavelengths), which is located beyond the visible part of the spectrum 400-700 nm. And right next to it is near infrared (700-900 nm), which can now be used without much difficulty for photography.
In the history of infrared photography, there are two events and two people associated with them that definitely deserve a mention. The first event proved that there is invisible light behind the visible, the second demonstrated the possibility of taking photographs in this invisible range.
Decomposing light into a spectrum using a prism, the English astronomer William Herschel / William Herschel discovered in his experiments (1800) that there is something beyond the visible range that can act on photosensitive materials in the ultraviolet region and heat thermometers in the infrared region.
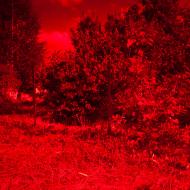
Using sensitized emulsions and filters of his own design, the famous American physicist Robert Wood took the first infrared photographs in 1910. Among them were landscape shots, showing the whiteness of living vegetation and the blackness of a clear daytime sky, unexpected for inexperienced viewers.
In order to photograph in the infrared range, it was necessary to invent sensitization and filters that cut off the visible component of light. The sensitizer substance works as an intermediary - it captures the energy of infrared radiation and then starts the process of illumination of silver salts that are sensitive in the short-wave region of the spectrum. Because at the same time, their sensitivity to visible radiation is preserved; it is impossible to separate the infrared image from the one visible to the eye, unless the latter is cut off by a filter. If this is not done, then the mixture of visible and infrared images will give a dull low-contrast picture for landscape scenes, somewhat close to a mixture of positive and its own negative.
Matrices of digital cameras, unlike traditional materials, have good light sensitivity to both visible light and near infrared. Because Since the brightness contrast of the infrared image does not match the brightness contrast in the visible color channels, in order to correctly reproduce the image visible to the eye, the infrared component has to be cut off by a special filter, which is usually installed directly on the matrix.
Another reason why it is necessary to cut off the infrared range in digital (and for general-purpose photographic films that are not sensitive to it, such a problem simply does not exist) is dispersion - the dependence of the refractive index on the wavelength.
A longer wave is refracted by the lenses of photographic lenses less than a shorter one. In order for the photographs to be clear, optical systems made of glasses of different grades are used, which makes it possible to more or less reduce the visible rays to one point. But such achromats and apochromats do not take into account infrared rays. As a result, either the visible image or the infrared image is out of focus, and the overall picture looks fuzzy and lacks contrast.
Infrared photography is quite accessible to the modern amateur photographer. To do this, you need to solve two problems: find a photographic material (film or matrix) sensitive to infrared radiation and a filter that cuts off the visible image. At the same time, such a pair should be correctly selected based on the following principle: the filter should cut off the visible and ultraviolet regions as much as possible and leave only the infrared - and at the same time intersect with the area in which the photosensitive material still has sufficient sensitivity.
The instructions for infrared films give recommendations on which filters and under what processing conditions you can get a good result. Manufacturers of digital cameras (with the exception of highly specialized ones) do not write how to use them to shoot in the infrared range.
Passing through the lens, light of different wavelengths is refracted differently. As a result, only the rays of a certain spectral range turn out to be exactly focused in the plane of the film or matrix. Focusing on the image visible in the viewfinder leads to the fact that infrared rays are not focused to a point, but form a spot in this plane. If the photographic material is insensitive to infrared radiation, this spot will not significantly affect the sharpness of the image.
In infrared photography, the opposite is true. We want to highlight a rather weak infrared signal against a strong visible background. In this case, two conditions must be met: to focus exactly the infrared rays and not to allow the rays of the visible range to blur the image.
You can focus with infrared shooting both manually and using the camera's automation. Since visual focusing through an infrared filter is impossible, you have to focus manually, either using the method of successive trials (for a digital, even a mirror, this is quite a suitable technique), or using a shift indicator for shooting in the infrared range. This pointer is usually marked on the distance scales of most good lenses. (To get an idea of the specific numbers, let's take an example. With a Canon EF 28-105/3.5-4.5 II USM lens at 28mm, focus for infrared rays coming from infinity is achieved when the distance scale is set to about 4m.)
The infrared correction scales that are applied to lenses are calculated for the use of certain light-sensitive materials and specific filters. Therefore, it is impossible to hope that they can be used for any infrared filter on any digital SLR.
The autofocus system of a reflex camera uses sensors that have a certain spectral sensitivity. If their sensitivity range is extended into the infrared region, then these sensors will work behind the filter. But relying on them is also not particularly worth it. For filter + matrix and filter + autofocus sensor systems, the sensitivity maxima, generally speaking, should not coincide at all.
So, the most reliable way to focus is by successive trials. If you constantly use a specific set of equipment for infrared photography, you will know its features and put your own marks on the lens scale, or if you are lucky, you will simply use autofocus.
The second condition - not to allow visible rays to blur the infrared image - is not difficult to satisfy by choosing the "right" filter. For strong filters, it is performed automatically. But for the weak ones, through which the visible image also passes, it is sometimes difficult to get a clear picture. When buying a filter, it is better to focus on "opaque", i.e. completely cuts off the visible part of the spectrum.
____________________________________
Schneider infrared filters
Both Schneider filters have been measured in our laboratory on a spectrometer. For comparison, the results of measurements of the Heliopan RG715 IR filter are given. As can be seen from the graphs of the spectral dependences of the transmittance (1), the results obtained are in good agreement
with the declared characteristics of the filters. The maximum transmission of 092 IR and RG715 is located in the visible region at a wavelength of 750 nm. The maximum transmission of 093 IR lies outside the bandwidth of the laboratory spectrometer (792 nm) in the near IR region.
Graph (2) shows the spectral dependence of the transmittance of a thermal filter installed in front of the matrix to cut off IR radiation. The tested filter was taken from a 1/1.8" CCD from a compact camera. As can be seen, the intersection of the transmission regions of the tested filters and the protective thermal filter lies in a narrow wavelength band of 650-700 nm, and the transmittance in this band does not exceed the level of 0.1. Therefore, a significant increase in exposure is required for tonal elaboration of the image. The wave nature of the transmittance at wavelengths of 450-600 nm is a sign that the filter is interference (in the old literature you can find the term dichroic).
And what is the spectral sensitivity of the actual digital sensor? We give the typical relative sensitivity of a Sony 1/3-inch EX view HAD CCD CCD (manufacturer's data). The matrix is black and white without color mosaic filters in front of the photodiodes. Graph (3) shows that the spectral sensitivity extends to the near-IR region of the spectrum, up to 1000 nm. At the level of 50% of the maximum, the cutoff wavelength is 800 nm, and at the level of 20%, it is 910 nm.
___________________________________
Schneider B+W Infrared Dark Red 092
Characteristics: transmission 0% at 650 nm, 90% at 730 nm
Estimated price: 2900 rub. (D 72 mm)
pros: high image sharpness
Minuses: troublesome IR image acquisition
Add. information:
I promised an article on this topic a long time ago, so I am correcting it.
I will not repeat the basics of what infrared photography is, you will read it in the book below (unfortunately, Russian books are in English only at your special request due to copyrights). I will only note that this is an invisible spectrum of light (700-1000nM), which gives us the opportunity for new experiments in photography, allows us to get very interesting subjects from sometimes uninteresting subjects. And in the article I just want to describe what opportunities it gives us and what difficulties arise, which is not described in the book.
infrared photography book
About infrared photography
You might think that if we photograph the infrared spectrum, we can see in the picture which objects are hot and which are cold? Unfortunately, it is not. This range allows us to see only the reflected infrared rays and, moreover, in the near infrared range, which is close to the visible light spectrum. This gives us dark skies, dark water, and white leaves on the trees when the sun shines on them.
You have probably already seen infrared photographs, and they surprise you with unusual colors for black and white photographs. So a photographer who is not experienced in infrared photography may think that the pictures come out in black and white. But they come out in red colors from light to dark, almost black, as it should be in a spectrum close to ordinary red light.

these are the IR images on the screen
Next, we convert the image to BW. In fact, we can tint the image as we please, in any colors using Channel Mixer V Adobe Photoshop or in any other way convenient for us. This is unprincipled. Fundamentally different - we have only shades of red available and, accordingly, it is quite difficult (but possible) to get very different colors.
After converting to B / W, we get something similar to the picture below. I just removed the color saturation, and if you do it more professionally, with Channel Mixer, higher quality can be achieved.

infrared photo converted to BW
You may have a legitimate question: won't the same thing happen if I just convert the original image to BW? Will not work. See below.
Here is the original picture.

Original image without filters
And here it is, simply converted to B&W by removing the color saturation (for speed).

regular shot without IR filter, converted to BW
Below in the picture, you can move the slider left and right. On the left is a normal B&W image, on the right is an infrared image.
It seems to be quite clear that an infrared image in BW is not the same as a regular BW image. This is where our new opportunities in photography come from!
You can use different filters for infrared photography, including Cokin 007 (89B), which I use.

infrared filter Cokin 007 (89B) in holder
They cut off the visible spectrum, leaving only the IR range. Depending on the filter, the IR range can wander a little and overlap a little with the visible red.

filter Cokin 007 (89B) - does not transmit the visible spectrum of light
Of the advantages of such a filter, it can be noted that it fits all lenses. You just need to choose a ring for the holder with the appropriate thread diameter.
And from the minuses, it is strong on wide-angle lenses due to the large thickness of the holder and, thus, you have to pick up on which there is none. Another disadvantage is that the filter is very loosely attached to the front element of the lens, due to which visible light hits the target between the filter and the lens and illuminates the frame at the edges. To prevent this from happening, you can use any dark rag, for example, a T-shirt from the things at hand. Gently drape the target from all sides. If you have something more suitable, then it will be more convenient in every way. Electrical tape and a strip of black velvet and so on will do.

a Cokin 007 (89B) filter and a slit that needs to be draped over to get bleed-free shots around the edges
In this article, I am talking about IR photography with regular SLR cameras, but there are special cameras, like the Canon 20Da, which do not have an IR filter inside and are able to capture the IR spectrum at much faster shutter speeds, or modified cameras that also reduce shutter speeds and can be with a custom filter that slightly stains the visible spectrum. Of course, they provide much more options, but I assume that you do not have a specialized camera (otherwise you already know enough about IR photography using a special camera) and do not have a great desire to permanently modify an existing DSLR.
If you have an unmodified DSLR, then it has an IR filter that prevents the passage of IR rays, and therefore, for photography, we needed additional filters that cut off the visible spectrum of light. And therefore, we need a tripod to take pictures at noise acceptable for modern matrices.
Plus, autofocus is no longer an assistant to us. We focus with autofocus on a normal picture, and then we put on a filter and introduce a correction according to the red dot on the lens.

in the area outlined in white, you can see both the standard focus line (white) and the red dot, to which you need to shift in the case of an IR photo
Unfortunately, not all modern lenses have such a correction point for infrared photography. It remains only to clamp the aperture to compensate for the miss. And also shoot focusing at infinity or hyperfocal distance.

Original image, f8, 1/100, iso 100

Here you can clearly see that the flowers, which in the usual black and white photograph merge with the leaves of the plant, become bright white in the infrared photograph. The sky is darker, giving the picture more emotional coloring. Thus, from a completely banal plot, we got something interesting. Here everyone is already experimenting and looking for their own contrasts.
It is worth considering that for IR photography they are different and therefore a picture that could look interesting in the visible spectrum may also become uninteresting in the IR range. You have to switch your vision of the picture to a new mode.
I have already said about water, leaves and sky. Now flowers have been added. For the landscape as a whole, this is enough. You can often find various combinations of these elements in beautiful infrared photos. White bushes along the river, a lone white tree on a gray field against a black sky. Flowering trees can also turn out very beautiful. Some photographers like to shoot people in IR and you will find examples in the book. It also turns out to be quite interesting and somewhat similar to frames from old films.

original photo, F8, 1/160s, ISO100

The ordinary landscape takes on a completely new intriguing look...

Original photo, no filter. F8, 1/320s, ISO100

So, you roughly imagine what you can get with a regular digital SLR camera.
But the fact is that if you think about it, it is logical to assume that the IR filter that is in the camera makes a very serious contribution to limiting our capabilities in IR photography. We use only the small remnants of the IR range that remain after the filter.
Accordingly, the conclusion is that it is desirable to remove the filter in order to get the maximum opportunities. Fortunately, there are enough services that carry out this modification, and not only in removing the filter, but also in installing an additional filter, instead of the standard one, which allows you to take pictures in one style you love.

pictures after installing special filters on a camera modified for IR photography
Modification of Canon 5D mark II for infrared shooting
I am not responsible for the result that you get after remaking the camera. These images are presented for educational purposes only and it is desirable for a specialist to disassemble the camera. This is recommended on the site from which the pictures were taken, and this is how I recommend it.
But we have plenty of people who like to dig inside, so...
Tools required
- Infrared filter to replace the standard one (required to order)
- Small Phillips screwdriver
— Tweezers
- Air from a can
- Lens cleaning tools
- ground wire
If the link dies, then email me for pictures.
Some examples of IR photos

If you want to learn a completely new and unusual photography technique, this guide is just what you need. Maybe you're stuck in a routine, or you just want to learn a skill that few people have (yet). The process of creating ethereal and almost otherworldly infrared images can become very addictive, and I hope that after reading this article, you will definitely try out what you read in practice.
I'll start with a little theoretical background, after which I'll talk about the reasons for at least trying this technique, and at the end I'll give you a few things to think about before you start.
What exactly is infrared photography?
In short, with this approach, the camera captures only infrared light, which is located in the part of the electromagnetic spectrum invisible to the human eye. The latter includes frequency ranges of electromagnetic radiation from short-wavelength gamma rays to radio waves, the length of which is measured in hundreds of meters.
The human eye is able to perceive light (electromagnetic radiation) having a wavelength ranging from 350 nanometers (violet) to 760 nanometers (red). Everything we see is within this tiny spectrum. This means that there is a whole invisible world around us!

The good news is that digital cameras are able to perceive radiation in a wider range than the human eye. They see equally well as ultraviolet light (< 380 нм), так и инфракрасный (>760 nm).
There is usually a glass filter right in front of the camera sensor that blocks UV and IR light, leaving only the visible range that we often need.
In this particular situation, we are interested in the near infrared region of the spectrum. It includes wavelengths of 760-1200 nm or so. All of these technical details may seem unnecessary, but they have a direct impact on the types of photos you end up with. More on this later.
Note: Infrared imaging within the scope of this article is not the same as thermography. Infrared thermography works with wavelengths of 3000-15000 nm.
5 reasons to try infrared photography
1. This is an invisible world that is absolutely real.
Infrared light exists in the range invisible to the human eye. It's like a color that's even redder than red. Sometimes the colors of IR images are called "false". This definition comes from the fact that in infrared photography, invisible light is transmitted in such a way as to become visible. The result is a photograph with unnatural colors. There are post-processing methods that allow you to get the "correct" colors. However, color in IR is just an interpretation of reality. There is no color here by definition. For this reason, many people prefer to take IR photos in black and white. Others, on the contrary, are attracted to this color. He is different.
2. You can provide a look and feel that cannot be conveyed in any other way.
Black sky in the middle of the day, bright white clouds and white foliage - this photo looks very unusual. Of course, some of the effect can be recreated in post-processing, but the look will still be different.

A perfect example of what can be achieved with infrared photography. .
This is especially true for color IR imaging. If this look impresses you, the best way to recreate it is to modify your camera to work with IR.
3. Midday light, which is usually undesirable for most types of outdoor shooting, is ideal for infrared
The characteristics of infrared light are completely different. This means that other rules also apply in lighting. If you're working indoors with different types of artificial lighting, you'll notice that the IR photos don't come out quite right.

A dark sky at noon can create a dramatic effect and be a good reason to go outside and take pictures even at this time.
This means that outdoor photography will become the norm for you. Photographers often avoid midday lighting as it creates harsh shadows and the light itself is flat and uninteresting. Due to the fact that IR light reflects off the surroundings in a completely different way, shooting at noon gives excellent results. Give yourself a reason to go outside and take some photos during your lunch break!
4. This is a narrow niche and an opportunity to stand out from the crowd
I have repeatedly said that IR shooting is something completely different. And standing out is often beneficial. In today's world, where we are surrounded by thousands of photographs, it is very difficult to present something new. If you have an intended eye for good IR shots, this can be a great way to get unique.
The fifth point speaks for itself. It's just interesting. Try it and if you don't agree, at least you'll understand that it's not for you. I bet you will enjoy the process itself.
For more reasons to try IR, .
Things to consider before you start
Modifications
Infrared photography requires significant modifications to the camera. A conventional camera sensor is sensitive to UV and IR light in the same way as it is to visible light. To work only with visible light, manufacturers use a special filter that is placed directly in front of the sensor (IR/UV limiting filter). Thanks to him, IR and UV light is cut off and does not fall on the sensor. Often this is exactly what we need, because we want to take pictures that depict the world as we see it.
To be able to work with IR and UV, the camera must survive certain surgical procedures. You need to remove the sensor and remove the IR / UV filter, then replace it with one of the options.
Such modifications are not entirely final, but in order to do everything correctly, you will have to pay a considerable amount. Think carefully about what kind of modification you want to make. The price varies from $250 to $400 depending on the company providing the service, the type of conversion chosen and the camera model (sensor size mainly plays a role here).
Companies that provide a conversion service
I highly recommend entrusting this to a qualified service. There are many tutorials out there on how to do it yourself, but it's likely that you'll end up with nothing but frustration. Even if you succeed, and you replace the standard filter with a special IR glass, without damaging sensitive electronics or losing tiny screws, then you manage to reassemble the whole body and make it work, you will most likely find spots in the pictures. This is dust that will probably get stuck between the sensor and the new filter.
Therefore, if you want to save yourself the pain and suffering of installing and reinstalling the sensor yourself (as well as bricking the camera along the way) or painting over dust spots in Lightroom / Photoshop, entrust the job to professionals.
Most of the shots in this article were taken with a camera modified in LDP LL C using their standard 715nm conversion. I want to convert one of my cameras soon and will most likely send it to Life Pixel. If you want to look at different options or buy an already converted camera, go to Kolari Vision. They have a pretty good reputation.
I've seen other companies offering sensor conversions, but due to negative reviews, I wouldn't risk using their services. Most people choose Life Pixel and Kolari Vision. I think they will suit you too.
Modification options
If you still decide on a modification, you need to choose which one. Typically, when converting to IR, a glass filter is installed that allows infrared light to pass through with a small fraction of light from the visible spectrum. Filters that allow the camera to perceive frequencies above 720 nm are the most popular. They allow you to capture the reddest light that the human eye can perceive.

A close-up showing a 720nm filter that was mounted on a Canon 5D MK II sensor. It appears completely black compared to a typical "clean" UV/IR filter that the manufacturer installs.
Another popular option is filters that pass 800-850 nm or higher. They are popular with photographers who prefer to shoot in BW and want very dark skies with sharp contrast. The downside of these filters is that they block out more light, hence requiring a slower shutter speed. Think full stop + shortening or doubling the exposure time.
On the other hand, some prefer filters that let in more visible light. They are sometimes referred to as color or "super color" IR filters. They create a unique look in that there are many interesting colors in the final photo that add to the quirkiness. Such filters transmit light from 550 nm to the IR range.
There are also specialized filters that pass certain parts of the range. For example, a blue + IR filter (commonly used in agricultural research) can be applied to create a unique rich blue sky effect without post-processing. Another example is a filter that passes the visible range of light and a small part of the IR range, known as H-alpha (or Balmer-alpha). Such filters are used during shooting of the night sky to emphasize the red tints present in the constellations, but difficult to capture with a conventional camera.
Camera
As I mentioned earlier, for IR shooting you need to modify the camera. It should be borne in mind that it is almost irreversible and will radically change the way the camera works. For this reason, you should not modify your everyday carcass (well, unless you can afford to have several cameras).
Most people convert one of their old cameras or buy an old used model that they won't regret. This is the ideal approach, I would recommend it in the first place.
As for image quality, dynamic range, etc., the camera will retain these characteristics after conversion. Pictures will look different just because the camera is working with a different part of the electromagnetic spectrum.
All SLR cameras (full-frame, APS-C, Micro, etc.), mirrorless cameras and even "soap dishes" are suitable for modification. Whatever the quality and other characteristics of the camera before the conversion, they will remain exactly the same after. However, now you can see the world in infrared light!
There is one important reason to choose a mirrorless camera for conversion. It lies in the technique of autofocus. Most DSLRs have phase detection autofocus, while mirrorless cameras mostly rely on contrast. The latter has the distinct advantage of using the camera's microprocessor to achieve sharp focus.
This advantage is due to the fact that IR light focuses differently compared to visible light. Have you ever noticed the little red numbers and lines, or the red dot on the focal length of a lens? These are focus shift guidelines for sharp photos when shooting in IR.
In the days of film and even digital photography, before the invention of the electronic viewfinder, one had to focus on the subject and then adjust the focus based on that marking for the focal length being used. The process remains the same even with modern DSLRs with phase detection autofocus. Focus, look at the scale, adjust the lens based on its value, then take the picture.

Focus scale with marks for IR shooting. When autofocus has worked, pay attention to the location of the white stripe. Then turn the focus ring until that part of the scale lines up with the red mark for the corresponding focal length. Fixed-focus lenses often have a red dot. Many new lenses do not have this marking, and its presence or absence does not guarantee that the lens is suitable for IR photography. By the way, this 24-105 f/4L works great, and the famous 24-70 is often not so good. More on lenses below.
If your camera is capable of focusing in Live View using contrast autofocus, as some DSLRs and absolutely all mirrorless cameras do, shifting will not affect autofocus as corrections are made based on what the camera sees. For the same reason, mirrorless cameras do not need Auto Focus Micro Adjustments. No calibration!
If your camera has phase detection autofocus, depending on the company you contact, it may be necessary to send the lens as well so they can calibrate the focus system.
Lenses
One of the problems for those who do superficial (or deeper) IR photography is that we can't use every available lens. It's annoying, but that's the way it is. The reason lies in the fact that many lenses exhibit undesirable characteristics when working with IR light. Things like flare, ghosting and light spot are common in popular lenses. Of course, this happens when shooting the visible range of light, but with IR, everything happens differently.
The most deprecated problem with some lenses is the presence of the so-called “hot spot”. This is a bright spot, often round, but sometimes taking the form of aperture slats, located in the center of the frame. Although this problem can be corrected in post-production, IR-savvy photographers try not to use lenses that have this problem.
Sometimes, in addition to a new filter, a special anti-reflection coating is offered on the sensor. It is designed to minimize or eliminate light spot, however, some sources say that such coatings are not very effective and in some situations can only exacerbate the problem. It's probably best to just use the right lens.
More information on light spots and lenses can be found on the corresponding Life Pixel page and the Kolari Vision database.
A full range of
It is not necessary to use a filter that passes only a certain part of the light spectrum. Full Spectrum Mods replace the IR/UV filter with a transparent filter that lets through the full range of wavelengths your camera can detect, from UV to IR!
The advantage of this option is that you can easily set any filters and work with the part of the spectrum that interests you. Want a super IR color effect? Just put on a 590nm filter. And now you need to take a contrasting black and white picture? Cling 850 nm. Need to use a camera to capture the visible spectrum of light? Well, you get the idea. Even UV shooting becomes possible!
Astronomik specializes in astrophotography and many of their products are designed for this particular area of photography. The ProPlanet 742 and ProPlanet 807 (742nm and 807nm respectively) will be your main IR filters.
Shooting in infrared light
Since you are photographing what you cannot see, it may seem difficult at first. Depending on the range of wavelengths your filter allows, you may need a tripod. In many situations, if the sun or a bright IR light source is close to the edge of the frame, you are likely to get a huge flare. Sometimes it looks good, sometimes it gets in the way. A camera's exposure meter will often be useless because it only works with visible light (this problem becomes much less significant when shooting in Live View or with a mirrorless camera).
Dealing with these challenges is very interesting. You will quickly get used to and learn to "see" in infrared light! You'll learn that green foliage turns to perfect white in IR, and you'll also experiment with the sometimes annoying lens flare and start using it to your advantage. This approach will re-open the world of photography for you.
Manual white balance
I didn't want to touch on the subject of IR processing in this article, but something worth mentioning. If you want to work with color, manual white balance is very useful. The easiest way is to go to the menu and set a custom WB based on a snapshot of a patch of grass.

The photo on the left is the result of how Lightroom processed the RAW file, and on the right is a JPEG with manual white balance set in the camera. RAW+JPEG can make a good workflow for IR shooting, as most programs have trouble handling overly red RAW files. For an image like the one above on the right, a channel swap is usually done in Photoshop and a few extra steps. However, due to the lack of foliage on the trees and overcast skies, this shot will never be the way I want it to be.
Of course, you can adjust the white balance in post-processing (when working with RAW, there are huge adjustment possibilities), but you will quickly find that even if you move the blue slider all the way to the right in Lightroom or similar software, the picture will still be very red. This can be a problem as it reduces the detail and contrast of the photo, giving it a "blue sky effect" that is hard to get rid of.
Camera profiles or the RAW processor that comes with the camera can help. I usually prefer to use camera profiles and shoot RAW+JPEG, applying styles to JPEGs right in the camera. Usually the styles are monochrome, but they work so well with color. Then I bring the JPEG into Lightroom or Photoshop and the result is close to what it should be.
Subject
A few words about subjects. Landscapes look great in IR light. The green foliage turns white and the sky turns black (it can be made very dark and oppressive blue by swapping the red and blue channels in Photoshop). Moonrise or moonset will be harsh even with foggy or bright skies.

Landscapes are ideal for shooting in IR.

The same shot, but with the colors warped.
Portraits can look good too, but you'll need a different approach to shooting. Think contextually and you can get pretty good results. A close-up shot of a face might seem a bit odd to you. The skin will look smooth and beautiful (due to the way infrared light is reflected), but the eyes may turn black. This causes a slight dissonance at first, so be prepared. When shooting portraits in IR, I tend to lean towards an ethereal ambient light effect.

Unless you're looking for a "ghostly" effect, you probably won't want to take close-up portraits.
Conclusion
I hope by now you are at least intrigued by the idea of trying IR photography. If you're still not sure, I'll give you the advice I give to anyone who is thinking about new equipment. Rent! On Lensrentals.com you can find several Canon and Nikon IR-ready bodies (715, 720, 830 and 850nm to choose from). Chances are you'll find a new favorite genre, or just rent a camera from time to time and experiment. Make sure you are using the correct lens.
In this paragraph, I want to thank my good friend and print master, Timothy Wright (Timothy Wright) from Timmy's Treehouse Print Studio. He not only does a great job breathing life into my work, but also inspired me to try infrared photography and borrowed 5D MK II converted for 720nm along with the 17-40 f/4L lens I used to create the shots in this article.
If you're curious about how to process IR photos, Life Filter has a page that describes various filters, as well as simple RAW and JPEG examples for each. You can download and play with them yourself.
Get out of the house, take pictures in IR and have fun!
During infrared shooting, it is impossible to see the intended plot with your eyes. It can only be felt by the soul. In general, this photograph is as shaky and subtle as our dreams and fantasies. Luis Castañeda
Have you noticed how many landscape photos are on various photo resources? Indeed, the landscape is such a genre in which every owner of a camera can try his hand. Someone does better, someone worse, but there comes a time when you want to do something unusual, to distinguish your work from the general mass of photographs. Sooner or later, any author who wants to expand his creative range begins to look for something new, not previously shown by others.
About a year and a half ago, looking through the results of another photo-outing to the open air, I realized that the shots taken were not bad in principle, but they were of little interest to me, this had already been filmed by more than one generation of photographers. Well, the sky, the trees, the river… everything is not right. Ordinarily, or something ... Dissatisfaction grew, and with it grew a desire to shoot something that was fundamentally different from the usual and somewhere hackneyed idea of the landscape. And here I was lucky, because. At about the same time, I got acquainted with the work of two interesting authors who worked in the genre of infrared photography. These were photos of D. Katkov (Hooligan Element) and G. Rozov. The first time I saw these shots, I realized - this is mine. And how could you not like these mystical, somewhere surreal shots, with white, luminous foliage, dark, textured sky, luxurious clouds and an indescribable atmosphere of mystery?
Fired up, I began to gradually collect information on the Internet. It turned out that there are not so many photographers who shoot in this technique, and this very information is even less. Over time, the baggage of knowledge and skills was replenished, dreams came true, and today I am ready to tell you about infrared photography, the necessary minimum that will allow you to try yourself in this genre of photographic art.
Technical information
In 1800, the English astronomer William Herschel conducted experiments with sunlight in his laboratory. A narrow beam that passed through a hole in thick curtains was expanded by a prism into a rainbow spectrum. By placing conventional thermometers in different parts of the spectrum, Herschel noticed that the temperature rises the most when approaching the red end of the spectrum. But the thermometer, accidentally lying away from the red part of the spectrum, seemingly in complete darkness, also showed a high temperature. Herschel concluded that, in addition to the light visible to the eye, the sun's ray will contain some other radiation that carries a very large energy. He called this radiation infrared, that is, located "beyond the red."

Today, everyone knows that visible light is only a small part of a wide spectrum of electromagnetic waves, which includes both radio waves and gamma rays. Invisible radiation, as a rule, has properties that are very different from visible light. Only neighboring regions of the spectrum - ultraviolet and infrared rays - can be used in photography, since they are refracted by the lens of the objective, and therefore the image can be focused on the film. For infrared photography, the near infrared zone is used - up to 1350 nm. Rays of light with longer wavelengths belong to the thermal range, they can only be detected with special devices and blurry images of heated objects can be obtained.
First, a bit of the physics and history needed to understand the process of taking an infrared photo.
Infrared radiation is outside the visible range and therefore invisible to the human eye. It was first discovered by the Englishman William Herschel in 1800. At first, infrared photography was used by astronomers, used in agriculture for aerial photography, by the military (where without them), is still used by restorers when working with paintings by great artists, and finally by ordinary photographers. The first photographic films sensitive to infrared (IR) rays appeared in 1931. Now infrared film is produced by Agfa, Ilford, Konica Minolta, Kodak, but all these films are not only inaccessible, but also require special handling. Not only do they need to be charged and stored in complete (absolutely) darkness due to their increased sensitivity, but you will also have problems during development, transportation and storage, because infrared films have a much shorter shelf life and use than conventional films, and even the infrared frame counter in your camera can partially light them up. In general, one can talk about the problem of developing such films in our laboratories for a long time, it’s enough that I had two films spoiled in a very respected and professional laboratory, simply due to the fact that the staff was not trained to work with this material. There is no need to understand my words as campaigning exclusively for digital, but at the moment, it is digital that is more accessible, simpler and clearer in mastering a beginner IR photographer. Luckily for us, a digital camera's sensor is just as capable of producing an infrared image as a special, and such a capricious, film.
Filters
Let's start with something without which it is almost impossible to discover the mysterious world of infrared photography, namely, IR filters. Almost all filter manufacturers have infrared models in their lineup. Several common models that can be found in our stores: B + W 092, HELIOPAN RG715, COKIN 89B, HAMA IR, HOYA RM-72, TIFFEN 87, B + W 093 (87C), HOYA RM-90. All of them are suitable for infrared photography. transmit radiation from 720nm and longer.
After monitoring the market for these filters in Kiev, the following opinion was formed - it is almost impossible to buy an IR filter in our photo shops. There are several reasons. This is both a rather high cost (a TIFFEN 87 filter with a diameter of 77 mm costs about 200-250 USD), and a low demand for such products, and the need to purchase filters in batches (and which seller wants to create additional product leftovers for themselves?) Lack of representative offices filter manufacturing companies and serious distributors of their products in Ukraine. Of course, you can always order a similar filter on eBay, but its price with delivery is unlikely to suit you. As a result of a two-month search, I was even

For those who have not found such a filter or are not ready to spend a significant amount on infrared experiments, there is a fairly simple way out. Go to any photo lab where they work with "slide" film and ask for a piece of unexposed, but developed reversible (that is, "slide") film, you will use it as an infrared filter at first (the developed emulsion delays the radiation of that range of the spectrum , to which the film is sensitive (that is, the entire visible range), passing everything else (that is, the ultraviolet and infrared ranges).In one of the labs, in five minutes I cut several pieces from the remnants of 120-format films developed and absolutely free (just smile at people , and you'll be fine).
Technique
And so, there is a filter, it's up to the technique. Let's talk about this in more detail. Determining if your camera is suitable for shooting in the infrared range is very simple, taking any remote control (it is known to emit IR rays) and pointing it at the lens of a digital camera in total darkness. If you see a glowing dot on the display, then the device is sensitive to IR rays, and you can continue experimenting.
Forced to upset the owners of Canon DSLRs. The fact is that in front of the matrix of any digital camera there is a so-called Hot Mirror filter (from it, and not from the matrix, the owners of digital SLRs blow off such nasty dust particles), the main function of which is to prevent the appearance of moiré, preventing infrared rays with a length of waves greater than 800nm. Apparently, in Canon this filter is too effective (or its transmission threshold is even lower than 800nm), which is good for color photos, but just a disaster for infrared. Long-term experiments with my Canon 20D showed that too little information reaches its sensor through the IR filter, which is necessary to obtain a full-fledged infrared image. To be fair, I have recently seen some decent infrared shots taken by the Canon 350D. So experiment more boldly.
There are several companies abroad that offer a completely extreme version of reworking your DSLR - the bottom line is that they remove the cut-off filter from the camera and replace it with infrared. Such a camera is no longer suitable for ordinary shooting, but in IR it gives just an excellent result. Such a service costs about 300 USD + postage and is in demand mainly by fans of astro photography, but if you are a dock in technical matters, you can carry out this operation yourself, since the network has detailed instructions for such alterations. Of course, the responsibility for such actions lies entirely with you.
Owners of Nikon DSLRs are more fortunate in this respect, the D70 model has proved to be especially successful, the D200 is already worse off with IR. The old models of digital cameras from Olympus proved to be excellent (look, yes you will find), some Fuji models, etc.
A few old models of Sony cameras stand apart in this row. Let's dwell on them in a little more detail. We are talking about Sony Cyber-shot DSC-F828/F717 cameras, which have a couple of very interesting features that are suitable specifically for infrared photography. Unlike most devices, they have a special Night Shoot mode - “night shooting”. In this mode, the filter that cuts off the IR region of the spectrum is mechanically removed from the optical system.

As a result, a sufficiently high sensitivity of the sensor in the IR range is achieved, which makes it possible to shoot at short shutter speeds and obtain low noise in the final image. It should be noted that shooting in this mode is possible with shutter speeds no shorter than 1/30, longer is not a question, so it becomes necessary to use neutral gray filters. I use ND8 or ND4, depending on the lighting, and also use exposure compensation and control the brightness of the frame with a histogram. With exposure metering in this mode, Sony does an excellent job.
Shooting technique
Now, let's move on to the features of infrared photography.
Imagine a typical day that you decide to dedicate to shooting a landscape. You got up early so as not to miss the magical morning light, covered a fairly long distance to a beautiful texture, filmed the morning session and decided to wait for the sunset to shoot a couple of interesting angles. What does a typical landscape photographer do at noon? That's right, I have to rest, because. shooting a landscape in the midday sun is a very dubious pleasure. Sharp, deep shadows, large differences in brightness - all this does not contribute to creating a good landscape shot. It's a completely different matter if your bag has an infrared filter. The bright sun will turn into your friend, because it is the main source of IR radiation, the sky does not need to be darkened with a gradient (it will be almost black anyway), infrared shooting will perfectly show textures and effectively emphasize brightly lit foliage. You calmly shoot IR during the day, and with the advent of regime time, you continue to shoot normally. The result of such a trip can be very impressive and it is not a fact that you will like the photos taken in the usual way. For places shot in infrared technology can reveal themselves from a completely unusual side.
Now a few tips for those who shoot with SLR cameras. Unlike conventional digital cameras, there is a certain problem with sighting and sharpness, because. infrared filters are opaque and focusing with a wound filter is very problematic. There is only one way out - the camera is on a tripod, sighting and framing the frame without a filter, then wind the filter and take a picture. In this case, you can not rely on autofocus. Automation takes into account the characteristics of the refraction of visible rays, while infrared radiation is refracted differently. Therefore, it is better to focus on the scale of distances, while setting it a little closer than the actual distance to the object. In addition, it is useful to increase the depth of field using aperture, up to f18-22. Some lenses have an infrared focus mark, use it by aligning the distance scale on the lens with it. Be sure to cover the viewfinder window to prevent overexposure and don't forget to take a few shots with bracketing in 1 - 2 EV increments with histogram control (pay special attention to highlights). Pay attention to setting the white balance if you are not shooting in RAW. Ideally, you need to set b/w on the illuminated leaves, then in post-processing, it will be much easier to get an acceptable result, which we'll talk about now.
post-processing
So, you've shot some infrared shots and are ready to start fine-tuning them. Yes, you will have to use a graphic editor, because. the resulting image is far from optimal and your shots still bear little resemblance to those beautiful infrared photos that you saw on websites and in magazines.


It's okay, we'll fix it.
1. First, open your photo in the editor and carefully examine the channels. As a rule, all the brightness is contained in the red channel, sharpness in green, noise in blue, but there may be variations.


3. After that, apply the "autolevels" command to the image
4. The next step is the channel mixer (remember, I advised you to carefully study their content?) In the red channel, we change to blue, and in blue, to red.


5. Then apply the "shadow/highlight filter" to equalize the tonal range of the frame with approximately the following settings (screenshot) Do not overdo it, otherwise the image will turn out unnatural.

Satisfied with the result?
If not, then you can move the sliders in the mixer indefinitely, achieving the desired colors.
There is an easier way if your goal is to get a black and white photo. After the operation with "auto levels", go to the channel mixer and move the sliders, not forgetting to check the "grayscale" checkbox. After that, you can tint the picture to taste, in any known way.
The second method is a little more complicated and is more suitable for frames shot in RAW.1. Convert the photo, don't forget to click with the white balance eyedropper on any greenery in the frame.


3. Transfer the photo to LAB space and use the Apply Image command (screenshot) to combine the channels to your liking.

or you can try to "knead" the channels at your own discretion without transferring to LAB

4. Then convert the frame back to RGB and finalize with levels and a shadow/highlight tool

Pseudo IR
The question is often asked, is it possible to get some kind of infrared image without using an infrared filter? The fact is that during normal shooting, a message of the visible range enters the matrix and to extract the infrared component from it, if possible, then by means of large losses, additional noise of the image and a decrease in detail. Some semblance of IR can be obtained, but no more, although the method itself is not complicated.
1. Open a regular frame in the editor (screenshot)

3. Then go to the channel mixer and move the sliders as shown in the screenshot to get some kind of infrared frame.

4. Then it will be necessary to work on reducing the noise in the photo (by any available method), I use the NeatImage plugin for this.
5. Then apply a "shadow/highlight filter" to even out the tonal range of the frame and eliminate highlights. Do not overdo it, otherwise the image will turn out unnatural.

6. After that, the picture can be tinted or left b/w.

That's all, good luck with your shooting and more sun, now you know that it is not your enemy at noon.
5 TIPS:
1. Don't be lazy! Look for your frame, think before you press the shutter. If you find an interesting place, take several takes from different angles, carefully look at the lighting, it may make sense to come to this place later, when the light is more interesting.
2. If possible, shoot in RAW. The quality, convenience and variability of processing more than compensate for the time for conversion and file size. This is especially important when shooting in the infrared range, because. will allow you to get interesting results at various white balance settings.
3. A tripod is a landscape painter's best friend, and for a landscape painter shooting in IR, it is already becoming almost a relative. If there is no heavy and stable tripod (or too lazy to drag it with you), use the remote control or the timer of your camera to reduce the shake.
4. Learn post-processing programs. In digital infrared photography without additional processing in the editor, you are unlikely to get an acceptable result. It is not necessary to learn exactly Photoshop, a lighter editor, such as Photoshop Elements or the like, is enough.
5. Thoroughly master your technique, know its advantages and disadvantages. Sometimes, there is very little time to take a good shot, do not spend it on “negotiations” with your camera, talk to it in advance. For example, not all cameras reliably display information on the histogram, taking only the green channel as a basis. As a result, you run the risk of getting overexposure that you cannot fix in any editor.
Ilyina Marina Andreevna 4328
In search of unusual ideas for photographs and video material, the cameraman sometimes looks into the most remote corners of the planet, looking for fantastic shooting points and even goes beyond the capabilities of the human eye.
To implement the latter, the operator comes to the aid of a set of specially designed additions to the lenses. In the photo and video environment, they are called light filters. Often, when using them, a really fantastic and unexpected picture is obtained.
It is precisely this property that the hero of this review has - an infrared filter for the lens.
It is a dark, often completely black, glass. When shooting, the IR filter limits the flow from the subject to the collecting surface - the matrix of the camera or video camera - of any rays other than infrared. You should not think that infrared filters allow you to register your own "thermal" rays emitted by any heated body. The images created with their help are obtained by registering those rays that this body can reflect in the infrared range.
What is the result? In order to understand this before shooting, the following rule is used: the stronger the object absorbs infrared radiation, the more it heats up (for example, in the sun) and the darker it will turn out in a photograph or in a video frame.
 |
Privezite | 8 853 Р | |
 |
Privezite | 7 800 R | |
 |
Privezite | 7 800 R | |
 |
Electrozon | 1 750 R |
Let's look around: leaves, grass and snow reflect infrared rays well (and, therefore, they will turn out light or even white). They absorb the same - asphalt, water and sky, which makes them dark or even black in the images.
Shooting with an infrared filter allows you to create truly surreal shots. Overly contrasting white clouds against a black sky, foliage as if covered with a thick layer of ash, deliberately pale faces with black eyes give unexpected sound and drama even to the simplest images.

If you decide to try shooting with an infrared filter, then pay attention to the following points:
- Not all cameras and video cameras allow you to create frames with an infrared filter. Often manufacturers of photo and video equipment put their own infrared filter inside the camera, in front of the matrix. This is done in order to cut off any IR rays, which are considered noise during "ordinary" shooting, on the matrix. To find out if your camera is capable of shooting in IR, you can only experimentally.
- Infrared rays are much weaker than rays in the visible range. And, therefore, for shooting with an infrared filter, you just need to use a tripod.
tell friends
Related Articles