Rock garden. How to make an alpine slide. Detailed description
Read: 100
A corner of wildlife on the site - Alpine Hill
Step-by-step instructions for creating an alpine slide (rock garden)
Alpine slide or rock garden- one of the favorite techniques in the arrangement of landscape design, both among amateur gardeners and professional designers. A piece of untouched nature on your site can be created in the form of a fragment of a mountain landscape.
Undoubtedly rock garden perfectly decorates any site, but at the same time, it is one of the most difficult compositions to create.
In order to do do it yourself Location on alpine hill right, it is necessary to adhere to clear rules, observing their sequence.
Step 1. Choosing a place for an alpine slide (rock garden)
rocky hill it is best to place on a hill, which will be well enough illuminated from all sides. In this case, the owners of hilly plots or those whose plots are on the slopes win.
Very attractive rock garden looks against the background of a green lawn, and if in the background, a little further away, tall trees grow that cast their shadow on the rock garden, then the composition will turn out to be very advantageous.
Alpine slide should have slopes that are oriented to different parts of the world.
Designing rock garden it must be taken into account that its southern and southeastern slopes should be more visible, therefore these slopes are made more gentle than the northern and northeastern ones.
Step 2. The choice of stones for the alpine slide (rock garden)
1) Choose the size and number of stones according to the size of the alpine slide. For example, for a rock garden with a size of 1.5 × 2.5 m and a height of 0.5 m, about 1 ton of stone will be required.
2) When creating rocky compositions, one must remember that the stone must be natural, natural forms and surfaces.
3) Don't arrange alpine slide from the remains of construction waste (fragments of plates, curbs, concrete, etc.).

Alpine slide stones
4) Use stones of the same breed, let the stones come from your area, they are easier to find and cheaper to purchase and deliver to the site. In addition, “local” stones will be most harmoniously and naturally combined with the local landscape.
5) Stones and plants in the rock garden should harmoniously emphasize the natural beauty of each other. Therefore, in order to get the final composition that will match your ideas, choose the stones yourself and be present during their transportation.
6) Do not use chipped stones with unnaturally sharp edges or, conversely, ideally shaped stones - smooth river ones.
7) The best option for a rock garden would be a moss-covered stone that can be found in the forest. Such a stone will cost less than all options, and the natural design of the stone, created by nature itself, is better than you can imagine!
Step 3. Dimensions and outlines of the alpine slide (rock garden)
One of the important conditions when creating an alpine slide that it should harmoniously fit into the overall picture of your site and not look like a pile of stones, because of which the house modestly looks out.
Eat clear calculations, with which it is possible to determine rock garden size For specific area plot:
On a plot of 6-8 acres, an alpine hill can occupy an area of up to 5-10 m 2 and reach a height of 60 cm.
The minimum size of an alpine slide is 1.5 × 2.5 m.
If you are a happy owner of a larger territory, recalculate based on these numbers.
The maximum height of an alpine slide with an area of more than 40 m 2 can be up to 1.5 m.
Step 4. Drawing a contour for an alpine slide (rock garden)
Before you start laying out the stones on the site, which is intended for the construction of a rock garden, you need to outline the contours of the future structure.
This is a very important step that should not be neglected!
At first glance, it seems that this is very simple, but its implementation is the basis of the entire process of arranging a slide.

Marking rock garden on the site
For a good example, draw a project for a future slide on paper, in the form of a drawing or diagram. Calculate the size and location of the alpine slide on the site, visually arrange the stones, marking them on the diagram.
Estimate which plants will take place in your slide, distribute the arrangement of stones accordingly.
After drawing the outlines on paper, transfer it to the land by laying out the outline of the structure with a rope, bright tape or a garden hose.
View the future composition from all viewpoints: you may need to adjust the boundaries and location on the ground.
Step 5. Removal of the top fertile layer of the earth
An important milestone rock garden devices is also the removal of sod land. To do this, carefully remove the top fertile soil layer, which will need to be sifted, and after sifting, add to the substrate to fill the space between the stones on the hill.
The top layer of soil is removed to a depth of 20 - 30 cm over the entire area of the future rock garden.
Such work is best done when the earth is dry enough to be sieved.
If the site is heavily overgrown with cereal weeds, it is recommended to apply herbicides, otherwise the seeds remaining in the soil will germinate on a hill with dense turf.
Step 6. Installation of a drainage system for an alpine slide (rock garden)
Drainage system for alpine slide necessary, but its creation is not always required. Drainage is indispensable in areas with loamy or clay soil, as well as in flat areas with a high groundwater table.

Drainage layer for rock garden
Broken brick, crushed stone or other small stones are used as drainage, which are poured in a layer of 10-30 cm. The drainage layer is poured unevenly - where the hill is planned to rise, the layer will be thicker.
Sand is poured onto the drainage rocky layer with a layer of 10 cm. At the same time, it is thicker in places of future hills.
After laying drainage from crushed stone and sand, abundant watering is required. The need for watering lies in the fact that after it the drainage will thicken a little, and all the shortcomings in the work done will manifest themselves. But at this stage, everything can still be corrected. Pour crushed stone and sand into the formed dips, spill it, once again evaluate the quality of the work done.
Step 7. Preparation of the soil mixture for the alpine slide (rock garden)
Soil soil to fill the space between stones in the rock garden should be sufficiently nutritious and moderately moist.
You can cook it yourself. Soil composition:
- 1/3 sod land,
- 1/3 peat or compost
- 1/3 coarse sand
- you can also add perlite.
If the land on your site is good - fertile enough, then the top layer that was removed to prepare the pit for drainage can be used for cooking soil mixtures for alpine hills.
One of the biggest mistakes preparing land for an alpine slide is that many hobbyists recommend adding fertilizers to the composition of the plant substrate to increase soil fertility. This is by no means acceptable for alpine slides!
"Alpine" plants on such soil will be strongly stretched, green mass will prevail over flowering, and flowering will become less abundant.
In addition, aggressively growing ground covers will quickly fill the area and cover the stone, as a result of which the whole meaning of the rocky hill is lost.
Pour the soil onto the hill at the same time as laying the stones, tamping it a little. Upon completion of the work, pour the resulting alpine slide well with water, and then correct the resulting recesses.
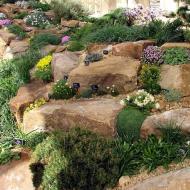
Step 8. Vertical planning of the rock garden. Creation of an alpine slide
Now the most important step in the construction of the rock garden has come. It consists in setting and grouping stones.
With the help of stones create three-dimensional compositions. Moreover, each individual group should differ from the neighboring one in size, ratio of sections and color.

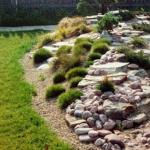
Alpine slide scheme
Alpine slide has a basic construction principle and includes several basic elements. She comprises at the foot of the hill - valleys» and three terraces. A lawn is planted in the “valley”, or a decorative embankment is poured, or an artificial reservoir is arranged.
The terraces are located one after another in the form of a ladder. Each terrace is a small natural composition of plants and stones. The alternation of a terrace only made of stone and terraces with stones and plants looks very interesting.
When creating an imitation of a mountain landscape, it is necessary to avoid regular geometric shapes. This will give the composition a natural look, otherwise the natural look of the slide will lose its flavor.

Laying stones in an alpine hill
1) The first thing to start when laying stones for rock garden- this is to install the first stone, the so-called main stone from which the rest of the stones in the composition will be laid. Choose the largest stone. Its location should be shifted from the center to the east side.
2) Then lay the stones from medium to smaller, stick to the rule - the closer to the edge of the hill, the smaller the stones should be.
Place stones in groups. Lay some groups of stones tightly to each other, leave gaps between others. Remember to avoid symmetry as much as possible.
When installing stones, it is necessary to leave soil pockets for planting plants.
The stones must be stable - they must not swing, so prepare small recesses for their base at least 1/3 of the height of the stone itself.
Add soil or small stones if necessary.
If your site is absolutely flat, then you will need imported land at the rate of 0.5-0.7 t / m 2. With the help of drainage and imported land, create the necessary relief for your future alpine slide.
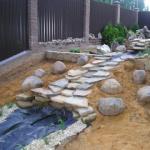
Artificial stream on an alpine hill
Create artificial stream, combination of water, stone and plant in the alpine hill- This is the most ideal option for rock garden. The murmur of water flowing over the stones and playing in the sun will decorate in a fabulous way. rocky hill.
A stream that will flow from stone to stone to artificial reservoir located on the south side at its foot.
artificial pond will feed the stream, which, flowing down the stones of the slide, falls back into the reservoir. The principle of circulation will ensure a continuous flow of water.
![]()
Scheme of an artificial reservoir
To create a pond:
1) It is necessary to dig a pit at the foot of the rock garden.
2) Cover the bottom with a film 0.8-1.2 mm thick.
3) Lay out the film with a layer of clay or loam, or sand 2 cm thick.
4) Cover with a layer of pebbles or gravel up to 1 cm thick.
To create a stream:

Artificial stream on the site for rock garden
1) From an artificial reservoir, a gutter is laid to the place from which the stream will flow (usually this is the top of the hill).
2) A hose is placed in the gutter and the “water supply” is sprinkled with sand, waterproofing is laid.
3) With the help of a pump (pump), water will flow from the reservoir through a hose to the source of the stream.
![]()
Waterfall on an alpine hill
4) The stream bed is arranged simultaneously when creating an alpine hill, tamping and compacting clay soil, making it semicircular 15 cm deep and 30 cm wide. You can lay out the stream bed with small stones or pebbles.
As a channel, you can use plastic water pipes of the appropriate diameter, cut along the length. After installation, the pipe must be masked with stones.
Stream on the alpine hill can be arranged in the form waterfall, cascades. It all depends on the size of the rock garden and your imagination.
Selection and planting of plants for rock garden
It is advisable to start planting plants in a rock garden after several plentiful waterings. After the earth settles and the resulting recesses will be filled up.
- Plant the most light-loving plants on the south or southeast side of the hill.
- Plant large plants near large stones, small plants near small ones. Avoid close placement of plants on the hill!
- Ground cover, fast growing plants, plant 3-5 pcs. / m 2.
- Cushion perennials place 8-12 pieces / m 2.
- Plant dwarf trees and shrubs separately or in small groups, so as to emphasize the asymmetry of the hill.
- In no case should trees be planted in the center or at the top of the rock garden!
Mulch the soil after planting with screenings of the stone that was used in the construction of the rock garden or gravel, marble chips, pebbles, organic mulch (wood chips, agrovermiculite, perlite, etc.).
10 mistakes when building an alpine slide:
1) The device of a rock garden on a site with a close occurrence of groundwater without drainage.
2) Placing a rock garden against the backdrop of outbuildings.
3) Unstable placement of stones.
4) Application in one composition of several different stony rocks.
5) Use of fragments of concrete slabs.
6) Use as a substrate of rich soils and fertilizers that increase fertility.
7) Observance of symmetry when laying stones and planting plants.
8) Ignoring the watering of the slide after the drainage device and at the final stage.
9) Planting ground covers that grow quickly next to small rosettes or very rare plants.
10) Planting annuals.
Great( 2 ) Badly( 0 )
Related Articles