To record an alpine slide with your own hands
The design of the landscape of the territory adjacent to the house is no less important than its actual construction. This direction is so popular today that it allows you to realize even the most original ideas. An interestingly arranged landscaping design of the site with classic lines of shrubs or bizarre shapes of tree crowns and statues of garden architectural furniture will allow you to enjoy your natural park or lawn near the house.
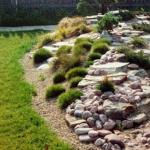
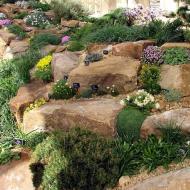
One of the most popular ways to create a beautiful green area near the house is to design alpine slides. A small mound of cobblestones and various plants, which in miniature recreates natural mountains - this is the essence of this way of ennobling your dacha or meadow near the cottage.
Where can I get an alpine slide?
It is noteworthy that the installation of an alpine slide in the country is quite within the power for independent design. The whole process, although it will require painstaking work and attentiveness, will certainly give results that will delight the eye with a unique corner of beautiful wildlife near your home.
Important! One of the indisputable advantages is the possibility of designing such an embankment on any territory - both in the park, and in the garden, and on an ordinary lawn right next to the house, on gentle areas and on slopes.
Despite the standard rules for designing alpine slides in the garden, each project is unique. This is what causes genuine interest and increased demand for such artificial hills.
How to make an alpine slide?
The whole process of arranging a multi-tiered embankment has a certain sequence:
Where to install an alpine slide?
When choosing a suitable site, consider the following requirements for proper organization:
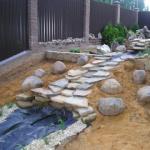
Alpine slide design schemes
Each slide is, in fact, a flight of the designer's imagination. That is why all the mounds are original, because even slight nuances of the color of plants or the size of cobblestones set their tone for the beauty of the entire artificial hill.
To create your own hill in this style, rely on your personal artistic taste, but be sure to look at the diagrams of the finished alpine slides in order to better understand all the intricacies of the formation process. Only in this case, the result will be a special realism of the form, due to which it will be difficult for an unbiased observer to recognize its artificial origin.
What materials to prepare for the design of the alpine slide?
It is not possible to give clear guidelines regarding the quantity, size and shape of all materials. But there are some standard rules that will help you quickly decide on a solution to this problem.
Alpine slide stones
Flowers for the Alpine slide
When choosing plants, keep in mind that different species are suitable for each layer.
Process sequence
- Territory marking.
- Drainage preparation.
- Soil preparation.
- Laying out stones.
- Landscaping of the hill.

Why mark the hill?
After completing the design, transfer the diagram directly to the site itself by marking up. To do this, use the pegs and the thread stretched between them. This method will help to properly organize the vegetation on the hill and visually correlate the sizes of the stones used.
Why is drainage needed and how to create it?
A drainage system is required for clay or greasy soils that prevent normal moisture regulation. Also create a drainage system with a close location of groundwater. It is an improperly organized water drainage system that usually causes a faded embankment.
The selected plants for the alpine slide cannot develop properly and all the beauty of the idea remains unrealized.
Important! Form a system for removing excess moisture either over the entire area of \u200b\u200bthe embankment, or in several small wells measuring 30 * 30 cm. Choose the most convenient method yourself, focusing on the size of the hill.
In order to prepare the correct system, follow these guidelines:
- Remove the top layer of soil by 20-30 cm.
- Leave it to later prepare the right mixture for growing herbs and flowers.
- Mix broken brick and rubble.
- Backfill the excavated space by 10-20 cm.
- Lightly tamp.
- Pour sand from large granules with a layer of up to 10 cm.
- Press down, but not too tightly.
- Water thoroughly to identify possible system flaws.
Soil preparation
In order for the alpine slide to fully comply with the project with your own hands, prepare the topsoil, taking into account the characteristics of the selected plants. Properly selected proportions of all soil components for the embankment will certainly contribute to the attractiveness of the finished slide, excluding the death or insufficient flowering of the selected plants.
When preparing the soil, be guided by the following recommendations:
Laying out stones
With regard to the technology of the sequence of laying stones and planting plants, there are several ways, but the direction remains unchanged - from bottom to top. The two most popular methods are:
Regardless of the technology chosen, consider the following recommendations for the installation of cobblestones:

Landscaping slides
After you have looked at many options for photos of an alpine hill in the country, have chosen the entire range of your future hill and decided on the time of planting, review the rules for landscaping the site to avoid premature death of plants or slowing down their growth.

Here are some of them:
Conclusion
Not only the whole process of self-creation of an alpine slide is long and laborious. Also, a sufficiently long period will be required before evaluating the finished result. To avoid the destruction of the shape of the slide and the death of plants, which will entail additional waste and labor, be sure to familiarize yourself with the rules for caring for an alpine-style embankment and be sure to follow them.
Related Articles