Drawings of a rabbitry. DIY rabbitry
Igor Nikolaev
Reading time: 5 minutes
A A
Any practicing rabbit breeder will tell you how important it is to create comfortable living conditions for rabbits.
Since the most common method of keeping domestic rabbits is a cage, a properly designed cage will greatly help ensure good living conditions and make cleaning easier.
In addition, an important aspect when creating it is the quality and safety of materials (including environmental).
There are two options here: either buy a ready-made house for the rabbit, or make it yourself.
The second option is not only less expensive financially, but also more preferable, since the rabbitry built by the owner himself makes it possible to take into account the specific number of rabbits and the characteristics of their breed. Next, we will look at how to build a rabbit cage with your own hands.
Design of a cage for rabbits and materials for making it yourself.
Whatever the design of the rabbit house you choose, its basis is always the same and consists of the following main parts:
- supporting frame;
- walls;
- ceiling;
- doors.
Cages for these pets can be made either from wooden materials or from metal mesh, however, they should never be made from iron. This will greatly harm the health of your pets, since in the summer heat such a cage will heat up excessively, and in the cold of winter, on the contrary, it will freeze thoroughly. Such cages are absolutely contraindicated for rabbits.
To make a frame with your own hands, as a rule, thick wooden beams are used, taking into account the fact that the legs of the cage must be at least 35 centimeters in length (if you plan to place the cages indoors). If rabbits are planned to be kept outdoors, then the height of the legs should be increased - from 70 centimeters to one meter. In addition to considerations of safety and comfort for the animals, this height of the rabbit's home will make it much easier to maintain. The material for the walls is usually either plywood sheets, or wooden boards, or metal mesh.
Cages for rabbits are not made entirely of mesh, as they need shelter protected from prying eyes. When arranging floors in cages and feeders, it is best to use a mesh or wooden slats, since feed waste and animal waste products fall out well through the left cage. To make the roof, the same materials are used as for the walls. When installing a roof in industrial cages that stand outdoors, it must be covered with additional insulating materials (tiles, roofing felt) to protect it from snow and rain.
It is important to remember that any part in the cage must be made safe and smooth. The mesh should not have sharp ends, and the wooden parts should be carefully polished so that the animals do not get splinters or other injuries. These rodents are very curious and can climb anywhere.
The most popular cage designs for rabbits are:
- regular cell (either without a queen cell or with a queen cell);
- design by I.N. Mikhailova;
- design N.I. Zolotukhina;
- a cage containing a walking enclosure for rabbits.
The first type of design provides two compartments: the first is for walking and feeding, the second is a shelter-nest. These sections are separated from each other by a solid partition, in which a hole is provided. The door to the shelter is made of solid wood, and to the walking and feeding area is made of mesh stretched over a frame. If free space allows, walking can be done separately from the feeding area (rabbit enclosure). The entrance to such enclosures can be made either through the back wall of the cage or from below, through the floor.
Housing with a separate enclosure is well suited for mating animals, since the large size of the enclosure allows for increased physical activity of animals, which not only has a beneficial effect on the general physical condition, but also improves their reproductive functions.
Industrial cages for rabbits according to the Mikhailov system are real mini-farms, as a result of which this design is considered the most difficult to manufacture and the most advanced. Almost everything is provided in such dwellings: heated drinking bowls and queen cells, a ventilation system, shelves for rest. A distinctive feature of cages of this design is a unique system for removing animal waste.
Mikhailov cell design
Wherever they shit, everything ends up in one container. Also, such mini-farms use a bunker feeder for rabbits, which allows you to supply food once or twice a week, as well as drip drinkers that dose the water supply from a large reservoir. This design is the topic of a separate article. We are considering simpler options that you can do yourself, although using a bunker feeder in them is also possible.
The Zolotukhinsky version differs from others in that instead of slats or a mesh structure, solid sheets of plywood or flat slate are laid on the floor. There is no waste tray in these cages. The whole trick is that the floor is arranged with a slight slope, and a mesh with a width of 10 to 20 centimeters is mounted on the back wall of the cage. Animal feces are removed through this mesh, since rabbits most often prefer to shit near the back wall.
Feeders for rabbits in cages of this design are of the tilting type, and there is no need to remove them to clean them. Simply tilt the feeder towards you and remove any leftover food. Be sure to put a net in the feeder to prevent small rabbits from escaping through it.
Also, Zolotukhin’s system does not provide for a summer queen cell. The author suggests using a board 20 centimeters wide to fence off a space of the required size, which is filled with hay, for the period of birth and subsequent feeding. The female rabbit will arrange a nest for herself in this place. This breeding technique brings rabbits as close as possible to the natural conditions of their life, which makes it possible to produce rabbits with a more stable immune system. As soon as the rabbits grow up, the board is taken away, freeing up space for them to walk. In winter, this approach is unacceptable, and a closed queen cell must be installed.
An important advantage of the Zolotukhin design is that to build it with your own hands you do not need to have special skills or use expensive materials.
To make such a dwelling, accessible and cheap materials are needed: boards, mesh, plywood sheets or flat slate, as well as a small amount of sheet metal. The frame, nest door and solid partition are made from wood. To construct the floor, plywood or slate (flat) is used. The partitions for the feeders and the outer door are made of mesh. Sheet metal is needed to cover any protruding pieces of wood that rabbits like to chew on. There should be no drafts in the nesting compartment, as well as a lot of light, so the door here is made solid. In the queen cell, it is necessary to provide a threshold of at least 10 centimeters in height so that any little rabbit does not fall out of it when the door is opened.
To prevent waste from the cells of the upper tier from falling into the lower ones, the back wall there needs to be made straight, and on the lower tier - with a slope.
Cells according to Zolotukhin
How to make a rabbit cage?
The sequence of actions when making a cage for rabbits with your own hands is as follows:
- first of all, a frame is made from wooden blocks of 5x5 centimeters, and a mesh is mounted on the floor of the feeding compartment;
- then the back wall and solid floor of the nesting compartment are installed;
- Sheets of plywood cover the side walls and install a partition with a pre-cut hole between the aft and nesting compartments. The size of the hole must be at least 20 centimeters in diameter;
- a cover is installed on the socket;
- a block is attached to the frame in the middle of the cage, dividing it into sections, and then drinking bowls and feeders for rabbits are mounted (how to make a drinking bowl for rabbits and how to make a feeder for rabbits is the topic of separate articles);
- the resulting structure is turned over, and with the help of slats the mesh is finally fixed on the floor;
- feed bunkers and a compartment for coarse feed are installed. You can install rods, or you can install a mesh with cells of 2x5 centimeters;
- then a roof and a movable door for feeders equipped with a handle are installed on the cage;
- mesh and solid doors equipped with latches are attached to the frame.
If the cages will be placed outdoors, then it is necessary to cover the roof with a moisture-proof roofing material. To do this, a slatted frame is placed on the finished roof, to which the roofing (roofing material or slate) is attached. The roof should be sloped to allow water to drain. For example, if the height of the front wall is 70 centimeters, then the rear wall should be 60 centimeters.
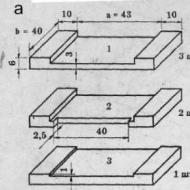
Whatever design you decide to make, be sure to first make detailed drawings of the cells with dimensions. This scheme will help you not to make mistakes during construction and purchase the required amount of materials in advance. The mesh size of the mesh used in the manufacture of housing for rabbits must exceed 2x2 centimeters. In larger cells, animals may get stuck.
One of the factors influencing the success of raising rabbits is a spacious, comfortable cage. It can be easily built at home from scrap materials.
The main thing is that the design fully meets all the requirements of long-eared residents.
What exactly needs to be taken into account during the construction process, what type of rabbitry to prefer and how to build it - we will talk about this later in the article.
What should a rabbitry be like?
The development of infectious diseases, frequent injuries and pododermatitis are the first signs of improper keeping of rabbits. In the future, this will inevitably lead to a decline in productivity and loss of livestock. In order to avoid losses, the breeder needs, in addition to feeding and watering, to pay close attention to the specifics of rabbit housing and the stocking density of animals.
Important! In cramped areas, rabbits' metabolic processes are disrupted, growth is stunted and aggression towards the entire environment appears. Experts advise placing adults one at a time, and young animals four at a time. Moreover, animals of the same sex, with the same development and temperament, are selected for the neighborhood.
General requirements
According to the requirements of rabbit breeding, a well-designed rabbitry should not only protect pets from inclement weather, but also be a cozy home for them with good lighting, ventilation and space for walking. It is important to provide for regulation of the influence of external factors, which depend on the time of day, season, and weather.  Any material is suitable for the construction of rabbit housing. However, experienced breeders advise using a wooden frame and mesh fencing. This is due to their reliability and durability. In addition, in hot weather the wood does not heat up, which is very important for residents.
It is unacceptable for rabbit feces to collect inside the structure. Vapors of ammonia and hydrogen sulfide will provoke respiratory infections in pets, and dampness and dirt will serve as a favorable environment for the development of pathogenic bacteria and fungi.
Important! For eared pets, fine spinous straw or hay is strictly not recommended as bedding. Soft, awnless cereals are preferred. They are used as bedding from late autumn until spring. At other times of the year, it is necessary to cover the floor only in cages with pregnant females. And then they do this 5 days before the birth.
To solve this problem and make the rabbitry easier to maintain, many breeders advise installing a mesh floor inside the structure. Experts categorically do not welcome such an initiative, citing the high degree of injury and frequent cases of pododermatitis in rabbits. The best option is wooden slats and a soft rug laid over them.  Also, the rabbit breeder must take into account the sensitivity of his charges to air exchange and dampness. Therefore, their home should have a good ventilation system that eliminates drafts. To ensure high productivity, experts advise keeping the air humidity in the cage at 60–70%.
Selecting a location
The peculiarities of the rabbit abode are that it should not collect ultraviolet rays, and at the same time it should be reliable protection for its residents from dampness and cold. This can be achieved by choosing the right location for the rabbitry.
Experienced rabbit breeders advise:
- Avoid wetlands, as this type of soil will lead to rapid wear of the material, as well as to illness and death of pets.
- Give preference to elevated areas away from lowlands, ponds and other sources of dampness.
- Place rabbit hutches in shady areas, as the animals react painfully to direct sunlight. This is especially true in the summer. Otherwise, you will have to protect your long-eared animals from the scorching sun with the help of an additional canopy.
- Protect pets from noise. Therefore, places near industrial zones, busy roads, or in the vicinity of predators are absolutely not suitable for rabbitry.
- Place the structure on the east or west side, because long-eared animals are very afraid of wind and drafts. For protection, you can line the northern wall of the rabbitry with a thick hedge.

Did you know? Australian law strictly prohibits domestic rabbit breeding, punishing violators with a fine of $30,000. The ban is related to the damage that wild animals cause to agricultural land every year. Local residents consider them the most destructive pests, blaming them for the destruction of crops, soil erosion and the disappearance of some species of fauna. According to local government estimates, the country suffers about $600 million worth of damage each year from the frantic rabbit activity.
Design
Depending on the number of residents, plan the dimensions and type of rabbitry. It is important for the builder to understand that the entire area of the structure will subsequently be divided into a walking area and a remote nook. The first zone in most cases is a space fenced off with a mesh under the cage. And the second is a blind box.
A removable door is attached to the front side of the structure, and a small opening is provided on the wall adjacent to the walking space. There must be a tray under the floor to collect feces.  Many breeders use multi-tiered group structures for mass breeding of eared animals. On them, as on the simplest cells, it is recommended to provide a single- or gable roof. Usually it is done on the last tier, and all previous ones are covered with pallets.
Whichever option you choose, the rabbit house should be inaccessible to rodents and predators. Therefore, it is recommended to install it at a height of 80–100 cm from the ground. In addition, this solution will greatly facilitate animal care.
Important! In rabbit houses, air movement exceeding a speed of 30 m/s is undesirable.
For the winter, the cage must be insulated in such a way that the temperature inside the room corresponds to the range of +10–20 °C. The builder must also provide for the possibility of additional lighting of closed structures. In the cold season, the length of daylight for rabbits should be at least 10 hours. Ideally, this problem is solved by installing a window on the east wall.

Varieties
Faced with various difficulties when raising eared animals, rabbit breeders are constantly improving homemade rabbitries. Therefore, today there are many projects for their construction.
The following options are especially popular among breeders:
- cell with queen cell;
- multi-section versions;
- single;
- solid wire;
- paired designs;
- rabbit farms Zolotukhin;
- Mikhailov mini-farms.
How to make a rabbitry with your own hands
Building a rabbitry is actually not a difficult task if you have all the necessary drawings at hand. But to create them, the first thing you need to do is decide on the number of rabbits and the type of design. And only then you can proceed to the most difficult and important stage. 
Dimensions and drawings
The dimensions of a rabbit's housing are based on its purpose and the characteristics of the breed. These nuances should definitely be taken into account by adjusting the following drawing options. For convenience, we suggest following a selection of recommendations from professionals:
Did you know? The left rabbit's foot is revered as a talisman of good luck and happiness in many cultures around the world, including Europe, North and South America, Africa and China. It is likely that the belief in the magical power of the long-eared paw originated in European countries from the 600s BC. e. among the Celtic peoples.

Single or two-section designs for outdoor walking under the cage are very convenient. The structure is a wooden frame with a ladder and a mesh fence.
Important! According to experts, among all the available variety of building materials, wood has proven itself to be the best. It is environmentally friendly, durable and retains heat well, does not heat up in hot weather. Metal is absolutely not suitable for such structures. In winter, animals in such a house can freeze, and in summer they can overheat. You should also avoid using chipboard. This material quickly absorbs moisture, resulting in severe crumbling.
To create drawings, you need to decide on the arrangement of all components. The builder must understand which side of the rabbit house there will be doors, windows, feeders, drinking bowls, nesting and walking compartments. In classic versions of rabbit hutches, the side and rear walls remain blank. A small hole is provided from the nest. The descent to the walking area is also important.
Before starting construction, prepare everything you need so that you don’t get distracted by empty searches later. Many rabbit breeders who make their own housing for their pets use scrap materials.  In our case, it will be enough to prepare:
- 10 wooden beams 3 m long, with a cross-section of at least 60×60 mm (for the frame);
- plexiglass;
- soft tiles (roofing felt, polycarbonate or slate are suitable alternatives);
- planed boards about 30 mm thick;
- plywood sheets measuring 1.5 × 1.5 m and 10 mm thick (for cladding);
- wooden slats with a cross section of 25×40 mm;
- welded mesh with cells 2.5×2.5 cm;
- latches, screws, fasteners and nails;
- furniture dowels;
- valves;
- door hinges;
- handles (for transportation);
- metal sheet 1 m long (for constructing a pallet);
- iron corners;
- polystyrene foam (for insulation and sound insulation);
- pipe (for ventilation)
 To work, the master will need:
- pencil (for marking);
- roulette;
- hammer;
- Bulgarian;
- perforator;
- coarse sandpaper;
- elastic glue;
- sharp metal scissors;
- riveter or construction stapler;
- wood saw;
- pliers.
Did you know? A 2 kg rabbit can eat half a bag of feed and drink as much water in one sitting as a 10 kg dog.
Step-by-step instruction
When the entire arsenal of necessary tools and building materials has been collected, you can begin measuring and preparing parts. Let's start in order.
Frame
To make this part of the rabbitry you will need 4 vertical supports and 8 cross beams. The algorithm of actions is as follows:

Did you know? Rabbits' eyes are designed in such a way that they can watch what is happening behind them without turning around.
In this case, a gable roof is proposed. Frame slats and polycarbonate will be used in its production.
So let's get started:
- Build a base from slats. Fasten it using self-tapping screws or nails.
- Attach the prepared part to the main frame of the rabbit house.
- Sew up the base of the roof with boards.
- Cover with roofing material, securing it with self-tapping screws.

The design in question has 2 doors: the first for servicing the rabbitry, and the second for the animal’s access to the walking area.
They are manufactured as follows:
- Make a frame from the slats, the dimensions of which should not exceed a third of the facade wall of the structure. The parts are attached using metal corners.
- Sew up the frame with a sheet of plywood. Alternatively, any other solid material can be used.
- Drill holes for attaching the canopies, having previously taken their measurements.
- The final step is to attach the door latch.
- Make the second door leading to the walking area using the same principle. Its dimensions should be calculated within 35x45 cm. At the same time, it should fit freely into the opening.
- The fastening of the second door involves the use of hinges in the upper part, so that the ward can freely exit and enter with a light touch.

Wall cladding and walking area doors
At this stage, the rabbit house and the frame of the walking area attached to it should already be ready. Its base is made of 5 rectangles of the same height, which will serve as the walls of the structure.
There is no need to make a floor for walking, since it will be replaced by grass. This option is very convenient because the animal will always have access to succulent food.
But do not forget about the ability of long-eared animals to dig holes. To prevent pets from escaping through the tunnel, during the covering process it is recommended to deepen the lower edge of the mesh into the ground by 20 cm.
Did you know? Rabbits chew 120 times per minute and have more than 17 thousand taste buds.
The next steps are:
- Using tin staples, attach the mesh to the fabricated frame.
- Cover the top of the paddock with light, waterproof material.
- Separately, using the same principle, attach the mesh fence to the door frame. After this, attach the latch.

Ladder
This part should be placed in the rabbitry in such a way that the animal can easily get inside the house. Experienced breeders advise making a smooth slope, but at the same time the lower edge of the ladder should not rest against the wall of the fence.
So, let's start construction:
- On a flat surface, attach transverse strips to 2 parallel long slats (there should be at least 5 of them).
- Sew up the gaps with a solid board. As an alternative, you can use a sheet of plywood. Metal, plastic and other slippery materials are extremely undesirable for such purposes. It is important to ensure that there are no large gaps in the design, since these defects can lead to injury to the pet.
- Using self-tapping screws, attach the ladder to the base of the house.

Feeders and drinkers
In the house near the door, attach a manger for hay. Metal rods attached to the walls at a slight angle are ideal for this.
In addition to the already provided hay barn, you need to install a drinking bowl and a feeder in the rabbitry. It is important that these containers cannot be knocked over or become clogged with animal excrement.
Therefore, experienced rabbit breeders advise purchasing a commercial drinking bowl, which is attached from the inside to the front side of the cage. And you can build a feeder yourself.  This is done like this:
- In the rabbit house, attach 4 wooden slats vertically to one of the walls (choose the one that will be convenient for you to feed your pets without scaring them) so that you have a rectangle. This will be the frame of the bunker. The length of the blanks must correspond to the height of the walls, because the feeder will be filled through the raised roof. If this is not possible, then the height of the container will have to be reduced by a quarter to make it convenient for the animal to get food. The bottom of the resulting figure should be 10 cm long.
- Having retreated 10 cm from the last pair of nailed slats, nail 2 similar blanks, reducing their length by a quarter. This will be the frame of the feeder itself.
- Sew up the sides of the L-shaped frame with pieces of appropriate shape cut out of plywood.
- Cover the front side of the hopper with a vertical plywood rectangle as well. Please note that its long side should not rest against the floor, since this arrangement of parts will block the animal’s access to food.
- Cut out the bottom of the feeder from plywood and attach it.
Important! The rabbit breeder needs to carry out a general cleaning of the rabbit house every six months and completely disinfect it. This procedure is carried out using chemicals and a blowtorch..
Warming cells in winter
In order for your ward rabbits to comfortably overwinter without reducing their productivity, it is necessary to insulate the rabbitry from the inside with polystyrene foam. You can also use for these purposes:
- fallen leaves;
- straw;
- dry reeds;
- felt.
After this, place a thick layer of bedding on the floor. In the autumn-spring period, it is important for rabbits that their paws are protected from bedsores and cold. Sawdust, coarse straw or hay of soft, awnless cereal crops are ideal for bedding.  You should be especially attentive to the choice of material when keeping downy breeds. Awns caught in their fur cause discomfort and pain. Straw is preferable for bedding as it retains heat and is safe for the rabbit.
Remember that the larger the pet, the more bedding it needs. For adults, a layer 12.5–15.5 cm thick is suitable.
In severe winters, rabbit hutches are covered with old cotton blankets and other warm things, and the interior space is filled with hay.
Important! The material for making cells must be smooth, without traumatic foreign inclusions. Therefore, all workpieces must first be thoroughly sanded with sandpaper.
Now you know about the main requirements for a rabbit house, the density of planting of animals and the creation of cozy conditions for their keeping. We hope our article will help you make a reliable and comfortable rabbitry yourself.
Video: DIY rabbit cages
Recently, rabbit breeding has become very popular among owners of country plots, as it allows them to make huge profits from the sale of meat and skins. Rabbits grow quickly, eat mainly green food and actively breed, but they are too picky about their living conditions. To raise them healthy, it is necessary to pay special attention to the construction of the rabbitry, taking into account all the features of cultivation.

Purpose and device
A rabbitry is a structure equipped with cages and enclosures, which is intended for raising rabbits. Such structures are installed both outdoors and in closed utility rooms. Since rabbits are demanding in terms of care, rabbit hutches need to be built with good heating, lighting and ventilation. As a rule, rabbit cages are installed in two or three tiers, and if the cottage is located in an area with a warm climate, then experts recommend placing such structures on the street, protecting them with a canopy.
In order for animals to feel comfortable, the rabbitry must meet the following requirements:
- provide animals with all the necessary conditions for growth and reproduction;
- be equipped with special enclosures for young offspring;
- have a width and height that would allow animals to move freely;
- be equipped with a convenient cleaning system.

Rabbits need conditions that would promote their rapid reproduction, development and good health. When setting up a rabbitry, it is important to consider the following parameters.
- Temperature regime. The optimal temperature for this type of animal is considered to be +16 degrees. If the cages are placed near doors and windows, then additional heating will have to be provided, since hypothermia is bad for the health of rabbits. In addition, at low temperatures, more feed will be required, which, in turn, will cause additional costs. Therefore, it would be best to build a recessed rabbitry, with good ventilation and heating. Roofing material also plays a huge role in insulation; it must be strong, thick and protect the structure from moisture and drafts.
- Air humidity. In the rabbitry, the humidity should be constantly maintained at a level of at least 75%. The rooms in which the cages are located must also be periodically ventilated, which will allow gases released from feces and urine to escape. To do this, install a metal exhaust pipe with an adjustable ventilation system in the room.
- Access to cleaning. Cages should be cleaned several times a week to make waste disposal easier. The rabbitry must be equipped with special assembly grooves.
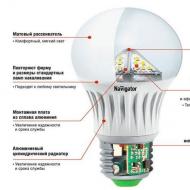
- Lighting. The density, quality of fur and growth rate of pets directly depend on the length of daylight hours. Since these animals are more active at night, the cages should receive good lighting. In this case, it is best to keep the brightness of the light moderate. For example, for adults the lighting standard is 70 lux, and for young animals - 30. As for the duration of daylight, it should be at least 18 hours. In this regard, in winter the rabbitry is additionally equipped with lighting in the form of several lamps.

If you take into account all the above-described nuances when building a rabbitry and properly organize the care of the animals, you will definitely get a good result in the form of a reward with useful meat and valuable fur.
Kinds
Rabbits can be raised in different types of buildings, each of which has its own characteristics, disadvantages and advantages. There is a mini-rabbit farm at the place of arrangement open (street) and closed (located, for example, in a barn). Wherein The first option is especially popular, as it allows you to conveniently place more than 100 individuals outdoors. Outdoor structures are much easier to clean and maintain, they are stable and reliable. Cages can be installed in several tiers, over which a canopy is attached to protect them from precipitation and sunlight.
In turn, outdoor and indoor rabbitries are divided into the following structures:
- with one section (single-, multi-tier);


- cells with two sections (most often built in 2 or 3 tiers);


- with three sections (family).


In addition, all-wire two-tier and three-tier cages, Mikhailov mini-farms with self-cleaning and Zolotukhin cages are also in great demand among rabbit breeders. Two-tier Mikhailov cages have the form of a frame stand, upper and lower shelves.
In such buildings you can keep up to 25 rabbits; the feeders in them are arranged in such a way that the root vegetables, hay and water poured into them are enough for one week.


The simplest and most accessible to manufacture independently is the two-section design. It is easy to maintain and saves space. To do this, it is placed in several rows. And also, every rabbit owner must have a double rabbitry with a queen cell - it is used for breeding and keeping young animals until they reach the required age.


Dimensions and drawings
Before you start building a rabbitry, you should make accurate calculations. To do this, a simple scheme is used, which takes into account the size of the rabbits, their breed and conditions of detention. The parameters of the cages also play a huge role, since they can be a structure for family or single keeping of individuals, with the possibility of walking young animals and with a queen cell. To properly build a rabbitry, it is important to consider the following recommendations and established standards.
- For nursing females, it is best to make the cage up to 180 cm long and one meter deep. As for the height, for such a structure it should be 60–70 cm. Such “houses” are mounted on poles dug into the soil at a height of up to 80 cm.


- For large rabbits that weigh from 5 kg, the structure must be quite spacious, so it is made up to 150 cm long and up to 70 cm wide. The height of the structures in this case is 50 cm. The roof in such rabbitries turns out to be sloping, since the height of the rear panels is reduced by 15 cm.


- Cages in which it is planned to keep only young animals, must have a structure height of at least 35 cm.


- For adult pets It is advisable to make large cages with dimensions of 100x60 cm. This will allow the animals not to limit their movements, since immobility can lead to infertility.


- For two- and three-tier structures It is recommended to observe the following dimensions: depth - 100 cm, width - 200 cm. It is worth noting that in cases of independent construction of rabbit hutches, you can deviate from these indicators.
But owners must not forget that saving on materials and space can cause inconvenience to rabbits, as a result of which they will gain less weight and get sick more.


After everything has been decided on the dimensions, drawings of the rabbitry are made, which indicate the length and width of the frame, doorways, and cage partitions. It is important to ensure that the design of the side and rear blocks completely eliminates the penetration of drafts. Depending on the area where the structure is located, these blocks can be either lattice or solid. Schemes for the construction of the rabbitry and preliminary sketches are transferred to the drawing, then they prepare the material and begin the actual construction.


Materials
The base of rabbit hutches is usually made of wood; as for the remaining parts, a different material is used for them, since these pets can chew wood. Doors, sides and corners are installed from metal; wooden boards, roofing felt, metal sheets and slate are used to create the roof; the mesh is additionally fixed with clamps. The floor is laid out with wooden slats and metal mesh.
The walls of the structure, with the exception of the front ones, can be made from boards; plywood is not recommended in this case, since it is less durable and is susceptible to moisture. Metal mesh is ideal for the front part of the building. but before installation they need to be coated with paint or other protective agents.


How to do it yourself?
Construction must begin with choosing a suitable location. Adhering to standard design standards, a building for animals can be placed from a residential building at a distance of 15 m. You cannot install a “pet house” near noise sources (roads, industrial facilities). When choosing a site for construction, it is important to consider the following recommendations.
- Construction is best done in an area that is protected from moisture (flooding). The site should be located on a hill or area with a slight slope. This will prevent water from entering during rain and melting snow.
- The rabbitry should be installed in a location where there is minimal exposure to wind. In addition, the structure should be made in such a way that pets are not exposed to drafts. To do this, you can additionally build a protective fence, sheathe the walls of the building with dense material, or select free space on an area where there are numerous tree plantations.
- You cannot build a building in areas where groundwater flows close (their deposits should be located at a depth of 1.5 m). Great attention must also be paid to the soil of the area - construction should not be carried out on loose and loose soil.


You should pre-plan all the work, which should consist of several stages.
- Preparation. A place for construction is selected and dimensions are calculated, materials and type of construction are selected. At this stage, the frame of the model is also being constructed from wall blocks.
- Roof and floor construction. Holes are made in the bottom of the box for the legs.
- Equipping the frame with all the necessary shelves, roofing and bottom. Feeders and drinking bowls should be made from natural raw materials; plastic containers are best replaced with wooden ones. Feeders should be placed at a distance convenient for rabbits, and drinkers should be attached to the sides.
- Making doors from mesh and covering the side and rear surfaces of the structure with boards. A mesh is attached to the front.
- Installation of a door and insulation of a room for rabbits. Lighting also needs to be done. Since a comfortable temperature for rabbits is considered to be from 10 to 20 degrees Celsius, in winter it is recommended to move the structure (if it is outdoor) to a heated room. As insulating material, you can purchase polystyrene foam and plywood, which are used to line the walls of the structure. In addition, it is necessary to lay the floor, and additionally lay a layer of hay on it.
A good option is to build a rabbitry in a barn - it will provide the pets with a constant temperature and there will be no drafts.


For novice rabbit breeders, building such a structure may seem difficult, but if you have patience, everything will definitely work out. If such a construction project is being organized for the first time, the following instructions will help inexperienced craftsmen with this.
- Frame assembly. The optimal size for a single frame is 70x50x50 cm; for keeping a male it can be larger. The selected material is cut out according to the drawings with a hacksaw. You will also need to purchase 8 corners and 4 racks in advance - they will be needed for installing the roof and base. To make a frame for the roof, you need to take two rectangles, and to assemble the base, two large corners are tightly connected. Holes in the corners are drilled with a drill, fastened with bolts and nuts, and then finishing is made from wooden blocks.
- Sheathing. For this type of work, try on metal mesh or clamps. The mesh is installed on the frame; it can be left one-piece, bent at the corners or cut exactly along the edges. In the case when clamps are used, they are tightened tightly on the vertical posts.
- Roof. Most often, such buildings are covered with roofing felt. It is carefully pulled onto a sheathing pre-made from beams. Then the slats are stuffed. Roofing felt can be replaced with sheet metal or slate, for fastening which self-tapping screws are used.
- Doors. To make it easier to care for pets, it is best to make door structures folding. They are fixed to the bottom of the building with special hinges. It is necessary to install a special latch or a reliable lock in the upper part. During operation, the doors may break; to prevent this, it is recommended to cover them with mesh or tin.


We must also not forget about making ladders for rabbits. They are non-metallic simple structures that look like gratings. The ladder is laid on the floor, it protects the rodents' paws from the cold and all kinds of damage. Construction is completed with the installation of drinking bowls and feeders. Their sizes must correspond to the dimensions of the rabbitry and the number of livestock, since crowding should not be allowed during feeding.


Raising rabbits at home is not difficult, but it is important for novice rabbit breeders to know all the rules for caring for them and the nuances of building rabbitries. The following expert advice will help you avoid these common mistakes.
- It is necessary to build “houses” for rabbits from high-quality and durable materials; you cannot skimp on them, especially when it comes to fastening systems. The edges of the cuts should be carefully processed, otherwise the animals may be injured. If cells are being made for the first time, then you can use recycled material (waste from boards). With the advent of young offspring and the acquisition of experience, structures are already built from new material.
- Constantly cleaning the cells will help get rid of the unpleasant odor. To do this, install a mesh tray on the floor; all waste will easily fall through it, making cleaning easier. In addition, structures located in enclosed spaces must be periodically ventilated.
- You need to equip the doors using locks not on nails and pieces of wood, but in the form of latches or hooks.
- Covering it with iron sheets will help increase the strength of the rabbitry, since animals will not be able to chew through the metal. This also applies to passages in partitions, walking compartments and queen cells - they are sheathed with tin. Thanks to such measures, the rabbits will not have the opportunity to destroy the walls.
- When installing cages under a canopy in the yard, you need to equip the cages with special containers under the floor. From above they cover with a ladder and a net. Thanks to this, pets will be protected from hypothermia.
Preparation of these structures for winter also plays a huge role. Rabbit hutches will have to be additionally insulated or moved to rooms where heating is provided in winter.


Original ideas
Today there are many options for building rabbit hutches, each model of which may differ not only in size, material of manufacture, but also in design. A house for pets should not only be comfortable, but also fit in an original way with the overall appearance of the site. Are extremely popular frame structures. They can be additionally equipped with a power supply and self-cleaning system.
The interior lining of the cages should be made of metal, and the exterior of the building can be decorated with wooden boards with carvings.

A good solution would also be to install a multi-tiered mini-farm. It is usually chosen for regions with warm climatic conditions, and if a similar structure is built on sites in the northern zones, it will have to be raised and insulated. These rabbit hutches are also suitable for installation in barns, but it is best to build portable models. In summer they can be taken out into the garden, and in winter they can be hidden in a heated room. Depending on the number of livestock, the structure is made with two or three tiers.

An unusual and budget option for keeping rabbits would be pit design, which is easy to construct, easy to maintain and allows you to save square meters of land. Since rabbits, like any other type of rodent, love to live in burrows, such homes will be comfortable for them. In pit structures, optimal air humidity and temperature are constantly maintained, which has a beneficial effect on the health and growth of animals. A pit for rabbits is usually dug to a depth of 200 cm, the walls and floor are filled with concrete, then sand is poured on top and a mesh is stretched.
Inside, such structures are additionally equipped with drinking and feeding facilities.

To learn how to build a rabbitry with your own hands, see the following video.
Rabbit breeding is quite common. The meat of this animal is considered dietary; they are bred quickly enough and do not require a special diet. All this together allows their breeding for families of any income. People living in Russia are also not lagging behind - they have decorative breeds as pets. However, for any animal it is necessary that it will be comfortable. Today we’ll talk about making a structure such as a rabbit cage with your own hands (step-by-step instructions with photo examples will help you figure out how to build it).
Only at first glance it seems that all cells are the same. In fact, there are differences between them. They may differ in height (1, 2 or 3 tiers), age of the eared (for adults or young animals). For different breeds, the cells differ in size (dwarf, regular, giant). Also, designs may differ depending on the direction of the rabbits, which can be decorative or productive. We invite you to familiarize yourself with examples of such structures in the photo.
DIY cages for domestic rabbits:


Two-tier rabbit cages for small areas:
1 of 8


Other wooden rabbit cages:
1 of 6


Rabbit cages
How to build a cage for a decorative rabbit with your own hands: drawing up a drawing, algorithm of actions
In order to build a cage for a decorative rabbit, you will need to complete a preliminary drawing. It can be done by hand on a regular piece of paper or use any computer paper. You can see approximately what the scheme will look like in the photo.
Drawings of rabbit cages that can be used to build a house:


Helpful information! When designing, it is worth considering a home for a decorative rabbit in such a way that it can move freely without sitting in one place. When installing a cage in a limited space, it is better to make it in two tiers with the ability to move from one to another.
After drawing up the drawing, you can begin assembly, for which you will need to have on hand:
- plywood or ;
- plastic or ;
- bars for the frame;
- mesh;
- construction stapler or small nails with;
To begin with, plywood (chipboard) is sheathed with plastic or linoleum, which is secured with a stapler and nails. After this, the frame is assembled and interfloor ceilings are installed. Lastly, the frame is covered with mesh.
Important! If the cage has 2 floors, then two doors are made: one at the bottom at the end, the second at the top, in the form of a hatch. This will make it easier to remove the rabbit and transplant it to another place while cleaning.
Examples of cages for decorative rabbits in the photo
Having looked at examples of ready-made houses, it will be easier to understand how to properly make a cage for a decorative breed of rabbit.
Examples of finished cages for decorative breeds of rabbits:


How to make a two-tier rabbit cage with your own hands: nuances
If this is not the first time a person is engaged in such work, then, as such, he no longer needs a drawing - everything that is required is “stored” in his head. However, it is better for novice home craftsmen to sketch out a schematic representation of the future house for long-eared pets.
Drawings of cages for rabbits with dimensions: examples
In order for the dear reader not to reinvent the wheel, we suggest that you familiarize yourself with examples of schematic images of various types of such cells.
Drawings of various types of cages for rabbits for your own production:


Do-it-yourself two- or three-tier cage for rabbits: step-by-step instructions with photo examples
Having understood how to draw a drawing, you can proceed directly to construction. The editors of the site will tell you in detail how to make cages for rabbits, supporting the text information with photo examples.
How to make a cage for rabbits with your own hands: installation of the frame and the bottom of one of the tiers
So, let's look at the sequence of work:
| Illustration | Description of action |
 | To make a frame from the material, you will need timber (the length of the timber is indicated in the photo). We trim the ribs that will be inside the cage with a corner - this will protect the wood from sharp rabbit teeth. The end result should be a fairly large rabbit cage. |
 | First, we assemble the sides of the frame of the future cage. The parts are fastened together using angles and self-tapping screws with a press washer 40 mm long. |
 | Having measured a distance from the edge equal to the future door, mark it and attach a partition from a pre-prepared part - this will add strength and ensure fastening of the hatch. We perform the same actions on the other side. |
 | Between the doorways we install 2 bars in the shape of the letter “V”. Subsequently, it will be in which fresh burdock or cabbage leaves are placed. |
 | Having assembled 2 similar partitions, we connect them with pieces of timber using the same corners and screws. The only difference is that it is better to take reinforced corners for these purposes. |
 | As a result, we get this frame, which is ready for covering, however, the bottom should be made first. Often a mesh is used for this purpose, but long-eared animals can fall into the cells with their paw and damage it, so we choose another option. |
 | To install the bottom you will need slats measuring 24x12 mm, a drill, and the same self-tapping screws with a press washer 40 mm long. A drill is used here to drill the slats to avoid splitting them. |
 | Having fixed the first rail, we lay two without fasteners, screwing only the third one. This allows you to measure exactly 48 mm without a tape measure or extra marks, which means it saves time. We repeat these steps until the bottom is completely covered. |
 | When this work is completed, we fix one more between the fixed slats. So the gaps between them will be of such a size that will not allow the rabbits to fall between the strips. |
 | The last step is to cut off the excessively protruding parts. You should not do this as in the photo - with a metal cutting disc. It may overheat. It is better to use a hacksaw or. |
We sheathe the frame and install the tiers in place
Now let’s proceed to covering the frame and further installing the tiers of the cage:
| Illustration | Description of action |
 | First, the mesh is attached to the feeder in such a way that the bars remain inside the cage, and the fastening screws are on the outside - this will eliminate the risk of injury for the rabbits. |
 | Having installed 4 racks in the corners, we fasten the first tier with corners, cover it with a sheet of galvanized metal, and fix the stop for the second floor a little higher. There must be a distance between the tiers that will allow production. |
 | We perform the same actions with galvanizing on the second floor. Please note that the photo shows a technological opening that makes cleaning easier. |
 | The third tier is installed in a similar way. Their number depends on the wishes of the owner, however, it is worth remembering that cages that are too high will be inconvenient to maintain. You can't run around rabbit houses |
 | Lastly, we install the doors. Making them is not difficult, you just need to assemble the frame to size and cover it with mesh. The doors can be hung on any hinges, you can even use piano hinges. |
 | Now all that remains is final disinfection before moving in. Using a torch, we burn wooden surfaces - in addition to destroying microbes, this action allows you to remove burrs that remain after cutting. At the end of the firing, the cage is treated with an antiseptic, after which the first residents can be moved into it. |
As you can see, you just need to put your hands to it - there is nothing super complicated in building homemade cages for rabbits.
Installation of a rabbit cage made of mesh: what you need
In fact, everything is quite simple here. Using wire cutting pliers, we cut the walls to the required sizes, which are subsequently sewn together with aluminum or copper wire. It would be more logical to make the door from the end of the structure. Sheet bending is also used. When using it, the long walls, floor and ceiling of the cage will be made of solid mesh and sewn together only on one edge.
Helpful information! Such houses for eared animals are not durable due to the lack of a frame. It is not recommended to place them in several tiers. Therefore, if you need a quality home for animals, it is better to use a frame option.
Making your own rabbit cage using the Mikhailov method
Quite an interesting design that helps awaken the instincts of rabbits, which contributes to the rapid growth of the population in one individual house. Let's try to figure out how to build a similar cage for rabbits.
Drawing up drawings and diagrams for a cell using the Mikhailov method
It makes no sense to pore over the drawings yourself, especially if you do not have specific experience in such work. It is much more convenient to find them on the Internet. The Homius editors have already done this for the convenience of our Dear Reader. You can see them in the pictures below.
Drawings of cages for rabbits using the Mikhailov method:


Work performed when assembling the stand and other parts of the rabbit cage
Carefully study the drawings and photos of finished houses - this will help you complete all the work correctly. The shaft located in the middle of the cage will serve to remove animal feces, so the inside should be lined with frost-resistant or bicrost. Experts do not recommend using roofing material - its rough surface will collect dirt, which is very difficult to clean. The dimensions of a do-it-yourself rabbit cage are chosen individually; there are no standards for the area of the houses.
Special attention should be paid to the walking and nesting areas. Compartments for walking rabbits are equipped with drinking bowls and feeders. It is better to make the floor from slats (by analogy with the step-by-step instructions). The queen cell is equipped with a small entrance (like a hole), from which there is a small tunnel that goes down 9 cm. This creates a resemblance to the natural habitat and helps to awaken the instincts of rabbits, including the reproductive instinct. The mother liquor is thoroughly insulated. If the winters in the region are quite severe, it is allowed to equip a nesting compartment, which promotes the reproduction of rabbits even in the cold season.
Drinkers and feeders are made automatic. You can see what they look like in the pictures.
Automatic feeders and drinkers do not require constant monitoring:


The upper third tier is most often used as a jigging tier - a few mature rabbits that are able to live without a mother are placed in it. It is also equipped with drinking bowls and feeders. The roof is made pitched, with a pipe leading through it, which is necessary for additional ventilation of the compartments.
Helpful information! Such designs greatly facilitate the farmer’s work. If installed correctly, the owner is required to maintain no more than half an hour a week.
Buying cages for rabbits: which one is better to choose?
If you don’t have time to make your own cage or don’t have the desire to do it, you can purchase a ready-made structure. Its form will depend on the goals pursued by the owner. Provided that rabbits are kept “for the soul”, it makes sense to purchase a simple frame house. If you plan to breed eared animals with subsequent profit, preference should be given to cages constructed according to the Mikhailov or Zolotukhin method. Such houses will allow you to get a large offspring in a short time.
Rabbit cages
Summarize
A farmer who breeds rabbits cannot do without good cages to keep them. Of course, it is easier to purchase such structures, but their cost cannot be called low. This means that making a rabbit house with your own hands will be much more profitable. The main thing is to understand that a rabbit cage made with high quality and according to all the rules will contribute to the rapid reproduction and weight gain of long-eared pets. Although some farmers claim that for their normal maintenance, a hole dug with an excavator and covered with plexiglass or plywood is sufficient. It is possible that this is true, but only for one specific breed. The majority of rabbits need more comfortable living conditions.

A summer cottage is an ideal place to keep rabbits. These furry animals can be placed in a barn without any problems or simply placed in cages in the open air.
Caring for rabbits will give you a lot of positive emotions if the housing for them is made competently and efficiently.
Beginners should know that a rabbitry in the country is not a simple box with a lid, but a special design.
It must have all the conditions for comfortable keeping of young animals, adult animals and pregnant rabbits.
Let's look together at the most popular options for rabbit hutches and study the features of their construction and arrangement.
What should a country rabbitry be like?
By answering this question correctly, we will avoid mistakes and shortcomings during its operation.
A country rabbitry must meet several requirements:
- Optimal dimensions with minimal consumption of materials;
- Strength and durability of the structure;
- Easy to assemble;
- Compliance of living conditions with veterinary standards;
- Easy access for feeding and cleaning (minimal maintenance time).
When deciding to make cages for rabbits with your own hands, you need to take into account the recommended dimensions of such structures.
Two adult rabbits can be kept in a two-section cage. Its length should be at least 140 cm, with a width of 60 to 70 cm and a height of 50 to 70 cm. An inclined mesh for grass and hay is placed between the sections, and bunker feeders and drinkers are placed at the edges.

To save space, the rabbitry is often made in two tiers. In addition to being compact, this solution significantly speeds up the cleaning and feeding process.

Cage dimensions for group housing of young animals:
- length 200 - 300 cm;
- width 100 cm;
- height from 35 to 60 cm.
The actual calculation of the size of cages for rabbits under 2 months of age is carried out based on the standard area for keeping one animal (at least 0.12 m2).
A female with offspring will need at least 0.6 m2 of space. In addition, for newborn rabbits in a cage, you need to pre-install a nesting box 35 cm long, 30 cm high and 25 cm wide.

Materials for making rabbitry
Here you need to intelligently combine strength and low cost. When you are planning to build a rabbitry with your own hands, do not forget that your long-eared pets are rodents. Therefore, it is better to pre-upholster the wooden parts of the frame that go inside the cage with metal (you can use foil from beer cans or galvanized steel roofing).
By spending a couple of extra hours on this procedure, you will extend the life of your cells by a good ten years.
The simplest and most economical version of a frame for a rabbitry is a wooden one made from bars with a cross-section of 50x50 mm.

There is no need to antisepticize them to prevent the animals from being poisoned by the toxic impregnation. But make sure that the material for the frame is well dried.
The roof of each tier should be made of moisture-resistant material. It can be wavy or flat slate. It is better not to use metal for the roof and cladding of a rabbitry located outside. It gets very hot under the sun and turns the cell into a hot “oven”.
The best option for covering the frame is galvanized chain-link mesh with a cell size of 25x25 mm. Interestingly, it got its name from the English word “rabbit”. Steel mesh is used for the facade, doors and sides of cages. The hay storage compartments are made of mesh with a larger mesh (50x50mm) to make it easier for the animals to get food.

The bottom of the cages can be covered with a flat galvanized mesh (cell 10x25 or 25x25 mm), laying it on wooden supporting slats. This solution makes cleaning easier. Rabbit feces fall through the cells, accumulating in the receiving hopper, or simply roll down the sloping roof of the lower tier onto the ground.
Solid flooring on the floor of a rabbitry is very rarely used. The caustic urine of animals quickly saturates it, worsening the microclimate in the cage and causing rotting of the wood. Instead, the bottom of the cage is made into a lattice, placing planed flooring bars with a small gap (0.5-1 cm).

Rabbits do not like drafts, so the back of the cages is made blind using OSB board, plywood, board or polycarbonate.
The supporting frame of a cage for keeping rabbits outdoors can be made of metal. Having welded such a structure from a corner (45x45 mm), it is filled with ready-made prefabricated sections made of stamped mesh, mounted on frames made of steel rod.
An important nuance of comfortable keeping animals in such cages is the installation of a small sheet of plywood on the floor, which protects the rabbits’ paws from corns (pododermatitis). The plywood is periodically removed for cleaning and drying.

The roof of a mesh cage will not protect animals from rain and sun. Therefore, it should be placed outdoors under a slate canopy.

Considering the existing designs of rabbit hutches, it is worth mentioning the Zolotukhin method. It was developed based on many years of experience and observation of the habits of fur-bearing animals.
Its two main postulates are:
- The floor of the cage is made combined (the front part is an inclined flooring made of flat slate, and a steel mesh is placed in the rear part);
- The grain feeders have a swivel design for easy cleaning and refilling.
The floor design was not chosen randomly, but based on statistical data. According to them, rabbits leave about 70% of feces and urine in the back of the cage (where the mesh is installed), and the rest of the feces are scattered over its area.
In cages built according to Zolotukhin’s method, there is no moisture-absorbing straw bedding. Therefore, they are always dry, and cleaning requires a minimum of time.
Sequence of making a rabbitry
Having made your own sketch or using a ready-made drawing, you can begin assembling the cells. To do this, you need to cut the wooden slats of the frame to the specified size and connect them with self-tapping screws.
It is more convenient to first completely assemble the front and rear frames, and then connect them into a common structure with short floor and ceiling jumpers.

Before fastening the frames with self-tapping screws, do not forget to use a level and square to make sure that the slats are vertical and perpendicular to avoid distortions.
After assembling the frame, they proceed to installing the door bars and hay bar. The next step is laying a grid or slatted floor (the gaps between the slats are 10 mm).
Having laid the floor, you can begin cutting the mesh and plywood, attaching them to the frame and hay sheds using self-tapping screws.
At the final stage, the roof of the first level is made using moisture-resistant QSB sheet. Its edge should protrude 10-15 cm beyond the dimensions of the cage. The second tier is covered with a sheet of corrugated slate, attaching it to the inclined bars of the frame.
The rabbitry can be called completely ready after installing OSB doors, bunker feeders and drinkers.
Articles on the topic