How to make a chair at home. How to make a chair with your own hands: make it according to instructions from wood using drawings
All photos from the article
Almost anyone can make the simplest furniture elements themselves; the main thing is to have a simple set of tools and devote some time to this work. By making wooden chairs with your own hands, you will hone your skills and each time you will be able to perform more and more complex operations, because experience is important here, as in any other business. Let's look at how to organize the workflow to ensure a good result.

What you will need to carry out the work
In order for the process to proceed comfortably and without interruptions while searching for the necessary material or device, you should collect everything you need in advance. Making wooden chairs with your own hands is done using the following kit:
| Bar, board and plywood | There is no exact list, since you can use any available materials. As a rule, a beam of 50x50 or more is taken for the legs to provide the necessary strength, and for the lintels you select elements at your discretion, as a basis for the back and seat, if they are soft. It is better to choose hardwood, the chairs made from it are much stronger, and the structure is more beautiful |
| Hacksaw, plane | Everything is clear here: all elements need to be cut to a certain size, and the surface must be processed to make it smooth. Nowadays, power tools are used more often, so the work becomes even easier and faster, it is also better to have a screwdriver on hand - you can use it to tighten screws and drill holes, you only need drills of the appropriate size |
| Measuring devices | This includes a ruler, tape measure, square and building level; with its help you can quickly check how even the frame is. Also, don’t forget to buy a carpenter’s pencil, it’s very convenient to use to apply markings |
| Useful little things | To bring the surface to perfection, you will need sandpaper with a grit from 80 to 240; to protect the product from moisture and improve its appearance, either impregnations and varnishes, or paint are used. Also, do not forget about fasteners, the ideal option is self-tapping screws, their length should be sufficient to ensure reliable connections |
Important!
In the process, you may need other tools, for example, a mallet for sealing joints, a chisel for finishing elements.
Also, if you want the seat and back to be soft, then do not forget to purchase foam rubber and upholstery material, it can be found in specialized stores.

Workflow Description
Of course, making a wooden chair with a backrest with your own hands is much more difficult than a regular stool, but if you are careful and precise, the time spent will pay off as an excellent product for your home or garden. Let's divide all the work into two stages - preparation and assembly.
Preparation
Here you need to do the following:
- You can make drawings of a wooden chair with your own hands, or you can find ready-made ones in specialized publications or on the Internet, this will simplify the process. You can go the other way - find an interesting option and, based on it, make your own unique project, which will be different from other options.
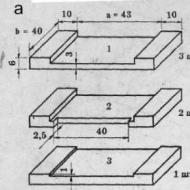
- Let's take the above diagram as a basis due to its simplicity and clarity, you will need two legs 50 cm long, two legs 110 cm long, four crossbars 55 cm long and the upper part of the backrest, its length is 45 cm. For the seat and backrest you can use either a thickness of 15 mm, or plywood with a thickness of 10 mm or more, the second option is used as a base for upholstery.
- You cut all the elements, this is not difficult to do, the most important thing is to take high-quality measurements, since an error of even a few millimeters will lead to skew of the entire structure, and the final result will be far from ideal.
Advice!
To ensure that the ends are perfectly even, we recommend using a miter box; it can be used to cut perfect right angles.

- Next, you need to treat the surface to make it smooth, it is better to round the corners, so the chair will look much more attractive.

Assembly
Now let’s figure out how to make a wooden chair with your own hands, the instructions are simple and clear:
- First, the sides of the structure are twisted together– a short leg, a long leg under the back and a cross member, for work use self-tapping screws and a screwdriver, this is much more reliable than nails, the joints can be additionally coated with wood glue for reliability.
- Next, the finished parts are connected to each other by the remaining jumpers– the frame is ready, now the seat and back are attached. If you want to make these elements with upholstery, then secure it in advance with a stapler on the back side, choose high-quality fabric, its price is higher, but its wear resistance is much better.
- Lastly, the structure is coated with varnish or stain. To avoid getting it on the upholstery, seal it with masking tape.

Advice: for this you will need either sandpaper or a special remover, which successfully copes with even several old layers of the composition; then, if necessary, the elements are tightened with self-tapping screws and the product is painted again.
Conclusion
Making a simple chair is a task that anyone can do, so don’t be afraid to get to work. The video in this article will help you understand some of the features of the process even better.
Or a small picture frame. Wood is a living and very rewarding material; it is quite easy to process. Provided proper treatment, it lasts a long time and easily fits into any interior. Products that you make with your own hands from wood will make the atmosphere in your home warmer, more comfortable, and more familiar. Moreover, if these products are not only beautiful, but also useful. In this article I would like to talk in more detail about how to make a chair with your own hands. There will always be a use for it, especially if large groups of friends and relatives often gather in your home. In addition, high-quality wooden furniture is quite expensive, and you can never be 100% sure that you bought a set of chairs made from solid oak, and not from chipboard disguised as natural wood.
Making chairs with your own hands is not too difficult and does not take too long if you decide in advance which model you want and what you will need it for: a stool for the kitchen, an elegant chair with a soft seat for the living room, a high chair for children or a folding camp chair .
If you want to make a really good piece of furniture, we recommend that you don’t skimp and purchase high-quality wood. In any case, it will cost you less than buying a ready-made chair. Beech, pine, oak - these are the types of wood that can be used. For the frame you will need a beam with a section of 40x40, 40x60 mm, for the lintels and back slats - boards 1 - 1.5 cm thick, as well as a plywood sheet (if you are planning to make a chair with a back and a soft seat).
If we talk about a set of tools, then your arsenal should include:
- saw or hacksaw;
- jigsaw;
- chisel;
- plane;
- hammer;
- screwdriver;
- mallet;
- sandpaper or sanding machine;
- construction stapler;
- clamps;
- square;
- roulette.
In addition, prepare wood glue, as well as paint and varnish materials of your choice. Stainless steel self-tapping screws will serve as fastening fittings. Don't forget about a sufficient number of staples for the stapler if the chair seat is upholstered.
The first time, by the way, when I made it out of wood, I didn’t make a chair, but a bedside table attached to the wall. Even the rack is bigger. So the chair is not for beginners. It's better to train on stools first. So the advice is correct.
We suggest starting with making stools - the simplest models of chairs. Photos will help you understand the intricacies of the process. Just in case, let’s explain: a stool is a chair without a back, with a regular wooden or soft seat, trimmed with foam rubber and upholstery.

So how are these chairs made? Photos and the following instructions will help you.
Prepare 4 bars with a cross-section of 40x40 mm and a length of 440 mm. When working with wood, make sure that there are no burrs on the parts, otherwise you may be injured by them later. Sandpaper will be an indispensable thing here. Each element of the future chair must be carefully polished with it. If the roughness on the wood is significant, use coarse sandpaper first and then finer sandpaper.

Prepare 4 drawers - horizontal jumpers between the legs on which the seat will rest. Their parameters are 20x50x280 mm. You also need 4 jumpers to strengthen the structure of the legs (legs). Their dimensions are 30x20x280 mm.

Queue for a seat. If you have a board wide enough to make it solid, that's good. In the absence of one, you can connect several narrower boards using the tongue-and-groove method (in the same way as lining boards or floorboards are connected). If desired, you can round the corners of the resulting seat.

Next, it is necessary to make spikes at the ends of each of the drawers and legs, and grooves of the appropriate sizes on the legs in the right places. The length of the tenons and the depth of the grooves are 20 mm. Grooves for fastening the legs are made at a height of 270 mm from the floor.

Assemble all the parts together (without the seat for now) to see if there are any distortions and whether the tenons “sit” tightly in the grooves. If all is well, you can coat each groove and the corresponding tenon with wood glue and finally connect the elements of the future stool. For more durable gluing of the legs in the places where the drawers and legs are attached, it is recommended to tighten them with clamps or strengthen the fastening with self-tapping screws.
How to attach a seat to the resulting structure? Screw a long self-tapping screw into each leg from the front side. In this case, it is recommended to drown the caps a little in the wood, and then disguise the place of attachment with wood putty or a plastic plug in the color of the wood (these can be found in any furniture fittings store).
All that remains is to paint the stool in the desired color or simply varnish it if the wood itself already has a beautiful shade and internal structure.
How to make a folding chair yourself?
A folding chair is an indispensable piece of furniture when camping, as well as in the households of owners of small houses, in which it is problematic to place a large number of ordinary chairs, and guests need to be seated on something.

What is required to make the most ordinary folding chair?
- 4 legs measuring 40x20x470 mm;
- 4 crossbars on which the seat bars will be held - 40x20x320 mm;
- 2 legs measuring 40x20x320 mm;
- 4 bars for making a seat: 2 measuring 90x20x350 mm, another 2 - 60x20x350 mm;
- 6 bolts with a diameter of 6 mm and a length of no more than 40 mm;
- self-tapping screws 45-50 mm long for attaching the legs to the legs, as well as the seat bars to the support bars.
To make the chair look more aesthetically pleasing, we recommend rounding the edges of all parts.
Do-it-yourself folding wooden chair: step-by-step instructions
First of all, we connect the legs in pairs in the form of two letters X using bolts. It is recommended to make the connection not in the middle of the legs, but closer to their top, so that the future chair is more stable. The bolt heads and nuts need to be slightly recessed into the wood.
After this, a leg is attached to each of the “halves” of the folding chair (at a distance of 100 mm from the lower ends of the legs), as well as one wide and one narrow seat block. When assembled, the seat should look like this: wide bar - narrow - narrow - wide. The distance between the wide and narrow bars is approximately 15-20 mm.
We complete the work by varnishing or painting. A fishing chair or a piece of home furniture for compact storage is ready!
Homemade wooden chairs video
Wooden chairs: variety of shapes and design options
Wooden chairs can be very different. If you have a milling machine and know how to work on it, then you can become the creator of original chairs and stools with carved legs and backs. 
Do you have several cut tree trunks on your property? They can also become wooden chairs: you just need to saw logs out of them and lay soft cushions on the latter. If the trunk is trimmed so that the log has a “back,” the chair will become even more comfortable. What you need to decorate a barbecue area or furnish a wooden gazebo.

Chairs can be made with your own hands and from unprocessed thick branches. Just remove the bark from them and varnish them. The main thing in this case is that the seat and back (if any) are smooth and comfortable, without branches or other protruding elements. Complete harmony with nature is guaranteed to you! 
The most ordinary chair with a soft seat can easily be turned into a rocking chair if you attach armrests to it (they can also be upholstered) and attach runners to the legs.

To make the chair as comfortable as possible, not only the seat is made soft, but also the back. In some cases, they are limited to a soft horizontal bridge connecting the rear legs in their upper part. Chairs with a completely upholstered back in a carved wooden frame (a la the famous “twelve chairs”) will look truly aristocratic.


 homemade wooden tables and chairs
Everyone who has ever worked with natural wood maintains a respectful attitude towards it. Not a single laminated slab, even the highest quality, can compare with natural wood. What is better: some kind of pseudo-chair made from pressed sawdust or do-it-yourself wooden chairs made from oak? The answer is obvious. Of course, the price of good furniture in stores is steep, so let’s try to make it ourselves.
We offer instructions on how to make such solid wooden chairs
Preparation of lumber
Chairs of this kind are made from radially sawn solid oak. You can take solid mahogany (if you have it), the chairs will turn out just as good. Radial cutting is good because the wood fibers are densely and evenly distributed across the entire width of the board. Furniture made from such blanks is durable and retains its original configuration for an indefinitely long time. In addition to the board, you will need screws, wood glue, stain, and polyurethane varnish.
Any natural wood is a living material that responds to changes in temperature, humidity and air composition. Therefore, the oak board from which we will make wooden chairs with our own hands must rest in the new room for at least a week. After acclimatization of the wood, you can begin cutting the blanks.
Set of tools for making wooden chairs
- Milling machine.
- Belt sander.
- Jigsaw.
- Clamps.
Marking and cutting out parts of a wooden chair
Here is a table of detailed product details.

Chair detailing
A clear drawing with numbered parts gives a complete picture of the chair's assembly. Consulting it, we begin to cut out the given elements in order.

Wooden chair diagram
The back legs of the chair are always cut out first (in the figure they are indicated by the number 1). Using a planed blank 75 mm wide, 38 mm thick, we cut out two parts of the indicated shape, 1075 mm high. We measure and find the locations of the grooves for the horizontal jumpers of the back.
We cut out two front legs (2) from the blanks. We finish them with a sanding machine. Using a milling machine, we mark and select grooves for connecting the legs with the jumpers and drawer parts. We cut off the upper ends of all the legs so that a low pyramid is formed.
We cut out the jumpers for the back: two horizontal (3 and 4) and five vertical (5 and 6). They are all the same length, 475 mm. We mark and make grooves in the horizontal planks. We form spikes at the ends of parts 3,4,5,6, adjusting their sizes to the size and shape of the sockets. The upper edge of horizontal part 3 should have a bevel from the middle to the edges.
When deciding how to make a chair out of wood without the slightest flaws, we first assemble the backrest dry. We adjust the tongue-and-groove connections. Having made sure that the pairing is perfect, we disassemble the back, attach all the parts with glue and tighten them with clamps. The assembled structure (the so-called subassembly) must be rectangular and flat.

We tighten the subassembly parts with clamps until the glue dries
Sawing and assembling side inserts
The most difficult part of the work awaits us - the formation of two side inserts of the chair. One insert includes the upper arched lintel 7, the lower rectangular crossbar 8, five slats 9 and 10. We cut blanks for them and for the arched lintels 11.
Since all four arched crossbars are identical, a template is indispensable. Making wooden chairs with curved edges without a template is simply unthinkable. We cut it out of MDF 20 mm thick. To the base of the stencil we attach a support rail and technological inserts that will hold the milled strips in the desired position. We grind all sawn parts.

A special template-device for milling the upper ends of the side insert strips
Mark and select the grooves on the arched crossbars of the side inserts. We will attach planks 9 and 10 to the tenons in these holes. Next, we draw an arched rounding on all 4 lintels using the template. We cut out four identical parts and polish them thoroughly.
We lay out planks 9 and 10 in the required order, planning spikes at the ends. We mark the upper ends using a template. We cut them along a smooth curve, adjusting them flush with a cutter. To cut tenons on the rounded upper ends, we first use a cylindrical cutter to make a rebate. On all arched elements, as well as on crossbars 12 and 13, we cut off the tenons at the edges. We assemble the side inserts, adjust them if necessary, disassemble them and glue them together completely. We compress the subassemblies with clamps and leave them to dry.

We mill the upper ends of the planks according to the template

To cut tenons on the rounded upper ends, we first use a cylindrical cutter to make a rebate.
They usually try to strengthen adhesive joints with screws, which is what we will do. We mark and drill out blind sockets 14 for small hardware. Each hole is closed with a wooden plug 15.
The plywood seat will rest on 16 slats, screwed with 18 screws to the crossbars. Sockets for screws should be drilled in advance.
Assembling a wooden chair
How to make a wooden one without wasting time? We lay out the elements and finished subassemblies of the product, check all the tongue-and-groove interfaces for consistency. We assemble the entire structure in a certain order:
- We glue parts 11, 12, 19 to the rear leg. Turn the structure over and glue the tenons of the free ends into the grooves of the second rear leg. We compress the subassembly with clamps. We screw screws into the mortise-tenon joints.
- Glue the side parts of the drawer drawer and both side inserts to the assembled back. Immediately glue the tenons of the arched lintel and the front part of the drawer into the grooves of the front legs. We put the resulting structure on the sidewall spikes. We install clamps on it and, without tightening, check the squareness of the product by placing the chair on a flat surface. Tighten the clamps and screw the screws into the tenon joints.
- When the glue sets, plug the holes with screws with wooden plugs. We carry out the final sanding of the chair, treat it with a dark stain, and cover it with polyurethane varnish 2-3 times.
- All that remains is to cover the seat. To do this you will need soft leather and thick furniture foam. Having completed the upholstery as shown in the pictures, we screw the seat with screws to elements 16. We glue felt pads 20 to the bottom of the legs so as not to damage the floor covering.

Chair seat upholstery. Take a piece of leather 600x600 mm, cut out strips 25 mm wide in the corners. We bevel the edges of the 50mm foam rubber at an angle of 30° (the lower side is the same size as the plywood seat). We nail the stretched upholstery with a furniture stapler.
When looking at the finished product, you get the impression of solidity, solidity and comfort, especially since with small additions the chair can easily be transformed into a comfortable chair with armrests.
Craftsman Tom McLaughlin designed this chair by combining elements from different furniture styles without sacrificing comfort for beauty. Using templates it is easy to make curved parts. Tom uses three machines to make joints: a band saw, a circular saw and a slotting machine (you can use a drill press with a slotting attachment instead). Having completed the carpentry part of the work, complement the chair with a comfortable seat, which is made in a simple and proven way.
Think carefully before you cut
The design of a chair consists of many parts that require attention and concentration in their manufacture and fitting. Here's what Tom advises.
Shape the legs
1. Using the diagrams as a guide, draw the contours of the posterior leg A real size (Fig. 1). Glue the drawing onto 6mm hardboard and cut out a template, marking the position of the sockets on it. Trace the outline of the template onto the back leg blank and cut with a band saw, keeping the cut close to the contour line. Then cut out the second back leg.
Tom advises! To achieve a better appearance, The texture pattern on the anterior side of both hind legs should be mirror symmetrical. To do this, when marking the contours, useswarm legs turn the template over, swapping its ends (photo A). Then you need to place several legs side by side along the width of the board. This ensures that you get paired parts that look like reflections in a mirror. (photo B).

2. Using double-sided tape, glue the template to the sawn leg blank. Secure a long pin in the collet of the router installed in the table.
piercing cutter with a bearing and adjust its offset, aligning the bearing with the edge of the template. Contour the back legs to the final shape. Mark the top and bottom of each leg with a pencil, remove the template and sand the legs to the outline lines.

3. Cut out the front legs IN(“List of Materials” and rice. 1). Mark those front edges. Angle the saw blade at a 7° angle and cut a bevel on the outside of each leg so that the front edge is wider than the back edge. Without changing the inclination of the disk, cut out two strips of wedge-shaped section 250-300 mm long, which will be required when selecting nests in the legs, under the same corner from the scraps.
Cut out the blanks for the back parts
1. Cut out the bottom crossbar WITH backrests (Fig. 4), but don't make bevels on its top edge just yet. Mark the positions of the four sockets.

2. Cut out the top crossbar D backrests (Fig. 5) with an allowance of 10 mm in length. Make two copies of the top rail template. Glue one copy to the bottom edge, but don't cut out the curved shape yet.

3. For the middle board E and side bars F backrests, make a blank measuring 13 x 178 x 533 mm (Fig. 6). You will saw off the side pieces later after cutting the tenons.

Select all slots
1. Mark the position of the sockets on the legs A, B (Fig. 1 and2) , remembering that the parts must be mirror copies.
2. Select a 10mm socket for the front drawer G in the front legs B (photo C, rice. 2). Rotate the front leg IN so that its beveled edge is adjacent to the stop on the table of the slotting or drilling machine (photoD) and make a 10mm angled socket for the side drawer N. Do the same with the second front leg.
WEDGES WILL HELP INSTALL PARTS IN THE RIGHT POSITION

To ensure that the walls of the socket are parallel to the front edge, place the leg with the beveled edge down, placing a wedge-shaped strip under it.

Place the part with the front edge on the wedge and use the second to secure it in the clamp. Do not use a second wedge if your machine does not have one.
3. If you do not have a large enough piece of workpiece left over from sawing out the rear legs, make a curved support (tsulaga) measuring 90x525 mm (photo E) from scraps whose thickness is equal to or slightly less than the thickness of the leg. It will help hold the leg at the desired angle when selecting a socket for the side drawer.

Transfer the outer marks of the drawer socket to a piece of board, trace the leg template and cut out the curved support-tsulaga with a band saw.

Align the marking lines of the nest on the leg and the tsulag. If the leg rests on the machine table, the socket will be selected at an angle.
4. Using a curved support (photoF), select in the back leg A 10mm socket for side drawer N. Do the same with the second back leg.
5. To select 10mm sockets for the lower backrest rail WITH in the hind legs A Press the flat edge of the leg (in which the previous socket was just made) against the machine stop and select a socket on the inside of the part.
6. Make an 8mm socket for the top rail D dorsum at the top of the hind legs A on the inside, pressing the front side of the part against the stop.
7. Select 6mm sockets in the bottom rail WITH backrests for middle board E and side bars F (Fig. 4).
8. Make the same 6mm sockets on the bottom edge of the top crossbar D for middle board E (Fig. 5). Making nests for the side bars F, insert a 4° wedge between the crossbar D and emphasis (step 2).
Now cut out the thorns
1. Make the simple tenon saw shown in the article “Safely and Easily Sawing Tenons.”
2. To cut tenons in three sizes, use the scraps to make three spacers with a thickness of 6, 8 and 10 mm, as well as a spacer whose thickness is equal to the thickness of the saw blade. The width of the spacers is 75-100 mm.

To cut 10 mm tenons on frames G, H, select a spacer of the required thickness for the first cut. Remove it before the second cut.
3. Cut out the front G and lateral N seat drawers (Fig. 7). Holding the appropriate spacers between the fixture and the part with your hand or a clamp (photoG), file at a 90° angle the cheeks of the tenons at the ends of the front G and lateral N tsarg, lower WITH and top D backrest crossbars, as well as on the blank of the middle board and side bars E/F backrests (Fig. 4, 5, 6 And 7).
Note. On the side drawers N Form 90° tenons only on the front end of the pieces.
(Although the backrest top rail tenons should have a final length of 17mm, make them 22mm long at this stage so you don't have to set up your saw specifically for this.)

Tom advises! Having made cuts on the test scraps that form the cheeks of the tenons, remove excess material using a band saw, but leave an allowance of about 6 mm at the shoulders to avoid jamming the trim between the disk and the longitudinal stop of the sawing machine. Check the fit of the test studs to the appropriate sockets. If the tenon is inserted too loosely, stick one or two strips of masking tape onto the spacer and cut out another test tenon.

Using the same settings, but tilting the saw blade at an angle of 7°, press the outer side of the drawer against the jig and cut out the tenon cheeks.
4. Attach a wooden pad to the head of the cross (angular) stop and make it in the lower and upper crossbars C, D, in preparation for the middle board and side bars E/F, as well as in the front drawer G cuts that form the shoulders of the tenons.
5. Tilt the saw blade at an angle of 7° from the vertical and file the cheeks of the oblique tenon with a thickness of 10 mm at the rear end of the side frames N (photo N).
6. Without changing the angle of the saw blade, form the shoulders of the front and rear tenons on the side frames at an angle (photoI, J, TO).

Make the first cut so that the disc barely touches the cheek of the tenon. Using a crowbar and a marking knife, extend the line at an angle of 7° to the edge where you want to make the second shoulder. Finally, place the part on the other side of the disk and cut out the second shoulder according to the marking.
7. Increase the saw blade angle to 8°. Form cheeks and shoulders of 6 mm thick oblique tenons on the lower end of the middle board and side bars E/F just like in 5 steps And 6 (Fig. 6a). Return the saw blade to a vertical position and use longitudinal cuts to separate the side bars F from each edge of the workpiece. Using a jigsaw and chisel, cut a notch in the middle of a wide tenon on both ends of the middle board E (Fig. 6) and add 6mm wide cutouts around the edges (see DIY Tip below).

Make the first cross cut with a jigsaw from one rip cut to the back edge of the other. Then saw off the rest.
Hone your hand tool skills for a precise midplank fit
Making a cutout in the middle of a wide tenon using only machines or power tools is not easy. There is a better solution. Using a band saw or a well-sharpened back saw, make cuts up to the shoulders of the tenon, then use a jigsaw, the narrow blade of which will easily turn in the cut, to remove the excess, leaving a small allowance at the base. Finally, use a chisel to cut the remainder flush with the hangers.

Point the chisel inward at a slight angle. This guarantees the tightness of the joint along the hanger line.
 8. Form the upper shoulders of the tenons on the front and side drawers G, N (Fig. 7). Shorten the ends of the top rail tenons D by 5 mm.
9. Dry (without glue) assemble the chair frame, adjusting the tenons of too tight joints using a chisel or file. First, insert the middle board and side timbers into the slots of the top and bottom backrest rails, and then fit the tenons of the rails into the slots of the back legs. Then start adjusting the tenons of the sides to the sockets of the legs. Once you have completed adjusting all connections, separate the parts.
Process all curved contours and narrowings
1. Using a band saw, create curved surfaces on the front and back sides of the top rail D backs and then sand smooth.

With three fingers pressed against the front of the piece, draw a line from the top parallel to the front edge.
2. Glue a second copy of the top crossbar template onto a piece of 6mm hardboard and file along the outline. Using this template, mark the bevel boundaries on the top and back sides of the piece. The marking line on the top side should be parallel to the front rib (photoL). Tilt the band saw table to 27° and cut the bevel along both lines. Sand all curved surfaces smoothly.
3. Mark and band saw the 16° bevels at the ends of the bottom rail C (Fig. 4). Then tilt the saw blade at an angle of 22° and cut the longitudinal bevels. Remove saw marks using a small plane. Using the top rail template, mark an arc on the bottom edge of the bottom rail. Cut out the arc with a bandsaw and sand smooth.
4. Using a band saw, make tapers on the back A and front IN legs (Fig. 1 And 2). Smoothly sand or sharpen the sawn edges.

Sequentially mill chamfers of different widths according to the markings. Then use a small plane and scraper to smooth out the transitions between them.
5. Place marks on the back of the rear legs A at a distance of 178, 470 and 533 mm from the upper ends. Attach an edge cutter for chamfers at an angle of 45° in the router collet and mill successively chamfers of different widths (on both sides of each leg): 6 mm wide from the top to the 533 mm mark, 8 mm wide between the 178 and 533 mm marks, 11 mm wide from 470 mark to last (photo M).
At the 533 mm mark, use a semicircular rasp to round and smooth the chamfer, achieving a smooth rounding.
Note. At the upper end of the leg, the chamfers and the middle flat bevel should be the same width. Do not make the chamfer too wide so that it ends below the shoulder line of the top seat rail.
6. Using a miter plane, make small chamfers around the bottom ends of all legs. A, B. At the upper end of the hind legs A chamfer 3 mm wide at the front and sides (Fig. 1). Then make a 12mm bevel at the back.
7. Finish sand all parts with 220-grit sandpaper using a sanding block.
Tom advises! Before the final sanding step, change all surfaces to raise the pile. This will avoid raising lint when removing wet sponge to remove excess adhesive and you won't have to sand in awkward places around joints.
Move on to assembly and finishing
1. Glue in the middle board tenons E and side bars F into the sockets of the upper and lower crossbars D, C backrests Then glue this assembly to the back legs A. Glue the front drawer G between the front legs IN. After thorough drying, glue in the spikes on the side drawers. N into the sockets of the front and rear legs B, A, fixing the assembled chair frame with clamps.
2. Cut out the front and rear corner braces I, J and install them in place using glue and screws to strengthen the connections between the legs and the drawers and make it easier to install the seat.
3. Apply any finish of your choice. (Tom recommends three coats of Danish oil or any varnish polish.)

4. Make the seat base K and cover it (Fig. 3 And 9). Once you've finished upholstering, attach the seat to the corner braces I, J screws 4.5x50 mm.


 Templates


About the author of the project
 Tom McLaughlin began carpentry professionally in North Carolina, initially copying classic designs made by famous 18th-century craftsmen. Tom now lives in New Hampshire, where he trains woodworkers in his own workshop - a large three-story mansion surrounded by maples, birches and oaks. He enjoys designing and making new chairs more than anything else. “The challenge of making them as comfortable as possible and looking flawless from all angles sparks a real creative passion in me.” He has designed more than two dozen chairs that have won numerous awards in design competitions.

Purchased furnishings are not suitable for everyone. In addition, making a chair with your own hands is much cheaper; on average, 2 or even 3 times. An additional advantage is that it can be made according to your own drawings, of any shape, size and designed in relation to the place of permanent “dislocation”, that is, it can be organically fit into the interior.
If you understand the nuances of wood processing and the main stages of assembling a chair, then making this indispensable attribute of many rooms is not a problem.
Before you begin choosing materials and direct work, you should decide on the following points:
- future location of the chair;
- its purpose is intended (for sitting only) or universal use (for example, a transforming chair that can easily turn into a mini-stepladder or bookcase; a “folding bed” that is convenient to transport in the trunk of a personal car, store, and so on);
- the size of the chair and the options for its back and seat (hard, soft, regular or curly);
- wood is a somewhat generalized concept in furniture making. You can make a good chair from materials (or use them partially, for individual structural elements) based on wood. First of all, from multi-layer plywood;

- own capabilities. This applies not only to practical skills, but also to the list of carpentry tools that are in the house. If you plan to make more than just a simple chair, but put this thing on stream, that is, decorate your home with exclusive pieces of furniture, it makes sense to either purchase the appropriate accessories or rent them. What a home handyman will need can be found in the article on;
- model. The variety of chairs is such that before choosing an option, you should familiarize yourself with their most common patterns and drawings. It is enough to “walk” the Internet and look through the photos available on it. It’s hardly worth copying on a one-to-one basis. But if you take your favorite model as a basis and make your own drawing, you will get a truly original and comfortable chair in all respects.
When starting to make furniture, you should start with the simplest option. In addition, the materials used are the cheapest. It’s okay if the chair turns out “not very good.” It can be placed somewhere in the utility room, garage, and so on. But such “training” will enrich you with invaluable experience; this is beyond any doubt.
A brief overview of the types of chairs
"Array"
These models are the most common, and they are also among the easiest to manufacture. There are no curly lines or changes in geometry, which is why these chairs are recommended for assembly by novice furniture makers. They are stable, reliable, durable and fit well into the interior of wooden houses or dwellings that are decorated in a rustic style.

The only drawback of this type of chair is its massiveness. But it is partially leveled out if you use low-density wood. And decorating it like a “heavy” species, such as oak, is not so difficult. You can familiarize yourself with some technologies.

For living rooms and dining rooms, you should focus on any of the modifications of a massive chair, which differs from the standard options in a soft seat. When assembling such a piece of furniture, it is advisable to combine materials. It is advisable to make the frame from solid wood, and reduce the parameters of all elements somewhat - carved legs, a more elegant back (not solid, but made of slats). For the seat, you should take plywood, which is sheathed.

Another variety is the armchair chair. It is somewhat more difficult to make, but for a living space, a recreation room, or a terrace, these are the most acceptable models. Such comfortable chairs can be additionally upholstered, with shock-absorbing material placed under the covering; here a lot depends on your own imagination.

If a chair is made for a child, then “solid” is the best solution due to its stability. It is guaranteed that a naughty baby will not roll over with the high chair.

"Cot"
These chairs are more suitable for use on the premises or in a country house. In addition to being easy to transport, they are convenient in rooms with a small area. Such a chair can, when folded, stand somewhere against the wall, on the side of the closet, and not take up useful space. If necessary, it is easy to transfer it to the “working position”. It is precisely these models that are most often used in garden plots, loggias, terraces and other places where the low weight of the product, size and mobility play a special role.

If the folding chair is assembled from multi-layer plywood, then additional ease of use will appear; it (given its light weight) can be hung somewhere on the wall or under the ceiling.

A lighter design can also be made. In such a “folding bed” the seat (and sometimes the back) is made of canvas. For example, from tarpaulin. For a summer cottage, going on a picnic or fishing - a good option.


"Transformer"
This is the name for chairs that can easily be turned into a multi-tiered shelving unit, stepladder, or something else (depending on the features of the design). These models are great for apartments. Whether it concerns cleaning, repairs, or attaching something to the wall (ceiling), you won’t have to look for a sliding ladder - it’s always at hand in the form of a “transformable” chair. And for those who like to grow flowers in the house, summer residents, who at the beginning of each year have problems placing containers with seedlings in their rooms, this is simply an irreplaceable thing.

Selection of materials
One of the most difficult questions that most novice masters stumble over. The nuance is that, unlike many other pieces of furniture, there is such a peculiarity in the manufacture of a chair - not every wood is suitable for this. And the point is not in its strength, texture, degree of humidity, but in the specifics of operation. The chair experiences dynamic loads in different directions. This is precisely why it differs from the same cabinet, table, bedside table.
Experienced craftsmen do not recommend assembling coniferous wood for chairs, even of the highest quality. The reason is that it has a straight-layer structure. Constant loads in the horizontal plane (who doesn’t like to “squirm” on the seat, especially kids) will lead to the formation of numerous chips. As a result, the service life of the chair is sharply reduced; it will simply have to be repaired quite often. The only structural element where the use of such wood is allowed is plywood seats (made from sheets for which coniferous veneer was used for gluing).
- Children's - birch.
- “Clamshells” - aka or plywood made from this veneer.
- For all other models - hardwood, but only fine-grained and durable. These include rowan, walnut, oak, elm, hornbeam, and beech.
- When choosing plywood, you should consider not only the cost of the sheets, but also their toxicity. If you focus on relatively cheap products, then the choice is small - FC or FSF. What is the difference? The main difference is the composition of the glue used in production. Without delving into the details of technology and “chemistry” issues, it is enough to note that plywood of the FSF category is not recommended for use for interior work. The reason is the release of harmful fumes when the material is heated.

- The wood for the chair should not have visible defects. For example, for a tabletop, some of them (curls, cross-layers) can be turned into an advantage if you know how to process them. But for a chair that experiences various loads that change in direction and magnitude, all this is unacceptable. The same knots that transform the appearance of the table, making its texture original, will quickly fall out of the chair.
Specifics of wood preparation
- If it is possible to dismantle the array yourself, then making furniture will cost much less.
- The moisture content of the workpieces is no more than 12%.
- Mandatory impregnation with biocides. Options - water-polymer emulsion, furniture oils (or wax-based compounds), acrylic compounds.

Features of structural parts
General – they are made only from solid wood. It is unlikely that you will be able to make complex, shaped elements at home. And it’s not just a matter of cutting the material. You will have to change the angles (and before that, calculate everything correctly) at which the connecting tenons should be located. In addition, accurate sampling of wood (for grooves) requires not only special tools and devices, but also a lot of experience. Deviations from the dimensions will lead to the chair constantly “playing”, and from a practical point of view, the benefit of such furniture is zero.

For this purpose, all similar elements should be prepared in this order. First, for example, one front leg. After processing it, it is used as a template for the second one. The same applies to the drawers, crossbars in the stacked backrest, and so on. The meaning is clear - to achieve complete identity of the parts, so that later you don’t have to adjust them.
Legs. Making the rear ones composite is not the best solution. The reliability of such a chair is sharply reduced. Seat. The thickness (in mm) of boards or plywood ranges from 10 to 30, depending on the size of the chair. If you plan to use a foam pad under the covering material (to soften the seat), then you need to cover it on top with something that absorbs sweat well. Optimally - a thin layer of felt. Unlike all structural parts, the upholstery is not fixed with adhesive, but is “fastened” with staples using a stapler. This will allow you to easily replace both the casing and the “softener” if necessary.It makes no sense to consider more complex options (curly, openwork, combined). The reason is noted above. In addition, if you are to master the profession of a furniture maker (like any other), then you need to start according to the principle “from simple to complex.” Having made your own, albeit not entirely “decorative” chair, in the future you can master more elegant models. The main thing is to understand the design principle and all the features of working with wood.
Chair assembly procedure
You will have to do this at least twice. The first is done “dry”, and its task is to check the fit of all structural parts (whether the dimensions of the jibs, crossbars, drawers at the installation site match). At this stage, you can still eliminate the mistakes made, correct something, and so on.
The second assembly is final. Here, all the elements of the chair are tightly fastened, and further alteration, as a rule, is impossible.
Algorithm for assembling a chair: “apron” – drawers – “apron”.

That's it in short. Although all the work is divided into a larger number of stages.
Assembling the rear legs and backrest
- All elements are adjusted in place and tongue-and-groove connections are made. The parts are fastened using wood glue. It is easy to make at home.
- The gluing areas are tightened with a clamp, and the chair blank is left in this position until the composition dries completely. This process should not be accelerated artificially (with a hair dryer, reflector, etc.). The result will be negative, since the adhesive mass will dry out unevenly in depth, and the strength of the connection will decrease.

Assembling the front legs
The drawers are inserted into the grooves, the parts are joined, and then everything is the same.
Connection of front legs and back legs
At this stage, the side drawers are installed.

Chair "screed"
You will have to decide for yourself what to use. If you don't have large clamps at hand, a cord will do. The task is to ensure that the glue dries completely at all points where it was applied.
If necessary, you can further strengthen the gluing areas by fastening the parts with self-tapping screws. To do this, “channels” are drilled and chamfered so that the head of the fastener is completely buried in the wood. You can disguise it with putty (furniture) compound or decorative plugs (available for sale in a variety of shades).

Seat mount
There are several options. For example, attach prepared wooden supports to the side drawers, and tighten the seat to them (from the bottom side, through the through hole). One of the best options that ensures good maintainability of the chair.
The beauty of independent work is the ability to realize your own ideas. Therefore, all photos, drawings, recommendations should be considered only as a basis for creating something of your own, unique. And if the meaning of the basic technological operations is clear, it is not at all difficult to do this, as well as to develop your own drawing.
Articles on the topic