DIY water conditioner. Recommendations for making a car air conditioner yourself
Many people daily face the problem of dry indoor air. This has an adverse effect on the body. Performance will decrease and a feeling of constant fatigue will appear. If funds allow, you can purchase special equipment to maintain optimal temperature conditions. But not every person can spend money on such a purchase. We will talk further about how to make an air conditioner with your own hands.
Store-bought air conditioners are expensive, so you can make them yourself, and they will be no worse in quality than store-bought ones.
Basic job requirements
The system that controls the temperature in the room differs in its operating principle. It happens:
- evaporative;
- compressor room
To make the first type of unit yourself you will not need to spend a large amount of money. The operation of the device is as follows: moisture is exposed to heat, due to which it evaporates and provides a normal climatic level.

The first method is to use wet towels. It was used long before the advent of automatic air conditioners. To obtain the desired effect, the fabric was generously moistened with liquid, after which all heating objects were covered.
The second method is to use a fan and water. For this you will need a fan in the house.
Also prepare:
- a wide-necked bottle filled with water;
- a piece of fabric (preferably terry);
- fasteners (use of metal wire is acceptable);
- frame.
If your house has wooden window frames, then fix the canvas in the window. One edge should be in a container of water. Then direct the air flow from the device towards the window. Monitor the level of moisture evaporation. Add fluid periodically.
This option is suitable for those who do not like increased noise.
The third model is made from plastic vouchers. To make the design you will need:
- fan;
- bottles with ice.

Fill the container with water, then place it in the freezer. Wait for it to harden. After this, place them close to the air flow. Keep some distance between them - no more than 5 cm. As soon as the ice melts, the bottle needs to be replaced.
For the fourth type you will need a copper tube and a rubber hose. Attach the tube to the fan frame. One end is connected to a hose, which is then attached to a cold water tap. The other side is discharged through a hose into the drain. By turning on the faucet, you start the streaming system.
You can make your own air conditioner using the fifth method. You will need to prepare:
- USB cable;
- several screws;
- container (it can be plastic or tin);
- CD disk;
- cooler for computer.
Return to contents
So, you put pieces of frozen liquid on the disk. Then use self-tapping screws to secure it to the center of the container. Make holes in the bottom of the container and around the perimeter of the CD. The former perform the function of an air duct, the latter allow melt water to drain. Attach the cable to the cooler and mount it on the top of the vessel. To start the design, insert USB into the system unit or connect it to a laptop.

Scheme of operation of a homemade air conditioner in the air heating and ventilation system of a house or cottage.
For the sixth type of air conditioner, you will need an air purifier used in cars. You also cannot do without a ventilation device and a hose.
To make the body, you can use available tools. Surely you have something suitable in your home. For example, the filter can be easily replaced with a mosquito net. But before installation it needs to be folded several times. Fill the air purifier reservoir with liquid after all the parts are connected to each other. The principle by which the homemade device operates is the path taken by the air flow through the water barrier. As it passes, it cools and exits through the filter.
Connect the unit to the network and begin operation.
How to make a spray air conditioner with your own hands?
For assembly you will need:
- container with water;
- spray;
- air duct;
- ventilation device.
Install an air duct onto the filled vessel. Place the sprayer in the inner chamber. It must have a regulator that will control the moisture flow. By starting the ventilation equipment, you activate the functioning of the system.
For those who have an old refrigerator collecting dust in their house, this advice is suitable. Place the freezer in the window. Pre-insulate cracks and openings.
The camera should be installed with its front part facing the inside of the room. This way the radiator will remain outside.
To prevent the cold from accumulating in one place, you can use a drill to make several holes on the side of the freezer.
Another way to make a homemade air conditioner from a travel refrigerator. The latter is used as the basis of the system. You will also need a submersible pump and a radiator.
A radiator is installed in a portable refrigerator. To prevent it from moving around the body, use silicone glue.
Connect the pump from below. The use of an aquarium is allowed. All wires must be outside. On the inside of the lid, cut out a square and two small circles on the outside. You insert small fans into them. After this, connect the wiring. To ensure silent operation of the device, attach a hose to the radiator outlet.
Not every family can afford to purchase an expensive air conditioner that will cool the house during the hot season. Therefore, the craftsmen came up with several simple ways to create a simplified version of the device from objects that came to hand. A homemade air conditioner is designed for use in an apartment, house, and even in a car.
To save money, you can make your own air conditioner
Using a fan and water
The easiest way to make an air conditioner with your own hands is from a simple fan.
The device itself is not capable of cooling the room. Therefore, it needs a little improvement. To make such an air conditioner you will need the following components:
- simple fan;
- a container filled with cool water;
- a towel or any other similar fabric product;
- wire;
- frame.
The one-piece structure must be placed in the window vent. It will work as follows. The fan forces the air to move in a certain direction, where the towel hanging from the wire is located. Part of the fabric product should be lowered into a container filled with liquid. Thanks to this placement, the air will gradually begin to cool.
Such a homemade air conditioner, made with your own hands at home, can even have different temperature settings. To do this, it is necessary to build in a high-speed type of fan switching and install incandescent lamps.
During intensive operation, the device will consume approximately 1 liter of water per hour. Many people liked this version of the air cooler due to the fact that during its operation it does not create annoying noise.
A simple device, for the manufacture of which you will need:
- plastic bottles;
- pure water;
- working fan.

Bottled conditioner is an effective solution, but does not last long
To achieve maximum results, before making your own conditioner, you need to place the filled bottles of water in the freezer so that the liquid turns into ice. During manufacturing, it is important to strictly follow the rules for arranging plastic containers. It must be in front of the fan that creates air flow.
The bottles are placed in a row, leaving small gaps between them. After some time, it is advisable to change the water in the container, as it heats up quickly, which is why the cooling effect is lost.
Home air conditioner from a cooler and container
Another interesting way that will help you understand how to make air conditioning at home. Its advantages include ease of use, small size and clear direction of action. To work, the master will need:
- 2 liter plastic container;
- cooler removed from the computer power supply;
- glue gun;
- corrugated siphon made of durable plastic.
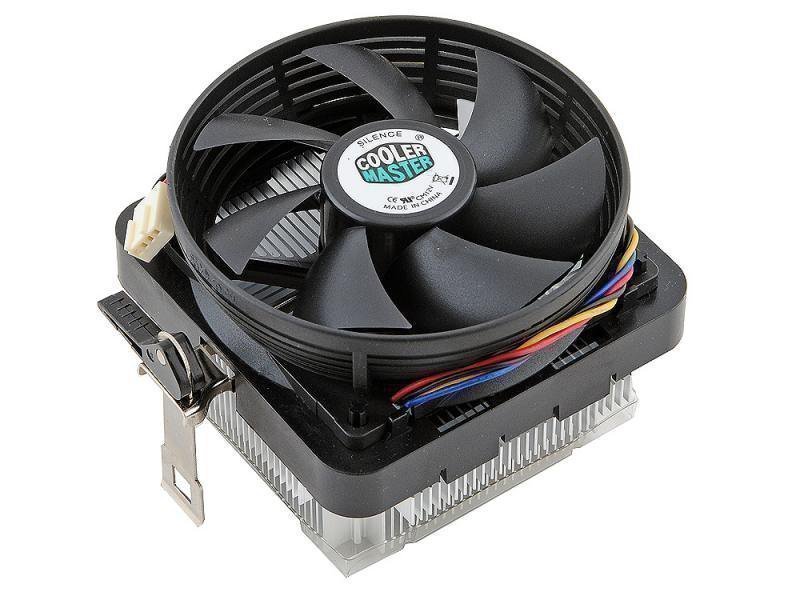
To create a homemade air conditioner you will need a cooler
For homemade products, a plastic container that was used to store various products is suitable. You need to carefully make a hole in the lid.
It should be slightly smaller than the fan taken from the computer power supply. It should be glued into the lid of the container using a glue gun. The work must be carried out so that the device can draw air masses inside the plastic container.
Another hole must be made on the same lid, only at its other end. The diameter of the resulting hole should be slightly smaller than the size of the corrugated siphon. A piece of about 30 cm should be cut from it, which is then glued into the lid.
Now pour a large portion of ice into the container and cover it with the prepared lid. After this, you need to connect the fan to the mains for it to start working. The air conditioner for your home is ready. With the help of a siphon, household members will be able to regulate the direction of cool air.
Using an old freezer or refrigerator
Those who have an extra refrigerator or freezer at home can easily make a home air conditioner. Both devices are ideal for freshening the air in a room.
The freezer must be installed in the window opening, carefully insulating absolutely all holes and cracks. The back of the device should go outside, since it is this that generates heat, which only causes the air to warm up. But the master needs to achieve the opposite effect.
Cold collects inside the freezer. In order for it to go outside and refresh the room, you should install a simple fan in the door of the device. It also wouldn’t hurt to make a couple of holes on the sides, which are necessary to collect heated air. Thanks to such a simple system, the house will remain cool for a long time even on the hottest day.
To create a homemade air conditioner from an old refrigerator, you need to stock up on the following materials:
- electric jigsaw with a file for working with metal;
- two conventional fans;
- polyurethane foam.
One fan should be installed in the refrigerator door to blow air into the unit.
In order for cool air to come out of it, you need to make a small hole in the device, the size of which is suitable for a plastic pipe. All excess cracks must be immediately sealed with foam.
To ensure maximum heat dissipation, you will need to install a second fan. It should be directed towards the capacitor. After installing it, you can connect the refrigerator to the network. Its power is quite enough to cool a small house.
There are many different ideas for creating such cooling systems with your own hands. However, most of them do not work properly. You need to understand that homemade devices will not be a complete replacement for modern air conditioner models. They should be used as a temporary solution to heat problems in a living space.
If the master is determined to make his own air conditioner at home, he needs to strictly follow the instructions for creating it. Only in this case can we guarantee that at the end of assembly the device will actually cool the room, although not for too long.
On hot summer days, many of us go to the country or to a country house. At the same time, not everyone there has a full-fledged split system.
You can, of course, get out of the situation by installing a mobile option. But even here there are problems with connecting and removing warm air. 
What to do? Suffer from sweltering heat? Not at all, there are at least five ways to assemble homemade devices that can partially replace a professional air conditioner.
You can make them at home, without special knowledge of thermophysics and special skills of a craftsman. Let's look at all these methods in more detail, ranging from ineffective ones to those that will significantly reduce the temperature by several degrees and comfortably spend the weekend at the dacha.
Air conditioner without electricity
 Let's start with an option that does not require any electricity, ice and all kinds of fans. Some even try to apply the law of conservation of ideal gas to this method of cooling.
For this homemade miracle you will need a lot of plastic bottles. It is best to take two-liter ones with a large diameter.
Cut off their top part along with the neck by about 1/3. 
Don’t throw away the lids from them, they will be needed too. They just need a little tweaking. To do this, use a stationery knife to cut off the top part of them. 
Cardboard can also be used as a base, as is done, for example, in India or Bangladesh. 
This is where this cooling method came from.
However, as they say - the rain comes, the cardboard goes away. Therefore, plywood is a more stable and reliable material.
On this sheet, drill holes every 15cm along the diameter of the neck of the bottles. 
It is best to use feather drills. But you can also use a wood crown. 
After preparing all the holes, insert the bottles into them and screw them on the back with cut caps. 
The plywood itself is mounted in the window of the bedroom or the room where cold is required. If you go to the necks of the bottles and put your palm on them, you can really feel the cold breath of a cool breeze. 
How does it all work? After all, there is no fan or ice here that would provide much-needed coolness? Where does the cooling come from?
The inventors explain it very simply. The wide part of the bottle that faces the street acts as an air intake. Under the force of the breeze, the air is compressed and enters the room with the effect of a fan. 
However, one condition must be met here - it must be cooler outside than in the room.
This design can work well at night. Moreover, there will be no noise from the fan blades.
However, if you think carefully and remember the laws of physics, then not everything is so simple here. Doesn't an open window look like a narrowed bottle neck?
In theory, a large volume of warm air from the street, passing through a narrow window, should ultimately produce the same cool draft. However, this does not happen.
The same can be said about this “air conditioner”. 
During the day, the entire cooling effect of the room will occur ONLY due to its darkening.
With this design you simply exclude the penetration of direct rays of the sun. Consequently, the floor and walls heat up less. This is where all the efficiency comes from. 
Where does the coolness come from, because if you put your hand near the bottles, you can really feel it?
In fact, you feel this cold not because the air has cooled, but because at a higher speed, the jet carries away more molecules of moisture or sweat from the surface of your body.
This is where all the sensations come from. To really cool the air, you would need not plastic bottles, but brass tubes three meters long! The law of conservation of energy has not yet been repealed. 
There would be a fan in the wide part of the tube and would drive air along the inner walls, which would be heated by it and thereby cool it. Next, throwing a cold stream outwards, from the back narrow side. 
However, where there is no electricity at all and there is no desire to buy fans, the method can be tried. If you open another window or door at the same time, the effect can be enhanced by a draft.
Just don’t forget about its danger and your health. However, let us repeat once again, all this works if it is much cooler outside than in your house. If it’s +35C or +40C outside, then a draft won’t help any of the residents of your house. 
And you are left without daylight. You can, of course, replace plywood with plexiglass, but the efficiency of such an air conditioner will immediately drop by 90%.
And from the outside, such a futuristic design does not decorate the facade of the building at all. The neighbors will laugh. 
And don’t forget about mosquitoes, which will be sucked whistlingly right into your apartment. 
Therefore, let's consider more effective and practical options.
Bottled ice and floor fan
For the next method you will need an ordinary floor fan. Without modernization, there is not much sense from it. Unless, of course, you sit directly in front of him all day and night. 
In fact, it simply circulates hot air around the room, but does not cool it. However, with simple manipulations, everything can be changed dramatically. 
All you need to do is attach a couple of bottles of ice to it with wire. Fill plastic bottles with water and freeze them in the freezer. 
When the “cooling cartridges” are ready, tie their necks together with wire. 
After that, hang them behind the fan blades. 
To ensure that cold air is taken in from the rear and no extraneous warm air is sucked in, glue a homemade cardboard casing around the circumference of the fan with double-sided tape. 
In fact, the air conditioner is already ready for use. Most of the time when making it will take you to freeze the ice in bottles.
To have a constant replacement supply, I advise you to freeze 6-8 of them in advance. In just half an hour, such an installation can “cool down” a small room by a couple of degrees.
However, this seemingly simple method has many disadvantages.
- ice in bottles melts quickly
You will have to place a basin under the fan, and change the cartridges periodically. Therefore, you definitely can’t leave such a thing on at night. 
- short circuit danger
Your floor fan is turned on via a 220V carrier. And next to the wires from it, it will be constantly humid and damp. You will also need special carriers. 
Therefore, it is recommended to replace melted bottles with new ones only after turning off the power. Otherwise, the whole thing could short-circuit and lead to a fire. 
Air conditioner from a plastic container
 To make the third option, you will have to tinker a little with its production. For assembly you will need:
- plastic container or cardboard box
- corner from a plastic pipe
These usually go to water supply or sewerage.
- food foil
- scotch

First of all, cover all the inner walls and bottom of the box with foil. 
Install a fan and a neck from a plastic pipe on the top of the lid. Use a marker to trace the outline and cut out the corresponding holes.


The operating principle is simple. The fan will suck hot room air inside, and cold air should come out through the pipe.
To do this, place bottles of ice inside again. You can't go anywhere without them. 
To prevent extraneous air leaks, it is advisable to seal the gaps from the holes after installing the tube and fan with tape.
Plug the hood plug into the socket and enjoy the coolness. Such a homemade air conditioner can cool the room by almost 7-8 degrees in half an hour. 
Which is a more than acceptable result for such a cheap model, assembled with your own hands. Not all floor-mounted mobile air conditioners are capable of coping with such a task.
At the same time, there will be no puddles, basins or safety problems around. Ice in bottles will, of course, melt, so it is better to use plastic containers rather than cardboard boxes. 
Someone on the Internet advises replacing regular bottled ice with dry ice. Supposedly this will get rid of moisture. Don't listen to such advisers.
When dry ice evaporates in confined spaces, it releases dangerous levels of carbon dioxide. Therefore, it is even recommended to transport it only in trunks.
Bucket conditioner
 The above design can be improved and simplified. Instead of a container, use a plastic bucket with a lid, and insulate its walls.
To do this, place pre-cut pieces of foam plastic in even rows inside the bucket. 
The bottom is also insulated with foam plastic. 
All this will allow the ice to retain its original condition for more time and your air conditioner will last much longer than the previous model.
In the upper part of the bucket, cut out the outlet holes and glue the pipe sections there. The cold will come through them.


The exhaust fan cuts into the lid and sits tightly on the glue. 
Frozen bottles or ice in plastic bags are again placed inside. 
The lid closes and voltage is supplied to the fan. This air conditioner will work properly for a much longer time than the first model in a plastic box. 
Autonomous homemade battery-powered air conditioner
But to assemble a truly autonomous, working air conditioner without water bottles, floor fans and 220V power cords, you will have to spend some time and purchase certain materials in advance. 
You will need:
- expanded polystyrene
- cardboard
- glue
- one pack of diapers
- corrugated sleeve
- two fans from computer processors
- accumulator battery
- button
First of all, you need to assemble the thermally insulated housing of the future air conditioner. For this purpose, polystyrene foam is ideal. They usually insulate the walls of houses or floors. 
Choose the size of the box so that it can be conveniently transported in the trunk of a car. Cut out the rectangles and assemble the cooling box.
Cover everything on top with thick cardboard. You can put foil on the bottom itself. During operation, this machine will form condensation. 
To remove it, it is advisable to provide drainage, in the form of a hole with a tube somewhere in the lower corner.
Cut holes for fans in two walls. One will suck in warm air, the other will throw out cold air.


Glue a plastic corrugated sleeve to the one that goes to the entrance, through the neck of the bottle. 
This will allow the cooled air within the system to be used more efficiently.


To power the coolers, install a 12V battery directly in the box. 
Similar ones are found in UPS uninterruptible power supplies. Instead of a battery, you can assemble a block of 18650 capacitive batteries for the appropriate cooler voltage.
To periodically turn the ventilation on and off, a separate on/off button would be useful. You run one of the wires from the battery to the coolers through it. 
When the refrigeration box is ready, it is necessary to make the cold batteries themselves, due to which the cooling will actually occur.
And in this case it is better to use diapers rather than frozen bottles!
Moisten them generously with tinted water, and cut out the same gel powder that absorbs all the moisture.


You should end up with a kind of jelly-like mass that, unlike water, will not spread or drip. This is what needs to be cooled properly.
Fill thick plastic bags with this mass and seal them on all sides. 
After that, throw your refrigeration batteries into the freezer. 
This substance holds the cold much better and longer than ice-cold bottled water. After complete freezing, fill the inside of the air conditioner with such bags.
The main task is to cover the corrugation, assembled in the form of a well, on all sides. As a result, this hose will freeze and cool the air sucked through it. 
To increase heat transfer, instead of a plastic hose, you can use a metal hose. After filling the container to capacity, close the top lid and turn on the fans.
The temperature of the air that will ultimately be emitted by such an air conditioner can be 10 degrees lower than that in the room. 
Autonomous operation of such a cooling system is several hours. After this, you will have to replace the refrigeration batteries.
I don’t think that you will recklessly drive this cold machine in your home for 24 hours. Therefore, for two evenings and two nights at the dacha on weekends, this is a very acceptable option.
Almost all home-made air conditioners use the principle of cooling the surface by evaporating water. If you blow on a wet fabric, then as it evaporates, it will cool the surface of the material, and it will, accordingly, cool the air located around at a very short distance. This principle formed the basis of the simplest climate control device, like a wet towel on a fan body. To automate the process somewhat, you can dip part of the towel into a container of water; it will be absorbed by the fabric and evaporate under the influence of the air flow.
If after the theory you still have a question about how to make an air conditioner with your own hands, then pay attention to several simple and cheap “recipes”.
Fan and plastic bottles
This is the same air conditioner, but instead of a towel, frozen water bottles suspended from the fan housing are used. Make sure that there is a gap between the cooler sections for free passage of air.
The main advantage of this manufactured air conditioner is its low cost and reusability. Frozen bottled water changed its state of aggregation and turned into water, took a new portion out of the freezer, and put this one to freeze. The disadvantage of this design is the problem with draining the condensation that inevitably appears on the surface of bottles with ice.
If the proposed schemes do not suit you, then you can always
You can find out what's new in modern air conditioner models in the article.
Pipe, water and fan
This is another variation of a self-made air conditioner on the theme of using frozen water and its cooling properties. Take a piece of plumbing plastic pipe with a diameter slightly larger than the diameter of a plastic liter bottle. A fan of suitable diameter is mounted at one end using hot-melt adhesive. Several plastic bottles with frozen liquid are placed inside the pipe.
 A directed air flow passes through a small gap between the bottles (cooler) and the walls of the pipe. Prolonged contact of air with cold objects quite significantly lowers its temperature, after which the structure remains directed to the cooled room. The issue remains with the condensate drainage, but this can be solved by making several small holes in the bottom of the pipe.

Expert opinion
Ask a question to an expertDo not direct a cold air stream at a person, especially one who is hot in the summer heat. This is not safe for your health!
Container, ice and fan
This is a small but effective air conditioner, made by yourself on the same principle as previous models. Its main advantage is the direction of action, compactness and ease of use.
To do this you will need:
- Plastic container 1.5-2 liters.
- Stationery knife.
- Cooler from a computer power supply.
- Corrugated plastic siphon.
- Glue gun.
Take a container for storing food or non-food products. It would be better if it were flatter in shape. A hole is made in the cover, slightly smaller than the intended fan from the computer power supply. It is glued into the lid using a glue gun so that it draws air into the container. A second hole is cut at the other end of the lid, of a smaller diameter, for a corrugated plumbing siphon.
Ice is poured into the container. The air, drawn in by the fan, is cooled in the container and exits through the corrugation.

- It is best to use a plastic container as a container.
- You will also need a plastic plumbing corrugation used for draining
- Fan and 15V power supply
- Ultrasonic emitter. In Chinese online stores it is called Mist Maker or fog maker, and costs about 4-5 USD.

We begin assembling the ultrasonic humidifier with our own hands.
1 step. We cut two holes in the cover: one for the fan mount,

second - corrugations

Step 2. View of the finished cover

Step 3. We connect the fan to the power supply. The red wire is a plus, so we insert it into the socket, h black - minus, connect to the outside of the plug. Afterwards we isolate all connections.

Making an air conditioner from an old refrigerator
This is practically a real air conditioner, based on the transfer of heat by freon from the evaporator to the condenser. To do this you will need:
- Jigsaw with metal file.
- Two fans
- Polyurethane foam for sealing.
You can make your own air conditioner from a refrigerator by installing a fan in the freezer door that blows air inside. To allow cooled air to escape, make a second hole in the freezer door, into which you need to insert a plastic pipe. Carefully seal the cracks using polyurethane foam.
For better heat removal, you need to install a second fan directed at the condenser. Now you should apply voltage to the refrigerator and fans and you can cool the country house.

Adding on topic
Note!
Which air cooling method from those provided will you choose?
If you have been thinking about buying an air conditioner for a long time, but are not ready to spend a large sum on this purchase, the master class will be especially useful for you. A homemade air conditioner made by yourself will keep your home cool at any time of the year. To construct this invention, a minimum of experience, time and financial investment will be required.
Advantages of a mini air conditioner:
- Low cost (500-1000 rubles). Compared to the equipment offered by manufacturers, a home air conditioner is at least 20 times cheaper and does not require subsequent additional investments.
- Speed of production (1.5-2 hours). If you really want to get an air conditioner today, in the best case scenario, manufacturers will deliver and install it in a few hours, when you can do it faster with a homemade air conditioner.
- Availability of consumables. You will find most of the materials and tools for your air conditioner at home, but you will find the rest at the construction market or department store.
- Low energy consumption. Experts have calculated that an air conditioner without an energy-saving system operates 450 hours a year, which costs 1,000 rubles. Not much, but a homemade air conditioner will cost even less.
- Possibility of rearrangement to any place in the apartment. A homemade air conditioner is lightweight, so it can be moved from the kitchen to the bedroom, from the bedroom to the living room, and periodically change its location.
- Safety. The air flow coming from a homemade air conditioner is not so powerful, so it is impossible to catch a cold under it. This guarantees the safety of you and your children.
- Computer cooler – 2 pcs.
- Large plastic or cardboard box – 1 pc.
- Outlet pipes – 2 pcs.
- Power supply (12 W) – 1 pc.
- Plastic bottles, cut in half - 2-4 pcs.

Additional tools:
- Super glue.
- Silicone glue.
- Insulating tape.

Insert the cooler into the cut hole and secure with silicone glue to prevent air from escaping through the cracks. If you have chosen a plastic box to make the air conditioner, you will have to work hard to cut out the hole: place the cooler on top and trace it with a pen, and then strictly follow the marks to make a hole with a knife or scissors. It will be easier if you make marks on the plastic with a thin drill, and then start cutting according to the marks.

Using long screws, screw the second cooler to the first. Instead of two small coolers, you can use one powerful one. The power of the cooler directly depends on the degree of cooling.

Remove the cover and start cutting a hole for the outlet pipe. The structure should be fixed with silicone glue.

Put on a second pipe that will direct the air flow. It should not be fixed with glue, otherwise you will lose the ability to twist it and direct air. You can make two holes for the pipe so that the air spreads faster throughout the room.

Put the lid on and make sure that the air entering the box comes out only through the pipe. If small cracks are noticeable, they should be sealed with silicone glue.

Now all that’s left to do is get a few ice cubes out of the freezer. Ice placed in 1.5-liter bottles will melt within an hour and a half after the air conditioner starts operating, so try to freeze the water in advance. The more ice, the more powerful and cooler the air flow. The air conditioner works well without the ice pack, but then you get the equivalent of a fan.

If you were unable to find a suitable plastic box, you can assemble it from thick paper. In terms of quality characteristics, a cardboard box is in no way inferior to a plastic one, although it looks less attractive. The situation can be corrected by covering the old cardboard with film. The ice, which rapidly evaporates inside the box, will soon render the cardboard unusable, so a cardboard box will last you for a maximum of one season. For convenience, insert the ice blanks into a plastic bowl so as not to damage the cardboard again.

You have the right to change the number of coolers or pipes, or the shape of the box. The main thing that you get in the end is a convenient and practical design that can cool a small room and become an excellent alternative to a fan or an expensive air conditioner.
Articles on the topic