DIY cutting board. Plywood cutting boards: classification of material, tools used, work progress Plywood kitchen boards drawings
Like there, with Bassoon, in “The Master and Margarita” - choral singing takes very little time, but a whole carload of benefits comes from it. Let’s rephrase and say that you can create a cutting board from plywood quite quickly, and the benefits of this idea will be felt in the family for many years. The main thing is to choose a suitable sheet of plywood, stock up on tools and show your creativity.
Although, it still wouldn’t hurt to know something first. The most important thing is to imagine what the construction market offers you, what kind of plywood you might get your hands on.


The business is only a penny, but the pleasure is a whole carload.
Classification
The main parameter that characterizes a sheet of plywood is its quality, determined by the number of knots per square meter of area.
There are five types of quality, designated by Roman numerals:
- IV - the lowest quality, which allows even falling knots and uneven edges of more than 5 mm. Such plywood is obviously not suitable for making a cutting board.
- III – this plywood has no more than 9 defects, the most noticeable of which are knots with a diameter of up to 6 mm. Plywood of this quality is also not suitable for kitchen boards.
- II - here there are only cracks, but no more than 20 cm, a new indicator is also introduced - glue leakage over an area of no more than 2% of the total sheet area. If you consider that the board itself is exactly the same length and will be about 20 cm, then, of course, quality II is also best avoided.
- I - quality I allows knots, but not more than 2 cm. If we take into account that knots are different from knots, sometimes these “interferences,” on the contrary, can add their own flavor to the board, then such plywood can already be considered as the source material.
- E is the so-called elite quality, there are no knots, and hence the direct path to work.

There are several more criteria for classifying plywood, but they will no longer be so critical when choosing. For example, sheet size in width and height. But the minimum size is 1525 by 1525 mm, which guarantees that you can get at least 10 boards from one sheet, for yourself, as well as for friends and acquaintances.
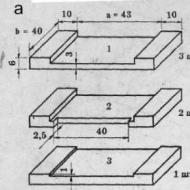
For our purposes, only one more parameter will be significant - the thickness of the plywood and, accordingly, the future product. Many people start with 6 mm and are quite satisfied, although, one way or another, over time they come to the conclusion that 10 mm would be better. This choice should be taken as the most optimal.

Tool
When it comes to carpentry work, it is very important to stock up on reliable tools.
When making a cutting board you will need:
- jigsaw, and this is the most important thing, (see more details)
- and also, a whole set of sandpaper of various calibers,
- stationery - pencil, paper, carbon paper, eraser,
- perhaps a small file,
- not bad, vice.

Work progress
The manufacturing steps are very simple:
- First, you patiently select or create with your imagination drawings of plywood cutting boards and transfer them to your paper.
- Prepared in advance. You should not try to achieve perfect smoothness of the sheet at this stage; it will be difficult for you to transfer the drawing, the pencil will only slide, a little roughness will not hurt.
- Then, using carbon paper, the drawing is already printed on a sheet of plywood.
- Well, and the main stage... Of course, you need to learn how to use this instrument, or, more precisely, to get used to it. But the basic rule, without which not a single instruction for working with a jigsaw is complete, is to keep its blade as close and often to the vertical as possible. The second rule is that the jigsaw does not tolerate haste, we do everything slowly.
Helpful advice: If you are doing a job that is very expensive to you and have found an unusual board shape for yourself, do not take the risk.
It is best in this situation to use a computer and create a drawing in a program such as AutoCAD.
Please contact any woodworking service center with a computer-controlled machine with this drawing.
This is the only way you can get the perfect sample that fully matches your drawing.
Only polishing will remain on your conscience.
conclusions
The cost of all your efforts to make a plywood cutting board will not be measured in monetary terms at all. It will be measured by much more valuable things - the ability to fantasize, work and the desire to please others. Have you noticed that labor education teachers in schools offer boys in grades 5-6 the first thing to make with their own hands - a plywood cutting board. 
In the video presented in this article you will find additional information on this topic.
Similar materials


In the apartment of every reader of this report, in the kitchen there is a tool necessary for cutting various products - a cutting board. Initially it was stone, then iron, bronze, and only then became wooden). Although plastic analogues have recently appeared, wooden boards are still popular. I recently managed to get into a workshop where cutting boards are made, but what I saw did not go with my ideas about such a simple utilitarian kitchen item on which vegetables, meat and other food are cut.
Today, we will find out how the most expensive cutting boards are made in Russia.
Just as a theater begins with a hanger, so a workshop where wooden products are made begins with a warehouse where the wood is stored. It arrives to our master, whose work will be discussed today, in finished form, dried at a certain temperature for several years. Fresh wood cannot be used to produce boards, as the finished product will deform over time due to shrinkage.

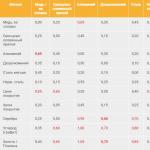
Here, the warehouse maintains a certain temperature and air humidity, which prevent the wood from drying out too much and becoming too wet. This table, which hangs on the wall of the workshop, shows the optimal percentage of humidity at different temperatures.

There is also a hygrometer hanging here showing the degree of humidity in the room. True, the master said that his readings were incorrect).

To produce some boards with particularly complex patterns, a CNC (computer numerical control) machine is used. The machine is small, just connect a laptop with a preset program to it.
The drawing of the board that the mill is currently working on is inspired by the famous work of Maurits Escher “Reptiles”.

If desired, the cutter will work wonders).

This is what the board looks like after the machine is running. If you look closely, you will see that this future board is glued together from pieces. We will find out why this was done later.

If the base of the board is made of walnut, then the inserts are cut from other types of wood that differ in texture and color - oak and rosewood.

As the master told me, the machine cut out the figures on the board in such a way that when inserting other reptile figures, no gaps were found. The figures turn out to be fitted to each other very tightly.

In this photo you can see examples of gluing. A multi-colored piece is glued together from different types of wood. This material will be used to glue one of the most difficult boards to make. You can see it at the end of the post.

The master takes a simple board, processes it, aligns the edges. Then the board is cut into pieces, which are turned with the end part and glued together. Moreover, gluing is not done in any random order, but in a special way so that the growth rings are directed in opposite directions, this will prevent the boards from deforming when humidity changes.
Why is this being done? Due to the vertical arrangement of wood fibers, knives do not become dull longer, since the knife blade does not cut the fibers, as in ordinary boards, but penetrates between them - slides. The fibers return to their original state after culinary efforts on it. Accordingly, the board does not deteriorate, and cooks do not have to sharpen knives several times per shift, as is the case with conventional boards.

In addition to walnut, hornbeam, ash, maple, oak and beech, valuable wood species such as American cherry, movingwood, and mahogany are also used as materials. As you can see from the markings on the wood, it is from the USA, some are from South America and Africa.

Other types of wood.


After the wood is cut into pieces and turned upside down, it is glued and clamped in clamps - a special press. As you can see, here the shields are of different thicknesses. The thicker one will become a board, and the thinner shields will be used to cut patterns and figures on the surface of future boards, like the figures from “Reptile”. After gluing, the shield will be ready in an hour, but it is recommended to subject it to load after 24 hours.

For gluing, a special glue is used that does not contain formaldehyde, is approved for contact with food and has great water resistance.

This is what the room looks like where all the tools needed for carpentry are located.

Perfect cleanliness and order! As you may have noticed, the workshop has all the machines and tools for making any wooden product. A real carpenter's paradise).

Special clamps for large boards.

We won’t touch that board with the reptiles for now; we’ll be working on it for more than one hour, so we’ll work on another one. After it is glued, it is run through this grinding machine - a thicknesser. Essentially this is a modern planer.

Then the sides of the board are cut with a circular saw.

The sides are sanded on another machine with a vertical movement of the belt. The corners are rounded right away.

The board is then run through the drum sander again.

This time the surfaces are sanded more delicately. However, that's not all.

Pumps are attached to each machine, collecting sawdust from wood processing. After processing by machines, the product is polished with a manual grinding machine. First, a coarser sandpaper of 120 grit is used, then 240 grit to finally polish the board.

Finishing touches to round the edges and the carpentry work on the board is complete.

After all the above operations, the board takes a bath of mineral oil, which has no taste, color, or smell. The oil is made from petroleum, but it is completely safe and is even used in cosmetics.
The same board with reptiles that is shown at the beginning of the post will turn into the same one. After some time, when the board is saturated with oil, it will be allowed to dry, then treated again with a hot mixture of mineral oil and wax in a 4/1 ratio.

Other boards are also sent to the same oil bath.

Now let’s go to the “Show Room” of elite cutting boards). In this room, the boards are packed and awaiting a meeting with their future owner.

Hygrometers monitor humidity levels.

This board just broke my mold of simple, utilitarian kitchen utensils! I can’t even imagine how you can dare to cut food on a work of art).

Many hours were spent to produce a board with a 3D effect. By the way, these boards are the most expensive, and it’s understandable why.


And this board can be safely hung instead of a picture!

The master also makes special boards for beating meat. There are even grooves for blood flow.

I’ll also add that the end boards, due to the material and manufacturing features, turn out to be thick and heavy, but they don’t roll around on the cook’s table/work surface. There is no need to place a rag or wet napkin/towel, hold it at risk. The boards are additionally equipped with rubber (sometimes silicone or plastic) legs, which are insurance against the absorption of water that accidentally gets under the board.


After the board has gone through all stages of the production process, it is packaged in film.

A little hot air and you're done.

This map shows where the ordered boards went - mainly Russia, Europe, the USA, there are even Japan and Australia.

Well, for those who want to make an end cutting board with their own hands - a master class. If you have all the tools and machines shown above, then go for it!
And as a bonus, watch the video of how boards with drawings are made, just cool!
One of the most important kitchen appliances is the cutting board. This accessory is very important for a real housewife; it is used for cutting almost all types of products: vegetables, fruits, meat, sausages and confectionery. Some types of cutting boards are even used as a stand for pots and pans, or as a serving device on a holiday table. Therefore, it should not only be comfortable and strong, but also attractive and pleasant to the touch.
Types of materials
Today, stores selling kitchen utensils offer a huge range of cutting boards made from various materials: silicone, plastic, stone, ceramics, glass and, of course, wood. Let's look at the advantages and disadvantages of each material separately.
Stone
Products made from marble, granite and other stones look very impressive. But you should know that, for example, marble cannot withstand high temperatures and treatment with acidic detergents. But the marble surface has bactericidal properties and is capable of killing harmful bacteria.
Most often, granite or marble is used to make boards.
Boards and stones are great for rolling out dough and making pastries. They are durable and have many positive properties.
Plastic
Plastic items are always famous for their long service life, but it should be understood that plastic cannot withstand any high temperatures at all and can melt upon any contact with fire. In addition, it is very unfavorable for the body and is capable of storing a large number of microbes on its surface.
Silicone
This material does not dull knives, unlike others. In addition, it is convenient to store, as its flexibility allows you to roll the board. Silicone can withstand both low and high temperatures, but should not be washed with acidic detergents.
Glass ceramics
This material is very durable, it can be easily washed, it can withstand any temperature and is not able to absorb food odors. The main disadvantage of glass ceramics, as well as ceramics and glass, is that these materials dull kitchen knives. For this reason, such boards are very beautiful, and they can complement the interior of the kitchen.
Tree
Of course, the most popular material for making cutting boards. Wood should not be washed in dishwashers, but can be easily washed by hand. Wood is a durable material, and it is indispensable for professionals. It not only helps to cut food efficiently, but also does not dull kitchen knives.
Types of wooden boards

A wooden cutting board may not be a kitchen utensil, but a decorative element.
Today the market offers a wide range of varieties of wooden cutting boards. Here is just a small list of types of wooden boards:
- Classic, there are prototypes of it with a metal or plastic edging, as well as a compartment for a kitchen knife;
- Retractable - built into the kitchen furniture and pulled out if necessary, for example from under the countertop;
- A board with a plate is very convenient, because after finishing cutting food, you just need to move the pieces into a plate with a kitchen knife.
Of course, complex designs are difficult to make with your own hands, but any owner can make a classic kitchen device for cutting food on their own.
Making a wooden board
The simplest version of a cutting board, made by yourself, is using a material such as plywood. This material is convenient to use, practical, easy to clean and quite durable. In order to make such a product with your own hands, you need a certain tool:
- Pencil;
- Sample;
- Hacksaw and workbench;
- Drill and drill;
- Files and sandpaper;
- Vise.

The most important thing is to make the correct drawing, and only then use it to make a template, after which you can start working. Before making a wooden cutting board, evaluate your work, whether you have time, and whether it would be easier to purchase a finished product in a store.
Work plan:
- We prepare a wooden board, preferably from hardwood, without knots and burrs. If necessary, remove burrs with a wood plane.
- We make markings with a pencil on the workpiece in accordance with a pre-prepared template.
Using a hacksaw and a workbench, we cut out the product according to the template. In the required place we make holes for mounting on the wall using a drill and a drill bit. - Having clamped the product in a vice, use a file and sandpaper to clean its surface.
- We treat the board, made by ourselves, with varnish on the outside, where you can also apply a design, including one made with a chisel.
- To make a cutting utensil on a stand, we simply attach two legs to a classic board, and make a cutout on one side in order to place a plate and not drop the pieces when moving them with a kitchen knife. In any case, a DIY wooden cutting board will always please the eye and soul.
Kitchen appliances such as cutting boards look very beautiful in the interior if they are kept clean, tidy and following certain rules.

Proper care will increase the life of the board and maintain its attractive appearance for a long time.
Here are some useful tips that will allow you to turn it into a useful interior element:
- If you make only one side of a wooden board work, then the second can be used as the front side when stored in the kitchen. Thus, guests will only see one side, which can be decorated, painted, pasted over with a pattern, and so on, it all depends on your imagination.
- It’s good when the appearance and type of material are selected in accordance with the overall interior of the kitchen, for example, in modern kitchens, you can use minimalist boards, in houses with children in the shape of animals, and so on.
- Choose the wood you use to make your product responsibly. Conifers can release resins, and oak, for example, is too heavy. Birch, beech, and acacia are best suited.
- Do not wash wood boards in dishwashers; it is better to wash them by hand under the tap. And once every couple of weeks, wash the device with a vinegar solution.
- The device should be cleaned every time after slicing food, especially wash after slicing fish and meat.
- If you cook a lot with different ingredients, you can keep a whole set of boards in the kitchen.
- If you take care of your cutting board, it will serve you for a long time and will perfectly complement your interior. The main thing is to wash its surface in time to prevent germs from multiplying.
All photos from the article
One of the most important kitchen utensils is cutting boards. It is on them that cutting vegetables, cutting meat and many other tasks are performed that allow you to prepare delicious dishes. Next, we will get acquainted with the characteristic features of plywood models, and also learn how to make them ourselves.

Advantages and disadvantages

Fiberboard consists of several layers of veneer, which are extensively glued together. Why is it so good for creating a cutting board? This is easy to understand after familiarizing yourself with the characteristic features of such interesting material:
Advantages
- High strength indicators. This is due to the presence of hardened glue in the structure of the product, which is stronger than wood fibers;

- Moisture resistance. What is more important in the kitchen than mechanical resistance? Resistance to excessive humidity. Juice from cut vegetables and fruits, water draining from them after washing, and steam simply standing over pots quickly render ordinary wood unusable. But the sizing mentioned above quite effectively prevents this;
- Beautiful appearance. Plywood, just like a classic wooden product, can boast of having an original textured pattern;

- Ease of processing. The shapes of plywood cutting boards can be very diverse;
- Acceptable price . Taking into account all the high performance indicators, fiberboard is cheaper than solid wood;
- Durability. The service life is not limited to ten years, subject to proper care.
Flaw
The only significant disadvantage is that toxic glue may have been used in the manufacture of the plywood you purchased.
Tip: You only need a small amount of particle board to make a cutting board, so don't try to save money by buying a cheap product of unknown origin.
It is better to purchase material from a trusted manufacturer, which probably used environmentally friendly adhesive.
This will eliminate the only possible drawback of your future piece of kitchen equipment.
Manufacturing process
Now let’s directly figure out how to make a cutting board from plywood with your own hands:
Stage No. 1: drawing and template

Drawings of plywood cutting boards are needed to create templates. That is, draw a drawing by hand, and then transfer it to cardboard in exact dimensions, creating a kind of stencil.

Tip: when creating a drawing, remember that the more intricate the contours of the future product, the more difficult it will be to wash.
So, if high loads are expected in the kitchen, then it will be more practical to use simple geometric shapes.
Stage No. 2: choosing plywood
There are several basic requirements

Stage No. 3: tool preparation

To work you will need:

Stage No. 3: cutting out the outline
This is the most important stage, which, in general, can be described as creating a cutting board. You should cut slowly, exactly following the lines drawn on the template and holding the plywood with your free hand, unless, of course, it is fixed in a vice. The quality of this task depends solely on your accuracy.

Stage No. 4: grinding and impregnation
In conclusion, the instructions involve performing the following steps:
- Take sandpaper and sand all the cut edges;
- Using a brush, apply Vaseline, linseed or sesame oil.
This completes the entire work process.
Conclusion
Plywood is the most suitable material for creating a cutting board due to its high performance characteristics and affordable price. The work itself is not difficult to complete, the main thing is to follow the above recommendations.

The video in this article will introduce you to additional materials related to the information presented. Be attentive to the details, and you will succeed. You can ask any questions regarding the topic discussed in the comments.
Articles on the topic