Paper cars instructions. DIY fire truck and racing car
Making crafts brings great pleasure to children. You can make anything, for example, a three-dimensional machine out of paper. The big advantage of working with this material is its safety. That is why children’s acquaintance with creativity begins, as a rule, with paper.
Paperwork can be very interesting and varied. You can make beautiful cars that little racers will definitely love. At the same time, there can be a lot of options for making such a craft.
One of the most popular areas is origami. This technique is suitable for making any products, and it is not at all necessary to immediately take on complex models. A paper car can be made in many other ways.
Important! The main thing that parents should take into account is the age and abilities of the child.
You should not immediately offer options with many details and demand that your child do the job perfectly.
You always need to start small. So gradually the child will learn to handle paper, glue and other stationery. Making paper crafts develops a child's creative skills, and the child becomes more independent and proactive.
Expanded diagram of a jeep made of paper
Handicrafts for boys are quite a difficult task, since parents have to choose a suitable topic for a long time. If girls can happily make flowers, animals, dolls, etc., then boys will quickly get bored with such work.
But, if you offer your child to make a beautiful car with his own hands, or maybe even a whole fleet of vehicles, he will definitely agree.
Toilet paper racing car
For production you will not need the paper itself, but only from it.
Craftsmen do not recommend throwing away such cardboard cylinders, as they will be useful for working on various products, including beautiful home wall decor.
 Toilet paper car
 In addition, you need to stock up on white and black cardboard, colored paper, felt-tip pens, glue and push pins. You can also use paints.
 Paper car model diagram
 The cylinder will be the basis of the machine. To do this, you need to prepare it. If the bushing is in good condition, you can simply paint it. The cylinder can also be made from cardboard yourself, in which case you will have to additionally cover it with colored paper.
Next you need to make wheels from black and white cardboard. The circles should be the same size. The white ones that act as disks should be smaller than the black ones. Having prepared 4 wheels, you need to carefully glue them onto the cardboard cylinder.
 Expanded paper diagram of Toyota
 After that you can work on the front of the car. To do this, cut out a triangle that is glued to the end of the sleeve.
You can glue 2 circles of yellow paper here: this will give the car headlights. Use a felt-tip pen to draw the radiator grille. At the back, glue 2 red circles that will be brake lights.
 DIY paper racing cars
 To do this, you need to cut out a semicircle that will become the windshield, and make a hole in the center of the sleeve where the driver will sit. You can put a small toy man or a Lego figure in the car.
 Step-by-step example of creating a paper car
 On a note! These cars are very simple to prepare, but they turn out interesting and bright.
If you wish, you can make several of these cars together with your child, and then organize races.
Car with cardboard trailer
This craft option is also considered very simple. All you need is the most accessible materials and a little time.
The end result will be an interesting craft that your child will enjoy playing with. It is worth noting that using this scheme you can make not only a car, but also a train.
To work, you will need colored paper, corrugated cardboard, which can be taken from any box, scissors, glue, a bolt with nuts and a rope with an awl. Based on this set, it should be clear to the parent that the child cannot work on this craft on his own and will need adult supervision.
 For work you will need colored paper, corrugated cardboard
 As for how to make a car out of paper, first you need cardboard. The body of the car and trailer should be drawn on it. 6 identical wheels are also cut out of corrugated cardboard.
In this case, the child most likely cannot do without the help of adults, since thick cardboard is difficult to cut.
 Scheme of the machine in expanded form from paper
 After the blanks are completed, you can cover them with colored paper or paint them with paints. Car windows are cut out of colored paper, and headlights and brake lights are made. Don't forget about the trailer: it will have 2 wheels, and given that the craft will be double-sided, both sides of the cardboard should be carefully processed. Moreover, you need to make sure that everything is the same on each side.
Next begins the difficult work of assembling the parts. A child cannot do this without the help of adults. First you need to make 2 holes with an awl in the bottom of the car and 1 in the trailer. You also need to make a hole in the center of each wheel.
Now all the wheels are attached to the body and trailer using bolts and nuts. Here you can let the child work on his own and even provide the appropriate tools for this. The baby will find it not only interesting, but also useful.
 Expanded paper diagram of UAZ
 Lastly, the car is connected to the trailer. To do this, you need to make 2 holes with an awl, and then tie the elements with thread.
Three-dimensional machine according to the diagram
These types of crafts are more complex. A child who knows how to handle scissors and glue can handle the job.
In general, the whole process consists of finding a paper machine, that is, templates for printing, cutting them out and carefully gluing them together. But the result will be very interesting. Such cars can keep your baby occupied for a long time.
 Expanded diagram of a paper machine
 The easiest way to make a three-dimensional car is to use ready-made drawings. These are the optimal models, where all the parameters are checked, and the child can only cut out and glue the three-dimensional car.
If your parents have enough artistic skill, plus they have drawing skills, you can create your own model. It will be a unique car, but the principle of its production will remain the same.
 Expanded paper fiat diagram
 To create a three-dimensional machine, ready-made machine templates for cutting out paper are printed, then glued onto thin cardboard and cut out. If possible, you can immediately print the workpiece on thick paper or whatman paper.
 Expanded paper diagram of Delorean
 On a note! Such models must have white corners.
These are valves for gluing parts. After the base is bent along the lines indicated in the diagram, glue should be applied to the white areas. Then everything is carefully glued together. You will have to spend some time, but the result will be a beautiful three-dimensional model.
Paper machine using origami technique
This option is considered the most difficult. Origami is an entire art to which many devote a lot of time to hone their skills. To become a master in this matter, you need to be patient and several sheets of paper. Don't worry if you don't succeed the first time.
Important! Experts in the art of origami recommend that you first learn how to fold a sheet of paper evenly.
After your hands have gained at least a little experience, you can move on to making products. It is worth noting that a machine made using the origami technique is considered a rather complex craft. Therefore, to begin with, you can complete simpler elements together with your child.
For example, the well-known airplane will be an excellent workout for children's fingers. This will give a good start and teach the child to bend and unbend parts correctly. Experts assure that the final result depends on how even the fold is. If you make a mistake in one place, the entire product will come out crooked.
The origami technique is considered quite complex, so parents should not leave the child alone with this work. Although scissors and even glue are not useful here, the baby will definitely need the help of adults. For example, he will need to explain the sequence of the circuit. After a child makes a car once with an adult, he can repeat it on his own.
To make a car using the origami technique, you only need one sheet of paper. If it is A4 format, you need to take scissors to turn the sheet into a square.
 Paper racing car
 The first step is to fold the sheet in half, and then in half again. Next, you should open the paper. You will see from the folds that the middle is marked here and each side is divided into 2 equal parts.
Now you need to take the bottom edge and fold it in half, that is, bring it to the center of the sheet. The corners are bent downwards from the central point. In the future they will become the wheels of a vehicle.
 Option of origami from banknotes
 The upper part of the sheet is bent forward to the middle. After this, more than half of it is bent in the opposite direction. Continuing to work with the same part, bend part of the sheet diagonally from the center. Now the workpiece can be turned over. It will already look like a typewriter. Here you can see the wheels and there is a body, which turned out to be a hatchback. At this stage, you can paint the car, draw windows, headlights, etc.
More complex products can be made using the origami technique. But for beginning craftsmen, and especially in childhood, such a car would be the most suitable option to try their hand at it. Having trained your hand, you can move on to more labor-intensive crafts, including trucks.
Cars are one of the favorite themes for children's creativity; boys of any age especially love this theme, of course. For example, in life safety lessons devoted to fire safety measures, children willingly make models of fire trucks. DIY fire-themed crafts always take pride of place at school and kindergarten exhibitions of joint creativity between children and parents.
Previously, matchboxes were used for this purpose, but now, when stores have a large selection of a wide variety of stationery materials, you can safely use cardboard and colored paper for this purpose. The main thing is that the material is of high quality and holds its shape well. You can read about how to make a car out of cardboard with your own hands on the Internet and specialized literature, as well as in old and modern children's periodicals.
Cardboard crafts: main advantages
 Layouts from assistants materials are often used as visual aids in kindergarten and primary school classes. Thus, vehicle models can be made from matches, cubes, and natural materials. Another suitable material is carton boxes different sizes and shapes. Before you make a car out of a box, you need to decide on the type of transport: a fire truck, a police car or an ambulance. There can be many options. Cardboard love crafts both adults and children, because:
- Making them is very simple: all you need is sheets of multi-colored thick cardboard, scissors or a stationery cutter or PVA glue. If a child knows how to carefully cut, he can easily cope with the work with the help of adults.
- There is no need to buy cardboard. You can use material from any boxes: shoes, sweets, household appliances, tea. Then you just need to paint it with gouache or acrylic paints, cover it with foil or colored paper, cover it with felt or any other fabric. Therefore, making such a craft does not require a trip to the store.
- Products made from this material are voluminous and, if handled carefully, will last a long time. Paper crafts are short-lived and fragile, so they are usually prepared only for exhibitions. Cardboard products, on the contrary, can be used as a toy, and not just placed on a shelf for beauty.
- Such homemade products can be actively used for educational purposes. A variety of layouts and visual aids are usually made from cardboard and papier-mâché for use in lessons and activities in kindergarten. These can be models of the planets of the solar system, dummies of vegetables and fruits, as well as various models of water, land, and air transport.
 Typically, children begin working with cardboard in the first or second grade of elementary school, because for successful work it is necessary carefully handle scissors. You can make various toys both at home and at school. This is a great option shared hobby children and parents, especially during the long autumn and winter holidays, when it is dark outside and the weather is often cold.
Girls willingly make cardboard dolls and clothes for them, and boys enjoy making cars and trucks. This kind of work is not takes a lot of time, if you have imagination and skillful hands, you can complete the craft in thirty to forty minutes (if you have everything you need at hand).
DIY cardboard car
 To make a car out of cardboard with your own hands, you can learn step by step general work process using the training video. But there is a simpler option - to take as a basis a ready-made scheme for the manufacture of such transport. Typically, diagrams of voluminous paper crafts are published in children's magazines. Page with picture pasted onto cardboard, all parts are cut out, bent along pre-designated lines and glued together. DIY paper fire truck diagrams printed in magazines, usually about differ simplicity, so this is a great option for beginners.
For those who don’t want to cut, bend and glue, we can offer a simpler, but no less interesting option- a car or truck made from cardboard boxes. You can do it as follows:
- The basis is a large and wide box (for example, tea, cookies, sweets). However, it should not be flat.
- The box is painted with gouache in the desired color, doors for “entering the car” are drawn and cut out on the sides, and a number is depicted on the front using paint of a different color.
- Four wheels are cut out of thick cardboard - circles of the same size. You can also use “real wheels” taken from a construction set or an old toy car.
- The wheels are mounted in pairs on two axles - thin long sticks; these axles are fixed on the underside of the box (for this you can use strong adhesive tape or electrical tape).
- The lower part of the machine is ready. Now you need to make the top part. To do this, a smaller box is installed in the center on a large box. “Windows” are cut out in it, which are then sealed from the inside with transparent plastic film. You can install a toy steering wheel (from the same cardboard) in the “salon”, and also sculpt a little man - the driver - from plasticine and put him in the “chair”. The top box is also painted with gouache.
- A spare wheel can be attached to the rear. An interesting toy is ready.
What you need for work
 First of all, you will need cardboard and a thin rubber band to secure the wheels and various small parts. You can also weave a long hose from rubber bands if we are talking about a fire truck. To make any car, a child and an adult will need:
- Several cardboard boxes of different sizes. They should be pretty tight.
- Wheels from an old toy car or an old construction set. If you don’t have such things at hand, you can cut out “donuts” from the same cardboard, but they will not roll on the floor as well as real ones.
- Transparent plastic film (for this you can carefully cut into pieces a regular document file or a thin notebook cover). Using film from bags is not very convenient, because it wrinkles and tears. This material will be needed to make transparent windows in the car.
- Plasticine or modeling dough to sculpt the “driver” and car interior. If you don’t want to sculpt, you can put a little toy man made from a Kinder Surprise chocolate egg in the car. Another interesting option is to cut out a driver figurine from a children's magazine and stick it on cardboard.
Decor options
 If we consider the production of a cardboard car in stages, the decisive stage will be the application of decor. Any child can cope with this task without the help of adults; the main thing is not to restrain the wild children's imagination. When decorating a finished vehicle, you can use any available materials. When working on decor, you should remember that the design details largely depend on what function a particular toy car performs, for example:
- The ambulance can be decorated with a red cross made of colored paper, multi-colored “flashing lights” made of colored foil and a beautiful inscription “03” or “ambulance” made with a red marker.
- It is recommended to attach a hose and a cardboard ladder to the fire truck. Making such a staircase is very simple: you need to cut out two long cardboard rungs and glue the desired number of steps from the same material between them. But a stepladder made from matches, toothpicks or sandwich skewers will look much more interesting.
- A police car can be decorated with non-working “flashing lights” from an old red, blue and white garland or with working LED bulbs. For greater realism, a small musical toy is placed inside, performing the function of a “siren”.
- You can glue cardboard or paper “smoke rings” to the chimney of a steam locomotive. There may be curtains on the windows of a “long-distance train”, and in the “cars” there may be “tables” fashioned from plasticine.
What kind of cars can you make?
 From cardboard you can easily make a truck, a car, and even a train with a steam locomotive and several carriages. A fire truck made from cardboard boxes with your own hands is far from the only option; using similar technology you can make a ship, an airplane, and even a submarine or a tank.
Several cardboard boxes connected in series to each other in the form of a chain will make a wonderful train. Every carriage must have windows. As an addition to such a craft, you can make a railroad out of matches or toothpicks. Of course, a locomotive will not be able to ride on it, but it will look like the real thing. The landscape on the sides of the railway is decorated with toy Christmas trees taken from children's construction sets, or paper trees cut out from children's magazines and glued to a solid base.
Any boy would love a dump truck. It consists of a closed cardboard box containing a “cabin” with a plasticine driver, and a larger box without a lid. This box acts as a body in which you can transport, for example, cubes. It is advisable to fasten the cabin and the body in such a way that the body can easily recline. This dump truck is perfect for playing at home or in kindergarten, but you shouldn’t carry sand in it on the street: any cardboard, even the most durable, easily gets wet from moisture.
Cardboard cars are a favorite toy of both girls and boys. To make such a homemade craft, you will need not only to show your imagination, but also to become familiar with the basics of how a real car works. Therefore, working on such a product will help a child and an adult spend time usefully, gain new knowledge, and join the world of design and technical creativity. Such classes are very useful. The main thing is not to force the child to work according to a ready-made scheme, but to unobtrusively help him turn his own plan into reality. Then from scrap materials you will get a wonderful car.
Attention, TODAY only!
Every child wants to have a lot of toys and often asks their parents to buy him something new. But today, not everyone knows how to make a car out of paper on their own and save money at the same time. This activity will be very useful for the development of the baby and will bring him a lot of pleasure in the future.
Making paper cars is very simple. The process of making them will be quite understandable even for a small child. The paper machine diagram looks like this:

This is how you can make a paper car with your own hands very quickly and without much effort. If desired, the finished machine can be painted with paints or pencils.
Moving transport
It’s not at all difficult to make a car out of paper that drives, and it may be more interesting for a child to play with it than with a regular paper one. In order for the car to move, you will need to place it on a flat surface and blow on it. With the help of air, the machine will begin to slide, thereby creating the impression of real movement. To implement this idea, You need to prepare a sheet of A4 paper and follow the instructions:

The car is ready, now the child should be asked to decorate it.
Racing car and military equipment
Making a paper race is not difficult at all. To do this, you only need a sheet of plain or colored rectangular paper. The size of the car depends on what the sheet is. . To make a racing car out of paper, you need to do the following:

The machine is ready and now you can carry out the final steps. The wings can be folded up or folded like an accordion. Children really like the paper race; it is popular nowadays.
You can also create a military machine from paper. To make it, you will need:

First you need to draw four squares on paper to make the cabin. On the next sheet make 3 rectangles and 2 squares. These blanks will become the basis of the body. Then you should take a new sheet, fold it lengthwise into 3 parts and glue it in the form of a triangle. This will create a mount for rockets. Then you can draw the glass on the cabin. Connect the squares from the inside using tape. Then do the same with the body and glue a triangle of paper. Connect the cabin and body.
Using black paper, create eight circles and make gaps for the skewers. To attach the wheels to the car, you need to form gaps at the bottom of the cabin and body, and then string them. To prevent the machine from falling apart, the ends of the skewers can be firmly attached with glue and then dried. After all these manipulations, you need to cut the paper tube into equal parts and paint all parts black. The entire structure must dry completely. At the end of the work, you should put the rockets on the body. In this simple way you can make a military machine.
Origami and 3D format
Origami is a real art. Many people love to create beautiful paper crafts. Children especially like this technique. Therefore, you can consider how to make an origami-style machine. This is a very interesting and fun activity. To make an origami car out of paper, you will need scissors and a square sheet of paper (can be colored). Now you need to follow the basic instructions:

The origami machine is ready. This is how you can easily and simply create a beautiful craft yourself.
Using available materials you can easily create a 3D machine. To make it voluminous and look great, you need to use a printer. All you need is a sheet of paper, scissors, cardboard, glue and pencils. You can use paints (optional):

There are different car schemes - regular and colored. If the diagram is colored, then you don’t even have to color anything. To make the car look like a real one, you must initially choose a clear, good quality picture. If the diagram is black and white and the printer is not color, then you can use pencils and make the car beautiful. Thanks to the imagination of parents, children will be able to play with wonderful cars, and adults will not have to spend money on new toys.
There are a million different ways to beat boredom. One of them is, of course, origami.
In our article we will teach you how to fold paper cars in different ways, because this is a very exciting activity for adults and children who will happily learn from you and then enjoy playing with the models they have assembled with their own hands.
All you need for work is colored paper, scissors and glue. And a good mood, of course.
From this article you will learn:
How to make a sports car out of paper
First of all we will create a sports car. To do this, take a rectangular sheet of paper, the sides of which have a ratio of 1 to 7. That is, if one side of the rectangle is 4 cm, then the other will be 28 cm.
1. Fold the upper right corner and also the upper left corner. Then we unbend them. This way we will get the intended fold points.


3. Then we bend the protruding triangles again towards the center.

4. We bend the sides of the sheet and fold the bottom of the paper in the same way as shown in the figure, approximately the same way as we folded the upper part of the rectangle in step 1.

5. Finally, fold the resulting figure in half and tuck the protruding triangles into the pockets. The sports supercar is ready! Children will be delighted, especially if they can make such a machine themselves. You can also color it and sign it.

How to make the simplest paper car
1. Take a square of paper and fold it in half from left to right. We unfold it and fold it in half again, but from the bottom up. This is how we mark the places for folding and the center of the square.

2. Fold the bottom quarter of the paper up and bend the corners as shown in the figure.

3. Fold the top half of the paper down, covering the folded triangles.

4. Bend back the sheet as shown in the picture. The distance from the edge of the paper to the dotted line does not play a special role.

5. To make a windshield, bend the upper right corner, connecting the red dots highlighted in the picture.

6. Turn the figure over and the car is ready!

How to make an origami machine out of paper
Another easy-to-use option for making a paper typewriter.
1. Fold a square sheet of paper in half from top to bottom and unbend it.

2. Fold the top and bottom quarters of the square and bend the corners. We bend the tops of the resulting triangles inward, and fold the entire figure in half.


3. Along the dotted line, bend the upper right corner into a pocket.

4. Make a cut on the sheet of paper as indicated in the picture and slightly stretch the figure.

Paper jeep
Hello to all glue lovers! Today we offer printable diagrams of the simplest models paper jeep. The difficulty level of gluing these paper cars is very low, so even preschoolers will find it interesting to glue them together.
The history of the appearance of "Jeeps"
The name "Jeep" appeared during World War II, as the American military vehicles Willys-MB and Ford GPW were called. The fact is that these cars fell into the “General Purpose” category (general purpose), abbreviated as JP.
Gluing a jeep out of paper
- In order to glue the paper car diagrams below, you will need to print them out, then cut them out and glue them together.
- It is better to print car diagrams on a color printer, then the crafts will turn out more beautiful. However, if you print the diagrams on a black and white printer, you can color them with colored markers or pencils.
- To make the jeep model more durable, it is advisable to use thin cardboard or sheets of whatman paper, cut to size in A-4 format, for printing.
- To cut out the parts of the jeep, use small nail scissors, with which you can carefully cut out all the small parts of the car.
- To ensure that the curves of the paper model are even, use a ruler and a non-writing pen. To do this, attach a ruler to the bend line, draw along it with slight pressure with a non-writing pen and bend the part.
- To glue the jeep model, use regular PVA glue or a dry glue stick. To make the parts stick together better, press the surfaces to be glued together for 20-30 seconds.
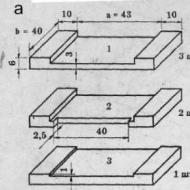
Paper jeep diagrams

Paper jeep 1

Paper jeep 2

Scheme - unwrapped paper jeep 3

Scheme - unwrapping of a jeep pickup made of paper

Diagram - paper development of a Cherokee Jeep

Articles on the topic