What is the best way to lay bricks. Bricklaying technology
Brick is a multifunctional building stone of artificial origin, with which you can build almost anything. Perhaps this is the most popular building material, without which the improvement of any suburban
Tools and equipment

When laying brickwork, it is necessary to have:
- trowels for applying mortar to bricks;
- hammer-pick, with the help of which products will be hemmed;
- additional tools, which include a cord, plumb line, level, etc.

For laying bricks, an ordinary concrete mortar is used, prepared from cement and sand in a ratio of 1 to 5-6. The solution is necessary to strengthen the masonry and glue individual bricks together. Sometimes ordinary washing powder is added there - due to this, plasticity and fluidity increase, but it is forbidden to use it for hollow products, because the solution will flow into the cracks, which will negatively affect the thermal insulation properties of the material.
To prepare the mortar, you must first mix dry cement with sand, then dilute with water as needed.

Note! It is undesirable to mix more than 50 liters at a time, since the solution is consumed slowly. It is better to take a small amount of dry mix and dilute it with water.
But if it is planned to carry out a large amount of masonry, and several builders are involved in the work at once, then it is more expedient to use. We also note that it is recommended to use cement of the “three hundredth” or “four hundredth” brand.
Prices for cement and mixture bases
Cement and mixture bases

After preparing the solution, you can start laying directly.
| Masonry size | Length, L | Width, V | Height, H | Number of bricks thickness not included mortar joint, PC. | Number of bricks taking into account the thickness mortar joint 10 mm, PC. |
|---|---|---|---|---|---|
| 1 m3 single brick laying | 250 | 120 | 65 | 512 | 394 |
| 1 m3 thickened brickwork | 250 | 120 | 88 | 378 | 302 |
| 250 | 120 | 65 | 61 | 51 | |
| 1 sq. m of masonry in half a brick (masonry thickness 120 mm) | 250 | 120 | 88 | 45 | 39 |
| 1 sq. m of masonry in one brick (masonry thickness 250 mm) | 250 | 120 | 65 | 128 | 102 |
| 250 | 120 | 65 | 189 | 153 | |
| 1 sq. m of masonry in one and a half bricks (masonry thickness 380 mm) | 250 | 120 | 88 | 140 | 117 |
| 250 | 120 | 65 | 256 | 204 | |
| 1 sq. m of laying in two bricks (masonry thickness 510 mm) | 250 | 120 | 88 | 190 | 156 |
| | 250 | 250 | 65 | 317 | 255 |
| 1 sq. m of masonry in two and a half bricks (masonry thickness 640 mm) | 250 | 250 | 88 | 235 | 195 |
How to lay corners

If you have seen how a professional bricklayer works, then you probably noticed that he starts his work by drawing corners. First, each of the corners should be drawn in turn, while their height should slightly exceed the height of the middle sections of the walls. For this purpose, beacons-benchmarks are used, through which a cord is pulled - it will indicate the height and level of the masonry. It is necessary to pull the cord as tight as possible so that it does not sag during operation. Moreover, it is necessary to periodically re-lay with beacon bricks.


To form rectangular corners, it is necessary to use the so-called ordering - a special device, which is a flat iron square. In order, you can make marks along the laying lines. The first two or three bricks must be laid using the rule, after which the order is established through the staples. To give a vertical position, use a plumb line. According to the marks made in order, a mooring cord is drawn.

Note! Experienced masons do not like to use ordering, preferring to draw angles “by eye” and considering this tool to be the lot of exclusively inexperienced craftsmen. But if you are doing bricklaying for the first time, then you cannot do without ordering.
Video - Laying corners
Types of seams
After laying out the corners in several rows, it is necessary to stretch the cord between them (the corners) and put the solution on. After that, you need to proceed to the main masonry. To understand all the nuances, you need to familiarize yourself with at least the main types of masonry joints.


There are several such seams, the most common of them are listed below.
- Pustoshovka - the solution in this case does not protrude above the surface of the bricks; there are small gaps that will be used for plastering. The plaster will flow into the gaps between the products, as a result of which it will hold well.
- Raised seams perform a purely decorative function. For their formation, a piece of a rounded pipe, cut lengthwise, is used.
- Function of concave seams also purely decorative, but an ordinary, uncut pipe is used for shaping.
- Undercut the cracks are filled completely and aligned with the surface of the bricks. Such masonry is used mainly for smooth surfaces (fireplaces, chimneys) to avoid soot accumulation, less often as a decorative one.
Main masonry

So, after removing the corners in several rows, you need to proceed to the main masonry. In the future, as the construction of the corners will rise. After the corners are formed, a layer of mortar is applied to the foundation, and a cord is pulled between them. You need to pull it extremely tight to avoid problems with the evenness of the masonry. A mortar is applied to the end of the first brick, after which it (the brick) is placed close to the corner. All subsequent bricks are laid in the same way.

Note! The cord should be pulled exclusively along the upper level of the bricks.
For a tighter fit, more mortar is placed on the walls, after which each brick is tapped with the end of the trowel and aligned with the level of the cord. The solution that came out is selected with a trowel. Of course, if you are doing the masonry for the first time, then the first few rows will have to be shifted in any case, but after two days the work will go faster.

Find out how it is made, as well as familiarize yourself with the choice of materials and styling technology, from our new article.
- After every five to six rows, a reinforcing mesh is laid.
- Bricks should be tied up, that is, the coincidence of the seams of adjacent rows should be excluded.
- Before laying, each brick is immersed in water for better adhesion of the mortar.
- If you are doing masonry for the first time, then start with primitive buildings (steps, posts, etc.). After such a training stage, it will be easier to lay out more complex structures - a summer kitchen, for example, or a brick barbecue.
- After preparing the tools and consumables, it is desirable to carry out the so-called dry laying (without the use of mortar) in order to identify possible flaws. If everything is fine, then you can start laying on the solution.
- For the first experience, the most suitable face brick (it has a smooth side) or chocolate brick (with excellent decorative properties), the dimensions of which are somewhat smaller than usual. Conversely, you can use a rough brick that looks like natural stone.
- Before proceeding directly to the laying, you need to draw up a detailed plan in which all rows of bricks will be drawn. This will avoid unnecessary costs, because brick is a very expensive material. The dimensions of the brick are as follows: 6.5x12x25 cm. When calculating, you should “throw” about 10% more over the required amount, since the battle is inevitable (especially if the laying is done for the first time).
And remember the main thing - do not rush. First, lay the brick dry, as we have already talked about, then apply the mortar and proceed with the laying, tapping each product with the end of the trowel so that it takes the desired position. The solution that protrudes out must be removed with a trowel and thrown back into the bucket.

You should not rush when working with a solution, because this is not a "Moment", which seizes in a few seconds. You will have enough time to experiment with laying, remove and put the mortar, turn the bricks in one direction or another - in a word, make it perfect. After acquiring the appropriate skills, you will be able to draw the right amount of mortar on the trowel the first time and immediately install the brick in the required place. So the laying procedure will be carried out much faster.
| Name | Average density, kg/m3 | Porosity, % | Frost resistance grade | Strength grade | Color |
|---|---|---|---|---|---|
| Brick solid | 1600-1900 | 9 | 15-50 | 75-300 | red |
| Hollow brick | 1000-1450 | 6-8 | 15-50 | 75-300 | light brown to dark red |
| Hollow brick "super efficient" | 1100-1150 | 6-10 | 15-50 | 50-150 | shades of red |
| Brick facing | 1300-1450 | 6-14 | 27-75 | 75-250 | white to brown |
| Brick facing glazed or engobed | 1300-1450 | 6-14 | 27-75 | 75-250 | any |
| brick parameters | Hyper pressed brick | Clinker brick | silicate brick | ceramic brick |
|---|---|---|---|---|
| Compressive strength, kg/cm² | 150-300 | 300-500 | 75-200 | 100-175 |
| Frost resistance, cycle | 75-150 | 50-100 | 35-50 | 15-50 |
| Moisture absorption, % | 6-8 | Less than 6 | 6-12 | 6-8 |
| Thermal conductivity, W/m° С | 0,7-0,8 | 0,7 | 0,3-0,7 | 0,3-0,5 |
| Weight at the size 250х120х65., kg. | 4 | 3-4 | 3,8 | 3,5 |
Prices for building bricks
Building brick
Find out, with step-by-step instructions, from our new article.
And as a conclusion - a thematic video.
Video - Proper bricklaying
To build a house, you need to know how to lay bricks. Such buildings are in demand, but buying a finished home is a common occurrence. A specialist will lay down a brick wall with high quality, but is it really impossible to build it yourself? This requires knowledge and practical skills.
What result can be obtained by self-laying the foundation?
Prepare the necessary materials and tools:
- mortar (wall fastening);
- bricks;
- chalked cord.
- wheelbarrow (transportation of materials from the warehouse);
- trowel (trowel) (masonry mortar);
- special glasses for eye protection;
- carpenter's square (corners are checked);
- level (horizontal masonry);
- hammer and pickaxe in one tool;
- roulette;
- cord for leveling brick rows.
Solution
Regulations for the preparation of the composition:
- Put cement and dry sand in a ratio of 1: 5, you can add clay or lime for plasticity.
- Mix cement with sand.
- Take the finished mixture in small parts, add water, stirring, avoiding the hardening of the overly prepared solution.
- It is not recommended to make a mixture of more than 40–50 liters, the consumption is small. It is better to use a dry solution little by little, add water.
- For a large volume of masonry, a concrete mixer is required.

A hollow brick with holes will absorb the mortar, reducing the fastening strength.
Masonry features
Compliance with these requirements will improve the quality of work. Masonry principles:
- Follow the equal volume of the applied solution, otherwise it is not easy to get a smooth edge of the outer row.
- The brick on the prepared work surface is laid parallel to the row, where the outer edge coincides with the plane of the wall.
- Three rules: the same height of the brickwork, the correct linear position, a snug fit with the adjacent brick.
There are several types of seams when laying.
Wasteland - the mortar is placed without protruding beyond the edge of the brick, there remains a gap used for plastering. The plaster mixture flows into the cracks, holds tight.
Undercut seam - fills the gaps between the bricks completely, leveled. Used in chimneys and chimneys to create a smooth surface so that soot does not accumulate. Rarely used as a decorative item.
A concave (convex) mortar joint has a decorative, design function. To create a concave seam, a piece of a round tube is used; for a convex seam, part of the surface is cut off in the tube.
Wooden lath for laying bricks
How to lay a brick?
There are a number of features in the process of laying bricks:
- Starting to lay out the first row, two layers of roofing material are placed on the foundation.
- They plan brick laying - one brick, one and a half or exactly two.
- How to lay a brick? Having made estimates, having acquired the necessary material, it is necessary to lay out dry masonry, revealing flaws.
- If no errors are found in the project, you can directly lay out the brick.
- If the first brick line is crooked, subsequent ones will be laid out in the same way.
- It is necessary to use special construction tools for a correct, even wall.
- The solution is applied, lay, adjusting the trowel handle until it is in the correct position, and remove the excess into a bucket.
- Cement hardens slowly, in several stages, it is possible to fix it, make it even. When a skill is formed, it will be obtained immediately.
- The gap between the bricks is three centimeters. The solution will evenly spread when laying.

Gap - three centimeters
Additional requirements
Masters advise beginners not to forget a number of additional requirements:
- Control carefully the building level laying.
- The correct angle of the structure is 50% of the success of the work. Before work lay out the corners in several rows.
- They work using a horizontal, vertical level, the quality of laying out the walls depends on the angles.
- The height should be twice the walls during installation.
- For plastered walls, the mortar is laid with a wasteland. Distribute between bricks without filling the gap.
- When building a fireplace chimney, the seams are filled completely. Then no combustion products are formed. Closed seams are used for facing laying.
- Smooth, right angles of the structure are created by “ordering” (metal corners ensure the accuracy of work).
- To fix the tool, brackets are used to ensure the accuracy of work.
- It is impossible to ensure even styling, a master class, without a level, tape measure, mason's cord, and chalked cord.
- A well-placed first row is important. Stretched construction cord is used.
- The laid brick does not have to adjoin a couple of millimeters so that the solution does not press.
- Each is controlled by the level of the horizontal arrangement, in pairs with the neighboring one. For beautiful facial styling, such control is needed.

Additional Information
Tips that might come in handy:
- The seams in successive rows must be different, otherwise the wall will reduce the degree of stability.
- Carefully approach the construction, draw a construction plan, indicating the required number of bricks, the number of rows laid out.
- If there are difficulties in laying out facing bricks, use traditional building masonry.
- Facing is more aesthetic in appearance, has a different purpose.
- When planning the required amount of solution, it is necessary to increase the volume by an additional 10%, this part of the master will be broken up during work.
- In order for the mortar to provide a strong attachment, pour water over the brick before use.
- The solution dries for a long time, if necessary, the bricks can be moved, removed or laid again.
- To lay brickwork, a reinforcing mesh is placed after 5–6 rows.
- For a tight grip, put more mortar, tap with the end of the trowel, align with the cord. The excess solution is selected with a trowel.
How to learn to lay a brick? After training, building simple structures (pillars, steps), in the future, the builder will lay out the brick barbecue itself, the walls of a barn or house, a summer gazebo in the garden.
It seems to a person who is not familiar with the correctness and technology of laying bricks that there is only one single option - to lay bricks evenly, that there are simply no other options, that it is impossible to lay a brick otherwise than evenly.
But the most important condition on which all construction work depends is that they be performed by a professional bricklayer who knows perfectly well how to lay bricks correctly. After all, bricks have a rectangular shape, so when laying them in rows, any builder, even a beginner, will achieve perfect evenness of the walls. However, this is a big misconception.
The strength of the brick walls of the building under construction is directly affected by the following conditions:
- The quality of the building material, which consists of bricks and cement mortar.
- Weather conditions under which brick walls are built.
Masonry brick walls and partitions
It turns out that for the correct laying of a brick wall, there are several requirements that must be followed:
It is necessary to constantly ensure that the mortar is applied under the brick in the same amount, otherwise it will be almost impossible to make an even edge of the outer row of brickwork.

Rules for bricklaying walls and partitions.
The brick is placed on the prepared work surface so that it lies parallel to the row. In this case, its outer side coincides with the plane of the brickwork - it turns out to be oriented along three rotary axes.
When laying bricks, follow the basic rules:
- The brick must have the correct linear position.
- The masonry should have the same height of all rows.
- Bricks should fit snugly together.
However, even if these requirements are met, without the proper experience and skills in bricklaying, the first time you can not get the correct and even masonry. Therefore, it is necessary to familiarize yourself with the theoretical technology for doing these works with your own hands. Knowledge of technology will help to properly cope with the practical part of the work.
Tools needed for bricklaying
For the proper organization of the workflow for laying bricks, it is necessary to have high-quality building material (brick and cement mortar), as well as stock up on special tools and fixtures:
- Mortar or mixture for laying bricks, prepared in compliance with the necessary proportions and in accordance with all the rules.
- Bricks in sufficient quantities (building material).
- A construction wheelbarrow, which is necessary in order to deliver the brick from the place where it is stored to the place where the brick wall is being laid.
- Trowel or trowel, which are used to lay out the solution on the work surface and in order to remove excess mixture.
- Construction goggles used to protect the eyes from dust or solid mechanical particles.
- Carpenter's square, which is used when connecting the corner parts of the brickwork.
- A building level that helps to evenly lay out not only the first row of brickwork, but also the following ones.
- A pickaxe hammer used to break bricks.
- Roulette, it takes linear measurements when performing bricklaying.
- Chalked cord to help determine the line of bricklaying.
- Bricklayer's cord, with which you can create straight horizontal lines of rows of brickwork.
Cement mortar for brick laying
The preparation of mortar for laying brick walls is not difficult. The composition of the solution includes cement and sand in the optimal ratio between them 1:5 (one part of cement is taken for five parts of sand). To give the solution plasticity, you can add a little clay or lime as a component to it.
The first step in the preparation of masonry mortar is the mixing of cement and sand. This is done without adding water - the components must be dry. Then the finished mixture is taken in small quantities and combined with water with thorough mixing.

Features of the preparation of cement mortar for brickwork.
Mixing in small batches prevents premature hardening of excess amounts of the prepared mixture, thereby saving financial resources on the additional purchase of cement.
To save mortar, do not use "hollow" bricks, since this will leave most of the mortar in the holes, as a result of which the prepared masonry mixture will not be enough to strengthen the brick.
Today, when building houses and summer cottages, not every site owner turns to professional builders for help. Some are financially limited, while others adhere to the rule of life, which says that a real man should build a house, plant a tree and raise a son.
It is these site owners who should familiarize themselves with the theory of brickwork before embarking on practical work.
brickwork technology
If you have purchased a piece of land on which you decide to build a brick house with your own hands, you should be aware of the correct execution of brick wall laying work. If you do not comply with the necessary requirements, you can build an unreliable structure.
The first rule when performing work on laying brick walls is the following: you can start laying bricks only after the pre-made foundation has completely hardened, otherwise the walls will lead in different directions, and your work will be in vain.
So, when laying bricks, it is necessary to perform work according to the following technology:
Before laying the first row of bricks, it is necessary to lay roofing material on a completely dry foundation, folding it in two layers. Before that, you need to decide how you will build walls: in one, two or one and a half bricks.
Needless to say, if the first row of bricks is laid unevenly, then it will be impossible to achieve evenness when laying out subsequent rows. Therefore, you must use special construction tools with which you can lay brickwork correctly and evenly.
The next requirement that must be observed when laying brick walls is that it is imperative to leave gaps between the bricks. The minimum gap should be 3 cm. The gap is made so that it is possible to evenly distribute the mortar between the bricks when laying the wall.

Checking the quality of brickwork using a level.
Do not forget to periodically check with the help of the building level the correctness of the laying directions in the horizontal and vertical plane.
The correct layout of the corners of the structure is 50% of the successful completion of all work. Before laying the brick, lay out several rows of corners. An important condition for the work is the use of horizontal and vertical building levels, since it is the correct layout of the corners that is the key to correctly laid out walls of the house. Therefore, when performing brick laying work, it is necessary that the corners of the house structure constantly rise above the main walls by a couple of rows.
When planning to plaster erected brick walls, be sure to use the “waste-filling” method, which consists in the fact that a certain volume of mortar is distributed between the bricks in such a way that it fills the gaps between them.
When laying out the chimney, it is necessary to completely fill the empty space between the bricks with masonry mortar, so that soot does not settle on the inner walls of the chimney. When performing facing laying, it is also necessary to completely fill the seams with masonry mortar.

Proper removal of corners in brickwork walls.
To create even and right angles of the house structure, it is necessary to have an “order”, which is metal corners that allow you to determine the correct laying of bricks. "Ordering" is fixed at the corners with the help of special brackets that ensure the correct design.
To ensure even laying of bricks in rows, it is necessary to have special building tools - a building level, a bricklayer's cord, a tape measure, a chalked cord, which are recommended to be used constantly during brick laying.
Professional masons give the following advice:
When laying brick walls, be sure to follow the seams - they should not match in subsequent rows, otherwise the wall will become unstable and easily fall apart if an effort is made on it.
Be especially careful about construction - before laying a brick wall, first draw up a work plan in which you indicate how many bricks you need, as well as how many rows of bricks you need to lay out.
Facing brickwork.
If you don't have the skill, when laying facing bricks, you can use the traditional methods of laying ordinary building bricks, and get normal results. The facing brick has almost no differences from the usual. They have a more aesthetic appearance and a different purpose.
When making a calculation to determine the required amount of bricks, be sure to add 10% of the total to the figure obtained in order to have a supply of bricks, since approximately so many bricks can crack during the laying of a brick wall.
To ensure the greatest adhesion between the mortar and the bricks, it is necessary to wet them before laying the bricks, lowering them into a container of water.
In order to learn how to properly lay out brick walls, you need to be patient and not rush. Due to the fact that the masonry mortar does not dry out immediately, if the need arises, it is possible to correct the shortcomings.
If you decide to do bricklaying with your own hands, then in order to extend its service life, you need to take care not only of the selection of high-quality building material, but also take into account such features as its humidity, the plasticity of the solution, the season and other characteristics.
When faced with the need to lay a brick wall for the first time, in addition to preparing the tool and masonry mortar, you need to imagine in what sequence the material is laid. Let's take a closer look at how to learn how to lay a brick. First of all, you need to understand that not only the appearance of the structure, but also the duration of its operation will depend on the quality of the masonry. Masonry in most cases is carried out in rows and layers, and a cement-sand mortar is used to fasten the material.
//www.youtube.com/watch?v=sGE2TKsrNjs&t=205s
Before laying a brick, you need to carry out preparatory work, the material should be laid out along each of the walls of the building being erected. It is also recommended to pre-moisten it with water. This is done to better bond the solution with the material. Regardless of what building material is used, the first row begins to be laid on a previously prepared surface. First, the foundation is leveled with a building mixture and waterproofing is done. Today, a lot of modern waterproofing materials are offered, but the most common is roofing material.
Preparation of the solution and preparation of instruments
You need to start laying bricks with the preparation of mortar, which should bind the material. In this case, a cement-sand mortar is required, which is prepared in a ratio of 1:5 or 1:4, depending on the brand of cement. If the solution turned out to be quite viscous, another component is added - clay, which will give fluidity. In extreme cases, you can add washing powder. It is important to remember that when laying hollow building material, such a solution should not be used, since thermal insulation will deteriorate when all voids are filled. use mortar for hollow bricks.
To prepare the working mixture, the sand is sifted through a sieve. This procedure is necessary in order to remove debris, stones, pieces of soil. First, the components are mixed together, and then water is gradually added in such an amount that the solution is of the desired consistency. If you plan to do the masonry with your own hands, you do not immediately need to knead a large amount of masonry mixture. By making the solution in small batches, you can avoid premature solidification. If the construction is planned for a long time, then it is better to get a concrete mixer, which will not only speed up the process, but also facilitate it.
Brickwork is made with a trowel, with which the mortar is applied to the material, leveled with a handle and excess masonry mixture is selected. The trowel is the main tool in the process under consideration. In order to lay the brick yourself, you will need an angle grinder (grinder) with a stone disc. If there is no such tool, you can use a hammer with a sharpened striker: having adapted, they can also crack bricks evenly. The accuracy of the masonry is checked using a level and a plumb line.
How to build corners?
The process starts from the corners. The straightness of the walls and, in general, the stability of the future building depend on how correct the bricklaying will be done in the corners. The main condition for this stage is to tie the brickwork of two adjacent walls, the connection of which is performed at right angles. Particular attention should be paid to the device of strictly vertical corners, for which a plumb line is used. Bricks are laid out one by one. If the vertical is not maintained, then the corner will turn out to be “littered” to one of the sides. In the case of large loads, there is a possibility of destruction of the wall. First, the bricks are laid in the corners, then the walls are erected. This technology is due to the fact that for the construction of even walls, the corners are first raised, then the cord or fishing line is pulled. These devices allow you to perform even laying of the corresponding row.
 To start, take and lay two bricks at right angles into a corner and press them against the masonry mixture. The seam between them is filled with mortar. In each of the sides of the corner, which are already the beginning of the wall, several masonry materials are laid. Immediately, with the help of a level, they check how the laid out brick is correctly positioned horizontally. In accordance with the order, the second, third and subsequent rows are laid.
The erection of corners and the laying of bricks with your own hands is carried out in the following sequence:
- Alternately erect two corners.
- Lay 2-3 rows of building material.
- Raise the third corner.
- By means of 2-3 rows, a connection is made with the second corner.
- Lay the fourth corner.
- From it, building material is laid to the first and third corners. This is how the wall is built.
By arranging the corners, a step is created that allows you to tie the brickwork between the walls and corners as firmly as possible. In addition, reinforcing mesh in the corners can be used for strength. Particular attention should be paid to the presence of a right angle. Check it with a square, while the bricks should be in close contact with the tool.
How to build walls?
 The first row is laid out directly on the waterproofing, and you should not worry that the laid material will not be connected to the foundation by means of a mortar. The brick structure is heavy, as a result of which the walls will stand securely on the waterproofing layer.
The horizontal laying of the walls was of high quality, they use a fishing line that is pulled between adjacent corners for a specific row. Laying in a vertical plane is controlled by a plumb line. It is necessary to make it a rule that the construction of walls is carried out with the obligatory dressing of the material. In this case, each brick is shifted by half: in the first row, the masonry material must be laid whole, and in the second, halves of two bricks are located on it. If the first row was laid out with a poke, then the next 5 rows are performed with a spoon side.
When erecting walls, it is necessary to provide openings for windows and doors. To do this, a quarter (recess) should be made in the wall, i.e. the inner part of the masonry is shifted by ¼ of the building material. Doors and windows are later inserted into the resulting recess. Close attention should be paid to the bricks above the openings: under them you need to build a reliable support. In most cases, the embedded element is a metal corner or a concrete beam (puff). How to lay a brick over the openings? Laying is carried out in the same way as the main laying of walls.
How to form seams?
Before laying a brick wall, you need to familiarize yourself with such an important point as the thickness of the seam. For horizontal seams, this figure should be 10-15 mm, for vertical 8-12 mm. When laying the material in the corners, it must be laid in such a way that the vertical seams do not coincide.
There are several types of seams:
- "wasteland";
- concave;
- convex;
- "undercut".
 When the brick to be laid is supposed to be plastered, a “waste” is used. In this case, the solution is not brought to the outside of the building material, a small gap is formed. How to make decorative masonry? In this case, resort to concave and convex seams. To create them, use a tube or a wooden stick made of hardwood. A concave seam is obtained by passing a tube along the seam, as a result of which excess solution is squeezed out. To get a convex seam, the tube must be cut in half, installed on the mortar and removed. The scope of the “undercut” seam is the laying of a chimney or chimney. Not only the seams are filled with mortar, but also the front side of the brick is covered. From the inside we get a smooth pipe: a good option, excluding the accumulation of soot.
If this is the first time you are faced with the question of how to lay brickwork, you should not rush: carefully calculate the number of planned rows and the amount of building material in them.
Oby in the process of work as little as possible to be distracted, draw up a plan and a scheme in advance, according to which bricklaying will be carried out, also prepare tools and necessary materials. As a recommendation: try laying the brick without mortar first, it will be a kind of training. When there is an understanding of the correct masonry, you can begin the process using the solution. Although very rare, sometimes you can see when a girl lays bricks. There are women who set themselves the goal of building a house on their own, and for some it even works out. Therefore, if you are new to construction, it is never too late to learn this business, because a house built with your own hands will always be warmer and more comfortable.
//www.youtube.com/watch?v=JkzAdpgXBNw
44340 0
Since its inception several thousand years ago and until today, brick has remained one of the most important building materials, along with concrete and wood. A huge number of houses, cottages, sheds, garages, bathhouses, utility and public buildings, etc. are being built from bricks. And even now, despite all modern building technologies, a person who knows how to quickly and correctly lay bricks is very highly valued. So why don't you join the skill of masons? Knowing , how to lay a brick correctly, you will get the opportunity to independently build various residential and outbuildings from this material on your site.


Brick is a regular-shaped block of artificial stone used for the construction of load-bearing walls and partitions, as well as for cladding in the construction of various residential, public and commercial buildings.

It is made in the form of a parallelepiped, the faces of which have their own names.
- The largest edge in area, which, as a rule, is parallel to the base of the masonry, is called bed.
- The long side face, second in area, is called spoon or spoon part.
- The short side face, the smallest in area, is called poke or poke part of a brick.

Facets of an ordinary brick: 1 - bed, 2 - spoon, 3 - poke
Bricks are classified according to the following parameters:
- material of manufacture;
- size and shape;
- structure;
- scope.
Let's look at them all briefly. According to the material of manufacture, bricks can be of the following types.
- ceramic bricks, also known as reds, are among the most common. They are made from high quality clay and with a low content of impurities. Ceramic brick blanks are formed, dried and then fired in a kiln at a temperature of +1000°C. The manufacturing process is quite long and laborious, therefore such building materials are relatively expensive. But at the same time, red brick is strong and durable.

- Clinker bricks- like ceramic ones, they are made from good clay, but at the same time they are fired at a higher temperature of + 1200 ° C. As a rule, it has a darker shade and the best indicators of strength and frost resistance among analogues. Also, of all bricks, clinker bricks have the lowest water absorption rates - from 1 to 6% of the total mass.

- silicate bricks- made from a mixture of sand and a small amount of lime. Unlike ceramic, they are not fired, but pass through an autoclave, where the temperature is about + 200 ° C and high pressure. Cheap and very popular material for the construction of outbuildings. But at the same time, it is less durable than ceramic bricks, and more prone to moisture absorption.

- Hyper pressed brick- a building material made from a mixture of rocks and a small amount of Portland cement, which are shaped and pressed under very high pressure.

- adobe brick- as a rule, home-made building material, which is clay blocks, where straw or its analogue is used as a filler.


The size of the bricks is determined by state standards. In accordance with them, this building material has basic dimensions called the “normal format”, from which all other options are repelled.
Table. The main dimensions of the bricks.

Important! It is worth noting that in the construction of brickwork, incomplete parts of bricks are very often used. This is half, one quarter and three quarters. To create them, a pick, a circular saw, a grinder or a special machine are used.
As for the shape of the brick, in addition to the standard rectangular, there are many more options that are used for decorative purposes or creating structures of complex shapes. These blocks, called shaped, you can see in the image below.

According to their structure, bricks are divided into solid and hollow. In the first version, the blocks do not have any specially made holes, pores and voids are obtained due to the peculiarities of the manufacturing technology. Solid bricks are used for the construction of load-bearing walls and other structures that are under significant load - they are stronger, but at the same time worse in their thermal insulation qualities.

Hollow bricks have in their structure rectangular or round holes in the bed. Masonry made of such material, due to such voids filled with air, has better thermal insulation properties, but at the same time it is not so strong.

According to its scope, the material is divided into the following categories.
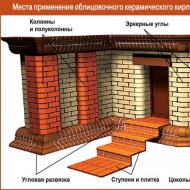
- Building, also known as an ordinary brick - is used to build walls and partitions, which are subsequently finished with other materials. It often has an imperfect shape and appearance, but it is cheaper.
- Facing, or face brick - can also be used for the construction of load-bearing walls, partitions, plinths and other structures, but at the same time it has a better appearance, because it can not be covered with other finishes and still get a beautiful and eye-pleasing building.
- Refractory- used in the arrangement of furnaces, chimneys and other structures that may come into contact with sources of fire or high temperature.
- Decorative brick is used exclusively for exterior or interior facades. Often has a special texture or painting.


Important! Separately, it is worth highlighting a used brick - this is the cheapest version of this building material, but its strength qualities and appearance are very far from ideal.

brick price
Types of brickwork, dressing and jointing
Without knowing the basic terms for masonry elements, it is not easy to understand the various instructions and correctly build brick walls. Therefore, we will get acquainted with the basic notation presented in the image below.

Versts- bricks laid on the front (facade) and inner (constituting the surface of residential premises) sides of the wall. Bricks lying between the inner and outer mile in a row are called backfill.
In accordance with the appearance of the facade, the rows in the masonry can be poke or spoon. In the first case, the bricks go to the front side of the wall with a poke. And, accordingly, if a spoon is visible on the facade, then such a row is called a spoon row.
The seam formed by mortar between rows of brickwork is called horizontal. And if the solution is between adjacent bricks in a row, then such a seam is called vertical. He can either be longitudinal, or transverse. In the first case, the vertical seam is located along the direction of the wall, in the second - across it. Their overlappings in rows of brickwork are called dressings.

The implementation of strong and durable buildings from this material is possible only if three basic rules are observed.
- In masonry, it is necessary to evenly distribute compressive loads and minimize them in bending. To do this, the planes of all rows must be parallel to each other. As a result, uneven distribution of the load on one of the corners or one of the sides of the masonry is excluded.
- Vertical seams located along and across relative to the direction of the brickwork should be located at an angle of 90 ° relative to the plane of the row and mutually perpendicular to each other.
- To ensure uniform load distribution and avoid bending moments, each brick in the top row must be supported by at least two bricks in the bottom row.
The classification of brickwork by wall thickness can be found below.

Important! Separately, it should be said that there is another type of masonry - a quarter of a brick. In this case, the plane of the rows does not pass along the bed of blocks, but along the spoon. The thickness of such masonry is 65 mm, strength and thermal insulation are low, therefore the scheme is suitable only for thin partitions inside the house.

As mentioned above, to create a strong and reliable masonry, its vertical seams must be blocked. To solve this problem, various stacking schemes are used, called suture dressings. Each of them has a certain level of complexity, as well as its own advantages and disadvantages.
Most often, the following systems of dressing seams are used during construction:
- single row, also known as chain;
- multi-row;
- and subspecies multi-row - three-row dressing system.

Principle single-row dressing of seams consists of alternating spoon and bonder rows of brickwork through one. In this case, you still need to follow some rules.
- The initial and final rows of masonry must be bonded.
- Longitudinal vertical seams overlap by ½ brick.
- Transverse vertical seams overlap by ¼ brick.
The single-row bonding system makes it possible to create a very strong and reliable masonry with uniform load distribution and minimization of bending moments. But at the same time, this method of laying bricks is very laborious. In addition, the bricklayer needs to produce a large number of undersized blocks, which increases material consumption due to unnecessary quarters or rejects resulting from an unsuccessful split.


From the point of view of saving material and time, it is preferable multi-row suture dressing system. In it, one tychkovy row alternates with 5-6 spoon rows. At the same time, there are specific features that must be observed.
- As for single-row dressing, the initial and final rows of masonry should be bonded.
- The next spoon row should overlap the vertical transverse seams of the previous row of the same type by ½ brick.
- Vertical longitudinal seams in the spoon rows, as a rule, are not tied up.
- The following bond rows in the masonry should overlap the vertical transverse seams of the previous spoon row by ¼ brick.
As mentioned above, such a system is more economical and simpler, but at the same time not so strong. As for the three-row dressing, this is a special case of multi-row dressing - when there are three spoon rows between two tychkovy rows.


In brickwork, not only wall thicknesses and block layouts differ, but also the types of mortar joints. Consider their main varieties.
- Undercut- the boundaries of the seam coincide with the plane of the walls. The result is an even and smooth brickwork.
- Pustoshovka- the boundaries of the seam do not reach the plane of the walls, small gaps remain between the bricks. As a rule, this type is used if the masonry is to be plastered. In the process, the finishing material will enter these slots and, thus, it will adhere well to the wall.
- Convex and concave semicircular and double shear seams- in profile, the solution at the wall boundary has the form of a semicircle or triangle, which goes out or, conversely, goes beyond the plane of the masonry. Used for decorative purposes.

Tools and fixtures for bricklaying
Any construction work is impossible without the use of tools. Consider everything that you may need for proper bricklaying.
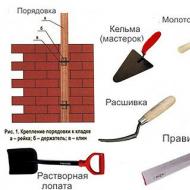
- a triangular-shaped metal spatula with a curved handle. The most important tool for laying bricks, it is necessary to apply mortar to a wall or a separate block, to mix it or cut off excess.

pickaxe hammer- used to split bricks into halves and quarters. The sharp side is used for small or normal-sized blocks, the blunt side is used for those that are larger. Instead of a pickaxe, you can also use a circular saw or grinder.

- with its help, the joints in the brickwork are carried out and giving them the necessary shape.

Nylon cord for arranging a mooring, with the help of which the correct position of a new row of bricks is controlled.

ordering- a metal corner fixed at the corners of the house with clamps-clamps. It contains holes or other fasteners that allow you to quickly move the mooring cord exactly to the height of one row of brickwork (taking into account the thickness of the seam). The use of ordering significantly speeds up and facilitates the work of a bricklayer.

For mixing cement mortar. Also, for its preparation and carrying to the point of laying bricks, you will need buckets, a trough and other containers. When working with a large amount of mortar, it makes sense to buy or rent a concrete mixer.

To control the position of the corners, you need carpenter's square. You will also need a tape measure to measure distances and lengths. And for marking - a pencil.

In the work of a bricklayer, it is of great importance to control how evenly one of the bricks or a whole row lies horizontally and vertically. For these purposes, use building and water levels.

Prices for building levels
Building levels

For laying the upper rows of bricks, it is necessary to use scaffolding or scaffolding. It is better to transport building materials using a wheelbarrow.

Scaffolding prices
Scaffolding
Also during construction it is better to wear separate work clothes and use protective equipment - goggles and gloves.
Important! Separately, it should be said about the templates for the bricklayer. These are simple plastic devices that allow even an inexperienced person to apply perfectly even layers of mortar on the bed and vertical surfaces of bricks.

Mixing masonry mortar
To connect the bricks into a monolithic and strong wall, you will need a cement mortar. And in this section of the article you will learn how to cook it.
Step 1. Prepare all the necessary components - cement grade M400, good sand, a small amount of water and a plasticizer. The latter is necessary to create an elastic, high-quality mixture that will lay down on the brick without any problems and smooth out. As a plasticizer, use either specially formulated additives or a regular detergent.

Step 2 Turn on the concrete mixer, pour three-quarters of a bucket of water into it, then add 30-50 ml of detergent. Wait until the mixture of two liquids mixes well and foams.

Step 3 Throw in two buckets of sand. Also wait until all the components in the concrete mixer turn into a mixture.

Step 4 Once the sand and liquid are mixed, add two more buckets of sand. Repeat the same steps as in the previous operation.

Step 5 Add one bucket of M400 dry cement to the concrete mixer. Rotate the bulb slightly down, about 5-10°.

Step 6 Stir the ingredients evenly until the mixture is slightly damp. After that, gradually add water to the concrete mixer. Do not overdo it with water, otherwise you will have to add dry ingredients and plasticizer again, while it will be difficult to maintain the correct proportions.


Step 7 As soon as the mixture is completely mixed and begins to stick off the walls of the concrete mixer, pour it into a prepared trough or any other container of a suitable volume.

Step 8 Stir the resulting mixture with a shovel, check how flexible it is and whether its consistency is suitable for use in brickwork.

Step 9 Having prepared a mixture for bonding bricks, do not forget to clean the stopped concrete mixer from mortar residue.

Prices for popular models of concrete mixers
concrete mixers
How to lay a brick - step by step instructions
Now let's start describing how to properly lay a brick. For this, several step-by-step instructions have been created, each of which is placed in a separate subsection.
Important! Before starting construction, it is advisable to "practice" to perform brickwork and its individual elements, such as corners and pillars. This will give you basic bricklayer skills and save you some mistakes in the process of building your own house, barn, garage or any other building.
Dry laying on the plinth
Work begins with laying out the first row of dry bricks. It is necessary to calculate how many blocks will be needed in this case, and for a rough idea of \u200b\u200bhow to make the correct masonry.
Step 1. Unpack the bricks and check the specimens from different pallets. Due to some features of the raw materials and the technological process, they may differ from each other in shade or size. Identify these features in advance. When laying walls and other structures, it is advisable to use bricks from one batch, one shade.

Step 2 Spread and fix the roofing material on the plinth or foundation - it is necessary for waterproofing. Without it, the brick will “draw in” water, which will not affect its durability in the best way. Then lay out the first row of blocks without mortar and careful fitting. Prepare a pin or a piece of reinforcement with a diameter of 8 mm - it corresponds to the thickness of the mortar layer between the bricks.

Laying the first row of bricks on top of the roofing material
Step 3 Now lay the bricks on the edge of the plinth, carefully aligning them and observing the desired gap using a pin of the appropriate diameter. In this way, a dry layout is made around the entire perimeter of the building being erected - pay special attention to the corners.


Step 4 Take length measurements from one corner to another, write down the results. Also take measurements diagonally - is everything correct, are the project numbers observed.

Step 5 In the corners, mark the plinth with a pencil in those places where the edges of the bricks will be located. If desired, and if there is time, the same marks can be placed along the entire length of the walls - this will require additional forces from you now, but at the same time it will greatly facilitate work in the future.

Laying out the first row
One of the most important steps in laying bricks is working with the first row. The quality of the subsequent masonry and the entire structure as a whole depends on how correctly it will be laid out. Keep this in mind and do this job with as much care as possible.
Step 1. According to the marks made during the dry laying stage, lay the first bricks on the corners of the basement. In this case, a reinforcing wire mesh was laid on top of the roofing material.

Step 2 Having planted the corner bricks of one of the walls on the mortar, carefully adjust them in height with the handle of a trowel or with very light and careful blows of the blunt part of a pickaxe. In this case, be sure to use both the water level and the building level - you need to make sure that the blocks on the two edges of the walls are located at the same height.

Step 3 By the same principle, lay out the bricks of the first row at all corners of the future building.

Step 4 Stretch a mooring thread between the corner bricks, along which all other blocks of the first row will be aligned horizontally and vertically. The cord is fixed either with the help of corners (as in the photo below), or in order. Please note that the mooring thread should not sag and that when laying it, it is undesirable to “push” it towards one of the faces of the brick.

Step 5 Proceed to laying out the other bricks of the first row. Lay the mortar on the plinth with a trowel, level it to a height of about 1.5 cm, lay the brick, align it horizontally and vertically, using a mooring thread. If this is your first time working as a bricklayer, check with the building level. In this case, it is allowed to adjust the brick with light taps with the trowel handle or the blunt end of a pickaxe. After that, the thickness of the horizontal seam should be approximately 8-10 mm, and the vertical - 8 mm. Remove excess solution with a trowel.

Step 6 According to the same principles as above, lay all the bricks of the first row.

Step 7 After laying the last brick in the first row, check again if the height of all blocks is the same, if there is somewhere bulging forward or backward relative to the base. If everything is in order, proceed to laying out the corners of the second row, moving the pier and further construction work.

Brick laying close and tight
After laying out the first row, it is necessary to start creating subsequent layers of brickwork. In this case, actions are performed according to a similar algorithm - corners are created, a thread is pulled, blocks are laid. In this subsection, we will focus on the last operation. There are two main techniques for laying bricks - sticking and pressing. Let's look at both in turn. Let's start with laying bricks using the butt method.
Step 1. Pull the mooring threads along the upper edges of the laid out row. It is advisable to do this both from the outside and from the inside. Then pour the cement mortar onto the bed of the previous row of bricks.

Step 2 Use a trowel to spread the mortar over the surface of the previous row of brickwork. Its thickness should be slightly larger than the thickness of the horizontal seam you are planning. Also make sure that the mortar completely fills the vertical longitudinal and transverse joints on the previous row of brickwork.

Step 3 Take a brick, tilt it down a little with a spoon or poke (depending on how you need to put it) and, immersing it in the mortar, move it so that a layer of the mixture floats on the inclined edge. As a result, you get both horizontal and vertical seams at the same time.


Step 4 Follow the same principle for laying the remaining bricks. If they deviate in height from the border set by the mooring thread, adjust them with light taps with a trowel or hammer. Cut off the excess mortar from the outside with a trowel, partially fill the vertical seams where the mixture is not enough.

Now let's look at laying bricks.
Step 1. As in the previous instructions, pull the mooring thread along the upper edges of the row, and lay out and level the mortar on the bed of the underlying layer of bricks.

Step 2 Then turn the trowel on its side and with a gentle movement over the mortar, rake up part of it to the vertical edge of the brick next to which you are going to lay the new one. As a result, you should get an even side seam.

Step 3 Holding the mortar on a vertical edge with a trowel, lay the brick in the right place and press it against the bed of the previous row and against the spoon (or poke, depending on the type of masonry) of the adjacent block. Carefully pull out the trowel.

Step 4 By the same principle, lay the next brick. Adjust them in height with light strokes with the trowel handle, if necessary.


Step 5 Excess mortar that has flowed out of the horizontal and vertical seams, cut off with one movement of the trowel. The mixture can be sent to a bucket to its main part or laid out on top (in the case when the joint of pokes or spoons of two bricks is not sufficiently filled with mortar).


Step 6 Repeating the previous steps, lay out all the other bricks in the row.

Prices for cement and mixture bases
Cement and mixture bases
Video - Brickwork for beginner masons
Video - Mistakes of novice masons in brickwork
How to cut and split bricks
When working with brickwork, especially when using complex seam dressing patterns, there is a need for a large number of incomplete brick blocks - halves, quarters, etc. To obtain them, the material must either be split with a pickaxe or sawn with a grinder (or circular saw). In this section, you will learn how to do this. Let's start with breaking bricks.
Step 1. Examine the brick before splitting it. Pay special attention to the presence and depth of cracks. If they are and lie in the wrong place where you plan to split, it’s better to take another brick, since when working with such an instance there is a risk of getting a marriage.

Step 2 Take the brick correctly - the middle of the hand should be in the place where the split line is planned, but firmly hold both future halves with your fingers. Otherwise, one of the pieces of building material, when struck with a pick, may fly off and fall on your leg or split to a state of marriage.

Step 3 With the sharp edge of a pick, scratch an approximate split line on the brick.

Step 4 Apply a strong and fast blow along this line. The brick should then split into pieces of approximately the size you need. If you are working with large blocks, make several strokes or use the blunt part of the tool, not the pointed one.

Step 5 After the impact, divide the brick into parts of the size you need and set aside for storage. If necessary, they can be slightly beaten off along the cut with a pick to remove excess.

Now consider sawing a brick with a grinder. With this tool, you get excellent and even cuts of blocks, but the work must be done much more carefully and with the obligatory observance of safety precautions.
Step 1. Lay the brick on a level surface. It is desirable that it has slats or other devices for fixing building materials.

Step 2 Stand in such a way that neither your legs nor other parts of your body are on the cut line. You must be "away" from her. Thus, the risk of injury due to the sharp movement of the angle grinder "under itself" is minimized.

Important! Also keep in mind that no one should be behind you or in front of you - being close to strangers is a violation of safety regulations.
Step 3 Turn on the grinder and wait until its disk spins up. Then start the sawing process. In this case, the master stood up in such a way that the disk was spinning “away from itself” - the dust obtained during operation goes to the side, and not on it.

When you have finished sawing, gently lift the angle grinder up, turn it off and set it aside. Transfer the resulting halves (or 1/4 and 3/4 bricks) to a separate pallet or other storage location.
This method is used not only for facing the facade walls of various buildings, brick fences, gazebos and barbecues, decorative architectural elements are also erected in this way. What is "Bavarian bricklaying"? Read about it in
Related Articles