DIY vibration table. Do-it-yourself vibration table: manufacturing features and video instructions
The production of paving slabs, as well as products made of concrete, gypsum or building mixtures involves compaction of the working composition. Under the influence of vibration, the working solution fills the corner areas of the mold, acquiring increased strength and the necessary structure. To make concrete products intended for domestic use, you can make a vibrating table with your own hands. This inexpensive and easy-to-manufacture equipment is not inferior to industrial designs in terms of operating efficiency.
DIY vibration table
Let's get acquainted with the equipment - vibrating table
For machine molding of concrete products poured into special molds, vibration equipment is used - a universal molding vibrating table. It is possible to make a unit with your own hands, the main thing is to understand its purpose, structure and principle of operation. The equipment is a metal structure with a hinged working platform on which the poured forms are placed.
The plate makes up to three thousand vibrations per minute, which allows:
- increase the density of the concrete mass;
- increase strength characteristics;
- get rid of air inclusions.
As a result of the vibration effect, the concrete structure is compacted, which has a positive effect on the quality and service life of paving slabs and other types of products.
What is the vibrating table used for?
A small-sized vibration platform, manufactured in domestic conditions, is designed to solve a wide range of problems:

The performance of the device is determined by the area of the working plate, as well as the intensity of vibrations.
Vibrating table - design features
The platform intended for vibration molding is a mechanism consisting of the following elements:
- steel frame. It is a massive metal structure made of vertical posts, to which jumpers are rigidly welded;
- work plate. It is a horizontal base with a collar along the upper contour, limiting the mobility of the forms;
- vibration motor. When installing a motor for a vibrating table with your own hands, you need to pay attention to the mass of the eccentric that transmits vibrations to the plate;
- movable fastening unit. It provides connection between the plate and the frame. It consists of four spring elements installed in glasses;
- starting machine. It performs the functions of supplying and disconnecting voltage to the vibration motor, and also protects against thermal overloads.
When deciding how to make a vibrating table yourself, you should pay attention to its performance characteristics.
 What does a vibrating table consist of?
 The main parameters influencing the efficiency of compaction and the quality of manufactured products:
- amplitude of oscillatory movement;
- vibration motor shaft rotation speed.
To ensure optimal performance, it is necessary:
- choose the right eccentric design;
- select a mounting location for the vibration drive;
- equip the site with an electric motor of calculated power.
The selection of optimal modes is carried out experimentally.
How a homemade vibrating table works
Before making a vibrating table, it is necessary to study the operating principle of the unit.
The forming device works quite simply:

A homemade vibrating table from a washing machine and industrial equipment operate according to the same algorithm.
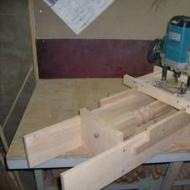
Getting ready to make a vibration table with your own hands - materials and tools
Prepare everything you need to make your own vibration table. The drawings allow you to determine the list of materials for its construction.
Need to prepare:

Installing a frequency regulator will allow you to change the intensity of molding when manufacturing products from various building materials.
We construct a homemade vibration table with our own hands - simple solutions
When planning to make a universal molding vibrating table with your own hands, you must purchase the drawings in advance or draw them yourself. It is important to determine the design features of the vibration unit. The following types of vibration compactors are used:
- molding equipment. It is used for vibratory compaction of concrete mortar poured into molds;
- unmolding device. Designed for removing hardened products from molds using a special device;
- non-standard design options. Used to make a limited number of products at home.
The advantage of the simplified design is the ability to assemble in a limited time without additional monetary costs using existing equipment and materials.
 Scheme of a simple vibrating table with your own hands
 The simplest options:
- based on automobile ramps. To assemble the tamping device, you need 2-3 slopes, a hammer, and a wooden board, the size of which allows you to place the molds. The compaction process occurs when the molds are placed on a wooden board located on the tires. When tapped with a rubber hammer, the concrete composition is compacted;
- using a drill or hammer drill. The design uses a slab made of metal sheet or plank board. The tabletop is placed on a horizontal base and rests against the wall with a damper made from a piece of rubber. When the hammer drill, connected to the opposite side of the base, is turned on, the material is compacted.
Other options are also possible, involving the use of an old washing machine, as well as used electric motors from household appliances.
We develop a drawing of a vibrating table
When developing a drawing for a vibrating table, you need to know how to do it correctly.
For this it is necessary:
- use verified documentation according to which the vibration platform was previously manufactured;
- independently develop a sketch using a working sample.
- the optimal dimensions of the tabletop are 50x100 cm;
- the distance from the floor to the work surface should not exceed 80 cm.
 How to make a vibration table yourself
 When developing a drawing, it is important to consider the following requirements:
- the engine should not touch the base or elements of the metal structure;
- the desktop surface is horizontal;
- the legs of the frame must be of equal length to ensure stability;
- Stiffening ribs are installed in the corners to increase stability.
Before developing working documentation, you must first determine the dimensions of the unit and the mounting location of the motor. It is advisable to place the vibration motor in the center of mass of the entire metal structure.
Selecting a motor for a vibrating table
Various motors can be used as a vibration source:
- used or new motor up to 1000 watts. It is capable of transmitting vibration to a tabletop with dimensions of 0.8x1.5 m. Two eccentrics must be fixed to the drive shaft of the electric motor, the angular position of which can be changed. This will allow you to regulate the amplitude and strength of vibrations;
- industrial vibration motor. It must be attached to the surface of the desktop. The standard vibration motor is equipped with eccentrics installed on opposite sides of the shaft. By adjusting the relative position of the imbalances, you can change the level of vibration exposure.
In a homemade version of the vibration drive, the motor shaft bearings are subject to increased loads under the influence of alternating vibrations. The purchased vibrator, which has an increased service life, does not have this drawback.
 Motor for homemade vibrating table
 You can also attach a shaft on bearing supports, which has an offset center of gravity, to the lower plane of the table. Using a belt drive, the structure can be connected to the motor pulley. The level and direction of vibration in this embodiment is regulated by the position of an eccentrically fixed load.
How to make a vibration table with your own hands - drawings and instructions
Using pre-developed drawings, it is easy to make a vibration platform, guided by the following algorithm:

It is important to reliably weld frame parts that absorb vibration loads.
How to make a vibration table with your own hands without mistakes
When performing work, pay attention to the following points:
- the presence of a side around the perimeter of the table;
- possibility of adjusting the amplitude of oscillations;
- reliability of fastening the frame to the floor;
- quality of welds;
- horizontal position when installing the countertop.
Making the site according to the drawings will avoid mistakes.
Making a vibrating table with your own hands - safety requirements
When assembling the device, observe safety precautions:
- use safety glasses when welding and working with an angle grinder;
- ground the power tool and the device drive;
- perform welding work in special clothing.
Don't forget that there should be a fire extinguisher in the room where you cook.
Conclusion
The recommendations will help you make your own vibration pad. The manufacturing technology is simple. It is important to carefully consider the design features, take the development of the sketch seriously and follow the sequence of operations. A self-made unit will provide effective compaction of products at home.
In order to mechanize this process and make the work easier, a mechanical device with an electric drive can be made. Such a mechanism will be especially relevant if it is necessary to prepare large quantities of building mixtures from bulk materials.
Such a device is called a vibrating sieve or vibrating screen. It has a fairly simple design, and therefore it is not difficult to make a vibrating sieve with your own hands.
General design
Making a vibrating screen for sand or crushed stone does not require a lot of time. The design description of the vibrating sieve includes the following elements:
- supporting frame on which all other parts and assemblies are located and secured;
- electric drive, which can be used as a power saw, jigsaw or drill;
- an external box (frame) without a bottom, mounted on fixed furniture casters;
- guide rails made of metal corners for moving rollers along them;
- nestable box with a metal mesh bottom;
- a chute for transporting sifted material to a collection bin;
- a device for adjusting the rotation speed of an electric motor.
The transport chute is easiest to make from plywood, but a metal structure will be much more reliable, especially when sifting gravel or other coarse materials.
A device for adjusting the rotation speed may already be provided in the design of an electric drill or jigsaw. In this case, a separate external regulator will not be needed.
The principle of operation of a vibrating sieve for bulk materials is to transmit translational movements from a power tool to a frame with a fixed sieve. After sifting the materials, the internal wooden frame with the sieve is raised and unnecessary screenings are dumped.

Necessary materials
To make a frame, two drawers and other elements of the mechanism, you will need:
- wooden blocks 60x70 mm;
- plywood 20 mm thick;
- 6 rubber or spring shock absorbers;
- 4 or 6 furniture casters with mounting frame;
- piano loop with a length of at least 500 mm;
- metal corners for guide rails;
- metal plates or strips to strengthen wooden structural parts;
- screws, bolts and nuts.
Particular attention should be paid to the strength of the piano hinge, since when the screenings are thrown away, it will be subject to significant mechanical loads.
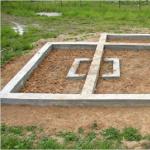
Dimensions of main structural elements
Before starting to assemble a sand vibrating screen, it is recommended to draw an assembly diagram or a simple assembly drawing. This will simplify the assembly work and help determine the order in which they should be performed.

- length 1400 mm;
- width 600 mm;
- height 850 mm.
The length of the outer box without a bottom should be equal to half the length of the supporting frame. The width is 100 mm less than the width of the base, the depth is at least 120 mm.
The dimensions of the inner box with a mesh bottom should ensure its easy removal from the inner frame for free overturning and release of accumulated waste. The outer and inner boxes are connected along the short side with a piano hinge, as a result of which there is the possibility of lifting and tilting the inner structure.

Assembly order
The production of a vibrating sieve begins with the assembly of a supporting frame from wooden blocks in accordance with the drawing. To increase the strength of the structure, it is recommended to make connections of wooden parts with reinforcement with metal corners and plates.
After this, guide rails must be secured to the inside of the base frame as a support for the movement of furniture rollers. The guide angles are fastened together into a single structure using transversely installed wooden blocks. To reduce vibration levels during operation, 6 or 8 rubber shock absorbers must be installed between the corners and guides.
To secure the drive for a vibrating sieve made from an electric drill, jigsaw or saw, on one side of the upper part of the support frame it is necessary to provide a platform corresponding to the size of the power tool.
After the support frame is assembled, a plywood gutter is made and installed. The processed material will flow through it into the collection container. A metal gutter is more difficult to make, but it will provide a longer service life.
 At the next stage, a sifting structure is assembled from two boxes, one of which with a sieve is inserted into the second.
 On one short side the boxes are fastened together using a piano hinge.
 Furniture rollers are attached to the bottom of the outer box without a bottom (frame), which ensure ease of movement of the boxes along the rails on the supporting support.
 The size of the metal mesh cells is determined by the fraction of the bulk material that will be sifted. Fastening the mesh to the frame is best done using metal tape and self-tapping screws.
The working body of the power tool is connected to the external movable box using a spring connection, which will provide smoother vibrations during operation of the mechanism. Translational movements from the electric drive are transmitted to the boxes, and as a result of their vibrations along the guides, the material poured into the inner box with a mesh is sifted.
The electrical power consumption of the mechanism depends on the power of the installed power tool. It should be noted that the more powerful the electric saw, the larger the dimensions of the vibrating sieve can be made and thereby process larger volumes.
 If you use an eccentric, then you can use an electric drill as a power unit. In this case, the tool is installed sideways to the drawers and the drive mechanism will perform oscillatory movements.
 Oscillation speed control unit
Manufacturers of power tools produce models with or without the ability to adjust the motor speed. In the second case, the oscillations of the electric saw may be too frequent, and an additional external device for adjustment will be required.
A rheostat-type regulator can be purchased at electrical supply stores. At the same time, it is recommended to buy a circuit breaker, which will provide additional protection for the tool and its long-term operation.
As a result, you will be able to provide any required vibration frequency of the working boxes of the vibrating screen, depending on their load and the weight of the material being processed, without overloading the electric drive.
Protecting the electric drive from dust
During work, especially with materials such as cement and dry glue, dust is generated that gets onto the electric drive. Therefore, it is recommended to cover the installed electric motor with a protective casing, the design of which should not block the ventilation holes of the tool. Such a casing can be made from a 2-liter plastic bottle.
The finished assembled vibrating sieve and its operation can be seen in the video below.
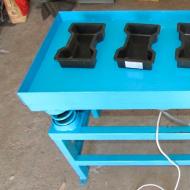
Handicraft production of paving slabs for one’s own needs must be carried out in compliance with technology. You need high-quality components, vibrating tables, plastic molds, drying racks. But a vibrating table for paving slabs is not cheap. You can make it yourself, saving money. We suggest you study the information about this.
The vibrating table is designed to compact the concrete mixture and displace air from it. This allows you to obtain a homogeneous concrete structure, which is important for high-quality tiles.
There are various designs of vibrating tables.
The main parts that make up the device:
- Rectangular cabinet with springs fixed at the corners.
- Metal tabletop with sides.
- Electrical engine.
- Belt drive system with pulleys and eccentric.
A forming vibrating table for making paving slabs works as follows: rotation of the electric motor shaft with an eccentric attached to it transmits vibration through a belt to a pulley and then to the tabletop.
Another option does not involve a belt drive: a motor with an eccentric (or a ready-made vibration motor) is attached directly to the tabletop from the back.
It should be kept in mind: a molding vibrating table can be used to knock finished products out of molds, for which it is necessary to install a nozzle with tile-shaped holes on top of the tabletop. In addition, it can serve as a sand sifter; for this purpose, the structure is supplemented with a fine-mesh steel mesh.
Making a vibrating table: tools and materials
To work you will need the following:
- grinder with a circle for cutting metal;
- welding machine;
- roulette;
- profile pipe with a cross section of 40×20 mm;
- metal sheet 3 mm thick;
- corner 40×40×2 mm;
- steel springs.
The springs will fit from a moped or from a Kamaz timing belt. As a motor, you can use a single-phase platform vibrator VI-99E or VI-98E, the rotor of which makes 3000 rpm. The design of the vibrator allows you to select the optimal vibration frequency by changing the position of the eccentrics.

DIY vibration table for paving slabs
After you have everything you need at your disposal, you need to make a working drawing of a vibrating table for paving slabs (can be done by hand) indicating the exact dimensions.
How to make a vibrating table for tiles: step-by-step instructions
Further work is carried out in this sequence.

Tip: the vibrating table should not be higher than 900 mm, otherwise the stand will not be stable. A device that is too low (less than 750 mm) is not convenient to use.
Vibrating table for paving slabs: video with comments from the designer.
How to make a vibrating table for paving slabs using a conventional asynchronous electric motor
If you have a suitable asynchronous electric motor at your disposal, it can be adapted for a vibration table. To do this you need to do the following.
- Excess parts are removed from the drive shaft.
- The shaft is cleaned on both sides for welding M12 type bolts.
- Using an emery wheel, the bolt heads are processed and welded to the shaft.
- Two identical parts about 150 mm long are made from a profile pipe. At the edge of both parts, which will serve as eccentrics, holes are drilled for attaching bolts to the threads.
- The eccentrics are fixed to the shaft with nuts. They should be oriented in one direction. The threaded connection is tacked by welding.
- The motor is installed in place and a test run is performed, while there should be molds with tile mortar or a replacement weight on the countertop. If the vibration is excessive, the eccentrics will need to be shortened by cutting them with a grinder. The vibration amplitude can be increased using a jumper welded between the eccentrics.

How to make a vibrating table designed for the production of large quantities of tiles

Now you know how to make a vibrating table yourself and save money.
The process of self-manufacturing various products from concrete, gypsum and other mixtures requires careful compaction of the mass and removal of air from it. The best assistant in this situation will be a vibrating table. How to make this device with your own hands will be discussed in our article.
The basis of the design of the vibrating table is the table itself, consisting of a base and a tabletop platform moving within a small range. The best material for their manufacture, undoubtedly, are metals and their alloys, which have high strength. The most accessible of these is steel. It is better to connect the finished parts of the base and tabletop using welded joints.
Based on the above, to make your own vibrating table you will need:
- grinder with cutting discs for metal;
- welding machine;
- several linear meters of steel angle 50x50 or steel rectangular profile of the same section;
- steel sheet 3-5 millimeters thick, the dimensions of which are equal to or greater than the dimensions of the tabletop.
Let's start the work by making the base. To do this, make a rectangular frame from four pairs of equal sections of a profile or corner, connecting the parts at the joints with a weld. Make sure that the frame is perfectly flat and square. This can be achieved by cutting the workpieces strictly perpendicular to the axis and welding the parts on a flat base, controlling the equality of the diagonals.

At the corners of the frame, attach four equal segments - the legs of the base. To give additional strength to the connection, which is especially important when making massive products, for example, concrete blocks, weld steel gussets made of 3 mm thick sheet at the joints. After assembly, check that the top of the base is level. If necessary, use a grinder to lightly trim the bottom of the legs.

Manufacturing of vibration platform
In addition to the base, it is necessary to make a movable tabletop. It will consist of a rectangular frame, the dimensions of which are identical to the dimensions of the table base frame, and a steel tabletop. When making the second frame, it is necessary to weld an additional steel block in its middle, on which we will make a small platform for attaching the vibration source.

Particular attention should be paid to the method of attaching the movable working platform of the table to its base. To maintain and enhance vibrations, it is necessary to achieve limited mobility of the tabletop. Most often, strong steel springs that work in compression are used for this (with a large distance between the coils). To install and fasten these elements, scraps of steel pipe of a suitable diameter are welded into the upper part of the base frame and the lower part of the tabletop frame. By selecting a sufficient length of scraps, you can avoid welding the springs to the table parts, which will greatly facilitate their further replacement in the event of a breakdown. Springs can be purchased at an auto parts store.

If the springs are installed correctly and the lengths are equal, the base and the vibration platform should be parallel to each other after assembly.

In addition to coiled springs, it is quite possible to use loops made from a durable cord or rope. Four rope connections at the corners of the base will center the top platform.

Factory and homemade vibrators
An essential part of any vibrating table is a source of vibration - a vibrator, which can be industrial


or self-production. As a rule, it is an electric motor with an eccentric attached to its shaft - a unit whose rotation is carried out with a certain offset relative to the geometric center or center of mass.
The design of factory eccentrics can be different and depends on the required operating parameters of the device. More powerful vibrators have a flat plate structure. They are adjusted by fixing the plates together at different angles of rotation.

When making an eccentric for a vibrating table with your own hands, various methods are used to adjust the displacement of the center of mass of the flywheel. One of them is to use a screw of sufficient length, fixed in various positions with a lock nut. Vibrations are increased by unscrewing the bolt, and reduced by screwing it into a hole in the flywheel fixed to the shaft.

Another option for using threaded parts is to use a nut-bolt pair with M10-M14 threads. The part with the hole is welded to the motor shaft, a bolt is screwed into it and locked in different positions, depending on the required operating parameters.

Vibrating table on a tire
In addition to the described options for self-made vibrating tables on a metal base for the production of small products using cold casting, we can recommend a fairly simple version of the device. We are talking about a vibrating table on a car tire.

It is a flat base made of a piece of chipboard, OSB or thick plywood, in the center of which an independent low-power vibrator is attached. The basis of such a vibrating table is a tire of any diameter.

As a source of vibration, you can use the most affordable options for electric motors from various household appliances, for example, washing machines.

The tire is fastened to the working platform using bolts or self-tapping screws. You can also attach a homemade vibration source to screws.
If necessary and convenient to use, it is possible to use a pyramid of several tires.

Thus, using the simplest materials, it is possible to make working devices that will greatly facilitate the process of making concrete or gypsum casting, and will also help to significantly improve their quality.
Videos on how to make a vibrating table yourself:
Dear readers, if you have any questions, please ask them using the form below. We will be glad to communicate with you;)
How nice it is to have your own country house or dacha with beautiful green lawns and smooth paths made of paving slabs.
If you don’t have a lot of money to purchase this decorative element, then you can put in a little effort and make a vibrating table for making paving slabs with your own hands.
What it is
This is a simple design with which tiles of various sizes and shapes are made. You can do it yourself using available materials.
To make this homemade device, we will need: a motor (you can use an electric motor from a washing machine), drawings that can be downloaded from the Internet, springs and several corners and channels.
In general terms, this device looks like this: a metal base, on top of which the upper plate is secured with the help of springs and at the bottom an electromagnetic motor that will drive the plate.
Vibration is needed to remove air bubbles and voids from the mixture, which gives excellent quality of the finished product.
Advice: In order for the vibrating machine to work properly and the products produced on it to be of high quality, choose a perfectly smooth material for the tabletop and a stably operating vibrating motor.
If you overlook these two points, the device will produce uneven tiles even in specially purchased molds.
What do we need
 When making a vibrating table yourself, you will need a welding machine and the ability to use it. Here are the most optimal sizes: width – 70 cm, height – 80 cm, length – about 200 cm.
To make table legs, use a rectangular profile pipe, since in the process of making paving slabs, the legs will use heavy loads due to the operation of the vibration motor. After about 30 centimeters, weld the cross members for a more rigid structure.
The material used for the tabletop is a steel sheet with dimensions of 2x0.7 m and a thickness of 5 mm. 4 cups on each side are welded onto the subframe and the main frame of the vibrating table and the springs are secured in them using bolts, connecting the frames of the table and table top.
If the glasses are more than 2 cm high, then the springs do not need to be secured with bolts. There are cases when a vibrating table is made without using cups for springs.
In terms of manufacturing, this design is undoubtedly simpler - the springs are immediately welded to the main frame and to the tabletop frame. But it has several significant disadvantages:
- firstly, this structure is not collapsible, and if you need to move it to another place, it will be a difficult task;
- the second disadvantage is the impossibility of horizontal adjustment of the tabletop (in the case of glasses and bolts, such a problem does not exist) and, as a result, defective products.
You can download drawings, photographs or a diagram for free on the Internet, or watch a video about making vibrating tables. The middle of the subframe is the most loaded part, since the electric motor is attached to it using brackets. It is he who will put our table, made at home, into operation.
It is important to know: The motor must be placed so that its shaft is along the length of the table.
 Any eccentric that you have at hand is attached to the end of the electric motor shaft. A good solution would be a flange with holes drilled for fastening on one side of the load.
Unfortunately, it is not possible to immediately find out the exact weight of the load - since there are many options for the engines used in the construction of the vibrating table. Each weight must be selected individually, based on the number of engine revolutions and its power.
Important - do not overdo it with the weight of the load, otherwise strong vibration will quickly damage the electric motor and it will have to be replaced. Cargoes are relatively cheap and can be bought used for a few hundred rubles.
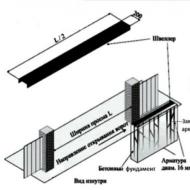
Make sure to install special protection where the eccentric is attached in case it suddenly becomes detached from the motor shaft. Make a hole at the edges the width of the vibrating table and install removable sides for ease of making paving stones.
At the very end of the legs, weld fasteners to secure the vibrating table to the base (for example, a concrete floor). You can use a rubber pad or a sheet of plywood as a gasket.
Selecting the right engine
 Most likely, this is the most crucial moment in the process of manufacturing a vibrating table.
As already written above, an engine from an old washing machine is very suitable, but its disadvantage is its fragility: it becomes unusable very quickly, the maximum lasts about 30 operating cycles. As a rule, the bearing either jams or the shaft becomes loose.
If you approach the manufacture of a vibrating hopper responsibly, we recommend installing a potentiometer with which you can adjust the vibration frequency. This will help you set the vibration frequency that is suitable for the type of solution you need.
Take note: The ideal solution would be the IV-99 vibrator. It costs about 6,000 rubles, which in principle is not that much. The attached instructions tell you how to prepare this engine for operation.
Small tricks in making a vibrating table:
- Pay careful attention to the choice of material for the slab. Basic requirements: to be solid and to withstand both vibration and static and dynamic loads;
- calculation of vibration amplitude. The quality and appearance of the manufactured products will depend on the amplitudes;
- place the engine in a certain place, according to the drawing.
So, you managed to make your own mini machine for the production of paving slabs at home. You not only saved your money (it would have cost several times more money to buy a new table), but also got the opportunity to make tiles of the sizes and shapes that you like.
How to make a vibration table with your own hands, see the instructions in the following video:
Articles on the topic