How to plant mint outdoors. Mint: planting and care in the open field in the country
There are several common ways to grow mint at home. If you create all the necessary conditions, a fragrant plant will delight the harvest all year round. It is important to choose the right container for planting, soil, create the optimal temperature and humidity. Care does not take much time, the main thing is to water it on time and apply the necessary fertilizers.
Subject to the rules for growing herbs, you can get a good harvest in an apartment in winter. There is nothing difficult in the process of planting and leaving. The plant is unpretentious and does not require much attention.
The main thing is to choose a container, fill it with suitable soil and decide how the mint will be planted. In the future, set the mode of irrigation and fertilization.
A container with seedlings is placed on a light windowsill, insulated loggia or veranda. Plants should not be exposed to direct sunlight and there should be no drafts.
Suitable varieties for home growing
For growing at home, mint varieties with small roots and not too sprawling greens are chosen.
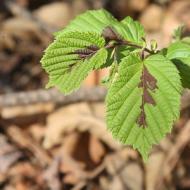
- Mint Vegetable fun is a perennial herb. The stem reaches a height of 55 centimeters. The leaves are small, oval in shape, with carved edges. Greens are characterized by a pleasant aroma and a refreshing aftertaste.
- Variety Zhemchug is characterized by a pleasant mint aroma. The dark green leaves are oval, slightly wrinkled. The plant is compact and does not take up much space.
- The ceremony is distinguished by a delicate sweetish aroma. The stem stretches up to 70 centimeters. The leaves are oval-elongated, with a wrinkled surface and a slight edge.
- Pennyroyal is characterized by a creeping form of growth. On numerous shoots, small leaves with a pleasant delicate aroma are formed.
- A compact upright variety of mint Moskvichka stretches up to 70 centimeters in height. The leaves are dark green with a slight pubescence. High immunity to many diseases and pests.
There are three main ways to grow any chosen mint variety.
How to plant and grow on a windowsill
There are several ways to grow mint at home:
- The hardest thing to grow mint is through seeds. You will have to wait more than 2 months for the harvest.
- It is easier to grow mint on the windowsill with shoots. Lateral shoots are cut from an adult bush in the garden, stepping back from the central stem 1.5 centimeters. Cut shoots are placed in a glass of water until roots appear, after which they begin to plant in the soil. Choose twigs with smooth straight leaves, without damage. A fresh harvest can be harvested in 3-4 weeks.
- Plant mint and root cuttings. Each cutting should have a bud and a couple of leaves. They are planted in a prepared hole, sprinkled with earth and watered. You can harvest after a month.
Whatever method is chosen for growing mint at home, it is necessary to create conditions and properly care for the plant. Only in this case it will be possible to harvest fragrant greens.

Preparing seeds and cuttings for planting
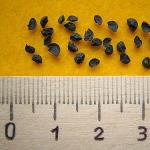
Mint seeds are best purchased at a specialized store. Self-collection of seeds is a laborious and complicated process. Even if it is possible to collect planting material, the plant will differ from the original version not only in appearance, but also in aroma and taste.
- So that seedlings appear faster, the seeds are soaked.
- As soon as the first shoots hatch, they begin to plant in the soil.
- For a week, the container with seeds is covered with a film and cleaned in a warm, dark place.
- After the appearance of most of the seedlings, the container is moved to a bright place.
If it is supposed to grow mint by cuttings, then cut off the upper shoots of an adult plant, 10 centimeters long. The cuttings are first placed in water. As soon as the roots appear (after about 1.5 weeks), you can start planting in a prepared container with soil.

What should be the place
In the apartment, you should choose the most illuminated window sill, best of all on the western or eastern side. Lack of light leads to stretching of the stem of the plant and a decrease in the content of essential oils. At the same time, seedlings need to be protected from direct sunlight, which can burn the greens.
The plant develops well at room temperature from +20 to +25 degrees. The spice loves moist air, so it is recommended to put a container of water nearby.
Where to plant
When choosing a container, you need to consider the amount of desired crop. If a few branches are enough, then you can use flower pots. To get a large crop, you will need a large container.

The mint root system does not go deep into the ground, so it diverges close to the surface. It is better to choose shallow containers with a large diameter. At the bottom of the pot, holes must be made that will not allow excess liquid to stagnate. Drainage is placed before filling the container with soil.
What kind of soil to plant
The soil for mint should be loose, light, fertile, with normal acidity and high aeration. The soil can be bought or mixed by yourself. Humus, peat and sand are added to the ground from the garden. These components create additional nutrition for the plant and improve the access of oxygen to the roots. Then the resulting mixture is calcined in the oven.
The acidity level should be neutral. Low acidity leads to a decrease in the content of essential oils in greens. Increased acidity causes a slow development of the plant.
Landing
In the prepared soil, grooves are made 5.5 millimeters deep, and the seeds are laid. The furrows are watered, sprinkled with earth, covered with a film. The container is moved to a warm, bright place. After 2-3 weeks, the first shoots should appear.

The temperature regime necessary for the normal development of the plant is in the range from +18 to +24 degrees. The container with seedlings is moved to the most illuminated window sill.
You can prepare for planting not only seeds, but also cuttings. Plants are dug up in autumn. The rhizome must be taken along with an earthen clod. Before planting, the rhizome is divided into several parts. It is important to ensure that there are kidneys in each separated part.
The cuttings are planted in pots with prepared soil. Holes are made, at the bottom of which wood ash is laid. The stalk is planted in a hole, sprinkled with earth, compacted and watered. In two weeks, the first, fresh leaves will appear.
plant care
Caring for mint is easy. In winter, reduce watering and make sure that the soil does not become waterlogged. In winter, plant growth slows down, and the need for moisture and nutrients decreases. It is recommended to carry out regular spraying of greens from a spray bottle. The place must be protected from drafts.

In the summer, do not allow the soil to dry out. The lack of moisture leads to the death of the plant, the risk of developing diseases and the appearance of pests also increases.
As soon as the first shoots appear, the seedling container is moved to a lighted place. With a lack of light organize artificial lighting. The optimal temperature in the room is considered to be the border from +20 to +25 degrees.
Watering rules
Mint should be watered only with warm, preferably settled water. The best time for watering is considered to be the evening hours, when the sun's rays cease to penetrate the room.
top dressing
Mint does not need frequent feeding. It is enough to feed once a year, best in summer. In winter, the plant is at rest, and additional nutrients will contribute to the growth of shoots.

A week after planting, it is recommended to feed the plant with a solution based on urea (2 grams of urea are taken per liter of water). Nitrogen-containing fertilizers should not be applied, as they reduce the content of essential oils in the composition of the plant.
Diseases and pests
Diseases that can harm the development of mint:
- rust - manifested by dark red spots on the inside of the leaves (excessive soil moisture, cold air, excess nitrogen in the soil provokes a fungal disease);
- powdery mildew is distinguished by a whitish coating resembling flour;
- verticillium wilt begins with blackening of the upper leaves of the plant;
- in the case of the appearance of brown spots on the leaves, they speak of a disease such as anthracnose;
- septoria is accompanied by the appearance of black dots and brown spots on the leaves.

The fragrant plant is attacked by many pests. Among the frequently encountered insects are.
All lovers of herbs that give dishes and drinks a special taste have ever wondered how to plant mint. Its leaves are rich in essential oils, the combination of which creates that very special fresh invigorating aroma. This plant is truly versatile. All over the world it is actively used in cooking, medicine, perfumery, cosmetology, added to toothpastes and powders. It is not difficult to grow it in the country, because the culture does not impose strict requirements on breeding conditions, and caring for plantings will not take much time.
Choose a plot
Under the cultivation of mint, it is better to take a sunny place, where there is a shadow at noon. Its bushes develop faster with a long daylight hours. Constantly being in dense shade near the walls of buildings or under sprawling trees, they will not die or wither, but their growth will slow down.
Peppermint is undemanding to soil quality. Ideal for her soil, corresponding to 5 conditions:
- easy;
- porous, freely passing air and moisture to its roots;
- containing a lot of moisture, but not waterlogged;
- rich in humus;
- loamy or sandy.
If the soil on the site contains a lot of lime, this will not be an obstacle to growing mint, but its leaves will exude a weaker aroma. Dense clay soil, in which water stagnates for a long time, is contraindicated for culture. Even competent care on such land will not save the plants.
Before planting mint, the site is prepared in the standard way: weeds are selected, dug up, and fertilizers are applied. Both organic and mineral compositions are suitable for her. The height of the beds is determined by the type of soil. If it dries quickly, it is better to make them low. This will help keep the moisture the mint needs in the ground longer. If the soil in the country is damp, it is worth pouring high ridges. They will protect the roots of the plant from decay.

Neighbors and predecessors
Mint will be a good neighbor for almost all garden crops. It will attract pollinating insects to them, scare away many dangerous pests, and improve the taste of ripe vegetables. Experienced summer residents advise planting it next to tomatoes, cabbage, and beets. And if ordinary nettle is next to mint, its leaves will smell even stronger, because more essential oil is formed in them.
An important point: if the plantings suffer from diseases or pests, no care will help to save them. Treating mint bushes with fungicides will make them unsafe to eat or for medicinal purposes. To prevent infection, it is better to place them away from flower beds, beds with vegetable crops and herbs - at a distance of at least 60-80 cm.
So that the cultivation of mint does not end in failure, air must circulate freely between plants and easily penetrate to their roots. Good drainage is also important. Plantings should be inspected regularly, paying special attention to the inside of mint leaves, where insects like to hide. Having found pests, they are washed off with a pressure of water from a hose.
Peppermint develops well after legumes, root crops, perennial grasses. Her root system is powerful, so it is better to make the beds for the plant separate, otherwise it will simply clog the neighbors. The site for mint often does not have to be changed. In one place, its bushes can remain up to 10 years. But from time to time they will have to be updated.
Mint is suitable for rock garden. And if you plant it en masse, its bushes will quickly cover the soil with a decorative green carpet.

generative reproduction
For the first time, you can grow mint on the site from seeds. For further propagation, cuttings and rhizomes obtained from an adult bush are more often used. It will take less time to care for them, and they will grow faster than seedlings. Seedlings are obtained from mint seeds, which are then placed in open ground. They are sown in mid-spring. Since they are very small, during the procedure it is more convenient to use a stick with a pointed end, which is periodically dipped in water. You can also take a special syringe for seeds.
The container for seedlings should be wide and shallow. It is filled with a nutrient substrate. When sowing mint seeds, they are not buried, but only slightly (maximum 5 mm) are pressed into the soil. Then a cling film is stretched onto the landing container. You need to place it in the sun, you can even put it on an unglazed balcony if it's warm outside. For germination of mint seeds, it is necessary that the air be warmed up to 21-24°C.
When seedlings hatch, care for them will include only regular watering. After they get stronger, they dive into separate pots and put in a cool place. Seedlings are planted in open ground towards the end of May, when 3-5 pairs of leaves are formed on them. The cultivation of mint at home is also widely practiced. Planting with seeds can be carried out immediately on the beds, but this is not very convenient due to their small size.

Other breeding methods
Peppermint is propagated by cuttings or rhizome segments. Both methods allow young bushes to retain all the properties of the mother plant. Mint cuttings can be cut when they have 5 leaves and a renewal bud is formed. Their length should be 7 cm. Having placed them in the prepared ridge, the mint cuttings are sprinkled with soil and watered abundantly. They don't take long to root.
There is another popular way. The cut cuttings are placed in a container with water and kept in it until the roots appear. They do not require any care at this time. It will only be necessary to add water from time to time as it evaporates. Then the cuttings are planted on the beds with an interval of 20-30 cm.
If you need to get pieces of mint rhizome, it is removed from the ground and slightly dried. The division is carried out so that each part consists of 10-12 knots. The resulting rhizomes are placed in shallow (8-10 cm) holes. They are made at a distance of 30-40 cm from each other. When planting a delenka, a handful of humus is thrown into the hole.

Landing Rules
When growing mint in open ground, you need to take into account the characteristics of the culture. Her bushes develop rapidly, giving many shoots and filling the garden bed. So that the site does not turn into continuous thickets of mint over time, the space allotted for it must be limited by driving sheets of slate or metal into the soil. Iron hoops cut from old barrels will also help in this.
It is better to place mint of different varieties in the garden. Pepper, curly, fragrant, apple varieties of it are perfectly combined with each other and pleasantly diversify the menu.
Before planting plants, the soil is enriched with the following fertilizers:
- humus;
- potassium chloride;
- ammonium nitrate;
- superphosphate;
- wood ash.
Having dug up the soil by 20 cm, level its surface and make a bed with wide (40 cm) row-spacings. Mint bushes are planted at intervals of 30-50 cm. The rhizome is buried in the soil to a depth of 5 cm. The plants will bush if you pinch their tops. Do this when their height is 20-25 cm.
Spring (in April-May, depending on the region) and summer (in August) planting of mint is practiced. In both cases, the procedure is completed with abundant watering. If planting a crop on the beds is carried out with seeds, the furrow prepared for them is thoroughly moistened, and after sowing, lightly sprinkled with dry soil. It will act as a mulch.

Agricultural technology
The care of mint growing in the country is almost not required. Newly planted bushes are watered frequently. It is better to do this in the evening hours. Mature plants moisten less frequently. In rainy summers, mint will have enough natural precipitation; in dry weather, it is watered once every 1.5-2 weeks. Landings need to be regularly weeded and loosened. Mint roots are located almost at the surface of the soil, so weeds greatly interfere with them. It is more convenient to perform such care after watering or rain, while the earth has not yet dried out. Moist soil makes it easier to remove weeds without damaging the mint roots.
The culture responds well to top dressing. It is better to take preparations with a high content of nitrogen and phosphorus for them, but you can also get by with organic compounds - rotted manure or compost. Especially important for mint is care in the form of dressings during the period of active growth of its bushes - in the spring. In the future, the beds are mulched from time to time, adding wood ash to the compost. In autumn, professionals recommend digging deep into the soil, adding semi-rotted manure (2 kg per 1 m²) to it.
Landings must be monitored to prevent their thickening. Because of it, powdery mildew can affect mint.
If you want to get bushy plants, they are periodically trimmed, shortening the top. Then the mint stops reaching up and begins to actively form side shoots. As a result of fragrant leaves, more can be harvested from it. If the mint bushes are very tall, you should pay more attention to watering. Usually the plant reacts this way to a lack of moisture.

Harvest and prepare for winter
Most of the essential oils in mint leaves accumulate when the plants are in bloom. You can collect them in different ways: cut with scissors, cut off, pinch. After removing part of the shoots, the bush will begin to intensively form new ones. To stock up on useful mint for the winter, the branches cut from it are tied into bunches and hung in a dark place. An attic is ideal for these purposes.
You can do it differently: wash the leaves and shoots cut from mint and lay them out on paper. When dry, they are crushed or left whole. Then the mint is placed in a container, tightly closed with a lid and placed in a cool and dark place. To keep herbs fresh, store them in the refrigerator. After cutting and washing the mint shoots, they are first placed on moistened gauze or a thin cloth, and then in a container. You can do without an additional layer in the form of fabric, but then the storage temperature should be 0 ° C.
If the winter is harsh, the plantings may die. Mint is prepared for the onset of cold weather, reliably covering the beds with heat-saving materials:
- dry soil;
- straw;
- sawdust;
- peat;
- spruce branches;
- needles.
Competent care includes periodic renewal of plants. Every 3 years, new bushes are planted on the garden bed. This minimizes the losses that weeds cause to mint and prevents it from degenerating. Heavily overgrown bushes are pruned, leaving 2-3 cm above the ground. They are watered abundantly and waiting for a new crop, which will appear very soon.
Growing herbs has become a tradition for many summer residents. And mint occupies one of the first places in the list of their preferences. It will fill the garden with an enchanting aroma, reminiscent of sun-drenched forest lawns and the coolness of the sea breeze. Tea made from mint will perfectly quench your thirst and refresh you on the hottest day. It will calm the nerves, help with depression, inspire pleasant dreams.
Mint leaves can be added to cocktails, kvass and fruit drinks, decorate desserts with them, prepare syrups, tinctures and marinades from them. They are also used for conservation. Fragrant baths are taken with mint, and broths from it are highly appreciated by bath lovers. It will become an excellent assistant in the fight for the health and beauty of the skin. Plant mint in the country and experience all its beneficial properties!
Mint is a delicious and versatile spice that can be added to fruit salad, lamb or fish dishes, tea or smoothies. There are many different varieties of mint, all of them are unpretentious, and with the right care, will grow with you for many years. However, mint grows very easily and will compete with surrounding plants for territory if allowed to grow unchecked. To successfully grow mint, you need to plant it in individual containers or find a way to keep the mint roots from growing outside of the area allotted to it.
Steps
Part 1
planting material- Add to a glass of water as needed. Be sure to change the water every four to five days to prevent rotting.
-
Buy mint seedlings. Seedlings are sold in nurseries and garden shops. There are many varieties of mint, such as sweet mint, chocolate mint, spearmint, lemon mint, apple mint, peppermint. Spearmint is most commonly used as a culinary spice. Mint grows very quickly, so it is ideal for beginner gardeners.
Use a container when planting outdoors. If you want to grow mint in a flower bed, you should plant it in a pot or net at least 12 cm deep and place it in the ground along with the container. The rim of the container should remain above ground level so that the root system of the plant is always in the container. If you don't, the mint will grow and take over your flower bed like a weed.
- You can also plant mint in a raised bed that won't have any other plants, on a bare patch of ground that you want to fill in with greenery, or in an area of the garden where brick or wood structures create a natural barrier for the mint.
Take a cutting from an adult mint plant. Mint is difficult to grow from seed, and almost impossible for species like peppermint, for example. Cut a cutting about 10 cm long, 1 cm away from the node (the place where the branch is attached to the stem), so that a new branch will grow from the cut. It is not necessary that there are a lot of leaves on the cutting: almost any cutting can take root. Place the cutting in a glass of water and remove any leaves that are under the water. After about a week, small white roots should appear on the underwater part of the stem. Wait a few more days or a week, let the roots get stronger and grow in length.
Part 3
mint care-
Water the mint frequently. In the first year of growth, mint should be watered frequently. Dip your finger into the ground to determine how dry the soil is. The soil should be moist, but not too wet. If your mint grows in full sun, water it more often. Regularly check the condition of the soil to water the mint enough, but not overwater.
Pinch off the top of the plant. This will keep the mint from growing too high and allow side shoots to develop. In addition, this way you will get the best harvest. When you check to see if it's time to water the mint, pay attention to whether it is too tall.
To keep the plant compact, pick off the buds. Mint has small flowers and usually blooms from June to September. Pick off buds before flowering so you don't lose control of the plant's growth. Pinching out the buds will also extend the mint harvest season.
Plant mint every two to three years. After five years, the mint will fill the entire container, the roots will become cramped. Carefully remove the plant from the pot, carefully divide it into several parts. Repotting your mint every 2-3 or even 3-4 years will allow the plant to maintain a great strong fragrance.
If mint is affected by rust, treat it with fungicides. Rust is one of the diseases that mint is most susceptible to. It is caused by a fungus, and as a result, orange-brown spots form on the leaves.
-
Make sure that the mint is not affected by pests and diseases. Mint can fall prey to diseases such as verticillium wilt or mint anthracnose, and can be infested with flea beetles, root borer, spider mites, or root weevils. This does not happen often, as the strong mint smell repels most insects and other pests. Keep your mint well circulated and the soil well-drained to keep your plants healthy. If you notice insects around the mint, simply wash them off with a garden hose.
- You can also wash mint leaves with insecticidal soap.
- Don't forget to check the space under the leaves as well. Pests can also hide there.
Part 4
Mint harvest-
Harvest fresh green mint leaves when you need them, from early spring through late fall. Never pick more than 1/3 of the leaves at a time, always give the plant a chance to grow more and produce a new crop. Collect as many mint leaves at a time as you need.
- If you want to dry the mint leaves, hang the stalks upside down in small bunches, or arrange them on a tray. Once the leaves are dry and brittle, separate them from the stems and place them in an airtight container.
-
Harvest as much mint as possible before frost sets in. In winter, mint roots will freeze, but survive, and by the next spring they will sprout again, and the ground part of the plant will die in frost. Protect plant roots by covering them with a layer of mulch for the winter. To get a good harvest of leaves, you must pinch the stems. If you have a lot of mint growing, wait for the plant to bloom and cut off the stem above the second or third leaf.
- Mint is usually harvested three times per season.
-
Use mint. There are endless uses for mint and you can use it wherever you want. Here are some common uses for mint to be aware of:
- Serve mint as an accompaniment to a fish, chicken, lamb, or other protein meal.
- Pair mint with vegetables like carrots, peas, and potatoes.
- Spice mint into fruit salads, with figs and radishes, walnuts or goat cheese.
- Use mint in drinks like iced tea, punch, or lemonade.
- Use mint in smoothies like mojitos or mint julep.
- If you decide to plant mint in the garden, make a fence for it. Dip a bucket with a cut bottom into the soil and plant mint inside it. This will keep the mint from growing.
- Try planting either garden mint or peppermint for a versatile herb suitable for most culinary uses. More unique varieties of mint are: white peppermint, chocolate mint, apple mint, bergamot mint, basil mint, lemon mint, lime mint, Chinese (curly) mint, and others.
- Pluck the mint at the knot from which the leaves grow. Leave at least one leaf node on each of the main stems. Leave stems at least 8 centimeters long (from the ground). This will give you a bushier, shorter plant (which is good with mint) as the mint will be forced to produce more new twigs and therefore more leaves.
- Try to plant mint away from other plants, as it grows quickly and will easily fill the entire flower bed or garden.
Warnings
- Don't let the mint shoots hang out of the pot into the open ground or into containers with other plants. Healthy mint shoots can take root in the soil, even if they are still associated with the mother plant.
- In good conditions, mint grows very quickly. Grow it only in containers or away from other plants. If the containers are on the ground in the garden, make sure there are no cracks in them, otherwise the mint roots can get out.
- If you see flowers on the mint, cut them off so that it still produces a lot of leaves. If the flowers are left, the plant will be beautiful, but it will not have enough strength for a large number of new leaves.
There are several ways to grow mint in your country house. The most difficult thing is to grow seedlings from seeds, but you can propagate the spice with cuttings. For good growth and development, the plant needs certain conditions, which will be discussed in the article. It is important to calculate the timing of planting crops. Care begins with the preparation of the land and the selection of quality seeds.
There is a wide variety of mint species (up to 25 species). Many varieties are bred artificially. Each type of plant has its own strong, pleasant aroma and taste.
The most common is peppermint. Due to the high content of essential oils, it is most often used in medicine, cooking, and cosmetology. A variety was obtained by crossing water and garden mint. Her taste is unusual, slightly burning and cooling.
Other varieties include white, apple, curly, water, flea, field, long-leaved, spikelet mint. Mint also grows with the aroma of banana, strawberry, ginger, pineapple, chocolate, lemon.
What is dangerous mint in the garden
When planting mint in your area, one feature should be taken into account: the root system of the plant grows very quickly, gradually filling the entire nearby area. To remove the spice from the garden, you have to dig deep into the entire area.
Experienced gardeners advise: before planting mint, enclose the site, for example, with slate sheets. They are dug deep into the ground around the site intended for planting.
There is another option, how to protect the soil from the endlessly growing roots of the plant. Mint is planted in a separate container (a bowl or bucket will do). The selected container is dug into the ground, leaving a small rim. Growing will not cause unnecessary trouble, and other crops can be planted nearby without fear that mint roots will interfere.

What conditions does mint need for successful growth?
Before you plant a spice, you need to select and prepare a site. It is best to grow herbs where legumes, potatoes, buckwheat, carrots, turnips, or melons were previously harvested.
Planting dates for mint
Mint belongs to frost-resistant plants. Planting is allowed in early spring and even late autumn. The main thing is that each season requires a certain landing method:
- The plant should be planted with seeds in early spring. Over the summer, it takes root and endures bad weather.
- In summer, cuttings are planted.
- Autumn transplantation is carried out only by cuttings. To prepare the plant for winter, the soil is mulched. Sawdust or peat are suitable as mulch. The layer should be thick, not less than 15 centimeters.

The latest way to propagate a plant is to divide the bush. Planting is possible even a few days before the onset of frost.
How to choose quality planting material
Planting material serves as the basis for the future harvest. Therefore, special attention is paid to the selection of seeds and cuttings.
Choosing seeds for planting
Mint seeds for planting are best bought in specialty stores. On your own, even if you manage to collect the seeds, then it is unlikely that you will be able to grow a quality plant from them. Mint will have characteristics far from the original version.
How to choose mint seedlings
It is easier to grow seedlings not from seeds, but from shoots cut from an adult bush. The side branch that extends from the central stem is cut at a distance of 1.5 centimeters from the central stem. The shoot is placed in a glass of water. As soon as he starts roots, you can start planting in the soil.

Only healthy plants with straight leaves and a strong stem are suitable as seedlings. You should not choose bushes with sluggish wrinkled leaves damaged by pests for planting.
Choose a plot
You need to choose a site that is well lit by sunlight, but not direct. Therefore, at noon, it is better if the site is in the shade.
The soil on the site should be fertile, loose with good aeration. If the acidity is high, then the soil is limed first (lime or wood ash is added). Loamy, sandy loam composition or black soil in the floodplain of a reservoir is considered ideal.

Landing in open ground
You can plant mint in several ways:
- Seeds begin to be sown in early spring. Furrows are made on the site with a depth of 5 millimeters. Planting material is slightly pressed and covered with a small layer of soil with the addition of humus. After that, it is recommended to cover the landing with a film. Planted seeds are periodically aired and watered. Subject to these rules, after 2.5 weeks, the first shoots should appear. Comfortable temperature is +23 degrees.
- For propagation, root or stem cuttings are used. Propagation is carried out by stem cuttings. A shoot equal to 8 centimeters is cut from the plant. The stalk can be put in water until roots appear or planted in sand. Sprouted cuttings with roots of 9 centimeters are deepened into the soil by 5 centimeters, the distance between them is 15 centimeters. Propagation is practiced using root cuttings. Each cutting should have at least one bud and 4-5 leaves. The separated stalk is immediately planted in the prepared hole and sprinkled with earth.
- Planting is carried out by dividing the bush. An adult plant is dug up along with the roots and divided into parts. It is important that each part has a bud and shoots with regrown roots.

You can also transplant seedlings grown at home to a permanent place:
- Initially, the seeds are germinated by wrapping in a damp cloth. In this form, the seeds are kept in a warm room for several days.
- As soon as the first shoots hatch, the seeds are planted in containers with soil to a depth of 6 millimeters.
- The containers are covered with foil for 6-7 days.
- After the appearance of sprouts, the strongest of them are transplanted into separate containers and cleaned in a cool room.
- Strengthened sprouts are transplanted to a permanent place.
After landing on open beds, they continue to care for the plant. To make the bushes lush, pinch the tops at a height of 24 centimeters. If you constantly remove flowers, then there is a better growth of green leaves.

General rules for mint care
Mint is an unpretentious plant and does not impose special requirements during cultivation. A standard set of actions is enough:
- Mint loves moisture, but do not flood the area.
- The plant is periodically fed with nitrogen, phosphorus and organic components.
- Be sure to weed the aisles, preventing the growth of weeds.
- To protect against frost, it is recommended to mulch the soil with straw or spruce branches.
- In the spring, the bushes are cut at the root.
In one area, mint can grow up to 11 years. But many gardeners recommend changing the planting site every 3-4 years, as the roots are destroyed by weeds and pests. The plant becomes weak, loses its aroma and pleasant taste.

Diseases and pests of mint
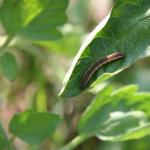
Mint is attacked by slugs, mint flea weevil, mint leaf beetle, whitefly and mites. Of the diseases, there is a high probability of infection with powdery mildew, anthracnose, and rust.
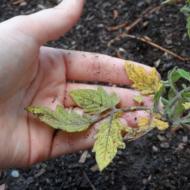
To understand that the plant is damaged by pests or sick, you can in appearance. The leaves become sluggish, turn yellow, dry and fall off. You can see spots and holes on them.
You can treat plants from pests with ready-made insecticides. They are used once a season and only in case of a severe defeat. It is important to remember that processing is carried out a month before the expected harvest.

Preventive measures include observing crop rotation, deep digging of the soil and removing all plant residues from the site. As a preventive measure, you can use a solution based on celandine and soap.
Every person who loves this spicy greenery “with a chill” should know how to grow mint at home. Mint has many valuable qualities - it is added to tea or soft drinks, used as a flavoring, for medicinal purposes. And it is not at all necessary to buy mint greens in the off season - even a person who is far from gardening can grow it on his own windowsill.
Our article today will be devoted to this process - the home cultivation of mint. Below we will share the secrets of potting this greenery and further care.

Mint is a plant that has been used by mankind for several decades for culinary, medicinal, perfumery, and cosmetic purposes. This is a perennial culture that looks like a small bush. Mint bushes, which we are used to seeing on store shelves, as well as in garden plots, are a cultivated hybrid of two natural varieties - water and spearmint.

The most valuable ingredient obtained from mint is essential oil, which is considered to be healing. Peppermint oil (as well as the leaves of this plant) is used in the treatment of insomnia and nervous disorders, in violation of the heart rhythm, and in the correction of the gastrointestinal tract. Mint is used for colds and ailments that affect the bronchi and lungs. The plant also works as an antispasmodic and is used for headaches, dental and menstrual cramps.
The list of diseases in which the use of mint in various forms is indicated is extensive. An equally impressive list of cosmetic problems can be solved with the help of mint. In particular, this ingredient is included in care cosmetics for problem skin (dryness, oiliness, imperfections), for the treatment of hair and scalp.

Peppermint essential oil is part of numerous medicines, in particular, various sprays and pencils for a runny nose and nasal congestion, drugs that relieve migraine attacks, this culture is used in the production of Validol and Valocordin.
Brewed mint leaves calm the nervous system, give vitality, in addition, they give a delicate, slightly cooling taste. At the same time, there are different types of mint, each of which has advantages.
Table number 1. mint varieties
| Title, illustration | Brief description, application |
|---|---|
 | Field, or, as it is also called, meadow mint is a wild plant that grows near water sources. It has a stem up to one meter high, oblong large leaves. Found throughout Russia. Flowering meadow mint long, from June to mid-autumn season. The flowers are medium-sized, lilac or pale pink. Mint of this species has a characteristic aroma, and the essential oils obtained from it are used for culinary and pharmaceutical purposes. |
 | A lush wild plant that is common in forested and hilly areas, this variety grows along fences and roads, it is ubiquitous. This is a lush tall bush (up to a meter), with branched stems and leaves in the form of an elongated heart. Catnip blooms very luxuriantly, so it is often planted in home gardens. The aroma of this plant is loved by cats - it acts on them in an exciting way. This is due to the fact that the essential oil affects the nervous system of animals. But, for cats, this is completely harmless, so this mint is often used in veterinary medicine and when creating toys for pets. Catnip is also used in pharmaceuticals. |
 | Spearmint grows in humid, hot areas. It has a stem with a height of 30 centimeters - it is erect, pubescent, has small serrated foliage. Fragrant mint blooms modestly - light small flowers collected at the base of the stem. This plant is used as a medicinal and culinary component. |
 | Perennial Japanese mint is harvested exclusively in wet and wetlands on the islands of the country of the same name. This is a creeping plant, the length of the stems of which reaches half a meter. The leaves of Japanese mint are small - about two centimeters, but the content of essential oil in them is high, so this variety is popular in perfumery production. |
 | Perhaps the most popular variety of mint, familiar to everyone. This is an artificially bred variety that has a bright menthol flavor and aroma. Interestingly, even honey collected from flowering peppermint has a characteristic "chill". The bushes of this plant are large - up to 1.3 meters in height, the leaves of a rich green hue, have carved edges. Most often, this particular variety is found in stores fresh, as well as in the form of dry spices and flavors. |
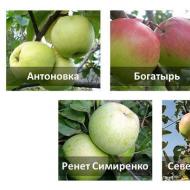
 | A hybrid variety characterized by low bushes, on which oval leaves with a smooth edge grow. The apple variety is so named because it has a subtle, characteristic fruity aftertaste. And the aroma and chill characteristic of mint in this variety is more delicate, almost inaudible. This variety is actively used in fresh cooking, especially for decorating dessert dishes or soft drinks. |
 | The appearance of the bushes of this mint explains its name - its leaves are wavy, twisted along the edges. The bush itself grows up to a meter high, it is distinguished by its decorative effect. Curly mint blooms at the same time light pink and snow-white flowers. This variety has a subtle, subtle smell, but it contains a large amount of carvone, which is widely used in pharmaceuticals for the preparation of lactation-improving agents. Therefore, nursing mothers will benefit from growing this herb to add to food and drinks. |
 | A variety with beautiful green-purple leaves that have a unique aroma - menthol, lemon and chocolate mixture. This mint is widely used in dessert cooking as a condiment for sweet dishes, so gardeners often grow this variety for sale or personal use. |
Video - Overview of different varieties of mint
Growing mint at home: general information
Mint plantings can be placed both on the windowsill and on the glazed loggia, where room temperature is maintained. You can plant mint in any container: seedling boxes, plastic containers, decorative pots.
Since mint grows for a long time, you do not need to expect that after the first harvest you will have to renew plantings, and you should choose a planting container with the expectation that it will be on the windowsill for a long time. That is why many plant mint in pots that fit into the interior of a room or kitchen.

Important! Do not use a container that is too small - despite the fact that the mint bushes are small, their root system is quite developed, and if the roots do not have enough space, then the greenery will be frail.
There are even special machines that allow you to grow mint greens (and any other small crops) at home. These are installations under the general name "Home Garden", which include a lighting device, a substrate for planting seeds, a container for them, as well as fertilizers and other components necessary for the growth of greenery.
But, if you do not want to spend money on a special apparatus, or if you want to independently control the entire process of planting mint growth, below we will tell you how to proceed.

How does mint reproduce?
Mint is grown either from seeds or from cuttings (seedlings). Survival by cuttings helps you get a crop faster, but the seed method is also good if you are preparing greens for future use. Let's talk more about these methods.
Video - Growing mint from seeds
seeds
It is best to purchase mint seeds in a specialty store, choosing a specific variety or taking several options at once, in order to leave the best one later. When the seed material is purchased, you need to prepare it for planting - the largest, even and smooth seeds are selected from the package, which are wrapped in gauze and soaked in warm water for 24 hours.

Next, you need to prepare a container filled with soil mixture. Mint likes the earth to be loose, filled with humus, and the acidity should not be higher than 6 pH. For culture it is well suited with peat soil. You can prepare the land yourself by choosing one of the options:
- Mix garden soil (two parts) with humus (one part).
- Take equal parts of sand, peat, garden soil and humus.
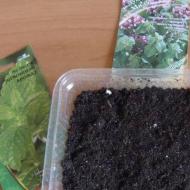
The landing process itself is very simple. It is necessary to make holes or grooves in the container (you can press a ruler or a strip of cardboard into the ground) about half a centimeter deep. Seeds are evenly poured into the recesses, which are then sprayed from a spray bottle. Humidity must be maintained constantly so that the planting material does not dry out. Nothing else needs to be done, and already on the twentieth day, the first shoots can be found.
Important! To speed up the germination of mint seeds, you can create a greenhouse over the pot by covering it with a bag or cling film. But such a greenhouse needs to be ventilated daily.

cuttings
Experienced gardeners recommend planting mint cuttings, since this method will not only allow you to get a faster harvest, but also provide better germination. There is a possibility that not all planted mint seeds will hatch and grow, this will not happen with cuttings.
How to get cuttings? You need to prepare them in advance by cutting someone in the garden or asking for a part of the plants growing in a pot. You can try sprouting mint cuttings from the store.
Step-by-step instructions for planting mint cuttings
Step one: With a sharp knife, cut off the top of the plant (below the flower bud and a centimeter above the stem junction). 
Step two: pour warm water into a small container (glass or flask) and lower the stalk there so that only the leg is in the liquid. The glass is placed in a warm sunny place until the roots appear. You can plant mint in the ground when the roots grow five centimeters. 
Step three: prepare the pot and the ground according to the rules that we described above. For one mint bush, a pot with a diameter of about 20 centimeters is enough; if you want to plant several cuttings together, the capacity should be larger. 
Step Four: Fill a third of the pot with potting soil, without pressing down or crushing it. 
Step five: make a small indentation in the ground and lower the roots of the cutting into the pot (if they are too long, you can bend them). 
Step Six: Fill the pot completely with soil so that the cutting can stand on its own. Don't bury the mint too deep - make sure the stem is long enough to rise above the ground, not just the leaves. Carefully water the planting. 
Further care for potted mint
After the mint is planted, it is worth providing it with optimal care. Note that the plant is not considered capricious and requires minimal attention, but like any greenery, mint is quite fragile, so it is undesirable to neglect the basic rules of care.
So, the main care for mint is regular watering. The earthen lump should not be allowed to dry out - this plant does not tolerate dryness at all, and will immediately die if you delay watering for at least a couple of days. But, it is also not necessary to overfill the mint, so the best option would be to water more often, but moderately.

Important! In the winter season, especially if the container with mint plantings is on the windowsill near the radiator, you can additionally spray the pot with a spray bottle. Use only room temperature water for this.
In order for mint to bush well and retain its aroma, you need to make sure that dust does not accumulate on it. You can remove dust under a weak stream of water (if the bush is already of sufficient size), or with the help of the same sprayer.

As for fertilizing, mint does not need them in the winter season. In spring and summer, you can feed plantings with urea once (one gram is diluted per liter of water).
It is also necessary to observe the temperature and light conditions. Planting mint will not endure the cold, it will grow optimally for them at a temperature of 20-22 degrees. Accordingly, a high temperature is also undesirable for planting (in the summer heat, the bushes can wither, so it is better to take them out to the balcony).

It must be remembered that bright sunlight, and especially direct hit of rays, will destroy mint leaves. To prevent this from happening, landings must be removed from the southern windows, or some protection must be provided - blinds, tulle. Since the plant loves diffused and soft light, additional lighting is not needed in the summer. But in winter, it would be good to transfer mint under a phyto-lamp, and extend daylight hours to 11-12 hours in a row.

Conclusion
As can be understood from the above, caring for mint is completely simple and easy. At the same time, you can always have greens with a wonderful aroma and excellent taste on hand, which will add a touch of chill to your favorite drink or dish, as well as replenish your home first aid kit. In addition, mint bushes growing on the windowsill are original decorative houseplants.
Related Articles