How to make a very beautiful cover for notebooks. How to make a notebook or notebook with your own hands
The cover is a way to extend the life of any notebook. This is especially true for school notebooks. They wear out, can tear or get dirty.
Also, thanks to the cover, it can be made original and unusual. To do this, you need to make a cover for a notebook with your own hands, as described below.
What do you need for a custom cover?
To create a notebook cover, you can almost always use the materials that you can find at home:
In order to make the cover for a notebook beautiful, as the child wants, it must be additionally decorated. For decoration you can use:

How to make a notebook cover out of paper?
This is the most convenient cover option. There is always paper for wrapping in the house, and if you wish, you can change it at any time.
Place the paper in front of you (face down if there is a pattern). Put an open notebook on it. Now you need to mark on paper with a pencil a rectangle the size of a notebook with a small margin: 1.5 - 2 cm on top and bottom, 5 - 6 cm on the left and right.
It is necessary to cut the resulting rectangle and wrap it around a notebook. At the same time, all edges are carefully folded inward and fixed with glue or tape.
The inside folds can be made large so that they completely cover the inside of the notebook cover. Everyone chooses the most suitable option.
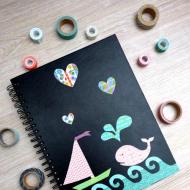
The cover is ready. If it was a beautiful wrapping paper, then the product does not need additional decorations. But if the base is made of plain paper, then it's time to show imagination.
As a decoration, you can use various stickers, geometric figures made of colored paper, patterns from multi-colored tape, etc.
Cover from vytinanka
In fact, it's still the same paper cover. But, if it is decorated with a vytinanka, then the product turns out to be original and unique.
How to make a cover for a notebook from a vytinanka? To do this, you need to create a wrapper in the way described above. The color of the paper will later serve as the background for the vytinanka. You can use white or colored paper.

Then you need to prepare the vytinanka itself. It is a composition cut out of paper. The principle of operation is the same as for cutting paper snowflakes. The sheet must be folded several times and cut out the pattern using scissors or a clerical knife. When unfolded, a picture or drawing is obtained.
Vytinanka can be the size of a notebook and cover the cover completely. You can make small decorative compositions and beautifully place them on a notebook.
You can create ready-made templates for vytinanok yourself by connecting a child.
The second life of the old notebook cover
Very often old or used covers can be used. Especially if they are made of beautiful and durable material. We are talking about both purchased copies and self-made ones.
So, what to do with old notebook covers? Here are some options:
- A great solution would be to make bookmarks for books. As a rule, the corners and edges of the cover wear out, and the central part can be used for this purpose.
- A beautiful old cover can be used to create a new one. One of the ways to decorate is overhead glued parts. And the more materials for their manufacture, the better.
- Also, unnecessary covers can become material for children's creativity. They can be used to create various collages, posters, etc.
So do not rush to get rid of boring or old covers.
Ideas for creating a variety of covers
Making a cover for a notebook, as described above, is not difficult at all. But there are also many other solutions. Here are some examples of beautiful covers.
Having learned how to make a notebook with your own hands, over time, you can decide on more serious crafts, for example, make your own book. Why not?
Having learned how to make a notebook with your own hands, over time you can decide on more serious crafts
Necessary:
- Colored and white paper A5 format;
- Cardboard for the base;
- Fabric strip, satin ribbon, piece of gauze;
- Glue "Moment";
- Clips stationery;
- Decor elements.
What to do:
- Fold the sheets, dividing them into blocks. Between the blocks we make partitions with colored paper. On both sides we form a cardboard cover.
- Fix the stack with clips. Place a piece of paper or a ruler under the clamps so that there is no trace of the clamp.
- Cut off a piece of gauze equal to the width of the paper bond. Put gauze on the junction, cover it well with glue. The product must dry thoroughly. For strength, re-glue the gauze on the back.
- When the craft is completely dry, decorate the binding with satin ribbons, small beads, lace, or simply draw a funny picture. Hide the edges with fabric strips.
- Hide the gauze sizing under the fabric strip.
In the absence of sheets of the required format, replace the material with notebook sheets. Remove the cover, leave the connecting staples on the sheets. Then do according to the instructions.
Gallery: do-it-yourself notebook or notebook (25 photos)


A simple do-it-yourself notebook from scratch (video)
Small notepad for girls
Necessary:
- White sheets of A4 format;
- Colored cardboard, a piece of cloth;
- Stationery knife;
- Ruler 2 pcs.;
- Pencil;
- 2 clips;
- PVA glue, brush.

The notebook is decorated at the request of the little princess
How to do:
- On the first sheet, make a markup with a pencil according to a certain size of the notebook.
- Draw a line to the other side of the paper. Secure the paper stack with clips, cut the pages of the product with a knife. Put the sheets together.
- On colored cardboard, circle the dimensions of one sheet of paper, cut out the front and back sides of the cover.
- Connect the sheets with the covers, putting the rulers on both sides, fasten with clips. Leave to dry for several hours.
- Lubricate the fabric base well with glue. Close the place of gluing the notebook with a cloth, press it back with clips until it dries.
Decorate the corners of such a notebook with braid or lace, gluing the ends on the reverse side. Need to divide your notebook into blocks? We use thick cardboard, laying it through the same number of pages.
How to make a notebook
A simple notebook is easy to make yourself. For example, a new notebook can be folded from double sheets of old notebooks.
- Collect all the double leaflets, carefully pulling them out of the staples.
- Under the basis of the notebook we take thick colored paper.
- Folding it in half, we connect the bend with the notebook leaves.
- If the holes from the bracket do not match, you can flash the product with a sewing machine. This will hide unwanted holes.
- After folding the sheets together, secure with a clip so that the paper does not move.
- Next, use staples from the stapler to fasten the stack with pliers along the existing holes.

A simple notebook is easy to make yourself
Smooth the middle bend of the notebook with an iron through tracing paper.
How to flash a notebook with your own hands
Necessary:
- Sheets of paper or notebooks;
- Pencil, ruler;
- Paid cardboard;
- Needle, thread.
- Decor.

When sewing, it is better to use a sewing machine
What to do:
- For crafts, collect all unused notebook sheets. Gently fold them together, pinch with clips.
- Mark with a pencil the middle bend of the future product, bend along the line.
- Separately, the same size as the sheets, make a cardboard backing.
- Lay sheets of paper on a thick base. Sew along the bend with threads. To make the seam beautiful and even, use a sewing machine.
Homemade covers for notebooks and textbooks: ideas
The habit of collecting wrapping paper from gifts or the remains of wallpaper after repairs is very useful here. Very beautiful covers are obtained from such material.
For book
You will need:
- Ruler, pencil;
- Small tape;
- Scissors;
- Decor.

The cover can also be made from fabric.
How to do:
- Spread wrapping paper or a piece of wallpaper on a flat surface. Put a book in the middle of the sheet. Mark the size of the book on paper with a pencil.
- Bend the wrapper along the lines of the book cover, fix the edges with tape.
- Trim excess paper evenly.
- Decorate the edges with lace or decorative colored tape.
For a more disheveled book, the cover can be done like this:
- We take a regular cardboard folder. Remove the old book cover. Put the book on a folder, mark the size of the future cover with dots, cut it out.
- Along the middle bend of the cardboard, we measure in different directions a width identical to the width of the page binding. At this point, we glue a wide satin strip with silicate sealant or Moment glue, with the ends inward.
- After drying, cover the outside of the base with wrapping paper. Form corners, decorate them with metal corners with pliers, after gluing them.
- With the help of felt-tip pens and a piece of colorful fabric, make an inscription - the name of the book being restored.
- Glue the base cover to the stack of book pages. Clamp the place of gluing with stationery clips through the rulers.
For notebook
Necessary:
- A4 folder;
- Scissors, glue, small tape;
- Ruler, pencil;
What to do:
- Place wrapping paper on a work surface. Open the folder at the top. On the folder we put a notebook unfolded in the middle.
- Make designations - dots according to the size of the notebook. Draw a line with a ruler, cut out the covers.
- Stick the packaging wrapper on the cut out cover from the folder, fix the edges with adhesive tape, decorate with ribbon or fabric border.
- Take out the paper clips in the notebook, remove the old cover. Through the holes, mark the future fastenings of the cover with dots.
- Use a needle to make neat holes at the level of the points. Refasten the sheets of the notebook with the new cover with the same staples.
Very good cover from an old newspaper. Such a binding will surprise you with its simple execution, but with an unusual design.
Necessary:
- Old yellowed newspaper or book pages;
- Tracing paper, thick paper;
- Colored pencils, markers;
- PVA glue, scissors;
- Fabric strip for decorating the edges.
How to do:
- Carefully and evenly glue the yellowed sheets of newspaper onto thick cardboard. Iron through the tracing paper.
- On the front side, draw a drawing with pencils, circle the contours with a felt-tip pen.
- Bend the piece in half. Put the book on the cover, bending the ends along the book outline, fix with tape. Trim excess.
- If the cover is intended for a notebook, attach it with staples along the line of the middle bend. Trim the protruding edges, decorate the ends with a cloth or outline with felt-tip pens.
The fabric makes a good and soft cover. It must be made in the same way as paper, only the ends are stitched with bright woolen threads. Decorate with fabric figurines of flowers, animals or pen pockets. For a loved one, you can make such a cover in the form of miniature hearts sewn to each other.
Budget school supplies and do-it-yourself office (video)
Today, the art of needlework has gained wide popularity, and handicrafts are recognized as an exclusive and unique creation. As you learn to be creative, build your collection of handmade masterpieces or, alternatively, update a long-worn old library. Joint lessons with a child on funny sticky notepads and notebooks on the eve of school lessons are economically beneficial for the family budget.
From childhood, mothers teach their children that everything needs to be protected. The same applies to books, notebooks and various notebooks, which, by the way, wear out more often than usual, as they are constantly in someone's hands. In this article I would like to talk about how you can make various covers for such printed publications.
Paper
The first way to make a book cover is quite simple. To do this, you just need plain paper. This option is suitable if you need to wrap a school textbook or other literature that very often falls into your hands and quickly loses its attractive appearance. So, you need to take a sheet of paper that will protrude 3 cm from above, below and on the sides of an open book. If one sheet is not enough, you can try to glue a couple of pieces with tape. Now you need to make special convenient pockets along the edges of the paper, into which a hard book palette will be tucked. First, a sheet of paper must be tucked from the bottom and top so that it completely matches the size of the book. The edges are wrapped, let's move on. Now the sides are tucked to fit the cover. That's all, the cover is ready. It turned out to be such a small pocket into which a book is inserted along the edges. Here it is important to correctly calculate on the cover so that it does not turn out to be smaller (it will tear) or more (it will strive to come off).

Cardboard
The next way is how to make a book cover out of cardboard. So it will be more dense and can be used for years. The principle will be almost the same as in the previous version - you just need to bend the edges correctly. But in this option, you yourself need to make a double deflection of the cardboard in the center of the book, where the spine will pass. After all, cardboard does not bend as easily as paper. To do this, you can use scissors, which are convenient to push through denser materials. The basis for the cover is ready! Now you need to decide how she will dress for the book. There may be several options. The easiest way is to simply stick it on the old cover with glue, but this option is suitable if the palette of the book is pretty worn out. Yes, and it will not look very aesthetically pleasing. Or you can make pockets from stationery film into which your favorite volume will be threaded. To do this, cut pockets of the desired size and glue them with tape. But bad luck, now the title side is spoiled. Not a problem, you can just re-decorate it. This is done using colored paper, fabrics, ribbons and other improvised materials. They sit on the glue and create a completely new product. That's it, the cover for the created is ready!

Leather
It may seem very interesting from the skin. To do this, stock up on fabric of the required size, given that more pieces will be needed to create pockets. So, the first stage in the preparation of such a cover is cutting out the product. Next comes the soaking of the skin. This is necessary in order to make it much more convenient and easier to work with. You will need hot water and a little time (by the way, the first steps are best done in the evening). When the skin is sufficiently moistened, it must be removed and blotted with a clean cloth. Now it remains to bend it in half according to the size of the book and leave it to dry overnight (this material dries for about a day). Let's see how to make a book cover. You can start working again the next morning. With a special chisel (you can also use a chisel for carving), about 0.3-.05 cm from the edge of the product, you need to lay a border around the entire perimeter of the cover, there will be a line that, in addition to fastening the two parts, will also perform a decorative function. You can carry out the same manipulations on the pockets into which the book will be threaded. Now you need to sew the main part with pockets, for this you need a sewing machine. That's all, the product is ready. Now it remains to completely dry the cover. However, it is important to remember that you need to do this in a folded state so that the skin is properly folded. That's all, now everyone knows how to make a leather book cover.

Disk
Today, quite a lot of people store various information on disks. But for some reason there are always not enough covers for them. This situation is easy to fix, you can just do them yourself. There are several ways to make a cover for a disc. This will definitely require paper. It needs to be cut out in a long strip, leaving allowances for bends of about 2-3 cm on the sides. The width of the envelope must match the size of the disc, then it will not fall out of its cover. Now the paper needs to be bent along the length so that one side remains a little longer, because you also need to make a kind of lock. It is worth noting that the product in the end result will look like a regular postal envelope. On the sides, the paper is glued together, and the remaining top is folded over so that it is possible to close the cover, as it were. That's it, the disk will be securely stored. However, there are special programs for how to make a cover for a disc. But there is a nuance: such a cover will be beautiful, bright, it can be printed and cut out, but it will not save the disc from unnecessary scratches and other damage.

Album
You can also try to figure out how to make an album cover. If a person loves to draw very much and has created real masterpieces in his album, why not make his cover beautiful? To do this, you need cardboard, synthetic winterizer and fabric. The cover will be soft! Cardboard and synthetic winterizer need to be cut exactly to the size of the album, but for the fabric, allowances of about 3-4 cm should be made. The soft part is glued on top of the cardboard (for reliability), and everything is wrapped with a piece of the selected fabric. You can also attach it with glue or double-sided tape. So you need to do with two sides, the front and back of the cover. The product is ready, it remains only to fasten it. To do this, parts can be put on glue or sewn on a sewing machine (if the cardboard is not too thick). First you need to fold the cover so that the album opens easily. Well, you can decorate your product with both various applications and rhinestone beads. If desired, you can make an album of strings.

Diary
The master class "How to make a cover for a scrapbooking diary" may seem interesting. To do this, you will need a plastic base, watercolor paper, clippings from books or newspapers, as well as old atlases, notebooks and printouts for decoration. First, the plastic base must be cut to fit the diary and bent in the center so that the cover looks natural when closed. Next, using the used, but still wet, you need to age the paper (pressing the bag against the paper over the entire sheet). Light brown spots should appear. Now everything is dry. After that, you can slightly scorch the edges of the cover with a lit match to create the effect of a manuscript thrown out but saved from the fireplace. Next, the paper is tinted, for this the paint is applied to a piece of foam rubber and small prints are made around the entire perimeter of the product. Blanks for decoration are also tinted. Now you need to stick all the prepared details on the cover. By the way, it is better to use for this and not glue, so the paper will not look warped, but will remain flat.

Notebook
You can also try to figure out how to make an interesting newspaper print. To do this, you will need thick drawing paper (not cardboard!), An old but not worn out newspaper, as well as stationery. First, four main parts are cut out of paper, equal in size to each other and slightly larger than the notebook (about 5-7 mm) and one strip, which will be attached to the fold of the notebook at the back. All parts are glued together so that there is a gap of about 1 mm between them. This can be done with ordinary tape. First, two identical parts are glued together in a row, then a strip is folded, and again two identical parts. Now, on one side of this “engine”, it is quite thick to put on tapes of double-sided tape, a newspaper is immediately glued to them, slightly bending around the edges. Next, you need to glue two identical parts on each side so that there is a pocket in which the notebook will enter. To do this, you can pre-prepare small strips of drawing paper, so it will be more reliable. After all, if you glue the product on a newspaper, it can quickly tear and the cover will be irretrievably damaged. Now you need to insert the notebook into the cover and put it under the press for the night. In the morning everything will be ready, and with such a notebook you can safely go to school. And a newspaper print will not reveal to anyone the secret for which subject this notebook is used.
I have already explained in detail. When the internal content, that is, the pages, are completely ready and sewn together, it is time for the most creative part of the work - the final binding of the notebook and cover design. In this article, I will show you how to make a notebook cover.

While the block of sheets dries, we glue the endpapers.
To do this, cut out the cardboard to the size of an A4 sheet, bend it exactly in half and make sure that the fold line is straight and even. We also bend sheets of aged paper in half (it was also possible to make printouts on the entire sheet on them). This will make it easier to glue.
We glue cardboard and paper together, making sure that all the tips are well glued and do not peel off anywhere.


Final formation of the notebook block
We take out the block from under the press, check if the glue is dry. If all is well, then proceed to the next step.
First, we glue small cardboard pieces 10 × 7 cm to the strips of fabric (with their help we will then fix the endpapers) on both sides of the block.


Now we glue the endpapers themselves. In order not to stain the sheets, we lay clean paper between the flyleaf and the first page.
We also carefully monitor that all the tips are well glued and do not move away.


Now we tightly glue the cardboard with the fabric to the endpaper.

And again we put it under the press, let it soak well with glue and take an even shape.
How to make a notebook cover
Now let's move on to the design.
First, cut out a strip of cardboard 10 cm wide and 22 cm long (along the length of the block) to decorate the spine. We mark the fold lines on it with a scoring so that the spine folds well. This can be done, for example, with an awl if there is no special creasing at hand.


Now we cut out 2 parts of the cover from thick cardboard. They should protrude 5 mm from the top and bottom of the notebook and 7 mm away from the spine. Approximate dimensions - 15 × 22 cm.
Cardboard should ideally be hard and dense (thickness 2.5–3 mm). If this is not available, you can take covers from thick organizer folders or from cardboard packaging boxes.
Glue both cardboard boxes to the spine. There should be a distance of 4-5 cm between them. It is better to try on the workpiece to the notebook block until the glue has dried.


Now we make out the outer part of the cover.
Mark a rectangle on the skin. On each side, retreat 3-5 cm from the edges of the cover.

We glue the cover to the skin, while carefully straightening the skin from the front side so that there are no wrinkles and bubbles anywhere.
After that, glue the edges: first the upper and lower parts, then the sides.


If the skin does not stick well, it can be fixed with clips, placing a piece of cardboard so that no traces remain.
After that, we proceed to the most crucial stage - you need to glue the notebook block itself to the cover.
It is better to do this at the same time for both sides. Lubricate the endpapers with glue (pre-insert sheets of paper between the first pages and endpapers so as not to stain with glue), try on in the center of the spine and apply the cover.


We press hard so that the glue grabs securely, and we look to see if the cover is correctly positioned relative to the notebook block


We put the notebook under the press again. The glue dries quickly enough, so an hour should be enough for fixing. Of course, you can leave the notebook under pressure for longer if there are other things to do.
If you want to keep the cover smooth and without any decoration, the notebook is already ready.
Since our notebook is dedicated to the World of tanks computer game, the logo on the notebook will also be from it. Of course, you can come up with any design option, fantasy and individuality in this matter are only welcome!
If everything is fine with drawing, just transfer the drawing to the skin.
If we can't draw very well, don't despair. We cut out the template of the picture, apply it to the cover and circle it with a pen or a thin marker.


Then, with acrylic paints on fabric (Decola brand, for example), we begin to trace the lines and paint over the details.


Let the paint dry completely. And voila, the notebook is ready!


Helpful Hints
Want to decorate notebook, book, notebook or diary?
There is nothing easier - you can make your own cover using simple rules and my imagination.
You can also make good cover for documents.
Here are some ways to do it beautiful handmade cover- you can borrow some ideas, or just follow the instructions and make your own colorful cover.
How to make your own cover. Cover for notebooks from the road map.

You will need:
2 road maps or atlases (you can choose maps that have a lot of details painted in different colors)
Scissors
double tape

* Choose 1 card for horizontal stripes and 1 card for vertical stripes. You need to cut so that after wrapping the book, you can read the titles without turning the cover over.
1. Prepare each card, turn it over and use a marker or pencil to mark the places where you will cut into strips.
* In this example, the width of each strip is 1.5 cm.
* The length of each strip should be such that you can wrap the notebook from top to bottom (vertical stripes) or from front to back (horizontal stripes), allowing for a margin of approximately 2.5-3cm on the sides of the notebook.

2. After you have cut the vertical strips in this way, they need to be laid flat on the table and pressed with something heavy so that they do not move.

3. Start weaving horizontal and vertical stripes.

4. When you have woven enough to wrap the notebook, glue the tape to the bottom of the blank so that you can fold it back.
Repeat the same with the top side of the workpiece.


5. It's time to cover the notebook with a cover. First, cover the notebook with double tape.


6.
Place the notebook carefully on the cover and wrap it around. Press well.

7. Trim the edges. You can glue the strips in some places (if necessary).

Cover with your own hands. Instagram Notebook.

You will need:
Photos from Instagram
Glue (better special glue for decoupage)
tassel
Notebook or notepad

1. Print small photos.
2. Cut out the photos.
3. Arrange them on your notebooks the way you like.

4. Lubricate each photo with glue on the back and stick it to a notebook or notepad.


5. If you used decoupage glue, you can use it on the pasted photos to make them a little shiny. It is better to apply it only in one direction.


6. Leave the decoupage glue to dry, after which you can glue the ribbon and write something on it - for example, your name.

DIY passport cover

You will need:
Scrapbooking paper or cardboard (14.8 cm x 12.7 cm)
Scrapbooking paper or cardboard (6 cm x 16.7 cm)
White paper A4
Openwork hole punch for the edge
Decorations
Ruler
Scissors
Double-sided tape
* It is worth noting that you need to choose not too thick paper for scrapbooking.
* If there is no such paper, then you can use ordinary cardboard.

1. First you need to cut a rectangle out of cardboard. The size should be slightly larger than the size of the passport.
3. Prepare a second rectangle of cardboard and cut it in half - you should have 2 equal strips.
4. Prepare white A4 paper and make openwork edges with a hole punch.
5. Bend the edges of the rectangular strips 2 cm.

6. Glue openwork edges to the middle of each strip.
7. Prepare a large rectangular sheet of cardboard and glue strips on it.
8. Insert your passport into the cover.
9. Now you can decorate the cover. It is advisable to use flat jewelry that will not cling to anything and thus will not come off.
10. In this example, a hole punch flower was used, but you can make a beautiful flower yourself.
There are several ways: you can simply cut it out of paper, make a quilling flower, an origami flower or a crepe paper flower. To find out how, check out one of our articles:
Add a half pearl, as well as a satin ribbon that can be tied into a bow.
How to make a cover for a book or notebook

The notebook can also be decorated with such a colorful, exclusive cover.
You will need:
Related Articles