Draining a piece of land. How to dry a damp area from water: effective ways to deal with excess moisture
The condition of the paths in your dacha in the spring and the degree of soiling of your shoes are indicators of the condition of the drainage system on your plot of land. Stagnant puddles do not indicate the amount of snow in winter or precipitation, but indicate your carelessness. After a year or two, excess water will result in bald spots on the lawn and rotting tree roots. Failure to do drainage work on time will definitely lead to the inevitable process of digging trenches, replanting plants and re-designing the landscape design.
The drainage system on the site should be one of the first on the to-do list for its arrangement. The result of reclamation will be:
- Dry soil in previously wetlands;
- Will disappear threat of foundation erosion Houses;
- The problem will become irrelevant washing out winter and garden plantings;
- Will decrease soil acidity;
Causes of water retention
The main factors influencing the degree of flooding of the area are:
- marshy area;
- groundwater.
You yourself can determine the groundwater level by digging a hole. If in summer no water leaves a two-meter hole, it can be stated that the water is close to the surface. Another reason for excessive soil moisture may be the composition of the soil: clay or peat.
Methods for draining a summer cottage
Today, homeowners know two methods of dehumidification:
- Linear system. Its purpose is to prevent the accumulation and stagnation of water on roofs, and to drain it beyond the boundaries of the site using gutters. It is also relevant for combination with the deep method, and does not require special implementation measures.
- Drainage system or deep drainage. The method involves laying underground channels, laying pipes and a step-by-step sequence of work.
Organization of surface drainage
 Before you begin drainage, you should understand the natural slope of the terrain. If there is no topographic plan, track in which direction the water runs. Consider yourself lucky if water rushes to the street, although this fact does not negate the presence of a ditch in front of the house, in which parallel drains from the garden and vegetable garden are connected. It is imperative to separate the flows from the garden, since the water noticeably washes away centimeters of useful soil.
You can provide a slope in the following ways:
- Use gutter, made with a structurally raised part;
- Use the trick step sequence when raising the height of the ground;
Reclamation begins with draining stagnant puddles near the house. The system implies presence of dug trenches in low areas or along the perimeter of the entire area. Holes are dug 0.5 meters wide and almost 1 meter deep. The walls of the cuvettes are formed at a certain angle of 35 degrees. Melt or rain water moves along the water intake branches into the central ditch, and flows into the storm sewer with a spillway, relative to the degree of the relief.
If ditches are laid across the plain, the drainage ditch will take the main load on itself, which will affect on decreasing water level next to the site.
A clearly marked slope of the terrain towards the street promotes drainage. To do this, drainage lines should be point outward, where a transverse trench has been dug to contain the release of water from the site into the storm drain. In the case of the opposite direction, a street transverse trench is dug parallel to the fence, and a longitudinal line is drawn slightly beyond the end of the site.
Storm drains and fill
When the drainage system moves inward, it is necessary to build storm drains, discharging wastewater into containers. Their careful organization will already half solve the problem of water drainage. The storm drain consists of:
- gutters;
pipe systems for drains and sewerage.
 Large storage containers for water, for example, barrels or special wells, can act as reservoirs. Its depth is determined by the length of the drain pipe bend. The top of the structure should be covered with a fine mesh and sand traps to avoid clogging. As the well is filled, the liquid is pumped out or several storage points are discharged into a common pipe, mounted at an angle of 30 degrees, through which the water flows into street ditches. In special cases, the well is equipped with a vibration pump. Mechanism works in support mode, and monitors the level of water accumulation. Typically filled tanks serve as a source for watering in hot weather.
Trench lines near the house look ugly, and the corners quickly crumble and the trench becomes shallow. For this reason, owners try to strengthen structures in different ways, and often crushed stone filling is used, consisting of 2 stages:
- The bottom of the ditch is filled up large crushed stone, and on top - with a small fraction.
- Placed on crushed stone turf.
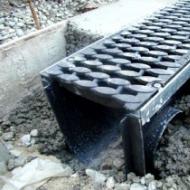
Backfill stops soil movement, but the system efficiency decreases. An alternative to dumping is concrete or plastic drainage trays. They pave the ditch to support the walls, and metal gratings laid on top protect it from debris. They quickly become overgrown with grass and become an extension of the lawn. The prefabricated structure is durable, reliable and especially suitable for those who are at risk of water entering the cellar.
Important to remember! Crushed lime pressed. Water does not pass through such a monolith. The simplest technique for owners of small plots is open drainage. If its location on a hill is unsuccessful, water will begin to penetrate into the area in streams. Dig a hole along the site and the water will flow down like a river. Channel usually sowed with grass.
The principle of deep drainage
 The plot of land in a lowland or next to a reservoir is due to excessive moisture saturation, and simple reclamation techniques are no longer sufficient. Instead of trenches it is necessary lay drains(perforated pipes) and insulating materials.
Scheme deep drainage looks like this:
- Water enters storage systems.
- Having filled the volume, it flows into the main pipe.
- Moves into the well.
- Discharged into a storm drain or other water intake (river, ditch).
Important point: the main line must pass below the location of groundwater. To determine the level, you will have to contact surveyors.
If we are not talking about protecting the foundation, it is permissible to simplify the course of work and place the structures in the ground, based on general calculations:
- with the mineral composition of the soil, the depth of the ditch reaches up to 1.5 m;
- and the parameters for the flower garden vary in values 0.5 -0.8 m;
- for garden trees - up to 1.5 m, forest species - 0.9 m.
In peat soil, the dug trench should correspond to 1 -1.6 m. The figures are due to the rapid subsidence of the earth.
Polymers are used for reclamation perforated pipes with a grid of holes of 1.5 - up to 5 mm. Certain brands are equipped with a filter sieve that prevents clogging with small particles. To purchase the right product, you should carry out design calculations, which take into account the degree of saturation with water, the type of soil, etc. Due to the high cost of services, homeowners buy pipes with a diameter of 100 mm.
Installation of drainage on the site

It is advisable to use geotextile backing that resists mixing of the lower and upper layers.
The purpose of the drainage well is to clean, flush pipes with streams of water and control the entire system. Bulky reinforced concrete rings are inserted into the dug hole, but at a depth of up to 3 meters, plastic pipes with a diameter of up to 500 mm will do. Round corrugated versions are also sold. But, any types of pipes involved will have to be additionally flushed - once every three years, with a hose through the collector.
Wells are placed along the trench, distancing themselves from the neighboring structure at intervals of 50 m. According to the rules, they are required to be mounted at turns and junctions of pits.
The result of proper drainage is a functioning system invisible to the eye, protects soil from washing out, and ensuring plant growth. In addition, the completed complex will ensure the stability and original appearance of sidewalk paths, since swelling of the soil is prevented.
Video of drainage of a summer cottage
You can name a huge number of disadvantages that can interfere with the work of a summer resident. Unfortunately, the soil may not bear fruit well and prevent sprouts from sprouting, and dry weather in the summer can negate all the work, destroying the crop, or insects will not leave it alone. The acquired plots may be different, for example, they may be a steep slope and in order to equip them and bring them into proper shape, it will take a lot of time and effort. Flooding of areas can be an important problem.
Flooding can be dealt with only after the area has been drained. In this article we will learn what steps need to be taken in order not to remember for a long time what excess soil moisture is.
Methods for drying an area yourself
There are many different factors that influence the appearance of swampiness, as well as several degrees of flooding. Swampiness can be caused, for example, by a special topography or type of soil, when water does not have the opportunity to flow through the area due to the natural slope. In this case, such a slope must be made manually, carefully calculating the trajectory. Additional soil may be required to fill the excavations. There is also an option that water stagnation occurs due to heavy clay soil.
Then, if it is impossible to add soil, it is necessary to do drainage. Thanks to drainage, you will be able to dry out the swamp on your site. If you still have to build drainage systems, then you simply cannot do without knowledge about this system, accurate calculations and planning. To make your life easier, you can contact us. We can carry out any work related to soil drainage for a fee. Of course, you can do everything yourself, but in this case you need to be 100% confident in your calculations.
A reservoir is created at the lowest point of the dacha, from which water flows into the drainage system. This pond can serve a variety of purposes: it can be used for watering or perhaps as a decorative element in your area with ornamental plants.
The essence of draining a site is to remove water from its territory. The best situation is when the site has its own water drain, but there are various obstacles to this. For example, the location of the dacha plot is lower, relative to others, or when there are obstacles in the form of some buildings or a fence at the water drainage site. A way out of this situation could be centralized water collection. It can be arranged using a system of canals and ditches.
Water from ditches needs to drain somewhere. The drainage location must be determined on site, looking at the positions of adjacent areas. The drainage is done below the level of ditches and canals.
When it has a relatively flat surface and a pronounced slope, then the drain is arranged parallel to the fence and placed as low as possible. The width of the drain should be up to half a meter, its depth – up to a meter, and its length – about two to three meters. The excavated soil must be spread evenly over the lowest parts of the site.
Throughout the year, you need to regularly compact the gutter with various debris; construction waste is perfect. It must be carefully compacted, adding more and more new debris until the ditch reaches the lower level of fertile soil. After this, a similar one is created near the filled ditch, which becomes, as it were, an addition to the previous one.
The excavated soil from the newly created additional drain is compacted into the previous one. By following these steps, you will become the owner of a high-quality drainage system that will work throughout the entire site. Then what is the point of creating drainage at the highest point of the site? This is left to your discretion, because the meaning of such a ditch is for those whose plot is not the first, that is, another one may be located higher, then such a ditch will catch the water of this plot and not allow it to flow through your territory.
We can summarize all of the above. To properly and efficiently drain your area, the best solution is to combine several methods. That is, fill up the soil, equip drainage and create a network of canals and drainage ditches. But ? There is another way that has not been discussed. This is a biological method, the essence of which is to grow special plants that consume a lot of moisture.
How to drain an area without drainage using different types of plants?
Wetland soils have a high water level, which means that not every plant will be able to take root. These plants include those with a tap root system, because the roots are located quite deep, and excess moisture in the soil can contribute to rotting of the root system. For example, willow, birch and maple can be safely planted on the site, since these trees are very fond of moisture. There are many more such plants that can be named. The advantage of this method of draining the soil is that by removing excess water, the plants also decorate the site.
If you prefer the smell of coniferous plants, then you can advise planting spruce trees around the area, but then it is better to build mounds on the soil for them in order to protect the root system.
You can also use the idea of creating a hedge. For such purposes, you can use plants such as rose hips, hawthorn, spirea, serviceberry, and bladderwort.
We can also offer alder or poplar. But you probably won't want to grow them on your property if there are alternative options. Because poplar fluff can cause allergies.
A good option would be hydrangea or mock orange, but such plants are only suitable for soils that are not very waterlogged. If flooding does not occur very often, then Amur lilac can also cope with them.
It is better not to consider fruit trees to combat soil flooding. Such trees do not take root in overly wet soils. It is best to choose tree varieties that have a shallow root system. But it is still better to plant trees on small embankments up to one meter high. If we consider berry bushes, then we can, for example, choose a blackcurrant bush.
If you want to decorate your garden with flowers, you can grow perennial asters, swamp iris, aquilegia and others. These flowers, among other things, are natural soil dryers.
It is necessary to carefully monitor the condition of the soil, because excessive moisture can negatively affect its condition and turn normal soil into acidic. To prevent this, it is best to combine the drainage procedure with liming the soil, which can increase soil fertility. As a result, we can say that despite the complexity of draining a plot of land on your own, anyone can do it. How to drain an area without drainage? Now you know the answer to this question. Yes, this will require a lot of time and effort, but the result will pleasantly surprise you. Don't forget that you are doing all this exclusively for yourself and your family.
Some summer residents sleep and dream of how to bring water to their plot, while others - on the contrary, how to take it somewhere far away. Moreover, in the second case, it can be much more difficult to realize what is planned.
Fatal mistake
When buying a dacha, my wife and I made a major mistake - we looked at the plot in the winter (a very tempting price was indicated in the ad), and the seller, of course, only praised it. And in the spring it turned out that it was sort of in a lowland, and therefore, because of the melt water, everything turned into a solid swamp. It’s funny to say: it was difficult to get from home to the toilet in rubber boots. And the barn almost floated away to the neighbors...
I had to accept urgent measures to drain the site .
In a hurry, on a whim, I decided to dig ditches to drain water around the perimeter of the garden and even between the ridges. It seemed to work out: the flood subsided, the ground more or less dried out, and the wife sowed a lot of things. We rejoiced at our successes and spent all our free time in the garden. And then the rains came, and again we had to get into our boots, because all the carefully dug trenches overflowed with water and the flood (albeit on a smaller scale) repeated.
Then I realized my second mistake: I didn’t pay any attention to the fact that our soil is loam, and therefore all the water in the ditches stands rooted to the spot, not being absorbed into the soil. It even started to bloom.
It took about a month and a half to correct this miscalculation. To begin with, I drew a plan for the future drainage system, divided the garden into plots, drove in pegs and began work. And again I almost got into trouble: I didn’t take into account that I had to think about the place where the water would come out, and almost ruined all the work that had started. Okay, I got over it.
I’ll say right away that you need to agree with your neighbors in advance so that they don’t experience any inconvenience from your drainage work, otherwise you might make enemies.
My neighbor Nikolai kindly allowed me to bring the drainage pipe into his drain from. He praised my “geodetic” research and suggested what to do next.
It turned out that there is no need to dig wide trenches at all - narrow and deep ones are enough. Especially for this work, I attached a long handle to the shovel. I dug alone, my wife helped whenever possible - she pulled away the earth. In general, the work was not that hard, it was just tedious.
The soil had to be put into a garden wheelbarrow and taken under the shed by the barn, otherwise the first rain that came would have turned everything into dirty slurry. Well, nothing, as they say, if you put it further away, you will take it closer. Again, at Nikolai’s prompting, I dug trenches to a solid layer: if you stop earlier, the water will stand under the drainage.
Cute grilles
For a long time I couldn’t think of anything to do with planting shrubs. Either the previous owners specially added clay to get rid of weeds, or they didn’t pay any attention to the berry fields at all. After some thought, I decided to completely remove the clay soil and add good fertile soil.
To drain water from the barn and gazebo, I left already dug ditches, only slightly increased the slope of the bottom and lined them with pieces of roofing felt. And I had to tinker with the house more. I combined the grooves dug around the perimeter of the foundation into one and also reinforced the bottom with roofing felt. Of course, the harmony was broken, and in order to hide the grooves, I covered them on top with gratings knocked together from bars. It turned out very nice, especially on the porch. My wife put all sorts of flower pots right on the grilles, and now it seems that everything has always been like this.
I decided to strengthen the bottom of the trenches in the garden using a homemade sledgehammer with a long handle.
And then - the highlight of the whole project - he poured ordinary crushed stone and crushed brick there. I laid pipes on the resulting coating. I wrapped the joints with rubber from bicycle inner tubes and tightened them with wire. And he covered everything on top with fertile soil.
Yes, all these ditches with pipes are reduced to one main drain, and that, accordingly, goes to the drain on the border with neighbor Nikolai. We now have it in common with him. I suggested covering it with a lattice too. Kolya really liked this idea. Now on this lattice we have a whole fabulous clearing of giant mushrooms cut out by a neighbor from logs (my wife, getting emotional, gave old bowls for hats for them).
I would like to drain the area...
Of course, I am not a master, but I am proud that I did everything myself. It was a little clumsy, but the next year everything somehow straightened out by itself and the places where the pipes were laid became invisible. And most importantly, our swamp has disappeared! It cannot be said that after the rains it is completely dry, but the water quickly seeps in and goes away. It doesn’t stand at all under the bushes, although I just left small grooves there towards the slope.
Every spring I come to the garden immediately after the snow melts and check the operation of my drainage system. I can’t say that everything remains at a high level; here and there we have to make adjustments and dig temporary trenches, but the design itself does not fail. But it was worth working without extension just once!
And now our site is already six years old, and it’s impossible to say that there used to be a swamp here. During this time, we became friends with Nikolai’s family, we even removed the common fence, and we are thinking of starting a small pond.
So are we masters now or not? The most important thing I wanted to say is that simple drainage in the garden can be done by yourself, if only you have the desire.
©Vladimir Vasilievich PLETNEV, Kolchugino Vladimir.
 2018 New Arrival Herbal Therapy Lymphatic Drainage Ginger Oil for...
146.85 rub.
Free shipping★★ ★★ ★★ ★★ ★★ (5.00) | Orders (69)
 10 pieces. wild bees Venom massage essential oil patches for…
Large amounts of water interfere with farming and contribute to the destruction of structures. In addition, excess moisture washes nutrients from the soil. A foundation exposed to the constant influence of water deteriorates over time, so it is important for owners faced with such a problem to figure out how to drain the area of water with their own hands.
Water drainage is necessary only on loamy and clayey soils. Sandstones do not need water drainage, since they themselves play the role of drainage.
Choosing a method

To drain water from a summer cottage, several methods are used. Before you start choosing the right one, you need to consider the following nuances:
- How permeable is the soil on the site?
- In what direction does groundwater move?
- The time in which the work needs to be completed.
- Number of buildings on the territory of the dacha plot.
Method 1

It is possible to organize groundwater drainage without using pipes. To do this, you need to dig deep trenches, which are subsequently filled with filter material. The best option for this purpose would be crushed stone and sand. They need to be covered in layers. In this case, it is advisable to use peat, which effectively protects the backfill from dirt.
Method 2

You can drain the area from groundwater using a pipe system. Experts recommend using perforated polymer pipes. The pipe must be laid below the freezing level of the ground.
When using ordinary sewer pipes to drain liquid, holes must be made in them.
How to do the job step by step

Instructions for installing soft drainage
You can use the economical method. But in the process of performing work you need to be prepared for high labor costs. To install drainage you will need:
- hacksaw;
- shovel;
- drainage pipes;
- manual rammer;
- building level and lath;
- wheelbarrow;
- geotextiles;
- crushed stone;
- sand.
The order of work will be as follows:
- At the initial stage, you need to dig trenches that should be located parallel to each other. It is important to maintain a distance of 4 meters between ditches. It is worth noting that the step must be taken taking into account the density of the soil. On heavy soils take a smaller step.
- Choose a place to install a drainage well.
- When performing work, you need to make a system with a slope to drain water into the well. For this purpose it is worth using a building level.
Closed drainage technology

- When installing the system, the ends of the dug trenches are connected into one and lead to a drainage well. It is worth remembering that the trench must be located on a slope. If it is not possible to complete the work using this method, you need to make several drainage wells.
- A cushion of a mixture of gravel and sand is placed at the bottom of the trenches. The layer thickness can reach 50 mm.
- Now you can begin laying the drainage pipes. The most commonly used are perforated polymer products.
- Before laying the pipes, it is important to wrap them with geotextiles. This is necessary to prevent clogging of the holes during their operation. An analogue of the material is coconut fiber.
- Having laid the pipes in place, the trench is covered with crushed stone and sand. During the work process, it is necessary to limit the contact of pipes with the soil as much as possible.
How to make point drainage

If you don’t want to make a large-scale system, you can give preference to point drainage.
- For this purpose, holes are made around the perimeter of the site, the depth of which must be at least 2 m. A distance of 5 m can be maintained between the holes. The diameter of the holes depends on the size of the pipe that will subsequently need to be inserted into them.
- A mixture of sand and gravel is poured into the bottom of the holes.
- At the next stage, pipe sections wrapped in coconut fiber are inserted vertically. It is important to select a pipe diameter such that the drainage pump can fit into it.
Using this method, it is necessary to regularly pump out water from the holes. On average, once a week will be enough. Pumping out water is simple and the process does not take much time.
The above method of draining an area is applicable only if you need to remove a small amount of water when the groundwater level is low.
Draining swampy areas

In order to drain a swampy area, you can resort to a not entirely standard, but effective method.
- Work should begin by marking the direction of the drainage trenches. There is no need for large wide trenches. The ditch should be up to 30 cm wide and two shovels deep. Marking is carried out using rope and pegs. The ditch system should be sloped in a herringbone pattern. Boundary ditches can merge into one main one.
- Before you start digging, you need to lay out polyethylene on both sides of the future ditch. Sod is laid on one side and a layer of infertile soil on the other side.
- Once the ditch is ready, you can place empty plastic bottles in two layers (pre-twisted). They are analogous to special drainage pipes. They are durable and perform their function perfectly.
- Place infertile soil on top of the bottles up to half of the ditch and compact it.
- At the final stage, turf is laid.
The main function of this method is the flow of water through the free spaces into the main ditch. Thus, after rains and snow, the soil will dry out faster.
Video
Watch a video on how to drain a site:
This video shows how drainage work is carried out on the site:
Photo


How to drain a summer cottage with your own hands
The drainage system on the site should be one of the first on the to-do list for its arrangement. The result of reclamation will be:
- Dry soil in previously wetlands; Disappears threat of foundation erosion at home; the problem will become irrelevant washing out winter and garden plantings; Soil acidity will decrease;
The main factors influencing the degree of flooding of the area are:
- swampy area; groundwater.
You yourself can determine the groundwater level. digging a hole. If in summer no water leaves a two-meter hole, it can be stated that the water is close to the surface. Another reason for excessive soil moisture may be the composition of the soil: clay or peat.
Methods for draining a summer cottage
Today, homeowners know two methods of dehumidification:
- Linear system. Its purpose is to prevent the accumulation and stagnation of water on roofs, and to drain it beyond the boundaries of the site using gutters. It is also relevant for combination with the deep method, and does not require special implementation measures. Drainage system or deep drainage. The method involves laying underground channels, laying pipes and a step-by-step sequence of work.
Organization of surface drainage
Before you begin drainage, you should understand the natural slope of the terrain. If there is no topographic plan, track in which direction the water runs. Consider yourself lucky if water rushes to the street. although this fact does not negate the presence of a ditch in front of the house, in which parallel drains from the garden and vegetable garden are connected. It is imperative to separate streams from the garden, since water noticeably washes away centimeters of useful soil. You can ensure a slope in the following ways:
- Use gutter. made with a structurally raised part; Use the technique step sequence when raising the height of the ground;
Reclamation begins with draining stagnant puddles near the house. The system implies presence of dug trenches in low areas or along the perimeter of the entire area. Holes are dug 0.5 meters wide and almost 1 meter deep.
The walls of the cuvettes are formed at a certain angle of 35 degrees. Melt or rainwater moves along the drainage inlet branches into the central ditch, and flows into the storm sewer with a spillway, relative to the degree of the relief. If ditches are laid along the plain, the drainage ditch will take the main load on itself, which will affect on decreasing water level next to the site. A clearly marked slope of the terrain towards the street promotes drainage.
To do this, drainage lines should be point outward. where a transverse trench has been dug to contain the release of water from the site into the storm drain. In the case of the opposite direction, a street transverse trench is dug parallel to the fence, and a longitudinal line is drawn slightly beyond the end of the site.
Storm drains and fill
When the drainage system moves inward, it is necessary to build storm drains. drainage into containers. Their careful organization will already half solve the problem of water drainage. The storm drain consists of:
pipe systems for drains and sewerage.
Large storage containers for water, for example, barrels or special wells, can act as reservoirs. Its depth is determined by the length of the drain pipe bend. The top of the structure should be covered with a fine mesh and sand traps to avoid clogging.
As the well is filled, the liquid is pumped out or several storage points are discharged into a common pipe, mounted at an angle of 30 degrees, through which the water flows into street ditches. In special cases, the well is equipped with a vibration pump.
Mechanism works in support mode. and monitors the level of water accumulation. Usually filled tanks serve as a source for irrigation in hot weather. Trench lines near the house look ugly, and the corners quickly crumble and the trench becomes shallow. For this reason, owners try to strengthen structures in different ways, and often crushed stone filling is used. consisting of 2 stages:
- The bottom of the ditch is filled with large crushed stone. and on top - with a fine fraction. Turf is laid on crushed stone.
Backfill stops soil movement. but the efficiency of the system decreases. An alternative to dumping is concrete or plastic drainage trays. They pave the ditch to support the walls, and metal gratings laid on top protect it from debris.
A beautiful dacha plot with your own hands. Crafts, garden and vegetable garden. How to design a dacha plot.
They quickly become overgrown with grass and become an extension of the lawn. The prefabricated structure is durable, reliable and especially suitable for those who are at risk of water entering the cellar. Important to remember! Crushed lime is pressed. Water does not pass through such a monolith.
The simplest technique for owners of small plots is open drainage. If its location on a hill is unsuccessful, water will begin to penetrate into the area in streams. Dig a hole along the site and the water will flow down like a river.
Channel usually sowed with grass.
The principle of deep drainage
The plot of land in a lowland or next to a reservoir is due to excessive moisture saturation, and simple reclamation techniques are no longer sufficient. Instead of trenches it is necessary lay drains(perforated pipes) and insulating materials. The deep drainage scheme looks like this:
- Water enters storage systems. Having filled the volume, it flows into the main pipe. It is moved into a well. It is discharged into a storm sewer or other water intake (river, ditch).
Important point. the pipeline must pass below the location of groundwater. To determine the level, you will have to contact surveyors. If we are not talking about protecting the foundation, it is permissible to simplify the course of work and place the structures in the ground, based on general calculations:
- with the mineral composition of the soil, the depth of the ditch reaches 1.5 m; and the parameters for a flower garden vary between 0.5 -0.8 m; for garden trees - up to 1.5 m. forest species - 0.9 m.
In peat soil, the dug trench should correspond to 1 -1.6 m. The figures are due to the rapid subsidence of the earth. Polymers are used for reclamation perforated pipes with a grid of holes of 1.5 - up to 5 mm. Certain brands are equipped with a filter sieve that prevents clogging with small particles.
To purchase the right product, you should carry out design calculations, which take into account the degree of saturation with water, the type of soil, etc. Due to the high cost of services, homeowners buy pipes with a diameter of 100 mm.
Installation of drainage on the site
- Are being dug out trenches half a meter wide. The depth is determined by the groundwater level. The bottom of the ditch is paved with a layer of sand and filled with crushed stone. Drains are laid. Polymer structures covered with crushed stone and sand. The filling, by definition, should occupy almost half of the trench. Free space filled with loam and on top with black soil or appropriate fertile soil.
It is advisable to use a layer of geotextile that resists mixing of the lower and upper layers. The purpose of the drainage well is to clean, flush the pipes with streams of water and control the entire system. Bulky reinforced concrete rings are inserted into the dug hole, but at a depth of up to 3 meters, plastic pipes with a diameter of up to 500 mm will do.
Round corrugated versions are also sold. But, any types of pipes involved will have to be additionally washed - once every three years, with a hose through the collector. The wells are placed along the trench, distancing themselves from the neighboring structure at intervals of 50 m. According to the rules, they are required to be mounted at turns and junctions of pits. The result of proper drainage is imperceptible for a glance, a functioning system, protects soil from washing out. and ensuring plant growth. In addition, the completed complex will ensure the stability and original appearance of sidewalk paths, since swelling of the soil is prevented.
drainage of a summer cottage
Reclamation of land is of great importance for growing plants and having a good rest in the summer at the dacha. Drainage is a necessary part of the construction work.
The main reasons for the accumulation of water at the dacha are melting snow, heavy heavy rains for many days. Drainage scheme at the dacha. Draining of the dacha begins with drainage of water around the house. Carrying out drainage at the dacha, they create storm drains, which are discharged into water storage tanks: large barrels or other containers . In the role of water storage tanks on a summer cottage there can be closed point deepened concrete wells, covered on top with nets and sand traps.
The water from them needs to be pumped out, or you can connect several of these points with a single pipe and lead it down a slope beyond the site into a roadside ditch. It is necessary to monitor the accumulation of water in them during the summer season.
The excess should be used for irrigation or pumped out using a pump, so that in places where water accumulates, many blood-sucking creatures do not hatch, which can easily ruin the entire summer holiday. Draining the dacha area improves the soil structure, keeps perennial plants from getting wet and helps keep the foundation of the dacha house in order.
Causes of high humidity in the country
Drainage scheme for a dacha plot. The land at a dacha plot can be waterlogged for several reasons. Either a swampy area was allocated for the construction of the dacha, or the site for construction was determined in a lowland, under a mountain, or the groundwater is close to the surface of the earth.
To determine the level of groundwater, when installing a fence on the site, you need to pay attention to the amount of water in the hole for the post. If there is water in a hole two meters deep until mid-July, despite dry weather, it means that the groundwater level is close to the surface of the earth.
The reason for this may be clay and peaty soils. All these disadvantages need to be turned into advantages by laying surface, linear, point drainage with your own hands.
With sufficient drainage of the site, the acidity of the soil, which occurs due to stagnation of water in the site, decreases. The destruction of the foundation of the house and the death of fruit trees, soaking of perennial crops, berry bushes and winter garlic are prevented.
And at the same time, there are some cultures that really love water. This must also be taken into account when draining a summer cottage with your own hands.
Drainage plan
Layout of a site with a drainage system. First, they draw up a plan for drainage work that will help drain the dacha area. When drawing up a plan, it is necessary to take into account the direction of water flow to the site, noting waterlogged places where the soil does not dry out to normal for a long time, preventing garden work from starting on time.
Decide which drainage of a summer cottage is most suitable: deep or surface, linear or point. To carry out reclamation work with your own hands, you will not need many tools and building materials. You can get by with just one shovel. To create a drainage system on your site, you will need: Do-it-yourself site drainage diagram.
- bayonet and pick-up shovels; cement, sand gravel, water for pouring; iron pallet for mixing concrete; perforated pipes;
- How to drain a site with your own hands, build drainage? Describe the drainage of the site, water removal. Diagram, tips. How to drain the area, remove excess water and moisture? Advise how to build drainage to remove excess moisture. Device, diagrams.
Excessive amounts of moisture can impede successful farming and contribute to the destruction of structures. Excess water washes away nutrients, contributes to soil salinity, and washes away building foundations and tree roots.
Water removal (drainage) is necessary if puddles form on the site after melting snow or heavy rain and last for several days. This indicates insufficient natural water drainage.
Where should the water be drained?
Before you start designing a drainage system, you need to understand where excess water will be drained. There are several options. This approach is recommended for use in regions where seasonal humidity fluctuations are large.
If it is very damp in the spring and drought in the summer, then it makes sense to collect water in the spring and use it for irrigation in the summer. Water is collected in special containers that can be buried or simply placed on the site. There is another option.
You can set up an artificial pond on the site and collect water in it. The village has a common water drainage system. Water can be drained into this system.
Decorating your summer cottage with your own hands
There is unoccupied territory around the site. Water can be diverted to this area. There is no possibility of water drainage .
In this case, excess moisture accumulates in tanks and is then removed by a sewer truck. Often approaches are combined. For example, water is stored in the spring and released in the fall. The need for drainage arises only on clay or loamy soils. On sandy soils, moisture is removed by itself.
Traditional drainage system
Organizing drainage according to the traditional scheme requires capital investments and a large amount of excavation work. The result will be semi-automatic operation. Within a week or two, water accumulates by gravity in the drainage well.
Then, as it accumulates, you pump it out of this well into a storage tank, a ditch along the edge of the site, or simply into the field/forest around. In the drainage well, the water level must be maintained below the desired groundwater level in the area, otherwise the water will stop flowing. There is a more economical, but no less effective way to organize drainage.
It is associated with high labor costs during operation. About it a little below. The traditional drainage system works like this. Parallel trenches are dug across the site at intervals of 4 to 6 meters, depending on the density of the soil.
On heavy soils you need to make trenches more often. Before starting work, you need to decide on a place for the drainage well. The entire system must have a smooth slope towards the well so that the water flows by gravity into this well.
The slope must be controlled using a building level. The lack of the required slope in at least a small section of the drainage trench can ruin the whole thing.
Those ends of the trench that are lower in level are connected to each other by a trench leading to the drainage well so that it has a slope towards this well. If it is not possible to connect this way, you can make several drainage wells.
The presence of wells at the points of connection or turning of the trenches will help when cleaning the system. A sand-gravel mixture of 3 - 5 cm is poured into the bottom of the trenches. Pipes are laid in the trenches for drainage. These are usually polymer pipes with holes.
It is important to ensure that the holes are not clogged with dirt. To do this, the pipes are wrapped in geotextile or coconut fiber. There is also an artificial fiber that looks very similar to coconut fiber.
My experience has shown that geotextiles are completely ineffective in this matter. It gets clogged within a couple of years and stops letting water through. Choose coconut fiber or its synthetic analogue. The trenches are filled to the top with a sand-gravel mixture.
In general, the pipe should not come into contact with natural soil. It should be surrounded on all sides by sand and gravel.
2 Drainage in a summer cottage with your own hands: types of drainage ^
on the topicVideo of the drainage system of the site Click on Play to view
Draining a summer cottage is especially important when the groundwater level is about 2.5 meters from the surface, and is strongly recommended if this level is 1.5 meters. A drainage system is a necessary safety measure, because water can destroy even a solid building. The groundwater level is not the only factor that should be used to guide the construction of drainage systems. It is also recommended to do the drainage of the site yourself if:
- the dacha area is located in a lowland; the garden plot is located on a slope or near the side of a hill; the dacha has clay soils.
You can do two types of drainage at your summer cottage with your own hands:
- deep drainage system. This system is relevant if groundwater is close to the surface. It is necessary to protect basements from flooding and remove excess moisture from the garden. It is always recommended to carry out deep drainage around the house. In the garden and vegetable garden, installation of such a system is required if the soil is clay. Surface drainage system. Serves for drainage of water falling in the form of precipitation (rain, snow). Combines effectively with storm drainage. The surface system, in turn, is divided into point and linear.
Point surface drainage is a water inlet where water flows from drainpipes. The purpose of such drainage is to retain water, preventing the appearance of puddles and dirt. Essentially, this is a small well that is separated by a siphon partition.
The partition is a lattice, which is necessary so that heavy contaminants settle in one of the sections, and an unpleasant odor from stagnant water does not appear. In order to further clean the drainage from debris, you can equip the receiving section with a special basket. A linear drainage system is a network of trays located at a slope to the water collection point.
The trays are installed in trenches on a gravel base. This system involves collecting moisture from fairly large areas: drainage around the house, along paths, in summer cottages.
Linear drainage is effective when the slope of the entire site is more than 3 degrees relative to the horizon, when the cottage is located lower than neighboring areas. Studying the geology of the site will help you find out what type of drainage should be installed. Such research can be ordered from specialized companies.
3 Draining a summer cottage with your own hands using deep drainage ^
on the topicVideo of drainage at a summer cottageClick on Play to view
A practical and economical summer resident will appreciate garden drainage created from scrap materials. It is necessary to dig a ditch, fill it with branches and other objects that will create conditions for the passage of water, and cover it with earth.
This is a simple, free and fast way to organize drainage. The effectiveness of this method is not very high, and the drainage will have to be updated very often. Therefore, it is better to invest money and labor once to create competent deep drainage. Stages of performing work on creating deep drainage with your own hands:
- Study of the relief. For this, a laser range finder and a level are useful (devices with a laser beam that will help determine the distance and height difference between several points); Digging trenches for drainage pipes. Characteristics of the trench: depth – 80–100 cm, width –40 cm, slope to the horizontal – 2–3 cm per meter of length, in the lower part of the drain the slope increases to 4 cm per meter. The bottom of the trenches is covered with a layer of sand 70–100 mm and compacted; A geotextile fabric is laid on top of the sand, the edges of which should be slightly higher than the trench; Crushed stone is poured on top with a layer of 200 mm;
Limestone crushed stone should not be used in the construction of drainage systems; it can cause an increased salt content in the soil.
- Pipes for drainage are laid in the trenches with holes on a layer of crushed stone filter; A layer of crushed stone is poured again; The edges of the geotextile are rolled up. The pipe is wrapped in a layer of crushed stone and fabric, which will allow water to pass through and retain soil particles; The trenches are covered with earth or pre-cut turf; The final stage of the drainage installation will be a collector well. It is located at the lowest point of the dacha territory. Water can be discharged from a well into a reservoir, ravine, or storm drain.
4 Drainage systems for summer cottages: surface drainage ^
on topicVideo of surface drainageClick on Play to view
The purpose of a surface drainage system at a summer cottage is to collect and drain water. Surface drainage of a site is simpler to implement than deep drainage. In this case, there is no need to dig up the territory of the dacha with deep ditches.
The drainage system can be made in bulk or in tray form. But the initial stages are always standard:
- Study of the terrain. Drawing up a diagram of the location of trenches. Usually it looks like this: main trenches go along the perimeter of the entire site, and additional ones - from places where water accumulates; Ditches are dug: depth - 70 cm, width - 50 cm. Main ditches are dug with a slope towards the collector, and auxiliary ones with a slope towards the main ;The walls of the trench must be beveled at an angle of 25–30°.
If the backfill method is used, then crushed stone is poured into the trenches, filling 2/3 of the depth. The rest of the space is occupied by crushed stone of a smaller fraction. Crushed stone can be wrapped in geotextile. Turf is laid on top.
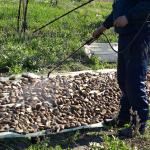
The entrepreneur drained the swamp with his own money
If you are using a tray-assembled system, you must select trays. Trays are ready-made products that serve for drainage and storm water. They can be made of concrete, plastic, concrete with the addition of polymers. Stages of creating drainage using trays:
- sand is poured into the prepared trenches in a layer of about 10 cm. The sand is carefully compacted. Trays and special plastic parts are installed on top of the sand, designed to retain sand and other small debris - sand traps. The trays are covered with a grid so that large debris does not get into the system and to give it a neat appearance view.
Almost every site needs one or another drainage system. For some, it will be enough to establish surface drainage around the house, while others will have to dig deep trenches. But in any case, the efforts will not be in vain.
You will protect your home and garden from the harmful effects of excess moisture, and make your dacha a pleasant place to relax.
http://samadel.ru
Articles on the topic