How to fix spotlights to a stretch ceiling. Fixing the luminaire to the stretch ceiling
Buying a chandelier you like is not difficult at all, but is it suitable for a stretch ceiling? To answer this question, you need to figure out how the installation of fixtures in a stretch ceiling generally takes place, and is it possible to do it yourself?
First of all, it is necessary to determine the type of device and select it in accordance with the design of the room and operational requirements. It is better to choose fixtures for a stretch ceiling even before installing the ceiling itself, in order to immediately foresee all the technical issues. If the ceiling is already installed, it will be much more difficult to hang a new chandelier, so it is better to immediately purchase fixtures and designate a place for them.
For stretch ceilings, by and large, you can use any lamps, but it is better to give preference to models without sharp elements and with shades directed to the sides or down. Otherwise, you risk damaging the canvas. The material from which the chandelier or lamps are made should not get very hot so as not to create a fire hazard.
The choice of bulbs is also very important. For stretch ceilings, it is better not to use ordinary incandescent lamps, because they get very hot. But if there is no other option, make sure that the distance between the lamp and the canvas is as large as possible, and do not use products with a power of more than 40 watts. The ideal option would be energy-saving or halogen lamps.

A wide selection of lighting products allows you to find an option for any interior, but at the same time, a large assortment complicates the choice. A lamp can decorate a room with itself, emphasizing its advantages and hiding flaws, but if you choose it incorrectly, the effect will be just the opposite. In the case of stretch ceilings, it is necessary to choose a lamp, focusing on the texture of the surface. So, if the room has a white matte ceiling, follow the classic rules for choosing lighting, since such a surface is almost identical to a regular whitewashed ceiling. If the canvas is glossy, then it will give glare and reflections. In this case, the lighting should be moderate, since the reflection on the ceiling will be a mirror copy of the light bulb.

But still, it is not the appearance of the lamp that is decisive, but the way it is fixed. The stretch ceiling itself is unable to hold even the lightest appliances, and therefore you need to decide in advance on the mechanism for their installation.
Fixing the luminaire to the stretch ceiling depends on the type of device:
- Overhead ceiling lights have the same fasteners as chandeliers, and installation takes place on the main ceiling.
- Recessed luminaires for stretch ceilings are placed on the back of the canvas, so that only the outer side of the ceiling remains outside, and the light bulb with the rest of the mechanism is located behind the canvas.
The latter type includes spotlights, which have been very popular lately, especially for stretch ceilings. They are compact, bright, consume little electricity and are able to provide full-fledged functional lighting, while decorating the interior. However, not all spotlights are suitable for installation. So, it is necessary to choose products with a round base part, and the shape of the outer part does not play a role. It is also important that the seat of the device, which will be located behind the canvas, must be at least 10 mm. When installing spotlights, a thermally insulating rigid gasket must be placed between the outer part and the canvas, and the side of the lamp must be wide enough to cover this gasket.
Helpful Hint: If you are going to mount hidden devices, for example, to create an imitation of the starry sky, choose low-voltage products from well-known manufacturers. Quality in this case should come first, since it is quite difficult to dismantle or replace a hidden lamp. For low voltage 12 W appliances, you will need to purchase a transformer. Ideally, each luminaire needs a separate transformer.

Mounting Features
Before proceeding to the description of the installation of fixtures in stretch ceilings, we suggest that you familiarize yourself with a number of useful tips. They will help you better understand the specifics of the work and do everything without mistakes.
First of all, turn off the power supply in the house or apartment. But even in this case, do not neglect personal safety equipment - work with rubber gloves. If you have hidden wiring at home, find or plan it in advance. You can find out the direction of the wires with a special device. This data is necessary so as not to disturb the main wiring while drilling the ceiling.

Do not tighten the fasteners all the way, otherwise you risk cutting the blade with the sharp edges of the rigid mounting bar. Always use plastic or rubber grommets for a firm hold. When mounting spotlights, self-tapping screws are often used. To safely screw them into the surface, glue small pieces of plastic in these places.
Mounting methods
There are two ways of fastening fixtures to a stretch ceiling: with bolts and screws or on a hook. The choice of each of them depends on the design of the lamp: its dimensions, weight, performance characteristics. In both options, it is necessary to pre-install a mortgage - a special bar that will hold the lighting fixture. This is an ordinary wooden plate attached to the main ceiling with anchor bolts or dowels. It allows you to attach fixtures that weigh a lot.

If bolts or screws are used to fasten the lamp, a slot is made in the stretch ceiling, the edges of which are glued with adhesive tape. After installation, the canvas is fixed around the chandelier with self-tapping screws. If it is decided to mount the chandelier on a hook, it is first screwed into the mortgage bar, and then a small slot is made in the stretch ceiling. After mounting the chandelier, the slot is closed with a decorative overlay.
For a better fixation of fixtures, it is recommended to use an intensifying ring with a thickness of at least 5 mm and a diameter corresponding to the diameter of the device. It is glued to the film with a transparent construction adhesive, and after it hardens, the canvas is cut along the inner diameter and only then the lamp is mounted.
Spotlights
First of all, you need to determine the location of the fixtures on the stretch ceiling. It is better to do this even before installing the tension web itself, and the wiring can be done after the frame is attached.

Step-by-step installation of spotlights on a stretch ceiling:
- Install the frame and mark the ceiling plane.
- Choose a place where all lighting fixtures will be connected. The junction box will be located at this point. For her, it is necessary to take such a place that it can be accessed at any time even after the installation of the canvas.
- Calculate the cross section of the electrical wiring depending on the power consumption of the lighting fixtures. This article will help you figure it out. Take the material (cables and wires) with a power margin of 20% in case of installing additional devices.
- Drill channels in the ceiling leading from the switchboard to the connection points. To do this, use a grinder with a circular nozzle for working with concrete. Keep in mind that it is better to place the wires in a corrugated tube for greater safety, so the dimensions of the channels must be appropriate.
- Connect the cables to the switchboard and route them through the channels.
- Attach the wires to the ceiling. When creating connections, do not allow twists. It is better to use terminal blocks for this - they are safe and provide a more reliable connection.
- At the installation points of the fixtures, make small wire allowances (about 10% more than the required length).
- Attach the mounting posts to the main ceiling, then use a punch to fix the brackets.
- Connect spotlights and check their operation. Evaluate not only the functioning of the wiring, but also the quality of lighting in the room - at this stage, you can still change the position of the lamps, and after attaching the canvas, it will be too late to fix anything.
- Keep in mind that if you use ordinary incandescent lamps when lighting, then the plane of the stretch fabric will be lowered by 10 cm. We remind you once again that it is better not to use such lamps with a power of more than 40 W for stretch ceilings. If there are energy-saving light bulbs in the lamps, the canvas will fall no more than 4 cm, and here you can not comply with power restrictions - energy-saving lamps are unable to get very hot.
- Now you can stretch the canvas and mark the places where the lamps are installed.
- Glue a plastic ring along the installation contour of each lamp. You can buy it in a specialized store along with lighting fixtures or cut it yourself. These rings do not allow the canvas to tear due to the load that the fixtures give.
- Press the rings to the film and wait for the glue to dry completely. Only after that it is possible to cut holes in the web along the inner diameter of the rings and connect the contacts to the terminals.
- Press the spring mount to the body, adjust the position of the device and set it to the level of the canvas.
Connect other devices in the same way. In this case, it is better to bring the wires to each of them separately, avoiding fastening on the same line. Then, if the light bulb burns out, only one lamp will go out, and not the entire branch.
Chandelier fixture
Chandeliers are much heavier than spotlights, so a frame or ceiling hook is used to mount them (the easiest way). Let's consider each of the methods in more detail.

Step-by-step installation of a chandelier on a ceiling hook:
- Punch holes in the ceiling with a perforator and fix the ceiling hook to the anchor bolts.
- Adjust its position so that it is slightly above the ceiling plane - so the glass of the chandelier will fit snugly against the stretch fabric.
- Try on the chandelier to the ceiling, and if there are no gaps, hang it.
If there is an old hook on the ceiling, but you are not satisfied with its location, do not cut it off, but simply bend it - it may come in handy in the future.
The second method involves attaching a heavy lamp to the mounting plate. You can make it from any wooden block. Attach it with dowels to the main ceiling so that it is at the level of the ceiling or slightly higher. After adjustment, you can fasten the lamp to the bar with self-tapping screws or bolts.

Helpful Hint: To securely and securely attach a mounting plate to a concrete ceiling, first drill holes in it, then place it against the ceiling and mark the mounting points. It remains only to drill holes in the ceiling and drive in the dowels. So you will be sure that the attachment points on the bar and in the ceiling will match.
After mounting the attachment points of the fixtures to the canvas, you need to decorate. To do this, use special caps and sockets made of polyurethane resin. Products imitate gypsum stucco molding and fit very harmoniously into the interior. If this method does not suit you, close the junction with a small piece of ceiling fabric - just cut a circle out of it with a diameter slightly larger than the attachment point and put it on the glue. Also recently, interior vinyl stickers that imitate artistic painting have become popular.
The installation itself is not difficult. The main task is to do the wiring correctly. Finally, we propose to summarize all the above video information about fixtures for stretch ceilings:
For a stretch ceiling, it is important to correctly install fixturesthat meet all the necessary requirements. The polymer film is highly thermally sensitive and can be easily damaged by sharp objects.
Two main types of lighting are used in the premises: the main and backlight. Ceiling sources are used as the main source, for example, chandeliers placed in the central part of the room. The following types of lamps can be used: raster, LED, fluorescent. Spotlights, to which LED strips can be added, are usually built into the ceiling, they serve as a backlight, although they can be the main ones.
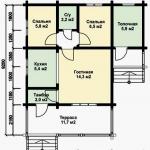
The location of spotlights and chandeliers on a stretch ceiling
Features of lighting premises
Lighting in the kitchen allows you to efficiently illuminate the work area. In the living room or bedroom, it can be used to create soft light and a comfortable environment for the eyes while relaxing. The ability to choose from a variety of luminaire models provides a variety of design options.
Due to the fact that the strength of the film is highly dependent on heating, the power of the lamps is limited:
- incandescent lamps - 60 W;
- halogen - 36 watts.
Before starting the installation of the canvas, wiring is first laid, and places are prepared for mounting each lamp. It is especially important to hang heavy chandeliers securely. Do-it-yourself preparatory work must be done with high quality, otherwise it will be difficult to correct mistakes later.
The following requirements are imposed on luminaires on stretch ceilings:
- Seats on the canvas must be necessarily round, even if the lighting elements are made in a different shape.
- The thermal insulation ring is covered with a light to improve the aesthetic appearance.
- Lamps protruding from the ceiling should be with upper screens so that there are no bright spots on the canvas.
- The power of the lamps is limited so that the film does not deform from heating. It does not withstand temperatures above 60 0 C. If measures are taken for additional thermal insulation, the power of spotlights can be increased.
Luminaire types
Luminaires can be mounted outside and inside the ceiling. In the external design, the light bulb is placed below the level of the canvas and cools better, as it is located in an open space. This type of luminaire is used more often, because it illuminates the room better due to the wide dispersion angle and provides a smaller indentation of the ceiling from the ceiling. At the same time, the thermal ring sometimes remains visible, which does not look very aesthetically pleasing.

Luminaires on the stretch ceiling: a - outdoor; b - internal
When the lamp protrudes far enough beyond the canvas, you can increase the power of the incandescent lamp to 70 V.
When interior installation is done, the light bulb is above the level of the stretch ceiling or protrudes down quite a bit. Only the protective cover is visible from the room.
When installing interior fixtures with your own hands, you should pay attention to the design, since the appearance can easily be spoiled by improper installation.
Indoor placement of the luminaire is less common as the fabric heats up, but when using LED or fluorescent lighting with little heat, this is not important. A spotlight creates a narrow luminous flux directed to a small area. It is better to trust its installation to specialists, since do-it-yourself installation requires certain skills, and if you make mistakes, you can worsen the properties of the canvas. Competent installation makes it possible to create a beautiful backlight due to the point direction of light.
The most common light sources for stretch ceilings are incandescent and halogen lamps, as well as LEDs (in R 63, FT 9240, MR 16 lamps). Popular models are shown in the figure below.

Common spotlights: a - R 63, b - FT 9240, c - MR 16
They are supplied with a voltage of 220 V, but there are models for 12 V. Here you need to install a step-down transformer. When installing a lighting system with your own hands, you need to find in advance the place of its hidden location.
Fluorescent energy-saving lamps are relatively large and are rarely used in stretch ceilings. It is advisable to use them when you can increase the distance from the base ceiling.
LED lamps are well suited for decorative lighting. Soft lighting is used in the form of LED strips around the perimeter of the room or in other areas on combined suspended ceilings, where drywall constructions are also used. They are often placed behind the canvas of the stretch ceiling.
Selecting the number of fixtures
Light sources are chosen of the same type. The distance between them is set on the basis that each of them illuminates an area of 1.5-2 m 2. Different rooms need their own illumination, which for incandescent lamps is:
- bright - 20 W / m 2 (living room, children's);
- medium - 15-18 W / m 2 (kitchen);
- muted - 10-15 W / m 2 (bedroom, hallway).
In a living room with an area of 25 m 2, a power of 25 m 2 ∙ 20 W / m 2 = 500 W is needed (8 lamps with a power of 60 W each). If you use halogen lamps that give 1.5 times more luminous flux, such a room will require a power of 330 W (9 lamps with a power of 36 W each). Fluorescent lamps require 5 times less power, and LED - 10 times less. If chandeliers are used for the main lighting, the number of backlights will be less.
Too many light sources spoil the appearance of the ceiling, and the canvas can also be deformed from overheating. The design of a stretch ceiling can be improved by using dancing lamps in its frame, in which streams of light are periodically directed in different directions.

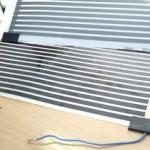
LED strips in stretch ceilings
The distances between the lamps are about 100 cm, and the distance from the wall is 60 cm.
Installation of fixtures
As the main lighting, chandeliers are often preferred that meet the following requirements:
- The base must not overheat. LED and fluorescent lamps heat up the least.
- Lamps can be placed separately or in plafonds, and the light is directed downwards or to the sides.
- The complex design of the chandelier should be avoided, and energy-saving lamps should be preferred.
- Traditionally, chandeliers are mounted on anchors built into the ceiling. There should be no visible gap between the cup and the ceiling. In another way, you can mount the structure on a mounting plate, under which embedded elements are made behind the canvas.
Before purchasing spotlights, you should determine the distance between the stretch ceiling and the ceiling, depending on the type of light sources:
- incandescent lamps - 9-12 cm;
- halogen - 6-7 cm.
Stretch ceiling is not load-bearing. The luminaires are held on adjustable stands (5). Their fastening to the ceiling is done on dowels.

Installation of a spotlight on a stretch ceiling
Heat-shrink rings (9) are first glued to the fixtures and holes are cut inside. They protect the canvas from spreading, as well as from heating.
Particular attention is paid to the quality of heat shrink rings. The best quality molded plastic products are made in Germany. The use of cheap fakes leads to their destruction and rupture of the canvas.
Wires are removed from the holes, their ends are stripped and connected to the lamp terminals.
The connection is made according to the instructions, as the contacts on the fixtures are marked: L - phase, N - zero, PE - ground.
The luminaires are attached to the rings with two spring brackets on the sides, which tightly press it to the ceiling.
Installation. Video
The video below is about the installation of stretch ceilings with the subsequent installation of fixtures.
Before installing fixtures and stretch ceilings with your own hands, preparatory work is important: marking, wiring, fastening mortgages and racks to ceilings. When the installation of the stretch ceiling is completed, the locations of the chandelier and spots are located on it, thermal rings are glued, holes are cut, lamps are connected and installed. Work should be done in stages, carefully and without errors. The result is a beautiful ceiling with spectacular lighting.
The popularity of stretch ceilings is growing day by day. Perhaps, there are simply no other materials on the market that can compete with tensile structures. But today we will not talk about the most stretch ceilings, but about how important it is to make the right choice of lamps for PVC film. After all, not all lamps can be installed, but only those that meet certain requirements regarding appearance, power, etc.
Stretch ceiling lighting features
When planning lighting, you will certainly want it to be even, so that the light is not too bright, does not distort colors, does not hurt the eyes, and does not interfere with the perception of the environment. Is it worth recalling that Ilyich's well-known light bulb, which is suspended from the ceiling in a carbolite cartridge, cannot meet all the requirements. But along with this, even the most spectacular chandelier will not give the desired lighting, it will only attract undue attention to itself, and it will still not be possible to avoid relatively dark corners in the room.
All of the above problems can be eliminated with the help of such spotlights for stretch ceilings, which are shown in the video about lights for stretch ceilings. Smooth and high-quality illumination of the working area in the kitchen, soothing soft light in the living room relaxation area, absence of darkness and a comfortable environment for the eyes - all this is fully achievable with this special type of lamps.

Illumination of the stretch ceiling with built-in spotlights is carried out according to one principle. A supporting structure called a rack is initially attached to the base ceiling, on which the built-in elements will subsequently be held. And only after stretching the web, holes of the required diameter are cut in it, which are fixed with reinforcing rings. After that, if necessary, a heat-insulating ring is glued and a spotlight is installed.
Varieties of lamps for stretch fabric
The popularity of spotlights is constantly growing, their diversity is becoming wider. Most of the luminaires that are used to illuminate traditional ceilings and illuminate the home will also be suitable for stretch ceilings. According to the nature of the fastening, there are 2 varieties of lamps for stretch ceilings: with an internal and external location of the light bulb.
What are the lamps
When placed outdoors, the light bulb is below the level of the stretch ceiling and is separated from it by a platform. Surface-mounted fixtures have the same mounting method as a traditional chandelier and are preferred because the light bulb is not located in a confined space and cools quickly enough.

Such lamps do not affect the service life of the ceiling, they illuminate better and brighter, as they have a wide dispersion angle, they “eat up” less than the height of the stretch ceiling due to the outdoor placement of the light bulb. Among the shortcomings of overhead lamps, perhaps, the following can be noted: the protective thermal ring is not closed by the body of the lamp, this slightly spoils the aesthetics.
The light bulb, when located internally, is hidden above the level of the stretch fabric and almost does not protrude beyond its level. Recessed luminaires for stretch ceilings are mounted in such a way that the housing, together with the bulb, is built into the stretch fabric, and only a small visible part of the housing is visible from the outside of the ceiling, called the decorative ring, or the cover glass.

Luminaires with internal placement of the light bulb are less recommended for installation. The light bulb is located inside the stretch ceiling, and this affects the process of its cooling, in addition, the ceiling and the thermal ring itself overheat. Spotlights have a narrow beam of light, which does not allow illuminating a large area. In case of incorrect installation, irreparable changes in the type, characteristics and properties of the tension web are possible.
However, in most cases they are chosen, even agreeing to comply with a number of strict restrictions: for example, the use of cast lamps, exclusively stamped, is unacceptable. And they choose such lamps, since the point direction of light can change the usual fall of shadows in the room and create an interesting lighting exposure. The thermal rings are hidden from the eyes by the side of the lamp.
What are the lamps
Mortise and overhead lamps can have ordinary incandescent, energy-saving fluorescent, LED and halogen lamps. The main fixtures for the stretch ceiling are MR 16 with a halogen lamp and R63 with an ordinary incandescent lamp.
Energy-saving fluorescent lamps are rarely used with stretch ceilings, since this type of light bulbs are large. Accordingly, a luminaire with a fluorescent lamp, when attaching the luminaire to a stretch ceiling, needs a significant distance between the base and stretch ceilings.

An interesting enough solution for a stretch ceiling is recessed fixtures with LED bulbs. However, they cannot be used as the main working lighting due to limited power, but decorative lighting will come in handy.
In addition to traditional lamps, you can make your choice in favor of the LED strip, which is usually installed behind the canvas. It is able to create soft illumination of certain functional areas of the room, for example, around the perimeter of the room or in other parts of it.
Requirements for spotlights
Far from any lamp can be built into a stretch ceiling, regardless of the desire of the owner. Recessed luminaires for stretch ceilings must meet certain technical requirements.
Appearance
First of all, the fixtures for the stretch fabric should be round in shape. Moreover, this applies to a greater extent to the landing hole, which is required for installation in the stretch ceiling of the lamp. It often happens that a square or other shaped lamp has a round seat inside. A similar spotlight is also suitable.

The housing of each luminaire must have a mounting flange on the inside. When choosing a luminaire, pay attention to the difference between the inner and outer diameters of its body. This indicator should be at least 10 millimeters. This is necessary so that the lamp installed in the stretch fabric closes the heat-insulating ring glued to the ceiling. Otherwise, the tread ring will protrude beyond the luminaire, and it will be noticeable to the naked eye.
It is desirable that the bulbs of recessed fixtures be covered with a special opaque paint to prevent light from penetrating the ceiling. If you use other lamps in fixtures, the stretch ceiling may shine through, while a small light halo will be created on it around the lamp.
Power
When choosing fixtures for a stretch ceiling, be sure to take into account the limitations on the power of the lamp bulbs and the restrictions that apply to the distances between the surface of the stretch ceiling and the lamps, since the PVC film can deform or melt when heated above 60 degrees. Therefore, the installation of double thermal rings is recommended.
To eliminate the risk of damage to the stretch fabric from strong heat in the place where the lamp comes into contact with it, choose incandescent lamps with a power of less than 60 W, or halogen lamps with a power not exceeding 35 W. With additional thermal insulation, you can use more powerful lamps in spotlights.

If overhead fixtures have an outer part far protruding from the level of the stretch ceiling, where a strong lamp is located, then power restrictions can be neglected. In some cases, they are no more than 70 watts. An alternative option is an energy-saving light bulb, which almost does not heat up.
Installation
The distance from the base surface to the stretch fabric with the internal placement of fixtures "takes" 6 - 7 centimeters for halogen lamps and 9 - 12 centimeters for incandescent lamps. The distance from overhead fixtures to the surface of the stretch fabric should be at least 15 centimeters, but it is better if this figure reaches 20 - 40 centimeters.
Contact between the body of the stretch ceiling and the spotlight is unacceptable in order to avoid punching the canvas. In the photo of stretch ceilings you can see the gap between the canvas and the side of the lamp. On the other hand, the maximum diameter of the hole that can be cut for mounting the lamp in a stretch ceiling is 15 centimeters. It is recommended to install in a room where there is such a type of fixtures, dimmers - light dimmers.

When selecting spotlights for installation in the bathroom, kitchen and pool room, it is advisable to take special fixtures with protection from dust and moisture. Such products are usually marked "IP65" on the packaging if the manufacturer uses European standards for marking lighting equipment.
Halogen bulbs in spotlights can be 220V or 12V, only it is mandatory for the latter to use a transformer whose power is greater than the total power of the connected lamps. Each luminaire is best connected, from the position of subsequent operation, to a 60 W transformer.
Calculation of the number of fixtures
It is advisable to buy lamps of the same type for each type of lighting. When installing lamps in a stretch fabric, remember that the light from the lamp is directed downward, illuminating an area of about 1.5 - 2 square meters. Therefore, you should correctly calculate the number of fixtures. And, based on practice, it is recommended to install one lamp on 1.5-2 square meters of the room.
It should be noted that the ceiling structure is not recommended to be oversaturated with recessed lights. A lot of recessed lights can destroy the entire design to the ground and bring unattractiveness to the surface of the ceiling, as well as provoke the appearance of defects in the canvas. To highlight the "bright" design of the ceiling, the so-called dancing lamps are used in its frame, from which streams of light are directed in different directions, "dancing" at the same time.
Ceiling markings
Previously, even before attaching the stretch ceiling, you need to decide how to place the lamps on the surface. This is especially true when it is planned to create a ceiling with several levels. Select each level in a separate lighting circuit and distribute the light sources accordingly. So, let's take the distance between the lamps at the level of one meter, the distance from the walls is about 60 centimeters.

The luminaires must be distributed so that their installation sites do not fall on the installed baguettes, and maintain a distance of 25-30 millimeters from the edge of the hole for the spotlight to the nearest baguette. When placing fixtures on a stretch ceiling, also consider the presence and placement of a chandelier on the ceiling. When used simultaneously, spotlights can be moved to the sides. Or with built-in lamps to separate the lighting contours of various functional areas.
Installation of adjustable stands
Naturally, a stretch ceiling is not able to withstand such a load as lighting fixtures, therefore, the preliminary stage in the installation of spotlights is the installation of embedded elements and special adjustable racks, due to which the fixtures are fixed. The stand consists of 2 guides and a special ring, which has an inner diameter that corresponds to the mounting diameter of the spotlight. The guides provide the possibility of adjusting such a ring in height.

When performing this procedure, it is necessary to ensure that the mortgages are placed in such a way that their body does not interfere with the subsequent installation of the tension web. More often, adjustable posts are fixed to the base base with screws and dowels. The luminaire, which is inserted into the opening of the stretch ceiling, is located on a rack, which is fixed to the main ceiling.
Installation of spotlights
After that, you need to perform electrical work, which consists in laying the cable to the installation site of each device. After a series of preparatory work and installation of the stretch ceiling, you need to proceed to the final part - the installation of fixtures in the stretch ceiling. For this purpose, it is necessary to fix (glue) a round profile directly on the film in the places where the mounting brackets are located, which is intended for mounting fixtures.
Before fixing the lamps, it is necessary to cut holes in the canvas for the future lamp along the inner contour of the round profile. Holes in the PVC film must be cut precisely to avoid defects in the web during installation.
Then, using the adjusting screws, you need to set the mounting racks flush with the ceiling material, bring out the electrical conductors through the holes obtained and connect the devices. The design of the lamp has a heat-insulating ring, which must be put on the body before installation. It is necessary to regulate the heating of the tension material of the ceiling and to separate the lamp from the surface of the material.

When installing the PVC film on the ceiling surface, pull the wiring through the holes. In order for the fixtures to be fixed evenly on the ceiling, after installing them, you need to perform the adjustment procedure for the fixtures, then you can screw the bulbs into all the fixtures and check the stretch ceiling for the correct lighting.
With well-arranged spotlights, the lighting will not tear your eyes, but powerful. If the stretch ceiling has a large area, then to improve the operation of the lighting system, you can install a transformer, which is designed to save energy and the ability to install low-power lamps with low current consumption.
Installing a chandelier on a stretch ceiling
The most popular way to mount a chandelier on a stretch ceiling is to use a ceiling hook. This fastener is created as follows. It is necessary to fix a special hook in the concrete ceiling and check the reliability of its fastening by placing a special load on it. After that, you need to make wiring, install a stretch ceiling, cut a hole in it in the center of the hook and glue a special thermal ring.
The main fastening for the stretch fabric is a standard ceiling strip. To do this, you need to mark the center of the installation of the chandelier, pull a special thread, which will be attached to the profile with a glazing bead. Next, measure the cup of the chandelier and the length of the ceiling mount and saw off the timber. The beam must be made a little longer than the cup of the lighting device so that the chandelier does not stagger.

Next, measure the distance from the base to the lace and install the beam exactly along the thread, prepare the wiring and install the stretch ceiling, cut a hole in the center and glue the thermo-ring. Attach the ceiling mount to the beam in the center and install the chandelier.
If you need to mount large chandeliers, you need to use a mount such as cross fasteners. Such mounts are prescribed mainly for chandeliers in the form of a flat square or large plate, parallelepiped or oval, which fit snugly against the stretch ceiling. Install this fastener as follows. Everything is done in the same way as when installing traditional ceiling fixtures, only you need to attach plywood to the beam, which has an area slightly larger than the base of the chandelier plate, or attach plywood to special suspensions.
Anyone wishing to install stretch ceilings must first consider the lighting option. A chandelier will be a good decoration for the interior of the room. Home craftsmen should learn how to install a chandelier on a stretch ceiling. Video editing step by step will help them in this work. Self-installation of the lamp is not particularly difficult. In order not to make mistakes with fastening, a chandelier is bought in advance.
All stages of installation must be calculated immediately, since after installation it will be very difficult to remove the lamp or replace it with a new one. Too bright light can cause heating of the ceiling cloth, its darkening and deformation. When choosing a luminaire, the following requirements must be considered:

An important condition when choosing a chandelier will be how it fits with the interior of the room. The wrong choice can spoil the design of the room. You should not choose models with a wide base, as a lot of dust collects there, which will be very noticeably reflected on the ceiling surface. For a large room, use a large chandelier, and vice versa for a small one.
The use of the ceiling covering and the lamp installed on it depends on how correctly the installation was carried out. If the installation technology is violated, then the canvas may break along its entire length. A chandelier can be hung from a stretch ceiling in different ways. Depending on the design of the chandelier, there are the following options for its fastening:
- hook fastening;
- fixation on a cross-shaped panel;
- bolting;
- plank mounting.
To prevent the appearance of web breaks, plastic protective rings are used. They are attached to the surface with glue. For gluing, you can use Moment glue. After firmly fixing the ring, cut a hole in the ceiling fabric for the hook and wires.
If new wiring is needed, then a cable is used for it. VVGng-LS or VVGng-LS that can withstand high loads. The cable can be laid in an open way, but for protection against short circuits, it is placed in a corrugated casing and brought to the attachment point.
Hook installation
 The anchor hook is installed when mounting the frame on a stretch ceiling. You can hang the chandelier when the canvas stretches and dries. This is the most reliable installation method, but it requires attention and accuracy.
If there is already a hook on the ceiling, then you can use it to hang the lamp. A thermal ring is installed on the ceiling first. This is done to protect its fabric from damage in the place where the hole for the hook and wires will be cut.
 If the length of the existing hook is too short, then a new mount of a suitable size is installed to mount the chandelier. In this case, a hole is drilled with a drill to install an anchor with a hook. Anchor spacer must fit exactly into the hole, after which the suspension nut is tightened until the sleeve is completely unclenched.
After that, the installation of a suspended ceiling is carried out. When the work is over, find the place where the hook is fixed and stick it there plastic ring. Its size is chosen so that it is completely covered by the cap of the chandelier. After the glue dries, you can cut a hole, pull out the wires and attach the chandelier to the stretch ceiling. Then the wires are insulated and hidden under the cap.
With this installation method, you can easily replace the chandelier with a new one. When buying a new lamp, you need to ensure that its cap is no less than that of the old one.
 Many models of small modern fixtures are designed for mounting on a bar. They are equipped with a large closing cap.
To lower the luminaire to the level of the suspended ceiling, a wooden plank is fixed to the ceiling plate with dowels. Its thickness should be 5 mm less than the distance from concrete to canvas. This is necessary so that the bar does not stand out on the surface. Instead, you can use a piece of plywood with small metal legs attached to it.
After stretching and drying the ceiling cloth, a plastic ring is attached at the location of the plank. Then the inside is cut out of it. The luminaire bar is attached to the base with self-tapping screws.
Then they pull it out and insulate the wires, fix the lamp to the stretch ceiling and cover it with a cap. If she has a metal cap, then a material with low thermal conductivity is laid between it and the ceiling covering.
 For a heavy ceiling lamp, the method using a cross is more suitable. In this case, make five holes in the ceiling at once using thermal rings. Four of them are designed for a cross, one for a chandelier. The cross is installed when the frame is fastened, after which the ceiling is pulled. The wires are pulled through the cut hole. The chandelier is mounted on a cross, the connection is closed with a cap, which is fixed with decorative nuts. You can also use an I-plate to install the luminaire.
After installing the chandelier, you need to connect the electricity. When installed correctly, all the lamps light up, otherwise a mistake was made somewhere. Usually everything turns out right away, since it is not difficult to mount the lamp. Sometimes when buying a new chandelier, it turns out that its cap is smaller than that of the old one. In this case, a decorative overlay helps.
The main thing when installing a ceiling lamp is accuracy and lack of haste. It is better not to save and use energy-saving lamps that last a long time and do not heat the surface. This will help preserve the coating and increase its life.
The beauty of a stretch ceiling is hard to dispute, it is obvious. But what about the functionality? More precisely, with the arrangement of lighting. How exactly is the installation of fixtures in a stretch ceiling formed by a PVC film sensitive to heat and easily damaged by sharp objects? - Consider in detail the features of the selection and installation of fixtures in a stretch ceiling.
As a rule, two types of lighting are used in the house: main and backlight. The main source of lighting can be a ceiling lamp: raster, fluorescent or LED, located in the center of the room. Recessed spotlights and LED strips are used as an additional source of illumination - illumination. With stretch ceilings, you can use almost any lighting fixtures, but due to the heat sensitivity of PVC film, there is a limitation on the power of the lamps (incandescent up to 60 W, halogen - up to 36 W). Installation of fixtures in a stretch ceiling is carried out according to a pre-planned scheme, while taking into account the layout of the room and the necessary general illumination.
Fixing points for fixtures must be prepared in advance (before installation of a stretch ceiling) and electrical wiring must be connected to them.
Possible mounting options
When choosing a chandelier, one should be guided not only by personal preferences, color compatibility and stylistic consonance of the lighting fixture with the rest of the interior elements. First of all, it is important to meet the following requirements:
- the base of the chandelier should not heat up;
- lamps should be placed inside the shades, have a side or bottom direction.
Try to avoid complex structures whenever possible. It is highly desirable to use energy-saving lamps.
The preparation of the chandelier attachment site before installing the stretch ceiling depends on the design features of the attachment of a particular model. There are several mounting methods.
Mounting the device on a hook
The traditional method, which existed even before the mass use of stretch ceilings, is familiar to almost everyone and to this day is the most reliable. The essence of the method is that the chandelier is hung on a metal anchor or hook built into the floor slab during the construction of the house.
It is only necessary to choose a hook of the required length, make sure that it is strong and matches the level of the ceiling (the hook must be above the level of the film so that there is no visible gap between the chandelier cup and the ceiling).
Luminaire with mounting plate and step-down transformer
Fastening with a mounting plate
In this case, the chandelier is mounted on a special mounting plate (included with the chandelier). It is necessary to make a wooden base, the height of which is determined by the level of the stretch ceiling film. Such a base should be firmly fixed to the main ceiling with dowels and self-tapping screws. A puncher is used to drill holes for dowels. Subsequently, you need to attach the mounting plate of the chandelier to this base.

The cross-shaped plate for fixing the chandelier is fixed with dowels and self-tapping screws
Mounting with cross plate
In this way, large chandeliers are fastened. The cruciform plate is made from a piece of plywood to which tin legs are attached. The legs are securely attached to the ceiling, thanks to their flexibility, the height of the plate is adjusted. In the center of the plate is a hole for wires.

Plate for mounting the chandelier, the position of the lighting device is adjusted by bending the tin legs
Installation of spotlights
It makes sense to purchase spotlights even before installing the stretch ceiling, in which case it is possible to measure the length of the spotlight with the distance between the base and stretch ceiling (if it is necessary to install spotlights, the stretch ceiling should be at least 6 cm lower than the base one). In spotlights, fluorescent, LED, halogen and incandescent lamps are used.
In our case, spotlights with additional thermal insulation, or fluorescent and LED light sources, are best suited, since they heat up the least.

Scheme of mounting a spotlight in a stretch ceiling
Before mounting the ceiling, it is necessary to perform preparatory work - laying wires and installing fixtures for fixtures. In the case of using lamps with a voltage of 12V, provide a place for placing a step-down transformer. In places where spotlights are installed, special suspensions on metal plates are attached to the base ceiling, which makes it possible to adjust their height - the lower suspension plane should be located at the level of the stretch ceiling.
After the preparatory work, a stretch ceiling is mounted, a special plastic ring is glued to the places where it is necessary to make a hole in the film, when the glue is firmly “grabbed”, the film in the center of the ring should be carefully cut with a clerical knife. Next, pre-laid wires are taken out through the hole obtained and connected to the lamp with special contacts. Then follows the installation of the lighting fixture in a manner consistent with its design.
Installation of fixtures in a stretch ceiling requires accuracy, accuracy, certain knowledge and skills. Such work can be entrusted only to a professional in their field.
Related Articles