How to make an electric boiler for heating your home with your own hands. We make an electric boiler with our own hands How to make an electric steam boiler yourself
Electrode boilers have an extremely simple design. They provide relatively quick heating of the coolant in the heating system and allow you to save a little on electricity. Individual craftsmen make them themselves, reducing the cost of creating a heating system. How to make a Scorpio electric boiler with your own hands? To do this you will need tools and raw materials.
Tools and equipment for electric boiler
What do you need to assemble an electric boiler with your own hands? If you decide to try this experiment, stock up on tools and raw materials. To carry out the work you will need:
- Steel pipe – diameter from 50 to 100 mm, length – 250-300 mm;
- Electrode - it is highly desirable that it be made of the same material as the pipe itself;
- Tubes of smaller diameter - for connection to the heating system;
- Insulator for the electrode - you can make it yourself or order it from a lathe;
- Wires for connecting to the electrical network;
- Wire for connecting to ground;
- Heat-resistant paint.
The tools you will need are a welding machine and a hacksaw. Now let's figure out how to make a 220 V electric heating boiler with your own hands.
We assemble an electric boiler with our own hands
If you are going to make an electric boiler with your own hands, you will find drawings and operating principles in our review. Before assembly, make sure you have the necessary tools and equipment. First, let's understand the principles of operation of electrode boilers.– there is nothing complicated about them, the technology is simple and proven.
The operating principle of a heating element boiler is quite simple; the heating element heats the water that comes into direct contact with it.
In classic electric boilers, the heating medium is heated using heating elements with or without a thermostat. The heating elements are somewhat slow - a lot of time passes from switching on to reaching operating mode. In addition, they are unsafe, as fires often occur due to their fault. In standard boilers, heating elements are located inside a small-diameter pipe through which the coolant passes - it heats up and heats the heating system.
Also in the design of heating element boilers there are temperature sensors that determine the degree of heating of the coolant - adjustments are made using them. Another control method is possible, using an air temperature sensor. Both types of sensors are connected to external automation systems responsible for starting and stopping equipment.
Description of the operating principle
The operating principle of electrode boilers is different:

Electrode boilers heat water using ions formed in the water as a result of alternating current being supplied to the electrodes.
- Instead of heating elements, one or three electrodes are located in the pipe (for single-phase or three-phase boilers);
- When electricity is supplied, ion exchange begins in the pipe;
- The coolant heats up and transfers heat to pipes and radiators.
Many of our readers are familiar with the military boiler, which consists of two razor blades and two wires. It quickly warms the water, after which it is used for making tea and other food needs. But this boiler consumes a huge amount of electricity - its operation often triggers the RCD in the panel. A similar principle is used in electrode boilers.
In order for the electrode boiler to work more efficiently, salt, soda or special additives are added to the coolant. They increase the electrical conductivity of water and improve heating of the system.
Electrode boiler assembly

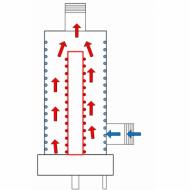
Scheme of a simple electrode boiler for heating systems.
Now we will try to assemble an electric boiler for heating a house with our own hands. With the indicated dimensions of the pipe used, we will get a device whose power will be about 4-5 kW - this is enough to heat rooms up to 40-50 square meters. m. We take the pipe and begin to inspect it - it should be intact, without cracks or traces of rust. If there is rust, it should be removed with fine sandpaper.
We weld two bolts to the pipe - zero and ground will be connected to them. Thus, the pipe body will become our outer electrode. Next, we weld the inlet and outlet pipes - they will serve to connect to the heating system. The inlet pipe is located at the bottom, and the outlet pipe is located at the top. The top cover can be welded, or you can make an internal thread in the pipe and make the cover removable.
The removable top cover will ensure ease of maintenance of the boiler - it is likely that in the future it will have to be cleaned of accumulated salts and slags. If you don’t want to deal with removable covers, then you can weld them.

When assembling the electrode boiler, be careful not to allow the electrodes to come into contact with each other.
The most difficult thing is to make the bottom cover and insert the electrode into it. We recommend making the cover removable so that the electrode can be easily pulled out and replaced.. The internal electrode should not come into contact with the internal walls or the cover itself. To create insulation, you should use ready-made insulators made of fiberglass or fluoroplastic. The procedure may seem labor-intensive, but if the assembler has “straight hands”, he will cope with this task.
Both covers, top and bottom, should be sealed with rubber gaskets. The length of the internal electrode should be such that it does not touch the opposite wall (aka the top cover).
Electric boiler installation
Our homemade electrode boiler is ready, all that remains is to complete the last steps:
- Install the boiler and connect it to the heating system;
- Fill the system with coolant and check its tightness;
- Make electrical connections.

The heating system is checked under pressure using a special device called a pressure tester.
Electrode boilers are mounted in a vertical position, so that the electrical outlet for connecting the central electrode is at the bottom. We connect the inlet and outlet pipes to the heating system, after which we fill the heating system with coolant. We carefully examine all connections for leaks. If possible, You should check the tightness of the self-installed heating system under pressure– the maximum value for such systems is no higher than three atmospheres.
If everything is fine with the tightness, we proceed to the electrical connections. Since the power of our boiler is more than 3 kW, we extend a separate electrical line from the electrical panel. Please note that there is no need to install an RCD - they do not work in conjunction with electrode boilers. The phase is connected to the central electrode, zero - to the body. The grounding is also connected here, to the body (for this, two bolts are welded to the body of our boiler). It is recommended to connect the grounding with a copper wire with a cross-section of 4 mm.
Electrode boilers produce large amounts of hydrolysis gases. Therefore, the heating system operating on such boilers must be equipped with an air bleeder.
Electricity is supplied to the boilers manually or using special automation. Power consumption is measured with an ammeter. Here you need to monitor whether the equipment is in operating mode. If we take into account that the boiler power is 4-5 kW, then the current in the circuit should be from 18 to 22 A (with a supply voltage of 220 Volts). If the current is insufficient, a solution of soda or salt is added to the coolant.
During the operation of the system, you will notice that it does not always work stably. It's all about changing the parameters of the coolant - its electrical conductivity changes, the resistance drops. Therefore, you need to regularly monitor the condition of the coolant and add salts and additives to it.
Video
Heating in a private home should be efficient and, preferably, economical, right? To achieve such indicators, a home craftsman needs a heating boiler. As you know, this device runs on either solid fuel, gas, or electricity. Typically, happy owners of suburban real estate prefer the latter variety because of its cost-effectiveness. Experts say that assembling this unit yourself is not so difficult.
DIY electric boiler
- Electric boiler from A to Z
- Step-by-step instruction
Electric boiler from A to Z
Before you figure out how to install and commission an electric heating boiler yourself, you should find out what this device is. In short, it is a metal container with an electric heating element placed inside it.
Note that the shape of the boiler can be any, at your discretion, and its power varies from 220 V to 380 V. The first type is more often used in residential premises, while a 380 V boiler can heat a large area - which means that It is advisable to install it as part of the heating system in commercial real estate.
When we talk about a homemade heating boiler, we mean two types of such a unit. An electric boiler can be a heating element or an electrode. Please note that the functionality and quality of operation of a home-made heating device will not be inferior to factory-made analogues.
You may have heard about induction electric boilers, which heat the coolant using a magnetic field. It is not possible to make this type of heating device yourself.
Important: no matter what type of electric boilers you decide to make at home, it is extremely important to take care of grounding. Otherwise, you and your household risk receiving a serious electric shock. If you are not confident in your practical skills and level of training, it is better not to take on making a heating boiler yourself. Any mistake during the assembly and installation of this unit may result in you receiving a faulty device and causing a wiring fire.
Advantages and disadvantages of the device
There are no ideal devices. However, an electric boiler for a heating system still has a more impressive list of advantages than disadvantages.
Advantages of an electric heating boiler:
- high efficiency (up to 97–98%). Such an electric boiler produces almost as much thermal energy as it consumes electricity;
- compactness. The size of the boiler allows it to be installed even in fairly small rooms, because the length of the water heating circuit is about 60 cm with a width of 30 cm - these are more compact dimensions;
- high water heating speed;
- immunity to voltage surges in the network. This factor is important given that the current supply in electrical networks is often unstable. The device does not suffer from power surges, but only changes the intensity of operation;
- competitive cost. A store-bought electrode heater will cost you $150, no less, but you can make it yourself using scrap materials - such a device will cost much less.
Disadvantages of an electric heater:
- the need to remove hydrolysis gases that are formed during operation of the device;
- mandatory grounding;
- selective compatibility with other components of the heating system. Electrode boilers do not work with cast iron batteries and metal-plastic pipes;
- high heating costs. Due to impressive electricity tariffs, heating a large two-story house with an electric boiler may require a decent financial investment from its owner.
I would like to draw your attention to one important nuance. An electric boiler is insensitive to voltage changes in the network, but this device requires high-quality, reliable electrical wiring. If you live in a region where power outages occur quite often, then you need to take care of purchasing an uninterruptible power supply (uninterruptible power supply). Its task is to accumulate electricity in case of an unexpected system shutdown. Thanks to this small but necessary device, the electric boiler will be able to work for several more hours even without light.
Tools and Supplies
Let's assume that you have already decided on the type of device you want to make, choosing a heating element or electrode heating boiler. Now you need to prepare everything you will need for work. Surely you will find some of the following in your workshop, some tools will have to be purchased or borrowed.

Tools and parts for making an electric boiler:
- welding equipment (inventory type);
- Bulgarian;
- hammer;
- tape measure, marker, chalk;
- steel pipe (its thickness must be at least 3 mm and diameter - 219 mm);
- electrode;
- electrical wires (ideally copper);
- metal pipes;
- FUM tape.
Step-by-step instruction
The workplace is prepared, all the tools and parts are at hand, which means that you can start creating an electrode boiler for your home heating system.
- Prepare a piece of steel pipe. To do this, you need to cut a thread at both ends. One end of the tube will need to be plugged, and a coupling with an electrode will need to be screwed into the other.
- To weld metal threaded pipes to the pipe, which will be used as fasteners with thermal communications of the entire system, round holes should be drilled in it.
- Two bolts need to be welded to the body - one of them will be used for the neutral wire, and the other for grounding.
- To install the resulting device into the heating system, pipes must be connected to the prepared pipes.
- The next step is to attach the positive wire terminal to the electrode.
- Connect the neutral cable terminal and the ground wire to the welded bolts.
- It is important to connect a pressure gauge and a fuse system to the heating circuit. Don’t forget about the device responsible for removing hydrolysis gases.
- A self-made electric boiler is ready to start. The system must be filled with prepared coolant and started.
It’s not for nothing that they say: it’s better to see once than to hear a hundred times. Let's paraphrase this catchphrase and note that a video tutorial on assembling and installing an electric boiler with your own hands will help you better understand the intricacies of this process. We invite you to watch a video prepared by experienced electricians.
Compliance with safety regulations
Let's start with the fact that before assembling and connecting the electric boiler, you will need to obtain permission from the electricity supplier. This is necessary so that you understand whether your boiler will have enough electricity and whether it will not work to the detriment of other network subscribers.
In principle, it is better to entrust the installation of this unit to specialized craftsmen, but if you managed to assemble the electrode boiler yourself, then you should be able to cope with its connection without any problems.
Connecting an electric boiler to the heating system is called “piping”. In order to connect your homemade boiler, you need to familiarize yourself with the heating circuit of your house or apartment, paying attention to the access points to the power supply. The connection diagram takes into account the type of heating system - single-circuit or double-circuit - as well as the power of the boiler itself.
We invite you to watch a video dedicated to the installation and commissioning of an electric boiler.
Experienced craftsmen advise paying attention to the following features of installing an electric boiler:
- Before installing it, the heating system must be thoroughly rinsed with water and special cleaning agents;
- make sure that the heating system has a safety valve and an air vent;
- the section of pipe connecting the electric boiler to the heating system must be metal;
- the air temperature during installation of the boiler can vary from +10 to +40 degrees, humidity - no more than 75%;
- if you live in a two-story cottage, then one boiler will not be enough for you. You need to connect two electric boilers - one for each group of radiators.
When choosing the place where your homemade boiler will be connected, it is important to consider the method of circulation through the coolant circuit. There are only two options here:
- if natural circulation of liquid is assumed, then the device must be installed at the bottom of the system. This will ensure maximum heating efficiency for the radiators. In this case, the discharge pipe should be placed above the batteries at the lowest height;
- if you expect forced pumping of coolant through the system, then the electric boiler can be installed in any part of it.
Important: when manufacturing, installing and starting up an electrode heating boiler, you must adhere to safety regulations. We are talking about electricity and liquid (coolant), which means that any mistake can lead to irreparable consequences.
Users of electric boilers claim that this type of heating device usually does not cause any problems during operation if you follow safety rules.
To summarize, we note that it is quite possible for a non-specialist to assemble an electric boiler for a home heating system. In order for the process to proceed without any unpleasant surprises, and for you to be pleased with the result, it is important to strictly follow the instructions and make sure in advance that you have all the necessary equipment at hand. Of course, basic electrical skills are also necessary.published
Subscribe to our Yandex Zen channel!
If you have any questions on this topic, ask them to the experts and readers of our project.
Electrical systems are the safest equipment, thanks to which you can create a comfortable temperature in the room during the winter. The efficiency of an electric heating boiler is quite high, especially since in order for it to operate normally and stably for a long time, you do not have to waste free space for laying flammable material.
Electric boilers completely lack a mechanical component, making their use much easier and also reducing the likelihood of a malfunction or serious breakdown.
The design of an electric boiler implies temperature regulation. Due to this, the system can respond in a timely manner to any changes in temperature in the environment. The boiler either increases or decreases the heating temperature if necessary.
Many boilers are economical; for example, to heat 30 cubic meters of space you need to spend only 4 kW per day. The use of such boilers makes it possible to heat rooms of much larger volumes than with other types of boilers.
During operation, the boiler does not emit any harmful or toxic substances such as carbon dioxide or carbon dioxide. In this regard, they can be installed directly in residential premises and used to heat bedrooms and children's rooms. Another advantage is that during installation you will not have to obtain any permissions from the relevant authorities.
Electric boilers can either be used as an additional source of heating or the structure can be made the center of the heating system. This boiler is powered from an ordinary electrical network with a voltage of 220 V. The average weight of the boiler is 22 kg, its dimensions are also not too large, but it is capable of heating a volume of air up to 400 cubic meters.
 device
 Do it yourself
 diagram of a heating element electric boiler
 For work you will have to use some materials and:
- angle grinder or Bulgarian.
- Welding machine of any kind. It is best used for this purpose. It is suitable if you have experience in welding. If it is completely absent, then it is best to ask someone to help in this regard. All welding work must be carried out with the highest quality so that there are no leaks anywhere.
- Sander.
- Multimeter.
- Sheet steel, the thickness of which will be at least 2 mm.
- Adapters, which are needed to connect the structure to the heating system.
- (it is best to purchase 2 pieces).
- Steel pipe– it is best to buy a pipe with a diameter of 159 mm, its length should be about 50-60 cm.
You can make the following types of boilers yourself:
- single-circuit;
- double-circuit;
- induction;
- wall;
- floor;
- electrode;
- heating elements;

Manufacturing instructions:
- At the first stage make pipes for connecting the heating boiler to the heating system. In this regard, you first need to cut a certain number of pipes from pipes that were specially prepared for this. You will need 3 pieces in total - one with a diameter of 3 inches and 2 of 1.25 inches.
- When it's all done, are engaged in the manufacture of a container for the tank, that is, the largest pipe where the coolant will be heated. First, markings are made on the pipe, a hole is cut in it, and the edges are carefully processed so that there are no sloppy cuts or metal shavings on them. Prepared pipes are welded to the holes. Now you need to cut two circles from a steel sheet, which will be slightly larger in diameter than the pipe that serves as a heating tank. This will allow them to be welded more accurately. All areas where joints are located are carefully sanded.
- To the top you need to weld a pipe with a diameter of 1.25 inches. Subsequently, another heating element will be welded to it. When all this is done, they begin to prepare the area where the first heating element will be attached. To do this, make 2 holes in the bottom of the structure, then grind the holes and install the heating element.
- When it's all done, the boiler is connected directly to the heating system itself. This is done using pipes made at the very beginning of the work.
A separate issue is connecting the structure to the electrical network. If you do not have the skills for such work, then it is better to contact an electrician. Then they are engaged in the installation of a less powerful heating element, which should have. It is attached to the upper pipe.
Installation and connection of equipment
 connection diagram
 The most difficult thing is to connect the structure to the electrical network. Since we have to deal with heating devices, we will have to install the input on 3 phases.
A number of systems will need to be installed directly in the electrical panel itself:
- machine;
- relay;
- toggle switch;
- fuse;
- temperature sensor;
- various control buttons;
- magnetic starters and a number of other elements, if necessary;
It is mandatory to make a grounding loop. To do this, you need to take a metal pin or reinforcement, the diameter of which should be approximately 15-20 mm, and attach a metal bolt to it. This structure is placed under the floor of a residential building and a wire coming from the electrical panel is passed to it.
Types and principle of operation
 There are 2 main types:
- Electrode.
- Induction, –
At the same time, all the others are just modifications of one of these types. An electrode boiler is often also called an ion boiler, since it converts electrical energy into heat.
The design takes up a minimum amount of space, and it is fixed directly to the pipe; it does not even have to be attached to the wall. Just in case, it is placed on 2 screws, but this is not necessary.
Outwardly, it looks like a small piece of pipe, the length of which is about 40 cm. At the end of the heater there is a metal rod, and on the opposite side the heater is welded or there is a special pipe in it, due to which the coolant is transferred throughout the entire system.
The design provides for the presence of 2 pipes into which pipes for return and supply are inserted:
- One of them may be located in the end part, and the second is installed at a right angle in the side.
- They are often installed from the sides perpendicular to the rest of the structure and so that they become parallel to each other.
 principle of operation
 This boiler has the following operating principle: the cathode (positively charged electrode) and anode (negatively charged electrode) are placed in the coolant. When energized, they trigger the movement of ions. Their polarity changes from time to time, in particular, one charged ion will change its charge from one to another approximately 50 times per second.
This ultimately leads to friction in the liquid due to this movement of ions, which causes an increase in temperature.
This technology leads to some disadvantages:
- Coolant In any case, it will be under voltage.
- It will have to be before filling into the batteries. prepare in terms of salt content.
- Antifreeze liquids Use in a heating system is strictly prohibited.
Induction boilers operating on electric current heat the coolant using a magnetic field that arises from the electric current.
This whole design is quite simple and includes the following elements:
- frame;
- insulation;
- the core where the coolant will be heated;
- coil;
The key difference from the electrode design is that in induction boilers the liquid is completely isolated from the conductive elements, so it will not be energized.
The coil winding, made of copper wire, is connected to the network through a special control system. Due to this, a magnetic field appears in the coil. It will heat up the pipe, which acts as a core, and it will already give off some heat to the water. At the same time, the body of the heating boiler will continue to remain cold, since its design contains a layer of insulation.
It should also be said that the core is not made straight, but has a curved shape, sometimes in the form of a spiral, so that the coolant passes through it much longer. The service life of such a boiler is at least 25 years. After this time, the pipe, which is the core, will rust.
Starting the boiler

Preparing an electric boiler for startup means that it must be completely checked all connections, the electrical network, and the filling of the system with water. If there are pinched or torn wires in the wiring, they will need to be replaced and carefully insulated. It is prohibited to do otherwise, since in a three-phase network there is voltage with a decent current strength, and the replaced section can break through.
Preparation also involves cleaning the structure from dust and dirt. You should also take care to prevent voltage surges both during the first start-up and during further operation. To prevent this from happening, install a residual current device.
Start:
- At first it is necessary to fill the system with water, and do this in such a way that there are no air pockets in it. As a rule, radiators have special taps in their upper part to release accumulated air.
- Further All you have to do is turn the boiler on and wait for it to warm up.
- To make the system work better, you can install it in it. It will distill the coolant, which due to this will warm up evenly.
- When manufacturing a system with natural circulation, It is best to make a slight slope from the outlet to the return line so that the cooled water returns to the boiler faster.
Electrical appliances are often used to heat the coolant in water heating systems. There are ready-made electric boilers on sale, but if necessary, you can make a homemade electric boiler. Such units are distinguished by their reliability and operating efficiency. The efficiency of an electric heating boiler is quite high. An additional advantage of a homemade unit is that it takes up little space and you do not need to allocate a separate room for its installation.
What will be needed to assemble the boiler?
Since such a device does not have mechanical components, it is easy to make it yourself. Also thanks to this, it rarely fails and is easy to use.
If you decide to make an electric heating boiler with your own hands, you will need the following parts and tools:
- angle grinder (you can use a grinder instead);
- multimeter;
- to weld pipes you will need a welding machine (the best option is an inverter type unit);
- regular grinder;
- steel sheet with a minimum thickness of 0.2 cm;
- to connect the boiler to the heating system, you will need adapters;
- heating elements – 2 pieces (regular heating elements are needed);
- a piece of steel pipe with a diameter of 159 mm and a length of 60 cm.
It is worth mentioning separately that you can make floor-mounted and wall-mounted heating equipment with your own hands. Such boilers can be single-circuit or double-circuit. According to the principle of operation, they are induction, heating element and electrode.
How to make a heating element boiler
If you are interested in how to make a 220V electric heating boiler with your own hands, then the following assembly instructions will help you figure it out:
- In order to properly connect a homemade device to the heating system of a private home, you need to make special pipes. For this, three steel pipes are prepared. You should end up with two 1.25" pieces and one 3" piece.
- After this, we make a container for the tank. To do this you will need a large diameter pipe. The coolant will be heated in this tank. For this purpose, two holes are cut on the side in a pre-prepared section of pipe. Their edges are well cleaned from burrs and nicks. Two previously prepared pipes are welded to these holes. Then two circles are cut from a piece of sheet steel. Their diameter should be 2-3 mm larger than the diameter of the pipe for the tank. These round blanks are welded to the ends of the heating container. Welding areas are well cleaned and polished.
- A hole with a diameter of 1.25 inches is cut in one of the circles welded to the end. A pipe with the same cross-section is welded to this hole. Two more holes are cut in the bottom of this cylindrical structure. Their edges are also carefully cleaned and polished. The first heating element is inserted into these two holes. An additional heating element will be installed in the previously welded pipe from the other end.
- Then the manufactured boiler must be connected to the heating system of the building. To connect, we use two pipes in the side, which were welded in the first step.
- Now we install the second heating element in the pipe on the top of the tank. Its power should be slightly less than that of the main heating element. However, an additional heating element must have a thermostat to regulate the temperature of the coolant.
- After checking that all parts are connected correctly, the homemade heating element boiler is ready.

Advice! To connect a homemade structure to the power supply, it is better to use the help of a specialist, since without experience it will not be possible to carry out the work correctly and, most importantly, safely.
After connecting the electric boiler to the power supply networks, check its performance and the correct operation of the entire heating system. To estimate the temperature of the coolant, you should use a multimeter. The temperature of the water in the pipes after leaving the boiler should be within 70 degrees.
Assembly and connection of equipment
If you nevertheless decide to independently connect a homemade electric boiler to the power supply, then this should be done in compliance with the following recommendations. Since powerful heaters are installed in the tank, you will need to install a three-phase input.
For this purpose, the following devices are installed in the electrical panel:
- toggle switch;
- machine;
- fuse;
- temperature sensor;
- relay;
- control Panel;
- protective devices;
- magnetic starters.
A grounding circuit must be installed. To make it, you need to weld a bolt to a piece of reinforcing bar. After this, the rod is driven into the ground in the underground of a residential building. A wire coming from the electrical panel is attached to the bolt.
Types and principle of operation
Having decided to make an electric boiler for heating your home with your own hands, you need to understand the types of such devices. It is possible to produce electrode and induction types of boilers. There are other varieties, but they are only modifications of these basic types. The second name for an electrode boiler is an ion unit. It is called that because the device converts electrical energy into thermal energy.
Electrode boiler

A homemade electrode heater has compact dimensions, so it can be easily mounted on a pipe and does not require a separate place for installation on the floor or hanging on the wall. For greater strength and safety, it is secured with two self-tapping screws, but you can omit them if you wish.
Externally, the entire structure looks like a 400 mm long pipe section. On one side the pipe is tightly welded, and on the other there is a steel rod sticking out of it. A pipe is installed on the side or at one of the ends for circulating coolant through the pipes.
A self-made heating element boiler, the manufacturing process of which we described above, must have two pipes on the side for connecting the return and supply pipelines with circulating coolant.
There are several options for the location of these pipes:
- One piece of pipe can be installed at the end of the device, and the other can be welded to the hole in the side. Thus, it is installed perpendicular to the axis of the first pipe.
- The second mounting option involves installing two pipes on the side of the unit. It turns out that both pipe outlets are installed parallel to each other, but perpendicular to the main tank of the heater.
A homemade heater has the following operating principle:
- Positively and negatively charged particles (called anodes and cathodes) constantly circulate within the coolant;
- when voltage is applied, the ions rush to the electrodes with the opposite charge;
- since the polarity of the electrodes constantly changes with a frequency of 50 times per second, the ions move in one direction or the other;
- Such chaotic movement of ions causes friction of the particles and their heating (because of this, the temperature of the coolant increases).
Having made an electric heating boiler with your own hands, you should not forget that it has its drawbacks. The disadvantages are associated with the fact that the coolant is constantly under voltage, so before supplying it to the heating circuit, it is thoroughly cleaned of salts and other impurities that can settle on the walls of the pipelines and the heating element.
Attention! In systems with electric boilers, it is prohibited to use antifreeze as a coolant. For these purposes, purified water is used.
Induction unit
The operating principle of induction-type electrical units is based on heating the coolant through a magnetic field, which is formed by an electric current.

These devices contain the following components:
- coil;
- heater body;
- core (here the coolant is heated);
- insulation.
In induction-type boilers, the coolant is not energized, as in units of the electrode variety. This is ensured by complete isolation of the liquid medium from elements that conduct electricity.
The copper coil winding is connected to the network through an automation system. After this, a magnetic field is formed in the coil, which heats the pipe, which acts as a core. Since the coolant circulates inside it, heat is immediately transferred to the liquid. During operation, the device body does not heat up. For this purpose, a layer of special insulation is provided in the housing design.
The core itself has a curved configuration to ensure longer passage of the coolant through this area in order to heat it sufficiently. The service life of an induction boiler reaches 25 years. There is simply nothing to break in this unit, so it will last until the core pipe is damaged by corrosion.
Starting the boiler
Before a test run of the heating unit, check how tight all components and connections are, as well as the correct assembly of the electrical network. After this, coolant is poured into the system. Be sure to make sure that there are no crushed or broken wires in the network, because a three-phase network has a high current strength. All wire connections must be well insulated.

Before starting the unit, it is thoroughly cleaned of contaminants. For proper and uninterrupted operation of such a heater, you need to be protected from power surges. For this purpose, an RCD is installed in the network.
A test run of the boiler is performed in the following sequence:
- Purified coolant is poured into the system.
- It is important that air does not accumulate in the circuit, so it is released using Mayevsky taps. Such fittings should be installed on the upper radiators in the system.
- We turn on the electric boiler and wait for the coolant to heat up.
In order for systems with electric boilers to operate efficiently and have high efficiency, pumping equipment is installed in them to circulate the coolant. Thanks to good circulation, the coolant will warm up evenly. It is recommended to install the circulation pump on the bypass so that you can switch to natural circulation of water in the system.
When installing circuits with a gravitational carrier current, the return pipeline is laid with a slope towards the heating boiler. Thanks to this, the cooled liquid will quickly flow into the boiler.
Heating the house using electricity- the most technologically advanced option. Electrical energy is converted into heat without loss and is conveniently and cheaply transported.
There are a number of standard solutions for organizing heating - heat pumps, reverse air conditioners, ceramic infrared emitters, convectors, electric boilers. Installing an electric boiler is popular.
Electric boiler for heating a house
Advantages of installing an electric central heater:

- Application other types of fuel in parallel with electricity.
- Possibility to embed in existing heating system.
- Saving on heaters.
- Simplicity designs and maintainability.
- Saving in the presence of differentiated heating tariffs.
- Low equipment cost, possibility of remote control.
- Availability technology, the ability to assemble a heater with your own hands.
- Possibility of installation in a heating system private house and outbuildings.
- The optimal solution in the presence of alternative energy sources: solar panel or wind generator.
Electric boiler design
There are various methods for implementing an electric boiler, but each one contains three components:
- Heater.
- Frame.
- Management and Security Group.
Differences in electric boilers are usually variations of these parameters and options.
How does it work

The device is connected to liquid heating system. The system is filled with coolant, which is heated by a heating element. A pump or gravity constantly forces the fluid to circulate.
The liquid transfers heat to the room through heat exchangers - batteries. The cold liquid is supplied again to the boiler.
For highways or sensors are installed at certain points in the room. They send a signal to the controller, which reduces or increases the voltage or turns off the boiler.
Electric boiler control depending on connection diagrams and the components used are stepwise or smooth.
The selection of heater power depends on the size of the heater tank and the power of the radiators. Installing too powerful heaters can lead to boiling of the coolant and rupture of the system.
Attention! To increase safety, use the maximum mechanical thermostat with relay, which will prevent the liquid from boiling if the controller electronics fail to cope.
Network connection and control unit
To connect to the network securely you will need:

- Wires of the appropriate section. The cross section is calculated based on power and length; for a powerful system it is better to connect the power cable and 380 volts.
- Grounding: metal parts should be connected to the ground loop.
- Separate difavtomat— will turn off the consumer if the protective tube rusts and “pierces” into the house.
To regulate the current, purchase:
- Controller or control unit.
- Ammeter.
- GPS module.
- Mechanical valve, which turns off the electricity when the liquid boils in the boiler (reliable mechanism, operates on pressure).
Schemes of homemade electric boilers
A home craftsman can easily assemble an electric heater in his workshop. There are a number of schemes and solutions that are optimal for various conditions.
From a cast iron battery with TEN
If you plan to heat a small insulated room (house, garage, isolated room), a cheap option would be to convert cast iron battery into an electric heater. This option acts as an electric boiler and heat exchanger.
For assembly you will need:

The heating element is installed in the bottom plug of the battery. If the battery is isolated, the opposite plugs are plugged, and above the heating element the plug crashes into additional expansion tank, which also serves as a “watering can” for filling and deflating the battery.
If the battery will serve as an electric boiler, the cold water supply is connected to the opposite side of the battery at the bottom, and the cold water supply is connected to the top of the battery.
During installation, be sure to follow the rules for safe installation of electrical wiring.
Attention! With a small cross-section of wires, uninsulated twists or weak contacts, there is fire risk.
You might also be interested in:
From the pipe
There are the following types of electric boilers made from pipes.

Induction
Works on the principle of electromagnetic induction.
Placed inside a plastic pipe metal pin.
A spiral of thick copper wire is wound through the dielectric from above.
A direct current is supplied to the wire, the core heats up and transfers the temperature to the flowing coolant.
With thermal electric heaters
The simplest boiler can be assembled from a thick-walled metal pipe or a 10-kilogram fire extinguisher. The heater in this system is a regular heating element. It consists of a heated nichrome coil immersed in a heat transfer core and a waterproofing shell. TEN, in fact, household boiler.
The heating element is installed both at the bottom and at the top of the tank. Heater coils can be easily inserted and removed without welding, as the service life heating coils limited, they will need to be changed periodically. When current passes, the heater filament becomes hot and heats the water.
If more power is required, you can assemble instantaneous combi boiler from several blocks connected by jumpers.
Electrode boiler

The essence of the operation of an electrode boiler is the principle electrolysis. The boiler consists of a tube - a body, inside of which a metal pin is lowered through a dielectric gasket. The housing is connected to the “zero” phase and grounded.
On one side of the housing there is a cold water supply, on the other there is a heated water outlet. An important element is the coolant; certain additives are added to it.
The water is heated by movement of electrons between the anode and cathode.
Do-it-yourself electrode boiler potential danger. The heating system in this case is an element of the electrical circuit. If the ground wire is damaged for some reason, the system becomes dangerous - if you touch the housing, you can get an electric shock.
DIY making
The construction of the boiler consists of two stages - design and assembly.
Design and preparation of drawing

At the design stage the following is determined:
- Type of boiler. The difference in boiler efficiency is small, so it is better to choose a heating element circuit that has been proven over the years.
- Boiler power. It is determined by the sum of the power of the heaters and depends on the heat loss of the room, as well as the thermal power of the batteries.
- General scheme and draw a project.
Assembly
Assembly consists of several stages.
Search and preparation
For our design we will need pipe cut 150 mm in diameter, two plugs, electric heaters, fittings for coolant inlet/outlet, connection of heaters and air vent valve.
Material processing
Pipe required hermetically sealed brew, connect the fittings. To do this, we turn to familiar welders. The task is made easier if you have a fire extinguisher housing - it is made of corrosion-resistant steel, the thickness and dimensions are quite suitable. All that remains is to weld threaded connections.
Final assembly
To assemble an electric boiler, we will need:
- Tools: adjustable and open-end plumbing wrenches, screwdriver and electricity indicator.
- Consumables: sealing gaskets, linen tow or fum tape.
The assembly proceeds in logical steps:

- Connecting heating elements to the housing. It is advisable that they be located in the lower part - this way the heating will be more uniform.
- Wall mounting. To do this, mounting brackets are welded in advance. You can use clamps.
- Connection to the heating system. All connections must be with taps - this will make it easier to remove the electric boiler in case of repairs.
- Connecting electrical wires to the contacts of the heating element. It is better to connect through a power regulator.
- Necessarily ground the housing. This will prevent electric shock in the event of a “breakdown” of the heater insulation.
Tests
The boiler starts only at filled out heating system. When checking, special attention should be paid to the integrity of the contacts and the presence of electrical breakdown. For this you will need an indicator. If the indicator light lights up when connecting the wires, turn off the device and check where the current leakage has occurred.
Articles on the topic