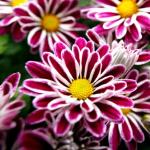
Wood craquelure technology. Craquelure technique: a master class for decoupage lovers and not only
The effect of creating artificial cracks on the surface is called - craquelure, from the French word craquelure - a crack. This technique allows you to create a unique design technique. Crack effect paint is very popular these days, it not only looks beautiful and original, but it can be applied to any surface.
With the help of craquelure, we can transform not only walls and furniture, but also smaller objects, such as a vase or a mirror frame. To create an unusual effect, you only need a set of special paint and varnish. With improvised means, we ourselves create an individual pattern, directing cracks and making them thicker or thinner.

The craquelure staining method can turn any surface or object into an antique antique. Drying paint with cracks, right before our eyes begins to crack.
We can make the thickness of the cracks with our own hands, with the help of improvised means, or even just draw a finger. And the direction of small lightning will be unique every time. This effect is achieved due to the rapid drying of the top layer of paint.
The advantages of choosing cracked acrylic paint are:
- A decorative look reminiscent of antiquity or antiquity.
- Large selection of color combinations, both layers of paint.
- Affordable price for any consumer.
- Environmentally friendly, as it is water-based.
- Air permeability, allows the surface to breathe.
- Good waterproofing, can be used in wet areas.
- Camouflage function, easily hides small surface irregularities.
- Easy to use, applies like regular paint.
Craquelure is divided into two types: one-step and two-step. Let's consider them in more detail.
Advice! Before applying craquelure, it is worth preparing the surface to be painted.
One step craquelure

There is nothing difficult to create craquelure at home.
Below is a step-by-step instruction on how to create a one-step craquelure:
- We prepare the surface of the walls or the object to be painted. Walls, metal or wood must be primed. The primer will improve the adhesion of the paint to the surface and this will be the color of our cracks, but if you want to leave the original color, just apply a colorless acrylic varnish. Planes from other materials are easy enough to degrease.
- We apply the base, main paint, in a thick layer. If we use spray paint, shake it before applying. If the wall paint with the effect of cracks in the can, apply it with a roller, it is better to paint small objects with a brush.
- On top, apply a thick layer of craquelure varnish and let it almost dry. You can check the readiness by touching your finger, if it sticks, but does not paint, then it's ready.
- After about an hour, apply a second paint for the top coat. Cracks begin to appear immediately. If you apply a thicker layer, you will get large cracks, and if you apply a thin layer, you will see a small cobweb.
- After a few hours, the paint will dry completely and the item can be used. You can speed up the process with a regular hair dryer.
Advice! You can avoid smudges when applying paint by applying layers gradually, allowing them to dry a little.

The box is made using the two-step craquelure method
Two-step craquelure is usually used for painting or over decoupage. It looks more like cracked varnish.
Work process:
- The first layer we apply shellac varnish in several layers, waiting for each to dry. It can be clarified or dark, the latter gives a shade of patination.
- As soon as it is completely dry, apply craquelure varnish. Its drying should not be accelerated, let it dry itself in the sun.
- As soon as cracks begin to appear, the top varnish can be washed off with warm water. We rub the cracks themselves with oil paint or even eye shadow.
- After complete drying of the product, we fix the process with shellac varnish. So your work will not lose its decorative appearance for a long time.
Advice! It is best to rub cracks with a sponge or rags made of natural fabric.
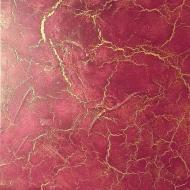
craquelure effects

With the help of the craquelure method, you can create something extraordinary. Craquelure can resemble a lot, it depends on the color of the paint and the fillers added to it.
For example, some of them:
- Wild stone.
- Eternal sand.
- Water flow.
- Drops on glass.
- Tree bark.
- Porous skin.
- Natural fabrics.
- Soft velvet.
- Mother-of-pearl.
- Marble monolith.
- Fine porcelain.
Types of craquelure
The choice of paint and varnish for the craquelure painting method depends on what we want to see in the end.
For example:
- rustic crackle- done with a one-step craquelure varnish. Cracks in the surface look like paint that has aged over time.
- Crackle in classic style- these are well-defined deep and frequent cracks. This style is most often used for the background of large decoupage works.
- wood style crackle- the cracks of this style resemble the bark of trees, they are densely spaced and quite deep.
- Crackle in picturesque style- the cracks look very artistic, they are delicate and thin. This style is used to age beautiful small items: caskets and small mirrors.
- Crackle in ceramic style- used for aging dishes. Cracks resemble cracked ceramics.
These are some of the types of craquelure styles, you can, by experimenting, try to create something of your own, individual.
Conclusion

With the help of crack effect paint, we can create the interior of a room in retro, provence, country and many other styles. The cracks themselves can create an imitation of many surfaces. Depending on their thickness, depth and focus, we can choose our own pair of craquelure sets. A variety of colors will satisfy any buyer.
Refined antiquity will give a room or furniture the effect of a rich history. We must not forget that the surrounding objects, walls, floor and ceiling, should also support the image of shabby chic - shabby chic. And then, all together, it will become not only unusual, but also elegant.
In the video in this article, you can see the technique of applying craquelure.
Summary of the lesson "Crackle technique"
Streltsova Natalya Alexandrovna, teacher of additional education, BEI DO "Center for Creative Development and Humanitarian Education", Tara
Summary of the lesson "Crackle technique"
Description: the material will be of interest to teachers of fine arts, teachers of additional education, as well as creative children.
Topic of the lesson: “Crackle technique”
Purpose of the lesson:
Introduce students to the technique of "crackle"
Equipment: Brushes - squirrels No. 5 and No. 3, water cans, palettes, scissors, hair dryer, rubber gloves.
Visual aids for the lesson:
Works in the technique of cold batik, photographs of various batiks
STUDY PROCEDURE:
1. Organizational part.
Greeting, checking those present, checking readiness for the lesson.
2.Updating knowledge.
Repetition of the studied material.
3. Explanation of the new material.
Message of the new topic of the lesson, goals and objectives of the lesson.
Hot batik technique
The hot batik method differs from the cold batik method in that wax (paraffin, stearin or a mixture thereof) is used as a reserve agent. Hot wax with a bristle brush or a special copper watering can is applied to those places of the fabric that should remain white (the wax stain should be transparent and dark, not white and matte). Then the entire surface of the fabric is filled with highly diluted dye solutions. After drying, the fabrics cover with wax those areas that should remain light-colored, and the rest of the space is painted over in darker tones. The cycle: reservation - dyeing - drying is repeated several times and ends with the application of black paint.
For hot batik, melted wax is required; a white household candle can serve as wax. There are special wax recipes for hot batik:
Wax for crackle:
-5 parts of paraffin;
-5 parts of pine resin;
-1 part dammar resin;
-0.2 parts of fat.
Hot wax can not only separate color from color, but also leave large spots unpainted, because. the paint does not lay down on the hardened wax.
Hot batik also includes the Crackle technique.
It consists in the following, the fabric painted with a colorful layer or clean, covered with wax in several layers, then it is removed from the frame and breaks, creating various cracks on the wax surface. Then the fabric is stretched again on the frame, degreased with alcohol, and then the resulting cracks are filled with any dark color of paint. We are waiting for complete drying. With a hot iron with a lot of newspapers or paper, remove the wax from the surface of the fabric. At the junction of the surface of colored and white spots, a bizarre texture is formed.
4. Practical work
Performing trial work by students in the "crackle" technique.
The provision of individual assistance by the teacher.
In the course of practical work, a physical education session is carried out.
PROGRESS OF PRACTICAL WORK
1. We stretch the fabric on the hoop

2. Free painting arbitrarily draw a house

3. Melt the wax in a pot of boiling water

4. "Fill" with melted wax areas that do not need to be painted over with a different color (clouds, roof of a house, pipe, bricks, window)

5. Paint over the sky and part of the window with blue

6. Dry the work with a hairdryer

7. The work is completely "filled" into several layers of wax

8. Remove the hoop

9. We crush the fabric so that cracks form

10. The formed cracks are “filled” with dark paint (do not overdo it, the paint is easily absorbed into the fabric)

11. Dry the work and clean it from wax (with an iron using napkins)


12. The work is ready.
(In this case, the search with dark paint did not give the result we were striving for. The house should have turned out in the branches of trees. We hope you will take our advice into account and your work will turn out the way you planned it.)

5. Final part
Pinning a new topic
6. Analysis of the work performed
Summing up, grading.
Homework: Continue with work.
Workplace cleaning.
Crackle - (from French - craguele), a network of fine wrinkles, cracks on the surface. Since ancient times, Chinese and Vietnamese masters of lacquer painting have used fragile eggshells that easily form numerous cracks in their works. This technique gives a lot of room for imagination, which becomes, perhaps, not only on paper.
Download:
Preview:
Crackle
Crackle - (from French - craguele), a network of fine wrinkles, cracks on the surface.
The crackle technique refers to the decoration of objects. Crackle is a pattern of fine cracks on the surface, created for the decorative effect of antiquity, using special tools.
If you crumple a drawing made with wax pencils on thin paper, for example, for typewriters, then cracks will appear on it. If you fill the cracks with paint, and then rinse the drawing on both sides under the tap, let it drain and dry it with an iron, putting it between two newspaper sheets, then the effect of an old work - crackle will be created. The crackle method is used to more effectively complete the finish in classic hot batik, in mosaics, and ceramics.
From the history of crackle. Since ancient times, Chinese and Vietnamese masters of lacquer painting have used fragile eggshells that easily form numerous cracks in their works. These cracks are called craquelure. Mosaic miniatures from the shell in the style of "crackle" can decorate many objects. Egg shells are difficult to scratch with a knife and are close to marble in hardness. It is perfectly ground and polished, acquiring a pleasant soft sheen.
In oriental lacquer painting, eggshells were glued where it was necessary to depict a cracked stone wall or rock. A scattering of small shells imitated the flowering of spring gardens. The expressiveness of the crackle mosaic is given by the so-called craquelure - cracks that form a bizarre mesh pattern on the surface of various materials.
When straightened, the eggshell breaks into many tiny pieces that do not fall apart due to the thin film on the inside. Many of the cracks formed between the shells are almost invisible. But as soon as they are developed with some kind of dye, the mesh pattern of cracks becomes visible, turning an ordinary eggshell into an attractive decorative material.
Over time, decorators moved away from the old technique, now instead of eggshells, varnish could be used, betraying the effect of aging. In modern art, both types of decoration are welcome, so you should not assume that crackle is just shell products.
Types of crackle
- Shell work.
The collected shells are dipped for two to three minutes in a five percent solution of baking soda, and then thoroughly washed in running water. The shell is so fragile that it has become a kind of symbol of fragility. When making a mosaic set, the fragility of the eggshell causes a lot of trouble, forcing the master to take special measures and be extremely careful.
But if the shell is covered on both sides with a thin layer of some kind of elastic glue, then it can be cut with scissors. True, the edges of the cut shell will crumble slightly. If you stick thin paper on the shell, you can avoid this trouble.
It is possible to harvest shells having various natural color shades. These colors can be used, for example, when working on a mosaic panel based on ancient architecture. Let's say the master has white, brown and cream shells at his disposal. White shells are suitable for imitating snow, white stone walls, brown for fortress walls and towers, and cream for buildings inside the fortress. This is, of course, an approximate layout.
On a colored or dark background, the silhouettes of the pasted shell are clearly visible even through tissue paper. This makes it possible to correctly navigate when cutting blanks on which the contours of mosaic elements are drawn. The silhouette of the pasted shell is unique, it can give impetus to the imagination of the artist. You can enter the contours of various animals, human figures, buildings, cars, plants, and much more into it.
2. Work with varnishes for crackle.
There are two types of top coats for crackle.
The first so-called two-component crackle varnish from one manufacturer is applied in several layers. The initial layer must be applied with a synthetic brush or made of natural bristles in an even, thin layer. The first coat should dry to a "tacky non-sticky" state in about 35-40 minutes.
The second layer of varnish used for the crackle aging technique is applied using the same technology as the first one. Make sure the coverage is even. The thicker the second layer, the stronger the cracks will be expressed. As it dries, cracks characteristic of the crackle technique will appear on the surface. The surface can be dried with a hair dryer. After complete drying, the cracks are rubbed with special grouts: it can be gold powder, dark oil paint, bitumen - patination agent or dry pastel powder of various colors. Cracks are rubbed with ordinary rags rolled up with a swab or a simple sponge for washing dishes. Excess grout is removed with a material soaked in linseed or sunflower oil, then the surface should be wiped dry with a cloth or rag. In view of the fragility of the resulting cracks, it is necessary to fix and protect the surface with a special fixative. You can use clear varnish for acrylic paints.
The second way is to use a single-phase craquelure varnish. Contrasting paint colors are used to achieve the crackle effect. To use a single-phase crackle varnish, one of the paints is applied to the surface, then after the layer has dried, a crackle varnish is applied, as in the first method, it must dry to a state of "tacky non-stickiness", then a second layer of paint of a contrasting color is applied. In this case, cracks appear immediately, so it is necessary to paint quickly, without crawling onto the previous stroke.
Some crackle tips:
- In no case should the varnish be shaken before use, otherwise the air bubbles formed after shaking will spoil the coating.
- The varnish should not stretch, if the varnish stretches it is either damaged or not of very good quality. The varnish should be transparent and liquid.
- Before the process of applying varnish, it is necessary to ventilate, vacuum, and it is best to carry out wet cleaning so that dust particles do not settle on the surface to be painted.
There are many techniques for aging and decorating furniture and interior items. To understand and learn how to make decorations for your home or make gifts to friends and loved ones with your own hands, and as we all know, handicraft is valued the most, you just need to learn how to decorate.
This technique gives new knowledge about the way of mastering the fine and decorative - applied art of crackle, a lot of room for imagination, which becomes, perhaps, not only on paper. There is an opportunity to experiment with color and image method, again not only with wax crayons and paints, but also with other materials, for example, on fabric, on ceramics, on stone. The main thing is that each child has his own idea - one of the most important moments of the creative process. Knowledge and experience gained in working with the new technique will allow the child to “think directly in the material”, keeping in mind the step-by-step possibilities of turning paper and other material into a creative masterpiece. Compliance with the technological sequence develops children's attention, memory, accuracy, independence.
In styles such as Provence, Chebbi-chic and Rustic, aged furniture and decor cannot be dispensed with. It is always more pleasant and cheaper to decorate furniture with your own hands. There are quite a few ways to age. Today we will take a closer look at the technique that creates a cracked surface: as if the furniture had been painted many times already and the top layer could not withstand the hardships of life. The main character of this master class is craquelure varnish.

What you need
- A piece of furniture or a basis for creativity
- Acetone, soft cloth
- Large and small skins
- Primer (optional)
- Roller, brush and foam sponge
- Two contrasting colors of acrylic paint (black and white in the example)
- Craquelure varnish
- Fixing varnish (furniture, parquet or even yacht)


How to do
Prepare the surface: sand, coat with a primer (if the surface is very rough), wipe with a soft cloth moistened with acetone. All this is necessary so that the paint lies evenly and holds firmly.
Let's start painting: the first layer of white acrylic paint will serve as the base. Depending on the size of the object, apply it with a roller, dotted with a household sponge or just with a brush. The brush leaves furrows, so a roller and sponge are preferable, and a brush can help in hard-to-reach places.
Let the white paint dry completely and then apply a coat of black paint. The most convenient way is with a can, but you can do it in other ways. When the dark paint dries, it's time for a thick layer of craquelure varnish, apply with a wide brush. The varnish must not be allowed to dry - immediately apply a new light coat of white paint.
When the paint dries, it will crack, thanks to the craquelure varnish. This process can be speeded up by drying the paint with a hair dryer. Black color will show through the cracks, which will create an interesting effect. If you want the bottom tone to show through more, rub it in several places with sandpaper.
Don't forget a few coats of topcoat for strength so your creativity lasts.


Additionally
You can complement this technique with the help of patina or bituminous varnish. The first is more often green, the second is always dark brown. This effect will look good on furniture handles or metal parts. On a layer of bronze paint (gold, silver - any with a metallic sheen) apply a little patina or bituminous varnish and rub it with a regular paper towel. You can apply these materials to other parts or joints of furniture.
If the shape of the furniture being decorated does not quite match the style of decoration, this can be easily fixed by gluing a polyurethane baseboard or other decorative elements. Replacing hardware will help too. So the furniture will look more interesting and sophisticated.


And we visited the master class on aging with wax ourselves, after which we shared our experience in the article
Photos: thegirlinspired.com, diynetwork.com, mydesiredhome.com, ulfurniture.com, marisawhitaker.com, sunbrushdesign.com
How to make craquelure with improvised means?How to make craquelure?
The simplest do-it-yourself craquelure is called single-phase (or one-step). It is used to obtain a uniform color of the surface with contrasting cracks. In order to complete it, you need to stock up on the following items:
- The object you have chosen for decoration;
- Ground brush;
- PVA glue or primer;
- One-component varnish for craquelure;
- Acrylic paints in two contrasting tones to create a design;
- Finishing varnish (acrylic);
- Regular hair dryer (to speed up drying).
Having collected all this and prepared the working room, you can proceed to the actual creation of craquelure. We will analyze step by step how to apply craquelure correctly:
- Thoroughly clean the surface of the object to be decorated from dust and prime; To dry faster, use a hair dryer.
- Apply acrylic paint that is intended for coloring cracks and let it dry completely.
- Apply varnish quickly, evenly, without gaps - the thicker the layer, the thicker and cracks you will end up with. You need to dry the varnish to such a state when it is still sticky, but no longer sticks to the fingers.
- Quickly apply base paint and watch cracks appear after a few minutes.
- Fix the finished color with a finishing varnish.
Just five steps - and in front of you is an original creation that can perfectly fit into your interior!
Craquelure with improvised means
While you decide to purchase the necessary materials, decide which craquelure tool to choose, I will tell you how to get craquelure with improvised means.
I am a supporter of the use of improvised means to obtain various effects in decoupage, I like to use egg crackle, semolina and cereals, BUT I will say right away that if you can buy, order by mail, ask someone to bring you funds for craquelure, then do not read this article))))
Although, I probably got excited, here I thought that if you decide to decoupage a barn or a bathhouse, or an entire wall (Oh, how drawn to large-scale objects)))) then go broke on purchased funds. So read, experiment, and remember to write down in detail and step by step if you get a good crackle, otherwise it will be difficult to repeat.
Craquelure on PVA.
1 way. Undiluted PVA is applied in a thick layer on the surface to be decorated. We dry the PVA layer but not completely, how to determine this is not completely? Empirically))) Then we apply a layer of acrylic paint and dry it. I dried after the acrylic paint dries on its own for a while.
2 way. I have not seen a description of this method anywhere, I got it by accident, we will assume that I slightly changed the first method). I decorated the bottle and, in order for the acrylic paint to stick better, I decided not to prime the PVA glass, but simply mix the acrylic with PVA somewhere 50-50 and apply it to the bottle. After drying naturally for about 30 minutes, I decided to dry it with a hair dryer and ... cracks started.
Craquelure with egg white.
1 Prime the surface well.
2 Apply a layer of acrylic paint, which will be visible through the cracks, dry.
3Apply varnish, dry, a layer is needed so that the protein is not absorbed later.
4Apply egg white in random order, with good strokes, in a thick layer. Allow to dry WITHOUT USING A HAIRDRYER! Dry properly.
5Apply contrasting paint carefully so that the strokes do not find each other.
Craquelure with PF 283 varnish.
Furniture varnish PF-283 is a solution of alkyd resins.
Lacquer PF-283 is designed to cover furniture, as well as other wooden and metal surfaces indoors during construction and repair. Forms an impeccably smooth homogeneous transparent glossy surface without foreign inclusions, which protects against the effects of foaming detergents, moisture and mechanical damage. Differs in high profitability. Furniture varnish film PF-283
Precautionary measures:
Do not work near open sources of fire. Work should be carried out with good ventilation, in rubber gloves, using personal protective equipment. Avoid inhalation and ingestion. If varnish gets on the skin, wash it with warm water and soap. Keep away from children!
So, most importantly, when using PF 283 varnish, we protect our hands and lungs. Experiment in a well ventilated area.
We apply a layer of lacquer on the surface of the object to be decorated and wait 3-4 hours for it to come off, that is, it still sticks, but no longer sticks to the finger.
We apply the second layer of acrylic enamel or acrylic paint and immediately dry it with a hairdryer.
Cracks will depend on how the top coat of paint is applied. If you apply it with a brush, the cracks will follow the movement of the brush. If you want to get a mesh, apply the top layer with a sponge or small strokes.
Now, we gain patience and dry the finished craquelure for at least 36 hours (as long as the PF dries according to the instructions) And only after that we carry out the decoupage directly.
Craquelure with gelatin.
Getting crackle on gelatin requires a little training, don't be upset if it doesn't work out right away, however, this applies to any way to get the coveted cracks. Even special tools are capricious and you need to be able to make friends with them, to say nothing of improvised means.
1 st. dilute a spoonful of gelatin in a glass of cold water. We are waiting for swelling, and then we warm it up for final dissolution. Then, cool and apply gelatin, which begins to harden, on the surface to be decorated. We wait 10-15 minutes, you can use a hair dryer, the main thing is not to overdry and then, we apply the paint on the dried gelatin. You can apply a layer of paint over gelatin arbitrarily.
The layer of gelatin is adjustable depending on what kind of cracks we want to get "at the exit".
Thin layer - gentle cracks. Thick layer - deep wide craquelurins. If the gelatin layer is thick, it is possible to pull it with a brush or sponge, so you need to be careful when applying a layer of paint.
If you decide to blow-dry a coat of paint over the gelatin, be extremely careful as the gelatin may leak. !!!
We fix the work with several layers of acrylic varnish.
When working with glass, it must first be primed with PVA or acrylic paint.
Craquelure with table vinegar.
Using 9% table vinegar, you can also get crackle.
We apply acrylic paint, dry it almost completely, and gently press a sponge moistened with vinegar to the surface.
You can use this method for reverse decoupage. We glue the motif, apply a layer of paint, process it with vinegar, dry it and then apply a contrasting layer of paint.
Craquelure with liquid laundry gel.
We apply the main color, dry it .. Apply the gel with a brush. The thicker the gel, the better. Strongly diluted paint is applied to the gel.
Related Articles