How to cultivate the land after plowing virgin lands. Digging up virgin soil in the country (video)
miesia4yk about how to turn virgin lands into fertile beds, not idle. And very timely, because spring is already on the calendar, we urgently need to prepare materials that will allow us to set up beds on virgin lands without breaking our backs and without hiring guest workers. And most importantly - without destroying the ecosystem of the site.One should not think that the problem of virgin lands concerns only new areas. It also happens that in the old garden the problem of transferring the garden, for example, to the place of the lawn, is brewing. And it also happens like this: they are tired of fighting with thickets of goutweed or leek. And it also makes no sense to drive even a walk-behind tractor, plow and beat, building beds.
The principle of gentle development of virgin soil is as follows: minimum digging, maximum stimulation of the work of microorganisms and worms.
So, what do we need to break the bed on virgin soil:
sharp shovel; pegs and twine; boards treated with septic tanks; EM preparations (Baikal-EM, Extrasol, Humisol, eventually microbial composting accelerator); plant and food residues; second-hand corrugated cardboard, black polyethylene film.
Consider the example of a bed measuring 60x300 cm.
At the site of the future bed, with the help of pegs and twine, we mark the bed in the north-south direction. At the same time, we mark the paths along the line of the beds with a width of 70-80 cm.
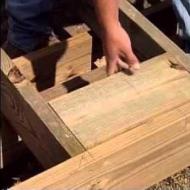
We cover the area of \u200b\u200bthe beds with corrugated cardboard so that 2-3 cm go out onto the tracks. We knock together a box of boards 20-25 cm wide and 60x300 cm in size. We install it directly on the cardboard. It is cardboard that will become the main obstacle to weeds.
We put a mixture of plant and food residues with half-ripe manure or compost into the box, the use of stale sawdust is acceptable. You can use dry bird droppings or dry horse manure instead of manure. The mixture should be just below the rim.
We remove a layer of soil 7-10 cm thick with grass from the paths with a shovel and lay the layers on the bed with grass down. Of course, it is better to remove the largest roots from these layers.
We water the bed with hot (50-60˚С) water, after 20 minutes - with a solution of the EM preparation. Cover tightly with cardboard, pour hot water again and tighten with black plastic wrap.
Such a bed should be prepared as early as possible, but at least 2 weeks before sowing. A couple of days before sowing, you need to remove the film and cardboard, slightly loosen the top layer, closing up wood ash (2 cups for this area). Water with green manure.
How to make green fertilizer if there is not enough grass yet? Take a bucket, fill it with nettles and any herbs that are already green, pour warm water, add a couple of tablespoons of old jam, yeast bread crusts, 2 tablespoons of an EM preparation, let stand for 2-3 days in a warm place. Strain and dilute with warm water 2 times. Water the bed and cover again with foil before sowing or planting seedlings.
Such a bed will need to be watered as necessary, the plantings can be mulched (you can cut the grass before flowering), then the humidity will be maintained, and the air exchange will be good and microorganisms with worms will multiply. It is important to add either green fertilizer or EM preparations to the water for irrigation 2-3 times during the season.
What about the tracks? And we immediately fill the paths with sawdust, which we first mix with dolomite flour (2-3 tablespoons per bucket of sawdust). Over the summer, they will need to be watered a couple of times with a solution of green fertilizer. The paths will be clean from weeds, it is convenient to walk on them, and a factory for the production of worms and microorganisms will form under them.
By the fall, the beds will settle a little, but before winter they should be plentifully mulched with coarse humus. The main thing: no digging. A minimum of weeds - rhizomatous ones will not break through the cardboard and die off, and annuals that have flown in seeds are easily pulled out.
So we’d better honor the upturned virgin lands, respect the feat of our ancestors, and in our garden we’ll save our strength for other things.
By the way, there are also special techniques for planting a garden on virgin soil without exhausting weed control and digging.
Every farmer knows how time is valued during tillage, sowing or harvesting, therefore, whether plowing virgin land with a walk-behind tractor is possible is of interest to many. The use of a walk-behind tractor in most cases does not raise questions and difficulties. A lot of information can be learned from the instructions, which without fail goes to each model of equipment. Still, newbies sometimes have questions. Often they are associated with the processing of virgin soil. In order to quickly deal with this, you should find out what a device for plowing the land can be.
Experienced farmers are well aware of the importance of quality tillage before planting, as well as in autumn. This has a lot to do with productivity. If earlier you had to spend whole days on such work, now you can use a walk-behind tractor that will cope with the task in an hour. When choosing a high-quality and productive device, it is possible to process in two hours the area that would have been spent a whole day with manual plowing.

When choosing an assistant to work on a farm, many are wondering whether it is possible to cultivate the land with a Neva walk-behind tractor or another model, or is a motor cultivator better. In fact, there are no significant differences between these types of technology. Many farmers use both one and the second name to refer to ordinary walk-behind tractors.
What is the difference between a walk-behind tractor and a cultivator
Looking back, there are some differences. It is considered that the motor cultivator is suitable only for plowing, mixing the soil and fertilizing. Motoblock is more functional. Additional attachments can be quickly connected to it, thanks to which the equipment can perform cleaning work, function as a lawn mower, etc. Motoblocks and motor cultivators can also be used for planting seeds, which speeds up this process and makes it easier.

Most walk-behind tractors are more powerful than conventional cultivators. This is a very important parameter that allows you to apply the technique in various situations. For example, if we are talking about plowing virgin lands, you should opt for a walk-behind tractor. In this case, it is desirable to choose devices with a powerful engine. This will avoid breakdowns and make the process of plowing virgin land as simple and fast as possible.
For a walk-behind tractor it is much easier to pick up additional nozzles. Therefore, arable work on the site can be as diverse as possible.
The difference between the two units may lie in the price. The more powerful the engine, the higher the cost of equipment. Moreover, motoblocks are often equipped with a set of attachments. This also drives up the cost. For this reason, if the owner of the site needs to cultivate a small area, a motor cultivator is most often preferred. With it, it is easy to engage in arable work in small areas. But keep in mind that the power of such equipment for plowing virgin land may not be enough. A weak cultivator in this case will simply burn out.
Pros and cons of plowing with a walk-behind tractor
Previously, farmers had no alternative, so all work was done manually. Now many can buy a motor cultivator or even a motor block. However, some still doubt that the land plowed with such equipment is of high quality.
The main advantage of using this type of equipment is that mechanical plowing takes a little time. The farmer saves time and effort, productivity increases, and this affects the level of profit. Having a walk-behind tractor, you can refuse the help of hired workers. As a result, the farmer saves on several salaries.
At the same time, using a walk-behind tractor, you can not only plow the land, including virgin soil, but also plant seeds, harvest, mow grass and hay, and also do a lot of other useful work without spending a lot of time on it. It is also convenient that with the help of one device you can do several jobs at the same time. So, already during plowing, the farmer has the opportunity to fertilize the land.
Both the walk-behind tractor and the walk-behind cultivator allow you to dig deep into the soil. Manually, such results cannot be achieved. This is especially true for work not virgin. Thanks to the deep plowing provided by the walk-behind tractor, cultivated lands become better in terms of structure. Thus, the soil can be saturated with oxygen and properly moistened. This will definitely affect the yield in the future.
Processing virgin soil with a walk-behind tractor brings a lot of benefits. With the help of this technique, the soil is cultivated.
As a result, planted plants grow well on the site, but weeds are removed.
Statistical data show that after processing the soil with a walk-behind tractor or a motor-cultivator, the yield increases at least twice.
Of the shortcomings, one can single out only the high cost of equipment. A good powerful walk-behind tractor for plowing virgin lands can cost about 100 thousand rubles. Plus, to perform various tasks, additional nozzles will be required. You can make them yourself, but some types still have to be bought.
Very carefully you need to use walk-behind tractors on virgin soil. If there are many deep-rooted weeds in the soil, mechanical tillage will only be harmful, as it will promote the reproduction of harmful plants.
Some farmers believe that the constant use of a walk-behind tractor for virgin lands or a motor-cultivator can lead to depletion of the fertile layer or to its violation, which negatively affects the yield. But this problem can be solved very easily. To do this, it is enough to apply fertilizer at the same time as digging up the soil.
Many gardeners and farmers believe that cultivating the land with a tractor will be much more convenient, and the quality of the plowed land will be much higher. The first parameter may be considered correct, but as far as convenience is concerned, it is not. Plowing with a tractor will only be possible in large and completely open areas. If there are buildings or trees nearby, then using this technique will not work. Motoblocks are much more maneuverable, and they are many times cheaper than the simplest tractor.
Plowing rules
In order for the land to be fertile and the harvest to be good, some recommendations should be followed that exist both for virgin lands and for lands that have already been cultivated. One of the key points is the equipment setup. Before plowing the soil, it is necessary to carefully adjust the width and depth of digging. Next, you should make sure that the walk-behind tractor is ready for work, that is, it is fully filled with fuels and lubricants.
As for how to plow the land with a walk-behind tractor, there are recommendations for different types of soil. But still, most often, experts advise making a furrow of about 50 cm at a depth of no more than 15 cm. If the soil is very rough, you can go deep up to 25 cm.
The area that is planned to be processed using a walk-behind tractor or a motor-cultivator must be completely cleared of large stones and debris. It is advisable to immediately remove all available weeds. Further along the site, an orientation cord is laid. This allows you to create the most even arable row.
Plowing virgin soil is somewhat different from the usual work of this type. Here you can move in a circle or in a zigzag. It all depends on the personal preferences of the farmer. In this case, the shape of the treated area is necessarily taken into account. Experts recommend circular plowing on rectangular fields, and zigzag on square ones.
Working on the virgin lands is often associated with numerous difficulties. Therefore, for such cases, it is recommended to choose a powerful technique. Sometimes the earth turns out to be so hard that it is not possible to plow virgin soil normally with a walk-behind tractor, even the most powerful one. For such cases, phased plowing is recommended, that is, the work will have to be done 2 or 3 times. In this case, it is recommended to choose the time after heavy rains, since moist soil is better processed.
After the end of plowing, it is necessary to thoroughly clean the equipment from the ground. In this case, the equipment will last a long time without the need for repairs.
They ask me about how to develop the virgin land of a new dacha, it’s a pity to write so much in the comments - I’ll take it out in a separate post.
Firstly, if the site has been launched for a long time, it is ... no, not a complete weep ***)))) This is a great happiness! After all, during all this time the earth rested, was "fallow", plants grew and died, overheated, they were eaten by all sorts of microorganisms and the soil improved from year to year. See what kind of grass is in the meadows - and who feeds and waters it? Natural balance. When ennobling the site, the main thing is not to break this balance, let everything grow like that - of course, only instead of wheatgrass - carrots. :)
When developing virgin lands, from a lack of experience and knowledge, I did things that I now consider my mistakes. What I would do now after receiving a piece of "wild" land:
1. I bought an electric motor cultivator
2. I bought an electric lawn mower with a grass catcher
3. I bought a good thick wire, from which I would independently make an extension cord (so that it is enough for any point of the site)
4. I bought the thickest black agrospan: for strawberries with a width of 1.2m, for beds of tomatoes, peppers, cabbage - 0.8m
5. Hose for irrigation and a reel on wheels to it, plus a gun nozzle with switching irrigation mode
6. An empty barrel of 200 liters for fertilizer infusion (herbal)
7. I would never buy any chemical fertilizers, except nitrogen for the lawn
8. I almost forgot about Fokin's flat cutter - buy it!
9. I would find it on the Internet and read it "Smart garden and smart garden" Kurdyumov
Land processing.
1. I would not plow the land with a tractor - never
2. I would not plow the entire area with a motor cultivator, except if there was wheatgrass
3. I would draw the beds in a north-south direction, I would make them 50 cm wide, and row spacing - from 80 cm to a meter wide.
4. I would develop narrow beds, and simply cut the aisles - perennial weeds in the beds will die, and the aisles will turn into a good natural and very resistant to trampling lawn.
Why did I stop on the green paths? Bare ground has some disadvantages:
1. Pulls moisture from the beds
2. After watering, it turns into an earthen swamp - do not step on
3. Dries quickly and cracks, becomes dead concrete
4. Overgrown with weeds and they need to be weeded
What about live tracks?
1. Always clean and beautiful
2. Turf keeps moisture
3. They don't get hot in the sun
4. Plants live in a natural environment (bare land in nature occurs only in barren areas)
5. They cut it with a lawn mower and covered the neighboring garden with mulch - very convenient!
A lot has been written about the advantage of narrow beds on the Internet, I will not repeat myself, only very briefly:
1. The strongest plants are always on the edge of the bed, so we make beds where everyone is extreme
2. This happens because, in addition to nutrition from the earth, they take a lot from the sun and air.
3. It is better to plant 10 plants and take 100 kg from them than 20 plants and take the same 100 kg from them (exaggerated)
4. It is convenient to work with such beds, especially to step over them))))
So what would I do next.
1. I would mow the whole area, put the grass in a pile
2. Marked with twine and pegs places for beds
3. I would remove the sod from the first bed - I cut it with a sharp shovel into squares and folded it to the side
4. I dug a trench deep on the bayonet of a shovel
5. I put the turf there with the grass down
6. I would lay the cut grass on top, almost filling the trench
7. I would lay the earth that I dug out of the trench on it
It turned out a beautiful warm fertile bed.
It remains only to sow it with green manure - for example, mustard. When it grows up, just cut it down (no digging! Its roots will die and are an excellent fertilizer) and leave it in this place - to rot. The worms just love her.
If there is not so much enthusiasm, you can make it easier: plow the place where the garden bed is planned with a motor cultivator (no deeper than 7 cm). If the soil is dry, water in the evening - cultivate in the morning. And sow green manure - rye, for example. Let the weed choke. Chop it up later and leave the green mass in the garden as mulch. Can be cut with a lawn mower.
If you are not in a hurry, you can cover the places of future beds in several layers with cardboard boxes or old linoleum - I did this. During the summer without light, any perennial weed will die. In the spring, anything can be sown on the cleared land. Lay it straight on thick grass - everything will die and the worms will grind into a fertile layer.
Plant seedlings, trying not to dig the ground once again. Cover the beds with mulch - sprinkle mowed grass, for example, leaves. The bigger, the better. Water does not evaporate, weeds do not grow, and plant nutrition is in abundance!
You can cover the beds with black agrospan and cut crosswise places for planting. This mulching material does not transmit light - the weed does not grow, does not give up water (water less than every five times).
It is far from always that the owners get the plots in excellent condition with dug up beds and trimmed. Basically, the new owner simply receives a plot overgrown with weeds and weeds with fruit trees and shrubs that have grown wild and began to bear completely different large and juicy fruits that they had previously brought in a well-groomed condition. However, sometimes the plot is inherited from grandparents, or they simply forget about it for a while, during which it manages to overgrow with weeds and thickets of grass as tall as a man. Of course, it is impossible to plant anything on such a site without first clearing it. The first task that faces the owner of the site is to clear the territory and prepare it for the next season.
In general, smart and diligent gardeners have long come up with many ways that allow you to quickly and efficiently develop virgin lands in order to use the land for their needs. After all, the land, which has rested for several years and is overgrown with weeds, is excellent for any planting, since it has accumulated all the necessary nutrients. It remains only to bring it into proper condition and proceed with its plan. But it sounds just like words. In fact, this is a huge work that requires a lot of time and effort. But the result is worth it.
In general, all methods of developing virgin lands can be divided into those that allow planting some plants in the first season after processing and those that do not allow this.
Radical changes
This method is considered quite simple in design and time-consuming in execution. In the process of freeing the site from thickets, it is required to remove the top layer of earth, called turf, in which numerous roots are intertwined. Cut layers are placed in the allotted place with the roots up and covered with a material that does not transmit light. Periodically, this pile must be treated with urea so that after a few years it turns into excellent compost.
As for the earth itself, a new layer of soil is poured over the cleared earth, which is ordered on several machines. The main thing is to know the origin of the soil and its quality. Otherwise, you risk losing money for nothing and getting a new layer of land rich in weeds and pathogens and even pests.
The simpler the better
Relatively easier than the first method, since here it is proposed to dig the site manually without removing the roots of the weeds. Another thing is that with this method you will not be able to sow a lot of things on the site for a long time. Cabbage and potatoes will come to the rescue. Cabbage is planted with seedlings, but as it grows, it will bring a powerful shadow from its leaves, as well as. This shade will cover the ground and begin to suppress the growth of weeds. In addition, periodically you will need to hill the beds, which will also help to destroy weeds.
For greater effect, mulching between rows can be done with grass clippings, manure or compost. 
Useful waste paper
This very original method will be effective if you carefully follow the instructions. To translate it into reality, you will need rotted manure (you can use chicken manure, compost or humus). This composition must be evenly distributed over the entire area of the area being developed and covered with black and white newspaper 5-7 layers thick. If you think this is complicated, you can replace the newspaper with thick cardboard. Compost mixed with manure is poured on top of the paper layer.
The advantage of this method is that in newspapers you can make holes in which you can plant any crops grown through seedlings. This is perfect for those who do not want to wait a long time, content only with potatoes and cabbage. At the end of the season, in addition to an excellent harvest of cultivated crops, you will also receive a clean site, with soil enriched with vitamins and microelements. 

black veil
Black film is a fairly well-known way to get rid of weeds. You can cover the entire area with it, so that under the hot summer sun a real hell will be created under it for all living plants. Not a single weed can survive the absence of sunlight and this steam room, so by the end of the season the film can be removed, and the earth dug up and feel like a winner. Alas, with this method, there is no talk of any landings in the current season.
Siderates come to the rescue (video - site planning)
Many pleasant words have been said about green manure plants, from which there are a lot of benefits. Including during the development of the site. Among all the cultures of this series, three can be distinguished that are better than others to cope with the task.
Winter rye is the first of these three helper crops that will rid the site of weeds. By itself, rye perfectly suppresses the growth of other plants, and winter rye is used for a reason. Rye seeds are planted in spring instead of autumn. Thus, the gardener is cheating a plant that will not be able to bloom during the season and does not form an ear.
You can enhance the effect if you cut the wheat several times a season without damaging the growth part of the plant. In the spring of the next season, the rye will go into the ground, and potatoes or other crops can be planted in its place, depending on how overgrown your site is.
Sunflower is a much easier job for a summer resident, but at the same time no less ruthless in relation to weeds. In early May, its seeds are planted in the ground after digging as thick as possible. When seedlings appear from the ground, other plants simply will not have a chance to survive under such pressure.
At the beginning of autumn, sunflowers can be mowed and chopped into pieces of twenty centimeters, and then thrown into the soil. During the fall, these parts will decompose and fertilize the land well, preparing it for planting new crops in the next season.
Bush beans are not only effective, but also tasty. Only it must be sown thicker than it is usually prescribed for it. A distance of 5-10 cm is maintained between plants, and 20-30 cm between rows. During the first month, you still have to weed between the plants, and then the beans will cover the entire bed with their leaves, and it is unlikely that anything will be able to grow in this shade. When the season comes to an end, the bean leaves will go into the compost, and the site should be walked with a hoe to remove the most tenacious weeds.
As you can see, the methods are very different in nature. You can choose any of them, depending on whether you are in a hurry to plant something on your site or are ready to wait for time and the sun to do their job. In any case, if you take up this business and bring it to the end, you can then enjoy the delights of working on your site, free from weeds.
To print
Alexey Smirnov 08/12/2014 | 13724
With the acquisition of a land plot, the owners want to master it as soon as possible. For this, plowing, harrowing, herbicides are used. How to treat the area correctly? Find out from the article.
Tillage in large areas
If the site is large enough, then they resort to the proven method: for the winter, the site needs to be plowed as deep as possible so that the weeds freeze out during the winter. In the spring, when the earth dries out a little, the site is harrowed, leveling it and breaking up clods of earth. Further cultivation of the land requires careful maintenance. To create a beautiful lawn, weed roots should be removed manually, otherwise the ubiquitous wheatgrass, quinoa, wood lice, and dandelions will spoil the look of the lawn.
If you use herbicides, you will have to select weed roots two weeks after spraying and compact the soil. After spraying again, you need to wait for the weeds to sprout, which are again shed with a solution of herbicides. You can sow grass seeds no earlier than a month after the last treatment. These two methods - manual removal of weeds and with the help of herbicides - are quite laborious.
You can plant vegetables on the site after autumn plowing and spring harrowing. It is necessary to level the land and form ridges, while removing the roots of weeds, after which fertilizers are applied and seeds are sown. It is recommended to plant corn, potatoes, beans, which will help to cope with weeds, because caring for them involves repeated weeding, hilling. Mulching will make the job easier by minimizing the growth of annual weeds.
These methods of tillage are suitable for large areas, and require considerable physical strength in order for the uncultivated virgin land to turn into fertile beds.
Land cultivation in small areas
First of all, it is necessary to mark the area for the beds, mow the grass. A small area of \u200b\u200bthe earth is covered with thick cardboard or plain paper, newspapers in several layers. The cut grass is evenly laid on top, organic fertilizers are applied and fertile soil or compost is evenly distributed (at least 10 cm). On such a bed, vegetables grow well that do not require deep embedding: zucchini, cucumbers, pumpkin, beets, carrots, beans and others. You can plant seedlings in a garden bed, covering it with agrofibre, in which cross-shaped cuts are made. Plants are planted in the holes, adding soil or compost if necessary, not forgetting to generously water them with water. Peppers, tomatoes, cucumbers, eggplants, cabbage will grow well, because agrofibre not only protects against weeds, but also from cold, overheating, keeping moisture in the ground.
In autumn, it is enough to dig such a ridge, the unripe remnants of paper, grasses will completely decompose over the winter. The next year, the ground will be fluffy, light, perennial weeds will not grow in this place, and you will be able to grow your favorite crops.
Using this method, it is possible to develop not such a large plot of land, but the beds are high, and thanks to a layer of grass, organic fertilizers, the plants receive enough nutrition for the whole season. This method is convenient for low areas, because by forming raised rows, it is possible to level the area.
In the absence of fertile soil or compost for the top layer of high beds, weeds are often used after weeding. Weeded weeds, on the roots of which there is always a little earth, are laid on a bed of cardboard, mowed grass, and organic fertilizers. Having covered the bed with agrofiber and making holes for planting seedlings or seeds, you need to pour a little earth in the places where the film is cut so that the plant starts to grow. Weeds under agrofiber will pereperet, planted crops will have good conditions for development and fruiting, it is only necessary to water them regularly.
To print
Read today

Work calendar Cultivation of autumn radishes - we plant and get a harvest without the hassle
Often, gardeners believe that the most delicious radish is obtained only after spring planting. But that's not always the case, because...

Plants Planting green manure in August - saving the garden from problems
Do I need to plant green manure in the garden and when is it better to plant? Do these crops enrich the soil and what's wrong with them...
Related Articles