How to put a railing on a wooden staircase. Do-it-yourself installation of balusters on a wooden staircase: installation of railings and balusters with a step-by-step process
A baluster is a post used to connect railings and steps. The main function is to ensure safe operation and sufficient strength of the ladder. Owners of their own homes often use balusters. How to fasten them correctly? The material below will help you figure it out.
Materials used to make balusters
For the manufacture of balusters, you can use various materials:
- wood is not only the most environmentally friendly material, but also harmoniously fits into almost any interior;
- metal is a real godsend for a designer, as it allows you to get absolutely any shape;
- forging - the main positive qualities include elegance, unusualness and reliability;
- concrete is strong and durable;
- glass can give a home a fantastic look.
Features of mounting wooden racks
Wooden baluster includes the following main parts: support, base and central array. The main load will be taken by the base, therefore, it must be as strong as possible. The place of attachment of the support is the railing, and in order to ensure their reliable functioning, it is necessary to achieve their tight fit to each other. In the manufacture of these two elements, a small margin of length is made, which in the future will provide the possibility of installing racks. The array performs an exclusively decorative function.

The design of the pillar is usually divided into 3 components: support, center and base.
Balusters how to fix? If there are small children in the house, you need to carefully monitor the distance between the racks, otherwise the child may simply fall out.
Can be connected directly to the floor. To save space on the staircase itself, balusters are often attached to a bowstring or stringers.
To install balusters made of wood, you can use self-tapping screws, studs and dowels. The simplicity and convenience of the first method is fully manifested in the presence. This case involves attaching balusters to treads. The self-tapping screw is screwed directly to the step so that its tip protrudes halfway. Then you need to mark a point on the lower cut of the rack, which will serve as a place for screwing.
Stud installation sequence
How to fasten balusters with studs? The lower part should be screwed into the tread, and with the help of the upper one, fix the rack. Before proceeding with the installation, you must stock up on the following tools and materials:
- standard galvanized studs;
- drill;
- end saw;
- wooden racks;
- glue.
Now you can proceed to the installation:
- The lower end of each wooden baluster must be equipped with a hole with a depth of at least 0.8 cm and a diameter 2 times smaller than the diameter of the stud.
- Then you should proceed to the manufacture of the upper and lower cuts using. In this case, it must be borne in mind that the angle of inclination should fit under the bowstring.
- The pin and hole must be connected with glue.
- How to fasten The depth of the holes in the bowstring should be at least 8 cm, and when installing, one should not forget about the optimal order - first 2 extreme columns, and then all the rest.

self-tapping screws
How to fix balusters to the floor? In this case, the most versatile way is to use screws or self-tapping screws. They can cope with the fixation of both wooden and metal elements.
The following approaches deserve attention:
- balustrade;
- use of a base plate;
- using direct fixation.
All these methods are very similar to each other. A secure connection to the steps can be achieved by using a plate, which is usually fastened with four screws.

In addition, self-tapping screws make it easy to connect balusters to railings.
If the step is not equipped with a riser, then it is considered optimal and most convenient to bring the mount to the bottom. And if the risers are removable, then there is nothing left but to disguise the junction.
The presence of a thin bowstring does not allow fastening the balusters by the method described above, but the issue can be resolved using one rather interesting technique. It requires the addition of an additional rotary element to the structure, which connects the baluster and the side part of the stringer. This maneuver not only increases the free space on the steps, but also allows you to move the fences beyond them.
During the execution of work, utmost care must be taken so that damage to the supports does not occur. For manufacturing, you need to find a suitable wood species that is resistant to splitting, which is able to withstand such installation.
How to install balusters on rods and dowels?
How to attach balusters to stairs? Wooden structures involve the use of ordinary round dowels. Their diameter should not exceed ¼ of the diameter of the rack, and the length - two diameters of the baluster.

Marking implies each element - railings, steps, columns. The depth of the hole should be half the diameter of the dowel. When installing fasteners coated with glue, the following order must be observed: first steps, then railings.
A metal rack can not be called a complex installation
The use of metal in stair construction is considered traditional. Such elements are distinguished by sophistication, elegance, and the regular appearance of new ornaments and curves of lines remind of a new time, a new trend or a new fashion trend.
How to fix metal balusters? Very simple, because all the necessary parts and detailed instructions are included with such racks. The sequence of standard installation is as follows:
- the distance between the balusters, previously coated with paint, is outlined;
- the stand is screwed onto the tread with a bolt or self-tapping screw;
- the railings are attached to the rack from above, after which the railings themselves are glued.

Private houses do not involve the use of hollow balusters; they are much more popular in office buildings. The main advantage of such structures is a special protective layer that prevents rust, therefore, increases the service life. We fix the balusters with our own hands:
- On the steps, you need to make marks, in the place of which columns will be located in the future.
- Bolts or screws must be used to install each column.
- The lodgements, on which the railing will be attached in the future, can be rotated to the required angle.
Mounting Features
The safety of the structure directly depends on the reliable fastening of the balusters to the stairs, which, regardless of what material and shape were used for their manufacture, are subject to the following general rules:
- The optimal safe distance between two adjacent supports is 15 cm, especially if small children live in the house.
- The value of the support height that is comfortable for many users varies between 80-100 cm.
- The fastening of each support should be carried out at two points - upper and lower.
- The safety of the structure does not depend on the thickness or cross-sectional area of the baluster, since this element does not perform a load-bearing function, its choice is mainly influenced by the style and interior of the room.
- How to properly fasten balusters to load-bearing structural elements, railings and handrails? The answer to this question largely depends on the material that was used to make them.

Glass balusters
How to fix balusters made of glass? Despite the fact that such elements seem very fragile, they have sufficient strength and reliability.
Metal hinges or nozzles are used to fasten glass to any support. The installation of protective glass screens requires certain profiles.
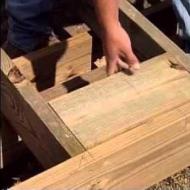
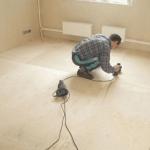
We make markings for poles and balusters
We do the markup for the installation of balusters as follows.
So that there are no deviations, I set aside 60 mm from the side edge of the upper step.

I set aside the same 60 mm from the edge of the lower step.

I make marks and put a guide rail on them.

With the help of a corner, I put marks at the beginning and at the end of each step.


Thus, deviations will be minimal and all balusters will stand exactly.The next step is to mark the distance between the balusters.

We install a pillar at the top of the stairs on the second floor.

To do this, take a bolt 10 x 100 mm, weld it to a metal embedded plate.


 While the post is not bound by railings and balusters, it wobbles, but when the whole structure is assembled, it will stand firmly.

Now we install the lower pillar, on the platform between the upper and lower flights of stairs. Set aside 55 mm from the overhang point of the step and drill a hole for the bolt on which the pole will be attached.

The width of the column is 100 mm, but we set aside a little more than half of this value - 55 mm, so that there is a gap of 5 mm between the column and the step. So the pillar will not rub against the step and creak.

Let's move on to how to arrange balusters. Again we take a corner and make a mark on the second step.

We mark the place where the overhang of the upper step ends and set aside 1 cm from this point.

We use small trimmings of the base of the baluster as a projection.

The distance from the step board to the baluster is 4.5 cm.

The same 4.5 cm are set aside from each riser board on each step.

We measure the distance from the extreme baluster on the upper step to the pillar - it turns out to be 8 cm.

The width of the tread on the steps is 26 cm, so the distance between the balusters should be 13 cm (exactly half).

The second baluster on the step will stand at a distance of 7 cm from the edge of the step and at a distance of 8 cm from the next lower baluster, taking into account 1 cm of indentation.


Taking into account the fact that the gap between the pillar on the platform and the step is 0.5 cm, the distance to the baluster there will be slightly less - 7.5 cm.

Main! It is necessary to observe the following sequence: first, the pillars are placed, and then the balusters are arranged in such a way that there are approximately the same distances between the upper and lower pillar and the balusters closest to them, with an error of 1-1.5 cm.
How to fix the balusters on the stairs evenly and firmly
When installing balusters, we see that the base of two adjacent balusters is not the same. The one that stands at the riser has a higher base than the extreme one.

The tops are all the same. Initially, all balusters were the same size.

How much do you need to trim the base of the baluster? The leg of the baluster has a height of 19 cm.

Since the extreme baluster is exactly in the middle, we reduce it by half - by 9.5 cm.

We attach the balusters to the steps with a hex head self-tapping screw.
Be sure to use the puck.

Using a ratchet, we fasten the baluster to the step.

With the help of a guide and clamps, we fix and tie together all the installed balusters. We verify their position with the help of a level and correlate with the position of the pillars.


Each baluster is marked with its own number corresponding to the step number.

Also, on each baluster, a mark is made along the installed guide, indicating the cutting line for the installed handrail.

On the reverse side, so that later it would be more convenient to assemble the entire railing structure, marks are also made on the rail itself indicating the position of the balusters.

The position of each of the balusters on the rail is also numbered.
After the balusters have been cut, they are re-installed, according to the numbering, and only after that the railing bar is attached to them.

How this whole process looks in real life, you can see in the video:
How to install a staircase handrail to the second floor in a house
We start by measuring the angle of the handrail in relation to the post.

In accordance with this, we also adjust the angle of inclination of the circular saw, with which we will cut the handrail of the stairs.

After that, saw off the edge of the handrail.

We did not succeed in sawing through to the end, it remains to finish literally 0.5 cm.

We do this with a regular hacksaw.

We process the edges with sandpaper.

We repeat the same operation on the other side of the handrail.


We install the handrail and check how it fits to the posts. At the bottom, everything fit perfectly, without gaps.

In the upper part we see a small gap and correction is required.

We cut the edge of the handrail a little and remove the interfering protrusion-knob. After eliminating this shortcoming, the handrail fits snugly to the upper post. When tightening with fasteners, the structural elements will adjoin each other even more tightly.

One more point must be noted. The railing is initially an ordinary beam and we need to make a groove on the reverse side for the railing bar.

To do this, I use the following tool. With a clamp, I fasten a piece of wooden beam to the router at a distance of 15 mm from the cutter.

This will be the offset from the sides of the handrail.

The groove itself will be 50 mm wide and 5 mm deep - exactly along the thickness of the railing bar.

You can also watch how to make a handrail in this video:
How to bend a handrail at the bottom of a staircase
The end of the handrail at the bottom of the stairs should be rounded. In this part, I'll show you how to do it.

As a blank for the handrail, we use an ordinary beam 80 x 55 mm.

A board 40 x 100 mm is glued to this beam.

I alternately glued three such additional elements.

I got a build-up to the handrail, on which I first drew how the end of the railing would go.

I started cutting off the excess with a saw.


Then we begin to process the end of the railing with a manual cutter with a diameter of 8 mm, removing unsawn residues.

Movements must be performed vertically, since the railing will twist with a screw and smooth out.


We cut the handrail almost along the line that was originally drawn.

Now we take a belt sander and align the sides of the handrail.


We outline with a small margin the trim line from the bottom of the handrail.


We also cut off the excess part at the end of the handrail.

The thickness of the handrail at the attachment point with the lower post must match the thickness of the handrail at the baluster. We draw a vertical line and measure, we got 72 mm.


Thus, we made a blank of a curved handrail using only three tools: a hacksaw, a grinder and a turbo machine with a cutter.


After processing the handrail, we get this option.


It remains to install two more missing balusters.

As a result, we get such a construction.

For a better understanding of the material presented, you can also watch the video:
Railings installed around the stair structure ensure the safety of people on it, and also give the stairwells completeness. Such fences consist of supporting pillars, railings and balusters. Support pillars are rigidly attached to the steps, so the installation of fences begins with their installation. Vertical balusters are installed between the pillars. The distance between them should be 10-15 cm. It is this distance that provides the maximum level of security.
Stair railing design diagram
Balusters can be made from a variety of materials: wood, concrete, glass, stone, metal, durable plastic. In a private house or in the country, support strips made of wood or metal are most often used. Metal crossbars are attached using ready-made brackets, hinges. They may initially have plates with holes through which the balusters are screwed to the steps or to the floor. The installation of such elements does not have any features, so we will analyze the installation of wooden balusters in more detail.
Railing installation steps
- Support poles are installed, attached to the floor.
- The locations of the balusters are marked.
- Prepared balusters are trimmed at the top end to match the slope of the railing. To do this, first, the extreme crossbars are mounted, between which the cord is pulled. The ends are trimmed according to the level of the cord.
- If the crossbars are installed on top of the bowstring, or the ladder has a special design, the crossbars are cut at the bottom as well.
- Balusters are attached to the steps.
- The railing and railings are being installed.
Construction of a wooden baluster
 Appearance of wooden balusters
 This element has three parts:
- A base that is directly adjacent to the floor or is installed on a special rail - sub-bolsters.
- The central part, which is a decorative element.
- A support connected to a railing or a railing.
The support and base are always made slightly larger so that they can be easily adjusted to the design of the stairs.
Wooden railing stairs
The crossbars running along the entire length of the stairway must be securely fastened to the stair structure. You can do this in three main ways:
- On wooden dowels.
- With the help of self-tapping screws.
- On metal studs with thread.
Fastening with dowels
 Fastening wooden balusters with dowels
 Structurally, dowels are rounded wooden spikes, and the type of connection is called "thorn-groove". The work is done in this order:
- From the bottom of the balusters, as well as on the steps or the string, through the same distance, holes are drilled with diameters equal to the diameter of the dowels.
- The holes in the balusters are smeared with wood glue.
- The dowels are coated with glue, and then hammered into the prepared bases of the balusters.
- Holes in the floor are smeared with glue, as well as dowels protruding from the racks.
- Racks on dowels are attached to the steps.
- Using a level, the verticality of the supports is checked.
- A break is made for 3 hours for the glue to harden.
- A railing bar is fixed on the crossbars. It is screwed with self-tapping screws or screws to the installed transverse racks.
- The railing is attached to the bar with glue.
Threaded stud fastening
 Fastening the baluster with a threaded rod
 This method is quite laborious, so it is used only by experienced craftsmen. Stainless studs are used, which are screwed into the balusters, and then fixed to the railings and steps (bowstring). The work is performed in the following sequence:
- A hole about 8 cm deep is drilled in the central part of the base of each baluster. The diameter of the hole is 10-12 mm.
- The holes are filled with glue, after which metal studs are screwed there. They should protrude from the tree by at least 6 cm.
- Holes 8 cm deep are drilled in the floor or in the bowstring. Their diameter should slightly exceed the diameter of the studs.
- Racks with studs are inserted into these holes for glue. First, two extreme racks are attached, and then, along the rope stretched between them, all the rest.
- In the same way, the balusters are attached to the railing. It is best to fix the racks to the railing, which will later be glued inside the handrail. If there is no experience in such work, then you can fix the racks directly to the handrail.
Self-tapping fixation
This is perhaps the easiest way to fix the transverse racks, which even inexperienced craftsmen can use. Before starting work, you should prepare wood screws, preferably stainless. Their length must be at least 5 cm. Installation on self-tapping screws is carried out in this order:
- Self-tapping screws are screwed into the lower and upper parts of each baluster at an angle so that their tips protrude slightly in the vertical direction.
- Places of installation of vertical supports are marked.
- Racks are installed on the marked places, after which they are screwed with screws to the bowstring or steps. For reliability, each support is fixed from below, and then from above with two self-tapping screws. It is recommended that the heads of the self-tapping screws be sunk in the process of screwing deep into the tree. Subsequently, the resulting recesses are sealed with wood putty or wax.
- After fixing all the racks, the railing strip is attached to them. In exactly the same way, self-tapping screws are screwed into it, screwed into the balusters in advance.
- A handrail is glued to the railing bar.
We have listed the main ways in which balusters are attached to the elements of a wooden staircase.
One of the main elements of the staircase design is its fencing. It performs two functions: protective and decorative, and consists of balusters, main support and intermediate posts, protective screens and handrails. Railings provide a safe movement of a person along the flight of stairs, give him support when walking and prevent falling over the perimeter of the stairs. To properly install the fence, you need to know how to fix the balusters and railings, depending on their type and material of manufacture. Let's try to understand this issue.
Balusters - an important element of the stair railing
Balusters are vertical supports on which a handrail is laid. They are installed directly on the steps, or attached to bowstrings or stringers. The shape of the balusters can be different and depends on the interior of the room, the design features of the stairs and design ideas. They are able to decorate even the most nondescript flight of stairs, and they make balusters from:
- tree;
- metal;
- natural or artificial stone;
- concrete;
- gypsum;
- glass, etc.
Often there are stair railings, in which there is a combination of two or three types of materials that are in harmony with each other. It is on them that it largely depends on how to attach the balusters to the stairs, which installation option is better to choose.
Requirements
In order for the stair railing to be reliable and safe, when installing it, it is necessary to ensure compliance with some mandatory rules and conditions:
- the clear distance between the balusters must be at least 150 mm;
- the safe height of the railing can be at least 900 mm;
- fastening of the supports must be done at two points - to the handrails and the staircase structure (steps, bowstrings, stringers);
- handrails should be as comfortable and smooth as possible, but not slippery. Near the wall, they can be attached directly to it without installing balusters.

The main protective function of the railings is assumed by the support posts - lower and upper ones, therefore, their fastening must be approached more responsibly. Although the installation of intermediate balusters should be taken no less carefully. It is necessary that the fence withstand a person weighing 100 kg leaning on it.
The railing installation process consists of the following steps:
- installation of extreme (upper and lower) support pillars;
- marking the locations of balusters. To do this, you can use a thin but strong cord, or a laser level. Do not forget that markup accuracy is extremely important and avoids unnecessary problems;
- drawing center lines in the center of the balusters with a pencil or marker;
- preparation of the upper ends of the balusters. They must be sawn off in accordance with the slope of the flight of stairs. The lower ends are filed only if the vertical supports are installed on top of the bowstring or the fastening of the railing to the stairs has an individual design.
wooden stair railing
The main load-bearing elements of the fences can be attached to the steps with ordinary nails, but such a design will very quickly begin to loosen and become unusable after a short period of time. There are three main ways to make a more reliable fastening of the railing; handrails are mounted identically to the balusters. Fastenings are carried out:
- on stilettos;
- on dowels;
- on self-tapping screws.

When installing the railing on metal studs, a hole is drilled in the middle of the lower end of the wooden baluster with a depth of no more than 80 mm. Its diameter is usually 12 mm.
It should be noted that the studs, in order to avoid rust, must be galvanized. A pin is inserted into the hole so that it protrudes 5-7 cm beyond the surface. Using special glue, they are fixed in the desired position and await its final setting.
Installation of balusters on dowels, which are rounded wooden spikes, is carried out as follows:
- at the lower ends of the balusters and on the bowstring or steps, larger holes are drilled than for metal studs;
- dowels are inserted into the finished recesses, using glue identical to PVA for fastening;
- a baluster is placed on the dowels, filling the pre-prepared holes with glue;
- check the verticality of the racks using a level or plumb line and leave them for 2-3 hours until the glue has completely set;
- start installing handrails.

The easiest way is to install wooden balusters on self-tapping screws, which must be made of stainless steel. A self-tapping screw is screwed into the vertical support at an angle so that its tip protrudes slightly beyond the end of the baluster. Then it is installed in the desired position, and the self-tapping screw is screwed into the ladder structure to the end so that its cap is slightly recessed. In the future, the recess will not be difficult to seal with putty or wax.
Feature of fastening metal railings
The metal railing is combined with almost any material from which the staircase is made. It can give it severity, make it elegant or massive, give a touch of mystery or super technology. Forged railings are sophisticated and expensive, so the question of how to fix balusters and railings will be taken care of by specialists.
A simpler option is vertical stainless steel supports or with a special protective coating. Their package includes universal fasteners suitable for wood, or glass and metal. These can be hidden screws or fasteners with protruding spectacular elements.
Glass balusters
Glass elements of fences in modern interiors are quite popular. Despite the apparent fragility, they have sufficient strength and reliability. Glass is attached to any base using metal hinges or nozzles. Protective screens made of glass are installed in certain profiles.

There are many more different materials from which railings are made, but we have considered the main options for their fastening above. And the nuances appear, add up and are resolved in each case individually.
The railing on the stairs not only provides convenient movement along it, but also serves as a safe fence that prevents a person from falling. According to the regulatory documents in force on the territory of the Russian Federation, any stair structure consisting of three steps and above should be equipped with a railing.
Assembling a good staircase is not easy, but making a solid fence is even more difficult. Today we will talk about how the pillars and balusters of the stairs are fastened - the elements that form the basis of the railing.
Classic railings include balusters and handrails, but such filling is not always used. In many ways, the structure of the structure depends on the purpose of the stairs, for example, it is intended for use in a kindergarten, its dimensions and the stylistic direction in which the room is finished.


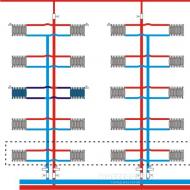
The presented photo gallery shows some filling options that are most often:
- through- such railings are also called open, without internal filling.
- Ornamental- refers more often to forging and wood. Various patterns and shapes are created from these materials, with which the railings are filled from the inside.
- latticed- the fence is filled with gratings with different mesh sizes.
- solid- perhaps the safest type, since a child, for example, will not be able to climb through it or climb up. Such solutions are very popular in modern high-tech styles, and they are made of glass or plastic.
- With horizontal filling- vertical balusters are replaced or supplemented with horizontal lintels.
Advice! The latter option is unacceptable to use in rooms where small children live, since the child can freely climb up the rungs and fall over the handrail.
If we are talking about the classic version with balusters, which we are actually talking about today, then the support pillars form the basis of the whole structure. It is they who hold the handrail and carry the bulk of the horizontal load. Balusters, in fact, are a decorative element that only further strengthens the railing.

- Posts for the stairs are installed at the beginning and end of the ascent, as well as at all places of turns - the first are called the pillars for the ladders, and the second are rotary.

- They can also be installed in the middle of a long span of railings or balustrades to strengthen the entire structure.
- The height of the fence is on average 90 centimeters, while the length of the pole for the stairs can vary from 100 to 130 centimeters, with a diameter of up to 15 centimeters. On top of them, a pommel is usually set in the form of a ball or other geometric or artistic figure.
- If balusters are often used typical, having the same shape, then the pillars themselves can be real works of art.
Take a look at these:


- however, due to the fact that they do not perform load-bearing functions, they usually have much more modest dimensions than the supporting pillars for the stairs. The diameter of these elements can be both 3 centimeters and 8, so that the whole structure looks lighter, or, conversely, more massive.


- Last on the list of parts, but by no means least, is the handrail. Its shape can be any, but always in the production of quality products, ergonomics and anthropomorphic features of an adult of average height are taken into account. All this is aimed at the convenience of using the stairs, and at maximum safety.
- The recommended handrail height (in section) is 5.5 centimeters, while the width is usually chosen between 5 and 7.5 centimeters.
- The parameters of the mounting groove, which is located on the underside of the element, are selected depending on the size of the head of the balusters, and also whether there will be a balustrade in the composition. We will talk about this in more detail a little later.


Of the additional elements that may be found in the design of fences, it can be noted, in addition to the rail under the handrail, the baluster. Both of these elements change the design and require a special approach when installing balusters - they do not have any effect on the installation of pillars, since they themselves are attached to it.

Ways of fastening balusters and racks
We have already figured out that balusters and racks perform different functions, which means that the requirements for their fixation will be somewhat different, although fasteners are often chosen the same. Naturally, in the end, we need to get a solid fence, which is what we need to focus on in the first place.
Assembling a wooden fence

So, the fastening of balusters and stair pillars is carried out in the following sequence.
- First things first, an accurate markup is made that will show the center points of all the vertical elements of the fence. It is very important that the step between them is strictly verified, otherwise the overall picture will look deplorable.
- Further, invitation poles are mounted strictly according to the level, after which the procedure proceeds depending on the structure of the fence.
- If the railing does not have a baluster, then one or two balusters are attached to each step, depending on the intended design.
- If this element is planned, then it and the handrail are mounted first, and only then the balusters.
- Using a rail for attaching a handrail means gluing it. A very convenient technique when you do not want traces of fasteners to remain in sight.
How to fix the ladder post to the floor with your own hands so that it stands straight and does not stagger?
For this, several types of ligaments have been developed:
- Mounting on metal studs. For these purposes, different companies have developed their own fastener designs. In general, we can say that such a solution is the most reliable and fast enough to install - we will analyze it in more detail a little later.

- Mounting on wooden dowels. This method is the oldest and is used today mainly for fastening balusters, because it is equally good for both smooth and inclined joints.
- For poles, it is preferable to use studs, but if you have good powerful dowels made of hardwood, you can also connect with them.
- In addition to these elements, you will need wood glue or PVA, which will not only strengthen the connection, but also get rid of possible squeaks.

- If we are talking about a rather rough staircase, for which it is not particularly important whether the fasteners are visible, you can fix the posts and balusters on ordinary self-tapping screws. Of course, only if the floor is also made of wood.
Advice! Often, fasteners leave behind untidy marks that can be hidden by either installing a wooden or plastic plug, or using wood putty.
Stud installation
So, now in more detail about fixing the pillars.
- Studs are used only when connecting parts perpendicularly, that is, only when connecting parts to the floor and steps.
- The mounting procedure depends on the design of the stud itself. Let's look at two options.

- As an example, let's take a fastener model from the ZipBolt company. Its design is such that on the one hand it has a threaded head - this part will be hidden in the baluster, and on the other there is a screw that is screwed into the base like a self-tapping screw.
- So, the first step is marking on the floor - there will be a hole corresponding to the center point of the pillar.

- According to the drawing attached to the stud, the rack is also marked, after which holes of the desired diameter are drilled in it.

- A hole is also made in the floor, which should be smaller than the diameter of the screw. The stud is tightened with a 10 mm open-end wrench.
Advice! It is not easy to tighten the hairpin, so you can pre-lubricate the screw part with wax or paraffin.
- If the floor is not wooden, but concrete, then a chemical anchor is used to strengthen the element.

- The gearbox head is inserted into the side hole on the pole. This element is designed in such a way that when it is tightened from the end with a hexagon by 6 mm, it goes down, simultaneously attracting and lowering the post.

- The final chord will be the installation of a wooden plug, which can then be sanded and painted along with the post.
A very simple and convenient method of fastening, but what if you don’t want at least some traces of installation to remain visible? You can use another type of fastener - consider the option with a spacer metal platform

- The installation instructions for this fastener are also simple, but require more operations.
- The photo above shows the base of the stud, which on the reverse side has a beveled surface like a wedge.
- We begin the installation by determining the position of the platform, which should be exactly in the middle of the column, and draw its contours with a pencil.

- Now, in the thickness of the floor, it is necessary to select a groove in which our platform will fit flush. Use the wood pen first to select the main part of the wood (we got six small holes).

- Then, using a small hand-held router, select the rest of the array. If there is no router, then you can use the classic chisel, but it takes longer and is not so neat. We carefully monitor so as not to get out of the markup.

- We lay the platform in place and circle all the mounting holes, including the central one, in the form of a lock cylinder.
- Corner holes, as you probably guessed, are designed for self-tapping screws - there we just drill holes of a slightly smaller diameter. The bolt head will be fixed in the central one, so you will also need to select a groove under it.

- We use the same pen drill for this, after which we return the platform to its place and check how the head passes in the groove - it should move freely.

- Next, the platform is rigidly attached to 4 self-tapping screws, after which we proceed to work with the rack.

- We find the center of its end along the intersecting diagonals, and drill a hole of sufficient depth in it, after which, using a wrench, a hairpin is twisted into the pole.

- The screw is not fully tightened so that you can thread its head into the mounting hole.

- Due to the lower shape of the platform, which, as we remember, is beveled, when the column shifts, it begins to wedged. In practice, we install the pole, check that it does not play, and knock it in the right direction with a wooden spacer so as not to damage the pole material.
- If you feel that the post is not very secure, just knock it back gently, tighten the screw a little and repeat the installation procedure.
Such fastening will be very reliable, especially after the final fixation of the handrail.

For fastening balusters, there is another type of stud, which has a screw part on both sides. This fastener is first twisted into a baluster, after which it is screwed onto the steps together in it.
We will apply this method only on stairs with stringers, but if you have bowstrings installed, then read on.
Mounting on dowels and screws
We have found that studs are not suitable for installation on sloped surfaces. Dowels and self-tapping screws are suitable here as fasteners. Again, the difference between the two will be whether the fasteners remain visible.

- Dowels are very easy to install and hold quite securely, but they are very difficult to use to fix the handrail, so they are used only at the bottom of the balusters. They can be installed equally effectively both on open steps and on beveled bowstrings and balustrades.
- In other cases, the use of screws and self-tapping screws is indispensable. They are usually screwed in at some angle to the baluster (depending on the steepness of the rise), but perpendicular to the base (steps, string, handrail).
- Visible holes and caps are masked or left as is, especially in inconspicuous places, for example, under a handrail.
- It is especially easy to mount balusters on steps if you have free access from below - a rare option, but having the right to exist.

After the posts and handrail are fixed, proceed to the installation of the handrail. To do this, you will need to cut the handrail support on each baluster at the angle of the stairs.
- You will need a flat guide: a rule or a rail.
- With the help of clamps, it is fixed at the desired height.
- Each baluster is leveled and is also attracted to the rail with clamps.
- As a rule, carefully, with a hacksaw, cuts are made on a tree.
- Now you can install either the handrail immediately, or the rail under it.

A baluster rail is, in fact, an insert that is one with the handrail after installation. The use of this element allows you to pull off the balusters with self-tapping screws without damaging them, after which the handrail is carefully glued on top and fixed with clamps until dry.
Installation of metal balusters
Everything is much easier if your balusters are metal. For them, you do not have to invent complex fasteners, and all connections are made either by welding or using special fittings.

There are also screw options (pictured, top right), which are convenient to use when accessing the space under the stairs.

Options with mounting pads for self-tapping screws are also very convenient, and the installation task comes down to clearly setting and fixing with a screwdriver.
Interesting to know! Unlike wooden balusters, many metal balusters (for example, forged ones) are not cut, so the dimensions of the elements of the entire fence are known in advance and are made to order.
Installation of balusters and pillars made of concrete

So far, we have mainly talked about the stairs installed in the house. For outdoors, the same materials are applicable, but there are others, such as balusters and pillars for stairs made of concrete, artificial and natural stone.
Of course, the price of such a solution is rather big, and those who can afford it will not search the Internet for information on how to install it themselves, but since we have touched on the topic, let's analyze all the options.
Structurally, such elements can be divided into two types:

- The first type has a rod embedded inside, which is both a reinforcement and a fastener. Products are solid and are made in vertical forms. In appearance, they are quite rude, which is why they cost less.

- The second type does not have a rod, although there is also a reinforcing frame inside. In addition, it is equipped with separate mounting cups (upper and lower), due to which the fastening takes place. Such balusters are much stronger and look richer due to the almost polished, pore-free surface from the factory.
Installation, respectively, they will also be different. In the first case, it is enough to drill a hole in concrete steps, filled with glue, after which a baluster is placed. Formwork is mounted on top and a handrail is poured.
In the second, everything is a little more complicated.
- First, a hole is drilled into which a piece of reinforcement is hammered, acting as an anchor.
- Next, the bottom glass is placed, in the center of which a hole is made.
- A layer of glue is laid out under the glass and inside it, after which the baluster itself is placed.
- The top glass is glued, as shown in the photo below.

- By the way, the upper glass is pre-cut at the right angle, similar to how we did it with wooden balusters, but here it’s not a hacksaw, but a grinder that is used.
- Lastly, an already cast handrail is placed, which, in addition to bonding with glue with balusters, must have an anchor connection with support pillars.
Let's finish with this. We have analyzed how the stair posts are attached to the floor and the handrail, mentioning all the basic materials. Of course, this work requires some experience and skill, not to mention the tool, but if you wish, you can master everything - the main thing is to have the opportunity to practice. In addition, take a look at the video in this article, where the installation is carried out by a wizard.
Related Articles