How to fix a leak in a toilet bowl. The toilet cistern is leaking: the main malfunctions and how to fix them The toilet is leaking how to fix it
Plumbing wears out over time. Some parts require correction, others need to be replaced. Finding out about a breakdown is quite simple: the tank starts to leak, makes a lot of noise, and there are problems with flushing. But you can repair it yourself, without special knowledge.
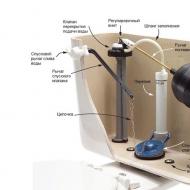
It is possible to carry out repair work on the toilet bowl, because the design device is quite simple. The toilet bowl scheme provides a bowl and a tank. But most often, breakdowns are observed in the tank.
The drain tank operates on the principle of a water seal. Its system includes levers, a seal and a float. After draining, the water enters the tank again and a shut-off valve is activated at a certain point.
Signs of a tank problem:
- Liquid constantly enters the tank;
- Water flows from the tank into the toilet;
- To flush the house, you need to press the flush button several times;
- The flush lever does not work at all;
- The toilet is leaking;
- Lots of noise when draining.

The main thing is to correctly determine the cause of the breakdown, and repair is not at all difficult. With a constant flow of liquid into the tank, the reason lies in the skew or displacement of the float. This breakdown is eliminated quite simply - you need to install the parts in the right place.
The correct position of the float is determined 2.5 cm below the connection of the underwater pipe.
Shutting off the water supply is easy with a wrench. Often, inspecting the float helps to find out the causes of the leak. If the float is damaged, water flows into it and the element becomes heavier.
It is quite easy to repair a float. It is necessary to remove the element and pour out excess liquid from it. The chip should be repaired and reconnected to the system. But such a repair will last only the first time, then you will need to completely change the broken part. The resulting chips are sealed with heated polyethylene.
What to do if the toilet is leaking from the bottom
If the tank is leaking from below, then the siphon membrane needs to be replaced. The same operation should be done if the water is not washed off for a long time. It is quite easy to complete this process.
Membrane replacement sequence:
- First, a crossbar is installed instead of a tank lid;
- A float is connected to the crossbar;
- All liquid should be drained from the tank;
- The nut that fastens the pipe to the tank will need to be unscrewed;
- The siphon nut is also loosened;
- Then the siphon is removed;
- After that, the membrane is removed and replaced;
- Then install all the extracted parts.
When the flush lever is not working, the thrust is repaired. The broken part is removed and replaced with a new one. For this, a homemade element from a wire is suitable. Over time, you can buy new traction.

But most often the tank passes water due to the wear of the gasket between the toilet bowl and the tank. There is a constant flow of water in the bowl, which reminds of itself with yellow spots. The worn element should be replaced with a new one. To begin with, they turn off the water and disconnect the flush tank from the toilet, then unfasten the drain. With this part, they go to a plumbing store and buy a similar one.
In some cases, drain replacement is not required. Perhaps the problem is wear and distortion of the rings. They are either fixed or replaced.
When the tank is leaking, you need to check the correct water level. To remove excess fluid, there is a special tube. It should be moved below.
How to fix a leak between the tank and the toilet
If there is a leak between the tank and the toilet, then the reason is the depressurization of the device. Most likely, the problem is the deformation of the seal, a special rubber gasket. To fix the problem, you will need to replace the gasket.
Gasket replacement steps:
- First, shut off the water supply;
- The liquid from the tank will need to be drained, possible residues are also removed;
- Under the descent hatch there is a drain nut, it should be loosened;
- Then you should remove the tank by unscrewing the corresponding nuts at the place of fastening;
- You will also need to unscrew the drain;
- Next, you need to replace the gasket;
- Then reinstall all parts in place.

But the old rusty bolt that holds the container to the bowl can also be the cause of the problem. Next, you need to replace the damaged part. Also, the water is first shut off and the water is drained. Bolts will need to be removed and replaced with new ones. Sealing washers are required.
When buying gaskets, be sure to take into account their size, because the element is available in different forms. That is why you need to know exactly the dimensions of the part.
Sometimes you can only tighten loose bolts. To do this, just fix the element with a key and turn it with a screwdriver. But you need to be careful not to ruin the ceramic bowl. That is why it is better to replace parts, and not constantly twist.
Fastening the gasket between the tank and the toilet
Gasket is one of the most popular fasteners. The advantages of such a part are obvious: small size and reliability of fastening. But there is also a minus - a little pressure. To wash off the drains for the tank to work, you need a lot of water.
Types of gaskets:
- In the form of a guitar;
- round;
- Invoice.
The replacement is pretty fast. First, all communications are turned off. From the tank you will need to drain the water and disconnect from the bowl. To do this, simply unscrew the bolts.

Older models have metal bolts and will rust over time. Removing these elements with a key is not easy, you can damage the ceramics. It is best to treat parts with special WD-40 fluid.
The rubber seal needs to be replaced. To increase sealing, use silicone sealant. You can apply a gasket or mount in a special hole.
There may also be a gasket between the bowl and the toilet. It all depends on the chosen toilet model. This element acts as a shock absorber. This minimizes possible damage between porcelain and faience.
Modern toilets come mostly without gaskets. From the tank to the bowl is a solid monolith. Using such a toilet is simple and convenient, but the cost of the device is quite high.
You practically do not pay attention to plumbing if it works smoothly. But be wary if the toilet begins to leak or make unusual sounds. And there is every reason for this, because a toilet leak is a serious thing, it can cause a lot of trouble not only to you, but also to the neighbors below. In order not to explain yourself about flooding, you need to regularly check the performance of your plumbing. And if a leak does occur, then you must act immediately, until it leads to serious consequences.
Condensation can form because the water and air in the room have a different temperature, or because the drain tank fails.
Sometimes there is condensation At once after the installation of the toilet and this is an eloquent evidence of the poor quality of the product. Therefore, let's look at a few examples with which you can understand the cause of the problem.
- It happens that the water does not drain from the tank for two to three hours, which is why it heats up to air temperature. In this case, the condensate disappears, but provided that the tank is working properly.
- Sometimes the hood is to blame, but then the condensate should also be on the pipeline. Examine it.
The problem with condensation can be solved in one of the following ways:
- reduce the frequency of draining from the tank;
- reduce the humidity in the house;
- raise the temperature of the water entering the drain tank.
- change the tank itself, but only with firm confidence in its malfunction.
Video - What to do if the drain tank is leaking?
As you can see, the causes of a toilet leak can be very diverse, so each individual case needs an individual approach. If you come across something new, then do not be afraid. Often, it only takes a few minutes to detect a problem. In extreme cases, you can always contact a specialist - a plumber. And the last: regularly check the serviceability of the drain and water supply- timely detection of a malfunction will save you from many problems related not only to money.
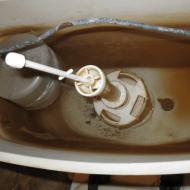
The cuff under the shelf is the weak point of the toilet
"Tool" for universal repair
Constantly flowing water from the tank to the toilet - this, on the one hand, does not look like a big problem. At least until the liquid is on the floor. But at the same time, you will have to pay large bills for housing and communal services. And finally, it's just annoying.
Fortunately, modern drain systems are simple enough that most problems can be fixed by hand with minimal replacement parts.
Why is water flowing?
The toilet flush system has several weak points. These are nodes with moving elements, as well as sealing zones of various kinds. In a modern tank, a problem can be created by:
- float valve system, which is responsible for supplying water and shutting it off;
- the place of attachment of the drain mechanics to the bottom of the tank;
- sealing zone at the outlet of the main flow of water into the toilet bowl.
If water does not flow outside the tank, most problems can be solved. This will require care and a few simple tools.
Neutralization of breakdowns
In order for the repair process to be understandable and for beginners, not to frighten with unnecessary details in the description of the process, we will outline the possible causes of water leakage in the toilet bowl from simple to complex. We only note the list of works that should always be done so that the repair is easy and convenient:
- Shutting off the water supply is a reasonable step, this should be done after the initial check of the valve system.
- After removing the water from the tank, you can easily get to the attachment points of the drain system, adjusting bars, and inspect the parts for damage.
- Do not dismantle everything at once - checks must be carried out sequentially.
Work with the toilet is best done by carefully wiping and cleaning the inspection sites. This guarantees a good result and an accurate diagnosis of problems.
Valve system
This system consists of:
- the valve itself, on which the water supply pipe is screwed;
- a float that transmits force to the rod;
- the main gasket - a membrane located inside the valve and responsible for shutting off the water.
In such a system, a whole series of problems may arise. To make sure that water is running in the toilet due to poor valve operation, an easy check should be made: raise the float as high as possible with your fingers. If the water continues to flow or has stopped, you need to start repairing.
Float
The cause of the loose valve closing may be a float. When its walls are damaged, water enters. As a result, the part does not float to the desired level, and the liquid overflows over the edge of the emergency outlet tube.
The problem is neutralized as follows: you need to find the place of damage and glue it. If it is significant (for example, a long crack) - the float can be replaced or placed in a strong plastic bag. If there is no damage and water inside, it is reasonable to try to move the floating block lower along the adjustment bar.Place of attachment to the stem
The adjusting bar, on which the float is fixed, transmits force to the rod. The parts are connected with a plastic pin. It can split and fall out, and the hole where the fastener is located can also be badly broken.
A worn stud is easy to replace, you should not use a rusting wire, a piece of plastic or a small wooden chopstick will do. If the mounting hole is badly broken and it is not possible to achieve a reliable water shut-off, it is easier to replace the valve.
valve membrane
If during the initial check (moving the float with your fingers up) the water supply does not stop, valve will need to be replaced., since the membrane cannot be repaired or replaced. Over time, it cracks and loses flexibility, which can cause leakage.
It’s worth going to the store with the valve removed, because today there are such a variety of options that you can only accurately guess the right model by direct comparison.
Dismantling is carried out as follows:
- you need to turn off the water supply,
- unscrew the underwater hose,
- remove the clamping plastic nuts,
- remove the float
- after that, the valve is pulled out without difficulty.
Cracks may occur in the plastic system. Expensive tanks, where there is a brass knot, do not experience such problems. We note right away: it is useless to glue, try to melt or otherwise repair damage to the valve body, the part must be replaced.
Pear and sealing cuff
The toilet is drained as follows: pressing a button or lever causes a pear with a semicircular tip to rise, after which the main volume of water is released. The part is automatically lowered, pressing against the sealing collar. It is this part of the mechanism that is subject to the action of time. Rubber loses elasticity, cracks may appear.
Seal failure can occur due to bad water. Salt deposits form on the surface of the cuff, and the pear does not close the outlet tightly. Checking the zone is done like this:
- you need to activate the trigger mechanism;
- after draining the water, the pear should be lifted with your fingers, carefully wipe it and the cuff;
- it is necessary to check the elasticity of the seal, as well as the cleanliness of its surface.
You can clean the cuff with a fine sandpaper or file. However, if the part has lost flexibility or cracks have formed, it is better to replace it. To do this, you will have to remove the tank and dismantle the drain system, and how to do this will be described below.
Drain system installation area
Leakage can occur due to wear and damage to the gasket located at the very bottom of the tank, where the main stem of the drain system is attached. Over time, rubber loses its elasticity. In addition, some brass fittings are equipped with iron bolts, which can rust.
A broken threaded rod or cracks in the gasket can only be repaired by replacing the corresponding parts, for which you will have to remove the tank and partially dismantle the drain system.
All work should be done carefully:
- The tank is removed after unscrewing the fixing bolts at the bottom. If they are made of plastic, wipe the nuts thoroughly and apply some force. Rusted steel parts can create a problem. It is not necessary to act with a chisel, so as not to split the tank. A wrench, adjustable wrenches, an impeller, possibly a hacksaw will come in handy.
- After removing the fixing nuts, the tank is removed and carefully placed on its side.
- Using pliers and other hand tools, fasteners are removed that prevent the removal of the drain system. In this case, it is not necessary to dismantle the valve and the float.
- After the disassembly is completed, it is enough to purchase parts to be replaced in the store.
Installation of the entire system is carried out in the reverse order and is not difficult.
Conclusion
Repair of any area of the toilet drain fittings is not difficult, it requires only accuracy and care. It is enough to follow simple rules, avoid distortions in threaded connections, do not apply excessive force to plastic parts, do not rush - and after a while the toilet will again delight with excellent work without the slightest sign of emergency leakage or overflow of the tank.
Any toilet leak always causes a lot of problems. She begins to spoil the mood, annoying noise of continuously flowing water.
Large numbers appear on the water meter, you have to pay several times more for water. The surface of the toilet is starting to rust. Drops of condensate become noticeable on the pipes, which can cause corrosion and mold.
Tank leaks must be fixed immediately to avoid negative consequences.
Today, the resulting leak in the toilet bowl can be easily fixed without resorting to the services of specialists. But for this you need to understand the principle of operation of such a system and its components.The tank can leak for various reasons. There is only one solution to fix it. Each tank design has its own characteristic features. Therefore, the approach to solving such a problem will be individual. However, the most common is the "classic" design. Therefore, we will consider the problem of leakage, taking this design as the basis. We will give 7 solutions on how to fix a leak in the toilet and why the toilet can leak?
Reason 1: Overflow
Perhaps the most popular and obvious reason was the banal overflow of the tank. When the toilet cistern leaks water into the toilet. Excess water simply goes into the overflow hole. The main reasons for the appearance of such an overflow can be:
- The rubber seal has lost its elasticity. Long-term operation of the tank, led to a loose shutoff of the flow of water. The gasket began to deform and let fluid through;
- The gasket does not fit well and does not tightly close the outlet located near the drain valve, thereby creating a leak. Such a gasket has retained its elasticity, there are no signs of deformation. Water starts to flow due to its poor pressing against the wall of the toilet;
- It is possible that the valve pin that holds the float has frayed. This occurs during long-term operation and the appearance of corrosion on the body of the stud;
- There is a crack in the valve body itself. Water starts flowing through it.
Note! When a brass valve is installed in the tank, there simply cannot be any cracks. They only occur on plastic products. Brass parts are highly durable.
How to deal with such a leak
To quickly fix the problem when water leaks from the tank into the toilet, you need to find out the true cause of the tank leaking. To do this, you need to do a little testing.
Remove toilet lid. Raise the float by hand. One centimeter is enough to stop the flow. Therefore, the float arm is not properly bent. It simply cannot shut off the water, it flows freely through the drain hole.
To fix and eliminate the leak, you need to slightly bend the lever so that it starts to shut off the water as soon as it reaches a certain edge.
If after lifting the lever the flow does not stop, you need to carefully inspect the valve. The special fixing pin must be in place. It shouldn't have any damage. It should stop the float arm while inside the valve. In addition, you need to check the condition of the hole in which the pin is located. It may have been deformed.
A stud that has become unusable can be replaced with a copper wire of a large cross section.
If the hole is deformed, a new valve must be installed.
It is possible that the leak appears due to the gasket. If, after pressing it against the valve, the water stops flowing out of the drain hole, you need to adjust its pressure. If it cannot be adjusted, a new gasket must be installed.
We examined the main causes and methods for solving the problem of tank leakage in the classical scheme. It has been used for over 40 years. However, every year there are new designs of tanks with a certain principle of operation. Try to further study their design.
Reason two: Bolts
Quite often, leaking water is associated with bolts that connect the cistern and toilet. Metal bolts become rusty over the years, plastic bolts simply burst, and the toilet bowl flows from this.
How to solve such a problem
First you need to carefully inspect all the fittings. You may only need to replace one bolt. However, in order not to additionally run to the store, it is better to immediately purchase a new set of spare parts for the toilet bowl.
To accurately determine the cause of the leak, you will have to disassemble the tank. Sometimes it is simply not visible which part is out of order, which requires immediate replacement.
How is the replacement
To fix a toilet cistern leak:
- Before starting disassembly, you need to turn off the water supply;
- Remove all water from the tank;
- Unscrew the flexible liner through which water is supplied;
- Loosen all screws. If the body of the bolts is covered with a large layer of rust, they must be cut with a hacksaw. Buying new bolts is much cheaper than installing a new toilet. After all, the old one can be broken when unscrewing rusted bolts;
- The toilet bowl moves back;
- The shelf lying on the cuff is removed;
- The rest of the water is drained;
- All rust found is removed.
For assembly, all steps are performed in reverse order. New bolts are installed, rubber gaskets are changed.
When tightening the bolts, the slightest distortion is not allowed. Tightening should be done with little effort. If you start to press hard on the bolt, you can easily crush the faience.
Third reason: Pear
The rubber bulb failed and the toilet bowl constantly flows after flushing. With prolonged use, the rubber becomes inelastic. She becomes rough and cannot take the desired shape. As a result, water constantly flows in the toilet.
Solution
How to fix a leak in the toilet? Repairing a pear that has lost its shape is almost useless. You can spend a lot of time, and the result will be zero. It is much easier to buy a new pear in the store.
When buying, you need to choose the softest from several products. It can be used for a long period of time until it becomes rigid.
The fastening of the pear is made on the thread. To remove it, you need to turn the pear clockwise. For installation, the pear turns in the opposite direction. While there is no new pear, you can use the weight hanging on the rod. He will put pressure on the pear, and press it to the saddle. Any heavy nut can become such a load.
Fourth reason: Skew
A tank malfunction may be due to a skew or large displacement of the lever that holds the float. There are many reasons for the formation of distortion. For example, a hole through which water begins to enter the float. Perhaps the lever has moved a little to the side due to long-term operation.
Another reason when the toilet cistern is leaking can be poor-quality plumbing parts purchased at the store.How to solve such a problem
If you purchased a bad float in a store, you need to change it to a more reliable and high-quality one. When a small hole is formed in the float, it is easy to close it with ordinary polyethylene. You can also heat a piece of plastic with a lighter and close the hole.
But such repairs are considered temporary, the float will still need to be replaced.
Fifth reason: depressurization
There was a leak between the toilet and the cistern. Such a leak in the area of \u200b\u200bthe junction of the tank and the toilet itself appears if the joint has been depressurized. Usually the cause of this phenomenon is a large deformation of the rubber seal.
To eliminate the leak, a new gasket must be installed between the tank and the toilet.
This work is done in the following order:
- The water supply is turned off, for which the main water valve is closed;
- Remove all residual water from the barrel by collecting it with a soft kitchen sponge;
- Slightly unscrew the drain nut. It can be found right under the drain valve hatch;
- The screws that secure the tank to the toilet shelf are completely unscrewed. The tank is being dismantled;
- The lock nut is unscrewed, which holds the drain, after which it is removed from the tank;
- A new gasket is installed. Each gasket is made to a specific size and shape. Therefore, before buying a gasket, you must definitely choose the exact size.
- If the gasket is smaller or larger, the problem will remain unresolved;
- The drain assembly is fixed with locknuts;
- The tank is returned to the shelf and secured with bolts.
I must say that the leak between the toilet and the tank may be associated with other circumstances:
- The bolt holding the tank capacity on the bowl was heavily rusted;
- The insulation that seals the mounting hole for the bolt has become unusable.
Of course, you will have to install a new bolt and replace the seal. The work must be done in the following sequence:
- The water supply is shut off;
- Drained;
- All bolts are unscrewed and removed from the mounting holes;
- Sealing washers are put on the bolts;
- The bolts are put in place and tightened with nuts.
Your cash costs will be:
- Gasket - 200 rubles;
- A set of bolts - 50-300 rubles;
- Master's services - 1200-1400 rubles.
Sometimes no replacement is needed. Simply tighten loose bolts. To do this, hold the nut with a wrench, and tighten the fasteners with an ordinary screwdriver.
Care must be taken when doing this work. Ceramic products are not very durable. It is enough to tighten the bolt more strongly, and a crack may appear at the bottom of the barrel. To prevent this from happening, it will be much calmer to just put new gaskets.
Reason six: Shut-off valve
The check valve has failed. From this, water constantly flows from the tank into the toilet. You can of course try to disassemble the bleed valve. Adjust the pressure of the hatch on the drain pipe, slightly undermining its end. Such manipulations require a lot of labor, and the desired effect is not always achieved. This suggests a simple conclusion, you should not engage in repairs, it is better to completely replace the entire drain assembly, or the entire toilet flush tank.
To do this, you must perform the following steps:
- The toilet room needs to turn off the water supply. To do this, the central water supply valve is twisted.
- The remaining water is flushed down the toilet;
- Open the lid and remove any remaining water with a sponge;
- Remove fixing screws;
- The tank is removed from the shelf;
- The sealing gasket is removed;
- The lock nuts securing the drain assembly are unscrewed;
- The old mechanism is removed;
- A new system is being installed.
Before buying a drain unit, you need to try to purchase a similar model that used to be in the tank. In extreme cases, the same manufacturer. In other words, if the tank was manufactured by cersanit, then the drain unit must also be of the same brand.
The new assembly is secured with new locknuts, a new gasket is installed.
We return the tank to the shelf, new bolts are inserted into the holes. We fasten it to the toilet bowl.
It remains to connect the water and check the tightness of the new drain.In principle, this work is not very difficult, it is enough to have a set of box wrenches and several adjustable ones.
Buying a new drain will cost 400-4000 rubles. It all depends on the type of mechanism. Elite systems are much more expensive.If the work is done by a professional craftsman, you will have to pay 1600-1800 rubles.
Reason 7: Cracks
The toilet cistern is leaking due to a crack in the bottom or sides. With such a serious problem, you can cope without even changing the entire toilet.
What should be done
The tank is detached from the toilet and dried well. All cracks that appear must be covered with a high-quality sealant. I must say that this method gives the greatest effect. Of course, the sealant is not designed for long-term operation, you still have to buy a new tank and toilet.
If the toilet bowl with a button starts to leak
First of all, set the position of the switch. If the return spring is weakened, the button may simply remain in the shaft. As a result, the drain cover will always be in the "open" position.
To repair the toilet cistern with a button, you must follow a certain sequence:
- The cover is being dismantled;
- The locking switch is removed;
- The spring is changing
- The seat is centered. It is located directly under the hole made in the lid.
- Perform reassembly.
Preventive work
If you do not want your toilet to break often, you must constantly perform certain preventive measures.
Once every six months, you need to clean the cistern and bowl of the toilet bowl.
Constantly monitor the condition of the fittings and related fittings.
Any toilet bowl does not "like" mechanical damage, it does not tolerate temperature fluctuations.
Timely preventive maintenance will extend the life of the entire system.
When a leak occurs, the simplest breakdowns are first corrected and only then they begin to solve more serious problems.
The leak of the drain tank can be eliminated with your own hands. The design of the tank is so simple that it does not require special tools. Having completed such repairs yourself, you will definitely get great pleasure.
Conclusion
We have given the 7 most common solutions to why water flows in the toilet. In 95% of cases, you have exactly the same problem. But if you've tried everything and nothing worked, then what to do if water is still flowing in the toilet tank? Better call a plumber. He will fix the problem in less than an hour.
In our article today, we will talk about the main causes of a toilet cistern leak, as well as tell you about troubleshooting methods.
Causes
The detected problems with the toilet, which began to flow in certain places, are caused by three reasons. Sometimes individually, and sometimes they provoke a breakdown by joint efforts:
- When installing new plumbing, installation and assembly errors are often made.
- During long-term operation, the tank flows due to failed or worn structural elements, fittings. Natural breakdowns usually occur only three years after installation.
- Mechanical damage, violation of operating recommendations. This is for you sharp pulls on the levers, strong pressing of the buttons, random blows and so on.
Now consider several types of leaks separately.
Leak types
When draining
- After pressing the drain button, leaks may occur. This indicates the need to check the design of the drainage system. Often the cause is a malfunctioning shut-off valve. Grasp it with your hand, press lightly. If this helps, then the valve simply did not fit snugly against the surface. Replace the old valve gasket with a good quality new one and you're done.
- The drain key is displaced, the position of the height regulator is violated. In such situations, the valve is located higher than the drain hole. The formed gap leads to leakage. Correct the knob a little, try to return the button to its original position. To do this, you need to tighten the fasteners with which the tank is attached to the pipe or the plumbing product itself.
- Water leaks due to a loose nut attached to the outside of the bottom. The reason is simple - the tightness is broken. Most likely, replacing the gasket or installing a new nut with a high quality gasket will help.
Remember, if the breakdown is minor and caused by a seal failure, then use simple sealants. For more serious problems, replace damaged tank elements.
If it flows through the overflow
First of all, correct the lever of the float system, and also check the condition of the valve and the float itself. Water is sometimes not held inside the tank, but flows directly into the bowl through the overflow. It is possible that the lever has shifted from its original position, or there has been a skew.
Related article: Choosing entrance street doors
See if there is liquid in the float. Often it is because of this that a leak occurs through overflows. If it really is there, then the float is out of order. Bringing it back to life is simple:
- Remove the float;
- Pour out the accumulated water;
- Dry properly, even with a hair dryer, which will speed up the process;
- Eliminate cracks and holes through which water got inside. For this, epoxy glue is useful. If you add a little supercement to it, the quality of the repair will be even higher;
- Put the element back in place.
If the float system valve is out of order, the easiest way is to replace it with a new one. It's not hard to do this:
- Release all liquid from the water tank;
- Disconnect the fitting using a wrench. It connects the valve to the water supply system, that is, the water supply;
- Remove the lever, but be careful not to damage other elements;
- Remove the inner as well as the outer nut that holds the lever;
- Remove the float valve;
- Install the new element using the fixing nuts;
- Fill the reservoir with liquid;
- Fix the lever in the correct position;
- Do a test drain, which will determine if you did everything right.
In case of problems with the siphon membrane, it must be replaced. Solve the problem by applying glue, sealants will not work. Buy a new membrane, and similar to the old one. Remove it, find a similar one in a plumbing supply store. To repair, follow the simple instructions:
- Drain the water so that nothing remains in the drain tank;
- Using a rope, tie the float arm to a crossbar. The element must be securely fixed;
- The crossbar can be any plank, piece of wood, placed instead of the tank lid;
- Remove the nut connecting the flush pipe and reservoir;
- Slightly loosen the other nut by unscrewing it from the siphon. It is located at the base of the container;
- Carefully disconnect the siphon from the lever and pull it out;
- Now take a new membrane and put it in its rightful place;
- Assemble the entire system in reverse order.
Between cistern and toilet
- Check the condition of the cuff. It will have to be corrected or tightened using a clamp. Do not overtighten the bolts, but at the same time, do not make the fasteners too loose.
- If there is a corrugated section on the cuff, they are sometimes displaced from their original position. Clamps or plumbing insulation will help to return to the place. The latter option will give a temporary result, because the collar is the best solution.
- The reason for this type of leak may be a weak fastening of the tank and shelf. Check that the nuts and bolts are firmly tightened. Brass bolts are eternal, while metal counterparts lose their original characteristics over time.
- If the previous option did not work, take a closer look at the gaskets on the tank. Unscrew all nuts, bolts, inspect the condition of the gaskets. Replacing them is not difficult and not expensive.
- If the shelf is damaged, you will not help with clamps and sealants. A complete replacement of the shelf or even the tank will be required.
Related article: Problems in the operation of the gas column
From tank to floor
The primary reason is poorly tightened or deformed bolts over time and under the influence of moisture:
- If they are loose but the fasteners are new, just use the appropriate tool to tighten the fasteners.
- If the quality of the fasteners is lost, they must be changed. Shut off the water, drain the remaining water, partially dismantle the fittings in order to have more or less convenient access to the bolt heads. After removing the old ones, replace them with new ones, not forgetting the rubber seals.
It will not be superfluous to use sealants at the joints. This is generally a useful thing to solve many problems of leaks. Relying solely on gaskets and seals is not worth it, since even the highest quality products do not always cope with the loads. An additional measure of protection in the form of a sealant will extend the life of the plumbing and make your life easier.
Other causes of leakage
This is not a complete list of possible leaks that result from the operation of toilets. Let's name a few more of them, as well as ways to eliminate them:
- The flush button does not work. Here you will need to remove the cover and check the condition of the drain system. Often the stem from the drain comes off, as does the pressure gate valve. You just need to put them in their place. Check the button for dirt, clean the accumulated dirt and put it back. Problem solved.
- High level of noise when collecting water. The plumbing system may have a different pressure. If it is high, then increased pressure is created on the float valve and the element cannot cope with the load. As a result, increased noise. Replace a valve that can cope with such a set, or mount a stabilization valve.
If the tank is leaking due to the formation of condensate, then you need to find out the cause and eliminate it:
- It is necessary to repair the intake and exhaust valves. If it is broken, water goes into the toilet, heats up to room temperature. At the same time, cold water comes out of the water supply, which creates condensate;
- It is necessary to reduce the volume of the drain. This is true for regularly operated toilets. It is recommended to replace the conventional drain button with a double one, where one will drain a smaller volume of liquid, and the second a larger one;
- Eliminate high humidity in the room itself. If it is a combined bathroom, it will be more difficult. You can put an electric heated towel rail, plus be sure to provide an effective ventilation system.
Related Articles