How plasterboard ceiling plastering is done: the sequence of the process and some of the nuances of the technology. Plastering a plasterboard ceiling: how to get a high-quality surface for painting How to properly plaster plasterboard on a ceiling
Completed, it is impossible to consider that all the work is finished. Although this building material itself is intended for leveling surfaces, nevertheless, in order to bring the structure into proper shape, you still need to plaster it, because at this stage various defects are still visible, especially in those places where the screws were screwed.
Do-it-yourself smooth and high-quality puttying of a plasterboard ceiling with your own hands largely depends on the state of the self-tapping screws with which the sheets are screwed when installing a drywall box on the ceiling, since a screw head that protrudes beyond the plane at least a fraction of a millimeter will not allow you to pull an even layer with a spatula.
What you need to know before plastering a plasterboard ceiling

Usually the primer is applied in 2-3 layers in a certain way. The first layer is applied perpendicular to the direction of sunlight, and the second layer, on the contrary, in parallel.
Before you start, you first need to check if the screws are recessed enough. This can be determined using a spatula drawn along the ceiling. If it catches, this will mean that the fasteners are not screwed in well enough and, accordingly, this defect must be eliminated with a screwdriver.
Then you need to sand all the small bumps. In addition, the room where the installation work was carried out should be cleaned of debris and construction dust. This is done so that the putty can be collected from the floor, since even with experienced craftsmen it still falls. If it is not planned to replace the floor, then it must be covered with a protective film.
There is another important rule, which, by the way, is not observed even by some specialists, and the final result of all the work done will actually depend on it.
The fact is that after installing drywall on the ceiling, the material should, as it were, adapt to the conditions of the room and “lie down”.
This usually takes about 10 days. If you ignore this, then cracks may subsequently form on the surface, therefore, before you start applying plaster to the ceiling, this period should be observed.
Back to index
Step-by-step process of plastering a plasterboard ceiling
So, in order to do it quickly and efficiently with your own hands, you will need to stock up on tools. In the process of work you will need:
The seams are glued with a sickle - a fiberglass mesh that will protect against cracks. From above, it is puttied to the most even surface.
- a container in which the putty will be mixed;
- paint knife;
- perforator with a nozzle;
- spatula of various sizes;
- grinding grater;
- sandpaper;
- screwdriver;
- roller;
- brush;
- respirator;
- ladder.
In addition, you will need to purchase such material as:
- sickle;
- primer;
- plaster;
- finishing plaster.
Back to index
Plasterboard ceiling primer
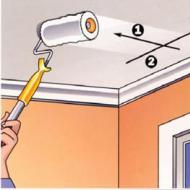
The application of a primer layer on drywall is done to avoid its susceptibility to temperature and humidity changes in the room, as well as to ensure better adhesion of gypsum board and plaster. It should be applied to the entire surface of drywall, including in places where there are joints and seams. This is done in two layers. After the initial primer, you must wait until this layer dries. Then a second thin layer is applied. A large surface can be primed with a roller, and a brush can be used for corners. There are different types of primer mix, and in this case the best option would be one that is designed for protruding surfaces.
Back to index
Primary plaster ceiling plasterboard
With a wide spatula, we apply the final putty with significant effort, removing the slightest waves and irregularities. Pauses between applying layers are not needed: a thin layer of putty will dry faster than you apply it.
When the primer dries, it is necessary to dilute a small amount of plaster and, using a narrow spatula, putty the holes that were formed when screwing in the screws. Plastering such flaws is a very simple task and there should not be any problems with this. Next, you need to process the seams, since it is too early to plaster the entire surface of drywall.
To do this, plaster is taken and applied to the seams with a spatula so that all joints are filled with it as much as possible. As a result, a thin, even strip should form. After that, a sickle (or reinforcing mesh) is glued to it, which should be located exactly in the middle of this seam. This must be done quickly, as the solution dries quickly, so skill will be needed here. Serpyanka should not just be applied to the solution, but you need to lightly press it, as it were, into it.
There is now a huge selection of mixtures for processing drywall coatings on the market, but Fugenfüller has proven itself to be the best for sealing joints on drywall surfaces. It should be noted that it is not necessary to dilute a lot of the solution at once, since in about 30 minutes it begins to harden. After sealing the seams with a reinforcing mesh, they must be allowed to dry well. It usually takes one day. In this way, all seams should be plastered.
Every person dreams of having a flat and smooth ceiling surface in his house. To do this, it is covered with plaster. The work is simple, but it is worth paying attention to studying the features and sequence of actions. This will allow you to make the perfect drywall ceiling that will fit into any interior design.
Attention! Drywall is a versatile material with unique properties. It is often used to level walls and ceilings, to create multi-level structures that become the pride of the interior.
Drywall, material advantages
Drywall is one of the most practical materials. With it, you can create almost any surface on the ceiling. The result will surprise you anyway. The ceiling will turn out smooth, reliable and will last for many years. Drywall is a gypsum material that is protected on both sides by compressed cardboard.
Among the positive features of the material are the following:
- Large sheet sizes for quick and easy installation.
- Ease of installation work, which makes repairs affordable for everyone.
- The ability to cut the sheet with an ordinary construction knife.
- Reliable fixation of profiles made of metal or wood using ordinary self-tapping screws.
Fixing drywall is done in one of two ways. The first involves the creation of a metal frame. Sheets of material are subsequently attached to it. The second possible option is the use of ceiling tiles. Their difference from wall counterparts is the thickness. At the same time, the technical specifications remain unchanged.
Drywall itself is ordinary, moisture resistant and fireproof. It is recommended to select the type of material depending on the specific room. For the bathroom and bathroom, the best choice is moisture-resistant plates. For the kitchen, they take refractory or combined options. The latter allow to achieve high levels of reliability and durability.

How to prepare the surface for plastering?
Some people believe that as long as the drywall surface is even and smooth, plastering or puttying is not required. This opinion is erroneous. If you omit the need for preparation, the material is unlikely to last long.
Preparation consists in selecting the required number of fasteners and choosing their type. Sheets of drywall are easily fixed with self-tapping screws. Initially, the material is carefully grasped with fasteners, and then tightened after finishing. This must be done immediately after applying the plaster. This will eliminate possible shrinkage and guarantee resistance to shedding.
The seams that are located along the edges of the plates must be carefully prepared. They are carefully cleaned of dust and primed. Putty is applied on top. It is preferable to additionally apply a reinforcing mesh. It will come in handy to avoid cracks. When the seam adhesive dries, it must be carefully cut off. As an alternative to metal mesh. After that, the entire ceiling is carefully primed again.

How to choose the right plaster?
Dry mixes are presented in different versions. Most of them combine well with drywall sheets. Some solutions are suitable for both ceilings and walls. Other varieties are used exclusively to get rid of cracks and other types of defects. All these mixtures are intended for decorative coating.
In accordance with this, solutions of the following types are distinguished:
- Polymer.
- Cement.
- Gypsum.
The choice of a particular plaster option depends on the type of room in which the solution is planned to be used. Cement mixtures can be safely used in the bathroom, toilet or kitchen, achieving high resistance to moisture. Gypsum analogues are useful for offices, bedrooms, nurseries or living rooms, where there is no need for increased resistance to moisture.
Polymer solutions are considered universal. They are used in any premises. Among the positive features are elasticity, plasticity, resistance to moisture and low consumption. The price of the polymer mixture is higher than other plasters, but its properties are much better.
Attention! It is necessary to choose the right plaster so that it matches the type of gypsum craton and the room itself. This will guarantee that it will last a long time, and the need for applying additional putty is not required.

Masters are advised to immediately pick up the finishing putty. It is sold in special containers - buckets or bags. Initially, a layer of putty is applied, and after it dries, the finishing layer. If necessary, if pits or notches remain on the surface of the ceiling, all this will have to be repeated again.
What is useful for plastering?
Before you start plastering, prepare the necessary tools. The mixture must be diluted correctly. You will need the following tools:
- Plastic bucket - preferably wide.
- Spatulas - both narrow and wide.
- The paint brush is wide.
- A special drill that has a nozzle in the form of a mixer.
- Plaster for starting work.
- Primer - it is better to choose acrylic.
- Plaster for finishing work.
- Adhesive tape for applying to the joints of drywall sheets.
- Metal nets for grouting, including small and large.
- Grids - fine- and coarse-meshed.
How is the starting plaster done?
Before starting the starting plaster, the joints should be prepared. To do this, they are specially reinforced with meshes. In some cases, the gaps between the plates remain noticeable. They can be glued with meshes with large cells or fine meshes, if the inconsistencies are not too visible.

The mesh is fixed on a layer of putty, which was previously applied. Construction adhesive is not recommended, as it is not suitable for these purposes. After that, the priming of the ceiling begins with a wide brush. The primer is allowed to dry a little and a layer of plaster is applied. It is mixed in water with a construction mixer or drill. The addition of ingredients should be gradual to avoid lumps.
The resulting mixture should be similar in consistency to thick sour cream. She is allowed to brew for 5 minutes and then used. The tool is filled with plaster to the brim and the ceiling is smeared with it. The residue is removed with a narrow spatula, taking care to exclude the appearance of bumps. If irregularities remain on the ceiling, re-apply a layer of plaster after the first one dries. If you're wondering how many layers there should be, the answer is 3 thin ones.
In conclusion, the surface is carefully polished. To do this, you can use a tungsten mesh. Grinding of the first layers should be carried out with a large-mesh type mesh. The resulting grinding is done with a fine mesh. If you wish, you can watch a video illustrating all stages of work.

How to perform finishing plastering?
In conclusion, finishing plastering is done. It is done after intermediate cleaning has been carried out. It involves cleaning the room and throwing out debris to prevent damage to other surfaces, as well as facilitate the final cleaning.
The first thing to do is prepare the solution. It is prepared in the same way as the starter mix. The powder is poured into a wide bucket with water in appropriate proportions. Instructions are on the packaging. Usually it specifies the ratio of ingredients in detail. The solution is kneaded with a construction drill, on which a mixer attachment is attached.
The finishing solution is applied to the ceiling using narrow and wide spatulas. The material is collected with a narrow instrument and applied to the edges on a wide one. The ceiling is covered last, gradually spreading the mixture on it. The result should be a smooth ceiling, without bumps. The layer must be very thin.
After that, another layer is applied. This should be done only after the previous one has dried. If this is done earlier, cracks may form. This may lead to the fact that you have to do the work again.
The final step is surface polishing. It is performed with a fine mesh. This will achieve a perfectly flat ceiling without flaws. After that, proceed to the finishing work, if necessary. If necessary, you can watch a video that introduces this work in detail.

Now you know how to plaster a plasterboard ceiling with your own hands. This work is simple and accessible to everyone. The main thing is to act carefully and in compliance with the instructions. This will ensure that no difficulties arise. If you still have questions, you should watch a video that shows how plastering is done, step by step.
At the present stage of development of construction and repair technologies, more and more new materials have begun to appear, which are quite intensively used for ceiling coverings. Drywall was no exception, which in its practicality is considered a universal finishing material.
It is used very widely for leveling surfaces and in frequent cases it is necessary to plaster a plasterboard ceiling. But, despite this, a variety of complex and simple ceiling structures are made from it.
Plasterboard ceiling finishing process
Before determining how to properly plaster a plasterboard ceiling, you need to understand its design. What is drywall?
These are sheets of thick cardboard, between which gypsum dough is placed. The finishing material itself is strong and durable, but it still needs to be handled very carefully, since the gypsum dough is quite fragile.
Characteristics and advantage of drywall:
- Drywall is very easy to work with.
- It is quite easy to cut and for this you use a regular clerical knife.
- Drywall is available in sheets that have a variety of sizes.
- This material is attached to a special metal profile frame using self-tapping screws.
How are ceiling structures constructed, which can be single-level or multi-level:
- Previously, a metal frame is attached to the surface of the ceiling. Drywall sheets are already mounted on it.
- As a rule, in the manufacture of plasterboard ceiling structures, a special type of this finishing material is used - ceiling. It differs from all existing types (wall and arched) in its thickness.
But all types are almost similar in their technical characteristics. - There are two types of drywall: moisture resistant and fire resistant.
Advice. For the construction of a plasterboard ceiling, it is best to use this type of plasterboard sheet, which will be moisture resistant and fire resistant.
Preparatory work for plastering a plasterboard ceiling

Plastering a plasterboard ceiling implies high-quality and proper surface preparation. The entire ceiling is preliminarily assessed.
If it is just smooth, then there will be no problems with the preparatory work. If it is a rather complex ceiling structure, then some difficulties may arise.
Preparatory work:
- To carry out the plastering of the ceiling, it will be necessary to take out all the furniture from the room, if it has not already been removed. All this is necessary for the reason that the entire process of work will be carried out at the top and it is possible that some elements of the plaster will crumble down.
- It is also worth carefully processing all the joints of the sheets of finishing material. But these actions are carried out only if the layers of plaster are not too dense.
For such a process you will need:
- Plaster or putty.
- Small spatula.
- Sandpaper.
Attention! It is worth paying special attention not only to the joints of the sheets, but also to the caps of the screws. They can also be closed during the complete plastering of the ceiling.
To make the joints in the process of plastering a plasterboard ceiling less noticeable, it is worth gluing them with a special tape.
It is necessary to apply plaster or putty to the joints with cross-shaped movements. Only in this way can the space that has formed between the sheets be completely filled.
Choice of plaster and plasterboard ceiling tool

Plastering a plasterboard ceiling is not a very difficult process.
You can implement it with your own hands. To do this, you just need to choose the right quality material.
For the ceiling, you need to purchase two types of plaster:
- Starting plaster serves to level surfaces and to hide various defects on any surface.
- Finishing plaster is suitable in order to mask the defects of the starting layer of plaster. Paint will already be applied to it.
Advice. Do not replace these two types of plaster. Each of them performs its own functions.
As a rule, these materials are sold in stores in bulk form. There are special instructions on their packaging.
According to it, a certain amount of liquid is added to the powder. After that, the solution is thoroughly stirred until a homogeneous mass is formed (the consistency of thick sour cream).
Tools and getting started

At the moment there is a very large selection of plaster. The price of each brand can vary greatly.
Before giving preference to any manufacturer, it is worth consulting in advance with repairmen who can advise which plaster to buy.
To plaster a plasterboard ceiling you will need:
- Two spatulas (large and small).
- Paint brush.
- Large bucket.
- Drill with a nozzle for kneading the solution.
- Sandpaper.
- Starting plaster.
- Finish plaster.
- Primer (acrylic).
- Tape for gluing the joints of drywall sheets.
- Grid with large and small cells.
Work process
Where to begin? Before plastering the plasterboard ceiling, all joints of the sheets of finishing material on the ceiling surface are pasted over with special meshes.
So:
- For large differences in sheets, grids with large cells are used. For smaller differences and not too noticeable seams, meshes with small cells are used.
- Such material is attached to a previously applied layer of plaster. You can also use construction glue, but it will be much more difficult to fix the mesh on the surface.
- Then the ceiling surface with a paint brush is treated with a primer. It is necessary to wait for the complete absorption of this agent.
It will help increase the viscosity of the drywall surface with a layer of plaster. Only then will he be able to establish himself qualitatively on it. - After such preparatory work, it is necessary to knead the starting plaster solution. To do this, a loose mixture is poured into a bucket and poured with the required amount of water.
Advice. Such actions must be carried out gradually. If you immediately pour a certain amount of liquid into the mixture, then it can take lumps and it will be quite difficult to place it qualitatively.

- Everything is thoroughly mixed to such a consistency that the solution can be well kept on a spatula. After the solution is ready, you need to let it brew a little.
This period of time will take several minutes. Then the solution is mixed again and only then can it be used. - A certain amount of plaster is collected with a small staple and applied to a large spatula with strokes so that the surface of the latter is completely filled.
- After that, large spatulas are stroked on the ceiling surface. No need to try to completely remove all the plaster from the surface of the spatula.
It must be applied smoothly and efficiently. - Excess plaster from a large spatula is removed with a small one. It is necessary to drive a large spatula along the ceiling evenly so that there are no bumps.
They will then be very difficult to remove. - Thus, the entire plasterboard ceiling is processed. It is necessary to apply the solution evenly.
- If irregularities are already too noticeable in the process after applying the starting layer, then they must be eliminated until the plaster layer is completely dry. If this could not be done, then you will have to wait for the first layer to dry completely and only then try to level the ceiling with the help of the second.
- The starting plaster is applied in small layers. This will ensure it dries quickly.
As a rule, for such works it is necessary to apply several layers - 3-4 layers. Once the plaster on the ceiling has dried, you can start sanding. - For this, sandpaper is used. It has a varied appearance, but it is necessary to give preference to a larger one, since the starting layer of plaster is considered rather rough.
The surface of the ceiling must be completely sanded. Places where there are visible irregularities can be leveled with it.
To do this, you just need to apply a little more physical strength.
Advice. As a rule, after such work there is always quite a lot of dust. It settles not only on the ceiling, but also on other surfaces in the room.
In order to get rid of it before applying the finishing plaster, you must use a regular vacuum cleaner or a damp cloth.
Shutdown

As soon as the surface of the ceiling with the starting plaster has been processed and all dust has been removed from it, you can begin to apply the finishing layer.
Finishing order:
- To do this, the finishing plaster is taken and dissolved in a bucket of water. To do this, it is also necessary to observe the proportions of adding liquid, which were indicated on the package.
Everything is thoroughly mixed. - It is also necessary to use two spatulas - small and large. The process of its application is very similar to the application of starting plaster.
All actions are carried out smoothly and evenly. It is also necessary to apply finishing plaster in several layers.
They are thinner than when applying the starting layer. - Each layer must be dry before applying the next. As soon as the layers of finishing plaster are completely dry, they must be processed with sandpaper.
For this, paper is used, which has smaller cells.
How to plaster a plasterboard ceiling? Pretty simple.
It will be necessary to follow all the advice of experienced craftsmen in this area so that the process is not only of high quality, but also fast. In the photo you can see the plasterboard ceilings, which are treated with plaster.
After the drywall has been installed on the ceiling, further procedures must be followed to finish it. It is necessary to prepare the surface for painting or wallpapering. The surface is not suitable for immediate application of paint or wallpaper. In some places, traces of seams and hats from self-tapping screws are visible. This article will describe in detail how to plaster a plasterboard ceiling.
Ceiling plastering is a process of finishing the coating, in which possible irregularities are smoothed out and the desired shapes are achieved at the corners. In this case, drywall serves to level the ceiling. But still, in order to be able to do something further with it, you need to plaster the surface. First of all, it is necessary to plaster the seams and places where self-tapping screws are visible.
It is worth paying attention to the frame where the drywall sheets were attached. If it was a raw tree, then over time the ceiling can “lead”. Therefore, no matter how much plaster is applied, cracks will still appear.

Then you no longer need to plaster the ceiling, but simply putty small cracks and seams.
The easy way
This method is applicable when there is little time, and thick wallpapers will be glued to the ceiling. The relief of the wallpaper will partially hide the bumps and cracks. And the seams between the sheets of drywall will become stronger.
First you need to prime the ceiling with any primer that penetrates the material. The primer will help increase the adhesion of drywall to wallpaper or putty.

Sometimes a primer is not used. However, this is not correct. The primer not only strengthens the surface, but also reduces paint consumption.
All seams and recesses from self-tapping screws on drywall are filled with putty. To do this, use a spatula up to 10 centimeters long and 35 wide. A sickle is glued to the corners. It is puttied with the same putty. The most common mixture for such work is the Fugenfüller trademark. You can glue the sickle even before the putty begins. The essence of the matter will not change. After the putty dries, the surface is rubbed with a masking net. Then it is necessary to apply a layer of primer again. When the surface dries, you can start gluing wallpaper.
It turns out that all the seams are plastered. At the same time, a minimum of time and effort was spent. And most importantly - spent a small amount of building materials. All small surface flaws will be hidden by wallpaper sheets.

The right way
It is worth figuring out how to plaster the ceiling for painting. Undoubtedly, water-based paint will hide small cracks. However, not for long. Therefore, the requirements for surface preparation for painting will be much higher than when wallpapering.
Before applying the primer, you need to pay attention to some details. The sheet of drywall, which is located near the wall itself, should not stand close. In the seam, which should be between the sheet and the wall, a putty is laid, which will prevent the appearance of cracks on the ceiling. If the edge of the drywall has been cut off or broken, it must be processed. To do this, half of the sheet is chamfered at an angle. This is necessary in order to apply putty to that place. And, of course, self-tapping screws. Their caps should be completely immersed in the sheet so that they do not protrude above the surface.

This is what the correct seam looks like.
After these procedures have been completed, you can begin to apply a primer to drywall. The goal here is the same - to strengthen the surface and create greater adhesion of materials. All seams must be primed with a brush only. Using a roller will not work to apply a primer into small pores.
Elimination of irregularities
Now you can start filling the ceiling. All recesses are filled with the mixture. When passing along the seam, the spatula should take an almost horizontal position. This is the only way to achieve the most even surface. In this case, it is also necessary to stick a sickle on the seams. Serpyanka is a fiberglass mesh. It prevents cracks. Then it needs to be perfectly putty.

The next stage of putty is the sealing of traces from self-tapping screws. After the seams are dry, you can begin to prime the surface.
Banding is the next step, which involves gluing paper onto PVA glue. Paper tape urinates in water, and glue is applied to the ceiling at the seams. When the tape sticks, it is necessary to smooth it with a spatula.
Finishing seams
Residual glue is removed with a sponge. Some people think that sticking paper on the seams is an extra procedure. However, this allows you to strengthen the seam.

Then the bandage tape is puttied with finishing putty. For these works, a wide spatula is used.
At this stage, you can finish the preparatory work and start gluing the wallpaper. But for painting - this is not enough. In order to stick wallpaper, one layer of putty is enough. Three coats are required for painting.
Final surface coating
Sometimes this stage is called ceiling plastering. Here the entire surface of the ceiling is leveled for painting. If puttying skills are not yet fully mastered, then it is best to apply three thin layers. Puttying with a thick layer is allowed when there is a certain work experience. A wide spatula is taken and putty is applied to the surface. Small bumps and waves are removed immediately. In order to perform several layers, you do not need to wait until the previous layer dries. The putty dries fairly quickly.

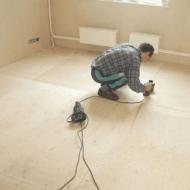
When the last layer is applied, it is necessary to wait for the surface to dry and clean it with sandpaper or a grinder. It is connected to a vacuum cleaner so as not to breathe dust.
When sanding, you need to immediately place the light where the lighting fixture will be. This is the only way to notice the slightest irregularities, which will then be difficult to correct. Proper lighting ensure 100% quality of work performed.

Conclusion
This article presents only two methods of finishing. In fact, there are quite a few of them. Each worker prefers one or another method of finishing, which, in his opinion, is the best. It all depends on the materials and tools that are available.
Before any finishing, the plasterboard base needs to be puttied. Moreover, in some cases, only the installation sites of fasteners and seams are puttied, and in some cases, the entire surface. GKL ceiling, like a concrete base, can be puttied and plastered. We will describe how to putty a plasterboard ceiling, as well as plaster bases from plasterboard.
Gypsum ceiling plastering technology
First you need to stock up on the necessary amount of material, for this, the consumption of putty is calculated. It depends on the evenness and nature of the base. Consumption increases in direct proportion to the number of seams and surface breaks. As a rule, when calculating the consumption of this material, the following principle is followed - 1100 grams of dry mix per 1 m² of surface. Gypsum putty is consumed in the amount of 1000 g/m². Adhesive putty compositions are more economical, 0.5 kg of the mixture will be needed per 1 m².
On a note! When calculating the consumption, consider the area of \u200b\u200bthe ceiling and the number of layers of putty. Their number depends on the experience and skills of the master.
Ready putty mixtures can be used without prior preparation. To prepare the dry mix, follow the manufacturer's instructions. As a rule, 1/3 of the amount of water that is required is poured into the prepared container. After that, the dry mixture is gradually added and the creamy solution is kneaded. Then the putty should stand for 5 minutes, after which it is mixed well again. Prepare the solution in small portions, so it will not have time to set.
Attention! Do not add water to the finished putty and do not mix the mixture. Once prepared, it is ready to use within a couple of hours. The thickened putty is thrown away.
The choice of putty
Before painting the surface, the plasterboard ceiling must be puttied. Moreover, not only the recesses from the fasteners and seams are puttied, but the entire surface.
For work, you can use two types of putty:
- Ready solution is recommended for beginners. It is already ready to use, you just need to open the bucket. But the price of these mixtures is higher.
- Dry formulations are mixed with water in the specified proportion before use. They are inexpensive, but require pre-cooking.
When choosing a putty plasterboard ceiling, preference should be given to the following varieties:
- The starting composition for rough leveling is suitable for rough work, sealing the place of installation of screws, cracks and seams. The thickness of the applied layer should not exceed 0.5 cm.
- The finishing composition is suitable for final alignment. This fine-grained mixture is applied in a layer no thicker than 1-2 mm.
- Also on sale there are universal putties that are suitable for rough and finish leveling.

Depending on the composition, all putty mixtures are divided into:
- polymer - the highest quality, but expensive;
- gypsum - not suitable for places with high humidity and do not shrink;
- cement - can be used in a room with high humidity, but the surface cracks during the drying process.
When choosing a suitable putty, the purpose of the room and the features of the processes taking place in it are taken into account, as well as the financial capabilities and professionalism of the master.
Required Tools
If you will putty the plasterboard ceiling with your own hands, then you will need:
- brush;
- drill and mixing attachment to it;
- solution container;
- different spatulas (wide, angular and narrow);
- stationery knife;
- paint grater;
- ladder;
- carrying to make it easier to identify surface defects;
- starting putty;
- sickle;
- deep penetrating primer;
- finishing solution.
Surface preparation
First you need to feel all the screws on the surface of the plasterboard ceiling. Their hat should go deep into the material, and not stick out on the surface. Areas with peeled cardboard are cleaned to a gypsum core. To improve the adhesion of the base with the applied mortar, the ceiling is primed with deep penetration impregnation. It is applied with a roller or brush.
Important! An acrylic primer is suitable for priming a drywall surface. Alkyd compounds that cause swelling of the plane are not suitable for these purposes.

After the primer has dried, you can proceed to the processing of seams. If the drywall sheet does not have chamfers, then they need to be done. The chamfer is cut to a third of the thickness of the material at an angle of 45 °. It is better to use sheets with a finished chamfer. They are a little more expensive, but will save you time and nerves.
A masking tape on a self-adhesive basis is glued onto the seam. The mesh without the adhesive layer is placed on the solution layer and pressed into it well. The excess mixture is removed with a spatula, and the surface is well smoothed. Places of installation of fasteners are also puttied.
Applying putty
Now we describe the sequence of work. Putty plasterboard ceiling ready putty takes place in this order:
- With a falcon, we apply a solution to the spatula. The mixture is distributed over the surface with a layer of 2 mm and stretched well over the drywall sheet. We do not pay attention to minor scratches and defects, because they will be completely hidden by the second layer.
- After a day, the putty mortar will dry, as you can guess from the brightened surface. We remove large furrows and significant irregularities with sandpaper. Then we prime the surface again and wait for it to dry.
- We putty the ceiling again, but at the same time carefully level the putty so that there are no defects. The need for a third layer depends on the quality of the application of the second layer.
- After complete drying, the surface is polished.
- Now we process the ceiling with a fine-grained finishing mixture. In work, from time to time we take breaks and inspect the surface at an angle, turning on the carrying. When the coating dries, we grind it with fine-grained sandpaper.
- Before finishing painting, the prepared ceiling is primed again.
GKL ceiling plastering technology

Plastering the surface is done in much the same way as puttying a plasterboard ceiling. Please note that such work can be carried out on the surface of moisture-resistant drywall, securely fixed to a frame of metal profiles. If you plaster ordinary drywall, then it will swell and deform from moisture. Surfaces on a wooden frame are also not plastered, because the fixing strength of the sheets is not so high.
Check that all self-tapping screw heads are recessed into the body of the material. After that, treat the surface with coarse sandpaper to increase adhesion with the applied solution.
Required Tools
For work you will need:
- grout mesh (with fine and coarse grain);
- solution container;
- wide brush;
- spatula with a spatula 10-30 cm wide;
- drill and kneading tool.
Preparation of plaster
The plaster of gypsum plasterboard ceilings differs from putty in the granularity of the composition. The plaster has larger grains, so it is applied in a layer up to 2 cm. You can buy a dry mix and prepare it according to the manufacturer's instructions. To this end, water is poured into the prepared container and the dry mixture is poured, constantly stirring with a drill with a nozzle. You should get a creamy consistency solution. He is allowed to stand for 1/6 hour and stirred again.
Plastering technology
Now let's figure out how to plaster a plasterboard ceiling.
We carry out the work in the following order:
- We prepare the GKL surface in the same way as when performing puttying. First, we fill the seams and grooves from the screws with the solution, then after it dries, we grind and prime the surface.
- The primary layer of plaster allows you to remove rough irregularities and defects in the base. The starting mixture contains PVA glue, which allows you to eliminate cracking of the coating and extend its life.
- When the surface is dry, grind it with a paint grid or sandpaper.
- We re-plaster the ceiling, only the direction of work is changed to mutually perpendicular. For work, we take the finishing fine-grained composition.
- When the coating dries, we grind it with a fine mesh grinder.
When should the ceiling be plastered?
At first glance, it seems, why plaster the ceiling, if it is much easier to putty it? But in fact, in some cases it is necessary to use plastering. The plaster is applied in a thickened layer and hides significant defects in the base. A thin putty layer allows you to level only minor defects, eliminate chips and cracks, close seams and recesses from self-tapping screws.
Important! Due to the larger grains in the composition, the plaster is applied with a layer of 20 mm thick, thanks to which even significant irregularities on the ceiling can be smoothed out.
Another case where plastering is indispensable even if there is a flat base is finishing with decorative plaster. When using such a top coat, pre-plastering is simply indispensable, because the starting mortar provides better adhesion to the layer of decorative plaster, because it is made on the basis of the same components as the decorative finish. Mixtures with different composition do not adhere well to each other. Because of this, the decorative coating will not last long.
Related Articles