How to shave with a t-shaped machine. Multimeter dt830b instructions for use Using a digital multimeter
The main electrical measuring tool used by electricians, radio engineers, auto electricians, and other electronics professionals is a multimeter. The name of the instrument reflects the ability to measure several electrical quantities. Most multimeters have the ability to measure the following quantities:
- voltage (constant, variable);
- resistance.
As additional options, multimeters can measure capacitance, AC current, transfer coefficient h21 of bipolar transistors, “ring” electrical circuits (determine the presence of contacts and connections).
According to the type of indication of the measured values, multimeters are classified into:
- turnouts;
- digital.
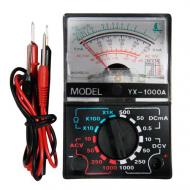
In pointer multimeters, a magnetoelectric type microammeter with a system of switching shunts and diode assemblies is used as a basic measuring device. On the analog scale, divisions are applied to measure electrical quantities. Type of dial multimeter.

In digital multimeters, the analog measured signal is converted to digital, then the information is processed and transmitted to the digital scale. Digital multimeters have a number of advantages over pointer multimeters:
- increased measurement accuracy;
- clarity of indication;
- mechanical resistance to falls;
- ease of use by non-professionals.
Manufacturers produce multimeters for general and special purposes.

Special digital multimeters can be designed for:
- measurements of large electrical quantities;
- control of climatic parameters (pressure, temperature);
- measurement of parameters of radio components (resistance, capacitance, inductance).
General purpose multimeter application
A general purpose multimeter is a measuring tool designed to measure currents, voltages and resistances in household networks, devices and cars.
A typical representative of such a multimeter is the MAS 830L.

It is made according to the classical scheme. The device includes:
- LCD indicator14 for visualization of measurement results;
- digital scale backlight switch 2;
- self-diagnosis mode switch 1;
- mode switch;
- probe sockets 7, 8, 9;
- connector for connecting transistors 10.
The impact-resistant case of the multimeter is placed in a rubber casing for increased mechanical resistance.
Measurement sequence
DC voltage measurement
To perform measurements, the black probe of the multimeter is connected to the COM connector (8), the red one to connector 7. This connection of the probes is used for all measurements, with the exception of measuring the DC current at the limit of 10 Amperes.
The measurement of the voltage value is carried out by connecting the probe in parallel to the measurement points (terminals, contacts, connectors, terminals). The mode switch is set in zone 13 to the limit corresponding to the maximum possible voltage in a particular circuit. For example, when measuring in a car, the switch is set to a limit of 20 volts. If the value of the measured voltage is less than 2 Volts, to obtain more accurate data, set the switch to 2 V. If the value of the measured voltage exceeds the measurement limit, the value 1 in the upper register will appear on the digital indicator.

The digital indicator shows the polarity of the voltage (sign + and -).
Measurement of alternating voltages
This mode is often used to control a household network 220/380 Volt 50 Hertz. To do this, the mode switch is set to zone 3 at the limit of 600 volts. The measurement results are displayed on a digital scale. If the value is less than 200 Volts, the limit can be set to 200 Volts to improve accuracy.
When performing measurements, precautions must be taken.
DC current measurement
Measurements are carried out by connecting the probes to the break in the electrical circuit. If you connect, for example, in the current measurement mode, the probes to the battery terminals, the device will fail. Initially the switch is set to 200m (milliamps), then lower if required.
At the current limit up to 10 amperes, the red probe is placed in socket 9. At high current, the probe conductors can heat up.
Resistance measurement
The switch is set in zone 11 to a limit of 200. The probes are installed in slots 7 and 8. If 1 is displayed (Fig. 4), then the resistance of the circuit is greater, the limit increases.
Indication 1 at the maximum limit indicates an open circuit.
Diode health monitoring
The multimeter has the ability to check the performance of the diodes. The switch is set to position 12. Alternately connecting the probes to the diode in different directions, determine the health of the diode. In one of the directions, the resistance should be about 600 ohms. In the reverse connection, the resistance is almost infinite (1 is shown on the indicator).
"Continuity" of the electrical circuit
To determine the health of the wiring using the sound method, the switch is set to position 6. The probes are connected to the opposite terminals of the controlled conductor. If there is an electrical connection (serviceability of contacts, conductor), the buzzer will sound.
Determination of the transfer coefficient h21 of bipolar transistors
The switch is set to OFF. The transistor is inserted into connector 10 according to polarity, base, collector, emitter (cbe) location. The switch is set to direction 5. The LCD displays the transistor gain.
Security measures
During the measurement process, the following safety measures should be observed:
- when working with high voltages (in the position of 200 and 600 volts), do not touch the current-carrying elements of the probes and wires, connectors;
- during measurements in a 220/380 Volt household network, it is necessary to use personal protective equipment (rubber gloves, insulating mat);
- when measuring high currents (10 A), it is advisable to use goggles to prevent sparks from entering the organs of vision;
- current measurement should be made only in the open circuit.
What is a multimeter? This is a device with which you can easily determine the magnitude of the voltage and current strength, the resistance of conductors, find out the parameters of diodes and transistors, you can conduct wire continuity. That is, the device is actually needed even in everyday life. Therefore, the question of how to use a multimeter sounds quite often today.
Classification
Currently, all multimeters (testers) are divided into two types: pointer multimeter, also known as analog, and digital. Electricians have been using a pointer multimeter for a long time, but it is difficult to work with a multimeter of this type.
- It is not easy to understand several scales.
- It is necessary to hold the device itself in a certain position so that the arrow on the scale does not “walk”.

Therefore, more and more masters give their preference to digital rather than analog multimeters. Therefore, it will be considered. It should be noted that the modern market offers a wide range of multimeters, which has almost any offer. But it should be noted that there is a certain proportionality in which the ratio of price and functionality of the device is direct. That is, the more expensive the device, the more functions it has.
Manufacturers offer expensive models that look like oscilloscopes. At the household level and for beginner radio amateurs and electricians, simpler multimeters for dummies are suitable. All of them have the same design, and their appearance is almost the same. 
The package of such testers includes the device itself and two probes: red and black. Power is supplied by a 9 volt Krona battery (minimum power consumption). This is the whole set.
Before moving on to the main question of the article - how to use a multimeter of any type: all the subtleties - you need to familiarize yourself with its functional devices and learn how to manage them. In principle, the rules of use are quite simple.
Appearance
A switch is located in the middle of the device. It selects the operating mode of the multimeter. In a circle around the switch, departments are applied, which determine the modes for measuring parameters:
- voltage: constant and variable;
- current: direct and variable;
- resistance;
- radio parameters.
There are three holes for probes, a button or toggle switch for turning the device on and off, a monitor on which the results are displayed. 
Before you deal with the question of how to use a digital multimeter, you need to learn everything about the inscriptions on its panel. DC voltage is denoted as (V-). Variable - (V~). Direct current: A-, alternating A~. Resistance: Ω. There are three probe sockets: V/Ω, com, mA. Some multimeters have four sockets. Added 20A max. It is used when it is necessary to measure a current greater than 200mA. 
Already by the inscriptions, you can realize that the functions of the multimeter have a large range.
What is a multimeter is defined, everything is clear from the inscriptions, now the main question is how to use a multimeter for dummies.
DC voltage measurement
Measuring a DC voltage with a multimeter requires installing a red probe in the V / Ω jack (it carries a positive potential), and a black one in com (negative). The mode switch is set to position (V-). It is better to start measuring voltage from the maximum value of the parameter.In this way, you can measure the voltage in a battery or accumulator. Install two probes on the battery terminals, the numbers indicating the voltage itself will be displayed on the screen. If a minus sign appeared before the numbers, then the polarity of the connection was simply violated. So, you need to swap the installation of the probes on the battery. 
If the battery voltage is unknown, then, starting from the maximum value of the switch setting, we check each position separately. For example, at the maximum, the tester showed 008. These two zeros in front of the number indicate that the battery voltage is much lower than that set on the multimeter. It is necessary to gradually, reducing the test mode, ensure that a single value is displayed on the monitor. For example, 8.9. It says the battery voltage is 9 volts.
If a unit appears on the screen, then the selected test level is lower than the nominal one. So, you need to increase the level by one position. It's simple, working with a tester is a pleasure.
AC voltage measurement
How to measure AC voltage? The probes remain in the same position, the switch moves to the section (V~). There are also several measurement limits. For example, how to measure the voltage in a 220 volt outlet with a multimeter. By the way, there is no polarity in alternating voltage, so the exact installation of the probes does not play a role. 
It is necessary to set the test level to more than 220 V, usually a switch from 600 to 750 volts, depending on the model of the tester. Now two probes are inserted into the socket. Depending on the load of the transformer, the result can vary in the range from 180 to 240 volts. If the indicators fall into this range, then everything is fine.
Resistance measurement
The position of the probes is the same. The switch is moved to the Ω section. Now you need to make sure that the multimeter is in good condition. How to check? Just connect two probes together. In this case, the device should show zero.
In this measuring range there are also several limits, plus the function of continuity of electrical circuits and diode testing. How to ring the circuit with a multimeter will be presented below. 
For example, consider how to measure the resistance of a coil with an unknown rating with a multimeter, this will come in handy if you are not sure of its performance. Unlike previous tests, there is no need to set the limit to the maximum. This will not harm the device. The check sequence can be as follows:
- For example, the measurement limit is set to the average value. Let it be 2M. That is, the limit value of the resistance should not exceed 2 MΩ.
- Probes are connected to the ends of the coil.
- If zeros appear on the display, then the coil has some resistance, the test limit was simply chosen incorrectly. Therefore, it must be reduced by one position - up to 200K.
- The test is done again. If it has already shown a numerical value, but there is a zero before the number, then you can further lower the threshold by one position.
- And thus bring the indicator on the display to an integer. It will be the nominal resistance of the coil.
![]()
If, when testing for coil resistance, the number “1” appears on the monitor. This means that the value is much higher than the selected limit. That is, it will be necessary to go in the opposite direction, increasing the measurement limit.
Current measurement
Using a multimeter to measure direct or alternating current, you need to insert the red probe into the mA jack, the black one into com. If the measurement of the current strength is carried out with a variable source, then the switch is transferred to the department - A ~, with a constant: A -.
Important! When measuring current greater than 200 mA, be sure to connect the wire to the appropriate socket.
The main condition for how to correctly measure the current strength with a multimeter is to install the device in series in the circuit. Experts have a negative attitude towards using a multimeter as a tester to check the current consumption of a large value (for example, above 10 amperes). It is better to do this with electrical clamps. Therefore, it is better not to measure the current with a multimeter. 
The whole point is not in the tester itself, because it is protected by a metal bracket through which large currents are checked. The bracket is installed inside and has a diameter of 1.5 mm. This size is able to withstand a significant amount of measured current in 10-12 seconds. It's all about the probe wires. They are thin, and certainly not designed for heavy loads.
Testing Diodes, Capacitors and Transistors
How to use a multimeter correctly when checking radio components. Diode testing is the determination of the presence of its resistance, in fact, as a continuity of wires and cables. Therefore, the black probe is installed in the com jack, the red one in V / Ω. In this case, the black probe itself is connected to the cathode of the diode, that is, with the negative end, red with the anode. The display of the device (ohmmeter) should show the value of the forward resistance of the diode. If you swap the probes at the ends of the radio component, then a unit should appear on the monitor. This, of course, if the diode is in good condition.
- If in two directions of checking the operating device shows a unit, then the diode has burned out.
- If it shows the minimum indicators (less than one), it is broken.

How to use a multimeter when testing a transistor. This is also easy. It is necessary to transfer the device to the "hfe" mode. The connected transistor has three outputs: base, emitter and collector. The same designations are on the device: B, E, C. The ends of the transistor and the input points must be combined, everything must correspond to the decoding. As soon as this happens, the gain values of the transistor will appear on the device. 
How to work with a multimeter when checking the capacitance of a capacitor. The indicator itself can be found by installing the radio component with two ends in the "Cx" sector. The switch also points to this sector. There are several limits here, therefore, knowing the capacity of the element being checked, it can be adjusted to the required indicator. The display will show the nominal value of the capacitance. 
dialing
What does it mean to ring with a multimeter? This term appeared back in the days of using pointer testers, when it was necessary to check the electrical circuit for resistance. In order to set the scale of the device to zero, as well as to make sure that the probes are in good condition, they were connected to each other. In this case, the switch was installed in the sector on which the bell was drawn. If everything was in order, then the bell rang.
Therefore, when the question is asked how to ring a circuit, or how to ring a wire with a multimeter, it must be understood that this is just an analogy.
Everything that has been described above is actually a few simple operations. But they help novice electricians navigate the problems of electrical circuits. It is they who, at the beginning of their work, begin to wonder how best to use the multimeter tester. All answers are in this article.
If you find an error, please highlight a piece of text and click Ctrl+Enter.
A multimeter is a fairly well-known device that allows you to perform all the necessary measurements of an electrical nature in a matter of seconds. With it, you can quickly and accurately set the current and voltage, resistance. At the same time, it allows you to easily and most effectively ring the chain for its integrity.
As numerous practice shows, with the help of a multimeter, people who are engaged in radio engineering check diodes and transistors for their performance. If we talk about more expensive models, they have much more functions and even allow you to measure the capacitance of capacitors, temperature, inductance and many other characteristics that electrical equipment may have.
How to use the multimeter dt-830b, dt-838, dt-832b, instructions for use for dummies are considered incredibly popular, because these models of devices are most often used. They are easy to use and not very expensive. If you have no idea how to handle this type of measuring device, then on our website you can find a large number of videos that show all the details of using the product in practice.
The device and principle of operation of the digital multimeter dt
In order to understand how the device works and on what principle it works, for example, we will take the popular model dt-838. If you yourself understand the principle of operation of this model, then you should not have any difficulties using other devices of this type. The only differences that different multimeters have can only be the icons that are applied to the products. In addition, there may be some additional features. On the front side of the model we have chosen, there is a special LCD indicator, a switch that allows you to change the operating modes, as well as connectors with which the probes are connected.
Digital multimeters how to use, video instructions for use for dummies
Due to the fact that there are special marks on the devices, this allows you to set a value that can be controlled. This value allows you to switch and set the upper limit of the reading measurement. Modes of a homogeneous type are located side by side and are divided into different groups.
In some more modern multimeter models, it is customary to set the measurement limit at the automatic level. In order to do this, it is enough to select the control value that you need using the switch. If we talk directly about the designations that are located on the front of the product, then an instruction is needed, because such designations in different models from different manufacturers may differ slightly.
How to use multimeter probes dt-830b, dt-832v, dt-838, instructions for use
To use the device for its intended purpose, you must initially expose the probes and then touch them to the wire, outlet, switch, and so on. For this, on the front side of the multimeter, there are special three connectors. If we talk about measuring by color, then this type of measurement should only be used when you are manipulating in a DC network. If we talk about alternating current, then in this situation there is no difference how exactly the probes will be connected.
How to use a multimeter instruction for dummies video
When you take voltage measurements, be very careful not to touch those parts of the probes that are bare. Before starting work, it is also very important to check whether the probes are correctly connected to the connectors located on the front side of the device. You should always remember that if you misuse the dt-832, 830, 838 and other models of multimeters, this can provoke a short circuit or more serious problems. Therefore, the instruction must be studied without fail, regardless of the amount of knowledge in this area.
Rules for working with a digital multimeter
Instructions for use on how to use a dt multimeter should be read before starting work, especially if you have very little experience in making measurements. If even after that you cannot fully work with the device, then watch the video on our website, where it will be described in detail how to use this device correctly and accurately.
How to use a multimeter correctly instruction for dummies video
In order to be able to measure the voltage with a multimeter, nothing special is needed. All sorts of switching in the circuit and so on are not required. The main rule in this situation is that you need to try to determine as accurately as possible the approximate value, as well as the type of voltage that you are going to measure. So, insert the appropriate probes into the socket and then lightly touch the terminals of the socket. When a touch occurs, you need to have time to fix the readings that the device shows.
If you are still a teapot, then having learned how to use the multimeter DT832B, DT830, DT838, everyone can measure the strength of direct current. It is very important in this situation to correctly install the probes. Otherwise, the fuse starts to work, which then needs to be replaced immediately so that more serious breakdowns and other things do not occur. It is worth noting that it is desirable to work in the current measurement mode for no more than 15 seconds. The limit for measurement must be set at least with a minimum margin. After the probes are installed, you will need to disconnect the circuit and connect the device itself - always in series.
In order to be able to determine the active resistance of an element, you must first disconnect it from the circuit, then connect the multimeter in parallel. If you incorrectly set the maximum value, then in this situation it will not lead to damage to the digital device. If this happens, then you will see several units on the screen and no more.
Video review of the DT-830D multimeter. Instructions for use for teapots
In order to be able to ring the circuit without problems, set the switch on the multimeter to the ringing mode, and then carefully close the probes. The device must necessarily emit a sufficiently loud beep, and then display a reading on the screen that will be as close to zero as possible. A similar procedure is usually carried out in order to find out if the tester is working and whether it is possible to use a multimeter. In that situation, when the circuit under test is intact, the device will emit a certain sound signal, and then show the resistance value on its screen. If there is an open circuit or other breakdown in the circuit, then the numbers on the screen will show an increase. In some cases, only a few may appear and nothing more. Some more modern models may show a special abbreviation "O.L" in the event of a circuit failure.
Be sure to check the operation of the device. In order to do this, you need to additionally connect a voltmeter to the outlet in parallel. Then it is enough to compare the readings that the voltmeter and multimeter will show. In order to be able to check how correct the current measurements are, you need to take readings of the constant load of the device and additionally with an ammeter.
If you see a unit on the screen, then this can only mean one thing: the limit was set incorrectly, then you need to repeat the entire procedure for checking the operation of the digital tester. Sometimes the battery may catch fire - this means that for the normal functioning of the device, it will need to be replaced immediately.
How to use a multimeter: instructions for use dt-830b, dt-832, dt-838 for dummies, you should definitely study before you start using the device for work. If, after you have read the instructions for use, you still have some questions, you can watch the video on our website, where you can get quick answers.
Selecting a multimeter. Beginner Video Tips
The DT digital multimeter may seem like a very complex instrument at first glance, but it's actually very simple. It is necessary to have a minimum knowledge for its application and be at the same time as accurate as possible. If you follow all the points of the instructions for use, then you will use such a device for many years, and at the same time, no failures or malfunctions will occur in its operation.
Hello, dear readers of the blog "Mobile Home"! Please count how many times a day you send SMS messages. I am sure that many will lose count, because it is so popular.
SMS (there is no such verb in Russian) you can spend hours ... This is a great way to kill time. Cell phone manufacturers make sure that it is convenient for us to write messages, and they offer the T9 function for this.
T9 is a predictive typing system that allows you to speed up the process of entering words. How to use T9?
After reading some forums, I found that many scold the T9 function with the very last words. The following arguments are given:
“Knows only a hundred or two stupid phrases”
“I want to write one thing, but writes some kind of heresy”
"Too lazy to figure out how it works"
"Mangles words, does not understand proper names"
If any of you are also thinking about the T9 function, then I will try to change your attitude.
How to use T9 - the simplest instruction
So, we have 12 buttons for entering a message - numbers from 0 to 9, * and #. Each of the numbers from 2 to 9 has 4 letters. The 0, 1, * and # keys are either a space, or a punctuation mark, or the inclusion of uppercase / lowercase letters, or a choice of a word from the T9 dictionary (depending on the phone model).

We need to write a phrase "Hello! How are you?"
When dialing in the standard way, you will have to press the phone keys around 40 times! Even if you do it quickly, compare - with the T9 function turned on, the number of clicks is approximately halved! You can dial SMS even faster!
You just press once on the buttons with the letters P, R, I, B, E, T and as a result, the T9 dictionary will offer you the word "HELLO".
When entering a punctuation mark, this will not happen. you click on 1 (or 0, or *, or # - depending on where the punctuation marks are on your phone) and then using the button to select a word from the dictionary (again, different models vary) choose a comma, exclamation point, dash, etc.
For example, we took the words that T9 will probably know. And when he does not know the word we entered?
If you think that in this case the task becomes more complicated, you will be only partly right. There is a simple scheme for entering complex or slang words using T9, which will greatly speed up the typing process.
For example, let's take the word "LOW". Naturally, T9 does not know him and will offer you the words "in shifts" or "frosty". How to be? Let's calculate how many clicks are needed for classic input. I got 24.
But when using T9, the number of clicks is reduced. How? You just need to enter the word by syllable. We enter “O” (this letter is offered to me immediately), then “PUP” (offered third in a row from the dictionary), “EN” (this syllable is offered fourth) and finally “BUT” (comes out second). Total - 16 clicks.
On other phones, the number may be less. It depends on the features of the input. Thus, any rare and incomprehensible word can be broken into syllables.
You can, of course, add frequently used words to the T9 dictionary, but for some reason I didn’t remember them. Therefore, it is much easier to use the input of words by syllables.
You say that you are used to typing SMS in the classic way? Your right! But no need to say that T9 is a stupid feature. You just aren't used to it. And if you are not too lazy to get used to it - it will make your life easier!
Thank you for your attention!
Related Articles