Installation of a fence from a profiled sheet. Do-it-yourself fence from corrugated board - step-by-step implementation, expert advice
In order to enclose a suburban area or a house within the city, a profiled sheet fence is a popular option: a wide choice of material colors, construction speed, reliability, strength of such a structure are the main reasons why the owners prefer it.
A do-it-yourself fence made of corrugated board is easy to install even for a person without special building skills, but it is still necessary to gain certain knowledge about the material and the features of working with it.
A fence made of profiled sheet can have a beautiful and presentable appearance. The possibility of using sheets with different colors of polymer protective coating, a variety of architectural forms of the fence, allows you to make a fence made of corrugated board a real decoration of the site.
Profiled fence
In addition to fences made entirely of metal sheet, the material can be used as inserts in brick, concrete, wood and metal structures. Fences made of corrugated board decorated with forged inserts look especially organic and beautiful.
Features of the choice of material for fences
Profiled sheets are produced in several versions: wall, load-bearing and roofing. For fencing, it is recommended to use a wall sheet with a thickness of 0.3 to 0.7 mm. The profiled sheet of the wave structure has sufficient strength and is able to withstand large wind and mechanical loads and impacts, which makes it possible to erect structures of a sufficiently large height from it.
Profiled C-8x1150 for the construction of walls and partitions

Often, profiled sheet fences reach 2.5-3 meters or more, when choosing a material, it is necessary to take into account wind loads in a particular area, and if it is planned to build a tall structure, then the sheet should have a greater metal thickness.
Wave height: to build a fence from corrugated board with your own hands, it is recommended to choose material marked from C8 to C21. The letter designation indicates the type of sheet - wall, and the digital designation indicates the height of the wave.
Profiled s21 for fences, walls and pitched roofs

The length of a profiled sheet can be from 1.5 to 3 m, the production of this product is carried out from rolled steel and a sheet of any size can be made to order. The width of the sheets has limitations and varies from 980 to 1850 mm, the higher the wave, the narrower the sheet, the calculations will have to take into account the necessary overlap, which reduces the usable width by 30-100 mm.
Decking MP-20 for walls of prefabricated buildings, fences

The advantages of a fence from a profiled sheet
- durability, service life exceeds 20 years, but can reach 50 years, galvanized metal with polymeric color coating is used for production.;
- all construction works are carried out without the involvement of special equipment;
- the construction of the fence takes place as soon as possible;
- during operation, special care and painting is not required, it is enough to periodically clean it from dirt and dust with water from a watering hose;
- such a fence provides reliable protection from the outside world, including street noise and dust.
The cost of a profiled sheet

The cost of a profiled sheet is from 200 rubles per square meter, you should not purchase the cheapest option (its service life will be minimal): it must be taken into account that this structure should last several decades.
Site marking and start of construction
Before you start building a fence from corrugated board with your own hands, you will need to complete the required amount of work on the site. The marking of the territory is carried out, which is recommended to start from the entrance group (gates and gates). Places are indicated for the installation of columns, to which the enclosing structure will subsequently be attached. The length of the spans with which we build a fence from corrugated board should be from 2-2.5 to 3 m, it is necessary to take into account the height and windage of the future structure and make adjustments depending on these parameters.
Scheme of a fence from corrugated board

Marking is best done using wooden pegs, a measuring ruler or tape measure and a cord. Stakes are installed in the corners of the site and, between them, a cord is pulled. The remaining points are marked along the cord at an equal distance from each other.
Fence scheme and site marking

The place for future construction must be cleared of various types of debris and leveled, if the site has differences in height, take into account its lowering and the installation of columns must be carried out deeper by this amount - this will eventually allow you to get a structure whose upper level is at the same height. It is possible to build a fence from corrugated board in a cascade - in this case, adjacent sections are located at different levels, but the height of the fence is the same throughout.
Fencing materials, calculations
Knowing the height, length, and width of the fence on the site, you need to calculate the number of required sheets. Please note that 3-10 cm from each leaf sheet will overlap.
Calculation of materials for a fence from a profiled sheet

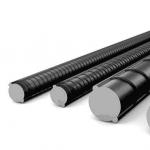
The device of the columns is a metal square pipe 40 × 60 or 60 × 60 mm and with a wall thickness of 1-3 mm. You will need pipes 80x80 for the gate posts and/or the gate. Their length is calculated from the height of the fence plus 0.8-1.5 m for the foundation. The last parameter is determined taking into account the characteristics of the soil on the site: for loose soils, a deeper base is required than, for example, for clay ones.
The device of columns for a fence from a professional sheet

Installation of fences from a profiled sheet is carried out to horizontal crossbars, it is necessary to prepare material for them. You can purchase the same pipes as for the posts or a smaller size 20x20, 20x40 mm with a metal thickness of up to 2.5 mm. On average, they require two units per section, if the fence exceeds 2.5-3 meters, then it is recommended to install an additional one - the middle one.
Pipes for a fence from a professional sheet

You will need fasteners for sheets - special roofing screws with a rubber gasket measuring 5.5 × 20 mm and at the rate of 14 units per 1 m2.
Foundation materials
To build a foundation for metal posts, you will need gravel or crushed stone under the pillow, as well as cement and sand to make the mortar.
In addition to installing metal pipes, you can also use wooden beams, asbestos-cement pipes, and make brick columns. In order for the profiled sheet fence to have greater solidity, a different technique is used: first, a metal pipe column is installed, and then it is lined with decorative facing bricks.
The device of the foundation of the fence from the profiled sheet

Choose the type of fence: at ground level or above level. The second option may have an additional element - a low plinth, sheathing or brickwork. This method is more costly in terms of time and finances, has undeniable advantages. The plinth creates protection for the lower part of the fence, contributing to its durability, does not leave a gap for the penetration of stray or wild animals into the area, which can easily climb through if the sheets are simply lifted 10-20 cm above the ground.
Tool for the job
To build a fence from corrugated board with your own hands, you need to stock up on the tools necessary to complete the work.
For marking the site and excavation, you will need:
- hand drill or shovel for preparing wells for posts and trenching;
- cord or rope;
- measuring ruler or tape measure;
- building level;
- sheet materials for formwork.
To fasten the profiled sheet to the fence, you will need roofing screws with rubber gaskets or rivets. You will need a screwdriver and a special device for installing rivets. To install the log, you may need a welding machine, you can make a fence from corrugated board without welding - you need to prepare holes with a drill and connect with screws.
Foundation for posts
Foundation for posts

Posts are installed for the foundation, and a strip base is recommended for fences with a plinth. It is possible to combine two types of foundation: for supports - columnar, and for the basement - tape.
To install the posts, you need to drill small holes with a hand drill or dig with a shovel. Depth can vary from 80 cm on heavy compact soils and up to 1.5 m on loose or loose. At the bottom of the pit, it is recommended to make waterproofing from roofing material, this is especially necessary at a high level of groundwater. It is necessary to make a gravel cushion and install posts.
Checking the level of the columns among themselves, their height is adjusted by placing stones, gravel and other materials. First, sand is poured and filled with water, compacted, after which concreting with a cement-sand mortar is required. This method of arranging the foundation provides the columns with stability, reduces their susceptibility to heaving forces during the thawing of the soil.
In the case of a foundation for erecting a fence from corrugated board on loose and loose soils, it is necessary to make a formwork for which boards, plywood sheets and other improvised materials can be used.
Installation of posts

Metal poles are installed in the corners of the site and elements of future gates are mounted. A rope thread is pulled for a level, and the remaining intermediate posts are installed in pre-prepared pits. They should be about 1/3 of the height deep into the ground.
When installing the posts, you need to use a plumb line to prevent them from falling over, and with a building level, check the height of the posts.
To protect against the penetration of stray animals into the site, you can make a concrete side, with a small (no more than 20 cm) deepening. A small trench is being prepared between adjacent pillars, and as soon as the formwork is made and installed, concrete is poured. In this case, before installing a corrugated fence, it does not take time for the concrete to gain strength, the element being erected is not a load-bearing one - its hardening is enough.
Strip foundation

A trench with a width of at least 20 cm is prepared along the perimeter of the future fence. The depth is determined by the characteristics of the soil and the choice of material for the manufacture of columns and the basement. If it is planned to pour a monolithic concrete tape with subsequent cladding with decorative materials, then a profiled sheet fence can be placed on a shallow foundation. On average, the laying level can vary from 0.4 to 1.5 m, depending on the weight of the structure and the geological conditions of the site.
When the trench is ready, it is necessary to install a sand and gravel cushion, with a high level of groundwater, waterproofing will be required. A layer of roofing material or geotextile is laid.
We install the formwork and frame. Reinforcement with a thickness of 12-16 mm is used. We pour concrete.
Overlaying metal poles with brickwork or stone.
Masonry brick pillars

A simple but effective way is brickwork or stone cladding. Together with the installation of metal poles, the formwork for the masonry foundation is prepared.
If it is planned to use a facing stone, then the formwork should be installed up to the top of the posts.
Rules for installing a lag fence from a profiled sheet

Usually erected fences do not exceed 2-2.5 meters. For such structures, it is enough to install two crossbars, but if the fence is planned to be made higher and from heavier material, then it may be necessary to install a third, and sometimes a fourth element.
The lower and upper crossbars are installed approximately at a height of 20-30 cm from the ground and, accordingly, from the upper edge. If the height of the fence is 2 m, the distance between the lags will be about 1.5 m, at 2.5 m - a little less than 2 m, which is quite enough for the structure to be able to withstand any mechanical and wind loads.
Logs should be located strictly perpendicular to the pillars and parallel to each other. Immediately after attaching the crossbars, they must be treated with primers and applied paint intended for outdoor metal work.
Fastening the log using a welding machine and bolted connections

Fastening is carried out using a welding machine, by welding a log to a metal column. Welding points must be primed and painted with anti-corrosion compounds. If a fence is installed without welding, the logs should be fixed with bolts. Using a drill and a metal drill of the appropriate size, holes are prepared in the post and in the crossbars, and then tightened with bolts and nuts.
This method is in no way inferior in reliability and strength to the welding method.
It is necessary to process the joints, since the bare metal under the influence of adverse weather conditions will begin to corrode.
Attaching sheets to joists. Particular attention should be paid to the installation of the first sheet, it must be fixed perfectly evenly. Each next profiled sheet is fastened with an overlap on the previous one. After installing each next element, it is recommended to check their installation accuracy and, if necessary, adjust the fastening by placing additional washers.
For fixing profiled sheets, special roofing screws with a rubber gasket are used. The sheets should be fixed at the bottom of the wave, at a distance of 20-30 cm from each other. Self-tapping screws are best matched in color with the color of the sheet coating. Sheets can also be fastened with rivets; a special apparatus for their installation (riveter) is required.
Protection of metal from corrosion, safety precautions

The profiled sheet can be made independently using metal scissors: the material has a small thickness and is easily cut. All cutting points will need to be protected: painted or put special overlays. Metal posts are recommended to be closed with inserts or other decorative elements.
Special construction gloves will protect your fingers from cuts, be careful, the edges of the cut profiled sheet are very sharp.
As a rule, such fences consist of sections and exist in two types: fences with supports made of metal pipes or brick columns. Profiled sheets on them can be located in one case at a small distance from the ground, and in the other, they can be based on a foundation or a brick side connecting the fence posts.
The first option is more economical, as it involves the use of fewer materials and simplified installation. Another type of fence allows you to make it more respectable, but requires more materials and labor.
The use of a profiled sheet in the metal fencing of the site is fully justified, since it has a number of advantages:
- The installation process of the fence does not cause technological problems;
- The profiled sheet is strong enough;
- If such a fence is properly mounted and then maintained, it will stand for a very long time;
- The appearance of the fence made of corrugated board is quite modern.
Technology of installation of a fence from a professional flooring
The entire production process of installing a corrugated fence can be divided into several stages. Let's consider them in order.
Preparatory work before the installation of the fence

Before purchasing basic materials, you need to prepare tools and equipment for work. You will need a building level, a concrete mixer, a welding machine, pegs and a cord for marking the territory, an electric drill with drills, electrodes d. 2.5 mm. It is also necessary to organize the supply of water to the place of concrete work.
It is not recommended to build any fence without a diagram or drawing. To compile any of these documents, markup data is required. It should begin with the definition and measurement of the perimeter of the site. To do this, you need to hammer pegs in its corners and connect them by pulling a cord between them. Using a tape measure, it is necessary to determine the length of the future fence and the required number of its supports, which are arranged in 2-3 m increments, depending on the length of the sheets. The location of each pole must be marked with a peg.
In addition, it is necessary to determine the dimensions of the foundation, the width of the entrance gate and the entrance gate. The width of the base, in order to save costs for earthwork and concrete work, can be made unequal. Then, under the supports, it is made in their size, and under the sheets - narrower. Gate dimensions depend on their purpose. All markup data will have to be transferred to the scheme to calculate the required amount of materials.
If facing the supports with bricks is not planned, then a powerful foundation for a lightweight fence structure will not be required. In this case, a hole 15 cm wide to a depth of 1.5 m is dug under each rack. You can use a hand drill. The depth of immersion of the supports into the ground depends on the height of the fence. The higher you plan to make the fence, the deeper you need to dig in its supports.
For a heavy fence with brick posts, you will need a more massive foundation. To prepare it, shovels, a supply of polypropylene bags for removing excess soil and time are needed.
A trench, for example, with a volume of 4 m 3 is dug by a pair of workers within 4-5 hours with smoke breaks. Its depth for the foundation depends on the level of soil freezing in a particular region, on average - 1-1.5 m.
The most important thing in this type of work is the selection of soil to the desired depth. The level of laying the foundation, its immobility and the normal functioning of the entrance gate depend on it.
The choice of materials for the fence from corrugated board

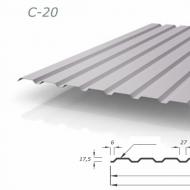
The main material of the fence is profiled sheet. It is made from durable zinc plated steel. All sheets have a ribbed shape, as well as marking A or C followed by numbers from 8 to 35, which indicate the wave height of the product in millimeters. For example, C10 corrugated board used for fences has a wave height of 10 mm. The larger it is, the stiffer the profiled sheet. In regions with strong winds, it is recommended to use C20 corrugated board for fencing.
The thickness of the profiled sheets should be chosen depending on the height of the fence. If it is, for example, up to 3 meters, the optimal value will be 0.5 mm. For a higher fence, sheets of t. 0.6 mm are suitable.
When buying, you should pay attention to the flooring. More resistant is powder coating. Sheets must be double sided. Their outer side has a brighter color. Inside the corrugated board is gray.
For the manufacture of a fence from corrugated board, in addition to steel sheets, you will additionally need:
- Pipes and bricks for supports. Steel pipes are taken with a rectangular or round section of 60x60 mm with a wall thickness of 3 mm and a length of 3 m. The brick is silicate, clay or facing. For laying columns from it, you will need a mortar.
- lags. These are transverse fencing elements designed to securely connect supports into a single frame. In addition, they serve as the basis for fastening profiled sheets. The material for the crossbars will be steel pipes of rectangular section 40x25 mm with a wall thickness of 2 mm and a length of 6 m.
- fasteners. It is needed for the installation of fencing sheets. These are roofing screws or metal rivets measuring 3.2x10 mm.
- M200 concrete for mounting fence posts. If its self-preparation is provided, cement, crushed stone and sand will be required.
Pouring the foundation for the fence

Formwork assembly is an extremely responsible event. The fact is that after pouring concrete, the admitted formwork defects can no longer be corrected. Therefore, in addition to a semi-edged board, drill and screws, you will definitely need wooden lintels and brick supports for additional fastening of the entire structure.
The assembly of formwork panels is carried out in a trench and begins with the top board, which marks the level of the foundation. Its upper part should be 10 cm above the ground in order to avoid the accumulation of dirt on it during rains.
Reinforcement of the foundation is carried out using a three-dimensional frame made of metal rods with a diameter of 10 mm. In the frame, horizontal reinforcement is represented by two lower and two upper reinforcement bars. Vertical reinforcement - four short jumpers connecting horizontal rods at regular intervals of 1.5 m. The reinforcement is connected with knitting wire.
After installing the frame, pipes or powerful corners are lowered into the formwork to reinforce future brick columns. The installation of these elements is carried out using a plumb line and building level. Then they are fixed in it with short boards. After fixing the formwork with lintels and props, concrete can be poured into it.
When installing a corrugated fence, concrete preparation is done manually or using a concrete mixer. The composition of the mixture is used as follows: cement - 1 part, crushed stone - 6 parts, sand - 3 parts, water - 0.7 parts, concrete additives (liquid household soap) - 0.1% of the amount of cement.
It takes 30-40 minutes to manually mix 100 liters of concrete. After concreting, it is advisable to cover the formwork with a film to avoid drying out of the top layer of the coating, and it can be removed after a week in the presence of warm weather.
A massive strip foundation for brick columns is poured in the usual way. If it is not planned to line the racks with stone, the bottom of the recesses under them is covered with a layer of crushed stone t. 200 mm, then the racks are installed and concreted with a cement mixture.
In order to prevent the soil between them from washing out over time, instead of the foundation, the pipes of the supports can be connected with a deepened concrete tape with a total height of 20 cm. For its manufacture, a wooden box is made along the bottom of the metal racks. Its boards are fastened with wire or timber trimmings, and then lined with waterproofing from the inside. After pouring concrete into the box and setting it, the formwork is carefully disassembled. The resulting side will serve not only as a protection against washing out of the soil, but also as an obstacle to penetration under the fence into the territory of pets.
Instructions for installing a fence from corrugated board

The frame of the fence from profiled sheets is assembled from a metal pipe with a section of 20x40x2 mm using manual welding. The pieces of the profile pipe cut to the required length in a horizontal position are slightly welded to the vertical posts in 2-3 rows, the installation accuracy is checked by the building level. After that, the final welding takes place. A fence 15 m long takes about 2 hours of welding.
After their completion, anti-corrosion treatment of frame elements and places of its welding is performed. For this purpose, primer GF-020 is suitable, which can be applied to metal with a brush or paint sprayer.
For the installation of brick columns, facing bricks are used. Usually, experienced masons are involved in such work, because the quality requires it. When laying bricks, a mortar is used in the ratio of cement / sand 1 to 3 with the addition of a small part of liquid soap for the plasticity of the mixture. The masonry of the columns is carried out alternately in 1 day to a height of 0.5 m.
The gaps between the masonry and the metal rack are filled with mortar while working on the column. Each row of masonry is reinforced with a mesh of 50x50x4 mm. To protect the upper end of the column from rain and snow, decorative caps are installed on it. This gives the fence a special expressiveness.
As an option, the racks can be lined not with bricks, but with artificial or natural stone. From this, the appearance of the fence will only benefit. However, such a procedure will require considerable investment.
Installation of a professional flooring is the last stage of production of a fence. In order not to damage the end of the profiled sheet during installation, it is recommended to lay cardboard on the foundation. Products are fixed on a profile pipe through a wave at the base of the corrugation. The connection is made with an overlap with self-tapping screws using an electric drill with a nozzle. You can take rivets, but they must be steel.
Aluminum fasteners can create a galvanic couple between different construction materials, the appearance of which causes electrochemical corrosion of steel.
Sheets of profiled flooring in the same fence can be easily combined, for example, with forging. In order for such a fence to have an attractive appearance, you can use a different arrangement of its enclosing elements: the upper, lower part of the structure or the gap between them can be covered with a deck.
To maintain a good and attractive condition of the fence from corrugated board, a lot of effort is not required. It is quite enough to periodically clean it from dirt. Any solution containing soap will work for this. It is important that the emulsion does not contain solvents: they can damage the coating.
How to make a fence from corrugated board - look at the video:
The fence is the main structure used to mark the perimeter of a private household and protect property from intruders. Among the mass of structures and varieties of materials used, a corrugated fence is considered to be the simplest and most cost-effective solution. The design of this fence is relatively simple and does not differ in special labor costs. However, the cost of services for its construction significantly “hit the pocket” of any homeowner. This publication will tell you how to make a fence from corrugated board with your own hands, eliminating this expense item from the amount allocated by the developer for the improvement of the territory of a private house.
Advantages and disadvantages of a profiled sheet fence
 Decking is a profiled steel sheet material with an anti-corrosion surface coating. Depending on the purpose, manufacturers offer several dozen varieties of profiled sheets, differing in thickness, type of protective coating, profile shape and height, and dimensions. The main advantages of fencing made of this material are:
- affordable cost;
- high resistance to corrosion;
- durability;
- ease of installation;
- undemanding maintenance (painting, rust treatment).
In addition, the fence from the profiled sheet has a very presentable appearance. According to reviews, a solid fence made of this material perfectly protects the territory from wind and street noise penetration.
The sharp edge of the sheet greatly complicates unauthorized entry into the territory of home ownership.
 The disadvantage of such fences can be considered: low resistance to wind loads and mechanical damage.
Nevertheless, the abundance of shapes, textures and colors of the profiled sheet presented today on the domestic construction market allows you to create beautiful fences from corrugated board using a relatively small set of tools and materials for this.
Preparatory work
 If you decide to do the independent construction of a reliable fence from a profiled sheet, then you should not immediately run to the nearest building supermarket to purchase materials. Initially, preparatory work should be carried out on the site. The algorithm is the following:
- Make the necessary calculations of the number of profiled sheets.
- Determine the type of fence (solid, sectional).
- Think about the support structure and the type of installation of the material.
- Create a drawing (sketch) of the fence.
- Prepare materials, tools, fasteners.
Only after completing these works, you can proceed to the direct installation of the fence from the corrugated board. Next in order.
Calculation of the amount of profiled sheet
 In order to correctly calculate how much profiled sheet is needed, the first thing to do is to determine the location of the fence. Pegs should be installed in the corners, and a cord should be pulled between them, the length of which will be an indicator of the length of the fence. Next, we determine the height of the fence.
The dimensions of the profiled sheet for the fence vary depending on the type of material and its purpose, but the average figures are as follows:
- width 100-130 cm;
- height 180-200 cm.
The required length of the sheet, which determines the height, will be cut by the manufacturer or the trading company. Knowing the length of the fence and the standard width of the sheet, it is easy to calculate the required amount of material: the total footage of the perimeter of the future fence is divided by the working width and we get the required amount of material plus two sheets of stock.
Choose the type of fence
 Today fences from a professional flooring of two types are practiced: solid and sectional. The first is easier to manufacture and requires fewer materials. The second, by all accounts, is more presentable, but also more costly. In the first variant, all elements of the supporting structure are sewn up.
In the second - the material is placed between the supporting pillars of the fence: 
The type of fence determines its design, material and method of installation of all elements of this structure.
The design and installation methods of the fence
 One of the easiest ways to build a profiled sheet fence is to make a fence with metal poles installed directly into the ground. For supports, a steel hollow pipe of round or square section is used. Round pipe diameter from 60 mm. The cross section of a square profile is 60X60 mm.
Logs are required for the supports, which are used as a square steel pipe or wooden beam. The recommended section of the steel profile is 30x20 mm; wooden beam 70x40 mm.
There are three material installation options:
- using fasteners;
- through welding;
- between brick pillars.
For the first option, an X-bracket is used, which is a special fastener that is attached to the pole with self-tapping screws. 
The main advantages of this method are: the low cost of the fastener, the high speed of erecting the fence without the use of a welding machine.
In the second option, three methods of fastening the lag are used: end-to-end, on the side, using a holder. 
It is quite difficult to build a sectional fence made of corrugated board with brick pillars on your own. Requires practical skills in laying bricks, creating a foundation, knowledge of the basics of reinforcement. When choosing such a fencing design, it is recommended to contact professionals, the cost of whose services can be very significant. Such a fence is chosen by the owners of households, for whom good wind resistance and a respectable appearance of the fence are important.
Material selection
 The first thing to do before buying material is to carry out a full calculation of the fence from corrugated board.
- The length of the posts is calculated according to the following formula: fence height + 1 m for penetration into the ground. If the fence is installed on heaving soil, then the pillars are dug in below the freezing depth of the soil. In this case, when calculating the height of the supports, the height of the fence + the depth of the pillars are taken into account.
- The distance between the supports can vary from 2 to 3 meters. Among specialists, the distance between the racks is most often practiced - 2.5 m.
- To calculate the lags, you need to multiply the total length of the perimeter of the fence by two, and add the necessary footage for the manufacture of gates and gates to the resulting figure.
Above was the calculation of the required number of profiled sheets for fencing. When choosing this material, you need to pay attention to its thickness, wave height, characteristics, anti-corrosion coating, color and texture. For the erection of a fence, most often they choose durable and inexpensive corrugated board, the “C” or “MP” series. 
Professional sheets "C" are intended for wall cladding. They are characterized by a small profile height and sheet thickness. The material of the "MP" series is widely used for roofing, construction of light buildings for household needs.
Create a drawing
 The construction of a fence from corrugated board begins with the creation of a sketch (drawing) which should include:
- the location of the fence on the site;
- plan for the placement of supporting elements;
- landscape features;
- fence dimensions;
- material specification.
To compensate for differences in the level of the landscape, a strip foundation is used, with the help of which all irregularities are closed.
Tool selection
Before you make a fence from corrugated board, you need to prepare the necessary tool that will be needed to install the poles and fasten all structural elements.

In addition, you must have: tape measure, marker (chalk), metal hardware and roofing screws, building level (plummet), necessary fasteners. From building materials you will need crushed stone, sand, cement. For concreting pillars, you need a shovel and a container for mixing sand-cement mortar.
Construction of a fence from corrugated board: stages of installation work
Consider the process of erecting a metal fence from a profiled sheet with the installation of supports by concreting. Installation of a fence from corrugated board begins with the installation of support pillars. For this you need:

After the concrete has gained primary strength (not earlier than after 7 days), continue the construction of the fence from the corrugated board.
 At the height of the fastening of the lower and upper logs, pull the cord around the perimeter of all racks. Check its level relative to the horizon. After that, install the X-brackets at the intersections of the cord with the supports. This is done as follows: in the first support with a drill, make holes according to the bracket attachment marks and attach this element to the corner post with metal screws. Attach a mount to the next post. Check the correctness of the position with the building level. Carry out the mounting process. In a similar way, install the brackets along the entire length of the fence. Fix the lags on the back side of the bracket.
 The next step is to attach the profiled sheet to the fence frame.
You can fix the material with roofing screws or rivets. The installation step is through the wave. First, align and attach the first sheet. Each subsequent one enters the previous one for one wave.
 It is important to know how to properly tighten roofing screws. When screwing, be guided by the rubber seal. The figure shows the options for correct and incorrect installation.
You can learn more about the rules for attaching a profiled sheet from the video:
As a conclusion
In this publication, the process of how to make a fence from corrugated board with your own hands was considered as detailed as possible. As you can see, everything is extremely simple. The main thing is to strictly follow the instructions, do not neglect the calculations and do not save on materials.
A fence made of corrugated board is the best solution for protecting the territory of a country house or cottage from prying eyes and unauthorized visits. Fences made of this material serve at least 30 years. The metal profile is extremely easy to process, and a simple installation technique allows you to install a fence around the house or summer cottage quickly and with your own hands, without involving additional labor. Possessing high performance and durability, measured in decades, the metal profile also performs a decorative function, with which you can ennoble a private area, making it not only inaccessible to prying eyes, but also homely.
Construction of a fence from a metal profile: the pros and cons
A distinctive feature of a metal profile (profiled sheet, corrugated board) is versatility. In addition to the arrangement of roofing and the construction of temporary utility structures (hangars, sheds, garages, etc.), this material is widely used in the construction of fences and fences for various purposes.
The metal profile is made from cold-rolled sheet steel, which is coated with a layer of zinc and a protective polymer film of various colors using a special technology. The thickness of the profiled sheet is 0.4–1.2 cm. At the final stage of production, the sheet laid in rolls, using roll forming equipment (manual or automatic), receives a certain profile (trapeze or wave).
Good to know: The steel base and stiffening ribs provide increased material resistance to deformation and force, while galvanizing and polymer coating reliably protect the profiled sheet from rust and mechanical wear.
For the construction of fences, a wall profiled sheet with a profile height of 8 to 44 mm is used. The final cost of the material is influenced by such parameters as:
- thickness of the steel base;
- availability and quality of galvanization;
- the quality of the polymer coating;
- profile shape and height.
Advantages of a metal profile
The main advantages of using corrugated board in the construction of fences and fences include:
- High performance.
- Small specific weight.
- Ease of processing and installation.
- Durability and resistance to aggressive operating factors.
- Relatively low material cost.
The profiled sheet is well protected from rust, deformation, damage and climatic factors. The material is produced in a wide range of sizes, which allows it to be used for the construction of fences of any height and length.
Good to know: The lightness of the profiled sheet, as well as its mechanical rigidity, greatly simplifies the installation process. In addition, when building a fence from this material, the requirements for the strength of the supporting frame are reduced.
Cons of wall corrugated board
The disadvantages of the metal profile used in the construction of fences and barriers include:
- Low level of sound insulation (a corrugated fence will not be able to protect the internal territory from noise coming from the street).
- Low resistance to destructive impact (it is easy to break through a fence made of such material, say, with a heavy car, or cut a hole in it with a special tool for subsequent penetration into the fenced area).
- Low presentability (corrugated board is significantly inferior in external attractiveness to traditional materials used in the construction of fences - wooden and plastic fences, metal, brick or stone).
Good to know: Despite the obvious shortcomings, the professional sheet has no equal in terms of efficiency and has absolute fire resistance. The material is produced in a wide range of colors and an extensive range of shapes and profile sizes, which allows satisfying almost any aesthetic needs of the buyer.
Photo: types of fences, ideas for implementation on the site
 Profiled sheet as a decorative trim on the entrance gate
  Metal profile fence on metal supports: inside view
  Decorative design of a profiled sheet as part of a country fence
  Metal profile fence with decorative design: inside view
  Fence made of profiled sheet with decorative design
  Fence from a profiled sheet on a site with a slope of the terrain
  Corrugated fence with brick pillars
  Fence from a metal profile on a concrete foundation
Fence project and preparation for construction
It is necessary to carefully prepare for the construction of a fence from a metal profile. Errors in the design and installation process are unacceptable, as they entail unplanned expenses of time, nerves and money.
In order for the construction of the fence to be carried out promptly and not to take an unreasonably large amount of manpower and resources, at the preparatory stage of construction it is necessary:
- Decide on the type and required characteristics of the metal profile.
- Develop a construction project.
- Calculate the required amount of materials.
- Prepare a set of tools and auxiliary materials necessary for construction.
- Perform accurate marking of the fenced area for construction, taking into account the location of gates, entrance gates, terrain slope, etc.
Important to remember: After the purchase and delivery of the base material to the construction site, it must be carefully stacked and covered to protect against premature wear and climatic factors before installation work. The location of the stacks should not interfere with the passage, passage or placement of other building materials, elements of building structures, vehicles, etc.
What decking to choose?
If the decision to build a fence from a metal profile is made, it remains to choose a material that is suitable in terms of cost and quality. To do this, it is necessary to determine the requirements regarding its protective characteristics, as well as the reliability, durability and resistance of the future fence to wear and damage.
But first, it does not hurt to pre-install:
- conditional life of the fence;
- priority on the aesthetics of appearance or operational reliability;
- design features of the fence and the possibility of replacing its individual elements during operation.
The list of key factors determining the choice of profiled sheet for the construction of the fence includes:
- Material brand.
- steel thickness.
- The quality of the galvanized steel base of the profiled sheet.
- type of polymer coating.
- Sheet dimensions and profile options
- Price-quality ratio.
- Durability and wear resistance.
- Aesthetic preferences of the owner of the protected area.
Profiled sheet marking
The metal profile has a special marking, which determines its main characteristics and purpose. So, for the construction of a fence, material grade C (wall) or HC (universal) is suitable. The numbers in the marking of the profiled sheet mean:
- profile height in mm;
- useful sheet width;
- thickness of the steel base.
It is important to remember: The thicker the steel base and the higher the zinc content in the protective layer, the more resistant to corrosion and deformation is the profiled sheet. However, at present, galvanizing technology is used less and less in the production of material. A much more reliable protection against corrosion, damage and wear is a special polymer coating, which, moreover, can be set in color and even texture, corresponding to the purpose of the metal profile.
Polymer coating and value for money
The polymer can be applied both on one and both sides of the sheet, which significantly affects the total cost of the material. In addition, the price of the metal profile is determined by the type of this very polymer coating:
- Polyester (PE) - film thickness is about 25 microns. The coating is used to protect the inner surface of the material. The film has low resistance to mechanical damage and ultraviolet radiation, which is offset by the low cost of the profiled sheet.
- Matte Polyester (PEM) is a 35 µm coating that is gloss-free and resistant to direct sunlight.
- Pural (Pural) - a protective film about 50 microns thick. Differs in elasticity, high degree of anticorrosive protection and excellent color quality.
- Polyvinyl fluoride (PVF, PVDF, PVF2) is a coating with high strength and elasticity. Meets increased performance requirements, with excellent resistance to ultraviolet radiation, as well as rust and mechanical damage.
- Plastisol (PVC200) is a universal film with a thickness of 200 microns, designed to protect surfaces of any type. Possesses high decorative qualities and elasticity, providing reliable protection of steel against corrosion.
Important to know: The dependence of the price on the type of polymer coating, which largely determines the durability and wear resistance of the material, is obvious. The greatest demand in the construction of fences and barriers is used by a metal profile coated with matte polyester, which has an optimal price / quality ratio. Pural-coated material is also popular, since the latter provides not only high aesthetic performance of the profiled sheet, but also increases the service life of the fence.
Profiled sheet parameters
The strength of wall corrugated board depends not so much on the thickness of the steel base (0.1 cm is enough for the construction of a fence), but on the size, shape and thickness of the ribs (waves) of the profile. Therefore, the main attention when buying should be paid to the height of the latter. For the construction of a fence in an area with normal wind loads, a material with a rib whose height does not exceed 21 mm is suitable. As for the required sheet dimensions and the amount of material, they are determined based on the required height of the fence, as well as its perimeter. In this case, it must be borne in mind that the profiled sheet will be mounted with an overlap.
For the construction of fences and barriers, four grades of wall corrugated board are used. Their calculated parameters are given in the table:
Good to know: Wall corrugated board is produced in sheets 12 m long, but before sale it is cut into pieces 2–3 m long that are more convenient for transportation and installation.
Proper design of the fence and calculation of materials, scheme
Before you go to the hardware store for materials, you should correctly calculate their quantity, as well as determine the amount of work on the manufacture of the main elements of the fence design. This can be done only if there is a detailed project. The latter is easy to develop on your own, without involving expensive specialists.
The first and main thing that is necessary for the design is the value of the perimeter of the fenced area. If it is not indicated in the cadastral plan, it will have to be measured independently. For this you will need:
- hammer marks (metal or wooden pegs) into the ground at the corners of the site, as well as at points where the fence changes direction;
- tie the tags with nylon or linen cord;
- calculate the length of the cord between the marks, which will correspond to the value of the perimeter of the site.
The next step is to determine the location and required dimensions of the entrance gate and gate. On the sides of the latter, it is necessary to set marks, measure the distance between them and subtract the obtained value from the total perimeter.
Calculation of the number and size of sections
- For example, let's assume that the site has a rectangular shape with sides of 20 and 15 m. Let's take the width of the gate equal to 2.5 m, and set the value for the gate to 1.5 m. In this case, the length of the fence will be equal to: L=(20+15) * 2 - (2.5 + 1.5) \u003d 66 m.
- The standard length of the profiled sheet is 12 m, so for ease of transportation and installation it will have to be divided into segments. Therefore, at this stage, it is necessary to calculate how many segments will fit in one section along the length.
- Set that the gate will be located next to the gate on the 20-meter side of the perimeter. In this case, the length of the fence in this section will be: l=20–4=16 m. Thus, we take the number of sections equal to 3 meters: 2 sections will have a 5-meter length, and the size of the remaining will be 6 m.
- If we take the length of the sections on the opposite side of the perimeter as 5 m, their number here will be 4.
- It remains to calculate the number of sections on the 15-meter segments of the perimeter. The calculation is carried out in a similar way: we take the length of the section equal to 5 m. This means that only 6 sections will be obtained along the width of the rectangle - 3 on each side.
- Let's calculate the total number of sections: n=2+4+6+1=12+1. Thus, the fence will have 12 sections 5 m long and one 6 m section adjacent to the gate.
Support calculation
Having the value of the number of sections, we calculate the required number of supports using the formula:
From this it follows that for the installation of the fence you will need: K \u003d 13 + 1 \u003d 14 supports.
Important to know: It is convenient to use a profile pipe of square (50 * 50 mm) or round (d = 50 mm) section as supporting posts for a corrugated fence. It should be noted that the length of the supports is a composite value. The outer part should be at least 10–15 cm longer than the corrugated board sheet. This is necessary in order to leave a clearance of 5–10 cm high from below and a height margin in the upper part of about 5 cm. So, for a 2 m high fence, the height of the supports will be 210–215 cm. For installation in the ground, another 80–120 cm will be required (depending on the type of soil, freezing depth and groundwater level), and if the fence is installed on a strip foundation - 40–50 cm.
Subject to the necessary requirements for the design of the supports, their length will be:
L og \u003d 200 + 15 + 80 \u003d 295 cm (when installing supports in the ground);
L op \u003d 200 + 15 + 40 \u003d 255 cm (when installed on a foundation).
Calculation of corrugated board
Using the values of the height of the fence, as well as the number and length of sections, the required dimensions and the number of profiled sheets are determined.
The height of the fence is equal to the length of the section of the profiled sheet. If the fence being designed is 2m high, a standard 12m sheet will need to be cut into 6 2m pieces. If a profiled sheet of the C21 brand is chosen for construction, 5 such sheets will go to each 5-meter section and 6 more sections of 1 m wide for the remaining 6-meter section.
As a result, the total number of profiled sheet segments 2 m long will be:
N=n 5 *5+n 6 *6=12*5+1*6=66 segments
where n 5 and n 6 are the number of 5- and 6-meter fence sections.
It is important to remember: The installation of the profiled sheet is carried out with an overlap. This means that each of the sheets will lose a little in length during installation. Thus, when calculating the number and size of sheets relative to the length of the section, the value of the joint size, multiplied by 2, should be subtracted from the total length of the sheathing.
Calculation of transverse logs
For fences made of corrugated board, a metal profile pipe with a cross section of 40 * 20 mm and a length corresponding to the dimensions of each section is used as a transverse log. At the same time, for the installation of a fence with a height of 2 m, no more than 2 tiers of crossbars will be required.
This means that the number of lags for the calculated fence will be:
k=k s *2=13*2=26 lag
where k c is the number of fence sections.
Final result
As a result of the surveys, it was found that for the construction of a fence around the site in question, it is necessary:
- 26 crossbars;
- 14 support pillars;
- 66 sheathing sheets 2 m long.
Then it remains to re-draw the diagram of the site and put on it a projection of the fence with the designation of the number and size of sections, the location of the gate and gate and other important data. The construction project can be considered ready.
Necessary tools and auxiliary materials
In order to independently manufacture and install a fence from corrugated board, it is necessary to prepare in advance the tools that you cannot do without in the process of work.
This list should include:
- bayonet and shovel;
- concrete mixer (if the fence is installed on the foundation or the supports will be installed on concrete);
- earthen drill (for mounting support pillars in the ground);
- electric scissors;
- metal scissors;
- electric drill with a set of drills for metal;
- screwdriver;
- welding machine;
- circular saw with discs for metal;
- construction tape measure;
- measuring cord;
- building level;
- plumb.
In addition to the basic materials of corrugated board and a profile pipe for the manufacture of supports and transverse logs, auxiliary tools will be needed for the construction of a fence.
The last list contains:
- sand;
- crushed stone;
- cement;
- primer for metal racks and crossbars;
- paint;
- metal screws or other fasteners for mounting the cladding.
It is important to remember: When cutting metal, in the process of building a foundation or installing supports in the ground, as well as when installing crossbeams and fixing a profiled sheet, it is very important to observe safety precautions. This will avoid injury, as well as damage to the material and breakage of the tool. Protective goggles, gloves and overalls should be used when performing work operations. And most importantly: you need to prepare a free area for work, on which nothing will interfere with the manufacture of fence elements, and bring electricity to it to connect power tools.
How to build a fence from corrugated board with your own hands: step by step instructions
After marking the territory and preparing materials, it's time to start building. The general algorithm of actions is as follows:
- pouring the foundation with the installation of vertical supports on it;
- installation of support pillars in the ground;
- installation of transverse logs;
- priming and painting of the metal frame;
- cladding installation;
- decorative fence.
Good to know: If the installation of the supporting frame is carried out by welding, the welds must be cleaned. Also, plugs of the appropriate shape should be welded onto the support posts, which will prevent moisture from entering the pipe. Holes in metal are best done before assembly, although with a powerful drill and a quality drill, they can be made after. It is advisable to apply a primer and paint on a metal frame before installing the crate so as not to stain the new profiled sheet.
Laying the foundation for a corrugated fence
If the conditional life of the fence exceeds 20 years, or the nature of the soil or the layout of the site does not allow installation in another way, the fence is installed on a strip reinforced concrete foundation.
The foundation is poured in several stages:
With the help of a concrete mixer, a concrete solution is made from sand, crushed stone, cement and water, with which the trench is poured to the desired level. In the process, you should periodically check the vertical of the support posts or fix it to the formwork with a lock from the waste boards.
Important to know: The soil will not take away moisture from the concrete if the bottom of the trench is abundantly moistened before pouring. The finished foundation should be allowed to dry for at least 3 days, after which you can proceed with the installation of the transverse logs.
Installation of support pillars in the ground
If the fence is planned to be used for no more than 15–20 years, the fence is temporary, or the soil or site layout allows installation without pouring the foundation, the support posts are installed in the soil.
There are several ways to install supports, the choice of which depends on the nature of the soil, the depth of groundwater and the height of the fence:
- driving;
- partial concreting (combined installation);
- butovanie (installation on a pillow of sand and gravel);
- full concreting (with reinforcement);
The algorithm for installing fence supports into the soil looks like this:
- Plugs are welded on the upper and lower ends of the supports, which will prevent moisture and soil from entering the pipe.
- The corner supports and poles are installed first at the edges of the gate and gate. In this case, it is necessary to carefully monitor the observance of the vertical level of the supports.
- Installed corner posts are knitted with twine or rope to mark the fence line.
- The remaining supporting posts of the fence are mounted along the perimeter in the same way, observing the vertical level and the line set from the corner supports.
Important to know: To enhance the bearing capacity of concreted or partially concreted supports, the hole can be reinforced with thin (d = 10 mm) reinforcement.
Installation of fence posts on a site with a slope
If the land plot has a slope, a number of additional steps must be taken when pouring the foundation or installing support pillars. In particular, with a slight slope, the soil should be simply leveled.
When installing a fence on a foundation on a site with an average slope, the procedure will be as follows:

When installing supports in the ground on a site with a slope, the depth of the holes is adjusted in the same way: the bottom of the hole of the first support of the next level should be at the level of the middle of the hole of the last support of the previous one.
Important to know: The level difference in height should be the same along the entire length of the fence.
Installation of the supporting frame
After installing the support pillars in the ground or on the foundation, the installation of transverse logs is carried out. They can be installed by welding or by means of special “crab” fasteners.
When mounting on "crabs" in supports and transverse lags, it is necessary to make holes of the appropriate diameter for bolted connections.
The installation of crossbars for welding is carried out in one of three ways: the logs are butt-welded, on the sides of the support column, or fixed using a holder pre-welded to the support (a section of a U-shaped profile of the required dimensions).
Good to know: The location of the lag and the distance between them depends on the height of the fence. If the latter is 2 m, 40-50 cm must be subtracted from the upper edge of the support - at this level the upper line of the crossbars will be attached. Further down, we retreat 100–120 mm and mark the installation level of the lower lag. Then the distance from the lower crossbar to the ground will be: l=200–40–120=40 cm.
Sheathing with metal profiles and finishing, painting the fence
If the installation of the frame is completed, and plugs are welded on top of the supports, you can proceed to the final stage of construction of the fence sheathing. To do this, in the transverse lags with a step equal to the step of the profiled sheet profile, holes are made for fasteners. Before starting work, it is important not to forget to calculate the location of the joints of the metal profile; its sheets are attached directly to each other, bypassing the crossbars.
After installing the sheathing, the fence can be decorated with decorative elements. For example, forging or bumpers along the upper and / or lower edge of the profiled sheet. You can also additionally protect the caps of self-tapping screws and bolted connections with special plastic plugs.
It is important to remember: When joining sheets with an overlap, installation is carried out on the upper wave of the profile. Fixing the profiled sheet to the crossbars is carried out in the center of the lower profile wave.
The construction of a corrugated fence requires thorough preparation and, most importantly, correctly performed calculations. Then, if you do not make gross mistakes during installation, the work does not take much time and effort. For example, it will take only 3-4 days to fence off a site with a perimeter of 60–70 m, of course, provided that you don’t have to dig a lot to level the soil. As a result, a reliable and durable fence should be obtained, which will serve as an excellent protection of the site from prying attention and greatly complicate unauthorized entry into the fenced area.
Related Articles