Balcony block plastic self installation. Installation and installation of a balcony block - professional advice
Old balcony doors often cause cold air to enter the room. To avoid this problem, it is worth installing a plastic balcony block made of modern materials and being airtight. Before installation, it is necessary to correctly dismantle the old structure in order to change it to a plastic product.
General description of balcony blocks
Modern metal-plastic balcony doors and windows not only contribute to the effective protection of the premises, but also decorate the room. You can install a PVC balcony block yourself, without resorting to professional builders. The block consists of a door and a window. It may have a different look. For example, the door can be located both on the right and on the left. You can also find designs in which the sash is placed between two windows. Installation of a balcony block can be done independently, even without experience in carrying out such work.

Each element of the balcony block can be both hinged and folding. Windows in some balcony blocks are deaf. The kit includes the following items:
- low tide;
- slopes;
- windowsill;
- threshold.
The door consists of elements such as a frame and a door leaf. Installation of a balcony block can be done independently, but it is worth remembering that to facilitate the process, you need to call assistants.

Varieties of balcony blocks
The products described are usually standard sizes, but you can find different products if desired. They are divided into the following types:
- Standard balcony block most popular and low cost. A feature of such a block is the presence of a blind window, which is not separated by a profile. Ventilation when installing this design is carried out by tilting the door. It can be installed in panel houses and other types of residential buildings.
- Block for insulated balcony has a window that can be opened. At the same time, the glazing area is smaller, but the ventilation of the room can be carried out better. The door can be opened and tilted. Before installing the balcony block, it is worth disconnecting the sashes from the plastic frame.
- "Stalin" bloc. Such designs are intended for the so-called "stalinok", in which the door to the balcony and the window are narrower. It should be noted that such products have a higher cost than standard ones. Installing a balcony block of this type is no different from fixing standard structures.
- Glazed blocks. They differ in that the door is glazed over the entire area, and the window is deaf and is installed to the floor.
It is worth remembering that, if desired, you can order blocks of other types. Often purchased products with a window. To select a specific option, it is worth viewing all types of such products. Most often, balcony blocks with a blind window are purchased. All types of such products do not require special care and can be used for a sufficiently long period of time.

Preparatory stage before installing a balcony block
Before carrying out work, it is necessary to purchase all building materials and tools that may be needed during the installation process. These include:
- pencil;
- building level;
- roulette;
- anchor bolts;
- sealant;
- hacksaw for metal and wood;
- hammer;
- perforator and drill.

It is worth remembering that there are several ways to measure the size of a balcony block. Some window companies offer free measurements if you decide to buy their products. By choosing such a company, you can not worry about the delivery of windows.
Before taking measurements, it is necessary to completely clean the walls to the main wall. It is worth remembering that all corners must be right. Alignment occurs when using a building level and a plumb line. If measurements are made independently, it is necessary to draw a sketch, given that the size of the opening should be 1 cm larger than the size of the window.
Before installation, you should find assistants, since it is quite difficult to install a balcony block on your own. This is due to the fact that the structure is heavy and it is rather difficult to fix it. During the unloading of products, you should check whether all parts of the kit have been brought. It is also important to pay attention to the presence of scratches and other damage that may have appeared during transportation.
According to the rules for the transportation of window units, all sashes must be located in frames, and the locking mechanisms must be in the closed position. To prepare the window for installation, you must perform the following steps:
- first you need to remove the sash from the hinges;
- after that, it is necessary to remove the double-glazed window;
- then a sealing tape is glued to the outside;
- at the next stage, the brackets for the mosquito net are fixed;
- holes for anchor bolts are made in the center of the profile.
All the described actions are also performed to prepare the door frame.
It is worth remembering that the sides of the box and the window frame should not have holes. They are fixed with a connecting profile. If you make holes in them, you can break the tightness of the balcony dock.

How is the installation of the balcony block
At the first stage, the balcony block is inserted into the opening. During the described actions, it is necessary to check the correct location of the structure using the building level and plumb line. To install the frame as accurately as possible, it is worth placing wooden blocks under it.

Before fixing it is necessary to drill holes in the wall through the frame. After installation, through the holes made earlier in the profile, it is fixed with anchor bolts. Only after the final fixing of the profile, the sashes and double-glazed windows are installed. Performing such actions is quite simple. To do this, insert the corners and score the middle with a rubber mallet.
At the last stage, the gaps are filled with mounting foam. During such work, it is worth using a special gun. This will allow more accurate work to be done. It is worth remembering that the seams need to be filled about 2-thirds, as the foam will expand.
It is imperative to use foam, as it allows you to completely protect the cracks and prevent the penetration of moisture. After filling the space between the wall and the frame with foam, it must be covered with paint or other protective compounds, since this material is destroyed by sunlight. Complete drying of the foam occurs within a day. Until the end of this period, the sashes should not be opened, as this may affect the position of the window and balcony door.
Dismantling the balcony block is quite simple. To do this, you must first disconnect the double-glazed windows and sashes, and then disconnect the frames by removing the mounting foam from the opening.
The final design of the balcony block
The final step is the installation of window sills and ebbs. The window sill is usually purchased complete with a balcony block. In some cases, it is purchased separately.
The following materials can be used to make a window sill:
- plastic;
- tree;
- a natural stone.
The installation of the window sill takes place in several stages:
- first, the opening is cleaned;
- after that, the laying of wooden bars takes place, on which the window sill will be laid;
- window sill installation;
- cargo installation;
- filling voids under the window sill with mounting foam;
- plug installation.
It is worth remembering that the window sill must be installed strictly in a horizontal position in the longitudinal direction. There should be a slope of about 5 mm towards the room. The installed balcony block should not have stickers, since after heating the product it will be more difficult to remove them from the product.
Ebb is rarely installed, since on the balcony there is rarely a need to remove moisture from under the window. Slopes can be plastered or covered with plastic panels. When doing independent installation work, you must be very careful not to make a mistake.
The whole structure must be well fixed. At the same time, during the closing of the valves, there should be no friction between the structural elements.
A balcony block is a balcony door in one construct with a window overlooking the balcony. Do-it-yourself installation of a balcony block is not technically difficult and saves up to 10% of money and even up to 15% if a standard block is suitable, but has a number of features. We will describe them in the order of production.
Feature 1: helper
At all stages of work, you will need an assistant, and by no means a stunted white hand. The components of the structure, even without glass, are heavy and bulky. It is impossible to bring the delivered solid block into the apartment - it will not go up the stairs; You will need at least 3 walks. Considering that riggers do not charge less than 150 rubles per floor, and bulky assembly units cannot be grabbed by one, lifting them from the entrance to the first floor eats up a good share of the savings.
Installation of a balcony block alone is generally impossible: something will turn out and crash. Perhaps breaking through the glass of the balcony, outside, on passers-by. And in any case, measuring and leveling the mounting surfaces alone at a distance exceeding the span of the hands will not give the required accuracy, and the already paid block cannot be assembled on the spot. Therefore, even before the start of work, agree with an intelligent and strong helper.
Feature 2: what about the old block?
If the balcony is glazed, insulated, and the previous block has not rotted, dried out or cracked, then think carefully: why not leave it in place? Glass can be removed and washed, frames can be removed, old paint can be removed to the tree with a building hair dryer and a metal spatula.
Old wood is not necessarily old trash. Tweak frames, replace fittings, prime, paint or varnish - and an old tree, closed from external influences, can last for a long time. For a habitable balcony, it is easy to arrange an air vent in a wooden door, and put a fan in the window: this will provide heating and heat exchange in the cold season.
But if you are determined to install a new block, then the dismantling of the balcony block of the old one must be carried out to the main wall. After removing the frames, dismantling the window sill with a low tide and dismantling the old box, it will be necessary to knock down the plaster and screed around the entire perimeter of the opening. In the brick walls, grooves for the window sill will certainly be found; they need to be cleaned with a hammer and a chisel or chisel to a brick.
Feature 3: What kind of block do you need?
Types of balcony blocks
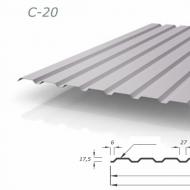
The most common designs of balcony blocks are shown in the figure. The price increases from left to right. For any type of block, only a hinged door, without the possibility of tilting, will reduce the price of the block by 4-7%. But to ventilate an insulated balcony with such a door, you will have to work extra, see below. The purpose of the structures shown is as follows, in order from left to right:
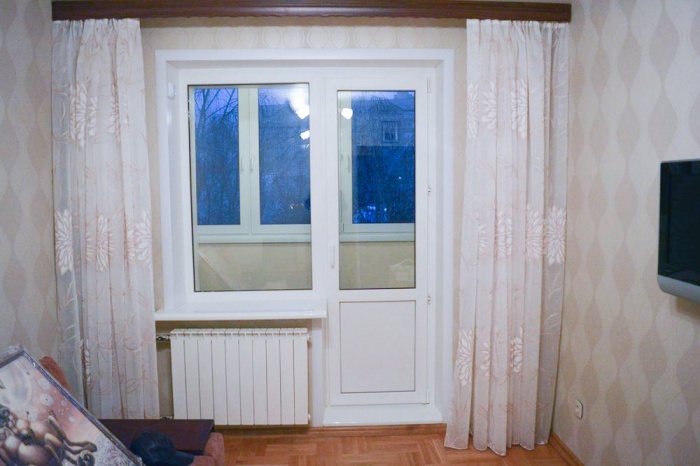
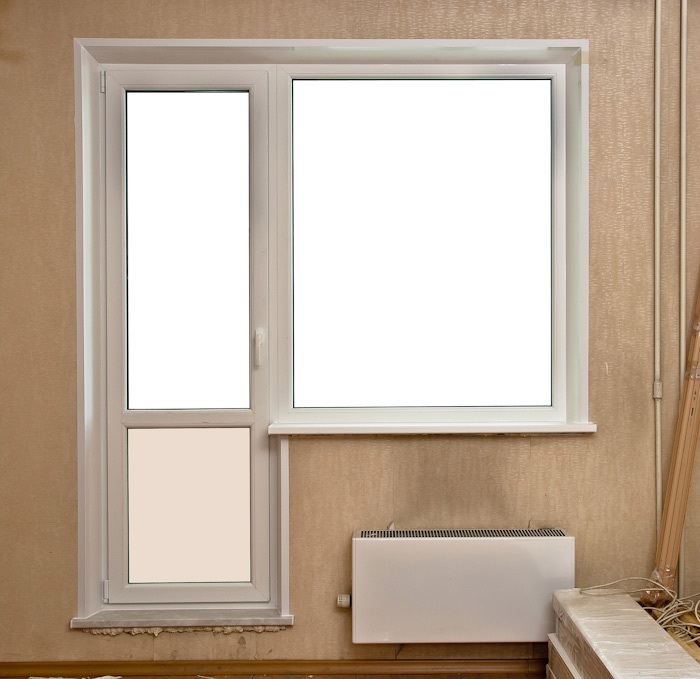
Typical balcony block
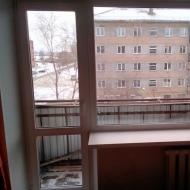
- Typical block. Plastic windows of such blocks are often made with an adjustable ventilation slot, which, in combination with a hinged door, solves the problem of air exchange with an insulated balcony. The bottom panel of the door can be made of glass, which brings such a block closer to a viewing one. In general, it is inexpensive and quite convenient, and therefore a widespread option. How such a block looks “live” can be seen in the figure on the right.
- Block under the insulated balcony. Window - two-section; the section farthest from the door is hinged / folding, the door also. Ventilation of a closed balcony is easy, and suitable for an open balcony, but more expensive.
- "Stalin" bloc- for old houses with small balconies and a narrow balcony door. Balconies in such houses are often dilapidated, glazing with insulation does not withstand, so "Stalin" blocks are not made with blind windows. The waste of material during manufacture is also large: the dimensions are not standard, so that the "Stalin" block with a smaller area is much more expensive than a typical one.
- Overview block- glazing in the entire height of the structure. It is used in new buildings of a class above the average or private houses. Expensive, and absolutely unsuitable for typical high-rise buildings: no one will allow breaking a load-bearing wall to such an extent.
feature 4: material
Here, in fact, there are no special features: PVC. The aluminum profile is more expensive, and when the balcony is closed, your “chic-brilliance-beauty” will not be visible from the outside. And for an open balcony, aluminum is not suitable because of useless thermal insulation. The choice of PVC profile depends not so much on the manufacturer, but on your climatic conditions, if the balcony is open. With an insulated balcony, the choice is clear: the cheapest, for places with a warm, even climate.
Possible option: modern modified tree. It is very expensive, but if the whole room is already finished with wood, the wooden block will organically fit into the interior. In this case, it makes double sense to think: is it not better to repair and renew the old wood?
Feature 5: standard or customized?
Modern glaziers, as a rule, are well aware of the peculiarities of the development of their area and keep at the ready balcony blocks of commonly used sizes. The most common option is a block for houses of the 137th series; in size it is suitable for many other typical buildings. The standard dimensions of a balcony block for 137 houses are shown in the figure.

Standard dimensions of the balcony block
Measure your opening, estimate by eye, or beat off a piece of plaster, stock up to a solid wall. If it fits, you're lucky, it'll be cheaper. You just need to visit the seller, choose the right or left block that you need, and try it on the spot.
Notes:
- When inspecting the selected block, make sure that it is equipped with a dummy profile for the window sill. It is safer to measure the dimensions from the prepared opening, and measure them at the seller's warehouse, taking into account the height of the false profile.
- Anchor plates of balcony blocks are up to 4 mm thick. Therefore, when measuring, you must also take into account a margin of 10 mm around the perimeter of the block.
Feature 6: metering
Let's say you're out of luck and you have to order a balcony block. First of all, ask the seller if they send a measurer for free. Most do, but some require you to place an order first and make some prepayment. Such a manufacturer may be quite conscientious, but, for example, in the outback, where the flow of orders is small, he simply has no other choice, and according to the results of measurements, it may turn out that the order is unfulfillable or an additional payment is needed. In this case, you need to know how to measure the balcony block and the opening under it yourself and, based on the results, agree on the order.
First of all, measurements on a custom-made block are MANDATORY made on a cleared to a solid wall and a prepared opening. All mounting surfaces must be respectively horizontal and vertical and perpendicular to each other; window sill removed. The opening, if necessary, is leveled with a cement-sand mortar. When drawing a sketch / drawing, you need to give a margin for anchors of 10 mm around the perimeter. No more follows, since both the window and the door are firmly fixed only on three sides.

The measurement scheme of the opening for the balcony block is shown in the figure. Sizes shown in red may not be produced; in this case, the manufacturer will make the door “by default”: the upper glazing is at the height of the window glass block, and at the bottom there is a plastic panel. The dummy profile for the window sill must be selected in advance and accurately measured its height.
Notes:
- The widths of the window and door are indicated separately, as in the figure, and not from a common base, as is customary in mechanical engineering.
- For all glazed areas, you need to specify whether they will be hinged, folding, or both. Otherwise, the manufacturer will by default make all the glazing deaf, and the bottom of the door - plastic.
- Check with the manufacturer ahead of time if they can make a door with an adjustable vent slot on the BOTTOM. This, together with the ventilation slot at the top of the window, will solve the problem of air exchange of the insulated balcony.
In the free space of the sketch, you need to indicate the following:
- "The height of the window - taking into account the dummy profile of such and such (indicate the type of profile)."
- "At the top of the window - an adjustable ventilation slot" if required.
- “There is also an adjustable ventilation slot at the bottom of the door,” if they make such doors.
If, instead of a sketch, you decide to draw a drawing of a balcony block in accordance with all building codes and regulations, then, of course, no additional instructions will be required.
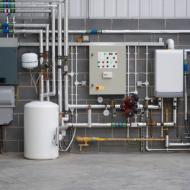
Feature 7: ventilation 
Ventilation scheme for an insulated balcony
In order to maintain at least an “industrial” temperature of at least +14 degrees on an insulated balcony in winter without noticeable additional heating costs, the balcony must have sufficient air exchange with the room. The scheme of such air exchange is shown in the figure. The problem is completely solved by an exhaust fan with a diameter of 110-130 mm, with a capacity of 70-100 l / h and an outlet with a damper at the bottom of the door, but the plastic window slot does a good job if the outside is not lower than -16.
If an old tree remains in the case, we give the glass from the window to the glazier and get it back with round holes of the required size. In the door, from below, with a pen drill, we drill 3-4 rows of holes of 20-30 mm and close them with a decorative mesh.
New plastic is not suitable for making holes, therefore, when installing the block, you need to punch a through groove 200-250x40-60 mm in the door threshold and put a galvanized box with an adjustable damper into it. The damper rod is brought out with stainless steel wire 1-2 mm to the level of the window sill. The box is sealed flush with the threshold.
Feature 8: delivery to the installation site
From the integral construct, brought from the manufacturer, carefully remove the double-glazed windows. To do this, pry off the fixing glazing beads with a thin screwdriver. First of all, we bring glass into the room. A third person is needed here - a watchman, at least a wife: an unforeseen feature in the form of nearby children can affect the integrity of the glass, and it is very difficult to grab one and carry 20-30 kg of glass up the stairs. Frames and sashes also need to be brought in together. In general, the third guards while two are dragging.
Feature 9: Mounting
How to install a balcony block? Not exactly like a regular plastic window! (but it makes sense to study the typical technology for installing plastic windows in advance).
The door and window of the unit are completely adjacent to the wall on only three sides, so there are several features here:
- When buying / ordering, we select a block with thicker anchors, at least 2 mm. "Zero" tin anchor plates are not suitable.
- The door frame, in addition to anchors and wedges, is reinforced with self-tapping screws with press washers 6-8 mm, which enter the wall by at least 60 mm. Under them, you need to mark the holes in advance, first in the frame, and through them on the wall, and drive the dowels there. Location of holes: a pair 200 mm from each corner and two along the long (high) side of the door at an equal distance in height.
- Wedges for leveling need to be taken in pairs, for the floor, and plastic: they slide more easily, besides, the tree dries out over time and stops holding.
- After landing on the anchors, we align the frame of the block with wedges from above and from the sides; we knock the wedges with a hammer through a screwdriver or a steel bar and leave them in place (see the figure below).

Leveling with twin wedges
- After alignment, we apply frames without double-glazed windows to the places, check for fit and skew.
- We fix the door frame with self-tapping screws.
- We hang frames, install fittings, mount mechanisms, check their work.
- We insert double-glazed windows, fix with glazing beads.
Note: hammer the glazing beads with a RUBBER hammer. The usual one with a rubber spacer on scotch tape will either not drive in, or there is a high risk of breaking the glass, especially a large window package.
Feature 10: window sill
Installation of the balcony block is completed with the installation of a window sill; low tide on the insulated balcony will only interfere. Balcony blocks are not equipped with window sill boards, they must be purchased separately. The width of the window sill must be chosen so that it closes the heating radiator no more than a third in width from the wall, otherwise the circulation of warm air will be difficult.
We cut the window sill to size; if the wall is brick - taking into account the depth of the grooves. Then we close up the sidewalls with decorative overlays and insert them into the groove of the false profile. The window sill should lie tightly on the bottom shelf of the profile groove. To do this, we temporarily press it on top with pieces of foam.
You can read more about installing different types of window sills here.
Next, align the window sill horizontally in the transverse direction, also with foam placed on the bottom of the board. From below we put props from cut-to-size rails, and we impose heavier oppression on the window sill. This is necessary so that the board does not warp when foaming.
In conclusion, we foam the groove of the backing profile. After the foam hardens by foaming, a gap along the perimeter of the entire block. The work on the installation of the actual balcony block is completed.
Without features
Finishing the slopes of the opening, lining the quarters, finishing the balcony and the room are done in the usual way.
A balcony block is a balcony door in one construct with a window overlooking the balcony. Do-it-yourself installation of a balcony block is not technically difficult and saves up to 10% of money and even up to 15% if a standard block is suitable, but has a number of features. We will describe them in the order of production.
Feature 1: helper
At all stages of work, you will need an assistant, and by no means a stunted white hand. The components of the structure, even without glass, are heavy and bulky. It is impossible to bring the delivered solid block into the apartment - it will not go up the stairs; You will need at least 3 walks. Considering that riggers do not charge less than 150 rubles per floor, and bulky assembly units cannot be grabbed by one, lifting them from the entrance to the first floor eats up a good share of the savings.
Installation of a balcony block alone is generally impossible: something will turn out and crash. Perhaps breaking through the glass of the balcony, outside, on passers-by. And in any case, measuring and leveling the mounting surfaces alone at a distance exceeding the span of the hands will not give the required accuracy, and the already paid block cannot be assembled on the spot. Therefore, even before the start of work, agree with an intelligent and strong helper.
Feature 2: what about the old block?
If the balcony is glazed, insulated, and the previous block has not rotted, dried out or cracked, then think carefully: why not leave it in place? Glass can be removed and washed, frames can be removed, old paint can be removed to the tree with a building hair dryer and a metal spatula.
Old wood is not necessarily old trash. Tweak frames, replace fittings, prime, paint or varnish - and an old tree, closed from external influences, can last for a long time. For a habitable balcony, it is easy to arrange an air vent in a wooden door, and put a fan in the window: this will provide heating and heat exchange in the cold season.
But if you are determined to install a new block, then the dismantling of the balcony block of the old one must be carried out to the main wall. After removing the frames, dismantling the window sill with a low tide and dismantling the old box, it will be necessary to knock down the plaster and screed around the entire perimeter of the opening. In the brick walls, grooves for the window sill will certainly be found; they need to be cleaned with a hammer and a chisel or chisel to a brick.
Feature 3: What kind of block do you need?

Types of balcony blocks
The most common designs of balcony blocks are shown in the figure. The price increases from left to right. For any type of block, only a hinged door, without the possibility of tilting, will reduce the price of the block by 4-7%. But to ventilate an insulated balcony with such a door, you will have to work extra, see below. The purpose of the structures shown is as follows, in order from left to right:

Typical balcony block
- Typical block. Plastic windows of such blocks are often made with an adjustable ventilation slot, which, in combination with a hinged door, solves the problem of air exchange with an insulated balcony. The bottom panel of the door can be made of glass, which brings such a block closer to a viewing one. In general, it is inexpensive and quite convenient, and therefore a widespread option. How such a block looks “live” can be seen in the figure on the right.
- Block under the insulated balcony. Window - two-section; the section farthest from the door is hinged / folding, the door also. Ventilation of a closed balcony is easy, and suitable for an open balcony, but more expensive.
- "Stalin" bloc- for old houses with small balconies and a narrow balcony door. Balconies in such houses are often dilapidated, glazing with insulation does not withstand, so "Stalin" blocks are not made with blind windows. The waste of material during manufacture is also large: the dimensions are not standard, so that the "Stalin" block with a smaller area is much more expensive than a typical one.
- Overview block- glazing in the entire height of the structure. It is used in new buildings of a class above the average or private houses. Expensive, and absolutely unsuitable for typical high-rise buildings: no one will allow breaking a load-bearing wall to such an extent.
feature 4: material
Here, in fact, there are no special features: PVC. The aluminum profile is more expensive, and when the balcony is closed, your “chic-brilliance-beauty” will not be visible from the outside. And for an open balcony, aluminum is not suitable because of useless thermal insulation. The choice of PVC profile depends not so much on the manufacturer, but on your climatic conditions, if the balcony is open. With an insulated balcony, the choice is clear: the cheapest, for places with a warm, even climate.
Possible option: modern modified tree. It is very expensive, but if the whole room is already finished with wood, the wooden block will organically fit into the interior. In this case, it makes double sense to think: is it not better to repair and renew the old wood?
Feature 5: standard or customized?
Modern glaziers, as a rule, are well aware of the peculiarities of the development of their area and keep at the ready balcony blocks of commonly used sizes. The most common option is a block for houses of the 137th series; in size it is suitable for many other typical buildings. The standard dimensions of a balcony block for 137 houses are shown in the figure.

Standard dimensions of the balcony block
Measure your opening, estimate by eye, or beat off a piece of plaster, stock up to a solid wall. If it fits, you're lucky, it'll be cheaper. You just need to visit the seller, choose the right or left block that you need, and try it on the spot.
Notes:
- When inspecting the selected block, make sure that it is equipped with a dummy profile for the window sill. It is safer to measure the dimensions from the prepared opening, and measure them at the seller's warehouse, taking into account the height of the false profile.
- Anchor plates of balcony blocks are up to 4 mm thick. Therefore, when measuring, you must also take into account a margin of 10 mm around the perimeter of the block.
Feature 6: metering
Let's say you're out of luck and you have to order a balcony block. First of all, ask the seller if they send a measurer for free. Most do, but some require you to place an order first and make some prepayment. Such a manufacturer may be quite conscientious, but, for example, in the outback, where the flow of orders is small, he simply has no other choice, and according to the results of measurements, it may turn out that the order is unfulfillable or an additional payment is needed. In this case, you need to know how to measure the balcony block and the opening under it yourself and, based on the results, agree on the order.
First of all, measurements on a custom-made block are MANDATORY made on a cleared to a solid wall and a prepared opening. All mounting surfaces must be respectively horizontal and vertical and perpendicular to each other; window sill removed. The opening, if necessary, is leveled with a cement-sand mortar. When drawing a sketch / drawing, you need to give a margin for anchors of 10 mm around the perimeter. No more follows, since both the window and the door are firmly fixed only on three sides.

The measurement scheme of the opening for the balcony block is shown in the figure. Sizes shown in red may not be produced; in this case, the manufacturer will make the door “by default”: the upper glazing is at the height of the window glass block, and at the bottom there is a plastic panel. The dummy profile for the window sill must be selected in advance and accurately measured its height.
Notes:
- The widths of the window and door are indicated separately, as in the figure, and not from a common base, as is customary in mechanical engineering.
- For all glazed areas, you need to specify whether they will be hinged, folding, or both. Otherwise, the manufacturer will by default make all the glazing deaf, and the bottom of the door - plastic.
- Check with the manufacturer ahead of time if they can make a door with an adjustable vent slot on the BOTTOM. This, together with the ventilation slot at the top of the window, will solve the problem of air exchange of the insulated balcony.
In the free space of the sketch, you need to indicate the following:
- "The height of the window - taking into account the dummy profile of such and such (indicate the type of profile)."
- "At the top of the window - an adjustable ventilation slot" if required.
- “There is also an adjustable ventilation slot at the bottom of the door,” if they make such doors.
If, instead of a sketch, you decide to draw a drawing of a balcony block in accordance with all building codes and regulations, then, of course, no additional instructions will be required.
Feature 7: ventilation

Ventilation scheme for an insulated balcony
In order to maintain at least an “industrial” temperature of at least +14 degrees on an insulated balcony in winter without noticeable additional heating costs, the balcony must have sufficient air exchange with the room. The scheme of such air exchange is shown in the figure. The problem is completely solved by an exhaust fan with a diameter of 110-130 mm, with a capacity of 70-100 l / h and an outlet with a damper at the bottom of the door, but the plastic window slot does a good job if the outside is not lower than -16.
If an old tree remains in the case, we give the glass from the window to the glazier and get it back with round holes of the required size. In the door, from below, with a pen drill, we drill 3-4 rows of holes of 20-30 mm and close them with a decorative mesh.
New plastic is not suitable for making holes, therefore, when installing the block, you need to punch a through groove 200-250x40-60 mm in the door threshold and put a galvanized box with an adjustable damper into it. The damper rod is brought out with stainless steel wire 1-2 mm to the level of the window sill. The box is sealed flush with the threshold.
Feature 8: delivery to the installation site
From the integral construct, brought from the manufacturer, carefully remove the double-glazed windows. To do this, pry off the fixing glazing beads with a thin screwdriver. First of all, we bring glass into the room. A third person is needed here - a watchman, at least a wife: an unforeseen feature in the form of nearby children can affect the integrity of the glass, and it is very difficult to grab one and carry 20-30 kg of glass up the stairs. Frames and sashes also need to be brought in together. In general, the third guards while two are dragging.
Feature 9: Mounting
How to install a balcony block? Not exactly like a regular plastic window! (but the very typical technology for installing plastic windows makes sense).
The door and window of the unit are completely adjacent to the wall on only three sides, so there are several features here:
- When buying / ordering, we select a block with thicker anchors, at least 2 mm. "Zero" tin anchor plates are not suitable.
- The door frame, in addition to anchors and wedges, is reinforced with self-tapping screws with press washers 6-8 mm, which enter the wall by at least 60 mm. Under them, you need to mark the holes in advance, first in the frame, and through them on the wall, and drive the dowels there. Location of holes: a pair 200 mm from each corner and two along the long (high) side of the door at an equal distance in height.
- Wedges for leveling need to be taken in pairs, for the floor, and plastic: they slide more easily, besides, the tree dries out over time and stops holding.
- After landing on the anchors, we align the frame of the block with wedges from above and from the sides; we knock the wedges with a hammer through a screwdriver or a steel bar and leave them in place (see the figure below).

Leveling with twin wedges
- After alignment, we apply frames without double-glazed windows to the places, check for fit and skew.
- We fix the door frame with self-tapping screws.
- We hang frames, install fittings, mount mechanisms, check their work.
- We insert double-glazed windows, fix with glazing beads.
Note: hammer the glazing beads with a RUBBER hammer. The usual one with a rubber spacer on scotch tape will either not drive in, or there is a high risk of breaking the glass, especially a large window package.
Feature 10: window sill
Installation of the balcony block is completed with the installation of a window sill; low tide on the insulated balcony will only interfere. Balcony blocks are not equipped with window sill boards, they must be purchased separately. The width of the window sill must be chosen so that it closes the heating radiator no more than a third in width from the wall, otherwise the circulation of warm air will be difficult.
We cut the window sill to size; if the wall is brick - taking into account the depth of the grooves. Then we close up the sidewalls with decorative overlays and insert them into the groove of the false profile. The window sill should lie tightly on the bottom shelf of the profile groove. To do this, we temporarily press it on top with pieces of foam.
You can learn more about installing various types of window sills.
Next, align the window sill horizontally in the transverse direction, also with foam placed on the bottom of the board. From below we put props from cut-to-size rails, and we impose heavier oppression on the window sill. This is necessary so that the board does not warp when foaming.
In most cases, after buying an inexpensive apartment without repair, the first step in ennobling the interior space of the purchased housing is the installation of modern energy-saving doors and windows throughout the apartment, including on the balcony. This article will discuss how you can install a balcony block, following a certain sequence of work and some nuances.
What is a balcony block? In simple words, this is a window and a door, connected into one and installed in the opening of a load-bearing wall (they share a room and a balcony).
Materials and features of balcony blocks
The most suitable material from which they are made is a metal-plastic profile (it is also called PVC). As for installation options, as a rule, there can be three of them:
- the door is on the left, and the window is on the right;
- vice versa;
- or the door in the middle, and on the right and left one window each.
Depending on the application of fittings, windows are:
- deaf;
- rotary;
- swivel and tilt at the same time.
The door can be either only pivoting, or pivoting and folding at the same time (the second option is used in the case of using blind windows).
When purchasing a complete balcony block, you need to make sure that all the components included in its kit are available. These include:
- windowsill;
- threshold;
And, of course, accessories.

Installation of a balcony block: preparation
1. It’s worth starting from the preparation of the place necessary for dismantling and installation work. To do this, they remove everything that can be taken out, and the rest is covered with a film to protect it from dust and construction debris.
Read also: Bamboo wallpaper: properties, pros and cons, choice of glue, gluing
2. Then remove the moving parts of windows and doors.
3. In order to remove the wooden door frame installed in the opening, it must be cut at the bottom with a hacksaw or use a grinder with a circle on wood, and then pry the cut part of the structure up with a crowbar.
 4. All slopes are knocked down with a puncher, after which the remains of the door frame and the window frame are dismantled in turn.
5. In conclusion, it is necessary to clean the surface of the opening from everything unnecessary (it can be an old sealant or hardened pieces of mounting foam, etc.).
In the case of dismantling the old PVC balcony block, first remove the doors and double-glazed windows from the windows, and then remove all the fasteners.
Upon completion of all preparatory work, the opening must be completely freed from finishing.

How to install a balcony block?
The first thing to start with work related to the installation of a balcony block is, of course, the assembly of its components into one. To do this, the frame of the window and doors is placed on a flat surface and connected to each other by means of a metal strip and screws specially designed for this. To do this, pre-prepare the holes into which the screws will be screwed. The distance between them should be approximately 30 cm. It is important that the upper parts of the window and door frames are in line, and their side parts are close to each other. Thus form a balcony block in one piece.
Advice: before performing connecting work, it is necessary to free the window and door frames from all removable parts.
 Immediately before installation, mounting plates are attached to the top and sides of the balcony block using metal screws. During the execution of this stage of work, it is necessary to observe the following nuances:
Read also: Kitchen renovation: types, features, main stages
- the distance from the corners of the assembled structure to the nearest mounting plate should be 15 cm;
- intermediate plates should be at a distance of 50 to 70 cm from each other or from plates located near the corners of the balcony block structure;
- screws for fixing the plates should be fixed strictly in the middle of the width of the PVC profile.
 On the opposite side of the apartment, a special sealing tape is glued around the entire perimeter of the balcony block (it is abbreviated as PSUL). The main purpose of this building material is to create a reliable protective coating that prevents the penetration of moisture and ultraviolet rays into the composition of the mounting foam used to seal the empty space between the balcony block and the wall.
At this stage, you can install the brackets for the mosquito net. To do this, it is applied to the turning part of the window from the outside, marks are made and set aside, after which the brackets are twisted in the designated places.

Installation work
The whole point of a proper installation is to do the following:
1) all horizontal and vertical parts of the balcony block are installed strictly according to the level, using linings and small wedges of various sizes, placing them between the frame of the block and the wall;
2) bend each pre-installed plate closer to the wall surface, while observing all measures aimed at maintaining the safety of the verified position of the balcony block in space;
3) holes with a depth of approximately 80 mm are drilled through the holes of each plate in the wall;
 4) then, using a hammer, dowels are hammered into each hole and screws are screwed into them, thus fixing the balcony block to the wall;
5) after that, an ebb is installed, cutting off its excess part with metal scissors and fixing it to the included profile with screws;
Replacing a balcony block is easy enough even for a person with no experience Balcony is a great place to relax or store the right things. However, it can fully fulfill all its functions, be warm and comfortable only when it has a high-quality balcony block. The balcony block consists of a window and a door. It is located between the space of the room and the balcony. In most cases, the two components of the block are tightly interconnected into a single whole: the window can be located to the right or left of the door. Installing a balcony block is within the power of every person. In this case, it is not necessary to call for the help of a professional, for whom you will need to spend a significant amount of money.
When is the old structure replaced?
When deciding to replace an old balcony block, you need to think through everything well in advance: is there really a great need for this. If there is a window and door frame made of wood such as larch or oak, the quality of the material should be assessed. Very often it has a long service life and, with good waterproofing, can serve its owner for many years.
If the balcony block perfectly withstands temperature fluctuations, does not grow moldy and does not fall apart, it will be enough just to get rid of the old paint and cover it with a new one.

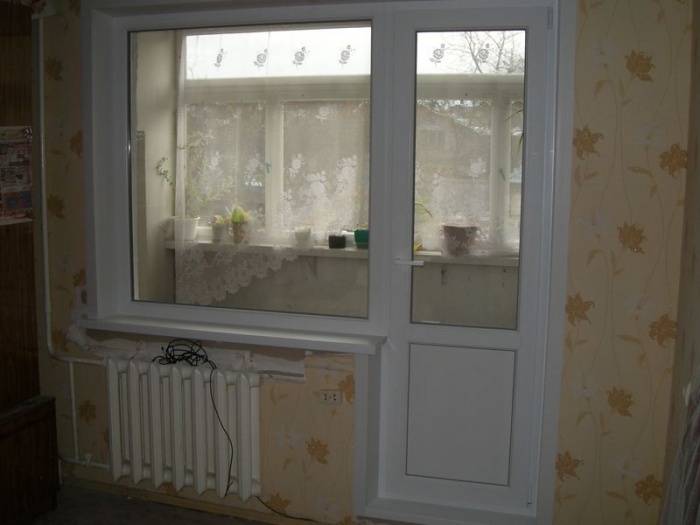
As a rule, a balcony block is a single structure
In the event that the condition of the entire frame is far from satisfactory, you will have to dismantle it and think about purchasing another one.
Plastic balcony blocks
Today, plastic is considered the most popular material. Compared to natural wood.
It has a large number of positive properties:
- plastic profiles can serve their owner for more than 30 years;
- have excellent soundproofing properties;
- do not allow dust to enter the room;
- such a balcony block perfectly retains heat in the apartment, without releasing it to the balcony;
- do not change their appearance;
- do not require special care;
- are completely safe for children and animals;
- in stores you can choose any plastic designs that are suitable for classic and non-traditional rooms;
- plastic doors and windows have various ventilation functions, which increases the convenience of their use;
- a large selection of colors that can fit the design of any apartment or private house;
- plastic structures are relatively inexpensive (compared to wooden counterparts);
- simple installation, which requires only to be attentive and listen to the recommendations of specialists.
Related article: Odnushka with classic traditions

With a small room size, you can install a balcony block with the door opening outwards
Among the shortcomings of plastic balcony blocks, it can only be noted that the material from which they are made is not environmentally friendly enough. Under the influence of high temperatures, it is able to release a large amount of substances harmful to the body, so it is not recommended to mount them on the sunny side of the building.
Modern models of balcony blocks
The main difference between them is what functions plastic doors have.

The room will be brighter when installing a sliding door
Modern manufacturers offer three of its models:
- rotary– can only be opened in three positions;
- sliding- has a lot of advantages. The main one is saving living space;
- swing-out- has five positions for opening, equipped with micro-ventilation and the ability to open in different directions.
Design
Today, there are a fairly large number of described structures installed between the balcony and the apartment. To choose the option that suits you, you should know the features of each of them.

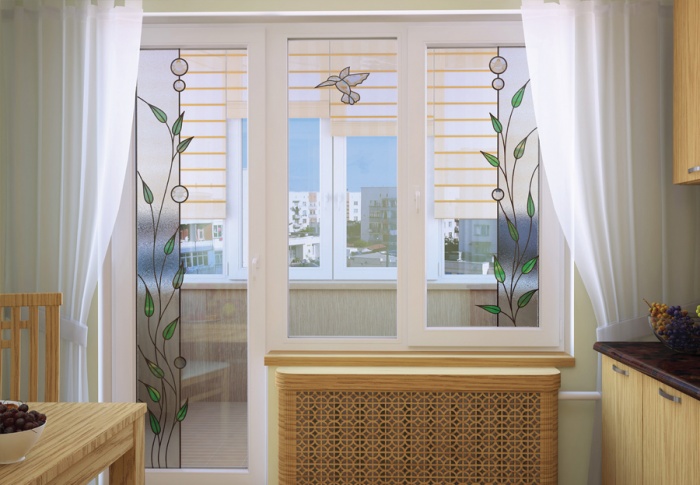
Wooden balcony block

Plastic balcony block
Features of different block models:
- Classic. The traditional model is a transparent window and a door consisting of two parts: an opaque bottom and a glass top. It perfectly retains heat in the room and provides access to the required amount of sunlight.
- French style. Completely transparent components are installed in cases where the owner wants to show all the beauty of the loggia. Thanks to durable glass, they are safe for all family members and at the same time make the room as bright as possible.
- Maximum light. Balcony block made entirely of glass, the dimensions of which occupy the entire height of the room. In addition, it is equipped with a sliding system - this is an excellent and newest version of the unit. Its installation differs from all other models only in that before installing it, you need to remove the batteries from the wall, which will interfere with the opening of plastic doors. They are placed on the adjacent wall in order to prevent freezing of the entire structure in cold weather.
Related article: How to make a fashionable chandelier with "bubbles" with your own hands?
How to choose the right size?
After the balcony block you like has been selected, you need to determine the correct dimensions for it.
The manufacturer of the design you like can provide a specialist who, for a fee, will take all the measurements and transfer them to the immediately made drawing.
If you are going to independently calculate the required block sizes, then all actions must be performed carefully, carefully and slowly. It will really be possible to do this for sure only if you first clean the surfaces of all the walls to which the future structure will adjoin.
When preparing a balcony block for measurement, it is worth getting rid of the old window sill, because otherwise it will not be possible to measure the exact dimensions of the block.
We take a blank sheet of paper and make a drawing on it separately for windows and separately for doors. At the same time, do not forget to leave 1 cm on each side for anchors. The figure indicates not only the dimensions, but also with the help of arrows mark the directions for opening doors and windows (in the event that it will have such a function).

Modern balcony blocks have a wide choice of configuration and material of manufacture.
On the side of the drawing, indicate all the questions you are interested in that you can ask the seller: mounting and dimensions of the window sill, installation of the threshold, installation of air valves that will prevent condensation on the windows.
Required Tools
In order to mount the balcony block yourself, you need to prepare a working tool.
You may need:
- drill;
- perforator;
- hacksaw for metal and wood;
- screwdriver;
- anchor bolts;
- electric jigsaw;
- hammer;
- rubber mallet;
- level;
- roulette;
- pencil;
- construction knife.
The sequence of installation of the balcony block
It is better to install a balcony block in stages:
- Dismantle the old door and window that are in the gap between the apartment and the balcony.
- Align all surfaces and slopes (use a level for accuracy).
- Check the dimensions of the opening and the structure to be mounted.
- Install the balcony block and level it using wooden wedges. It should stand symmetrically with respect to all walls, ceiling and floor.
- Drill holes through the plastic profiles in the wall and place anchor bolts in them. This will secure the door frame and window frame.
- Using mounting foam, all cracks must be blown out to provide the necessary sound insulation in the room.
- Replace plastic doors and windows.
- A plastic window sill is laid on small wooden slats, fixed and all the cracks are blown out with mounting foam.
- Plaster slopes, cover them with paint.
- Remove protective film from windows and other surfaces.
Related Articles