A simple oven with a stove bench with your own hands. A stove with a stove bench - what are all stove-makers silent about ?! Type and scheme of masonry Swedes with a stove bench
How to fold a Russian stove with a stove bench, what scheme and materials will be required for this? This design is ideal for a country or country house, it provides a place for comfortable rest, cooking, heating the house. For independent masonry, special ordering drawings, furnace ceramic bricks are used.
Collapse
Furnace device
The device of the Russian stove with a stove bench
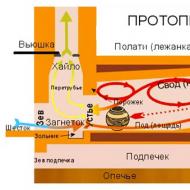
The dimensions of the Russian stove with a stove bench can be different, most often it is 1.5 * 2 meters, which is optimal for any room. The level of the bed should be at a height of about 1.8 meters, the hearth - 45 centimeters. The design will include the following elements of the device:
- a crucible for laying firewood;
- couch;
- vault for the crucible;
- a six for utensils;
- the surface of the crucible (underneath);
- hail to release smoke into the room (if necessary);
- overtube (the place where the gas duct is blocked to remove combustion products);
- samovar into which the pipe of the samovar is inserted.

Principle of operation
Approximate dimensions of a classic Russian stove with a stove bench:
- length - 150 cm;
- width - 125 cm;
- height - 208 cm.
These dimensions are enough to heat a room of 30 square meters. It is recommended to put the structure in the center or in the corner, not far from the entrance.
Materials and their quantity
To work, you will need the following materials:
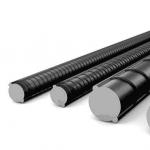
- ceramic brick (chamotte, refractory furnace);
- clay, sifted sand, water for masonry mortar;
- grate grates with dimensions 120*140, 180*250 mm, 2 pcs.;
- firebox doors 280*270, 210*250 mm, 2 pcs.;
- blew doors 130*140, 140*270 mm, 2 pcs.;
- cleaning doors 130*140 mm, 4 pcs.;
- plate 300*250 mm;
- smoke damper 130*250 mm;
- ventilation valve 130*140 mm;
- oven damper, 400*420 mm;
- hot water box 500*340*185 mm;
- steel strip 850*40*10 mm, 500*40*10 mm, 2 pcs. each kind;
- corner 1200 mm 25*25*3 mm;
- bars 25*25*3 mm;
- burnt wire 6 mm, total 10 m;
- fasteners (washers, nuts);
- 2 pre-furnace metal sheets 500 * 700 mm (roofing iron is used);
- asbestos cord.
For a small-sized construction with a stove bench, 1500 bricks, 0.8 cubic meters, will take. solution. For a standard medium oven with a stove bench, you will have to spend 2100 brick blocks, you need to take 1.1 cubic meters of mortar. Large construction required already 2500 bricks, 1.35 cubic meters. solution.
List of tools
A modern Russian stove with a stove bench requires the use of such tools:
- trowel;
- hammer-pick;
- jointing for processing seams (if decorative plastering or tiles are not used in the future);
- level;
- plumb;
- order;
- rule;
- solution container;
- scapula;
- plank.
Solution preparation
For masonry, a clay mortar of a normal type is required, which has good plasticity and does not crack. A lean solution is not suitable, as it crumbles a lot, and a greasy one cracks when it dries.
The composition of the masonry clay mortar will be as follows:
- oily clay, very carefully sifted - 3 parts;
- river sand, also sifted, pre-calcined - 3-5 parts;
- clean water for mixing - 1 part.
After kneading, it is necessary to obtain a thick, viscous, greasy solution, but it should not be soft and fluid.
For cooking, various methods are used, the most optimal is soaking the clay, followed by the addition of water. When calculating the volume of mortar, it should be taken into account that when laying 50 bricks with a seam thickness of no more than 3-5 mm, approximately 20 liters of mortar are used, but experts recommend increasing this amount by 15%. The proportions of the clay mixture are 1 part sand to 2 parts clay.
When, when kneading, the solution becomes similar in consistency to sour cream, it can be used for work. If traces of water appear on the surface of the mixture, a small amount of sand must be added. To increase strength, you can use ordinary salt at the rate of 100-250 grams of salt per bucket of mixture. When laying the chimney, cement must be added to the solution at the rate of 750 grams per bucket of the mixture.
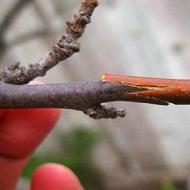
Brick selection
Do not use standard refractory bricks, as they are not suitable for laying furnaces.
For the firebox, the material is selected based on the following parameters:
- only fireclay bricks SHA-8, SHB-8 are suitable;
- block dimensions 230*123*65 mm, 230*113*65 mm;
- the strength grade should be M100-250 or M500, but in the latter case the cost will be much higher;
- the brick should not crumble, a ringing sound is heard upon impact;
- the edges of the block are smooth, sharp, no chips or cracks.

fireclay brick
And for laying a Russian stove with a stove bench, ceramic bricks are used, which must meet the following requirements:
- dimensions of one block 250*120*65 mm;
- strength grade M125, M150;
- color - straw uniform or with brownish patches, saturated red-orange;
- when struck, a metallic ringing sound is heard;
- no cracks, chips.

Ceramic solid brick
You can use a simple formula to find out how much brick is needed to implement a Russian stove project with a stove bench:
- the number of sides for the solid 1st row will be determined;
- the resulting value is multiplied by the number of rows (the height of one row is standard 70 mm);
- 1/3 of the value obtained is subtracted from the result obtained.
When calculating, it is necessary to take into account the percentage of marriage, material that can be damaged during operation (10-15%).
Foundation manufacturing
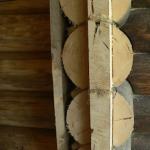
To build a Russian brick oven with a bench, you should prepare the foundation. The weight of the structure will be quite large, so you will need a massive base with a carefully calibrated horizontal surface. It is better to do this at the stage of building a house, when a common foundation is being laid.
The base for the furnace is made in the form of a monolithic concrete slab, but not communicating with the foundation of the house. A hole up to 30 cm deep is dug in the selected area, its contours must be larger than the dimensions of the base of the future furnace. A layer of sifted sand is poured at the bottom of the prepared pit, formwork is placed.
The height of the formwork above the ground level is 10-15 cm. Then the formwork is poured with concrete mortar, after drying, the surface is covered with a layer of coating waterproofing. Between the base for the furnace and the common foundation, a 1 cm expansion joint should remain, which is covered with sand.

Foundation scheme
The Russian stove with a stove bench begins to be mounted only after the concrete has completely dried. Brick before work should also be prepared, it is enough to soak it in a bucket or trough with water.
ordering
The laying of a Russian stove with a stove bench is carried out strictly according to the scheme, the brick is first placed on a dry one, so that you can draw the contours of the future structure, clarify the location of the brick.
A detailed diagram of a Russian stove with a stove bench:

Ordering a classic Russian stove with a stove bench (32 rows)
The drawing indicates detailed masonry for each row, the location of bricks, doors, gratings and other elements. When working, you should strictly adhere to the chosen scheme, which allows you to quickly assemble a strong, reliable furnace with your own hands.
The construction of a Russian stove with a stove bench ends with a chimney (rows 23-32).
It is mandatory to install a hydro- and heat-insulating layer when the chimney exits through the roof / ceiling, which helps prevent overheating of the surrounding structures and ensure the fire safety of the building. A spark arrester can be installed above the pipe, which will protect the roofing material from fire.
Drying
After the Russian stove with a do-it-yourself stove bench is finished, the structure should be dried. This is the most difficult stage, requiring attention and compliance with the conditions for preparing the structure for commissioning.
After finishing work, you should wait for the solution to dry, then light a small fire on the grate, heat it for one and a half to two hours. The appearance of smoke indicates the airing of the chimney. You can remove the cork by kindling a very small fire from the chips on the view.
The procedure is carried out in the evenings. at least a week when wet stripes disappear on the brickwork and the walls of the structure become uniform in color, the preliminary combustion can be stopped. With further operation, microcracks may appear, which must be slightly expanded with a sharp knife and covered with clay mortar.
You can start decorating after the mortar has dried. At first, it should be heated carefully, the logs should be laid out near the mouth, and then pushed into the crucible with the help of a poker. Raw firewood must first be dried, a large amount of fuel is not recommended.
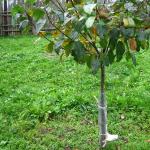
Examples of finished structures in the photo:


Conclusion
A Russian stove with a stove bench in the house will help create a comfortable and convenient corner. Making a Russian stove with a stove bench takes some time, but with strict adherence to technology and the right choice of materials, this is easy to do.
←Previous article Next article →The stove with a bench in its unique combination of space heating and cooking will give an extraordinary spirit of Russian traditions. The stove runs on wood, it is often installed in country houses and cottages.
According to its design, a stove with a stove bench is mainly of several types: traditional Russian, a heating stove, Kuznetsov's stove. In the structure of all these models, the following elements are distinguished:
- couch;
- oven for heating;
- hob;
- oven;
- ash pan;
- woodcutter;
- place for kitchen utensils.
Formation process
This design can be done with your own hands, using the prepared drawings. The material used is high grade. All drawings and diagrams are made in advance. After completing the order, you can determine the required number of bricks. How to develop a plan for the construction of the stove - we suggest watching in the video presented.
Foundation and foundation
The mortar mix can be bought ready-made in bags or kneaded with cement, sand and clay with your own hands. According to the design, pre-purchase

Like all furnaces, the unit requires a separate one, because total weight reaches 10 tons. You can do it yourself by calculating the depth of the pit, provided that every 5 cm corresponds to 1 ton of weight, and the area of the foundation should be 15 percent larger than the base of the furnace. A layer of sand is poured at the bottom of the pit, it is rammed, covered with rubble, reinforcement is installed and concrete is poured below the floor level. The hardening of the foundation requires at least two weeks after which waterproofing is done to prevent moisture from entering the furnace. A good example of creating a foundation in the video instruction.
 Based on the developed order, the base of the stove is first laid out. It should be from several rows of bricks, horizontally aligned, with right angles. Distance from masonry to wall should be at least 15 cm. In the next row, a blower and air ducts are laid.
Read also: Miracle wood-fired oven
Basic structural elements
 Due to the serpentine winding air duct, the air heated in the furnace rises, passes through the entire body of the furnace and heats the stove bench. On eighth to ninth row make an overlap on the stove bench and firebox. Then the rows for the oven and hob are reported, as well as the row separating the hob from the wall. After that, jumpers are laid out. Above the oven, simple or figured masonry (arch, wedge) is used, and metal corners are used above the casing of the stove, a decorative shelf is made.
Next rows combine all chimneys into one, and windows are made on the walls, next to the oven - a “letnik” to maintain combustion in the warm season, and located above - for stronger heating of the room in the cold season. The pipe is laid out higher, has a square section, the best masonry size 2.5 bricks. The ceilings through which the chimney passes are insulated with basalt slabs in several layers.
Shutdown
The outer part of the chimney is best laid out from silicate brick, it is more resistant to temperature fluctuations and precipitation. After the chimney is built, all cast iron and other fittings are installed. For the accuracy of work, each layer of brick is compared with the ordering drawings, which can be hung near the construction site. An example of creating a simple oven with a stove bench is shown in the video.
Russian stoves came to the living user from the depths of centuries. Modern interpretations are somewhat different from the old ones, but in general they repeat all the architectural and functional aspects. The effectiveness of the structure with a stove bench and a cooking stove is beyond doubt. The only question is whether to make such a project or order drawings of the project (as well as masonry and trial run) to specialists.
Before delving into the topic, you should understand the definition.
- Until now, such a term as ordering is in use:
- and the masonry itself (the brick is laid out layer by layer horizontally, with a detailed receipt for the placement of the rigging elements);
- and the type of furnace design (stove-ordering, in which each layer is associated with the placement of an element).
In general terms, a Russian stove is understood to be endowed with the following features: 
- massiveness and scope (as a rule, the design takes at least ¼ of the hut, and sometimes half);
- the presence of beds (they are also called a couch - a place where people go to sleep or when they feel unwell to warm up);

- compatibility of the heating base with a stove for cooking;
- wood is mainly used for heating.
In old models, it was customary to use the firebox itself for cooking, surrounded by red-hot wood firebrands (refractory food containers with porridge or stew with a “horned” grip were placed inside the firebox, where they languished for several hours).
To date, there are those in which it is allowed to use coke coal in the furnace. It gives more heat than ordinary wood, but coal dust is a big problem. At the same time, a horizontal stove is used in cooking, and the “languishing” effect has to be abandoned.
Such heating structures are relevant for Russia, the eastern regions of Ukraine, as well as the northern regions of Belarus. If you are interested in a scheme or masonry, there is practically no information in Western European sources.The dimensions of some models reach 1.5-2 m in length and / or width. In height (we do not take into account the chimney) more than 1.2-1.5 meters. It is probably hard to believe, but the most gigantic furnaces reached such dimensions that it was quite possible for a person to wash inside them. In modern conditions, such projects are, of course, not in demand.
The device of the Russian stove

- The main elements without which the device of the Russian stove is unthinkable:
- foundation (guardianship);
- cooking chamber, it is also a firebox, also called a crucible or a firebox. Located under the bed. The air for burning firewood enters through the throat, and after heating it goes to the overtube, after which it goes to the chimney for removal to the street;
- cheeks - the front wall of the furnace;
- mouth - the gap between the cheeks of the firebox for communicating the firebox with the chimney and the heated room;
- vault - the topmost layer of the firebox. During operation, it undergoes intense heating, therefore it is prone to the formation of cracks from incandescence. Here it is necessary to involve the most heat-resistant and heat-intensive materials;
- under - the bottom of the cooking chamber (crucible). It has a slight slope towards the entrance to the furnace, so that it is easier for the user to slide in and out heavy dishes with food. It is installed directly on the roof lining. Provides strength to bricks hewn into a cone along a cylindrical surface;
- podpechek (podpechek) inside the ward under the hearth. The element is designed for storing and drying firewood;
- hob. An independent surface, the basis of which is most often a cast-iron, and sometimes a steel part. Located on the underside;
- sixth - a platform in front of the entrance to the crucible. This is where the stove is placed, if it is provided in the model;
- "trough" or semicircular vault - covers the sub-heaters. Material crumbles on the trough, they are able to retain heat (brick chips, sand, pebbles);
- chambers (in some regions they say "palat") or overlap. This element is also called a couch - a place where people go to bed. In classic models it is located strictly behind the chimney, in some more modern ones it is moved to any side. It is at this level that the ordering ends with the topmost layer of brick;
- hailo - a smoke outlet above the hearth in front of the mouth. It is a bell, expanding from top to bottom. During the operation of the furnace, smoke from burning firewood goes there.
More complex projects may include a number of elements - to retain heat, to accommodate cooling cooked food and cold clean dishes. The higher the user's requirements, the more complex the scheme of the furnace, its device and bricklaying.
Do-it-yourself Russian stove
We must pay tribute to the courage of some enterprising people, but doing it yourself with a stove bench and a cooking surface is a rather bold decision. The fact is that no matter how intelligibly the design scheme looks on paper, it is rather difficult to translate it into reality. And yet for decisive people there are recommendations.
Tools for the job
- What tools do you need:
- container for mixing the solution;
- measuring bar to the width of the masonry joints;
- building level - a must! Without it, it is guaranteed that the structure will have a roll, and it will be impossible to eliminate it at the end of the masonry;
- rule (with its help, the surface of the foundation is leveled - a one-time operation);
- a plumb line (also an extremely important device, serves to clarify the vertical curvature in any desired place);
- ordering - a special device for multi-level oven masonry;
- Master OK;
- pick-nosed hammer - a hand tool that allows you to chop a solid brick into pieces instead of cutting it with a grinder.
Materials and accessories
When creating a Russian stove with a stove bench and stove, you will need additional elements, thanks to which you will achieve the desired functionality:
- hardened brick (recommended M-200) in the amount of 1850-1900 pieces;
- oily pure clay 245-250 kg;
- cleaned sand 295-310 kg;
- grate;
- furnace, cleaning and blowing doors;
- damper for the firebox;
- smoke damper;
- hob;
- steel sheet, steel angle, water tank - according to the situation and depending on the project.
Layer order
In competently drawn up working drawings, the Russian order with a stove bench and stove is represented by each level separately. Otherwise, it will be impossible to fold the stove due to the complexity of its internal (not visible from the outside) device.
- row 1st. The layer is laid without screed directly on the floor waterproofing. Overheated brick is suitable, since there will be no exposure to high temperatures;
- row 2nd. Along the edges of the future hearth, bricks are placed on edge, and if non-solid bricks are used, in the next row they must be covered with solid ones;
- row 3rd. Similar to the previous one. It is also recommended to install a blower door here;
- row 4th. It is put in the same way as the 2nd;
- Typical example:
- row 5th. The cleaning channel continues. Make the basis for future arched vaults;
- row 6th. The narrowing of the cleaning channel begins. The grate is installed;
- rows 7th, 8th. Here is the steel sheet. It is also necessary to fasten the wire to fix the furnace door. The laying of the hearth is finished;
- row 9th. Sand bedding is being done. Bricks along the entire row of the future hearth are installed on the edge.
- rows 10th, 11th. Just like the previous one. A hob is installed on top. On the edge of the hearth, it is best to lay half bricks;
- rows 12th, 14th, 16th. Just like the previous ones.
- rows 17th, 18th. A knitting metal wire is laid between them. On these rows, the vault narrows;
- rows 19 to 21. The work on the bed is being completed;
- row 22. At this level, the hail rise begins. At this stage, the stove masonry is very complex and responsible;
- rows 23 to 31. A tubular channel is formed. Blowers and valves are placed in the right places.

Summing up, we note the availability of laying stoves with a stove bench and a cooking panel. It is possible to carry out what you have planned with your own hands, although it will require a high concentration of attention, thoroughness and repeated refinements in the calculations. Be sure to enlist the support of an experienced specialist - if not with practical actions, then at least with useful advice from him.
Modern private houses rarely resemble old village huts, more often they are more suitable for a different name - a cottage. However, even now, many owners of estates, especially country estates, follow traditions and consider Russian stoves with a stove bench as useful and functional heating and cooking facilities.
We will talk about what a stove with a trestle bed or a stove bench is. Consider the technical side of the issue, together with you we will understand the design features. Independent home masters in the article presented by us will find a detailed description of the structure with diagrams and orders.
It is impossible to imagine a Russian stove without a stove bench - it seems somehow too compact, modern and unusual. But the building on which Emelya moved is fully consistent with the idea of a Russian person about a classic village stove.
Today, large and comfortable structures on which you can “warm the bones” are diverse both in shape and design. Here are a few samples that you can make yourself if you wish:
Image Gallery
If the stove is fired with coal, it is not necessary to use refractory fireclay bricks for laying the entire structure. Usually it is necessary in those places of the firebox where coal is placed. In this case, the firebox is made in the form of a funnel and arranged 1 row below the door.
When heating with coal, 1 brick is placed across the door, and when heating with wood, it is simply removed so that the flame is closer to the hob.
You can take care of possible repairs in advance and overlay the firebox with a brick installed on the edge. Heat transfer can be improved by increasing the wall thickness from 12 cm to 19 cm.
Option 2 - classic oven with stove bench
The dimensions of the structure vary, but usually a stove with dimensions of 1.5 * 2 m was erected for a village hut. The hearth was raised relatively low - to a height of 0.45 m from the floor level, and the bench was located almost under the very ceiling - at a height of 1.8 m.
Under for ease of maintenance (cooking, baking bread) arranged at the height of the table, that is, approximately 0.7-0.8 m above the floor
The stove is designed to heat a room of 30 m² and has the following heating properties:
- heat transfer at 1 firebox - 2100 kcal / h;
- heat transfer with 2 fireboxes - 3000 kcal / h.
If the design of the furnace was planned to be massive, bulky, then the foundation was made appropriate. For its device, they took large stones, fragments of bricks, processed pine or oak logs.
One of the main conditions for the construction of the foundation is autonomy. It is always built separately from the foundation of the house, and all elements are insulated with asbestos gaskets or metal sheets to prevent fire.
1 row- bricks are laid in a continuous layer using mortar for the foundation.
2,3,4 rows- are arranged according to the type of well, while one should not forget about the additional space for stove appliances - the under-furnace. The suture ligation system is actively used.
5-6 rows- starting from this level, they build a vault. For the erection of masonry, formwork is made, support heels for bricks are prepared separately.
7-8 rows- they form a vault, which closes on the 8th row also using the technique of dressing the seams.
9-10 rows- laid out in 1 brick.
11 row- final for the "cold stove". The well is filled up with the formation of a slight slope.
12 row- form the flooring of the hearth from a special brick - hearth. The seams are not sealed, but covered with sand, then the entire surface is polished.
13-16 rows- they lay the crucible - a large furnace section. The walls are built in ¾ bricks, height - 190 mm. For the device of locks, bricks are cut at an angle of 45 °. Apply dressing of seams, without binding material.
17 row– the mouth and back wall are finished. A frame is being erected for the construction of the arch of the cooking chamber. The heels are squeezed, the brick is placed on its side. After preparation, the vault of the cooking chamber is erected.
18 row- Build a wall. The space between the side elements and the cooking chamber is filled with clay, sand, broken bricks.
19 row- hemispherical, covers the opening above the pole.
20 row- the walls of the structure are leveled, the hole above the hearth is reduced. The overtube is laid out evenly, without steps - for this, corners are squeezed. An overlap is arranged under the channel for the samovar.
21 row- the same as the 19th row.
22 row- masonry over the vault ends. The bars for mounting the samovar are cut off to ensure the free movement of gases inside the pipe. Lay out the chamber for soot.
23-32 rows- construction of an overtube. Mount the valve, finish the chimney (2 bricks 260 * 260 mm).
Then lay out the channel. To mount the damper, you will need a 25 * 25 mm corner with a thickness of 3 mm. It can be replaced with a strip or a sheet. To make the valve convenient to use, 1-2 handles are welded to it.

Scheme of damper design: 1 - metal sheet; 2 - steel welded handle; 3 - steel "legs" to give stability; 4 - mounting frame from the corner 25 * 25 mm
The frame is pre-made and mounted in the masonry of the mouth, fixing it with mortar or anchoring. It performs the function of formwork during the construction of the arch.
Option 3 - photo gallery of self-construction
For heating a large house, the best option is a stove with a stove, stove bench, cooking chamber and two fireboxes.
The air ducts are located under the heating shield, which enhances heat transfer and is located on the stove with a stove. The thickness of the rear wall is 28 cm, of which 12.5 mm is sand backfill.
As a solution - kneading clay (local), which must first be soaked and filtered. Sand also needs to be sieved to eliminate debris and large inclusions. The main masonry material is red brick, which first undergoes a rigorous selection and then soaked in water. The process is long and tedious, but the result is excellent.
Cutting bricks may require a tile cutter or a special wet stone cutter.
To reduce heat loss, a deflector is installed on the pipe. Gypsum plaster for finishing does not retain heat. Drying of the furnace was carried out for 10 days.
First steps:
Image Gallery
The most "dirty" work is best done on the street, on specially constructed scaffolds.
It is better to keep all barrels, buckets and other containers for soaking bricks or preparing mortar in one place, next to the construction site.
Brick soaking can be done in an old bath, and mortar can be prepared in a wide container or a special tray.
Each brick must be checked for strength, to exclude the presence of cracks and chips, and then sent to a bath of water for soaking
Brick cutting place
Workplace at home
Main preparatory activities
Brick passes a strict selection
Image Gallery
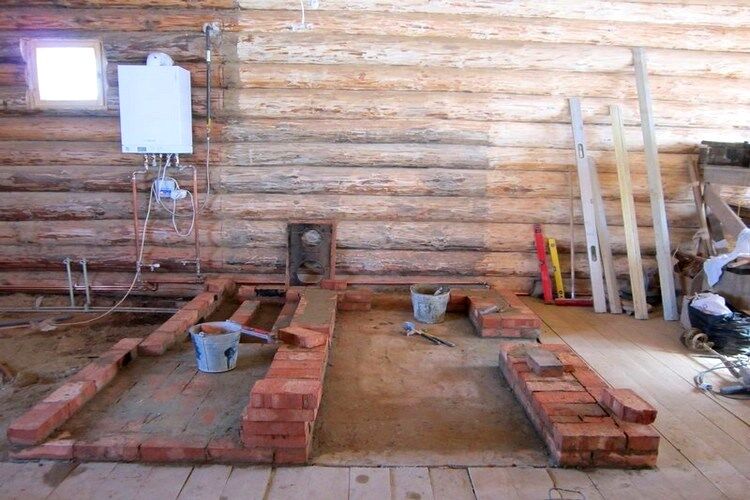
Foundation and first level device
The initial stages require accuracy
Installation of cleaning doors
Construction of a stove with a stove
Strengthening the doors in the masonry
Strengthening joints and corners
Formation of the furnace department
Create overlaps between departments
You can experiment with different segments of the furnace, change them as you wish. The main thing is not to change the key details and the laying order.
Image Gallery
In terms of the complexity of construction, the classic Russian stove surpasses brick heaters of other designs, so without skills and practice it will not work to put it together with your own hands. The cost of construction is not inspiring either, because even a modern model of a hearth mini-stove will cost about 800 pieces. quality bricks. But due to their high efficiency (more than 60% efficiency) and heat capacity, these structures remain attractive to many homeowners. We also decided not to ignore them and give you a detailed description of the laying of a simple version of the stove, equipped with a stove bench.
We study the device and the principle of operation
At the moment, the traditional Russian stove has undergone many improvements. There were options for heaters with a fireplace, a hob and an oven, as well as outdoor complexes - barbecues, built under sheds or in large gazebos. But the basis for all these structures is an old hearth stove with a chimney extended to the front. Its device is shown in detail in the diagram:
Reference. The approximate dimensions of the structure, most often erected in ancient Rus', are 3 x 2 x 2.5 arshins or 2130 x 1420 x 1780 mm. The last number indicates the height to the top of the couch.
We list the design features:
- The building rests on the foundation and guardianship - 4 walls with a cavity inside for storing household equipment or a portion of firewood - under the stove (otherwise - under the fire). Previously, the base was made of wood, now it is built of brick.
- The body of the furnace consists of two compartments. The front one - a zagnetok - is a pre-furnace surface closed by walls, ending at the top with a chimney. The back part is an oblong furnace with an inclined hearth and a semicircular vault. The latter also leans towards the mouth at a certain angle.
- The cavities between the outer walls and the crucible are filled with clean sand or a clay-sand mixture. The overlap above the top backfill plays the role of a couch.
- In front and on the sides of the heater there are several small niches - stoves.
- In the simplest version, the chimney is equipped with an inspection door and a damper (the old name is a view).

The movement of gases and heat in the firebox
The principle that the Russian stove uses when working is quite simple and at the same time effective. To the firewood burned in the crucible, air enters through the mouth and the opening of the fire, and the flow spreads along the lower part of the hearth, closer to the hearth. Lighter products of combustion move towards it along the upper zone, leaving the mouth into the smoke channel. How this happens is clearly shown in the figure above.
An important point. Efficient heating of heat-intensive walls and sand filling is achieved due to the inclination of the vaults and the hearth. Hot air cannot escape until it cools and becomes heavier. This principle is used in modern bell-type furnaces.
After the flame dies out, thick walls return heat to the room and the furnace for a long time, where you can make delicious pastries, cook a variety of dishes or bake bread according to a homemade recipe. For a detailed review, see the video:
We spread the Russian stove with a stove bench
The most difficult moment is the laying of the inclined vaults of the furnace. Therefore, to begin with, we propose to perform a classic design without additional elements - stoves, ovens, and so on. If you successfully build the stove shown in the photo, you will subsequently take on a more complex project at your own discretion.

The drawing below shows in section a relatively small stove measuring 1650 x 1270 x 1540 (couch height). Such a mini-structure will fit both into the interior of a country cottage, and into a small house in the country. Of the additional functions, there is only a stuffing box for heating the samovar and a stove on one of the walls (there can be more of them).

Construction is carried out in several stages:
- Procurement of building materials.
- Building a solid foundation.
- Erection of the furnace body and chimney.
- Drying and primary heating.
Now let's look at the whole process step by step.
Preparation of materials and fixtures
Before you make a small Russian stove with your own hands, you need to buy the following materials:
- red full-bodied ceramic brick - 1650 pcs.;
- valve having a "live" section of 26 x 24 cm;
- cleaning door;
- dry clay-sand mixture for laying stoves and fireplaces, based on the preparation of 70 buckets of mortar;
- building materials for the foundation - cement M400, sand, roofing material;
- basalt cardboard or felt;
- roofing sheet.

Varieties of figured brick
Advice. You should not experiment and make a solution of clay and sand yourself if you are not an experienced stove-maker. The price of the finished building mixture is not so high as to save on the reliability of the structure.
In addition to the usual brick of standard sizes 25 x 12 x 6.5 cm, there is now a figured stone for sale, designed for laying arched vaults. It is divided into 2 types - a wedge-shaped brick and the so-called heel with one hewn edge, placed at the base of the arch.
To work, you will need the usual masonry tools: a trowel, a pickaxe, a wooden or rubber mallet, as well as a building level, tape measure and plumb line. In addition, before starting work, you need to make a template for laying the arched vault, which is a frame made of timber with circles and plank flooring. What a wooden fixture looks like is shown in the figure below.

Formwork for the formation of brick vaults
Pouring the foundation slab
As you understand, the Russian stove is a rather heavy structure. In our case, its weight will be 1650 x 3.5 = 5.8 tons (calculated by the weight of the brick). The base must be appropriate, therefore, at the construction site, it is necessary to dig a pit with dimensions of 180 x 140 cm, taking into account a protrusion of 50 mm in each direction from the dimensions of the heater. The depth of the pit is determined by the location of stable soil horizons, and even more simply, by the existing foundation of the house.
An important point. It is unacceptable to combine the furnace base with the foundation of the building. Provide a minimum indent of 10 cm, as shown in the photo.

- The bottom of the pit is compacted, then covered with sand to a height of 100 mm and also compacted.
- Prepare a very thin solution of cement and clay.
- When filling the pit with rubble, spill all the cavities with mortar until you reach ground level.
- Cover the resulting base in 2 layers with roofing material to avoid capillary rise of moisture from the soil. In other words, waterproof.
Serial masonry process
Before starting masonry work, a sheet of metal and basalt cardboard (or felt soaked in liquid clay) should be laid on the finished foundation. Then prepare a bucket of water and mix the solution according to the instructions on the packaging of the building material. If you do not have enough experience in the furnace business, then first read the general masonry recommendations outlined.

Now you can put a solid first row of the Russian stove, focusing on the order. Pay attention to how its corners are laid out of chipped bricks - three-fours. This is necessary to ensure the correct dressing of subsequent rows. Further, the walls of the guardianship and the arched opening of the ward are formed with the help of stones chipped at the corners. To lay out the 5th row, which includes a semicircular arch, install a wooden formwork in the opening. At the same time, the bricks of the two side walls are also cramped for the installation of a template that forms the arch.

On the sixth row, the sidewalls are laid out in half a brick, and the front and rear walls are laid out in a whole brick, after which the arch formwork is placed. A vault of wedge-shaped stones and heels is arranged on it, the body of the furnace is being erected in parallel. After laying the 10th row, the opening is carefully covered with sand.
Advice. If wedge-shaped bricks cannot be purchased, lay a vault of stones of standard sizes, wedging them with small fragments and mortar.

Row No. 11 is made solid in order to block the backfill, and the 12th forms a pod. The bricks that turned out to be the bottom of the firebox (crucible) are not bound by the mortar. The next steps are the laying of the furnace walls and the installation of the formwork at the mouth of the fuel chamber.

In the 17th row, you need to cut 8 bricks under the large arch of the crucible, then put the formwork again and lay out the arch. Having reached the 20th row, the sanding operation is repeated.

Solid rows No. 21 and 22 are the basis of the couch. Further, the masonry continues only in the front part, where the cap and the chimney are finally formed.

On the 26th row, a door is placed, and on the 32nd, a valve. Above, the laying of a chimney pipe continues, diverting combustion products to the street.
In order to pass a wooden floor in compliance with fire safety standards, a cutting must be laid out on the chimney. This is an extension of the chimney, increasing the distance from the inner wall of the pipe to the wooden structures. The masonry cutting scheme is shown in order:

Drying and first kindling
If the Russian stove with a stove bench was laid out in compliance with the technology, including soaking bricks, then initially its walls contain a large amount of moisture. Removing it requires time and effort on your part, since you cannot immediately melt the stove to the maximum - the masonry will crack. It is necessary to wait 3 days for the initial drying of the solution, and then proceed in this order:
- Open the door and make a small fire right on the view, fully opening the damper. So you dry the chimney and remove the airlock, due to which the stove will begin to smoke heavily into the room.
- Place some brushwood in the crucible and set it on fire. Then keep a small fire going for 2 hours.
- Repeat the operation daily for 2 weeks, gradually increasing the portions of firewood. A sign of complete drying is the absence of dark stains on the walls of the stove and chimney.
If cracks form in the masonry during the drying process, they must be carefully cut with a knife, and then filled with a thick solution of clay with water. The technology for building a brick heater is clearly demonstrated in the video:
Conclusion
If you have recently begun to master the stove business, our publication on the construction of a Russian stove will be useful in an introductory plan, so that you can imagine the volume and order of work. To get the most information, we recommend that you study the popular book by Gennady Fedorov “The Russian Stove”, and also work with an experienced stove-maker as an apprentice. Armed with theoretical and practical knowledge, you will definitely be able to take on such construction.
Related posts:

Related Articles


