Do-it-yourself toilet repair: a complete guide. The toilet bowl is leaking after flushing: possible causes of the malfunction and how to fix them What to do so that the toilet bowl does not flow
If you notice that water is constantly leaking from the tank into the toilet, you need to immediately find a solution to this problem, since the noise will interfere with sleep at night, and rust will soon form on the toilet itself. In addition, the readings of the water meter will also not be particularly encouraging.
Let's try to figure out the reasons why the water flows, because further actions depend on it. After that, we will consider several possible options for how to fix a leak in the toilet with your own hands.
Breakdown detection
Experts do not dare to say for sure that the toilet is leaking for one reason and the solution to the problem is also the same. Each reason may have its own characteristics depending on the design. However, the “classical” construction is still the most widespread, so it is better to consider the definition of the current problem on it.
The first place without a doubt can be assigned to the overflow of the toilet, which is due to the fact that excess water leaves through the overflow. The problem in this case is the following:
- Over time, the rubber gasket can deform, that is, the rubber loses its former elasticity, due to which there is a loose overlap and the toilet bowl leaks.
- Poorly pressed gasket to the outlet of the drain valve also does not hold water. It is not necessary that the gasket is deformed or has lost its elasticity - it just does not press enough against the toilet part - that is why water flows.
- The pin that holds the float in the valve body can rust or wear out.
- The tank often leaks due to a crack in the body.
If the toilet cistern does not flow, but the problem still occurs, it may be the bolts that hold the cistern and the toilet directly. During the operation of the structure, quite often the bolts rust, and the plastic ones burst, which is why water leaks.
In third place in terms of prevalence is the cause associated with a rubber pear. The problem is that over time, this part of the toilet may lose its elasticity, becoming more rigid. As a result, the pear cannot take the necessary shape to retain water after flushing.

Another problem may lie in the malfunction of the drain tank itself due to the displacement of the float lever or its skew. The reasons for these factors are as follows:
- a hole has formed through which water flows into the float;
- after a long use of the toilet, the lever itself may shift;
- Repairs were made with low quality parts.
The reasons for the constant flow of water in the toilet can be eliminated with some effort.
Fixing toilet overflow and bolt issues
The most common problem that causes water to flow in the toilet is overflowing the tank. So let's start with a simple experiment.
We remove the cover. After that, you should slightly raise the float. If this helped and the tank bowl does not overflow, then the search for the problem at this stage is completed. It is enough to pull the float lever a little so that the water stops flowing earlier.
Another option is that the water continues to leak. Perhaps the problem is in the valve, so it should be carefully examined. Initially, spend time on the pin that secures the float lever in the valve - it should be in place and solid. Otherwise, you will have to replace it with a piece of thick copper wire. At this stage, you need to inspect the hole into which it is attached, because with an increase in its size, you will have to completely change the entire valve.
And the last possible option, when, after the above inspections and even actions, water still flows in the toilet, this is a worn valve gasket. It will not be possible to purchase it separately, so the question regarding the culpability of a cracked valve or gasket loses its practical value.

But what if the water in the tank is less than the overflow level, but the toilet itself is leaking? Quite often, such a description has the problem of the unfitness of the bolt, which tightens the shelf and the toilet. This, as a rule, is inherent in older models of structures, where manufacturers still used steel bolts. Of course, over time, the bolts deteriorate under the influence of water, so they should be replaced periodically.
The process itself implies the following:
- Shutting off the water supply.
- Removing the cover.
- Tank emptying.
- Disconnecting the flexible hose.
- Loosening bolts.
- Tilt the tank to remove the shelf from the cuff.
- We eliminate excess liquid and lay the tank on a flat surface.
Upon completion of the repair, the structure must be reassembled. It is important to tighten the new bolts not tight, since the material of the toilet bowl is quite fragile.
Replacement or repair of a pear or float
If the toilet is leaking due to the loss of elasticity of the rubber pear, which regulates the water supply with the button, it should either be replaced or repaired. To do this, you first need to unscrew this part (counterclockwise, but when viewed from above, the position changes to the opposite) and disconnect from the stem. When buying a new such part, you should choose the softest one, otherwise this problem will arise again, and quite soon.
If it is not possible to buy a new rubber bulb, it can be repaired for a while. To do this, simply attach a small weight to the rod, which will pull the pear to the saddle, respectively, after flushing, the water will not drain. Any weighty nut or washer is suitable as a load.
When water constantly drains due to a malfunction of the float in the tank, it can also be replaced with a new one. If a small hole is found in the float that is leaking liquid, an alternative, more economical option is to plug the hole with polyethylene or fused plastic. It should be borne in mind that such repair work will not eliminate the breakdown itself, but only postpone its solution for a while. Therefore, it is better to do everything right right away.
The toilet in every home is an element of everyday life, without which it is simply impossible to do. It is operated much more often than all other plumbing fixtures. That is why it fails more often than other devices. And its most vulnerable component is the tank, which consists of several internal components. Their mechanical damage, as well as careless handling of the tank are the reasons for the loss of this device of its performance. In the article, we will look at how to repair a toilet cistern with a button on our own, without calling a plumber team.
All drain tanks have a similar design. The difference is only in the mechanism of starting water.
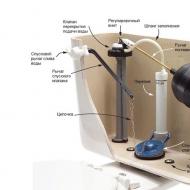
Structurally, a toilet cistern with a button or two buttons, as well as a flush lever, can be represented as a set of interacting nodes:
- filling valve. He is responsible for maintaining the water level at a certain level. The valve is controlled by a hollow float. When the water rises to the desired level, the float closes the water supply channel to the tank;
- Plastic float attached to the filling valve. Works on the principle of a rocker, rising when filling the tank;
- drain valve having an overflow system. Modern tank options involve controlling this valve by pressing a button. With manual control of the old-style drain, it is enough to pull the lever or chain to start water into the toilet;
- overflow is a mandatory component of the tank. It is adjustable in height, thanks to which the maximum water level is set. When this level is exceeded, water flows through the overflow pipe into the sewer without spilling out through its walls.
A tank with a mechanical drain is very simple to operate. Water enters it through the filling valve when the float is in the lowered position. After reaching a strictly defined level, the float shuts off the water supply. Drainage is controlled manually. If the tank is equipped with buttons, then the water is drained after pressing them. In this case, the drain valve partially or completely opens, passing water into the toilet. The float drops, slightly opening the filling valve.
The structure of the toilet flush tank with two buttons is a little more complicated, but you can use such a tank more economically. If you press one of the buttons, the water is partially drained. Full drain occurs when the second button is pressed.
Increasingly, you can find new types of tanks that have bottom water connection. It is advisable to install them if the use of lateral connection is not possible due to lack of space. The main difference between this tank is the presence of a membrane valve. Under the influence of water pressure in the pipeline, the valve opens slightly and allows water to enter. When the water rises, the float presses on the piston rod, which gradually closes the diaphragm valve. When the set level is reached, the valve closes completely.
 Fittings with bottom water inlet and button control
 Common faults
Drain malfunctions may well lead to the loss of the toilet bowl of its performance. For many, such a sudden breakdown can be a real natural disaster. In addition, no one will like the increased water consumption either.
About what it is and what types it happens, read in a separate material.
And how to choose and in what situations it is necessary, we told in another article on the site.
What kind of breakdowns are typical for drain tanks? We list them in order of frequency of occurrence:
1. Leakage of water from the toilet to the floor. Most often, water flows through the sealing ring located between the bottom of the tank and the toilet shelf. If the ring is cracked or warped, water will seep through it. Also, the place of leakage may be the gaskets of the mounting bolts with which the tank is attached to the shelf. They will have to be replaced if tightening the bolts does not work. And it doesn't matter if the cistern of an old-style toilet bowl is being repaired, or a modern system is being repaired. After all, they all have the same mounts.

Tip: When replacing gaskets and seals, it is recommended to lubricate them with liquid silicone to prolong their life and prevent cracking.
2. There is a constant flow of water in the toilet. Most often this is due to the overflow of the tank, in which water flows out through the overflow tube. This can happen due to a change in the height of the overflow, a loose fit of the float to the shut-off valve, and the loss of its tightness by the float. The rubber seal on the drain fitting may also be worn. Most often, the malfunction can be eliminated by adjustment. When the locking gasket is worn, it is desirable to replace the entire drain mechanism.
3. Starter malfunctions. If you are using a push-button water dispenser, water may not flow to the drain when the button is pressed. You can repair the fittings of the drain tank with your own hands, since, most often, the lever mechanism that connects the button to the drain breaks. This also applies to tanks with a handle or a chain.
4. Noisy tank filling. This happens due to the disconnection of the tube through which water is poured into the tank. This is typical for tanks in which water is supplied from the side. With a flown tube, the noise of incoming water will be clearly audible. To fix the problem, remove the top cover and install the tube on the fitting.
5. Water does not flow into the tank. Repairing a toilet cistern with a button or with other descent mechanisms in the event of such a problem comes down to checking the inlet to the cistern. It is necessary to remove the valve from the tank and clean the inlet with a thin steel wire and rinse it with water.
Tank repair with one button
Many people who are accustomed to old-style cisterns do not know how to fix a toilet bowl flush with a button. In fact, the differences between these systems are very minor. For many, the main problem is disassembling such a tank. Indeed, the button located on the tank lid requires careful handling during disassembly. But the device is very easy to disassemble.
The procedure will be as follows:
- turn off the water;
- empty the tank;
- carefully unscrew the plastic nut near the button;
- remove the cover.
Further actions depend on the nature of the breakdown. Breakdowns of a tank with a button can be as follows:
- Little water is drawn into the tank. Check float position and adjust.
- The water start button is stuck. This may be due to clogging of the button shaft. It is necessary to clean it, and set the button to its original position.
- Water does not go into the toilet when the button is pressed. Most likely, there was a break in the mechanism between the button and the drain valve. You can restore it yourself. If this fitting is broken, then you can use copper wire to replace it or replace the valve completely.
- Water flows through the overflow neck. Overflow height or float needs to be adjusted. The overflow is very easy to adjust. To do this, unscrew the union nut and set the desired overflow level.
- Water flows into the toilet from under the valve. The drain valve gasket may have worn out. It is best to replace the entire valve. To do this, unscrew the plastic nut at the bottom of the tank and remove the valve from its place. Install a new valve.
Note: It happens that the valve is loosely in place due to skew. Re-opening and closing it helps eliminate the problem of leakage.
Repair of a two-button tank
Economical water consumption adds popularity to such a plumbing fixture. And how to repair a toilet flush tank with two buttons? The principle of disassembling such a tank remains the same as that of the one-button version.
Typical breakdowns of a two-button tank:

Repair of a tank with a bottom water connection
A tank with a bottom water connection uses a membrane-type filling valve. This may cause a problem with filling the tank with low pressure in the water supply system. The water pressure may not be enough to squeeze the valve and fill the tank. If your system is constantly maintained at low pressure, then it is better to replace the diaphragm valve with a rod analogue.
Another common problem is water leakage at the inlet valve reservoir. Its location is such that the valve is constantly under water. With insufficient tightness of the connections, the presence of leaks is almost guaranteed.
Repair of the toilet cistern with a lower water supply is carried out after shutting off the water supply and removing the cistern lid. After that, the problem is fixed using the same algorithms that are described for repairing models with buttons.
We figured out how to repair a flush tank with a button, with two buttons or with mechanical control. They differ slightly, mainly in the design of the control mechanism. The general principle of operation and repair for all considered devices is the same.
The video shows the repair of the toilet cistern with your own hands, or rather, the process of replacing its fittings.
Leaking and faulty plumbing is a source of constant headaches, however, in most cases, fixing the problem is much easier than we think. If you have a constant flow of water in the toilet, this is an occasion to take urgent action. High humidity, unpleasant background noise, problems with neighbors - this is a non-exhaustive list of problems that you may encounter. What are utility bills alone!
Think about it: a leaking toilet can spill about 200 liters of water in a day, for which you have to pay. So what to do if water flows in the toilet?
There can be two ways out: the first is to call a specialist and rely on his professionalism, and the second is to roll up your sleeves and tackle this issue on your own. If you prefer the second option, then below you will find detailed instructions, as well as a list of recommendations and tips to help you. Do not forget that the cost of a good plumber today is almost equal to the price of the plumbing itself.
How to fix a leak in the toilet - step by step instructions
So, the toilet is leaking - what to do? Start by turning off the water. This point should not be neglected in order to avoid additional problems. Remember: water enters the toilet flush mechanism under pressure and if something suddenly goes wrong, an impromptu fountain may appear in your toilet. Next, you need to find out exactly which part is malfunctioning and, depending on the need, stock up on some working materials.
You may need the following spares:
- building sealant;
- knife and sandpaper;
- tow, twine or burlap;
- you will need a new analogue of some part if it turned out to be broken.
In addition to materials, you may need construction tools - pliers, a screwdriver, a hammer.
The most difficult thing is, perhaps, identifying the essence of the problem. The mechanism by which the toilet and flushing system works is not that complicated, but it consists of a number of details, the operation of which you will need to look closely.
 Reason 1. The reason why the toilet is leaking may be the fact that it is not fastened to the floor (or wall) well enough. In this case, you just need to check the fasteners, tighten them if necessary or replace them with new ones. Be careful, as the toilet is set on a tile, and with a strong pull, the tile may crack.
- Reason 2. If the first item does not apply to you, it makes sense to look inside the tank. The cause of the leak may be hiding there. Remove the cover very carefully. This part is relatively fragile and can be easily broken or damaged. And since toilets tend to vary greatly in shape and design, finding a new lid can be tricky. An accidentally broken lid can be a reason to buy a new cistern or even a toilet, so be careful.
- Reason 3. If water flows from the toilet bowl, the reason for this is most often a pear that is not tightly adjacent to the drain. Over time, this part can be deformed, as a result of which a free space appears in the place of a loose fit, from where water flows. The most obvious way to solve this problem is to simply buy a new pear.
- Reason 4. If you do not have the ability or desire to buy a new pear, you can always continue to use the old one. Of course, it will have to be repaired a little for this. To return the pear to its original shape, stuff it with some material, such as twine, tow, or burlap.
- Reason 5. Even if the pear is close enough to the drain and has the correct shape, the problem due to which water flows in the toilet may remain. Perhaps the whole point is that the pear is underweight. In this case, you need to weight it. You can do this like this: take a fairly large nut and put it on the rod. Ready!
- Reason 6. If you are dealing with old plumbing, rust may be the cause of the leak. It can accumulate at the drain and interfere with the snug fit of the pear. If this is the case, remove the bulb and use sandpaper to thoroughly clean the saddle. If things are really bad and the layer of accumulated rust is too large, use a knife. Pieces of rust or other debris can also build up at the drain, especially if your home has old metal pipes. If this is the case, just clean the drain.
- Reason 7. It also happens that water is constantly flowing in the toilet, but the drain tank is not filled. In this case, most likely, the problem lies in the fact that the float is warped. It is easy to determine that the float is warped - it will lie at the very bottom. Solving this issue is extremely simple: slightly move this mechanism to make it fall into place.
- Reason 8. How to fix a leak in the toilet if you failed to return the float to its place? Perhaps the reason for the leak lies in the fact that the connection between the lever on the left and the float was broken. Return the float to its place - this should help eliminate the leak.
- Cause 9. If your toilet bowl is clean of rust and debris, the tank filling mechanism works smoothly and all of the above operations did not solve the problem, you may need to replace the drain mechanism itself. It is quite simple to do this, but it is important to know the following: the drain system can be arranged according to two patterns - when water is connected to the tank from below or from the side. First, determine what type of connection you are dealing with. Then, pay attention to the two valves involved in the drain mechanism - we are talking about the inlet valve and the outlet.
 Reason 10. According to statistics, the exhaust valve breaks somewhat more often. If the problem is in it, then the intake valve can not be changed at all. However, they are only sold as a set, so you will have to buy both. It is not at all difficult to unscrew the exhaust valve and put a new one in its place: unscrew the connecting bolts (there are two of them), then the valve itself and replace the gasket. Install a new mechanism and check if everything works properly. Check yourself again: did you forget to turn off the water?
- Reason 11. How to fix a leak in the toilet if the inlet valve is still broken? To begin with, it will be easy to determine this: in this case, the water flows directly onto the floor. Inlet valves are also divided into two types according to the type of connection (bottom or side). However, regardless of the type of connection, the principle of operation of the inlet valves is the same. This mechanism is based on a float that rises as it fills with water. It happens that the float clings to something and stops rising. If this is your case, just unhook it. If this is not the case, and there is a need to replace the intake valve with a new one, do the same operation as with the exhaust valve. Use a wrench to unscrew the old valve and install the new one. Before you do all these operations, remember that you need to turn off the water.
- Reason 12. Do not forget that any work that you carry out in the toilet barrel must be carried out with the utmost care. Parts of this system can be fragile or simply worn out and break easily if handled carelessly.
- Reason 13. How to fix a leak in the toilet if all of the above mechanisms are working properly? Another source of the problem may be the connection of the toilet, or rather the corrugation, i.e. the place where the toilet is connected to the sewer pipes. It is better not to postpone the solution of this problem until later, as an unpleasant smell may appear or the ceiling of the neighbors may leak. You can try to fix the situation with a sealant, but this will not work if the corrugation you have installed is cheap or completely worn out. The only way out of the situation if the corrugation is leaking is to change it to a new one. You can buy a new corrugation in the market or in a specialized store with plumbing. There should be no problems with the choice - the diameters of pipes and similar connections have long been standardized and adjusted to each other. It is not worth saving on this part and choosing the best reinforced stainless corrugation so that after a while you do not have to change it too. Reinforced corrugation with a stainless coating will, of course, cost more, but it is more hopeful and will last you much longer than its cheaper counterparts. For the operation to replace the corrugations, you will also need a special plumbing sealant.
So, remove the old corrugation and, properly, remove the layer of old sealant. This is necessary in order for the new corrugation to sit as tightly as possible. Then apply a new layer of building sealant and put a new corrugation on the sewer pipe. Apply a new layer of sealant over it. All these operations are important to perform as carefully as possible. Let the construction sealant dry properly (this may take a couple of hours, no more), and then check how the mechanism works. If you carefully read our instructions and followed our recommendations, you should not have any problems installing a new corrugation.
If the toilet cistern starts to leak, it always causes a lot of inconvenience. In addition to the fact that the sound of constantly flowing water is annoying, and stains form on the toilet itself, the bills for the used water also increase. It is not difficult to figure out why the toilet cistern is leaking, and in most cases it is within the power of anyone, even a completely inexperienced master, to fix it with your own hands: the only exceptions are those plumbing products that have additional electronically controlled functions.
- The device of standard tanks
- Types of tank malfunctions
- Helpful Hints
The device of standard tanks
Any toilet bowl is a product consisting of a seat and a tank connected to each other with a built-in mechanism for draining water. It is noticed that the drain mechanism fails more often than all other parts. In order to determine what disrupts the operation of the device and correctly eliminate it, it is necessary to understand the basics of the design of the system for draining water.
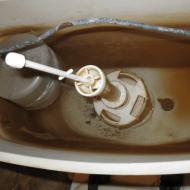
Drain tank device
A typical drain device is equipped with two mechanical units: one of them accumulates water, and the other drains. The first of them ensures the retention of water in the tank, the amount of which should subsequently be enough to drain. This device is a system of a float and a closing valve. If the tank is empty, the float falls down and moves the lever system so that they open the valve, and when it begins to fill with water, the float rises and the levers move so that the valve is closed. The device closes completely when the float reaches its highest point.
The second part of the system is responsible for ensuring that at the right time all the accumulated water is drained into the place intended for this. In various models of plumbing devices, you can see a variety of drain systems, but the principle of operation for all is almost the same. There is a drain hole in the tank, which is closed with a sealed siphon. The siphon in many models resembles the shape of an ordinary plunger, but does not have a handle, and in the newest devices it is designed in the form of a button, which is considered more aesthetic. This detail is connected with the trigger device by means of a reinforcing lever system.
Many do not know what to do if the toilet bowl is leaking and the first thing they tend to think about is calling a plumber so that the problem is solved as soon as possible. However, do not be too hasty to call the service departments, since this task is available to any home master who knows how to properly handle the wrench, and problems that occur in the drain device are in most cases not too serious and can be fixed by hand.
However, you should not delay the repair of the drain device too much, since this directly affects the final amount of payment for the use of water (if the apartment has a cold faucet meter), and the sound of running water can irritate the residents of the apartment, especially at night. In recent years, many new plumbing devices have appeared, but the principle of operation of drain tanks has not changed for several decades: water, filling the internal reservoir, raises the float. The system of seals, float and fittings releases all the accumulated water into the toilet, and then the water begins to accumulate again and, raising the float, closes the system.
Some, thinking about how to fix a toilet bowl if it is leaking, remember that plumbers always have professional tools with them. In fact, to remove such a malfunction, you only need wire cutters, rubber gloves and pliers. Experienced craftsmen are also advised to look in advance at the nearest store for a new plumbing drain unit.
Types of tank malfunctions
Before starting repairs, you should determine what exactly is causing the leak and needs to be adjusted. A leak in the drain system can occur for several reasons:
- If water flows into the tank without stopping, this may be due to a slight misalignment of the lever or damage to the float valve. There are also cases when the valve does not work quite correctly, but at the same time remains intact. It is quite easy to solve such a problem: the float lever should be aligned horizontally, and the faulty valve or float should be replaced with a serviceable one.
In the case when the float can only be replaced later, you just need to protect it from the water in the tank by wrapping it in a plastic bag or sealing it with heated plastic.
- If water flows from the tank into the toilet all day and night, this is most likely caused by a rupture of the membrane inside the siphon, which is enough to be replaced with a whole one. To do this, a lever attached to the float is attached to the top bar, allowing you to unscrew the nut that secures the flush pipe and connects it to the drain system. When the siphon is disconnected, the damaged membrane should be removed and replaced with a similar one that fits in size. After that, the fittings are assembled and installed in the reverse order.
- Sometimes it happens that the tank passes water because the rubber constipation has lost its original elasticity. With rubber "pears" this happens often: they become similar to the touch of wood and completely lose the elasticity inherent in rubber. In this case, the aged constipation should simply be replaced with a new one.
A constipation holds water when it is firmly seated in its recess. If limescale appears on the saddle, the base of the constipation does not adhere to its walls with the required density and, as a result, the toilet bowl does not hold water. In such a case, the constipation must be temporarily removed, and then the surface of the saddle should be cleaned with a hard brush or sandpaper and replaced. Experienced craftsmen also advise tightening all saddle fasteners during this operation.
Drain tank device
- If the nut securing the base at the overflow point is loose, you need to temporarily remove the tank and tighten the nut located in its lower part.
- In the case when the connecting cuff between the toilet and the tank is leaking, you can tighten it with a clamp or try to install it back into place. The cuff that is stuck should simply be replaced with a new one.
- Another cause of leakage can be a rubber gasket between the tank and the toilet. These gaskets may rot, or they may simply be installed incorrectly. Plumbers call such gaskets "bitten".
- If during the check it turned out that the gasket is installed normally, the leak may be caused by a crack formed in the tank. Repairing a cracked tank is also not at all difficult: you need to remove it, dry it and fill the crack with sealant.
- Sometimes the toilet cistern begins to leak when the shutoff valve is not holding water. It is very easy to detect a valve defect: if you press the valve with your hand, the water flow should stop. If this does not happen, then the gasket in the valve needs to be changed.
- When the button height adjuster moves for some reason, the tank can also leak. The gap through which water flows is formed when the valve is higher than the water drain hole. To fix this problem, you just need to adjust the height of the button.
- The problem of water flow can also occur in the place where the drain hose is connected to the tank. A cracked nut will need to be replaced, and if it is not damaged, tighten it well enough.
- Sometimes the operation of the tank is disrupted due to breakage of the reinforcement. To cope with this malfunction, the easiest way is to change the entire armature.
Currently, old models of toilet bowls are often replaced with modern ones, which have a more aesthetic appearance and are noticeably more convenient to use. So, for example, one of the advantages of the new toilet bowls is the absence of water splashing and splashing during the drain. However, it should be understood that new tanks break just as often as it was with the old ones. At the same time, it should be noted that new models of tanks are much easier to repair, and spare parts for them are made of durable plastic and are relatively inexpensive.
If you are going to change plumbing, you should decide on the desired toilet model and pay attention to how the outlet pipe is installed, which can be horizontal or directed to the floor. Most often today there are toilets of the “compact” type with a drain in a horizontal plane, as well as “monoblocks”, in which the drain tank and the toilet are one.
Before buying and installing a new toilet bowl, you should check whether the installation instructions are included in the kit and carefully study it.
It is important to immediately deal with the device of the tank, so that later you can clearly understand why a problem could occur. Plumbing with a simpler cistern design usually lasts much longer and is more reliable.
Most often, spare tank mechanisms are sold as a set, but if necessary, individual parts can also be purchased. If a rare and expensive tank is installed in the apartment, then it will be much more profitable to look for individual spare parts, and in simpler models it is often easier to immediately replace the entire tank. Some time ago, it was customary to install the toilet seat on a small elevation of cement screed or to mount it on wooden rails. Now the toilet is installed after the wall and floor tiles are laid in the room. Before installing the toilet, the tile is marked with a felt-tip pen, and then it is fastened according to the marking.
Drain tank device
What to do if the toilet bowl is leaking
Drain tank device
Replacing fittings in the drain tank
Do-it-yourself replacement of the mechanism in the tank
Similar content


It's good when the bathroom works like clockwork, but according to the laws of so-called meanness, we have to find out why the toilet tank is leaking, what to do and who is to blame, at the most inopportune moment. To speed up the process of returning this attribute of a comfortable life to the senses, here are a few typical problem situations and their solutions.
If you at your leisure come up to your toilet and study its structure, you will notice that the cistern is the most complex in structure. Inside it there is even a mechanism of a certain action, all parts of which interact regularly and allow significant amounts of water to be drained, carrying all the waste into the sewer. It is expected that it will not always work so clearly, and someday its plastic elements will crack, gaskets will leak, bolts will rust or simply unwind. All this will cause a leak, the consequence of which will be, at best, an increased figure in the water consumption column on the utility bill. At worst, a sudden flood awaits you, the consequences of which will also affect your neighbors.
To avoid all this, you should sometimes look closely at the space near the toilet and behind it, so you can notice a puddle under the tank or in the hose area in time, and also not ignore the phenomenon of water leaking from the flush hole. If even minor flaws are found, care should be taken to eliminate them, it will cost faster and cheaper than later to carry out major repairs. Tank designs come in several types, but they differ slightly, so when looking for problems and solutions, you can navigate by lifting the lid. So, in total, three areas can be distinguished for inspection and repair - the tank itself, its mechanism and hoses. Let's deal with each option separately.
Let's start with the hose, which is still outside and connects the water pipe to the tank. As a rule, it breaks in the middle and rarely leaks, unless, of course, it is mechanically damaged on purpose. But the junctions, especially from the side of the float structure, are problem areas. It is quite simple to determine the breakdown here, a trickle, which, depending on the severity of the damage to the fastener, will either drip steadily or gush, persistently hints at you about this. In this case, it is necessary to establish whether such a phenomenon is caused simply by loosely tightened nuts, or whether a crack on the valve is to blame, which crowns the end of the hose at the junction with the float mechanism.
Check the fasteners and gaskets under them, if everything is tightened well, and the rubber part has retained sufficient thickness and shows no signs of wear or breakthrough, then the valve should be looked at. By the way, if you nevertheless found a lack of connection in this particular place, then it is enough to change the gasket and tighten the nuts, just pay attention to what material they are made of. Plastic products should not be twisted with a metal tool, you can not only damage it from the outside, but also strip the thread, or even split it completely without calculating the effort. In this case, it is enough to screw it by hand, you can use a rubberized glove so that your hands do not slip.
If the problem is in the valve, and it can only be a crack, then it does not make sense to eliminate it, such a part just needs to be replaced. But do not rush to run to the store, remove the old valve and take it with you. Due to differences in cistern designs, you may end up purchasing a product that won't fit your toilet even though it looks very similar to what you're looking for. To remove it, turn off the water, remove the tank cap and remove the valve from the junction of the hose with the float mechanism. How to install a new one, you already guessed it.
Now let's pay attention to the other outer side of the tank, with which it adjoins the toilet itself. To do this, the latter has a kind of shelf on which the gasket is laid, and it is mounted on top. So this intermediate strip, which saves sanitary ware from mutual abrasion and seals the joint at the same time, can be rubber, plastic and metal. Leakage in this place is characterized by the formation of a puddle after each flush. The gap through which water escapes may appear due to wear or even due to a banal shift of the cuff.
The first step is to check the clamps that secure the material between the tank and the toilet shelf. The gasket will become unusable even faster if you overtighten these fasteners, so do not get carried away, and if during the check you determined that they are tightened enough, you do not need to make a “control” turn with a key. If this does not help, but the cuff still looks good outwardly and promises to serve at least 5 years, you can treat its edges with a sealant and press it.
Sometimes the gasket is not to blame for the leak, but the problem lies in the bolts that directly fasten the tank and, these are two large fasteners with nuts. That's just their weakening, rust or abrasion of the gasket under the nuts and becomes the cause of constant seepage of water, even if no one uses the toilet. To get to this part, you need to turn off the water and drain the entire contents of the tank. Unscrew the nuts that are under the toilet, check the metal for rust, and the rubber bands for signs of wear. If such defects are found, purchase a new set of fasteners and install it.
If, while crawling under the cistern, you saw that there is a crack on the body itself, it is unlikely that anything will save you from buying a new toilet bowl set, since it makes no sense to close up the sanitary ware.
How to fix the mechanism inside the tank with a leak?
Now we have come to the most curious stage of the repair - the mechanism, you should climb into it when water oozes out of the toilet drain, that is, it does not close tightly after flushing. A float or a siphon can be problematic there, so we will determine the sequence of how to eliminate the unnerving murmur of the toilet bowl.
Related Articles