Do-it-yourself supports under the floor logs. Floors: the main types of floors
For many years, in the construction of houses, wooden logs have been used as a supporting structure for flooring.
They hold the flooring well and allow for additional insulation, which makes any finish warm and makes it possible to walk on the floor with bare feet.
They also install the floor on the logs in the apartment during repairs (if the ceiling height allows) on top of the cement screed or the old coating.
The use of logs in the apartment and mounting options
 Logs and flooring are mounted quickly enough
 Despite the commitment of many builders to leveling cement mixtures and their use for apartments, individual specialists continue to level the floor by installing logs on the concrete floor.
The supporting and leveling flooring made of wooden logs is quickly mounted, it allows you to install and fix various communications under the main finish coating and install insulation.
 Between lags you can carry out:
- electrical wiring;
- water pipes;
- pipes of the heating system;
- television cable;
- fiber optic and cable interchange for the Internet;
- cable lines for various sound systems;
- sewer pipes if necessary (with a log height of 10 cm or more).
 Lay insulation between the carriers
 To create good thermal insulation on the subfloor, it is necessary to lay insulation material between the lags, which will allow the finish coating to be kept in the required temperature range for the apartment.
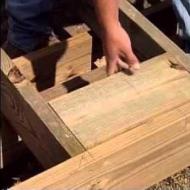
Quite often, the floor covering is leveled with a log, balancing the thickness of a bar or board until the elements are brought to the same level. Each owner will be able to carry out such a process in an apartment with his own hands, you just need to stock up on the appropriate material (wooden board and timber) and find out the features of fastening.
It should be remembered that installing a log to the floor is a fairly inexpensive option for installing a rough leveling floor, which allows (by laying insulation in the gaps) to create a warm flooring without the use of modern electrical and water devices.
Of course, it will not be heated from below, but a comfortable environment for your feet will be guaranteed.
Log fastener options
 When installing the floor on the logs in the apartment, the question necessarily arises: “How to fix the logs to the concrete floor?”.
Indeed, there are a number of lag installation options that are worth considering in more detail.
Often there are disputes between supporters of hard lag fasteners and fans of installing lags without fastening to a screed.
The latter constantly indicate that fasteners destroy the concrete base and increase the conductivity of sound.
Do not forget that visually, when buying a beam or a board for logs, it is quite difficult to determine whether the forest is wet or dry.
 It is recommended to install linings under the logs that muffle the sound
 A rather striking counterbalance to all statements is a reliable fact, the twisting of wood over time (if it is not fixed), this suggests that the forest was damp and not dried properly.
Even if the board or timber is under load (but the pressure on the flooring is different), modifications still occur in the material. Wooden boards, changing their shape, violate the parallelism of the finishing flooring, leading to the dismantling of the cover and the removal of crumpled logs.
 The issue of conducting sound with rigidly installed objects remains open, since insulation is often placed between the lags (often with increased sound-absorbing properties).
Since wood transmits sound quite well, many builders believe that it is necessary to install a soundproof pad under each log, which will be additional sound insulation directly for the log.
An alternative to rigid fastening and installation without connecting elements is the possibility of fastening the floor lag in a floating way. For more information on how to lay the floor along the logs, see this video:
The floating floor is a lattice of logs, mounted on stands and made exactly to the size of the room. The wooden mesh is also filled with insulation, and plywood and finishing flooring are laid on top of it. Such a floor has the right to exist, with proper construction, it is able to serve for a long time.
It should be remembered that loose logs to the base will emit a creak characteristic of wood.
 Before installation, let the material rest in the apartment at room temperature
The key to a high-quality installation of a lag and in the future, a good floor covering, is the right choice of material.
For logs, it is customary to choose pine wood with a moisture content of no more than 20%.
The selected products (beam and board), having brought into the room, must be laid and loaded with heavy objects (boards should lie for 3-7 days). After that, the press is removed, and the boards are ready for installation.
Before installation, it is desirable to plan the material and treat it with antiseptic and fire retardant compounds.
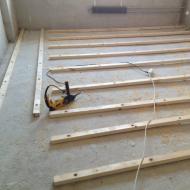
 The distance between the lags should be no more than 60 cm
 It is worth choosing a high-quality and reliable soundproofing material that will serve as a substrate; with it, you can set the lag to the level.
Before laying the prepared and processed logs, it is necessary to remove visible irregularities from the rough floor (knock down concrete bulges) and lay a waterproofing layer (roofing material or a special film).
 Depending on the thickness of the subfloor, the distance between the lags is selected.
The most popular gaps are 40-60 cm. The extreme logs should be 2-3 cm away from the wall.
Only then can you expose the structure and fix the lag to the concrete floor. It remains to choose the option of rigid mounting.
Types of hard fastening lag in the apartment
 Various options for rigid fastening the log to the concrete floor should be considered in more detail:


It should be remembered that when choosing a material for a log, you should not take boards with knots and cracks. After a little drying, all curved bars or boards should be discarded and new ones purchased.
After reviewing all the possible ways of fixing the lag in the apartment and installation methods, you should opt for the option that is right for you.
Today, sustainable construction is in the spotlight, and wood, as a building material, occupies the first place in it. This is facilitated by the fact that wood is an environmentally friendly and affordable material that has been processed by man for many thousands of years. Increasingly, you can see country houses and cottages made of wood, which combine nature and technology. As in any other house construction, one of the important stages is the creation of the floor. The very arrangement of the floor in a wooden house is a very important and crucial moment, requiring increased attention to the work performed. Therefore, in order for the floors in a wooden house to be strong and durable, it is necessary to follow the technology of their laying and adhere to certain recommendations and rules.
Floor construction and wood selection
The floor in a wooden house on the ground floor is laid on the ground and consists of the following elements: logs, subfloor, hydro and thermal insulation, finished floor and floor covering. The entire structure is installed on beams or support posts made of brick or concrete. Between the floor and the ground there is an underground, which is carefully ventilated to keep the wood in optimal condition and create a microclimate on the first floor.
Scheme of the device of a wooden floor
Important! The arrangement of wooden floors on the ground is a fairly cheap option, but for their arrangement it is necessary to take into account the level of groundwater. If it is high enough and the soils are wet, then you should take care of waterproofing the entire floor structure and high-quality ventilation of the underground.
Since the floor is subjected to frequent mechanical stress, the wood for its creation must be selected carefully and adhere to the following rules:
- the moisture content of the tree should be 12%, this will directly determine how long the tree will keep its shape;
- the tree should be free of chips and cracks, so that later you do not have to replace or repair part of the floor structure;
- boards should be treated with flame retardants and antiseptics, this will help increase fire resistance and avoid damage by pathogenic flora;
- to create a durable and strong structure, you should choose hard coniferous wood - spruce, pine, larch, cedar, fir. Although the most durable will be deciduous oak or ash.
underground space

Underfloor ventilation installation
The microclimate in the house will depend on how dry and well-ventilated the underground is, and how long the wooden floor will last. Therefore, to ensure ventilation around the perimeter of the basement, holes are equipped, which, regardless of the time of year and the direction of the winds, will provide natural ventilation. In case of snowy winters, ventilation pipes with a visor are taken out of the underground openings, and several window fans can be installed to increase air circulation. It is also necessary to take care of protection against various rodents. To do this, gratings with cells up to 8 mm should be installed on all openings.
wooden floor base
In order for the floor to be strong and durable, it is necessary to prepare a high-quality base. Wooden floors in a private house are laid on support beams laid in the foundation. If support beams are not provided for in the project of a wooden house, then it will be necessary to equip support posts made of brick or concrete. The only difference is in the supports on which the logs are laid; further work on laying the wooden floor is identical.
If the beams are laid together with the foundation, then the supporting pillars have to be done separately.
We determine the places for arranging support columns. To do this, we make marks on the embedded beams and pull the cord along the entire length of the underground. We do the same in the perpendicular direction. At the intersection of the cords will be the corners of the posts. It is also necessary to calculate the number of columns so that the step between them is 70-100 cm. The length of the step between the supporting pillars directly depends on the thickness of the beams or logs that will be laid on the pillars. The thicker the beam or lag, the smaller the step can be taken between the pillars. For beams with a section of 150x150 mm, the pitch of the supporting pillars should be no more than 80 cm. The dimensions of the recesses for the pillars should correspond to the sides of the pillar. When laying support posts, it is necessary to take into account the fact that the higher the posts are from the ground, the more stable they should be. Accordingly, the larger should be their cross section.

Arrangement of support posts made of concrete under the logs
In the places of installation of the pillars, we select the soil to a depth of 40-60 cm and lay the pillars themselves. They can be made of brick or concrete. Brick columns with a height of up to 250 mm are laid in "one and a half" or "two" bricks, higher columns are laid in "two" bricks.
Important! For greater reliability of the construction of brick columns, it is desirable to pour a foundation under them, which will protrude at least 5 cm above the ground level. Fix the bricks with cement mortar and waterproof them.
Concrete columns are more durable due to the reinforcing mesh inside. The dimensions of the sides of such columns range from 400 mm to 500 mm based on the height of the column itself.
Important! In order for the floor to be even, it is necessary to observe the horizon even at the stage of laying the supporting posts and beams. To do this, you should constantly check their level so that they are all in the same plane.
Then, over the entire area of \u200b\u200bthe future underground, we select a fertile layer of soil, level and fill up a layer of gravel, and then sand. Pour each layer with water and carefully tamp. To do this, you can use a special vibrating plate or an ordinary log with a nailed board.
Wooden floor installation
Once the base in the form of supporting posts or beams is ready, you can proceed with the installation of the wooden floor itself. We lay several layers of waterproofing on top of the posts; roofing material is perfect for this. We install logs or beams on top of the waterproofing layer, which we firmly fix in place. Logs can be laid directly on the support posts, but to increase the strength of the floor, beams should first be laid and logs already on top of them. If the length of the beam or log is less than the length of the room, then we lay the places of their joints on the support posts, connect them together into a lock and fix them with self-tapping screws. To fix the beams and logs on the supporting pillars, we use metal corners, which we firmly fasten to the posts with dowels, and to the tree with self-tapping screws.
Important! We process logs and beams with antiseptics and flame retardants. If you missed somewhere, or failed to maintain the horizon for the columns, then it's okay. This can be corrected by placing wedges or wooden spacers under the beam or lag in the place of its subsidence. The wedges and gaskets themselves are firmly fixed.
Single wooden floor
The device of a wooden floor in a private house can be single or double, but the design of the floor itself will be unchanged. Single wooden floors are usually made for summer wooden houses. Houses with such floors are unsuitable for year-round living. To keep the floors warm throughout the year, double floors with insulation are created.
To equip a single wooden floor, it is necessary to lay logs on the support posts and fix them. For logs, it is enough to use wooden bars 50x50 mm or 60x60 mm. A tongue-and-groove board 40-50 mm thick is laid on top of the log and fixed to the logs with self-tapping screws or nails. As a floor covering, you can use linoleum or just paint the boards. Sometimes, in order to give the entire structure of the floor strength, beams are first laid on the supporting pillars and logs are already on them. For support beams, in this case, a wooden beam with a thickness of 100x100 mm or 120x120 mm is used.
Draft floor double floor
Laying the floor in a wooden house, which will be inhabited throughout the year, involves the creation of a double floor with insulation. Such a floor requires a lot of effort and the amount of materials, but its level of reliability and strength will be an order of magnitude higher compared to a single-layer one. To make such a floor, you will need to perform the following steps:

Important! Boards should be laid at a distance of 15-20 mm from the wall to ensure ventilation and avoid swelling of the floor during seasonal wood swelling.

You can waterproof a wooden floor with a 200 micron polyethylene film.
- for waterproofing the finished floor and floor covering, we lay a 200 micron thick polyethylene film on top of the subfloor and additional thermal insulation made of foamed polyethylene. We overlap the film, and glue its edges with tape between each other. We make an overlap of 20 cm on the walls and glue it with tape;
- now that everything is ready, you can start laying the final floor and flooring.
To create a finished floor, you can use sheets of plywood or a massive board. Plywood sheets are laid on top of the heat-insulating layer and fixed with self-tapping screws along the perimeter and diagonally. Then you can lay the wooden flooring.
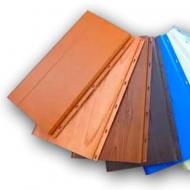
Grooved solid board

Groove board made of solid wood is not only beautiful, but also easy to install and use.
In the case of a massive board, everything is somewhat more complicated, although a significant advantage is that such a floor can be opened with varnish or paint without additional flooring. There are two types of solid board: tongue-and-groove and regular. The difference lies in the installation method. More simple and practical in laying is a tongue-and-groove board. To install it, do the following:
- before laying the board, it should be aged in the room for three days and "get used" to the microclimate of the room;
- we measure 10-15 mm from the walls to create a ventilation gap and in case of seasonal swelling of the boards;
- Finishing floor boards are laid across the subfloor boards. We lay the first row of boards strictly along the line with a spike to the wall and fix them with self-tapping screws. We screw the self-tapping screws in such a way that they overlap with the plinth near the wall. On the other hand, we screw the screws into the groove at an angle of 45 °;
- in the gap between the wall and the board we lay a wooden gasket;
Important! If the length of the floorboards is smaller in size than the room, we lay them "in a row". This will provide additional strength to the floor. The length of the screws should be several times the thickness of the board. Under the self-tapping screw, it is necessary to pre-drill a hole, this is necessary so that the board does not split and crack.
- the second and further rows of boards are laid with a spike in the groove of the previous row. We seal with a rubber hammer and fix with screws on the other side into the groove;
Important! In order for the wooden floor to last for a long time, the boards must be laid with annual rings opposite to each other.
Parquet massive board

We lay parquet boards "out of the blue"
Another option for the finishing floor is solid parquet flooring. In fact, this is the same grooved massive board, only shorter. Her styling has its own characteristics:
- a massive parquet board can be fixed with self-tapping screws only from the side of the spike;
- it is performed only "on the run";
- if a plywood base is used, then it makes sense to glue the parquet board first, and then additionally fix it with self-tapping screws;
- a massive parquet board can be laid diagonally, thereby visually enlarging the room.

You can open the wooden floor with varnish or paint at the end of all installation work.
Regardless of which element of the wooden floor structure we lay, it must be treated with antiseptics and flame retardants, this will extend the life of the entire structure as a whole. The laying of the wooden floor will be fully completed with the application of the final floor covering. It can be varnish or paint, the main thing is that the floor in a wooden house looks natural and fits into the overall concept. Laying a wooden floor is a rather responsible and complex matter, requiring increased attention and care in the performance of work. You can do all the work yourself, but still, you should find a partner.
Wooden floors are an ageless classic that, despite the emergence of numerous new technologies and materials, remains popular today. For the installation of wooden floors, boards are laid on wooden blocks, which are called "logs". And the floor is also called: "floors on the logs" or "on the logs." The essence does not change.
The concept of "lags" includes an extensive set of lumber:
- a log sawn in half;
- bars of rectangular section, in which one side is at least 1.5 times longer than the other;
- one thick board or two spliced or glued together;
These are the materials that can be used in the manufacture of a wooden floor on logs with your own hands. There are also metal and polymer ones, but they come with industrial systems and are not used in private housing construction.
If we talk about wood, then conifers are more often used for laying under the floor. They have low prices, and due to the significant content of resins, they are less susceptible to decay.
Any wood before laying should be treated with antibacterial treatment. For baths, treatment with flame retardants is also desirable - compounds that reduce the flammability of wood. Whether you choose ready-made impregnations for processing or soak with hot wax or drying oil is not so important, but this stage cannot be skipped.
 Logs can be laid on concrete, but only under them you need to spread a waterproofing film
 These bars are based on specially made structures - columns. This is when it comes to a private house or a bathhouse built on or a columnar foundation. They are laid directly on the concrete base. This is possible if:
- slab foundation;
- previously made as a base for the floor;
- the dimensions of the foundation allow you to make hanging logs;
- the floor is mounted in apartments of multi-storey buildings.
What lags to use
Choose the size and number of bars based on the load and thickness of the floor boards. The cross section of the lag and their thickness depends on the length of the span - the distance between the two supports. The greater the distance between the supports, the more powerful the timber required. For logs installed on a concrete base, there are no such requirements. Here, most often, the dimensions are selected based on the dimensions of the insulation, and of the thickness of the board that will be laid on the floor.
The step for the log (the distance between two adjacent bars) is selected from 30 cm to 100 cm. It depends on the thickness of the floor board. Correspondence is shown in the table. A step of 50 cm is considered optimal for baths. The thickness of the board is 25-30 mm.
 Table of the dependence of the thickness of the floorboard on the installation step of the lag
 There are some more recommendations on the width of the floorboard - do not take it too wide into the bath - as the humidity rises, it will warp more, which can even create difficulties when moving. Medium width is the best choice for baths.
It is desirable to lay the logs in one piece, without joints. But if necessary, they can be spliced. To do this, either cut the tongue into half a tree, or connect them end-to-end, securing at least two sides with pieces of boards at least 1 meter long.
Location rules
The first and last logs from the wall should be at a distance of no more than 20 cm. If, subject to the calculated step, the extreme logs are further away, their number is increased and the step is reduced.
They are placed either along the wall in which the door is located, or perpendicular to it. If one wall is much longer than the other, then it is along this long wall that the logs are placed. If the room is square or close to it in shape, then the location of the window can influence the choice: floor boards look best if they are located along the flow of light. That is, in this case, the logs are placed along the wall in which there is a window.
Lag floor device
The wooden floor can be with or without a subfloor. The type of floor device is determined by the level of groundwater. If they are located closer than 2 m, a subfloor device is mandatory. In all other cases - optional.
With a deep occurrence of groundwater, you can make wooden floors on the ground. There is a very cheap option, but it is also the coldest: there is no insulation, so this option is either for seasonal residences (dachas and baths) or for regions with a very warm climate. The only requirement is a high base.
 Floor device on logs with a cold subfloor
 If the waters lie close to the surface, wooden structures must be raised. Then they arrange special foundations-columns, on which lags are already laid. In this case, additional waterproofing measures are required.
Legs on concrete floor
If there is already a concrete base - a floor slab, screed or slab foundation, it is easier to make a wooden floor. Installing a log on a concrete floor takes a little time, how much depends on the height difference and the required adjustments. The order of actions and layers is as follows:

For baths, the choice of material depends on the type of room. For a steam room with its high temperatures, it is advisable to choose heat insulators that are not afraid of high temperatures. But they should not be afraid of humidity.
On the other hand, in the floor area, the temperature rarely rises above 30 °C, and under the boards it will be even less, so the question of temperatures can be removed. Remains moisture resistant. Expanded polystyrene and expanded clay meet these conditions. Mineral wool mats can also be used, but they are afraid of dampness, so it is advisable to insulate them well. As an option, each mat is hermetically sealed in a thick film.

Sometimes, for convenience, additional jumpers are installed between the lags. Such a frame for laying floorboards requires more materials, but allows you to save on the floorboard: it can be taken in a smaller thickness, since the supports are located more often.
There is a quick installation option - installation of adjustable logs. Adjustable logs are wooden or plywood bars with studs built into them and an adjustment system (nuts). By turning the nut in one direction or another, you change the level of the lag relative to the floor. The studs themselves are immured into the floor.
 This is what adjustable lags look like
 It takes 3-5 days to install such a floor, but its cost is about 15-20% more expensive than the usual version. But boards with a sufficient degree of moisture insulation will serve for a long time: there is no direct contact with a humid environment and they will not be damaged. Among the shortcomings: they "eat up" extra centimeters of ceiling height. For some, this is not critical, but for someone it is very important.
Wooden floor on the ground
For private houses, cottages and baths, it is often necessary to make the cheapest floor. And this is the floor on the logs on the ground. There is a minimum of material costs, but the floor turns out to be cold. So this is either for summer houses, or for the southern regions. In other regions, the cost of space heating will be very high.
For the device of such a floor on the logs, the following work is carried out:

Work on the device of such a cold floor does not require a lot of time. You also need some money.
Insulated version
Underfloor heating on the ground is expensive, but still it remains an inexpensive option. The preparation of the pit is exactly the same: removing the fertile layer and tamping the remaining clean soil. Here are the differences:
- The bottom and walls of the pit are lined with waterproofing materials.
- Crushed stone of the middle fraction is poured with a layer of 8-10 cm, it is well compacted, then it is shed with cement milk. Drying and setting of the layer last at least a day, then work can be continued.
Cement milk is cement diluted with water. By consistency, it resembles, rather, liquid kefir. Most often, the proportions are as follows: three or four parts of water are taken for one part of cement. This operation serves to adhere the bedding. A fairly strong foundation is formed.

In order not to bother with setting the lag - a long and troublesome business - level it up. This is easier to do when the beacons are set.
Floor on poles
When constructing a wooden floor, there is a subfloor on the pillars. It may or may not be insulated. Cold or insulated can also be the floor in any of the options.
Poles for the floor
Columns for the floor are made of bricks, small concrete blocks or use the "FL" type. You can use bitumen-impregnated wooden logs as posts. Some put boulders of suitable size with a flat top on the base. Boulders are a good support, but attaching logs to them is problematic.
Each column has its own foundation. In size, the base is 2-10 cm larger than the column. The depth of the foundation depends on the type of soil, but usually 10 cm is enough.
 If the underground waters are close, the logs are raised. Supports are made for them - brick columns
 There are two options for making bases for posts: separately make formwork for each, or fill it with a single tape. The first method is more economical in terms of material consumption, but the second takes less time: one or two common formworks are faster to make than many small ones.
The location of the supports is marked with a pencil on the foundation or on the lower crown (on the element to which the logs will be attached). Then, threads are pulled between the marks, and the formwork under the posts is already knocked down along them. There are other markup methods, but this one is the fastest and most accurate.
The dimensions of the formwork for the posts are 2-10 cm larger than the post itself, the height is 10 cm. Inside, on the compacted soil, several bars of smooth reinforcement are laid, they are poured with a standard cement-sand mortar. They wait for the solution to set for at least 3 days, then columns can be laid out on the base.

When pouring, it is necessary to monitor the height of the foundations: it must be the same. In principle, it can then be corrected by adding a solution, but again you have to wait 3 days. Therefore, try to immediately make them the same height.
Roofing material is laid on the finished base, it is possible in two layers. Then stack the columns. On top of them, it is also recommended to put roofing material, and then also a three-centimeter wooden board soaked in antibacterial compounds. Logs will already be laid on it.
As you can see, floor posts take a long time to do. If you want to speed up the process, you can put ready-made concrete blocks or beams, you can lay asbestos-cement pipes on well-compacted bedding. Some put boulders or tarred logs. There is another option - to drive pieces of metal or asbestos-cement pipes into the ground, stick several bars of reinforcement into them and pour concrete. There is probably more than one option, because our craftsmen are famous for their ingenuity.
 This is how the finished columns look like under the logs
 By the way, there is another option, but without support: hanging logs. Such a device of a wooden floor is possible in narrow rooms, which is far from always the case (do the laying step of the log a little more often than in the versions with supports).
 Hanging joists are a super fast option
 Warm and cold underground
If the logs are raised above the ground, there is free space under them. There are two exits. Leave the basement uninsulated or insulate it. At the same time, in each of the options it is still possible to insulate or not the floor structure, and it itself can be single or double. So there are a lot of options here.
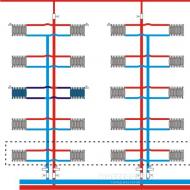
An uninsulated subfloor can be made with a single or double plank floor. Some options are shown in the figure. Moreover, the insulated floor is only in one version - at the bottom right.
 Floor options for logs with a subfloor
 You can insulate the underground very simply: lay any non-hygroscopic insulation on the waterproofing layer (roofing felt, roofing felt, film, etc.). Expanded clay is often used, from modern materials slab foamed foam propylene has shown itself very well, it behaves a little worse, but it costs less, so it is also used often. Sometimes the space is filled with foamed polyethylene - all the insulation takes several hours, but they do it only with special devices, so you either have to rent them or pay a specialist for work.
When using any of these heaters for ventilation of a wooden floor, it is necessary to leave a gap of at least 5 cm to the rough or finish coating.

Warm and cold floor
The cold plank floor along the logs can be single or double. Warm - only double: the insulation needs to be laid on something. One of the options is shown in the photo.
A cranial bar is attached to the lags on the sides below, boards of a rough (cranial) floor are laid on it. The bars should be thick enough so that it is convenient to nail the flooring. You can use an unedged board on the subfloor, but just be sure to remove the bark and soak it well with antiseptics: woodworm larvae often nest under the bark.
Next, waterproofing (membrane or film) is laid, and insulation on top. Here you can use all the same materials as for the insulation of the underground, plus (if you are satisfied with their ecology). But in the case of laying mineral wool, they also need to be covered with waterproofing from above - they really do not like water, and when wet, they lose their properties. The whole cake should take up so much space that 5 cm remains to the floor boards.
Ventilation of wooden floors on logs
It is also necessary to provide ventilation holes in the skirting boards. According to the standards for a room up to 15 m 2, two vents are required, the total area of \u200b\u200bwhich is not less than 20-30 cm 2. They are arranged in the plinths of opposite walls, covered with decorative metal bars.
 To improve traction and protect the underground from rodents getting into it, you can install a tin pipe in the air, on top of which you can install an umbrella
 For normal ventilation of the floor of the basement part of the foundation, ventilation ducts must be provided. In order to be able to somehow regulate the flow of air, dampers can be made. You can bring the ventilation pipe outside the foundation, raise it above the base, and make an umbrella on top of it so that precipitation does not fall into it.
One of the most important structural components of any building is the floor system - not the finishing decorative coating, but the whole "pie", consisting of several layers. There are several types of floors that differ in the raw material base, manufacturing method and characteristics. Everyone who is faced with a construction or major reconstruction makes a choice in favor of one of the systems, based on their capabilities, preferences and building parameters. It is convenient that some designs involve the simultaneous creation of an underfloor heating circuit - the only one or an additional one. Consider the main floor systems in demand among users of the FORUMHOUSE portal:
- how to make floors;
- how to make floors along the lags;
- how to make floors on floor slabs.
Floors on the ground
Monolithic floor - a multi-layer structure, arranged directly on the ground inside the perimeter of the foundation, a type of concrete screed.
The system consists of the following layers:
Packed soil- it needs to be aligned. Depending on the level, the ground is sprinkled or extra centimeters are removed. The more carefully the surface is rammed and leveled, the stronger and more reliable the screed will be.
bedding- most often used sand. If a thick layer is needed due to the height of the “pie”, it is recommended to backfill in several approaches with tamping of each layer (10-15 cm each). In order to level and compact the soil and bedding as much as possible, a layer of coarse gravel is poured and compacted over the sand. It is also possible to use a common layer of ASG instead of separate layers of sand and crushed stone, tamping is required regardless of the type of backfill. A vibrating plate, in several approaches with a change in the direction of movement, is the best friend of floors on the ground.
Rough coupler- a layer of concrete a few centimeters without reinforcement. It is relevant with strong groundwater pressure and when creating in-depth structures - in basements, basements. A bituminous waterproofing is welded over the screed, sealing the surface and requiring a flat, rigid base. If we are talking about ordinary floors on the ground and there are no problems with waterlogging, this layer is dispensed with.
Waterproofing- cuts off moisture that will come from below, various materials are used, but in most cases it is a thick film (from 150 microns), overlapped with a margin (15-20 cm), in one or two layers. The joints are glued with adhesive tape for tightness, 20 cm of film is put on the walls.
insulation- for the insulation of the floor, slab materials (PSB-25 or EPPS, with a thickness of 100 mm or more) are used, which are laid end-to-end over the waterproofing. When using extruded polystyrene foam, another layer of film is needed on top to prevent direct contact with the cement mortar. Styrofoam is not afraid of such a neighborhood.
Screed- the thickness of the concrete layer and the brand of mortar used are calculated based on the expected loads, on average it is 50 mm. The screed is reinforced with a metal mesh with a thickness of 4 mm. The thicker the screed layer and the greater the expected loads, the thicker the mesh should be. In order for the concrete layer that protects the filling from external influences to be uniform, special plastic stands or improvised devices are used. To maintain the fill level, beacons are used, installed at an equal distance.
With a standard pie, there are two ways to create a floor on the ground - with the union of the slab and the foundation (rigid bond) and through the damper tape (floating screed), you can learn more about the damper tape from the material. In the first case, the design turns out to be dependent on the possible shrinkage of the foundation, in the second the screed lives its own life and is not subject to deformation.

The advantages of floors on the ground include their energy efficiency - they accumulate heat, versatility - suitable for various types of soil, durability - you can forget about a properly made screed for many years. It is also attractive for owners of private houses to immediately fill the floor heating circuit - water or electric - into the screed. Plus, for most finishing materials, the resulting slab will be the optimal base with minimal or no finishing, if you try and maintain the level. For a concrete base - the best option.
But it was not without drawbacks - there is a high laboriousness of the process (one of the forum users earned disk protrusion without calculating his own strength), and the inability to carry out communications in the ground, and the rise in price per square meter with large volumes of backfill. This is one of the most popular types of floor, mastered by the portal participants.
Staryjdub Member FORUMHOUSE
- Region of residence - Stary Oskol, Belgorod region;
- Foundation type - TISe;
- Type of walls and number of floors - walls made of gas silicate on mortar, plastered from the inside, not yet insulated from the outside - thickness 300 mm;
- Floor construction on the ground (in layers) - soil, sand, polyethylene, roofing felt, concrete, XPS (2 layers of 25 mm each), heated floor: 50 mm screed with polypropylene fiber, 10 mm finishing screed, special substrate for TP, finishing - laminate 8 mm.
The screed is floating, we have been living with such a floor for several years, no problems or minuses have been noticed, everything suits.
Another FORUMHOUSE user chose ground flooring as the best heat-saving option.
chicken-A Member of FORUMHOUSE, Moscow
The house with a total area of 135 m², I operate all year round in the mode of residence on short trips - a couple of weeks in it and the same in the city. Partly due to the floors on the ground, which do not break the thermal contact of the internal volume of the house with a huge earthen heat accumulator, I spend very little on heating. True, other applied methods of saving on heating help me here.
And this craftsman built a concrete base that has served faithfully for two decades.
motiv Member FORUMHOUSE
- Samara Region;
- A mixture of strip and pile foundations (non-hanging grillage);
- A house of one and a half floors, well masonry with expanded clay inside, two bricks thick;
- The house is about twenty years old;
- The floor on the ground is just there, and I don’t remember any problems with it. You can postpone the erection of the floor to a later stage during construction.


Floors on joists
Beam ceiling, as opposed to a monolithic concrete slab. When creating floors along the lags, a “lattice” of longitudinal elements is obtained at the base - wooden, metal or reinforced concrete beams.
In one-story and frame private housing construction, wooden beams or logs are more in demand - they can withstand heavy loads, their laying does not require special time costs and wet processes. The required beam thickness is calculated based on the expected loads, the optimal indicator is 1/24 of the length. Coniferous wood is used for the beams, as it is more resistant to external influences, the humidity should not exceed 14%. Before use, it must be treated with special antiseptic compounds - to prevent decay and damage by pests and microorganisms.
Depending on the type of foundation, the beams are installed in special grooves (left during pouring or masonry, cut out in wooden bases) or stacked on top. If the beams are in contact with metal, concrete or brick, it is necessary to make additional waterproofing at the junction (resin, roofing material, film).

A typical beam slab pie consists of the following layers:
floor beams- the step between the elements depends on the expected loads and the length of the span, on average - 1 m.
Logs (crate)- a wooden beam laid perpendicular to the beams, the greater the distance between the beams, the more powerful the logs should be. To withstand the level with curved beams, wooden spacers are used, the distance from the wall to the log is 20 cm. When calculating the step, this nuance is taken into account. When the distance between the beams is less than 80 cm, you can immediately mount the subfloor, without a log.
Draft floor- it is necessary for laying insulation, it is laid between the logs or between the beams, with a small step. As fasteners, cranial bars (beams with a smaller section) are used, attached to beams or logs. The flooring of the boards on the bars is carried out without the use of fasteners, the boards are placed close, but lie freely.
Moisture protection- protects the insulation from absorbing moisture from the subfloor, but should not retain steam, so ordinary film is not suitable. You can refuse waterproofing if the subfloor is dry and the groundwater level is low.
insulation- most commonly used slab or roll materials: stone wool, PSB, XPS or backfill materials such as ecowool.
vapor barrier- it can be a special membrane or ordinary polyethylene film.
ventilation gap- when designing the ceiling, it is recommended to choose logs that will be slightly higher than the insulation layer - there will automatically be a gap for ventilation. If this was not done, then after laying the insulation, a timber is stuffed, which will give the desired distance.

Whether to lay another layer of the subfloor after the insulation depends on the future finish coating - plank or slab varieties are self-supporting, for linoleum and carpet you will have to spend money on the base layer.
The advantages of such a floor system include the speed of construction, reduced load on the foundation, the absence of heavy physical exertion during manufacture (no need to drag tons of sand and gravel, pour cubic meters of concrete).
Among the shortcomings, they note the need for effective ventilation of the underground, a lower load limit, the fire hazard of wood and less durability compared to concrete. To make underfloor water heating, you will need to spend additional money on a screed or use alternative systems, etc. But floors of this type are chosen by many developers, including portal participants, modifying a typical pie to fit their parameters.
kolyaseg Member of FORUMHOUSE
Hemmed from the bottom an inch board 15 cm wide, 7-8 cm apart, on top of the resulting grate I put a fiberglass mesh for facade plaster and there was already a heater on it - three mats overlapped, it turned out 15 cm. lag board 100x50 mm 24 cm apart. The boards are already OSB-12 or 15.
fiberglass mesh kolyaseg replaced the waterproofing film, believing that it would more reliably keep the insulation from destruction, taking into account the gaps in the subfloor.
Mishgun21 Member of FORUMHOUSE
Log cabins/houses made of logs 23 cm, 6x6 meters (with an attic floor), the distance between the logs is different - from 1 m to 1.5 meters. The logs are made of logs, the log house stands on screw piles. The floor pie is like this:
- Bar forty;
- On it is a rough floor;
- From above, a hydro-windproof membrane, with a smooth side to the subfloor (so that moisture does not pass into the insulation), rough - to the heater, so that moisture comes out of it;
- Insulation - 150 mm of basalt wool, I will increase the beams with a fifty-fifty bar;
- I cover everything with vapor barrier;
- Counter-lattice, to create a ventilation gap (bar 50x25 mm);
- Batten.
Floor installation on floor slabs
Like the floors on the ground - a beamless ceiling, with the difference that the reinforced concrete slab is not poured on the spot, but is purchased ready-made.
Floor slabs are a popular option for houses with a full basement or basement, when the slab is also the ceiling of the lower level. Unlike the floor on the ground and the floor on the logs, it is necessary to involve construction equipment, since it is impossible to lay even the lightest slab by hand. But in terms of speed, slab overlapping devices outperform all other options.
Floor slabs are manufactured industrially in two categories - single-layer solid and multi-hollow. The first ones are a reinforced monolith, the second ones have through rounded holes (channels) into which it is convenient to hide communications. In private construction, mostly hollow-core slabs are used. Their thickness is 220 mm, they are lighter than solid ones, have low thermal conductivity and better isolate sound. With a standard thickness, the slabs are able to withstand different loads, depending on the brand of concrete and the parameters of the reinforcing cage. The length varies from 2.4 meters to 6.8 meters, width - from 1.2 to 1.5 meters, weight - from 0.9 to 2.5 tons.
 Floor on floor slabs in a private house.
How to make a floor in a private house on floor slabs
The work on laying the plates is carried out in several stages:
Foundation preparation- the foundation for the slabs must be perfectly flat. If during pouring slight differences (up to 5 cm) are obtained, they are leveled with a cement-sand screed. In areas with a slope, it may be necessary to pour a concrete armored belt or brickwork.
Plate preparation- before laying, the channels at the ends are sealed with a heater (pushed in) and cement mortar (covered).
support- how much the slab should rest on the base depends on its type: the overlap on brickwork is from 125 mm, on concrete - from 60 mm, the long side of the slab does not rest on the foundation. If the slabs laid side by side have lugs, they are connected to each other (welded with reinforcement), if the slabs are without lugs, after removing the chalk (laying device), they are shifted close. At the points of contact between the slab and the base, a layer of cement mortar (M100) is laid - 2 cm, a reinforcing bar (10-12 mm thick) laid in the center of the seam will help prevent extrusion. Laying on a dry base is also possible, but this is not the case when it makes sense to save money. If the slab is both the base of the floor and the ceiling of the lower room, it is laid with the smooth part down to simplify the finishing later.
Building a house begins with a foundation, and major repairs are impossible without reliable flooring. This plane in any room has the greatest load, therefore, the reliability of the floor and its insulation depend on the quality of the installation of wooden logs. Although it takes half the budget to renovate, jogged wood floors provide comfort, a pleasant wood grain feel, and a mechanically resistant base that is designed to withstand heavy loads.
What are lags, their purpose
Logs are beams used as a base for a wooden floor or other covering. The logs are laid parallel to the walls, and wooden boards, plywood or laminated chipboard are mounted transversely on them.

Wooden floors on logs - a reliable design that is used in construction:
- new wooden houses;
- brick buildings;
- buildings made of concrete slabs and other materials.
Usually a wooden beam is used for the log, since it is a publicly available material. It is suitable for styling:
- on the screed;
- ground base;
- old wooden floors and other coverings.
Floors on logs are practically indispensable in cases where there is no other way to competently equip the flooring on a base unprepared for finishing. The main functional advantages of the lag:
- surface leveling;
- providing sufficient sound insulation;
- increase in thermal insulation of floors;
- the ability to hide communications;
- load distribution on the lower layer;
- providing air circulation under the floor;
- creating a suitable crate for flooring boards;
- the ability to replace several structural elements if they are damaged without replacing the entire floor;
- ensuring the strength of the floor when installing a log in a wooden house.

Wooden boards cannot be laid on an earthen base without laying a log in a wooden house, no matter how dry and well prepared this base may be. Without a lattice of timber, wooden floors will quickly become unusable. Everyone knows that the presence of high-quality wooden floors is both a special microclimate in the house and a beneficial effect on the health of wood.
The modern building materials market offers ready-made logs or beams and beams used for these purposes. A long wooden beam of standard sizes is suitable - 40x60 mm or 50x50 mm. Laying floors from modern materials using power tools and the latest technology is a pleasure. Therefore, it is more profitable to make logs and lay the floors on your own without paying for the work of an entire construction team.
Tip: The board for laying the floor should be about half as thin as the wooden logs, then the load will be less.
Adjustable lag designs: the pros of using
Many are familiar from childhood - in order to level the surface, you need to put a wedge or a piece of a flat board. But this is not so easy when it comes to floor surfaces with large wall-to-wall level differences. Large differences occur not only with uneven subsidence of the soil in old houses, but also when logs are laid in a wooden house during its construction. In this case, adjustable lags are made.
This design saves time on leveling the floor and simplifies its installation, and inside there is space for thermal insulation and additional insulation, there is also space for laying communications. Adjustable structures are not used only with low ceilings, since such floors will take about 7-12 cm from the height of the walls.

What is the best way to make lags?
Logs under a wooden floor can be made from different types of wood, and when there is a choice, it is better to use an inexpensive, but resistant to destruction and wetting timber, for example, from fir and other conifers. It is better to make floors from decorative types of wood, and for rooms with a low load, for example, in a nursery or bedroom, a soft tree with a beautiful texture pattern is suitable - cherry, alder, walnut, aspen. It makes no sense to pay for expensive wood with high decorative properties for painting, as long as there are no defects and knotty.
Heavy duty floors are made from Siberian larch, oak and ash, as they do not leave dents from heels and furniture legs. Supermarkets also offer ready-made tongue-and-groove boards, which have milled spikes and grooves on the edges for quick seamless installation. Logs under the floors are usually lined with inexpensive wood - spruce, pine. Quite enough dry wood of 2-3 grades.
Tip: If you take wood for logs in a building supermarket, consultants will tell you the size of the log for a wooden floor, help you choose a timber of a suitable breed and the desired section.
The beam under the logs and the board for laying the floor must necessarily be treated with a water-soluble, anti-fungal and mold composition, such as the drug MHCC, ammonium fluorosilicon, HCP.

What is the required distance between the lags?
The lag step (the interval between the timber) directly depends on the thickness of the board or flooring. When thick, durable boards are used, the joists are not placed so tightly. And on a light coating, for example, under plywood, logs are often placed.
The ratio of the thickness of the board and the distance between the lags:
- for 20 mm - 30 cm;
- for 24 mm - 40 cm;
- for 30 mm - 50 cm;
- for 35 mm - 60 cm;
- for 40 mm - 70 cm;
- at 45 mm - 80 cm;
- by 50 mm - 90-100 cm.
Tip: If by the end of the installation the lag has gone astray, it does not matter, take a little step between the last lags, which will strengthen the structure. If the floor board is rather thin, it is better to reduce the interval when laying wooden logs against the walls - where the furniture should be.

Basic requirements for the correct installation of a wooden floor along the logs
When installing a log for the floor in a wooden house with your own hands, it is important to comply with the following requirements:
- make lags as stable as possible;
- put the beam of lags horizontally, with the exception of the slope provided for by the architectural project;
- log wood should be as dry as possible;
- it is desirable to ensure microcirculation of the space under the floor.
Attention: If the logs are laid on an unstable base, such as the ground under the wooden floor on the ground floor of the house, it is recommended to build small brick columns 250x250. They are made of red ceramic bricks bonded with cement mortar. Such a base responds best to the natural moisture inside the floor.
Tip: It is important to provide a floor constructed on logs with sufficient sound insulation using a substrate or roofing felt.

Laying an adjustable subfloor
Directly on a dry concrete screed or reinforced concrete slabs, wooden logs are being installed. They are laid strictly horizontally, observing an equal interval - about 50-60 cm, checking the level. Where necessary for leveling, under the logs additionally lay scraps of wood building materials and wedges from boards:
- plywood scraps;
- other wood building materials.
It is easy to assemble the floor base structure:
- to screw in the bolt-racks in the logs, we make holes - for every 2 m of the length of the beam, 5-6 holes are enough;
- laying the log is carried out at an equal interval;
- we drill holes in advance, but so that the drill passes through the holes of the pillar bolts;
- we observe the horizontal level and align;
- we hammer in the stop of the dowel by 3.5 cm;
- when the bolt-racks have protruding parts, we cut them off;
- after the wooden logs are leveled, we lay wooden boards or other topcoat on this base.
We mount the logs to the concrete base with anchor bolts or dowels of sufficient length to break through the height of the bar by several centimeters. Adjustment will be provided by screws for fastening wooden logs, as well as plastic washers and racks on which they rest.
This installation technology has a lot of advantages - leveling the floor, laying communications, installing the "warm floor" system, laying the electrical cable, Internet, telephone, gas and water pipes, which it is desirable to hide under the floor.
Attention: All listed communications should not touch or intertwine with each other! It is important to provide access to the communication outlets.

How to insulate the floor along the lags?
Before putting logs in a wooden house, it is important to think in advance how the floors will be insulated from the inside. The properties of wood, due to environmental friendliness, naturalness and warmth, are widely used not only for aesthetic purposes, but also for home insulation. However, for all its attractiveness, in the cold season, the feet feel the coldness of the coating if the floor is not insulated.
Wooden floors are one of the oldest ways of arranging the lower surface of a dwelling. Additional warmth was provided by thick carpets based on wool yarn over planks. Today, various heaters from the inside are widely used, including the Nexans warm cable heating system.
Today it is recommended to insulate a wooden floor on logs with expanded clay, expanded polystyrene, isover, basalt wool and other modern materials, including spraying or roll materials. In free gaps, gaps or unfilled cells, they are filled with fragments and waste of insulation, but a small air gap is left on top.
Tip: If the device of wooden logs was required to level the old wooden floor, then additional insulation is not necessary. The coldest base for a wooden floor is the ground under the first floor or a concrete screed, on which expanded clay is often poured. The floors on the upper floors do not need to be insulated.

Laying lag on a concrete base
Logs are laid on a concrete base in two ways.
1. For leveling, a cement screed is made to lay logs on it. This is a reliable method, and the lathing of their timber lies flat, the floors do not deform, the lags on the screed are quickly mounted, providing a solid foundation around the entire perimeter of the room.
2. Sometimes a special lining is made between concrete and lags of different thicknesses to level them without adjustment. This is not the best method, although it is often used. However, when the floor is loaded, these pads will gradually crumble or deform, and the floors will creak and sag.
Before laying the lag on concrete, it is important to take several important steps:
- complete a cement floor screed or use a self-levelling compound;
- carry out work on waterproofing the base, since the soil under the first floor and concrete conduct moisture well - use a polyethylene substrate or film;
- provide sound insulation with special gaskets that can dampen all vibration and impact noise, as well as everyday sounds in the interior space - use cork substrates or cheaper ones based on foamed polyethylene.

If the logs are made on the ground (on the 1st floor without a basement), then it is better to lay the insulation directly on the subfloor.
After completion of these works, the laying of the log is completed, the timber is joined if it is shorter than the distance between the walls. It is advisable to use a bar with a length of at least 2 m and dock it with ends. Make sure that the joining seams do not go in one line - they must be alternated.
Logs and laying the floor on them are best done from the corner of the room opposite the front door - for the convenience of working in an unoccupied space. We begin to lay the first row 10 mm from the wall, that is, with a small gap, attaching it to the lags with self-tapping screws. This gap is important for the expansion of wood, which reacts to fluctuations in temperature and humidity. A plinth will be laid on top of the floor along the edge, which will hide this gap. The construction of the floor along the logs is very durable and reliable, and such a construction is easy to repair in fragments.
We lay the boards on the logs
The board must be measured and cut so that the butt joints go right in the middle of the timber. Sheet materials are fastened with self-tapping screws "in the pot" so that they do not go beyond the floor surface. The recesses from the hats after the installation of the board are sealed with putty, which will not be visible after painting the floor.
Tip: It is advisable to alternate the board with a different arrangement of growth rings - up or down, joining each other tightly, after which they are thoroughly fixed on each lag. In the last rows, we fasten along the very edge so that the baseboard hides the hats.

Under the finishing flooring is often used:
- decorative plywood;
- tongue and groove board;
- laminated chipboard;
- Fiberboard for linoleum, carpet or expensive parquet.
Related Articles