How to sheathe a metal staircase with a tree with your own hands. Facing stairs with wood: finishing options and installation steps Sheathe a metal staircase with wood with your own hands
Recently, old houses, as well as new buildings, are faced with decorative facades.
This is done so that the constructed building looks complete and beautiful.
The latest trend is siding.
Today we will talk with you how to properly clad a house with metal. Consider installation, advantages and disadvantages, and also perform some calculations.
Types of siding
According to the material used, siding is divided into types:

Characteristics of metal siding
Types of metal used
Panels for sheathing houses and buildings are made of various types of metals:
- Aluminum.
- Steel.
- Zinc.
have received wide practical application steel metal panels.
They are usually covered with paint with a protective varnish, or a polymer composition. Aluminium, zinc and color coated panels are significantly more expensive than painted steel.
Types of produced sizes
Types of external attractiveness
During production, metal siding can be given any shape in the form of rounded wood, or in the form of brickwork. That is, set any texture, relief, color and shade.
Also, the material has a perforation along the upper edge, which makes it possible to simplify the process of mounting on the frame, and also hides the heads of self-tapping screws for aesthetic beauty. Plus, this perforation reduces the stresses on the plates that occur during expansion and contraction from thermal fluctuations.
Also in these plates there are special holes designed to remove excess moisture from the skin.
Calculation of materials and components
Before buying material, you should draw up a plan with clear dimensions and calculations of the amount of material.
To do this, we make a detailed drawing on a piece of paper, indicate the height of the building, the width of the walls, the dimensions and doors. To calculate the number of elements, you should find out the usable area.
It is calculated according to the formula:
S total = S walls - S openings
If you are planning a brick house and do it yourself with your own hands, it is good to map out the strips of material on the walls. Also, this diagram will help with installation.
Now we will calculate the auxiliary components:
- Finish and start rails. As the name suggests, they are used for fastening the initial panel and for the final completion of the installation of panels. It is calculated as follows, the length of the perimeter of the house is divided by the length of the rail, and we get the right amount.
- Internal and external corners. Used to decorate the corners of buildings. For decoration, it is better to use whole guides, as the seams will be visible and the aesthetic appearance will be disturbed. Therefore, the number of corners is equal to the number of profile.
- J-profile. They are used as the completion of the vertical plane of window, doorways and diagonal gables. The length of all listed elements in linear meters is added up and divided by the length of the J-profile.
- H-profile. Used to connect the panels themselves. Usually sold by the piece. The quantity can be calculated according to your scheme.
- window profile. They are used in cases where the depth of door or window openings is deeper than 20 mm. You can use J-profile as an alternative if its width matches. Also sold by the piece.
- platbands. Used for finishing openings. Sold individually.
It should be noted that, like most materials, siding should be bought with a 10-15% margin to protect yourself from additional costs.
Also, different batches of the same color may differ in shades and it will be very difficult to choose a color scheme.
Pros and cons of metal siding
Advantages
Consider the main advantages of metal siding:
- Ideal for any climate. Ability to operate in temperature ranges from -50 to +50 degrees Celsius.
- When using siding, we create, which allows the wall and insulation to freely remove excess moisture, and fungus and mold do not appear from here.
- The service life of the material is over 50 years.
- High strength and practicality. The siding is not exposed to direct sunlight. Absolutely non-combustible material, and due to the high-quality coating does not rust.
- Ability to work at any time of the year. Convenience of finishing houses with complex geometry.
- Simplicity and speed of installation technology. Opportunity to do your own work.
Flaws
Now let's look at the cons:
- Since the metal does not heat, a layer of insulation is required.
- Bad scores. When it rains, you can hear the raindrops hitting the metal cladding.
- Under mechanical stress, dents may appear. Replacing an element is a laborious process, and bending is almost impossible.
How to sheathe a house with metal siding
Preparation
Like any installation process, this one also begins with a preparatory process.
- To do this, remove all decorative elements from the wall surface (drainpipes, television antennas, etc.).
- If the house is old, then you will need to clean the walls of dirt, repair all visible defects (chips, cracks).
- Also, experts recommend processing the walls. This is often used for this. But only the entire surface should be treated along with the base.
- Next, markup should be applied. This is done so that the vertical guides are perfectly aligned. To do this, you need a building level and a pencil. The interval between the posts is chosen equal to the width of the insulation or the length of the siding. But usually this distance is 50-60 cm.
- Also, for ease of installation, you should mark the installation location of the fasteners and install the beacon. Horizontally, a place for fasteners is marked every 50 cm, and vertically every 80 cm.
crate
After all the preparatory work, we proceed to the installation.
- To do this, we fasten the brackets, they are installed on a substrate made of, fastened with anchors or dowel nails.
- Next, the guides are attached to the brackets, for this we use rivets or self-tapping screws.
- The installation of vertical racks is carried out according to the following scheme: first, we install the extreme racks at the corners, and then we pull the thread or fishing line and set the rest of the guides.
- Periodically check the level of the plane. It is better to use a metal profile as guides, rather than wooden bars. Since even a well-treated tree will begin to rot and rot over time.
- In order to speed up the process of assembling the crate, you should use. There is one caveat, if the length of the guide is not enough, then it should not be joined closely, it is necessary to maintain a distance of 1 cm, this is the so-called technological gap.
Warming
The next stage is the laying of insulation between the profile.
You can fix the insulation with the help of dowels-fungi. Thickness and density varies by region. If you use polystyrene, then all seams and cavities should be foamed with mounting foam.
A membrane material is laid on top of the insulation material, which ensures the condensate exit from the insulation side. The joints of the material must be glued with construction tape.
Installing additional items
Before fixing the siding itself, the installation of auxiliary elements should be carried out. So, first we fix the basement plums. From below we set the starting bar, and from above the final one. We install corner profiles in the corners.
At the joints of the panels, we install flashings. Experts recommend applying sealing tapes to the frame at corners and joints, which will then be clamped by the siding and protect the internal elements from snow and rain. Framing window and door openings.
Now you can begin to install the first row of siding on the facade of the building, to the starting bar. Fastened with self-tapping screws into the profile holes on top of the panel. The self-tapping screw is placed strictly in the middle of the hole and is not tightened to the stop. By this we make the panel movable as a result of temperature fluctuations. Next, we install the next row, and so on until we assemble the entire sheathing system.
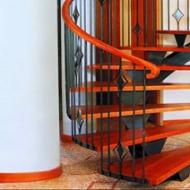
To improve the appearance of stairs made of metal or concrete, wooden cladding is used. A frame without additional plating not only looks rough and sloppy, but also poses a danger during operation. The staircase, finished with natural material, looks cozy, stylish and attractive. Such decor will remain relevant from season to season.

Advantages and disadvantages
There are many advantages to this type of cladding.
- Environmental friendliness. Wood is a natural and environmentally friendly material, completely safe for health. It is recommended to use natural finishes if allergy sufferers, small children and pets live in the house.
- beauty. Appearance is especially important when decorating residential premises. Wooden paneling gives an atmosphere of coziness and comfort. The attractiveness of natural material captivates and catches the eye. The choice of buyers a huge variety of colors, textures and textures.


- Durability. High-quality finishing material will retain its shape and beauty for several decades - this is a profitable investment in decorating and arranging housing.
- Safety. An improperly designed staircase can cause many injuries and injuries. Wood paneling is used to increase the security level of this object.
- Practicality. Facing will make the structure more reliable and practical - it will become denser and thicker. Experts recommend using this finishing option when it is necessary to strengthen the stairs.


The main disadvantage of such decoration is the cost. Finishing materials from natural raw materials have always cost more than artificial counterparts.
In addition, such a finish will not work if high humidity is constantly maintained in the room: such conditions negatively affect the lining, changing its shape and destroying its integrity. Moisture is quickly absorbed into the wood, as a result of which the cladding loses its positive performance characteristics.

How to choose the right method?
Depending on the style of the interior, material possibilities and personal preferences, the frame can be sheathed in two ways:
- partial clearance- decoration of individual structural elements: the material covers the parts that are most subject to daily loads;
- full plating- outwardly it will seem that the staircase is completely made of wood.


And also when choosing a method, it is necessary to refer to such characteristics as:
- state of the stairs;
- material features;
- configuration.
Natural wood upholstery costs a lot. Elite material from rare and valuable breeds is affordable only for wealthy buyers. To save material resources, it is necessary to choose the lining from the most affordable varieties or use partial lining.

Types of wood used
Oak
This tree deservedly bears the title of king among hardwoods. The finishing material boasts practicality, endurance, reliability and durability. Oak cladding will provide the structure with a long service life and decorate the room.
The color of the breed changes with time: the lining is darker, the color becomes more saturated, noble and thick. The color palette of the finishing material is diverse and multifaceted.

Ash
The variety is actively used in construction and the production of finishing materials. The wood has an expressive texture and a slight gray tint, giving the variety a nobility and sophistication. Ash is very similar in strength to oak.


Beech
Beech paneling will please you with a long service life. The texture of the material is uniform. Designers often use this variety for mahogany decoration.


Pine
Coniferous trees are also often used to make finishing materials. This is a practical and cost-effective option. The variety is easy to process and tinted without problems. And also wood has wear resistance and practicality necessary for sheathing stairs in houses and high-rise apartments. The best option for self-assembly.


exotic
Rare, exotic varieties are especially popular. Among the many options in the leaders are breeds such as teak, wenge and merbau. Wood attracts attention with a rich and expressive color. If you make a choice in favor of the above options, it is recommended to turn to the services of professionals for sheathing stairs.
Regardless of the option chosen, the product must be of high quality, because the decoration of the stairs with wood includes both practical and aesthetic aspects. In order for the stairs to the second floor to become a key element, the sheathing should please the appearance and harmoniously fit into the interior.


Required set of tools
If you plan to do the work on sheathing steps with your own hands, you will need special tools and fixtures. The minimum set for working with finishing material in a domestic environment is as follows:
- screwdriver;
- milling machine;
- Sander;
- a set of hacksaws for wood and metal;
- construction plumb;
- level;

- jigsaw;
- standard metal hammer;
- rubber or wooden mallet;
- electric drill with adjustable speed;
- a set of drills and a milling nozzle.

To carry out the work yourself, you must have experience in handling the above tools. During the installation process, be sure to adhere to safety precautions, and with the help of overalls and accessories, protect yourself from construction debris and dust.
Features of working with concrete structures
When facing stairs made of concrete, you need to familiarize yourself with some subtleties. Such structures can often be found not only in residential buildings, but also in shopping centers, industrial and public buildings, office buildings. As a rule, in such stairs, the dimensions of the steps differ slightly from each other. Before facing, this defect must be corrected.


frame
To facilitate the installation of wooden cladding material, you can install a frame made of natural material over the concrete stairs. After the installation is completed, it is upholstered with an array of the type of wood chosen by the buyer.
In the case when it is impossible to build a frame, it is necessary to navigate along the largest and highest step. The rest must be brought to its size using a special fill. In the process of work, formwork is installed from durable and moisture-resistant plywood.


fill
The most common and widely used option is the purchase of a cement-sand mortar. It can be found at any hardware store. Cement marking must be at least M150. You can also use special self-leveling mixtures based on cement. Such compositions give excellent results in the shortest possible period of time.


Do not forget to thoroughly clean the steps before pouring. Reinforcement of the stairs should be carried out only if the thickness of the fill allows. The design is reinforced for greater reliability and durability.
Padding
The material absorbs and retains moisture. So that this does not affect the practicality of the design, the stairs are treated with a primer. The composition based on PVA glue is ideal: the solution will block small cracks and pores in concrete, preventing moisture and dampness from getting deep into the concrete. Processing is carried out after leveling the stairs, sealing large cracks and correcting defects by means of putty.

Additional finishing
In the process of cladding, the stairs are often covered with a special gasket made of linoleum or polyethylene foam. The layer thickness is 3 mm. Such additional finishing is carried out only if it was possible to perfectly align the steps. The gasket will act as a reliable sound insulator.
Otherwise, when the surface of the stairs is far from perfect, experts recommend using plywood. As a rule, sheets with a thickness of 10 to 12 millimeters are used for work. The dimensions of the material are strictly adjusted to the dimensions of the steps. The material is fixed with liquid nails, and the corners are fixed with self-tapping screws. If you want to use a sound deadening pad, it is glued on top of the plywood.


After the laying of pre-prepared wooden steps is carried out. If it is not planned to use other wood facing materials, the free space is covered with plasterboard. If desired, it can be coated with enamel. Steps made of wood can hang about 10-20 cm from the monolith of the stair structure.


Installation Secrets
The optimal distances of balusters on marches are 90, 130 and 220 millimeters. They are fixed using an anchor stud, screwing the element into the very edge of the flight of stairs. You can place them at the bottom of the structure. Balusters can be installed on the side (using two studs), if the dimensions of the stairs allow.
With a full sheathing of the stairs, it is necessary to leave 20 millimeters for the overhang. A groove is milled in the lower part, the width of which is 25 millimeters. The element is placed at a depth of 14 millimeters. The upper part of the riser will be installed in the groove and secured with adhesive.


It is necessary to start installation from the lowest step. Several anchor studs (2-3 pieces) are inserted into the end of the riser. Before starting work, the structure is placed at the installation site and the points of contact of the studs are marked.

sheathing
If you intend to carry out the sheathing process, we recommend that you read the exact instructions for the work. The method of sheathing concrete structures cannot be called simple. Above in the article, we outlined the features of cladding steps with wooden finishing material. Carry out the work only if you are completely confident in your abilities and have all the necessary tools. Otherwise, you risk spoiling the finishing material and even damaging the stairs.
First of all, before facing, it is necessary to prepare the staircase structure:
- To begin with, the size of each individual step is measured. Having learned the maximum size, the remaining steps are adjusted to it. A regular cement mortar will help to cope with this problem. Work should be carried out slowly so as not to make mistakes.


- With differences of 1 cm, a wooden frame should be equipped and a special reinforcing mesh should be used to reinforce the structure.
- As soon as the leveling mixture is completely dry, it is necessary to carefully clean it from dust and other small contaminants.
- To increase the density of concrete, various adhesives should be used. They will enhance the adhesive properties of the stairs.
- At the very end, the structure is covered with a deep penetration primer.
Sheathing of a concrete structure consists of the following steps:
- the substrate from the steps is cut out of moisture-resistant plywood with a thickness of 1 to 1.5 cm;
- using moisture-resistant mastic, firmly press the cut parts to the base;
- fixing them in this position, glue;


- securely fix the dowels;
- lay the substrate (it will help smooth out bumps and take away excess moisture from the concrete structure).
The risers and treads are fixed with self-tapping screws. These elements must be prepared in advance: you can buy them or make them yourself. To fix the steps and risers correctly, you must adhere to the following technology:
- to begin with, screw in three bolts with a diameter of 0.6 cm (the elements are mounted in the lower side so that the bolt heads protrude on the surface);
- remove hats;
- lay a wooden riser on a concrete base;
- mark the location of the bolts;

- make holes on the marks and fill them with epoxy;
- apply liquid nails to plywood and attach wood finishing material;
- make a pass in steps: depth - 1.4 cm, width - 2.5 cm (this is done using a milling machine);
- fasten the lower edge of the riser flush with the step;
- from the back, gently press the tread with the upper edge into the groove.
Using the above principle, cover the remaining steps. To close the gaps, use putty or mounting foam. It is necessary to proceed with the installation of the railing only after the stage of facing the steps is completed.

Sections sawn at a specific angle are necessary for the design of rotary elements. For their installation using glue and screws.
Upon completion of the work, the joints are carefully polished, and the steps are covered with a colorless varnish to preserve the natural color of the wood, or with colored enamel. The compositions will not only decorate the stairs, but also protect the finishing material from the negative effects of the environment. In addition, such coatings increase the wear resistance of wood.


Features of working with metal structures
When finishing iron stairs, you can use any of the methods to choose from: partial finishing, when only steps are lined with wood, or full sheathing, covering the entire frame.
Experts note that the manufacture of metal stairs requires special knowledge and experience, as this is a troublesome and time-consuming task. The master must have the skills of a welder and a locksmith, as well as be able to correctly draw up a drawing, calculate dimensions and load. The best solution is ready-made wireframe models that are assembled on site.


Subtleties
The process of wood sheathing a metal staircase has certain differences from the sheathing of a concrete structure:
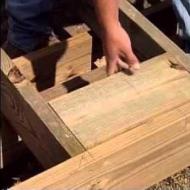
- It is not necessary to align the steps and adjust them to one size. Work begins with the fact that risers and steps are cut out.
- Holes suitable for the diameters of the screws are made on the reverse side of the iron profile. The boards are attached to the bottom of the profile. In this case, it is not necessary to make through holes in the wooden finishing material.
As for the balusters, they are placed according to the same principle as when sheathing concrete stairs.

A difference in height between steps is allowed: the maximum limit is 9.5 millimeters. If the difference is greater than the above parameter, it is necessary to perform adjustment work.
Experienced craftsmen note that the height of the riser should vary from 150 to 180 millimeters, while the optimal width is from 270 to 320 millimeters. Such indicators were compiled, taking into account the average width of a human step. Deviation from the above indicators can lead to inconvenience during operation.
Each type of wood used in the finishing of the stairs has its own individual performance characteristics, however, experts have deduced the indicators that the ideal finishing material should have: the maximum moisture content should be 12%, freshly cut wood is not suitable for work.


sheathing
As with concrete structures, the steps and risers must first be resized. The work must be carried out as accurately and carefully as possible. The resulting dimensions are transferred to the facing material. Due to the fact that the parameters may differ from each other, it is strongly recommended to number the skin elements.
Parts of the cladding are cut from natural material and adjusted to the dimensions of the steps. Experts advise making small canopies over the frame. For each individual step, plywood of the same size is cut out (taking into account the dimensions of the wooden sheathing). It is mounted on a metal frame. This step will help cover all the defects and distortions of the stairs.


Mounting adhesive is used for laying plywood elements. Make sure the composition is suitable for wood and metal.
With the help of self-tapping screws, steps are fixed from below or from above. When placing elements for fasteners from the bottom of the structure, the height of the step should be taken into account, otherwise the self-tapping screws may pass through.
Fastening from above is chosen less often due to the fact that this method is less aesthetic, however, from the point of view of the time spent on work, this method is more profitable: the screws are tightly screwed into the finish so that the hats “sink” into the body of the tree. After they are covered with furniture plugs or putty. During work, use the building level.
There are many options for sheathing a metal staircase. However, the tree always looks more profitable than other solutions. Due to the species diversity of rocks for decoration, a staircase trimmed with wood will fit into any interior. In addition, it is environmentally friendly. You can sheathe the step completely or just tread, which will save the budget. The very process of ennobling a metal staircase with the help of a tree is quite feasible with your own hands.
Material selection
Among the materials suitable for finishing can be called:
- Oak. Perhaps the most durable and strong material. It has a noble texture and a choice of colors from pale yellow to red-brown.
If you chose oak for finishing, then it is worth considering that its color will darken over time.
- Ash. The strength is not inferior to oak. The texture is pronounced, has a grayish tint.
- Beech. It is most often used for finishing stairs. It has a uniform texture, which allows you to imitate mahogany with paint.
- Exotic breeds: for example, teak, wenge, merbau. Such wood is most often chosen because of the variety of shades offered. But it is also worth noting their strength and durability.
- Coniferous woods, such as spruce or fir, due to their low wear resistance, are suitable for decorating risers. Pine has good performance characteristics and low density, which makes it easy to process. In addition, it has a low cost.


The choice of material is influenced not only by preferences in quality or colors and texture, but also by the requirements for wood:
- Its humidity should not exceed 12 percent.
- Surface cracks are not allowed.
- Impregnation with an additional protective compound will increase the life of the material and prevent the formation of fungus. This should be done before the start of the main work, when the wood is being prepared.
- Finishing wood processing involves coating it with a special varnish. The choice of color depends only on your desire. You can choose a clear varnish if the wood has a noble texture.
Sheathing options:
- Partial. It involves the installation of wooden treads on a metal frame. But the rest of the structural elements are left unfinished.
- Full. Provides full sheathing of the metal frame and all elements. The result is a complete imitation of a wooden staircase.


Finishing work
The work will be done using the following tools:
- screwdriver and self-tapping screws;
- a hammer with a rubber head, designed for possible fixation;
- woodcarving tools;
- tesanka;
- building level;
- ruler and pencil on wood;
Part preparation
- The first stage is the measurement of all elements of the staircase structure that are planned to be sheathed. This must be done carefully, excluding the possibility of cracks or too tight fastening. This can lead to deformations and cracks.
- After that, the measurements taken are transferred to the wood.
- According to the markup, the parts are cut.
- If the steps have a different shape, then it is worth numbering them so as not to be confused during the assembly process.
- When processing parts, it is worth rounding off the corners located on the front side a little. This will provide more comfortable operation, reducing the risk of possible damage to the tree and increasing safety.
- After preparing the steps, they proceed to the processing of railings and balusters, if the design involves their sheathing. When sawing out the railing, first determine the length, then adjust the width and shape.
Stages of work
- First you need to decide on the design of the stairs and the option that the frame will be sheathed with. In accordance with the requirements, it is necessary to choose the type of wood for sheathing.
- After that, the preparation of the skin parts is carried out. Solid wood is adjusted to the size of the frame. If the work is simple, without any special decorative frills, then you can get by with a hand saw for wood and a large file.
- Treads should be fastened in such a way that they have a small protrusion in front of up to one centimeter. This will not only give a nice look, but also allow you to make the most secure mount. Attach them from top to bottom. After installation, it is necessary to check each for strength, as well as how evenly they are fixed with a building level.
- When installing risers, it is important to observe the following requirement: they must rest as tightly as possible on the metal frame. They are fixed in the same way, starting from the top, and after fastening they are checked for strength and evenness.
- Provided that the full sheathing of the frame is carried out, the next step will be the choice of the balustrade. They not only perform a protective and supporting function, but are also an important decorative element of the staircase design. Balustrades are installed in increments of 15-20 centimeters. If there are children in the house, this step should be reduced to 9-10 centimeters.
- Next, we fix the prepared wood parts. Do it with self-tapping screws. It is necessary to drill holes in the frame in those places where the skin will be fastened. Using self-tapping screws, the wood cladding is attached to the metal frame. It is necessary to screw the self-tapping screw into the wood with a 5 mm deepening of the cap.
- The fastening of the balusters is carried out to the treads with the help of self-tapping screws. Next, railings are laid on them.

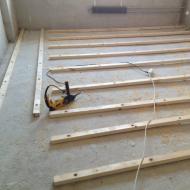
- You can also sheathe a metal frame. This is done using drywall, screws and wood panels. Begin work with sheathing the side surface with wooden panels. Their sizes are selected in advance. Fastening is carried out with a screwdriver on self-tapping screws to the balusters. The lower marching part of the stairs is sheathed with drywall. Fix it on the side and lower parts of the steps.
It is not at all necessary to finish the metal frame if it has an outwardly attractive appearance. But such a finish option will be able to hide the existing shortcomings.
- Coating wooden trim elements with varnish or paint is the final stage. You can also paint over the metal parts that remain in sight.
Video instruction for sheathing the metal frame of the stairs with wood
There are many men who like to do everything with their own hands, without involving masters in this. For them, it is not a problem to glue the wallpaper and lay the laminate. And what about the door trim?
How to sheathe: materials
There are several upholstery options:

Important! Please note: the weight of a door sheathed with MDF will increase greatly, which will become an additional load on the door hinges.

Foundation features
Consider the features of the base, that is, the material from which the door is made.
Wooden door
First, let's talk about its most popular types:
- The lead here is held by an array of pine trees. And all because of the inexpensive cost of the material. True, this does not eliminate its shortcomings: it is rather soft, does not tolerate humidity and strong temperature changes.
- Another option is walnut. This tree is also quite inexpensive. It has a beautiful structure and ornate patterns. It has many possibilities regarding its processing.
- For the front door or the door to the bathroom, alder is perfect because it holds moisture well. Plus, it has a low resin content, which is important.
- The best option is, of course, oak. It is durable, strong, moisture resistant, does not let cold and noise into the room. The surface of such a door is practically not deformed upon impact. But this material is the most expensive.
 The main advantages of a wooden door:
- environmental friendliness;
- with proper care, it will last for decades;
- high noise and heat insulation.
- requires more care and extreme care in operation;
- some types of wood have low moisture resistance, so they are not suitable for any room.
Important! When buying a wooden door, be sure to contact only a trusted manufacturer! Often, unscrupulous firms, under the guise of an expensive one, sell cheaper, and, accordingly, lower quality material. To do this, they repaint the wood in the desired color. And an inexperienced buyer may simply not notice a fake.
You can sheathe a wooden door in any of the above ways. 
Metal (iron) door
Advantages:
- it is believed that it is more reliable (but here you should not forget about high-quality locks!);
- moisture resistance is higher than that of a wooden "brother";
- tolerates temperature fluctuations;
- using seals, you can get high noise and heat insulation;
- does not require special care (although it is also necessary to monitor such a door).
- dents and scratches often appear on a metal door, which spoils its aesthetic appearance;
- rust may occur;
- their strength is sometimes not beneficial, for example, during a fire, it will take a lot of time for rescuers to open it.

How to sheathe a door
Let's go directly to the sheathing with different materials, learn about all the features of each method.
Laminate
Sheathing step by step instructions:
- Remove the door from its hinges and place it on a flat surface.
- Remove all fittings - locks, handles, peephole, etc.
- Paint the wooden slats in the desired color and secure them around the perimeter of the structure (metal will need liquid nails).
- Assemble a shield from laminated panels (make sure: all parts should fit as tightly as possible to each other - butt to butt).
- Measure the distance between the individual rails and transfer the results to the shield.
- Saw off the extreme panels in length and width (it is best to do this with a jigsaw).
- Seal the door tightly with adhesive. Wait for the exposure time of the glue, then put the shield on the canvas and press something heavy on top.
- When the glue dries, the door can be put in place, and then the fittings can be fixed.
Important! Use a laminate with a thickness of at least 7-8 mm!
Do not forget about the need to make slopes. They will protect your home from drafts and noise, make the door look more presentable.
The slopes are made with the same laminate that was used for sheathing. But first, eliminate all the gaps between the wall and the casing with mounting foam or special cement (on an adhesive basis). If you chose the foam, when it dries, be sure to cut off all its excess with a knife and only then proceed to the slopes:
- the most common method is gluing the finishing material with a solution. Such a slope will not bend, it will be durable and soundproof;
- if we talk about the decorative slopes, then you can use a special textured plaster or color. True, here it is necessary to pay attention to the peculiarity of the material, for example, to its possible incompatibility (the manufacturer will certainly inform about this on the packaging);
- another design method is frame sheathing with facing material. To do this, you need to make a simple "skeleton" of wooden blocks and a metal profile. Then, using universal self-tapping screws (do not forget about the caps for self-tapping screws that will match the tone of the laminate), attach the laminate to the frame - along or across. Vertical slats must be fixed at the edges and center, and horizontal - only at the edges.
If you still want to use laminate for outside sheathing, use a special waterproof solution and anti-vandal impregnation. Proper care will extend the life of this material by more than one year.
Lining
Before starting work, consider one point: to install the lining from the inside, she needs to lie down in the house for at least a day so that she gets used to the microclimate.
- Treat the slats with an antiseptic and open with varnish.
- Remove the door from its hinges, clean it, remove all fittings.
- Cut the slats to size (depending on the installation method).
- Start laying from the left edge. Install the first panel clearly along the edge (this can be checked with a level). Attach it with finishing nails.
- Dock each lamella into the groove of the previous one, fasten in the same way. Sand the ends.
- Once again, open the product with varnish and, after it dries, put the accessories back.
- Return the canvas to the opening.
 If you have a metal door, here is a slightly different algorithm of actions:
 - If possible, remove it from the hinges, so it will be more convenient to work.
- Remove accessories, clean the canvas.
- You can fix the slats with clamps by screwing them with metal screws using a screwdriver.
- If you are going to insulate the doors, install a crate of wooden slats. Fix the frame with self-tapping screws. Cut the heat insulator (foam rubber, polystyrene) to size and place between the slats in the spacer. If necessary, glue the material to the surface of the web. Joint the slats tightly and secure to the crate with finishing nails.

Did you know? There are a lot of colored doors in Ireland, and for a reason. It turns out that the whole reason is ... the love of freedom of the locals. When Queen Victoria of the United Kingdom of Great Britain and Ireland died in 1901, a decree was issued - as a sign of mourning, all doors must be painted black. The Irish, protesting, painted them in all the colors of the rainbow, but not black.
MDF boards
They are installed both immediately on the surface of the door, and on the existing trim (for example, leatherette). Do not forget to remove all accessories before starting work.
- Drill holes around the perimeter of the porch (the part of the sash that covers the door frame). Pitch - 20 cm. Diameter - 3 mm.
- Drill a series of through holes along the perimeter of the door leaf (the pitch and diameter are the same).
- Fix the inner MDF trim with screws, then the outer one. The length of the screw is a few millimeters less than the thickness of the web.
- Put the hardware back in place.
Video: how to install MDF board on wooden doors
Leatherette
The tree is sheathed with leatherette in this way:
- Remove all hardware from the door, remove it, put it on a flat surface.
- On the facing side, stick a heater (synthetic winterizer, foamed polyethylene, etc.).
- Nail and stretch the leatherette at the same time, starting from the center of the door.
- Nail the middle row of nails (from top to bottom), stretching the leatherette well. Nail the other rows in the same way - first to the left of the center row, then to the right.
- But there is one snag - in turning the edges. On the outer side of the door, special rollers are made, which should cover the gap between the door leaf and the frame. Tuck the leatherette, then with a slight stretch, nail along the edge of the fabric with upholstery nails. Rollers are not needed for the inside - tuck the fabric and nail it.
- The sheathing looks more interesting if a decorative metal cord or a special thread is pulled between the nails. In this way, you can create any pattern.
Video: how to sheathe a door with dermantine If you treat the skin with care, then it will last a very long time. Does not require special care. It is enough to wipe it from time to time with a damp soft cloth (it is possible with the addition of degreasing detergents).
The staircase must not only guarantee safe movement in the interfloor space, but also fit into the design of the room. In addition, the metal structure itself needs additional protection, which would prevent premature wear of the equipment and save the owners from the need to constantly repair the structure.

Sheathing a metal staircase with wood will allow you to immediately solve the entire range of tasks, so that the design will become wear-resistant and acquire a more attractive appearance. In this article, various options for finishing metal structures will be considered, among which everyone can choose the best option for themselves.
Landmarks in the choice of cladding
Metal stair cladding is a decorative design of the frame. But at the same time, it is desirable to use materials that would significantly improve the technical characteristics of the equipment. Also an important argument in favor of a suitable type of wood is the possibility of doing the work yourself. And only after a thorough analysis of all the pros and cons, you can make the right choice in favor of the best material.

In addition, the scales may tilt towards certain types of wood when evaluating such equipment parameters:
- form of a metal staircase;
- contingent of users;
- soundproofing characteristics of wood.
Moreover, the choice of material for sheathing largely depends on where the metal structure is located: in the living room or in the utility part. After all, the aesthetic characteristics of different types of wood are not the same. Some of them have a more presentable appearance, but are more expensive, others are not so attractive, but the price is much lower.

Features of the combined product
Sheathing the metal frame of the stairs with wood is one of the most successful solutions for interior design. The tree has always been and will remain the personification of comfort, because it can fit almost any type of room design. In addition, this material is easy to process, so that the metal structure can acquire new, more elegant forms.
An ordinary metal staircase does not look very attractive and, when used in a private house, can be a place of increased injury risk. Therefore, equipment finishing is simply necessary if you want to improve the aesthetic performance of the product and protect yourself and your household from injury.
Sheathing an iron staircase with wood can be either partial or complete. At the same time, the basis for steps made of wood can be fixed either on bowstrings or on crocuses.

Design subtleties
Before proceeding with the sheathing of a metal structure, it is necessary to clearly imagine the future appearance of the product. And in order to correctly transfer ideas to the real plane, you should follow these rules:
- Create a layout of the future staircase, while choosing the type of sheathing (partial or full);
- Determine the required amount of facing material and type of wood;
- The distance between the balusters should not exceed 20 cm if the product is used by small children;
- Decide on the size of the section of the future railing (they should not look bulky).

What type of material to choose?
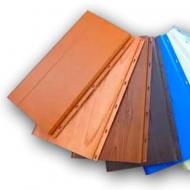
Finishing a metal staircase is a responsible and difficult task. And the first difficulties arise during the selection of suitable wood for cladding. Depending on the possibilities of the budget and a specific design project for cladding metal structures with wood, you can choose the following natural arrays:
- Beech. In terms of density, it is practically not inferior to oak, therefore it is a fairly reliable and low-elastic type of wood. Rather, it is suitable for cladding stairs in front and guest rooms, thanks to its excellent aesthetic qualities;
- Oak. One of the most noble and durable types of natural arrays. At the same time, its technical parameters directly depend on the place of growth. It has a beautiful rich color and a non-standard pattern on the cut;

- Ash. Sufficiently elastic material with a well-defined texture. Differs in durability and excellent wear resistance;
- Hornbeam. In the case of proper drying, the wood can become much harder than beech or oak. At the same time, the material is quite pliable, so it is easy to work with it;
- Coniferous arrays. Wood sheathing of a metal staircase from below is done mainly with conifers, since they are cheaper than others. At the same time, pine or cedar do not have good technical performance, so the material is used in places where high performance is not required;
- exotic arrays. Very durable and beautiful materials with intricate patterns on the cuts. For sheathing a metal staircase, wenge, abash or teak are most often used.
The photo shows samples of various types of natural materials, thanks to which you can appreciate the aesthetic qualities of each.
The process of sheathing metal structures
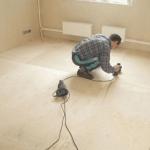
Sheathing stairs with wood with your own hands does not require any specific skills, so this process can be easily handled if all the recommendations are followed:
- The first step is to fix all the wooden parts on the metal stairs. To do this, they are attached to the frame using self-tapping screws and a screwdriver;
- In the upper part of the frame, it is necessary to install a wooden tread, after which the riser is mounted;
- Similarly, similar elements are fixed on the remaining steps;
- To increase the safety of movement on the stairs, it is advisable to remove the chamfer from all wooden elements installed on the steps;
- Then balusters are installed, which are fixed with studs;
- In the same way, it is necessary to veneer other parts of the metal structure;
- At the final stage of work, the tree should be treated with an antiseptic, then covered with stain and varnished.

It is obvious that finishing products with your own hands is not so difficult. The main thing is to correctly determine the dimensions of all parts and securely fasten them to the metal frame. You can watch the video for more details on the process of facing the stairs.
Conclusion
Wood is a noble and durable material that is ideal for finishing products in the house. Thanks to the beautiful aesthetic qualities of wood, your staircase will be transformed, becoming one of the most attractive and elegant interior elements. It is easy to carry out the lining of metal structures with your own hands, the only thing you should pay attention to: the type of wood species, the amount of building materials needed, as well as the size of the parts for cladding.
Usually, the sheathing takes place with parts already sanded and treated with varnish or paint, but in the case of self-assembly of the elements, no one forbids you to carry out all the paint work after finishing the staircase frame.
Related Articles