Mk how to make a matrix for making a wild stone. Fiberglass matrix Fractional numbers in a matrix
Working in the Word text editor with non-standard types of mathematical equations and formulas, it is often impossible to find a solution for inserting some element. For example, you can make a matrix in Word, but there are limitations here too. At first glance, it seems that the functionality is limited and many do not know how a 5 by 5 or 4 by 4 matrix is made, because there is no such structure in valid options. The maximum value that can be inserted is 3 by 3 - an erroneous opinion that many Word users have been subjected to. Let's look at a way to solve this problem, and from now on there will be no boundaries for you in a text editor.
Matrix in Word 2007 and 2010
If you need to make a matrix with a large number of integers or fractional numbers, use the steps below.
With whole numbers
You can make a matrix with natural numbers in the size of 5x5 using the "Inserts" tab and the "Formula" function. For this you need:

Fractional numbers in a matrix
It is very important when adding a fractional number not to make a mistake with an empty die. How this is done, we will consider below in a ready-made 5 by 5 matrix table.

Point the cursor at the desired cube and go to the "Working with formulas" or "Constructor" tab. Select the "Fraction" function on the "Structures" toolbar and select the desired type.

In the matrix, the first integer value has changed to a fractional value.

Do this with all subsequent squares if the matrix consists only of fractional numbers and print the desired values. Move from dice to dice using the mouse pointer or the arrows on the keyboard, which are located next to the number pad.

Creating a matrix in Word 2003
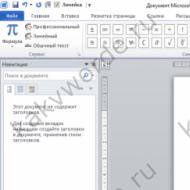
Making a matrix in the earliest version of Word is much easier than in newer ones. To do this, go to the "Insert" tab and select "Object".

In the "Insert Objects" window that opens, in the "Creation" subsection, select "Microsoft Equation 3.0" and click on "OK".

A separate field for the formula and a window with a toolbar will pop up. First you need to insert parentheses. 
Note. If suddenly, accidentally closed the toolbar, then go to the "View" tab and select "Toolbar".
Now you should click on the "Matrices" button and select the bottom option.

In the new window, set the desired number of rows and columns. Check the box next to the corresponding item in the "Column Alignment" area. Click on "OK".

In the added matrix, put down the desired values.


Save your changes.

A matrix with all previously entered numbers will be added to the document.

Matrix in Word 2013 and 2016
In these versions of Word, to create a matrix, open the "Insert" tab, then click on "Equation" and "Insert a new equation." If you need to create a 4 by 4 matrix, repeat the steps below.

Select a 1x2 matrix, click on the second square and add 1x3.

Insert 2x1 into the first cube and select the second vertical cube to insert 3X1.

Repeat the steps for inserting vertical columns in each horizontal square. The result will be such a matrix.

Matrix on your computer screen.
The Notepad utility is considered the simplest text editor, suitable not only for editing quickly typed text, but as the simplest representative of code viewers. In this regard, you can use its capabilities to do simple tricks that do not require special programming skills. On the pages of the Computer76 blog, I will show one of them.
Everyone watched the fantastic film "The Matrix". In several of his frames, a drop-down green code of numbers and Latin letters appeared on a black background, similar to the selection of a unique code by the program. This matrix on the monitor has become a kind of symbol or hallmark of the Hollywood trilogy. Let's do the same with our computer. You don't need to download anything from the web. The matrix code will be broadcast in the command console. For a computer, the matrix on the monitor screen is completely harmless, its only minus is that you slowly start to get tired of the ripples. But sometimes this trick gives the room in which the computer is reproducing running code a kind of hidden image.
Open Notepad (aka Notepad). Paste this text there (just copy it):
@echo off
color 02
:tricks
echo %random%%random%%random%%random%%random%%random%%random%%random%
goto tricks
And close it, after naming the new document ... whatever you want, but be sure to assign the extension .bat . (I have the name Matrix). You should get the following:

This is what we will see after double clicking on the file:

To add some mystique to what's happening on your screen, you can expand the console window to full screen, giving the appearance of a splash screen or hacking a government institution (nothing less!), while you go about your business. You can maximize the window by pressing ALT + Enter. You can return to the previous size by pressing the same combination again.
On the pages of the blog Computer76. Read and try.
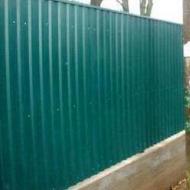
A plasticine model is some kind of undermaterialized idea. You can touch it, but you can't use it. Moreover, plasticine deforms when heated and cooled. Therefore, it is worth hurrying to fix it with fiberglass. I know of three methods for hand-crafting parts from fiberglass(glass fiber reinforced plastic). But, if we want to repeat our product, then we cannot do without an intermediate stage - the manufacture of a matrix.
fiberglass matrix this is the same part, only “turned inside out” (front surface inward). Inner surface matrices copies the shape of the surface of the plasticine model. Therefore, the part “glued” in matrix, will be an exact copy of our model.
Such a complex shape as a car body must be divided into fragments in order to matrix turned out to be collapsible. We don’t want to cut it, pulling out the part, do we? Fragments matrices should be fastened together, forming a common inner surface. To do this, along the contour of each fragment matrices make lapels outward - flanges. Flanges of adjacent fragments are fastened with bolts.
Even at the design stage of tuning, it is worth thinking about the complexity of its manufacture. And while sculpting a model from plasticine, the thought of matrix must discipline the rampant fantasy.
1. In the case of Copen, I ventured to do with one connector along the contour of the hood. In plasticine, it is relatively simple to put the formwork of the connector. To do this, we tear a furrow and drive a strip of hardboard (tin, foil, cardboard, PVC, plasticine) into it.
Contact molding process fiberglass tuners are often referred to as gooey. Perhaps the reason for this is someone’s unsuccessful experience of “gluing” polyester resin to a model or matrix with sad consequences ... Therefore, before molding fiberglass onto the surface of a model or matrices a separating layer must be applied. The release agent can be wax diluted in turpentine, parquet polish, automotive Teflon polish, or professional heat-resistant waxes.
 2. Making any matrices it is advisable to start with the application of a gelcoat (a special thick resin with a filler). Technologists recommend using expensive professional matrix gels, and our body kit sorcerers turn ordinary polyester into a gelcoat by mixing it with anything (talc, cement, soot, aluminum powder). The gelcoat is applied to the model in a thin layer with a flat brush or with a paint gun. I note right away that you need to learn how to work quickly, since the resin reaches a jelly-like state in 20-40 minutes.
 3. On the hardened gelcoat film in layers, with an intermediate holding for polymerization (“drying”), apply 1 layer glass mat 300 grade and 3 layers of 600 grade glass mat impregnated with polyester resin. Each hardened layer is sanded with sandpaper. (When materials such as glass mat not available, can be used fiberglass And glass mat to the last layers).
 4, 5. In order to avoid deformations, I decided to strengthen matrix hood. The cardboard template was transferred to a sheet of plywood and sawed out two identical strips, repeating the shape with the bottom edge matrices hood. Now we mold the amplifiers to matrix bonnet stripe glass mat 600 (or fiberglass).
 6. Before taking off matrices, most importantly, do not forget to drill mounting holes in the flanges. I set the distance between the holes to 15 cm for the M8 bolt closer to the corner of the flange.
 7. And now, the solemn moment of the first removal has come. In this event, the participation of strong guys and the use of mock-up ingenuity are useful. For example, a small jack often helps me. Filmed matrix We clean the hood from the remnants of the model and cut the flanges along the contour.
8. Gelcoat matrices hood roughness and irregularities are noticeable - prints of the surface of the plasticine of the model. When the gelcoat is heated with a hair dryer, bubbles inflate here and there - these are hidden shells. All these defects are eliminated with a knife, sandpaper and putty.
 9. After removal matrices hood, I clean the engine compartment from the remnants of the model. Now I have access to the attachment points on the body of the “native” wings and grille. In the same places I plan to fix my new parts. I sculpt the shape of the flanges of the new grille and fenders with plasticine, marking the points of their attachment to the body with grooves.
Naturally, the manufacture of an additional removable part of the flange matrix was provided in advance.
10. Having previously processed the surface for molding with a separator, we glue matrix flanges in the same order as the whole matrix. Before taking off matrices don't forget to drill mounting holes in the flanges of the new part!
 11. Carefully remove the finished part, cut it off and, if necessary, refine it with putty and sandpaper.
 12. You can never be completely sure of the success of a large and complex removal event. matrices. For some reason, you always want to quickly tear it away from the model. But, in a hurry, you can hurt matrix. Therefore, first you need to separate the edges matrices along the entire contour from the surface of the body and model. Then, carefully, using wooden wedges and rulers, try to pull the edges matrices. If there is a fulcrum, then you can use a jack. But in any case, you need to be prepared for the fact that matrix may crack and that the plasticine model will be destroyed.
 13. When matrix moved, it can be removed by hand. As a rule, the matrix falls off along with pieces of plasticine, foam plastic, chipboard and hardboard. Then all this has to be picked out, scraped off with scrapers, washed with kerosene.
14.Cleaned inner surface matrices we are the same as matrix check the hood for bubbles, shells, chips and other defects. Speakers on the work surface matrices irregularities, sanded with sandpaper. We putty large shells, small ones (on a rough matrix, as in our case) can be left. I'll tell you in secret matrix, designed for one eat, I generally “putty” plasticine.
 15. Clean and trimmed around the edges matrix fenders with a bumper and a radiator grill, it is better to immediately connect with matrix hood bolts. Matrix the assembly is less prone to deformation than individual fragments. We must remember that fiberglass, like any other plastic, “flows” over time, twists and sags under the influence of temperature fluctuations and a stressed state. Therefore store matrix recommend assembled and natural position for her.
Contemplation finished matrices soothes. Looking at the form contained in the matrix, you understand that the job is done. Glue by matrix details are a matter of technology, although there are subtleties here too.
Magazine "Tuning Cars" No. 05, 2007 " Humpback design" part 2, .
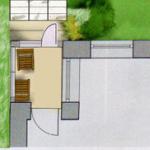
After the publication of a brief description of the production of a mold for gypsum tiles with imitation of artificial stone, questions about the intermediate stages of production rained down on us. We were surprised by such interest and the number of people willing to make their own tiles for their own needs. Let's repeat the description in more detail.
Task: to make a mold and gypsum tiles of my own design at home.
We choose future tiles in the form of a fragment of natural stone masonry as the most common option. The type and shape of the produced tiles are limited only by the imagination of the designer. Not only stones can participate in the preparation of the form, but any items that may relate to the theme of the decorated room - fruits and vegetables for kitchen decor, wrenches and spare parts for a car shop, milled plates with celebrity signatures for a nightclub, etc.
For the master model, a sandstone cut into strips of 20mm was chosen.
2. Formwork is required to obtain the form. The most reliable, durable, reusable, budgetary is obtained from laminated chipboard, the trimmings of which can be obtained free of charge at any sawing company

3. Formwork assembly is carried out on confirmations (furniture euro screws). This fastener, unlike conventional self-tapping screws, allows you to painlessly disassemble and assemble the formwork many times.
Gypsum tiles in our case should have dimensions of 200 x 400mm. Accordingly, the flexible form will have external dimensions of 220 x 420 mm. 10mm - mold wall thickness. Accordingly, 220 x 420 mm is the internal dimension of the formwork. The height of the formwork should be more than the height of the form by a couple of centimeters.

4. To comply with the exact geometric dimensions of the tile, an additional box was made with low sides and internal dimensions corresponding to the dimensions of the tile - 200 x 400mm.

5. For the convenience of adjusting the size of the stone in rows, we used ordinary end cutters.

6. After fitting and laying the stone, the joint gaps were checked and each stone was glued to the bottom of the box with silicone sealant

7. The stone is laid and fixed.

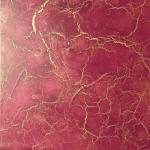
8. Lay out the pieces of paraffin and melt it with a technical hair dryer. Paraffin impregnates the stone and reduces the depth of the partitions between the stones.

9. More about the paraffin treatment.
1. Since we use natural stone, its shape is not ideal. Despite the fact that the stone was sawn into strips of 20mm, its base is chipped. After pouring and polymerization of a silicone or polyurethane mold, the material that has flowed under the base of the stones will not allow the resulting locks to normally remove the mold from the master model. The mold and master model will be damaged.
Molten paraffin fills all the voids formed by the stones at the base of the formwork.
2. The height of the stones in our case ranges from 30 to 40mm. The tile we need should have a thickness of 20mm (8-12mm relief and the rest of the height - to the base).
Paraffin allows you to raise the level of the bottom of the master model without processing the stone to the desired height.
3. Melted paraffin is perfectly absorbed into the heated stones without disturbing the pattern of the structure of the stone and is a good separator. A stone impregnated with paraffin does not need additional treatment with release agents.

10. After impregnation with paraffin, we make sure that the level of the day is raised to the desired height. Let the mold cool down for a couple of hours.

11. We remove the sides of the box and process the edges of the master model with a technical hair dryer, slightly melting the paraffin remaining around the perimeter.

12. We prepare the main formwork for pouring with polyurethane. We recommend wrapping each part of the formwork with stretch film. You will save a lot of time when removing the finished mold and ensure that the mold does not stick.

13. We put the master model into the formwork

14. And slowly pour the prepared polyurethane. In our case, Duramould ET45A was chosen.

15. After pouring, we brush over the relief of the stone to ensure that all voids are filled with polyurethane.
The popular sci-fi thriller The Matrix was released on the screen more than 15 years ago and during this time managed to win the love of millions of viewers, becoming a truly legendary and cult movie. For a long time, screens around the world had movie-style wallpapers and screensavers, long, mesmerizing columns of green symbols.
Especially for movie fans, I will tell you about a simple and uncomplicated way to create a matrix in a notepad without using any tools at hand other than those available in the Windows 10 operating system and the command line. Go!
Create a text file on the desktop. For example matrix.txt. Open it in notepad. Now you need to copy the following lines there:
setlocal enabledelayedexpansion
Disable output:
Set the title of the window:
Set the symbol color:
Clearing the command line screen:
Create a closed loop:
:prodolgit
set string=
for /l %%i in (0,1,78) do (
set /a vremenno=!random!%%2
set stroka=!stroka!!temporarily!
set /a generate=!random!%
if %generate%==0 (color 0A) else (color 02)
We display the matrix on the screen:
echo %stroka%
goto prodolgit
Save and close notepad. Now we need to rename the file, change its extension from *.txt to *.bat. After that, double-click on it and get the result as in the picture above. As you can see, this method of how to create a matrix in notepad is very simple and fast. Even a student can do it!
P.S. If you want to experiment, you can play with the colors in the window. To do this, you need to enter other numbers instead of 02 in the "color" line. For example:
03 - blue numbers on a black background;
04 - red;
05 - lilac color;
06 - yellow;
07 - white color;
08 - gray color;
09 - blue color
10 - black numbers on a blue background;
11 - white numbers on a blue background;
12 - yellow numbers on a blue background;
etc.
Related Articles