Foundation for a fence on a site with a slope. Basic rules for leveling a fence on uneven areas Features of creating a fence in areas with different slopes
The installation process of the fence is carried out in several stages:
- First, an inspection and marking of the site is carried out, a diagram is drawn up, and an installation option is selected.
- If, as a result of inspecting the site, it is decided to install a fence based on the foundation, then the second stage will be its pouring. This process is not mandatory for all cases, but in this article we will consider an example of installing a fence with a foundation.
- Then support poles, connecting logs are mounted.
- Further, if necessary, a drainage system is installed.
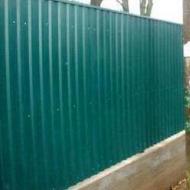
- The process is completed by sheathing the frame with corrugated board.
Each area has its own characteristics, which should be considered before installing the fence. Let's take a closer look at each of the stages.
Inspection, site marking, drawing up a diagram
Half of the success of the work done lies in the exact marking of the site on which the fence will be installed. This will allow you to calculate the amount of consumables and design the architecture of the fence. Geodetic reconnaissance will not be superfluous to study the soil, its structure, soil type, depth of the fertile layer and other things. All these nuances will help you navigate when:
- choice of material;
- foundation construction;
- choice of structural supports (brick, concrete, iron poles);
- span size;
- fence height.
After marking and calculating the area of \u200b\u200bthe site, the amount of material is calculated. Then an installation diagram is drawn up, containing:
- landscape contour, ground level, slope value;
- the depth of the trench under the foundation;
- concrete base height;
- fence height, span width;
- the height of the supporting pillars;
- the number of lags, the distance between them;
- span height difference, etc.
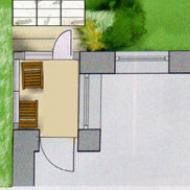
Scheme examples:

The step of the difference depends on the magnitude of the slope. The greater its degree, the smaller the width of the span. Also, the option of installing a fence largely depends on it.
How to make a fence on a slope: installation options
There are two options for installing a fence on a slope:- Repetition of the relief of the site.
- "Steps".
 It is much easier and faster to build a fence that follows the contour of the relief. The connecting beams between the posts in this case run parallel to the ground. The height will be the same, uniform along the entire length of the fence. Most often, such a fence is installed on extensive slopes. This option is ideal for areas with an uneven slope. More suitable material - metal picket fence, chain-link mesh. In the case of profiled iron or a 3D fence, more effort will be needed to secure the structure to the ground and look harmonious.
 The best option for a uniform slope is a fence set with “steps”. The spans between the pillars are set in this way - each subsequent profiled sheet is attached below the previous one, going down the slope in steps. Installing such a fence on a too uneven area is not recommended due to sudden changes in height. There will be a risk of formation of large gaps between the lower part of the structure and the ground surface.
When choosing any of the installation options, you need to understand the importance of firmly attaching vertical poles. Failure to comply with the fastening rules will lead to deformation of the fence, subsidence or bulging of the pillars.
How to choose and lay the foundation?
Depending on the chosen material for the fence, the appropriate foundation and support are laid. There are four types of foundation:
- pile;
- combined (tape-columnar).
- the most popular due to its strength and durability. It perfectly holds heavy structures made of stone, brick, concrete and cast iron. The basis of the base and soles are:

- roofing material, waterproofing film;
- fittings;
- concrete.
- According to the scheme, a trench is dug (you need to start from the upper limit of the slope).
- Formwork is installed.
- Sand is laid at the bottom of the trench up to a height of 15 cm, carefully rammed.
- The sand is covered with a film / roofing material.
- Fittings are being laid.
- Ventilation holes are installed.
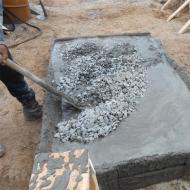
- Concrete is being poured.
- A film / roofing material spreads over the concrete.
- After the concrete has set (65-70%), the formwork is removed.

No less durable if the following rules are observed:
- Under the pillars, a hole is drilled to a depth of 1 m.
- Poles are installed and hammered to 1.2 m.
- The holes are filled with M300 concrete.
The column foundation is ideal for profiled iron, metal picket fence, chain-link, 3D fence.
pile foundation It is an iron pole screwed into the ground. They can stand for more than 30 years. For additional strength and resistance to deformation, the cavity of the pile is filled with a concrete solution. This option is most often used for a metal picket fence. Suitable for 3D fence or chain-link. At least 3 people are required to install such a support. You will not be able to handle the installation on your own.
The strongest and most durable. Its versatility lies in the fact that it is a construction site for a fence made of any material.

It is laid out as follows:
- First, holes are dug under the pillars, then a trench is between them.
- Poles are installed and fixed.
- Sand, roofing material / film, reinforcement are laid in the trench.
- The trench is filled with concrete.
- After the concrete has set, the fence structure is installed on the foundation.
Laying the foundation and installing pillars
Depending on the angle of the slope, the formation of the foundation may vary. There are three options:
- With a slight uniform slope, the surface is leveled as much as possible. The upper and lower borders of the fence run exactly along the entire length due to soil embankments. This option eliminates the docking of sections of different heights, which greatly simplifies the work. But still, builders rarely resort to this option because of its complexity. Another disadvantage is the violation of the fertile soil layer due to the embankment of soil.
- When the slope angle exceeds 30 degrees, the foundation is laid in the form of a ladder, where each section is located below the previous one. Two poles are attached to one span. The standard section width is 2.5 m. If the slope is steeper, then the span is reduced to 2 m.
- The fastening orientation of each span goes along the top of the fence - it is located horizontally exactly along the entire length of the fence. The lower part is adjusted to the contour of the landscape. This option is chosen when installing a fence from corrugated board. Profiled iron is easy to adjust, it is freely adjusted to any size of the fence.

Whichever option is chosen, construction begins with the foundation. It will become a powerful support for the fence and strengthen the soil from erosion.
Dig a trench starting from the top of the site. Its depth is constant throughout the entire distance. The exceptions are places where the fertile soil layer lies deeper than the lower level of the trench. In this case, the trench should be deepened until the fertile layer is completely removed.
The depth of the trench (It) depends on the sum of the height difference (Ipv) and the thickness of the vegetation layer (Ip). If you ignore the vegetation cover, which can hide large differences in height, then this will negatively affect the level of the basement relative to the top and bottom of the fence line. For example, in the upper part it will protrude above the ground more, in the lower part - less.The pillars are installed in pits, strengthened with broken bricks, gravel and concrete. Pouring concrete will prevent subsidence or bulging of the pillars. The diameter of the pit should be 15-20 cm wider than the pillar. The length of the supports varies depending on the degree of slope. The distance between them should not be slightly less than the width of the profiled sheets. This will make it easier to fit and sew them on top of each other.
If the fence on the site with a slope is installed on clay soil, the formwork inside the trench can be omitted. The walls will cope with its role. The main condition is to maintain a strict horizontal position along the entire length of the trench. A sandy “cushion” will help here, which must be carefully tamped and leveled. If a stepped version of the foundation is chosen, then the “cushion” should repeat each “step” of the slope. Roofing material is laid over the sand layer.
Formwork installation
When installing formwork, the following criteria must be considered:
- creating even corners;
- no deflections;
- ease of dismantling;
- optimal thickness of building material;
- structural strength and stability.
The formwork system is installed after marking. Installation process:

- Wooden bars are driven into the ground to a depth of at least 50 cm, the ground part - at least 40 cm. The distance between them along the length of the fence does not exceed 120 cm. Width - 60 cm.
- Next, the side and upper parts of the formwork are attached. On the sides, for greater resistance to pressure, they are fixed with planks with an emphasis on the ground. Additionally, you can tighten the structure with screws, strengthen with nails.
- After the work done, it is necessary to inspect the formwork for evenness, measure it with a building level. If there are no comments, a concrete mixture is poured inside. Subsequent installation begins after the concrete has completely set after 4-5 days.
When choosing a wooden formwork material, all parts of the structure should be impregnated with a waterproofing solution. This will prevent the absorption of moisture from the concrete mixture. Otherwise, the concrete will crack as it dries, which will negatively affect the strength of the foundation.

A drainage system is needed for the stability and durability of the foundation. Mandatory installation of drainage in clay and loamy soil. It normalizes the outflow of water, prevents soil erosion. To provide a drainage system, holes are left in the foundation for perforated pipes. They play the role of a drainage channel.
Gravel is an excellent drainage system. It is wrapped in geotextile and laid under the foundation.
To ensure the outflow of water into the collector pit, a sewer pipe is laid in the ground with holes drilled in it. For better absorption of moisture from the soil, it can be partially filled with gravel.
Installation of a corrugated fence on a slope: the final stage
Logs are attached to the supporting pillars. If the poles are iron, they are welded or bolted together. In the case of concrete, brick, stone, the logs are fixed with fasteners. The upper and lower joists should be horizontally parallel to each other, regardless of the type of foundation and slope.

Profiled sheets are fastened with rivets, self-tapping screws or bolts. Each leaf overwhelms the other. When installing a stepped fence, the step size and the height difference of the span are taken into account. When calculating the number of fixing points, the windage of the landscape is taken into account. The structure must stand firmly and withstand strong winds.
The material is fitted close to the foundation. The upper part can be ennobled with a fence strip. This will give the design a finished and aesthetic look.
Having dealt with the question of how to put a fence on a site with a slope, you can proceed with its installation. If you doubt that you can cope with this time-consuming task on your own, then leave a request on our website. Applications are processed instantly. The specialist will respond within 1-2 hours. We will not only advise, but also help to build a fence of any complexity, regardless of the type of terrain. We have already received hundreds of grateful reviews about the installation, we are sure that yours will be among them.
Ideally flat territory in residential or suburban areas is very rare. Therefore, during the construction of various structures, attention has to be paid to leveling the ground or to the competent process of erecting structures.
Fences are integral elements in private areas, as they are designed to protect the territory from a possible invasion of uninvited guests or simply do not allow people to look at what is happening near the house or cottage.
A fence on a slope must be created carefully and correctly, because if the work is carried out correctly, the resulting structure will not only be durable and attractive, but will also act as a full-fledged fortification.
Surface leveling

Leveling scheme embankment for installation of a fence
If you have to deal with uneven ground, then construction can be carried out using several technologies, each of which is used in certain cases.
For example, preliminary leveling of the surface using an embankment. It is considered the most optimal to level the very surface on which construction work is carried out, after which it will be possible to erect a fence in the standard way.
As a result, it is possible to achieve that the lower part of the structure will be exactly the same along its entire length. The slope will be corrected with an appropriate embankment created from the ground.
The disadvantages of this method include significant laboriousness, since in order to correctly and perfectly align the space, a lot of effort must be made. Additionally, labor costs will be significantly increased.
The advantages of the method include the ability to get a perfectly even fence, so you don’t have to pay much attention to the competent joining of its sections so that they look beautiful, although they have different heights.
Specific laying of the base

Many large and heavy fences made of brick or concrete need a foundation, and if you make a competent and complex bookmark on an uneven foundation, you can compensate for all the problems of the landscape.
It must necessarily be formed with a concrete base, which will have different heights in different places. In this case, you get a foundation with a slight slope, but the upper part of the fence will be flat.
The resulting fence will be reliable and durable, but this method is suitable only for those areas where there are small problems on the surface.
Fence with sections and stepped installation

The method of forming a fence with sections that are installed at different heights, but the upper level of the fence remains the same, is used quite often. As a rule, this option is suitable for structures formed from profiled sheets. It is important here to correctly straighten all sections at the same level.
The use of staggered mounting of sections assumes that each section is installed in such a way that it is slightly lower than the previous element. In this case, slope and unevenness are compensated.
If a fence is formed using an available chain-link mesh, then for such a fence it is enough to simply stretch the mesh so that it is fixed parallel to the ground.
The result is an even fence relative to the landscape, but there will be drops in it. The disadvantages of this option include the unattractiveness of the result, and you can easily view through the grid everything that happens near the house or cottage.
Proper foundation building

Thus, you can choose any suitable option that allows you to get a fence that is characterized by increased strength and fits well into the existing landscape. It is important to properly create a foundation on uneven ground.
If you have to work on an uneven area, then it is important to know how to properly equip the foundation so that it can easily compensate for unevenness. The base in this situation can be implemented to obtain an even fence in the following ways:
- deepening in different places may be different;
- the height of the base will be different, but the sections of the fence will be on the same level.
It is with the help of a well-equipped foundation that you can get an even fence on very difficult ground, with significant irregularities.
Features of creating a fence in areas with different slopes

The territory can have a small, medium or significant slope, and for each option the optimal solution is selected:
- On a site with a small slope, you can simply level the area in order to eliminate all the shortcomings. Due to small irregularities, this will not have to spend a lot of money and effort. It is enough to purchase the necessary bulk material, which fills up surface defects. Another possibility is the formation of a foundation in which the plinth in different places of the fence will have different heights. The depth remains the same for the base.
- It is almost impossible to level a plot with an average slope, and if you take up this particular job, you may encounter significant difficulties. It is much easier to choose another optimal option for an attractive fence. As a rule, in such areas there are drops of the earth by about 20 cm. When developing the soil, it is necessary to choose the territory as the base, which will be the lowest. The best choice is the formation of a foundation, which will have a different depth of penetration and height of the base. It is also allowed to create a fence in such a way that its sections are mounted with an offset, which compensates for landscape defects.
- On a site with a large slope, there may be a difference between different parts of the earth equal to 1 m. In this case, a stepped laying of the base of the fence is carried out. Such work is considered quite complex, as well as expensive, but there is simply no other way out in such difficult situations. Leveling the surface in other ways will be even harder, and this will require specialized construction equipment, so the costs will be high.
Thus, in almost every area there are certain irregularities and problems. For each specific type of unique landscape, you should apply your own methods of forming a fence that will be even and attractive. At the same time, it is important to determine what kind of slope is available on the territory, in accordance with which the optimal solution for the problem that has arisen is chosen.
Question: Tell me, please, is it possible to raise the level of the ground in front of a private house and how best to do it? it turned out that the neighbors on both sides during the construction raised the level of their plots, and our house ended up in a lowland, so during heavy rains, the flow of water from the street goes directly to our site.
Answer: It is a pity that you did not indicate to what level it is necessary to raise the level of your site in order to avoid flooding by surface water. Your neighbors, of course, are not very good people since they did this without informing you that they would raise the level of their plots. Of course, you can sue them, as they deliberately worsened your conditions, but it will take a long time, and the nerves you have lost will not be worth it.
You need to start with the installation of a strip foundation around the perimeter of your site, and make the height of the foundation above the ground level of your neighbors' sites. Well, then, depending on the level of bedding, start filling the area from the lowest point of the foundation of your house to the fence.
If you need to raise it to a height of up to 30 cm, then you don’t need to equip a pillow of sand and gravel, just pour 10-15 cm of earth, compact it, fill it with water for a day. The next day, repeat the procedure and so on until the entire surface of the land is leveled. If the thickness of the bulk layer is above 30 cm, first level the surface with a sand-gravel mixture, and then with black soil. You need a strip foundation for a fence so that during heavy rainfall your land does not move to your neighbors, and simply from moving various rodents to your site will serve as reliable protection.
It will be good if you can put a small layer of fertilizer in the form of a peat pad in the middle of the bulk layer. And of course, do not leave the site empty, be sure to plant grass with a well-developed root system, such as winter rye. And then just dig it up, it will compact and fix the top layer of bulk soil. This procedure can be performed a couple of times, the result will be yourself.
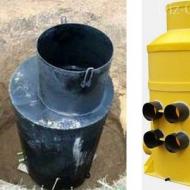
As for the flooding of the site from the road. If you do not have a drainage ditch along the site, then it's time to equip it. Along the road, you dig a ditch up to 1 meter deep with gentle slopes so that the slopes do not erode with water, strengthen them with turf or tamp coarse gravel into their body, etc. At the border with the neighboring site, dig a hole with a depth and diameter of one meter ) and equip there a drainage well made of red brick, car tires or other suitable material, close it with a fine mesh, everything, you are reliably protected from water entering the site from the side of the road. Of course, it is necessary to arrange a bridge over the drainage ditch for the entry of vehicles, but this is no longer a problem. Good luck.
Often homestead and suburban areas have a slope. It is more difficult to put a fence or a fence on such a surface. They will also hold and reinforce the ground, as will the hedgerow that is advised in such cases.
Fences on the slopes can be built if you know the features of such work.
There are two ways to solve this problem: repeating the contour of the site relief and “steps”.
Leveling the site before the construction of the fence
This is the simplest solution that will allow you to have a straight fence line, but will require moving a large mass of soil. If we carefully weigh all the pros and cons, then the conclusion is obvious: leveling the site will be very laborious and expensive. Such a fence will cost much more than building a foundation for it, taking into account all the features of the terrain. It is also important that the construction of the embankment will disturb the fertile soil layer.
Often, alignment is undesirable for the reason that there are many ways to diversify the landscape with the help of a slope. It will become the “highlight” of the site, will give the property originality and originality. For example, you can terracing a slope, and it will not only be beautiful, but also profitable, since in this case both horizontal and vertical planes are at the disposal of the owner. This will allow you to perform luxurious landscaping using containers in which you can plant not only flowers, but also fruit-bearing plants, such as vegetables.
Fence on a slope from a professional flooring
The device of the tape leveling foundation
First of all, you should determine the height differences between the extreme points of the fence line. To do this, a geodetic survey is carried out within the planned fence. Digging a trench starts from the highest point of the perimeter. If you make MZL (shallow strip foundation), then the depth of the tape will be different.

If the soil is clayey, then the walls of the trench can play the role of formwork. In this case, its bottom must be carefully leveled and have a strictly horizontal position throughout the entire fence line. This will help the device of a sand cushion, which must be spilled with water, compacted and leveled.
Where, according to the slope, a “step” is provided in the ground, the sand cushion should repeat it. On top of this layer you need to lay tapes of roofing material. Thanks to them, it will be easier to remove the soil that crumbled during the construction of the formwork from the trench. We mount it as follows:
- first of all, the corner points of the perimeter should be marked with wooden bars;
- racks are mounted on the ground, which consist of a vertical part and a “sole” - a horizontal part;
- racks are set along the perimeter line along the cast-off cord;
- first of all, the upper formwork boards are attached to the racks, which should form a strictly horizontal line. You need to start installation from the highest point of the site, where the top board can be laid close to the ground;
- after that, the lower formwork boards are sewn, which will have to be adjusted according to the slope relief, and therefore the number of boards at different points of the site will be different. At the very bottom, the shields will be with the largest number of boards;
- before pouring concrete, it makes sense to strengthen the formwork panels with the help of jibs and support them with bars with an emphasis on the ground.
Now you need to install the pillars to which the corrugated board will be attached. They can be iron, wood, concrete. The tree is pre-treated with an antiseptic. Pillars should be deepened into the ground. The distance between them is 2-2.5 m. It must be calculated so that it is convenient to fasten sheets of corrugated board.
After that, the reinforcing material is laid in the trench. At the corner points, the reinforcement bars are connected to each other. Next, concrete is poured in layers. The last layer is made more liquid, as this will help to level the foundation horizontally.
The device of posts for a fence from a professional flooring

Work begins with marking the site and determining the points where the pillars will be laid. The distance between them is calculated in such a way that later it would be convenient to sew sheets of corrugated board. Usually it is 2-2.5 m. The pit should be 20 cm wider than the pillars. Pipes with a cross section of 10-12 cm, timber 10/10 or 15/15 cm, asbestos-cement pipes can be used as supports. Each support is tied with reinforcement.
Pits for poles are best done using TISE technology using a special drill that creates a broadening at the bottom. After pouring concrete, the supports will be fixed in the ground much more reliably and will be able to withstand heaving forces. After installing and aligning the pillars vertically, sand, broken brick, gravel or crushed stone is poured into the pit and compacted. Next comes the pouring of concrete.
on a site with a slope has its own characteristics. In order not to dig holes of great depth at high points of the perimeter, the length of the supports varies. The main thing is that their upper planes are on the same line, strictly horizontal. The depth of the pits is chosen depending on the type of soil and the climatic conditions of the region. In northern latitudes and on heaving soils, it should be below the freezing point. Loose soils need additional strengthening of the walls with the help of reinforcement, backfilling and tamping of gravel.
Installation of corrugated sheets on poles

For high-quality installation of sheets, logs (crossbars) are mounted. On a site with a slope, they are installed with a “ladder” so that the horizontal is maintained. The lower and upper logs are fastened at the same distance from each other, in this case, a lot of identical rectangular openings are obtained, which are subsequently closed with sheets of corrugated board. If the pillars and crossbars are iron, then they are fastened by welding or bolted connections.
You should decide in advance which fasteners for the profiled sheet will be used: bolts, rivets or self-tapping screws. Sheets are recommended to be overlapped on one wave. The number of attachment points should be sufficient so that the fence can withstand strong wind gusts. The profiled sheet should be installed close to the foundation or ground. This will avoid prying eyes and the penetration of strangers into the site. It is recommended to install a fence strip along the top line of the sheets: it will give the fence a finished look and increase its aesthetic appeal.
Wooden fence on a slope
Fences in areas with a slope can be built in two ways: “steps” and repetition of the relief. In the second case, the construction of the fence will be much easier, since the veins between the posts will run parallel to the soil surface. Therefore, the height of the fence will be the same around the entire perimeter of the site. This method is preferable for gentle slopes, pasture-type sites, picket fences.
Stages of work on marking the contour of the fence

- Mark the location of the fence with pegs and cord. We will install one peg at the highest point of the fence line, the second - at the lowest. Check the verticality of the bars with a level.
- Stepping back from the ground 15 cm between the pegs, we will stretch the cord.
- We will tie red ribbons to the cord at the points of installation of the pillars. The distance between them must be the same. Usually it is 2-2.5 m.
- With the help of a plumb line attached to the red ribbons, we will find the location points of the pillars on the ground.
The stepped fence has a more rigorous and attractive appearance, but its construction takes more time and requires more labor. Such a fence consists of many sections of the same length, height and width, which evenly fall down the slope at equal distances. If the terrain is too steep, replete with ditches and height differences, then large gaps between the ground and the fence are possible. Therefore, either partial leveling of the soil or the sewing of additional wooden shields covering the gaps will be required. In order for fences in areas with a slope to be reliable and durable, you should carefully align the verticality of the pillars and firmly fix them in the ground.
Stages of work on the installation of pillars

- At the points found using the markup, we will make holes. The width of the recess should be 20-30 cm larger than the cross section of the timber selected for the supports. The average depth of the pit is 80 cm. In the northern regions, it should be below the freezing point of the soil.
- We tamp the bottom of the hole, make a sand cushion 30 cm high, spill it, tamp it down.
- We install a wooden support pre-treated with an antiseptic preparation in the pit and pre-strengthen it with the help of props. We fall asleep in the pit a little rubble, we tamp it down.
- We align the pillar strictly vertically and continue filling and ramming the rubble for another 20-25 cm. Instead, you can use broken bricks.
- We lay the reinforcing material. We fix several bars of reinforcement in the side walls of the pit.
- We do concrete pouring. Further work begins after he gains a fortress, that is, after 2-3 days.
The device of the frame and cladding of a wooden fence

First of all, we will align the pillars in height. To do this, we fix the cord on the support at the bottom of the slope and stretch it to the opposite extreme post. Using a level, set the cord horizontally and secure it.
Focusing on the markings on each support with a marker, we mark the cut line and, using a reciprocating saw or a hacksaw, cut off the extra centimeters on the bars.
Focusing on the markup, we mark the attachment points of the veins on the supports. If the height of the fence exceeds 1.5 m, then it is recommended to install two logs on each span: upper and lower. We mount the veins like this:
- Using suitable clamps, fix the upper cross member between the two supports.
- On the outer side of the vein, draw the outline of the post with a marker.
- Let's remove the board, find the middle at the marked distance and saw it off.
- We fasten the vein with nails, driving them obliquely, or with wood screws.
- Thus, we sew up all the spans with crossbars.
We produce cladding boards. In order to make it easier to align their upper ends horizontally, an auxiliary tool can be made. It has a T-shape and consists of two planks, the “leg” is made of a facing board, and the horizontal plank is made of a flat bar. Its length should slightly exceed three times the width of the facing board. When stuffing boards into veins, the tool is placed on top of an already fixed board, and its horizontal bar shows at what height the next one should be fixed. In this way, it is easy to achieve perfect evenness of the upper edge of a wooden fence.
Related Articles