Country frame houses. Country house - step-by-step construction technology Do-it-yourself frame summer house
People acquire dachas in different ways - they inherit them, buy plots with a house and remodel or complete them for themselves, or buy land in an almost open field and begin to develop virgin lands. One of our craftsmen, who decided to join country life, was puzzled by just such a process. And since the most effective way to save money is to do it yourself, that’s exactly what he did, starting small - with a summer house in the country “for the first time.”
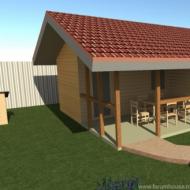
- Country house 6x6 with built-in terrace 4x3:
- project;
- foundation;
- water supply;
- box;
- internal work.
Country house 6x6 with built-in terrace 4x3
Gonzik1
Last year I purchased a plot of land in a field (like a new holiday village). The poles were installed, electricity was supplied to the site (it took two months to complete the paperwork), a panel was installed on the pole with a meter, a machine and an outlet. This year, having saved up some money, I began construction. I decided to do everything myself, because it’s cheaper and more reliable.
DIY country house project
The craftsman created the dacha construction project with his own hands over the winter; according to his idea, this is the first module, to which he will later attach another one, combining both parts into a solid structure. Using a special program, I made a drawing that allowed me to accurately calculate the required amount of building materials.


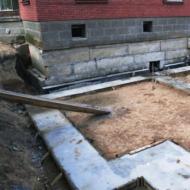
Foundation
Since the house is lightweight, using frame technology and on one floor, Gonzik1 gave preference to a columnar foundation made of special concrete blocks (20x20x40 cm). His choice was also influenced by the low groundwater level (GWL) at the dacha and the excellent condition of similar foundations under neighboring buildings. Depending on the level, I used one or two blocks per pillar - removed the fertile layer, added a sand cushion, and laid the blocks. The plane was maintained using a hydraulic level. According to the craftsman, he appreciated this simple tool - it’s cheap and the measurement accuracy is excellent. The pillars were covered with roofing felt for waterproofing. With the help of relatives, the foundation was ready in three days.

Water supply
There is no place for a central water supply in the field, so the problem of water supply is a personal matter for each summer resident. Our craftsman initially planned to drill a well. Test drilling at thirty-six meters was unsuccessful - dense black clay came out instead of water. The drillers reported that only an artesian well about ninety meters long would help, and they announced an exorbitant price. Gonzik1 I got upset, imagining the scale of the problem, and decided to dig a well, as the foreseeable future has shown - the decision is the right one. Three days of work, ten rings - a column of water for one and a half rings, restored in an hour and a half.
Box
The strapping is two-layer - at the bottom there is a board 100x50 mm, at the top - 100x40 mm, impregnated with fire and biological protection, the strapping elements were connected to each other with nails (100 and 120 mm). The strapping was laid on top of the roofing felt and secured to the posts with anchors.

All frame posts were also assembled from 100x40 mm boards with nails; the walls were raised directly on site using temporary jibs. They collected only the ridge on the ground, then lifted it onto the roof. This stage took another four days.


The next thing was to install the rafters, wind boards, install the wind protection, and put the counter batten and sheathing on top. Our craftsman chose metal tiles as the roofing covering.

Gonzik1
I read that no matter which side the sheets are laid on, they are often laid from left to right. It turned out, no, the tiles are laid from right to left, otherwise the next sheet will have to be placed under the previous one, which is extremely inconvenient, especially when installing alone. The weather was not very good, it was drizzling, there was wind, it moved along the roof like a cat, trying to cling to the sheathing with its feet. All twelve sheets of tiles (115x350 cm) were laid in half a day.


After the tiles, we got to the grounding, due to which the floor joists were not completely laid. Gonzik1 I used a corner 50x50x4 mm, a connection from a metal strip 40x4 mm, plus a piece of self-supporting insulated wire (SIP).


Next, we covered the entire structure with a protective membrane, installed a door, laid floorboards on the terrace, and began covering the façade with imitation timber. The cash was immediately treated with protective impregnation. During the work, the craftsman made adjustments to the project - he made a third window, so there will be more light, and the view from the window is attractive.


Interior work
With the end of the holidays, the construction process slowed down as much as possible, since free weekends did not occur every week, but it continued. I finished with the floor - rough on OSB joists, a windproof membrane on top, stone wool slabs between the joists, sheathing, and OSB again on it. Linoleum is assumed to be the finishing coating. The house also got another window.


I brought electricity into the house, insulated the perimeter with stone wool, a vapor barrier on top and clapboard as cladding.


The finishing process continued according to the same algorithm; contrasting trim on the window openings added decorative value to the house. All internal walls will be covered with clapboard.

Gonzik1
There are no stoves planned, the house is for seasonal use - spring, summer, autumn. I plan to install electric convectors, I have no problems with electricity there, three phases, new substation, 15 kW per site.
For all those interested, the craftsman posted a calculation of materials (all used boards are 6 meters long):
- foundation blocks 200×200×400 mm, 30 pieces;
- board 50x100 mm, 8 pieces (for the bottom layer of strapping);
- board 40x100 mm, 96 pieces - approximately 8 pieces left;
- board 25x10 mm, 128 pieces - approximately 12 pieces left;
- timber 100×100 mm, 3 pieces;
- rail 25×50 mm, 15 pieces;
- imitation timber 18.5×146, 100 pieces – approximately 15 pieces left;
- insulation, stone wool 1200×600×100 mm, 28 packages (6 slabs each) – package left;
- windproof membrane 1.6 m wide, 60 m² per roll, 3 rolls;
- vapor barrier 1.6 m wide, 60 m² per roll, 3 rolls - approximately 0.5 rolls left;
- OSB 3 2500×1200×9 mm, 15 pieces (rough and finishing floor) – approximately 1.5 slabs left;
- metal tile 350×115 cm, 12 sheets;
- lining 12.5x96 cm, 370 pieces (10 packs) - not sure it’s enough, partially used for toilet hemming, and the walls are not finished yet;
- wooden windows 1000×1000 mm, 3 pieces;
- entrance metal door 2050×900 mm, 1 piece;
- protective impregnation for wood, 10 liters - 3 liters left, but the house is covered in only one layer.
Taking into account independent construction and finishing, the estimate turned out to be quite budgetary.

Gonzik1
- Foundation - 2500 rubles.
- Boards for the frame, wind protection, vapor barrier, imitation timber (exterior decoration), lining (interior decoration), insulation, etc. - 110,000 rubles.
- Metal tiles - 20,000 rubles.
- Door - 13,200 rubles.
- Windows - 4,200 rubles x 3 = 12,600 rubles.
- Forwarding SIP to the house - 3000 rubles (with the cable itself).
- Impregnation - 3600 rubles.
I’m still planning to install electrical wiring around the house, I think I’ll spend 8-10 thousand. I don’t give the cost of nails, screws, staples for a stapler, etc., etc., because I no longer remember how much I purchased. Total: about 165,000 rubles.
For another short but fruitful vacation - I finished the electrical work, finished the interior paneling and painting, made a set for the kitchen, completed the terrace. I laid a 100x40 mm board on the terrace, took it unplaned, processed it with an electric planer, and then covered it with impregnation in two layers. Over the past winter, everything was in place, nothing moved, did not dry out or warp. The craftsman has plans to complete the second block, but this test of the pen is excellent - an excellent summer house for a family holiday.
The easiest way to make a country house with your own hands is using frame house technology. We present to you 5 projects of frame houses with photos that will help you in choosing the layout and design of a country house. In addition to useful plans and photos, we will tell you about the basic points of building a frame house, which must be taken into account when choosing a project.
Frame house project 1:
open plan country house.
For a frame house, a columnar or columnar-strip foundation is usually used, which significantly reduces the cost of building a country house. After all, about 30% of the entire construction budget is spent on creating the foundation of a house.
A columnar foundation eliminates the need for a significant amount of excavation work and reduces the consumption of expensive building materials. This type of foundation does not require costly work on heat and waterproofing. Such a foundation is an excellent solution for sandy soil or soil with a high groundwater level.

In the context of building a country house with your own hands, you can use red baked Boo brick for a columnar foundation. Columns of two bricks are able to support a light one-story frame house.

In addition to bricks, you can choose concrete blocks or asbestos-cement pipes as supports. In the case of pipes, they will serve as a kind of permanent formwork for pouring concrete supports.

A properly constructed columnar foundation will last you more than 100 years. This is a good foundation option not only for a house, but also for any country buildings - bathhouses, sheds, gazebos, etc. It is fair to mention the disadvantage of a columnar foundation - the lack of a basement in a country house. If having a basement is important to you, then building a freestanding one may negate any savings from this type of foundation.

Frame house project 2:
country house-studio.
For the flooring in a frame house, wooden beams treated with an antiseptic and reinforced with cross members are used. The floor must be reliably insulated, because with a columnar foundation it is blown through. The main feature of a frame house is an effective insulation system.

Floor coverings in a frame house are a pie of rough floor boards, mineral wool, vapor barrier, OSB boards, underlayment for the finished floor and the finished floor. It is this design that guarantees a warm floor in the coldest winter.

The ceiling of a frame house has a similar structure, but the first element, instead of a subfloor, is a plasterboard slab.

The country house itself, built using frame construction technology, is a rigid frame made of wooden beams and corner braces that enhance the strength of the structure. All wood for the construction of the house is treated with antiseptics and modern impregnations against fire.

The outside of the frame house is sheathed with OSB boards and a windproof membrane. Then insulation (mineral wool, cellulose) is laid between the wooden posts and the “pie” is sewn up with a second OSB board on the inside.

High-quality insulation with modern materials - a kind of layer cake made of OSB, vapor barrier film and mineral wool will provide reliable warmth to the country house. A correctly made frame floor with a thickness of 10 cm corresponds to the thermal insulation of 2 m of a brick wall.

Frame house project 3:
The exterior finishing of a frame house is carried out according to the principle of a ventilated facade, where wooden slats are packed between the wall of the house and the cladding, which form an air gap that ensures the dryness of the insulation and thus increases its effectiveness in any weather.

A ventilated facade will increase the service life of the walls of a country house and smooth out sudden temperature changes.

The external cladding of a frame house can be made of wood, siding, brick, and decorative plaster. In fact, any material to suit your taste and budget is suitable for the exterior decoration of your home.

Frame house project 4:
small country house-hut.
Frame houses came to us from Scandinavia and Canada, where the climate is quite harsh and people know the value of a warm home.

Often, to an ignorant person, frame houses look like flimsy and unreliable buildings, but more and more summer residents are mastering the benefits of this modern technology.

Frame house project 5:
country house with two bedrooms.
Why is a frame house project attractive for building a country house with your own hands?
You can build a country house quickly in one season. You do not need to stretch out the construction for several years, when in the classic version for a brick country house the foundation is poured in one year, then the box is erected, then this structure must be allowed to settle to shrink, then finishing work must be done. In addition, such a house can be built almost all year round (down to a temperature of -15 degrees).

You can build a country house with your own hands. To build such a house, two people are enough, who can completely build such a house in 2-3 months. If you first carry out the work of studying the intricacies of building a frame house, completely decide on the project and calculate the consumption of materials, then building such a country house over the summer is quite a feasible task for any summer resident.

A frame country house is an economical construction option. If you have a limited budget, then using frame construction technologies, you will get not only a cheap, but also a modern, warm country house. You will save on building materials, on their delivery, and on paying builders. You can build such a house modularly - its design makes the possibility of further extensions as simple as possible. This way you can break the construction of a large house into several completed stages, in accordance with your budget.

You will have a warm country house and you will save on heating. The main thing in a frame house is modern insulation systems, when everything in the “pie” of OSB, insulating films and the insulation itself is well thought out, is in its place and works as efficiently as possible for one main goal - to provide maximum effective thermal insulation using optimal means.

You can build a country house on difficult soils. The lightweight construction of a frame house, a columnar foundation, is a solution for problematic soils, which can be appreciated by anyone who has already tried to build on their summer cottage, where, for example, groundwater is high.

Simplicity and cost-effectiveness of finishing work. By covering the inside of the floor of a frame house with OSB boards, you get a perfectly flat surface, on which it is then easy to carry out any finishing work.

Eco-friendly microclimate of a country house. A house built using frame construction technology has the same healthy microclimate as a wooden house.
If you know the tools at the everyday level, then having a well-thought-out project in hand, understanding all the norms and rules for the construction of frame houses, you will be able to build an economical, energy-saving, environmentally friendly country house with your own hands.
How to build a cute and inexpensive wooden frame country house with your own hands with a single-pitched roof. A step-by-step photo project for construction with your own hands.
And so, today we are working out in quite detail the tech-no-log-gy of constructing a not-expensive dacha house. I think this project will be useful to many who want to build an inexpensive and not complicated frame house, but don’t know how to do it. We will build this production of art on the pillar of fun-da-men, although I am not a fan of this technology of construction. i-tel-stva. But that's not the point. Meet me!
How to build a frame house?
As I already told us, we still need a pillar of fundament. Looking at this photo, many people will say why there are so many tables. To this I will answer this way. The foundation is the key to the longevity of your home, and the stronger it is, the longer your home will last. But don’t think that if you force a fool to pray to God, he’ll make his forehead go wild. No, everything has its own good reasons. Each row of tables fulfills its specific role, and this should not be neglected. Since you are building a house using frame technology and not a house made of timber, which, in comparison with frame technology, has a greater -ness, then frame structures are more flexible in this regard, and where there is not enough emphasis, the board can bend, which ultimately can affect the entire geometry of the house. I will try to emphasize this point in the right places.

Since the floor will be insulated and made like a slab, we need to. Lies in this structure play a triple role. Firstly, they cut off the lower frame of the house from contact with the concrete. As rightly lying down, they treat anti-sep-ti-ka-mi from rot-e-sho well. It is also recommended to use more expensive wood species that are less susceptible to rot than pine. The second important role is played by lying as a means of leveling the horizon or level, as it suits you. And there is a third role for these boards in the construction of this dacha house. We will lay the subfloor on them. A cheaper and more reliable way to process the surface would be to use bitumen primer or mastic.
The primer is essentially like a liquid and black paint, after application it dries and forms a water-based coating . The ointment is thicker and more oily, the nano-sit is more complex than the primer, but no one dislikes it, not even insects. Lying close to the pillars, between the pillar-cha-tym fun-da-men and the lying-by-mi-laying rub-ro-id.

After laying it down, we proceed to manufacturing. To make it easier for us to assemble the lower harness, we move 10 cm away from the outer edge of the pillar and lay it along the perimeter -Ki, at the same time, do not forget to check the dia-go-on-structures, they must match. We will use 50x150 mm boards for this element. After assembling the first crown of the lower frame, we lay the floor joists in the center of the floor. The lying surfaces should protrude 5 cm from each side and nail the logs to the harness.

Next, lay the second row of boards, thereby increasing the thickness of the lower frame. As you probably noticed, each log goes to a post and is supported by two more in the middle, thereby protecting not using any kind of board under a fairly significant load that can form during operation a-ta-tion at home. In fact, the entire weight of the frame structure is equal to the entire pillar of the foundation and this is right -But.

The corner of the lower harness is joined using this method.

With the third row of boards we grab the veranda, and get a more accurate map of the size of our house. I forgot to say the house will be 6x8, of which there is a 4x8 roof, the rest is a veranda.

We strengthen the lower frame of the veranda with a second row of boards along the internal diameter and approach the installation of the floor joist. At this moment we will attach the floor joists to special metal brackets.

Lay it down and secure the subfloor. Thus, we won useful space for insulation. Of course, 10 centimeters will not be enough for constant living all year round, but if you use a 50x200 mm board. on the lower frame and on the floor joists, then the situation will improve.

After insulating the under-floor space, laying the floorboard on our slab and rejoicing in the process work. With this, the most difficult and tedious part of the work is over, then there will be only creativity.

We are about to begin the construction of the frame walls of our private wooden dacha house. Here, in principle, everything is simple, the main thing is to calculate everything correctly.

Mon-ti-ru-eat the second wall in accordance with our work-pro-ect. Between the floor and the wall there is a mandatory linen. Since the house has a single-pitched roof, the front wall will be higher.

Mont-ti-ru-eat the side blind frame wall. When installing the same walls, we use the same level and the joints between the walls also use ju-to-voy tape, if you want to do everything conscientiously.

After the installation of the fourth wall, the structure gains rigidity. To fasten the walls, use nails or nails.

Lay-dy-va-em build-pi-la. The outermost lines are attached to the side walls and, with the help of corners, we are attached to the top board of the front and rear walls . The rest of the lines are simply attached with the help of corners to the walls.
An important point in the installation of the same rafter-saw system is that the rafters are laid strictly above the supporting pillars walls, thereby correctly distributing and transferring the load from the roof to the lower frame.

Mont-ti-ru-eat end slats with outlets under the side overhangs of the roof.

We make it in advance and attach the lintels under the roof overhangs to the board. After which this structure is installed in place.

After which we close its end with a plank. On this note, we will consider our frame for the future dacha ready. We are starting to build a veranda.
Veranda for a country house

We need the hundredth beam for the veranda post of the dacha house. The veranda of the dacha will also have a single-pitched roof, so the posts are also made in different lengths.

We lay the same hundredth beam on the rack and hold everything together with a nage.

Lay-up the construction on the veranda. You can lay beams between the stro-pi-la-mi, thereby making it easier to fasten the stro-saws to the mau-er-la-tu. We have already done this in one of the manufacturing projects.

We make decorative railings on the veranda. And I approach the façade cladding. We will use timber as a façade.

The imitation of the bru-sa on the façade of the car-kas-no-go house looks simply great-sculpted.

The house is slowly starting to get ready, but something is missing in this picture called “How to build a dacha.”

Of course, we need to give the roof a more noble appearance. First of all, according to all the rules, we insulate the roof.

But on the last stage of insulating the roof of the dacha house, we need to do the construction a little differently mu. As a frame for this project, I used a 50x100 mm beam. thereby giving the roof more volume and strength. We set the end plank to a standard size of 50x150 mm. or 40x150 mm. If we make the third layer, then we will use timber measuring 50x50 mm. and the end plank will be 100 mm wide. The previous two layers can already be insulated, thereby obtaining a thickness of insulation on the roof of 250 mm. which will be considered very good for now.

According to this principle, the roofing pie can be made much stronger, warmer and thicker. But there is no need to be diligent, there is no need to make more than three layers, in this variation we operate with a wide board.

After that, the roof was sewn up with boards and flexible tiles were installed. For this reason, we have one beautiful one, in which the entire process of building a roof and not only is shown in detail.
 Country house with your own hands
 We put it together, and here it is, our wooden frame dacha is ready. In my opinion, the country house turned out to be quite good. And what do you think?
City dwellers usually try to get away from the dusty city and city worries to their country houses. If your choice is to live in a dacha only in the summer, then there is no need to build a house using expensive materials and equipment.
Before starting construction, you need to consider all the options for country houses, so as not to later regret the time and money spent.

Material selection
On the construction market there are proposals for the construction of country houses from solid logs, from profiled and laminated veneer lumber. They require a strip, pile or column foundation.

The choice in favor of one or the other is made based on the load on the foundation and the characteristics of the soil. Ultimately, houses made of logs and beams turn out to be not a cheap and labor-intensive option for building a country house.

Most summer residents dream of a cheap summer house with minimal losses for the budget and in a short time. A house made of wood will meet these requirements, since this material is natural and, accordingly, environmentally friendly.


For a small summer cottage, the best option would be a frame-panel house, which is cheaper among frame structures. Even non-professionals in construction can build such a structure.

The most favorable location for the house will be the north-eastern part of the site. Thanks to this position, the house will be maximally protected from the cold wind and will receive a sufficient amount of sunlight. It is better to place windows on the south and south-west sides.

Construction stages
If you are wondering how to make a summer house, we recommend paying attention to the following features. Small buildings with dimensions of no more than 36 square meters without a basement are built using a columnar foundation.

Its obvious advantage is ease of installation and relatively low cost. The disadvantage of a columnar foundation is that it can only be used on stable soils. Only then will such a foundation be stable and durable and become a reliable support for the structure. Otherwise, the entire structure may be distorted.

In addition, the support-column foundation has low load-bearing capacity, and therefore is recommended only for one-story buildings. Among the significant disadvantages is the impossibility of arranging a basement.

Door and window openings should be provided for in advance by constructing a sheathing of timber, since panel materials may not support their weight. When fastening pre-prepared panels with nails (during the construction of walls), we recommend using connecting plates. Sheets are nailed to the frame as the first layer, followed by insulation and the second layer is sewn up.


In order for a summer house for a summer house to be resistant to moisture, it is necessary to include waterproofing of the floors and roof into the project, and sheathe the façade of the building. Covering with plastic panels and siding, for example, with imitation wood, brick, or natural stone, will significantly decorate the appearance of the house.

The only drawback of such a structure is that it needs insulation if you plan to live there in the winter. The advantages are the simplicity and speed of construction, literally within a week, and the variety of architectural solutions.


Veranda
When planning to create a place where the family can relax in nature, a veranda is included in the house design. Those who prefer to make preparations for the winter need an attic and a basement. It is worth considering in advance a storage room for storing garden tools.

Having decided to build a summer house with a veranda, place it along the facade of the building so that the front door of the house is protected from bad weather and the rays of the sun. The size of the veranda is usually selected based on the personal preferences of the owners.

The structure is supported by foundation columns located under the corner posts of the frame. A concrete foundation for the posts is placed in pre-dug trenches.

Ready-made country houses
Most country houses are small summer houses, a photo selection of which you can see above. They are economical and require minimal effort and time to build. They are delivered to the site ready-made and assembled in just a few days, and the next day the house is ready for occupancy.


The house does not need a capital foundation, since wood is a lighter material compared to concrete or brick. Wooden houses are recognized as environmentally friendly. In addition, they perfectly retain heat, maintain optimal humidity and create a favorable microclimate in the room.


Photos of summer houses with your own hands


It is the dream of any city dweller to have a house outside the city, where one can take a break from the bustle of the city and breathe fresh air. One day spent in such a place gives you a supply of energy for the entire working week. But not everyone can afford to have such a house.
In this case, people with a limited budget can either buy a ready-made frame garden house or build a garden house with their own hands.
If you decide to buy a ready-made small country house, then there is currently a large selection of such houses on the construction market. There are options for small frame houses that are perfect for placing them on a summer cottage, in a garden or in any place for organizing active recreation.
These frame houses are well insulated, so you can save on heating them, since the costs are minimal.
Large houses are perfect for the role of a country cottage. Companies that manufacture garden houses not only offer ready-made houses, but can also build a house according to the customer’s individual design.
Below are examples of finished houses.

There are many options for using these houses as garden houses, fishing houses, and for equipment. To make the houses that are presented below, wood was used that was treated with special means, so they are highly durable, reliable, environmentally friendly and durable.
Depending on the size, a frame garden house can have different purposes. A small house can be used as storage space for storing household equipment. It is possible to make a house to order according to an individual project.
Selection of materials and step-by-step construction
Before you start building a frame garden house with your own hands, it is important to think about what materials will be used and calculate the required quantity. To build a frame house, you need to prepare the following building materials:
- timber for constructing the frame;
- edged board;
- insulation;
- polyurethane foam;
- roofing felt;
- hydro- and vapor barrier;
- fastening material.
For a lightweight frame structure, you can use a columnar foundation. If you build the foundation yourself, the cost of the work will be about 10 thousand rubles. When installing a strip foundation, it will take more time, but the foundation will be more reliable and durable. The cost of such a foundation will be 15-20 thousand rubles.

The amount of building material for the walls of a frame house depends on the size of the future house. For example, you can take a house 2.8 m high, 10 m long, 8 m wide. Using these parameters, the number of vertical posts for the house frame will be calculated. The perimeter of the house is 36 m.
The racks should be located at a distance of 50 cm from each other. If you use timber with a cross section of 10*15 cm for the racks, then you will need about 4 cubes of timber. To construct the base and the final connection, you will need 3 more cubes, for a total of 7 cubes.
- If you use an edged board 3 m long, 15 cm wide and 2.5 cm thick to cover the walls, you will need 4.65 cubic meters of board.
- The cost of the frame with walls, partitions, door and window frames will be approximately 70-80 thousand rubles.
- You will have to spend about 20-25 thousand rubles on interior decoration with the cost of materials and hired specialists.
Thus, a lightweight frame house for a summer residence will cost about 250-300 thousand rubles.
Having decided to own a country house, you need to decide which house is best to build. You can buy ready-made. The construction market now has a large selection of companies that sell ready-made houses or build according to individual projects to order.
But if you have a little experience in construction work, then you can build a house with your own hands, embodying all your fantasies in it. In addition, you will be able to save on construction costs.
To realize your dream, the ideal option is to build a frame house. Such a house can be erected very quickly, is cheap, and besides, anyone can build it with their own hands.

Garden house design
Usually we build frame garden houses either from plywood or timber. Below we will consider both construction options.
From plywood
It is believed that the simplest in assembly and design is a frame country house made of plywood. Its construction lasts literally a week. If you give it a beautiful exterior finish, for example, with wooden lining, then it will have a quite presentable appearance.
The list of materials for building a house depends on the personal preferences, tastes and financial capabilities of the owner. Therefore, only an approximate list will be considered.

The following tools should be prepared:
- saw;
- screwdriver;
- drill;
- hammer;
- roulette;
- building level;
- plumb line;
- set of screwdrivers and drills.
Materials you need to purchase:
- cement and sand;
- waterproofing - roofing felt;
- 4-meter board measuring 5x20 for mounting floors and frame rafters;
- 4-meter board measuring 5x15 for the construction of load-bearing frame walls;
- 4-meter board measuring 5x10 for internal partitions;
- plywood;
- OSB sheets;
- mineral wool as a heat insulator;
- flooring;
- thick board for the floor;
- drywall;
- fastening material.
- Covering the frame with plywood. When covering walls, it is necessary to perform thermal insulation using insulation. The outside of the house is sheathed with plywood, which is secured with self-tapping screws. Interior finishing is done with plasterboard, plywood, chipboard or fiberboard. Before installing a clean floor, insulation should be done. Linoleum or floorboards can be used as flooring.
Foundation construction. At the beginning of any construction, we build the foundation. Since frame houses are lightweight, a strip or column foundation is suitable for them. For a small garden house it is better to use a pillar foundation. To build the foundation you will need a garden drill. With its help, holes are made about 1.6 m deep in increments of 2 m. Posts are inserted into these holes.
To make the structure stable, a sand cushion about 0.2 m high is made. Before inserting the pillars, it is necessary to waterproof the holes using roofing felt. Cuffs are placed over the holes, and then everything is filled with solution.
Construction of the frame. The basis of the frame is the lower frame. It is carried out with beams along the entire perimeter of the future building. The lower part of the frame and joists should be treated with an antiseptic to protect the wood from fungus and insects.
It is important to protect the wood from rotting by placing a waterproofing layer between the foundation and the wood. Next, vertical supports are installed, which determine the height of the future structure.
You should not make the house too high, as it will be difficult to heat it later.
Thick boards are used to construct the subfloor.
Roof installation. To erect a roof, rafters must be installed. To speed up installation, racks 1.5 m high should be installed in the center. A beam is attached to the racks, which is joined at the edges at an angle of 50 degrees using an end connection.
Rafters are installed on the resulting structure. You can install the roof yourself in one day. You can choose any roofing material; it depends on personal preferences and financial capabilities. For the house in question, galvanized iron is suitable.
From timber
The technologies for constructing a frame garden house made of timber and a house made of plywood are similar. Similarly, first of all, the foundation is made: columnar or strip. A columnar foundation is chosen for a small house.
It is possible to use concrete slabs laid on a sand cushion and buried 15 cm into the soil. Roofing felt is laid on the built foundation for waterproofing.

After the foundation, the frame is erected. First, the lower frame and logs are laid on the foundation, then the vertical supports are installed. The construction of the frame takes a little time, but the structure is strong and durable.
There is an option for a garden house with a veranda. To do this, you need to extend the lower logs to the length of the proposed veranda, using additional supports.

The subfloor is laid with thick boards. For thermal insulation, the floor is first covered with insulation, then hydro- and vapor barrier is performed, for example, with glassine. For flooring, you can use thick linoleum or floorboards.
Following the installation of the floor, the walls are made of timber. The connections are fastened with dowels. Insulation is laid between the crowns. Insulation must be done for each layer. Tow or jute can be used as insulation. Then the roof is mounted: braces and rafters made of timber are installed. At the next stage, the sheathing is carried out with timber and a layer of roofing material is laid.
A country house can be made more attractive if the exterior is finished with siding or wooden clapboard.
After the basic work on building a house with your own hands has been completed, you can install windows and doors and move on to interior decoration.

Building a house made of timber takes longer than a house made of plywood, but it is more reliable and durable. Be that as it may, a house built with your own hands will serve you for many years.
Articles on the topic