Proper laying of a brick plinth. How a brick plinth is built on a strip foundation: types of blocks, as well as step-by-step instructions for construction
The basement is a very important element in the entire house. The choice of material for its construction must be approached with full responsibility. Many experts advise making brickwork. This plinth is reliable, strong and durable, so it is ideal for the foundation of your home.
But it should be borne in mind that it is a complex matter, and building it is not as simple as it seems at first glance. This should be done by a real master. Although life sometimes makes its own adjustments and forces you to learn this skill yourself. Fortunately, in our age of Internet technologies, you can learn everything, and experience will come with time, the main thing is to follow the theory.
Laying a plinth in 2 bricks
As already mentioned, the best building material is. For a long time it has been the most popular, especially often used when laying a plinth.
When choosing a brick for a plinth, it is worth considering that it must be durable and weather-resistant. Sand-lime brick is undesirable due to the fact that it absorbs moisture. Acid-resistant and clinker bricks are too expensive. Therefore, the most suitable is ordinary red fire brick.
For the base, brickwork is usually made of 2 bricks; it is quite strong and will withstand any load. But don’t forget about the solution, it is also important. In our opinion, the most suitable solution is M75; it is quite flexible and rigid. To give the base additional rigidity and strength, it should be reinforced every four rows. To do this, use a special metal mesh with 50x50 cells.
When laying the plinth, you need to take into account the load of a single upper brick - it should be distributed over the two lower bricks. Another very important point: when you lay a plinth with two bricks, you will need to ensure that the rows are perfectly even, but also do not forget about the correct tying of the corners.
 |
 |
 |
 |
Construction Materials
Peter Kravets
Reading time: 3 minutes
A A
The ground floor is the main part of the building, which is located directly on the foundation and is a transition from the base of the building to its walls. In addition to its own specified strength value, the basement must withstand the load of the entire building.
Located in the most vulnerable location to environmental influences, it must be stable and reliable, which implies the need for careful planning of materials for its construction and protection.
The plinth belt is made from rubble stone, from building blocks, reinforced concrete, or from brick with your own hands. The brick option is most often chosen for construction due to its environmental friendliness, affordability and characteristics of the material itself.
It is quite durable and has low thermal conductivity.
In order for brick basement walls to maintain their reliability for many years, all construction work must be strictly controlled to ensure compliance with many rules. But the first main condition is to choose the right type of material for construction.
Materials for the construction of a brick plinth
If you need to purchase building material to build a basement, then you should figure out which one is needed for such purposes. Not every type can be used according to its properties, since different materials for its manufacture are intended for different purposes.
So, one type can be used only for external walls, another - for laying a stove and fireplace, the third allows you to make stone cladding with your own hands, for internal partitions, and so on.
Sand-lime brick
So, sand-lime brick, so beautiful in appearance and in different colors, cannot be used for the base, only for internal walls or partitions in the room. It is not resistant to moisture, and the proximity of basements to water will provide it in abundance.
ceramic brick
Ceramic brick can be called the best option for the construction of basement walls, as well as for the construction of the walls of the building itself or for facing work on the outside.
It is made from a carefully calibrated mixture of quartz sand and clay, and through the process of firing at high temperatures received the necessary strength and water resistance.
The best option for laying a plinth is a brick of grade M150 and higher - it has high strength at an affordable price. There is also a drawback - it does not tolerate moisture well, absorbing it into the structure.
Such unprotected material quickly becomes filled with moisture, freezes during frosts, and in this case, cracks may appear in the structure, which will weaken the load-bearing functions of the walls.
The life cycle, that is, serviceability, of such a brick is only about 55-60 cycles. In order to increase this figure, it is necessary to additionally protect the walls of the basement with cladding or plaster.

The M250 grade material is more practical because it is made from types of clay that have plasticity. And after proper firing, its resistance to external influences is much higher; in some cases it can be used even without additional lining for protection.
In this case, the laying of the base is done with jointing. This material has proven itself especially well in regions where humidity is high.
Features of material marking
The suitability of a species is indicated by its marking, or more precisely, by the numerical load indicator in kilograms per square centimeter. This is the weight of the structure that the material can withstand without destruction. So, the M100 brand says that the material is suitable for the internal walls of a small building, but not for the basement of a structure with more than 2 storeys.
There are also differences in frost resistance. This designation is indicated by the letter F and the numerical value of the number of deep-freeze cycles. In the case of building a basement, you need to choose a larger indicator.
According to geometric parameters, single, double or one-and-a-half designs are possible. The structure is solid and hollow.
Solid brick
It is distinguished by a single structure and high density, which increases its thermal conductivity. When constructing plinths and other elements of the building, it is necessary to additionally insulate it.
Hollow brick
It has a certain number of voids and holes in its structure. It has low thermal conductivity and can be used for external walls of a building. The density of this material is not high, which provides advantages during its transportation and installation work.
Good for the construction of one-story houses, cottages, buildings. But for plinths of multi-storey structures it is better to use the solid type due to its resistance to loads.
It is necessary to further study the characteristics of the purchased material. The percentage of voids varies in some cases from 12 to 50%. This spread provides a lot of options for its use, so you should choose a value that is acceptable for specific purposes.
Calculation of the amount of bricks for basement walls
When drawing up an estimate for the construction of a basement, you need to know exactly where to start the work - by calculating the thickness of the walls, their height and length. For this purpose, the quantity of bricks required for these purposes is also calculated. This is quite simple to do, given the linearity of the dimensions of the selected material.
When calculating, not only the dimensions of the brick itself are taken into account, but also the seams during laying, usually another +10 mm. Thus, the typical value will be 260*130*75 mm, taking into account the reinforcing mesh and seams.
There are a couple of things to note about the thickness of the plinth walls. When it comes to brickwork, it is considered normal to use the terms “half-brick masonry”, “2-brick masonry”, etc. Knowing the linear dimensions of one unit, it is easy to calculate the thickness of the masonry.
The values will change with a difference of half a building unit – that is, 120 mm, 250 mm, 380 mm…. Since the dimensions of the hollow and solid versions are different, you should first decide on the choice of material, and only then carry out the calculations.
Do not forget about some reserve - from 5 to 15% are allocated for this. These precautions are necessary to ensure that the construction process does not stall due to a lack of building elements.
Important! When making calculations, it should be taken into account that the length of the plinth is taken from the outside of the building, internal partitions are already included in it, and the angles are calculated immediately, since this affects the total volume of masonry materials.
Mortar for laying plinth walls
For the strength of the structure being built, the mortar used to connect the bricks is very important. The best in this regard is Portland cement, starting from grade 300 and above, fine sand and lime, sometimes with the addition of clay.
The consistency of the solution itself should be homogeneous and plastic; a construction sieve with small cells can help with this. Kneading is done using a mixer for construction work or with a drill attachment.
When creating a laying solution, the soil moisture at the construction site is very important. They also follow the basic rule - all ingredients of the solution must be of the same brand strength.

Features of arranging a brick plinth
Before starting the construction of brick walls of the basement, it is necessary to take into account some points when planning:
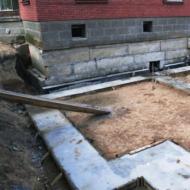
- Brickwork must be done on a layer of waterproofing above the strip foundation - this will protect the material from capillary moisture. You can use roofing felt in two layers for protection or its analogues.
- The brick is laid flat so that each subsequent rad overlaps the seams of the row below it. Moreover, using a level, horizontal evenness is monitored in rows.
The base can be:
- Wider than the thickness of the building, protruding as a step beyond its limits;
- in a single line, flush with the wall;
- The sinking appearance is significantly less than the thickness of the wall.
Brick plinth laying
After the mandatory flooring and installation of waterproofing, they proceed to marking the basement masonry. The markings must include checking the diagonals - they must be the same length, otherwise the house may be skewed in one direction.
If the diagonals do not coincide and are not equal, it is necessary to eliminate the defects using masonry.
This is usually not very easy to do. Marking begins from the corners of the belt, measuring the location of the diagonals and marking key points with crayons and construction tapes.
In most cases, laying the plinth begins precisely from the corners of the building, gradually moving inside the wall. The first row is laid only up to the adjacent corner, after which the exact angle of 90 degrees is marked, then it is done by analogy.
To avoid tilting the walls, metal corners are installed exactly plumb, with the help of which the height of the base is set.
They mark each level of the basement being built. A special cord is pulled along these markings to guide the installation work. As soon as the row is completed, the cord is moved to a higher level.
Having finished the wall, move the vertical corner to the diagonally opposite one and continue to build the wall.
If the plinth belt is made for a bulky structure, then it is necessary to use additional reinforcement to give greater strength. The size of the mesh cells is 0.5*0.5 cm.
The mesh is applied in front of the mortar, so that it does not move, it is secured with wire along the fastenings in the mortar of the seams between the bricks.
When laying, it is necessary to carefully adjust the space between the bricks, filling all the seams with mortar of the same thickness. If any questions arise during the work process, you can seek help from specialists, or watch videos of such work in the public domain.
Do not forget about ventilation ducts measuring 15*15 or 20*20 cm, located at a height of 15 cm in increments of 3 m. All openings are covered with grilles with small cells. If ventilation is not provided, dampness will form inside the basement and mold or mildew may appear.

Waterproofing a brick plinth
Protecting the basement with a basement or cellar from water is one of the most important tasks on which the reliability of the building in operation, its warmth and dryness of the premises depend. Waterproofing can be done vertical or horizontal.
Vertical basement waterproofing
This type of insulation consists of applying waterproof compounds or roll materials to the foundation material or to the side surfaces of the walls. This will provide reliable protection against water penetration through the joints between bricks. Vertical application can be of the following types:
Coloring
The essence of the method is to spray varnishes or paints on the surface of the walls. The main advantage is the ease of working with such material and the thinness of the applied layer. Among the shortcomings, we note the short shelf life of the coating and the need for repair and restoration work.
Coating insulation
Coating protection is made with a dense bitumen composition based on liquid glass or cement-based mixtures, which, when dry, become a crust on the wall, reliably protecting against water. Such coatings are particularly elastic, but are not resistant to mechanical stress; to avoid this, you need to make a decorative lining.
The basement is, in fact, that visible part of the building that is based on the foundation and is a kind of transition from the base to the walls of the house. It is obvious that in addition to the load-bearing capacity, that is, the built-in strength potential to withstand the entire load from the structures located above, the base must also withstand all external influences, since it is located in perhaps the most vulnerable place. In this regard, any material from which this part of the building will be built requires a special approach to selection and effective protection during operation.
The basement belt can be constructed from reinforced concrete, rubble stone, building blocks or brick - all these options require certain labor costs. When building a private house, a brick plinth on a strip foundation is often chosen for the reasons that such a material is environmentally friendly (made from natural components), accessibility, including price, simplicity, or more precisely, clarity of construction, low thermal conductivity and good strength characteristics (naturally, when choosing high-quality bricks).
In order for a brick plinth on a reinforced concrete base to be reliable and last for many years without requiring any repairs, the work on its construction must be carried out in compliance with a number of rules. And let's start with what kind of brick can be used for these needs.
Materials for the construction of a brick plinth
What kind of brick is needed for the base?
If you plan to use brick to raise the plinth, then the first thing you need to do is choose the “right” and high-quality material, since not everyone is suitable for laying out this part of the structure.
Brick is made from various raw materials and using different technologies, so products may differ in purpose. Some samples are suitable for internal partitions, others for external walls, others -, fourth - exclusively as a cladding finish, and so on.
- Sand-lime brick is usually not used when constructing a plinth, since the products do not have sufficient strength simply due to the specifics of the manufacturing technology and the materials used for this.
Sand-lime brick is widely used for the construction of internal and external walls and partitions, but it is poorly suited for the base, as it is not resistant to moisture. And for what it’s worth, there is always an excess of moisture in the area of the foundation.
- Ceramic brick can be called the most suitable material not only for building a basement, but also for building or cladding the external walls of a house. Several varieties are produced on an industrial scale, for example, construction (ordinary) bricks for the construction of walls, and facing bricks, which are well suited for decorative finishing of the base and above the surfaces of the facade.
Such bricks are made from specially selected types of clay and quartz sand, and in the process of high-temperature firing they receive the necessary strength and protection from moisture.

— Red brick M-150 has quite high strength and a very reasonable price. However, there is a drawback - the porous structure of such a product easily absorbs moisture. Therefore, unprotected brick quickly becomes wet, and at low temperatures it freezes and can crack, causing the supporting structure to be weakened. Such products can withstand 55÷60 winter cycles. In order to preserve the material in high-quality condition after the construction of the house, it is necessary (in addition to waterproofing and insulation) to provide a protective finish for the basement walls - resistant cement plaster or facing tiles.
- The red brick M-250 is more reliable, since plastic grades of clay are used for manufacturing, which acquire the necessary qualities after properly firing, and the resistance of finished products to external aggressive influences is incomparably higher, and the plinth may not even require protective lining. Typically, such bricks are laid “for jointing”. Such material is recommended to be used for the construction of building plinths in regions with high humidity.
The marking speaks of the strength of the product - it is according to it that the brick is selected for a particular application. Specifically, the numerical indicator indicates the permissible load that the brick can withstand without destruction (expressed in kilograms per square centimeter).
For example, a brick designated M-100 is intended for the construction of internal or external walls of small one-story houses, but it is not suitable for multi-story structures or a basement belt. For these purposes, products marked M-200 and M-300 are mainly used, since such products are designed for high loads and pronounced resistance to moisture.
In addition to the strength grade, the brick differs in the frost resistance grade. It is denoted by the letter symbol F and a numerical indicator indicating the guaranteed number of deep freezing and thawing cycles that the material will withstand without losing its characteristics. Naturally, for the base, the higher this figure, the better.
Ceramic bricks differ in their size and structural structure.

According to geometric dimensions, bricks are divided into ordinary single, one-and-a-half and double - the linear parameters are shown in the illustration. (In this case we are not talking about facing bricks - there are a lot of different domestic and foreign standards, as well as generally non-standard options).
In addition, ceramic bricks are divided into solid and hollow (hollow).
— Solid brick has a continuous material structure, that is, an increased overall density, which entails an increase in its thermal conductivity. It is highly durable and is used to build load-bearing structures of a house, including the base, and for internal walls and partitions, but masonry from it will require more careful
— Hollow products are those that have in their structure a different number of blind or through holes of rectangular or round shape. This type of brick has lower thermal conductivity, so it is often used for the construction of external walls. In addition, the overall density of such material is noticeably lower, which makes it possible to reduce the weight of building structures and facilitate the tasks of transportation and masonry.
Hollow ceramic bricks can be suitable for constructing the basement of small one-story houses. But for taller buildings it is better to use solid products, as they have a higher resistance to heavy loads.
By the way, it is always necessary to familiarize yourself with the technical characteristics of the purchased brick. Hollow products also come in different forms - the percentage of “hollowness” in them can range from 12÷13% to 40-50%; accordingly, the permissible load indicators also vary widely. That is, one should choose the “golden mean” in order to obtain possible “preferences” from the reduced mass and thermal conductivity of the base, but at the same time, without losing the required compressive strength.
Calculation of the number of bricks
When planning the construction of a plinth, taking into account its required thickness, length and height, the amount of brick that will be required for these purposes is usually calculated. It is clear that it is advisable to carry out such calculations in advance in order to include the obtained data in the prepared estimate and find out the amount required for the purchase of building material.

The thickness and height of the plinth are usually multiples of the linear dimensions of the brick. When making calculations, it is necessary to take into account not only the above parameters, but also the thickness of the joints between the masonry bricks, which is usually 10 mm. That is, in order to calculate the number of bricks taking into account the seams, you should also add the thickness of the seam to the length, width and height of the product. As a result, for example, the following dimensions of a single row brick will be obtained: 260 × 130 × 75 mm (this also includes the thickness of the reinforcing mesh layer, if used).
A few words about the thickness of the base. In bricklaying, they usually operate with concepts related to the multiplicity of whole bricks or their halves: “half a brick”, “a brick”, “one and a half bricks”, etc. Knowing the linear parameters of the brick and adding the thickness of the joints to them, it is easy to obtain a “pure” value for the thickness of the masonry. However, this is well shown, with dimensions indicated, in the illustration below.

A- “half a brick.” (In practice, when building plinths, half-brick masonry is usually not used - it is too thin and unstable). Thickness (hereinafter – without external finishing) – 120 mm
b- “into a brick.” Thickness – 250 mm.
V- “one and a half bricks.” Thickness – 380 mm.
G- “two bricks.” Thickness – 510 mm.
d- “2.5 bricks.” Thickness – 640 mm.
Since there are other standard sizes of ordinary bricks (except for single - one-and-a-half or double - in height), the required quantity can be calculated only after the type of material purchased has been determined.
The table below shows the average calculation of the number of bricks per 1 square meter of masonry:
| Thickness of masonry in “bricks” | Masonry thickness in mm | Brick type | Number of bricks per 1 m² of masonry, pieces | |
|---|---|---|---|---|
| - excluding seams | - including seams | |||
| "Half a brick" | 120 | Single | 61 | 51 |
| One and a half | 45 | 39 | ||
| Double | 30 | 26 | ||
| "In one brick" | 250 | Single | 128 | 102 |
| One and a half | 95 | 78 | ||
| Double | 60 | 52 | ||
| "One and a half bricks" | 380 | Single | 189 | 153 |
| One and a half | 140 | 117 | ||
| Double | 90 | 78 | ||
| "Two bricks" | 510 | Single | 256 | 204 |
| One and a half | 190 | 156 | ||
| Double | 120 | 104 | ||
| "Two and a half bricks" | 640 | Single | 317 | 255 |
| One and a half | 235 | 195 | ||
| Double | 150 | 130 | ||
Most often, calculations are made individually for each specific building, taking into account all the parameters listed above. In this case, it is recommended that after counting the bricks, add a certain margin to the result, from 5 to 15%, depending on the degree of skill of the builder and the quality of the purchased material. This measure is usually taken with any building material: there is never enough stock, but a shortage at the most unnecessary moment will slow down the work process.
Let’s make the task easier for the reader – below is a convenient online calculator that will quickly and accurately carry out the necessary calculations.
Calculator for calculating the amount of bricks for building a basement
The basement is a “transition” from the foundation directly to the building, therefore, when constructing it, it is very important to comply with all rules and standards, and in no case deviate from the project (if there is one).
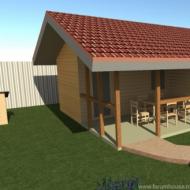
A brick base can be laid on a foundation made of any material, be it reinforced concrete or rubble masonry. It is only important to take into account the weight of the future walls of the building so that their weight does not create an excessive load that will be higher than the bearing capacity of the base. Usually a brick base is laid out for wooden or panel houses.
Construction of a brick plinth
Most often, the foundation protrudes from the ground at a distance of 30 to 90 cm. The height of the base should not be less than 50 cm. Of course, if the building is being erected on a slope, then the height of the base may increase. In buildings with a ground floor, its size can reach two meters.
The construction of a brick plinth has its own characteristics, since it does not fully resist moisture, which affects its durability. The construction of a brick plinth on a strip foundation is one of the most convenient and therefore widespread methods, since the plinth is, as it were, a continuation of the foundation.
Which brick to choose
It is best to use solid brick. The advantage of solid brick is that, unlike hollow brick, it will allow less moisture to pass through. After all, a hollow brick will sooner or later accumulate condensation inside itself, which will penetrate the material and gradually destroy the brick. This will only take a few years. The result is destruction of the brickwork and deformation of the entire structure.
 Bricklaying - photo
 If we talk specifically about the brand of brick, then it is worth paying attention to solid baked brick, the technical indicators of which in terms of stability and resistance to compression will correspond to M-200 and higher, and the level of frost resistance will not be lower than F 50.
In addition, in order for the brickwork of the base to last longer, you need to take a responsible approach to ensuring it is insulated from moisture and temperature changes.
Moisture protection
Before you begin laying the first row of bricks, a layer of waterproofing should be laid on the foundation.
For this, two layers of roofing felt glued together with bitumen grease (this is the cheapest option), mastic or bitumen grease (all surfaces are treated with it) or a mixture of quartz sand, cement and active additives can be used.

Having finished laying the basement bricks, you should lay the second layer of waterproofing at the height of the lower level of the basement floor.
Often, in order to provide more reliable protection of the base from moisture, a base-screen made of reinforced concrete slabs or thin sheets of asbestos cement is erected around it.
Thermal insulation of the base
In order to protect the basement masonry from temperature changes, the best material is polystyrene foam. It is fixed to the outside of the finished base. It is important to choose the right adhesive material - mastic or glue - they should not contain acetone, solvent or any other solvents. It is better to choose cold mastic.

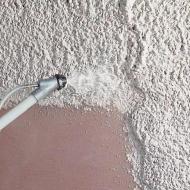
But if there are financial restrictions, then simply plastering the surface of the base will do for insulation, without the need to glue insulation.
Start of masonry
The best mortar for laying brick plinths is the M-75 mortar.
The solution should be laid out and leveled well. The thickness of the layer is at least two centimeters. A mesh of reinforcement is placed in this layer of solution, for which VR-1 wire with a cross-section of 4 mm is used. Cell size – 50 by 50 mm.
After completing these “procedures” you can begin installation.

Having laid out four rows of the base, you again need to lay out the reinforced mesh. Compliance with this condition will provide the brick plinth with strength and spatial strengthening.
Installation rules
The brickwork of the plinth should be laid out in horizontal rows. You can independently build a brick plinth using a single-row laying, alternating layers across the walls (bonded) and along the walls (spoon).

Blind area device
When constructing a plinth, creating a blind area is a mandatory step, since it protects the plinth from surface water. Its maximum width is no more than 60 cm. But it is also worth taking into account the extension of the roof of the building - the width of the blind area should be 20 cm larger.

The materials for it are asphalt, concrete, stone. You need to start installing it from the corner, having previously treated all joints with sealant.
Plinth cladding
Installation of cladding is another stage of waterproofing. Since the brick base is exposed to the influence of the atmosphere and does not withstand moisture well, materials with a long service life and a high level of moisture resistance are usually chosen as finishing materials.

These include ceramic tiles and stone - both natural and artificial. The use of plaster is also possible.
Installing a plinth on a strip foundation is a painstaking task, but the waste of effort and time will certainly be justified, because the plinth protects the building from external factors, and besides, it gives the building a complete and unique look.
Video - laying a brick plinth on the foundation
10.07.2014
When it comes to foundations, most people immediately imagine a strip foundation.
And not in vain, because tape is the basic type, the most successful and reliable support structure.
No type of foundation can demonstrate such a combination of qualities, economy and simplicity as.
It has several design options that expand the capabilities of the base and allow you to obtain the optimal option for given conditions.
Let's consider one of the specific working moments that arise when using tape - the creation of a brick plinth.
The brick plinth has the following advantages:
- Assembly from piece materials is slower, but does not require curing time for the material, so it is ultimately much faster than concrete casting.
- The brick plinth allows you to correct shortcomings made during the casting of the tape. In particular, you can correct the shape, align the corners, etc.
- An intermediate layer appears between the walls and the tape, allowing you to redistribute the load and more evenly transfer it to the tape.
- Brick has certain thermal insulation abilities that make it possible to improve the microclimate of the zero level or first floor.
The disadvantages include:
- Brick can absorb moisture, which creates problems for the structure of the entire house and requires appropriate measures to be taken.
- Bricklaying is a labor-intensive process that requires skill and experience.
- The load-bearing capacity of brick is lower than that of concrete casting.
- A large number of connecting seams significantly weakens the masonry, making the base vulnerable to mechanical stress and moisture.
Both advantages and disadvantages directly follow from the properties of brick, so they should be considered typical features of a building material.

Types of bricks and which one is most optimal
There are many varieties of brick blocks, but not all are suitable for laying a basement.
For example, sand-lime brick, although visually attractive, cannot be used for the construction of a basement due to low load-bearing capacity and high hygroscopicity.
These two qualities are unacceptable for the base, since this element takes on almost the full weight of the house and rainwater from the surface of the walls.
The best material option would be solid ceramic brick. It has the most successful combination of quality, price and performance..
Some sources indicate clinker bricks as a suitable option. This is a highly controversial option.
The fact is that clinker practically does not absorb water.
This is both an advantage and a disadvantage of the material, since for high-quality adhesion to the masonry mortar, it is necessary that the material can absorb moisture. Otherwise, the strength of the connection disappears, and the seams begin to have an adverse effect.
They absorb moisture, which freezes and expands, destroying the masonry.

How to calculate the number of bricks
The amount of material is calculated based on the parameters of the base.
Its height is always a multiple of an integer number of rows, and corresponds to conventional types of masonry:
- Half a brick (120 mm). For 1 m2 of masonry (including seams) 51 pieces of standard single brick are needed.
- In brick (250 mm). 102 bricks per 1 m2.
- One and a half bricks (380 mm). 153 pcs/m2.
- In two bricks (510 mm) 204 pcs/m2, etc.
The required amount of brick can be calculated based on the area of the tape, guided by the given standards.
You can approach the issue differently and count the number of briquettes individually by dividing the length of the tape by the length of one piece and multiplying by the number of bricks in the thickness of the masonry and then multiplying by the number of rows.
For those who do not have the time or desire to do calculations, an online calculator can be useful.
There are many of them, they all operate on the same principle - enter your own data into the appropriate boxes- tape length, width, other initial data.
The result is the desired value, taking into account the size and other features of the selected type of brick.
In any case, the obtained result should be increased by 15-20% in order to compensate for losses from poor-quality cutting, breaking or other unproductive costs of the material.

Selecting width and height
The width of the base is a parameter related to the thickness of the tape and walls of the house.
There are three options:
- Speaker. It is thicker than the walls, so rain moisture flows directly onto it. This contributes to the destruction of the base and requires the installation of a protective canopy and sheathing.
- Built flush with the walls. It is a continuation of the external walls, but when installing the sheathing, the thickness increases and makes it protruding.
- Recessed type of base. Its thickness is smaller, which allows, when installing the sheathing, to level the plane of the wall and base, forming harmoniously combined surfaces.
The choice of the most suitable option is made by comparing the load-bearing capacity of the material and the thickness of the base, to what extent it allows masonry of a given thickness.
The height of the plinth is a subject of constant debate and debate.
The main criteria for choosing height are:
- Maximum depth of snow cover in recent years.
- Floor level of the first floor (zero level).
For regions with snowy winters, the height of the snow cover is a significant factor, since when melting begins, a low base can cause the walls to get wet.
The floor level of the first floor is a technologically justified reference point, allowing you to simplify construction work and avoid unnecessary measures.

Types of masonry
There are many types of masonry, having decorative or purely practical value.
The choice of the most suitable option is primarily determined by the thickness of the base.
Since there are no half-brick plinths, the minimum option is brick laying. The main element of masonry is dressing, i.e. placing bricks in such a way that all seams intersect with solid briquettes.
The most famous method of tying is the usual spoon masonry, but it does not allow outer and inner rows to be tied together.
Therefore, chain masonry is most often used, when one row of bricks is laid using the usual spoon method, and the other row is laid using a bonded method, i.e. consisting of bricks laid across the axis of the wall.
NOTE!
When using chain masonry, there are special rules that require butting the first and last rows, protruding elements or areas located directly under the beams.

General construction scheme
The procedure for laying a brick base:
- Surface preparation of the tape, waterproofing, installation of a mooring cord.
- Laying the first row of bricks.
- Raising corner areas.
- Filling gaps between corners.
- Laying the top row, waterproofing the basement surface.
Depending on the design features of the house, some additional steps may be required, for example, laying out curved sections of the basement, etc.
Such work is carried out according to a special methodology adopted for such elements..

Preparing the solution
This procedure is designed to exclude the possibility of moisture absorption from concrete into brick, which is dangerous and threatens the rapid destruction of the basement.
As a waterproofing, a double layer of high-quality roofing material is traditionally used., with intermediate application of bituminous mastic.
There are many other options, but roofing material is the cheapest, most durable and easy-to-work material, so it is usually preferred.

Laying the first row
The first row of bricks is installed in a bonded (transverse) position along the length of the base.
This is the wrong suggestion. The solution has sufficient adhesion to roofing felt.
In addition, a layer of mortar will allow you to trim a number of bricks that are not always ideal sizes.
Vertical joints also need a bond, which is difficult to create without mortar.. The solution layer will lie as tightly as possible on the surface, which will allow you to distribute the load in an optimal way and avoid the appearance of weak “hanging” areas.
Finally, the presence of the solution will allow the reinforcing mesh to be closed, creating a strong and even base for brickwork.

Facing
Procedure:
- Bricks are evenly laid out in stacks along the entire length of the tape in order to reduce the time for the delivery of material when laying.
- The prepared solution is placed in a container convenient for moving with the mason.
- All necessary tools are prepared (or purchased) - trowel, trowel, pick, ordering, etc.
- Brick laying is carried out according to the planned pattern.
To obtain high-quality masonry, it is necessary to be careful and constantly monitor the process with a stretched cord.

How to get around corners
Brick laying begins with laying out the corners. Usually they are raised several rows (4-6), after which they are laid out at intervals.
First, the corners are laid without mortar in order to check the accuracy of right angles, determine the horizontal and other parameters (try-on layout). After this, control cords are installed and the corners are laid out using a solution.
All bricks at the corners must be tied together; two vertical seams on top of each other are not allowed.
It is important to check the uniformity of the diagonals of the plinth, which indicates the accuracy of the right angles of the structure.

Arrangement of the blind area
The blind area is a concrete casting poured over the ground, adjacent to the outer wall of the strip or plinth.
It is up to 60 cm wide (or slightly larger than the roof overhang). Typically, formwork is installed, which is a series of vertically installed boards.
A reinforcing mesh is placed between the wall and the formwork, strengthening and protecting it from the formation of cracks.
A properly made blind area protects the sinuses of the backfilled trench from the penetration of rain or melt water, eliminating contact of the tape with moisture.

Final stages
After laying the top row of the plinth, the surface is covered with a final layer of mortar and carefully leveled.
When it dries , a layer of waterproofing is laid on the surface, the same as on the surface of the tape before laying the brick.
In addition, procedures are carried out for installing the protective cladding of the base. Wherever necessary, vents, technological openings for supplying communications, canopies for moisture drainage, etc. are installed.

Useful video
In this section you can familiarize yourself with brick plinths on a strip foundation, how to cover the plinth, as well as expanded clay concrete blocks:
Conclusion
A brick plinth is a common element of home construction.
It allows you to reduce the height of the tape, distribute the load from the external walls of the house and provide reliable cutoff from moisture, preventing capillary absorption of water from layers of soil or wet concrete.
When performing work, you should act strictly according to the rules, constantly monitor the position of the bricks, the horizontal position and the correspondence of the length of the diagonals.
Compliance with the technology requirements will allow you to obtain a high-quality and durable brick plinth.
In contact with
Articles on the topic