Warm extension to the house with your own hands. Projects for extensions to a wooden house
For a number of reasons, some private houses and cottages need additional premises. A room for a kitchen, a bathroom or a closed veranda - everyone has their own plans for an additional extension. This article will help you understand how to build a high-quality extension to your house yourself.
Premises requirements
It is possible to make an extension to your house with your own hands. The most optimal thing is when the appearance of such a room is combined with the house itself. But this factor is not always the most important; the main thing is that the extension is durable and of high quality. Considering the lightness and reliability of the structure, many choose a frame extension to the house. It is inexpensive, reliable and quickly erected.
Think through all the details in advance. Each type of room has its own nuances. The veranda does not provide heating, unlike the additional room. If it will be a kitchen or bathroom, lay utilities and pipes before construction begins, take care of future insulation and waterproofing.
Select in advance the most optimal size of the extension
Construction of the foundation for the extension
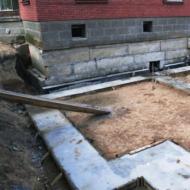
The most important point in the construction of an extension is the arrangement. If the owner took part in the construction of the house, he knows all the nuances of the size and design of the old foundation. When purchasing a ready-made home, such information may not be available. In this case, you need to dig a hole yourself near the wall of the house and take measurements of the foundation, its depth and determine the nature of the soil.
 Decide whether the foundations of the buildings will be connected by a rigid connection or whether the base of the new extension will be separate
 Strip foundation
The strip foundation is poured in the shape of a rectangle in two ways: closed, and also in the shape of the letter “P”, open.
There are several options for connecting the foundations of the house and the extension:
With a closed method of pouring concrete:
- install a sheet of expanded polystyrene 50 mm thick between the foundation strips. It will be part of the formwork when pouring concrete. After filling, the remaining gap must be sealed with sealant;
- connect the ends of the foundations with a reinforced frame. At the end of the base of the house, drill holes in two staggered rows. Place reinforcing bars there, which you will later connect to the frame of the extension’s foundation;
With the open filling method:
- pour the foundation of the extension in the shape of the letter “P”, and install insulation on the crack in the house;
- To connect buildings, drill holes for reinforcement only at the junction of two foundations.
 For a strip foundation, they dig a trench and fill it with a cushion of sand and crushed stone. After this, the formwork is erected and reinforcement begins
 Column Foundation
If your extension is small in size and weight, a columnar foundation is a good alternative to a strip foundation. Such a foundation is suitable for constructing a frame extension at high groundwater levels.
Stages of construction of a columnar foundation of an extension:
- Dig holes deeper than the freezing level of the soil; the distance between them should not exceed 1.5 meters.
- Place a bed of sand and gravel at the bottom of the holes. Compact the material well and lay the roofing felt.
- Prepare strong formwork from boards or plywood for each pit.
- Reinforce the formwork using 4 bars of periodic profile reinforcement.
- Pour the concrete mixture into the formwork and wait until it hardens completely. Remove the formwork and make a grillage.
 The columnar foundation is suitable for light extensions and is one of the simplest and most cost-effective types of foundations
 Installation of the base floor of the extension
For a columnar foundation, a wooden floor base is suitable. When constructing a strip base, there is a choice between wooden and concrete floors. If the extension room will be used as an additional room, care must be taken to ensure high-quality thermal insulation and a flat surface.
When comparing the properties of durability and strength, a concrete floor takes a leading place, but a wooden house has good heat and sound insulation. Wood beams are also faster and easier to install.
Concrete floor
Before pouring the floor, consider the soil characteristics of the extension. Concrete floors are not installed on moving soil. If the room is never heated, the concrete structure may deform over time.
The construction of a concrete floor includes the following steps:
- After the strip foundation has completely dried, dig out the top layer of soil 25-35 cm inside the structure and compact the surface of the earth.
- Fill with river sand 10 cm thick. Compact and lay two layers of roofing felt in a checkerboard pattern.
- Fill in expanded clay to a thickness of 15 cm. Install special beacons or bricks around the perimeter of the expanded clay cushion. Place a building level on top and level the base of the floor. If the extension is being built for a summer cottage, it is not necessary to lay the reinforcing mesh.
- Pour in a high-quality concrete solution, level it using the rule and wait for complete hardening.
 A building level will help make the surface of the concrete floor as level as possible.
 Floor on wooden beams
For a columnar foundation structure or frame extension, it is necessary to install load-bearing logs. They act as the skeleton of the building, evenly distributing the load throughout the entire extension.
The beams are laid using the following technology:
- Install and secure a double layer of waterproofing on the foundation pillars.
- Before installation, treat wooden beams with a special antiseptic.
- Lay the floor beams on the foundation pillars and secure with corners. Fasten the beams together in the same way.
 Load-bearing logs must be large and made of high-quality wood; the strength of the entire structure depends on them
 Construction of extension walls
The walls for the extension are selected according to a material similar to the house itself. The most common materials for building walls are brick and wood.
To connect the walls of two buildings, it is better not to use a rigid connection. The difference in age between the old and new walls can lead to uneven settlement and cracks. Leave a distance of 2-3 cm between the walls of the building, which after erecting the walls, fill it with polyurethane foam.
Frame walls
The necessary materials for the construction of frame walls are high-quality wood and mounting angles. We install the frame to the base of the extension on the supporting elements installed earlier.
- Install the corner posts first, securing them with reinforced steel corners. Fasten the intermediate beams either using the full cutting method, or in the same way as the corner beams.
- Additionally, secure the intermediate beams with temporary bevels, which must be removed after the walls of the extension are completely installed.
- Secure the upper tier of the frame in the same way as the lower part. For better strength, each beam can be fixed with braces on both sides.
- After installing the frame, sheath the external walls of the extension using wooden boards or sheets of plywood.
 Fastening wooden elements using corners is faster and more reliable than using the method of completely or partially cutting down the thickness of the timber
 Brick walls
The technology for constructing brick walls includes the following stages:
- Before starting construction, level the foundation using a cement-sand screed. Lay a layer of roofing material on top for waterproofing. Lay the first row of bricks on roofing felt without the help of mortar.
- Attach small diameter reinforcing bars to the brick rows of the main house. Drill holes every two rows of brick. During the process of bricklaying the extension, protruding reinforcement from the walls of the main house will end up in the joints between the new brick laid.
- Stretch a rope parallel to the wall, which will help build the brick rows as evenly as possible. Between every third row of bricks, you can lay a reinforcing mesh, which will reduce shrinkage and increase the strength of the walls.
After erecting the walls, tie them at the top with a concrete belt. Pour concrete mortar into the constructed reinforced formwork.
 The laying of the first row begins from the corner, and the thickness of the walls depends on the functions of the future extension
 Extension ceiling and roofing
The roof of the extension should also be in harmony with the main building. Select high-quality roofing material and carry out construction calculations of dimensions and angles of inclination. For slate and metal tiles, the optimal angle of inclination is from 30-40º, for metal profiles - from 20º, for corrugated sheets - from 12º.
The technology of the roofing process includes the following stages:
- Install ceilings in the form of wooden beams on the walls. Secure them with corners at a distance of 50-70 cm from each other. If the walls are made of brick, embed the beams in concrete. Then cover them with boards and insulate them.
- Lay the Mauerlat around the perimeter of the side walls. It will serve as a support for the rafters, which are erected at a distance of no more than 70 cm from each other. There should be the same spacing between the rafters and floor beams. To protect the walls from water, the rafters must extend 30 cm beyond the walls.
- Place a special waterproofing film on the rafters and install lathing in the form of horizontal boards.
- Place the selected roofing material on the sheathing.
 The simplest and most affordable option for independent roofing is considered to be a pitched roof.
 Insulating the extension from the inside
If the extension room will serve as a living room, it is important to take care of high-quality thermal insulation of the floor, ceiling and walls. For better ventilation, the concrete walls of the room are insulated from the outside. Suitable materials are polystyrene foam or mineral wool.
Floor insulation on beams
To provide insulation and floor covering, a subfloor is installed. Cross boards are laid on the supporting joists of the extension.
Further technology includes the following steps:
- Lay a waterproofing film on the subfloor, on top of which install additional joists.
- To insulate the floor, lay several layers of polystyrene foam or mineral wool between additional joists.
- Lay another layer of vapor barrier on top, on which sheets of oriented strand board will be laid.
- Install a finished floor covering.
 The waterproofing film will protect the floor from moisture, and OSB sheets serve as a durable coating
 Concrete floor
We insulate a concrete floor in the same way as a wooden floor. A layer of waterproofing film is laid on the concrete screed. You can install thick logs and cover half their thickness with expanded clay. This will increase the level of thermal insulation. Next, mineral wool, a second layer of film and OSB boards are laid according to the same scheme.
Frame walls
To insulate frame walls, a sheathing of wood blocks is created around the perimeter of the walls and ceiling. The insulation of the extension is carried out using rolls of mineral wool. The thickness of the wooden block and the cotton wool roll should be the same. The distance between the bars corresponds to the width of the insulation roll.
After thermal insulation, we waterproof the surfaces. The waterproofing film is laid overlapping and nailed to the sheathing bars. Next, the room is decorated with plastic, sheets of plywood or wooden paneling.
Brick walls
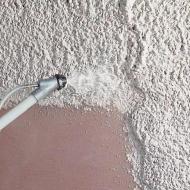
The brick walls of the extension can be insulated outside and inside. Internal insulation is carried out in the same way as insulation of the walls of a frame extension. Foam plastic is often used for external insulation of a brick wall. The insulation is glued to the outer walls of the building using a special glue in a checkerboard pattern.
The slabs are additionally reinforced with dowels, which are installed in the walls. A reinforcing mesh is applied on top and final plastering is carried out.

Allows you to significantly expand the living and functional space of a country house at a relatively low cost. An extension to a house can be used in different ways. Some people organize a summer kitchen there, others a dining room or living room, others a place for rest and relaxation.
There are many options for using new square meters, so you need to decide based on your own preferences and requirements.
All work on the construction of the extension can be done with your own hands.
And it doesn’t really matter what material is chosen for its construction. You need to understand that the use of heavy building materials (brick, concrete slabs, etc.) will require the construction of a fairly powerful foundation. Before starting work, it is necessary to carry out calculations and draw up a project that will take into account all the important construction parameters.
What kind of extensions to the house can there be?
An extension to a country house can have a very different look. It’s even difficult to single out the most common option, but in our country you can most often find the following extensions:
- Side with combined or own roof;
- Attic extension;
- Second floor extension.
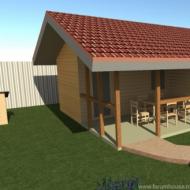
A side extension with a combined roof is an affordable and affordable option because it only requires a slight extension of the roof to the size of the extension. When choosing this type, the country house is simply completed. Regardless of the materials used, you will have to make a suitable foundation. The extension can have any dimensions, but structures that are too large, even on large areas, will not look aesthetically pleasing. Choosing an option with your own roof is usually relevant in cases where it is not possible to make a common roof with your own country house. In such a situation, the consumption of building materials, the time and volume of construction work, and financial costs increase noticeably.
If you want to make an add-on, then you need to take into account the fact that not in all cases such a possibility exists.
The main problem, as a rule, will lie in the structural features of the foundation, because during the construction of the house it was hardly planned that a superstructure would be built in the future. Therefore, not every foundation, even the most reliable one, can cope with an additional floor of the house. If you are sure that the foundation can withstand additional loads, then before starting work it would be right to consult with specialists who can not only carry out all the necessary calculations, but also give advice on strengthening the existing foundation with their own hands.
What building materials can be used to build an extension?
For the construction of extensions, timber, frame base, brick or foam blocks are usually used. Of course, any other building materials can be used if desired, but these four types are the most popular in our country.
- Using timber to build an extension is a rational and optimal option in many cases. In this case, the use of any timber is allowed - planed, glued, rounded. The features of the timber allow you to carry out all the work yourself and in a short time.
Timber extension.
The main advantages of the timber are:
- The production of timber is carried out at woodworking enterprises, so there is always the opportunity to choose a suitable model based on your requirements and wishes;
- In the factory, the material is treated with special compounds, which guarantees long-term resistance of the timber to various negative influences;
- If necessary, at the enterprise, at the request of the client, the timber can be given any shade by subjecting it to high-temperature treatment;
- Regardless of the type of timber, the material is environmentally friendly (although certain claims in this sense are made against laminated timber);
- Extensions can be made from timber for wooden, brick, and block houses. If necessary, the outer side of the beam can be treated with any finishing or facing materials.
- Frame base. Building an extension based on a frame is also a very affordable option that does not require major financial investments. The frame structure is formed on the basis of metal beams or wood blocks, which are installed around the perimeter of the extension using special technology. You can do everything yourself, but if you have no experience in this area, it is best to consult with specialists in advance.

Frame extension.
Upon completion of the frame installation, the internal and external surfaces are covered with special building boards (OSB, chipboard, etc.), the installation of which also creates an effective thermal insulation layer. In this case, the insulation can be traditional mineral wool, expanded polystyrene, specialized thermal insulation boards, sprayed insulators, etc. In addition, the thermal insulation material, regardless of its type, is additionally insulated using waterproof insulators.
- It’s worth noting right away that installing a brick extension will require the owner of the house to have some skills and some experience in carrying out masonry work. Only with a competent approach and compliance with all technologies can you properly make a high-quality brick extension with your own hands. In any other case, it is necessary to invite specialists involved in laying bricks and similar materials to carry out the work.

Brick extension.
The use of brick for an extension has the following features:
- If in the future it is not planned to decorate or cladding the brick wall with decorative materials, then such an extension is best built on the back side of the building;
- Taking into account the fact that even a one-story brick extension will have significant weight, before its construction it is necessary to take care of constructing a strong and reliable foundation;
- The financial costs of building a brick extension are significant (largely due to the need for a strong foundation and inviting specialists);
- It is quite difficult to connect an extension to a country house correctly and only on your own.
- An extension made of foam blocks has high strength characteristics; it will not require significant costs and the use of additional thermal insulation materials.

Extension made of foam blocks.
Using foam blocks to build an extension to a house with your own hands has the following advantages:
- There is no need to make a foundation as strong as in the case of using brick, because the blocks, given their size, have a relatively low weight;
- The use of foam blocks eliminates the need to decorate the walls of the extension with thermal insulation materials;
- You can build an extension made of foam blocks with your own hands several times faster than a brick structure.
At the same time, additional costs when using foam blocks may be required to ensure protection of the material from various negative influences. As a rule, siding, decorative brick, ventilated facades and other materials are used for this.
It is worth noting that processing foam blocks with your own hands is also not difficult, so working with them is quite easy.
Features of self-building an extension
First of all, even before starting work, it is necessary to determine for which solution to which problem it was necessary to make an extension to the house. Depending on this, the construction material, foundation structure, communications, number of windows, volume and quality of insulation and waterproofing used, as well as many other points will be determined.
If you plan to make a garage out of foam blocks or an outbuilding out of brick, then the work will be carried out in one direction; if you plan to build a summer kitchen or dining room, then in a completely different direction.
Particular attention should also be paid to the connection between a country house and an extension, regardless of what tasks the extension will perform. The extension must be organically combined with the main structure, not stand out against its background, and have a solid foundation that will not cause the structure to sag and prematurely collapse.
Certain difficulties may also arise during the construction of the roof, during the installation of which some nuances must be taken into account. The roof of the extension, made of brick or foam blocks, should be slightly lower than the roof level of the main building. Otherwise, precipitation will enter the joint, which can potentially lead to moisture penetration into the room.
From a legal point of view
The construction and operation of an extension to the house must be legalized. If this is not done in advance, then in the future you may encounter quite serious difficulties and sanctions from regulatory authorities.
In order to avoid running through the courts upon completion of construction, it is recommended to begin work on the construction of an extension to the house in accordance with the procedure established by law.
First, you must obtain a permit from the local authorities, which will provide recommendations for the construction of an extension. The project organization should then be visited so that specialists can develop a suitable design based on the material requirements and overall design. They can also tell you about the power and water supply of the extension (if communications are planned).
After this, it is necessary to coordinate the project with regulatory authorities and the local architectural department. Only after all bureaucratic procedures have been completed can the construction of an extension made of brick, foam blocks, timber or frame base begin. In a number of cases, after completion of construction work, the structure is inspected by supervisory authorities, which determine whether the object complies with all standards.
Article outline:
Extension to a wooden house
A house made of wood is a special home that is preferred by people who value practicality, functionality and the opportunity to live in an environmentally friendly home. In addition, a wooden house is also more economical: starting from the fact that the construction does not require a very strong foundation and ending with the fact that the heating costs of such housing are much less than concrete ones.
But what to do if the house has already been built, but any wishes of its owners are not taken into account or there is simply not enough space. The way out of the situation would be to build an extension to a wooden house. Depending on the needs of the owners of the house, it is possible to complete not only a veranda or a kitchen, but also a bathroom or a full-fledged living room - a living room or a bedroom. The principle of construction of any of these premises will be similar, but it is worth assessing the condition of the house and its load-bearing wall. When designing an extension, it is important to consider how it will fit into the design and architecture of the house.
Premises requirements
When planning an extension, it is worth considering in advance the purpose of the future premises and the features of its operation.
If you are planning to add a bedroom or living room, then the room should have:
- reliable foundation;
- good waterproofing.
Compliance with these requirements will make it possible to connect the room to the heating system of the house and ensure a comfortable temperature in it.

If you plan to build a kitchen or bathroom, then before building the foundation you need to take care of the connections: water and gas supply, sewerage. Insulation of walls, ceilings and floors, as well as waterproofing are no less important points.
To build a veranda or open terrace, you will not need to provide communications. A solid foundation with waterproofing will be enough to prevent moisture from penetrating into the room.
When installing a boiler room, the annex must be connected to the sewerage system, have a sufficient area (at least 15 cubic meters), as well as a reliable ventilation system. Free access to the heating unit is an important safety requirement. The boiler room cannot be attached to a wooden house in a place where there are doors or windows - only blank walls can be used.
If you are going to add a garage, you need to provide exhaust ventilation (natural or forced). This will protect your home from exhaust gases from the garage, as well as from other unpleasant odors. In addition, the garage must be provided with a water supply and drainage system, electrical wiring, a fire alarm system and heating (if year-round living is expected).
A porch is another option for an extension. May have several steps, be built from wood or blocks, and must be equipped with railings for safety.
According to the law, before constructing an extension, you must obtain permission from the appropriate authority, so that you do not have to demolish it later.
Construction of the foundation for the extension

A solid foundation is the key to the strength of both the attached structure and the house itself. There are three types of foundations:
- tape;
- monolithic;
- columnar.
The right decision when choosing the type of foundation will be the same as that under the house itself.
It is important to think in advance about how the two foundations will be connected. As a rule, reinforcement is driven into the old structure, which is then installed in the new one. This method guarantees strength and prevents the building from settling. The doorway can be cut down in the place where the window is structurally provided.
 A strip foundation is a strip of reinforced concrete running along the perimeter of the entire building. The depth of such a foundation should be less than the depth of soil freezing. Due to the shallow depth, sufficient reinforcement of the structure must be provided so that the expanding soil does not destroy it. If executed correctly, the strip foundation of the house will be durable and relatively inexpensive; it will be suitable for lightweight structures.
 Monolithic foundation - suitable for those regions where the soil freezes to a great depth. During its construction, you need to mark the site, dig a pit, and line its bottom with a sand cushion. An obligatory step is the installation of drainage pipes and waterproofing of the formwork. Construction of a monolithic foundation is a complex and expensive process, but such a structure will serve for many years.

Columnar foundation - its principle is based on the fact that pillars are erected at all points of intersection of the walls. This type of base is suitable for lightweight structures and is the most inexpensive. The advantage of the columnar type is that it can withstand the effects of unstable soil and does not require waterproofing. However, you should take a responsible approach to floor insulation.
Installation of the base floor of the extension
The floor in the extension can be concrete or wood. Each of the materials has its own advantages.

- cannot be laid on a columnar foundation;
- poured after installation of formwork and reinforcement of the structure;
- requires additional thermal insulation so as not to heat the surrounding area;
- has high strength, long service life, is not susceptible to dampness, fire and fungi.

- has high heat and sound insulation properties;
- lightweight, does not affect the foundation;
- can be quickly installed and used immediately after installation;
- environmentally friendly;
- susceptible to the destructive effects of humidity, afraid of insect pests, open fire and mold.
Despite the disadvantages of wood, it is still preferable to use it in your own home. If the wood is well protected, first with an antiseptic, then with varnish or paint, then such floors will last for many years.
The option of constructing a wooden floor on joists is used. The essence of the design is that the floor level rises to the required height, and the basement space is filled with soil. Wooden blocks are laid on special posts, and floor boards are placed on top of them.
To ensure comfortable living in the extension, it is necessary to take care of the insulation of the subfloor and its ventilation.
Construction of extension walls
When building walls, you need to consider the following rules:
- the height of the extension wall should be slightly lower than the wall of the house;
- it is advisable to use elastic connection of structures;
- the extension wall should not fit tightly to the main wall.
When choosing a material, it is important to consider construction technology, the purpose of the building and the budget. It must be taken into account that the structure must have a holistic appearance with the house.
Depending on the design of the house, you need to build two or three walls.

If you plan to build an extension from timber, then the presence of a foundation is a prerequisite. The timber can be rounded, planed or glued. If the latter has the best thermal insulation properties, then the former has an attractive appearance. It must be taken into account that this is a fairly heavy material, so the structure will shrink over time.
Advantages of timber:
- low cost;
- environmental friendliness;
- construction will not take much time.
The upper part of the building should be provided with piping made of the same material.
Advice from experienced builders when building an extension from timber:
- to reduce the shrinkage period, it is better to carry out construction work in the cold season;
- It is better to insulate the timber from the inside, and leave the outside attractive;
- fireproof and antiseptic treatment are steps that cannot be neglected;
- choose fastening materials made of galvanized metal and, if possible, reduce the number of such elements.
You can make a wooden extension from timber to a brick house. In this case, docking with the main object requires the use of movable type seals. This will help avoid drafts and heat loss.

If the extension to a wooden house is made of concrete blocks, then for joining it is necessary to perform gating with laying of reinforcement. When performing masonry, tying and precise placement of corners is required.
Brick is a strong and durable material; in combination with double-glazed windows, such an extension will become reliable and functional. The material is quite heavy, so a reliable foundation is important. Key points:
- the wooden structure must be of good quality, without areas of rot and decay;
- the foundation should be strip, or better yet monolithic;
- Brick laying must be done from the wood side in compliance with technological gaps;
- U-shaped channels are used to connect buildings.

Cinder block is an affordable material that can provide a high level of thermal insulation due to its special porous structure. And due to the fact that the blocks are large, the construction period is reduced. In addition, the extension will not be heavy, which means it does not require a reinforced foundation.
An extension to a wooden house made of foam blocks will have the following advantages:
- environmental friendliness;
- low fire hazard;
- high heat and sound insulation;
- cost-effectiveness and ease of construction;
- reliability and long service life.
The disadvantages of cellular concrete blocks include high hygroscopicity and unpresentable appearance. But these visual defects can be easily eliminated by installing waterproofing protection and finishing the facade with decorative materials.
The aerated concrete extension has the same features as the previous version. All the risks of such structures are associated with the fact that dissimilar materials can move differently relative to each other under the influence of unfavorable factors. Experts do not recommend attaching the extension to the wall of the house - it is erected in the immediate vicinity and the joints are insulated.
The construction of an extension to a wooden house made of gas silicate blocks can begin immediately after the foundation hardens. It needs to be lined with roofing felt and a cement-sand mortar used for the first row. Laying blocks starts from the corner. All subsequent rows are interlocked with each other using a special adhesive composition.
The SIP panel consists of two OSB boards, between which there is insulation - polystyrene foam or polyurethane foam. This material is light weight, affordable and high strength. An extension made from SIP panels will be a rational solution for people with a small budget, and the construction of even the largest objects will take no more than 2 weeks. Such an extension will be warm, light and inexpensive. The work can be carried out at any time of the year and does not require a large number of workers.
Extension ceiling and roofing

When covering the roof in an extension, you need to make sure that it goes under the eaves of the house, and the resulting transition is smooth. It is important to ensure such a connection is made to minimize the possibility of moisture getting underneath it.
It is advisable to make the transition from galvanizing, bringing it 30-40 cm under the roof of the house and leaving it on the surface of the extension roof for the same amount. All voids and gaps must be treated with sealant.
Sequencing:
- construction of a rafter system;
- creating sheathing or flooring;
- facing of gables;
- covering cornices;
- installation of wind parts;
- roof installation.
Roof beams can be made of wooden beams laid in grooves prepared in advance. The roofing material must be identical to the roof of the house.
To insulate the ceiling you can use: mineral wool, expanded clay.

For internal insulation of the extension, you can use plasterboard - it is an inexpensive material that is easy to work with. In a heated room, work can be carried out regardless of the time of year:
- First, the profile is drilled;
- plasterboard, cut into pieces of the required size, is mounted to the profile;
- A layer of insulation (Isover) is laid between the wall and the drywall.
Thanks to such simple actions, a thermos effect is created in the room.
Save money without harming quality, requirements for premises and materials
If during the construction of an extension there is a question of saving, then it makes sense to give preference to the frame method. Its advantages:
- affordable price;
- possibility of construction in a short time;
- it is easy to attach to the main structure.
A frame extension is built from beams or planed timber. The assembled frame is sheathed with pressed wood and additionally insulated.
If you take a responsible approach to heat and waterproofing, the extension will be comfortable to live in.
To connect to the house, you will need to connect the walls with powerful screws and seal the joints.
Selecting a construction team and the secrets of strict control
When choosing a team of workers to build an extension, it is important to immediately clarify the timing, cost and quality of the work. It is better to use the recommendations of friends and see with your own eyes the result of the work of this team. It is important to draw up an estimate and approve it, establish stage-by-stage payments, and not pay an advance (or give the minimum).

To control the work, you can hire an independent foreman, carry out unexpected checks yourself, and pay for the work only after drawing up a handover certificate.
Video on the topic of adding an extension to a wooden house
1 How to quickly and cheaply make a foundation for a house or extension
2 Selecting a construction team and the secrets of strict control
Overall size of the extension - 6000x3000
Walls - foam block 20x20x60 wall thickness 20
Interior finishing - plaster
Roof type is a complex envelope.
Doors - 890x200cm.
Windows are optional.
Foundation - strip foundation (calculated separately).
Paid separately:
Delivery
Insulation - Knauf mini-slab (knauf) house 50mm; 100mm or similar (if available).
Pile foundation or foundation blocks
Installation of soft roof
Replacing the floorboard
Window replacement
Replacing doors
Replacing the floor with larch
Hemming the roof extension
Extension of a boiler room to a 3x4 house price: 155,000 rub.

Overall size of the extension - 3000x4000
Floor - dry tongue and groove floor board 28mm.
The walls of the boiler room are foam block.
Exterior finishing - finishing brick
Interior finishing - tiles
The ceiling of the extension is finished with plaster.
The roof of the extension is painted 0.4mm corrugated sheet.
Roof type - hipped.
Doors - 80x200cm.
Windows are optional.
There are no extension partitions.
Paid separately:
Delivery
Installation of soft roof
Replacing the floorboard
Window replacement
Replacing doors
Replacing the floor with larch
Hemming the roof extension
Extension to the house 8x8 price: 190,000 rub.

The basis of the frame extension is timber 150x100
Overall size of the extension - 8000x3000
Floor - dry tongue and groove floor board 28mm.
Frame - timber 100x100.
Finishing - impregnation with a composition against rotting and fungus
Interior finishing - no
The ceiling of the extension is finished with softwood lining.
The roof of the extension is painted 0.4mm corrugated sheet.
Roof type - pitched.
There are no doors.
No windows.
There are no extension partitions.
Foundation - foundation blocks 20x20x40.
Paid separately:
Delivery
Insulation heat Knauf (knauf) house 50mm; 100mm or similar (if available).
Pile or strip foundation
Installation of soft roof
Replacing the floorboard
Window replacement
Replacing doors
Replacing the floor with larch
Hemming the roof extension

Two types of foundations are used for extensions:
Block:
1. Clearing of the area for construction is required;
2. Digging recesses for blocks up to 20 cm deep;
3. A pillow (sand or crushed stone) is poured in, and then carefully compacted;
4. Concrete blocks measuring 20x20x40 cm are laid;
5. Waterproofing with roofing felt is required;
6. The floor is laid on logs supported by blocks.
Pile-screw foundation:
1. Pile - a hollow pipe made of durable steel, treated with epoxy compound with a pointed tip and blades on it;
2. Installation is carried out by manually screwing the pile into the ground;
3. Pipe concreting with parallel alignment;
4. Mounting the strapping.
Our advantages:
. We accept payment after completion of the work;
. Delivery by our transport;
. We use high-quality materials;
. We work under a contract.
An extension requires a building permit, which is issued by the municipality
Is it important for honor to legitimize the project?
- Town planning legislation regulates the placement of buildings on the site, because you live next to your neighbors, and they also have their own rights.
- With an extension to the house, its design, area, and finally, the size of the shares changes if the house has several owners.
- In addition to the legal aspects of protecting the interests and rights of other persons from the law, there are also security issues, which primarily concern the residents themselves. After all, if you want to make an extension, you interfere with the design of the house, its communications, and make other changes that are not in the project.
- Finally, without obtaining permission for the extension, you will not be able to subsequently sell, exchange the house or conduct other transactions with it. In addition, the illegal construction may sooner or later be required to be legalized or demolished, obliging you to also pay a fine.

What kind of extension could it be?
- veranda;
- balcony;
- terrace;
How to legalize a non-permanent extension?
A package of documents and an application are submitted to the local government body (architectural or construction bureau or municipal department). If there are no violations, local self-government authorities will issue consent.
How to legalize an extension to a private house
There are many reasons why people add an extension to their house - for example, there may be a need to increase living space, correct some architectural flaws in the project, or simply protect a wall from the wind. Not everyone knows that an extension needs documentation just as much as the construction of the main house. Therefore, contrary to the law, owners sometimes build additional structures without permits and, after construction is completed, think about how to legalize the extension. This is not always possible and sometimes ends in the demolition of the new structure. We will tell you how to correctly draw up documentation during construction or how to legalize an extension that has already been built.
Is it important for honor to legitimize the project?
There is a widespread and erroneous opinion that if you are the owner of a plot, then it is your personal business what exactly you will add to your private home. Legal requirements are not a whim of the legislator, but an urgent necessity. And there are several points that limit the independence of the owner of the house. Including:

What is included in the extension category?
An extension is a reconstruction of an existing structure. When it is carried out, you make an addition to the house that was not planned by the previous project, attaching a secondary structure to one or more common walls of the main house. The extension can be of any number of floors, size, etc. In any case, like any reconstruction, it requires a building permit, which is issued by the municipality.
What kind of extension could it be?
Extensions can be auxiliary in nature and do not require additional land. Such buildings are called non-permanent, they include:
- veranda;
- balcony;
- terrace;
- other structures with these characteristics.
All other structures attached to a private house are capital if their construction requires additional land and they are planned for residential use.
How to legalize a non-permanent extension?
Non-permanent structures can be easily legitimized at any time, even if they were made a long time ago. To do this, you need to take the documents home to the local BTI and write an application for changes to the technical documentation. The same should be done if you have just completed construction. The acceptance committee will come to you and draw up a certificate stating that you have completed the renovation of the house.
When you have the documents with all the indicated additions and changes in hand, you can consider the issue resolved.
Important: In order to legalize an extension to a house for several owners, you will need to obtain their written consent to your work.
Procedure for registration of house reconstruction
Now about how to legalize a permanent extension.
You can register it after construction, but in this case you will have to register it in court as an unauthorized construction. Therefore, to avoid problems, it is better to take care of this at the preparation stage.
To do this, you need to prepare the following documents:
- confirmation of ownership of the land for development and the house in which reconstruction is planned;
- plan and technical passport of the home ownership, cadastral plan of the land plot;
- extension project (in the form of a plan or sketch);
- written applications from other home owners for reconstruction;
- written consent of neighbors to add an extension to your house;
- conclusion of resource supplying organizations (gas, water and sewerage services, energy companies, etc.) confirming the safety of connection to communications. If no connections are made, then no permissions are required.
In addition, in some cases, permits may be required from the SES, architectural department, firefighters, etc.
A package of documents and an application are submitted to the local government body (architectural or construction bureau or municipal department). If there are no violations, local self-government authorities will issue consent.
This document gives you the right to begin construction. Having completed it, you will have to invite the state commission to draw up an acceptance certificate, in which specialists will assess whether the structure complies with the project, sanitary standards and rules. You will be given a statement of compliance, with which you will go to the BTI and again make changes to the technical documentation for the house.
The procedure for legitimizing an unauthorized extension
Despite the fact that it is easier to make documents for an extension at the very beginning, many homeowners solve this problem after it occurs. And sometimes years later, when you suddenly need to formalize an inheritance or make other manipulations with real estate. All this is impossible without obtaining construction permits. Therefore, the owner has to register the extension as unauthorized through a court decision, where he acts as a plaintiff, and the municipal authority as a defendant.
Important: In court, you can not only legitimize an unauthorized structure, but also protest the decision of the local administration to refuse to issue a permit for the planned construction of an extension. This is possible even if the local authority has given a written refusal indicating the reasons for the refusal.
The documents for filing a claim must be collected almost the same as those described above, accompanied by a properly completed statement of claim.
The court decides to recognize the legal extension that was built earlier. To do this, the court must make sure that the case has all the necessary permits and approvals.
Finally, having a positive court decision in hand, the owner of the house registers the extension and pays the fee.
How to avoid problems with the legalization of an unauthorized extension?
The court may refuse to recognize an unauthorized building; accordingly, then the owner will not acquire ownership rights to it, and the building must be demolished, and at the expense of the developer himself. The owner will also pay a fine. At the same time, the court comes to a similar opinion in situations where the new extension is unsafe or violates someone’s legal rights. Another reason for refusal may be simply poorly prepared documentation. Therefore, when starting to prepare documents for the court, pay attention to the following points:
- for the completeness of the package of documents with permits from various regulatory and resource supply organizations;
- availability of all documents on property rights;
- try to eliminate all possible violations of architectural standards and sanitary rules, if any were committed during the construction of the extension;
- use materials during construction that meet safety requirements and are certified.
Articles on the topic