Homemade samovar. How samovars are made in Tula
The samovar has been a symbol of Tula for several centuries. Many songs have been written about tea from a steaming water heater; business negotiations and intimate conversations have long been held over tea.
Today, the only enterprise in Russia that produces the original symbol of home comfort is the Tula Stamp plant. 
The workshops where the Tula symbol is created were built back in 1905.
All samovars are made of brass. 
The sheets arrive at the procurement shop and there, blanks are cut out of them on special machines. 
They are given the desired shape in the stamping shop using a mold and a hydraulic press.
To produce premium samovars, a different technology is used. Instead of water, a punch (polyurethane) is placed into the workpiece. 
After each operation, the parts of the future water heater are sent to the furnace to relieve stress in the metal and make it more pliable. There they stay for about an hour at a temperature of +600°C. 
After leaving the furnace, all parts must be cleaned of scale in galvanic baths with a solution of hydrochloric acid. In total, each part requires 5-6 operations.
From here, the finished parts of the samovar are sent for polishing: they are sanded and polished on special wheels. 

On a special machine, the body of the samovar is soldered and a tap is welded to it. All other parts are manually attached to the body using special rivets. 

Then the assembled samovar is polished with “Viennese lime”. And again washed in a galvanic bath. 
Then comes the turn of electrolysis. Using special pendants through which a weak electric current passes, the samovar is immersed in a nickel solution and “overgrown” with a thin layer of this metal. 
The inside of the water heater bowl is covered with food grade tin. 
The samovar is then sent for final polishing and final assembly. A heater is inserted inside electric samovars - a heating device that is produced in a neighboring workshop. 
Here the device is tested. 
Then some of the samovars are sent to the warehouse, and some are sent for painting.
Artists apply a special varnish to the water heaters, then transfer the selected design through tracing paper. Each samovar is painted only by hand. 

The finished drawing is coated with transparent varnish and sent to the oven, where it is dried at a temperature of 130−150°C. 
There is also a department of piece samovars at Stamp. Exclusive water heaters are created here. 
It takes a craftsman a week to create each samovar. 
All parts are cut out by hand and attached to the body with special pins. 

Over the entire history of Stamp, several dozen such exclusive samovars have been created here. As a rule, they are made in only two copies: one is given to the customer, and the other is stored in the factory museum. 

Here, by the way, there is a whole collection of all the products ever created at Stamp: chandeliers, fire extinguishers, gas stoves, heaters, kerosene stoves and even... oil pumps! 


By the way, despite the fact that such exclusive goods are created on the territory of the plant, most of the territory is in decline...
Olga Chicherova
Samovar in Russia it is a household item, it is intended for heating water. It is not for nothing that the Russians, competing with the British, consider themselves perhaps the biggest tea lovers in the world. Our talented ancestors showed themselves here too; not content with a simple teapot, which was used in other European countries, they invented it in Tula samovar. The water in it boiled quickly and did not cool down for a long time, but it was suitable for kindling All: both slivers and cones. Samovars became very widespread, they were different forms: round, square, cylindrical, cone-shaped. Samovars skillfully decorated with various paintings. I offer to your attention the production papier mache samovar. This a samovar can serve, as visual and didactic material in educational classes, as well as in any type of activity, from theatrical to individual work. Enjoy watching.

For production the samovar took me 5 days. For this crafts will be needed: plastic bottle 9 liters, toilet paper - 2 rolls, newspaper - 20 pieces, flour paste, stationery knife or scissors, pan lid, brushes - wide and thin, gouache - white and blue, glue stick, colored paper, colorless varnish (optional).

We take the bottle and cut off the top part, which will serve for samovar stand.

This is what it will look like samovar.

And now all the spare parts of our samovar We coat it with paste and apply the first layer with newspaper, again carefully coat it with paste and apply a layer of toilet paper, and so on, alternating 8 layers. The last layer must be made of toilet paper.

Now we make blanks from plasticine of small parts (2 handles, tap)


All parts are dried and cut, then glued together and dried again.


The file "/upload/blogs/ /upload/blogs/detsad-209551-1399028634.jpg etsad-209551-1399018454.jpg" was not found! 


Now we tint it with white gouache and decorate it with elements of Gzhel painting. Decorated with the kids.


And this is what we got a samovar.

And this samovar decorated with Khokhloma. With this samovar The kids and I had a tea party


Steam above, steam below, our Russian hisses samovar. You're welcome for a cup of tea! This is how we live, we chew gingerbread, drink tea, we invite everyone to visit! Thank you all for your attention.
Wood-burning samovar: modernizing a rarity
A wood-burning samovar is a symbol of hospitality, comfort, and the strength of family ties If you live in a house, and even outside the city, a samovar just begs to be included in the interior. Yes, whatever it is in the interior, in everyday life or in holiday traditions that always hold the family together. A wood-burning samovar is a symbol of hospitality, comfort, and the strength of family ties. Homemade pastries, jam, and tea made with your own hands are not considered relics, but the samovar, which comes in handy in this “company,” is considered something long forgotten. Meanwhile, heating a samovar is not difficult, and even interesting; repairing it is also not the most expensive thing. Well, if there is nothing to repair yet, look for an interesting model in the store - new samovars are becoming fashionable.
Construction of a wood-burning samovar: how to use the unit
The operating principle of a flame samovar, or a wood-burning samovar, has not changed for several centuries. To understand how to use such a device, it is worth understanding how it works.
 The first fire samovar appeared in Rus' at the beginning of the 18th century
Construction of a wood-burning samovar:
- Body (or water tank). It differs in size, design nuances and decor. The body is equipped with handles for easy carrying. If the body is simple, copper, without any special decoration, such a samovar will not be as expensive as a painted analogue.
- Jug. This is the name of the pipe that runs through the entire body. This is where the combustion process takes place. At the bottom of the jug there is a grate connected to the base, and there are already special holes through which air is supplied to the firebox.
- Lid. The lid closes the body and has a hole for the top of the jug. The lid has handles as well as steam releases.
- Hotplate. After boiling, a burner is fixed on top of the lid to the outlet of the jug. There is a teapot on the burner. Moreover, in fact, you can put an electric kettle there.
- Faucet. It is located at the bottom of the samovar, just above the bottom. If the faucet was located at the very bottom, then the same scale could get into the cup.
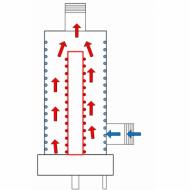
 Sectional view of a samovar: unit design
This is the kind of samovar our ancestors heated, and our contemporaries also heated almost the same one.
The device of a samovar (video)
What is the difference between a modern samovar and a traditional one?
An antique wood-burning samovar is usually made of copper. Today, a wood-burning samovar is made of brass. In addition, a modern wood-burning samovar can be copper-plated, or, for example, contain a galvanic coating. There are nickel-plated models, and there are models coated with a special heat-resistant varnish.
If you are restoring a wood-burning samovar, you will need some repairs, which you can do yourself, or you can turn to professionals. It all depends on the volume of restoration. If we are talking only about decor, cleaning and descaling, such procedures, of course, can be performed with your own hands efficiently. But not everyone can do more complex repairs, eliminating cracks and leaks, tinning, replacing components.
The choice of samovar shape is also interesting:
- Jar;
- Turnip;
- Vase;
- Acorn;
- Glass;
- Egg.
Collectors know what variations of the form there are. And the decor cannot be enumerated at all - smooth, corrugated, painted samovars, etc.
 Why is it not recommended today to heat copper samovars? The fact is that they are susceptible to oxidation, and this is not very good, and in appearance such a wood-burning samovar quickly deteriorates
Cones for the samovar: brewing aromatic tea
The name wood does not mean that only firewood can be used. A fire samovar can be heated with coal, and if you want unusual tea, you need to heat it with cones.
It’s worth saying right away that you won’t find a better way than heating a samovar with charcoal. After coal combustion, not much ash is formed, and the resulting powder is easily removed.
But how, if you have a samovar, can you not brew tea using pine cones with your own hands? Indeed, it is worth drinking this tea at least once, but taking into account some nuances.
Firebox of a samovar with cones:
- Melting a samovar with them is not the best option, the soot will be considerable, but you can add it to the firebox while water is boiling;
- The cones contain a lot of resin, which tends to clog the inner pipe in the samovar;
- The cone should only be pine.
 To ensure that the tea is not only aromatic but also healthy, only pine cones are used.
And here’s another curious fact: the water in the samovar will not come into contact with the burning fuel, but nevertheless, it will have the aroma of the wood that was used to melt the samovar. So your tea can be apple or pine. This is explained as follows: bubbles of active oxygen begin to form on the surface of the internal heating pipe during boiling. It turns out that the water in the samovar becomes, let’s say, alive.
Therefore, it is believed that tea from a samovar is special, soft, and the water for it has healing properties.
Rules for using a flame samovar (video instructions)
If you are not going to hand over your existing samovar for repairs, or if you don’t have any samovar at all yet, you will have to buy one. There are also a lot of questions about how to choose. In order for the samovar to keep you happy for a long time, and for the tea to always be tasty, you need to choose carefully.
How to choose a fire samovar:
- External persuasiveness. The simplest thing is that there should be no dents or cracks, and there should be no uneven color.
- Sustainability. Place the samovar on a table or other flat surface; it should not wobble.
- Jug device. If this part is made of thin iron, quick repair of the samovar is virtually guaranteed.
- Tinning the inside. The inside of the product must be tinned with special food-grade tin.
- Tightness. Neither the faucet nor anything else should leak.
- Capacity. If there are at least three people in your family, then the volume of the samovar should not be less than three liters. There are smaller models, which are popularly called “egoist”, from which you need to drink tea in several approaches if you have a company.
 Models with a corrugated surface are considered more stable.
How to brew tea in a samovar: instructions for beginners
Finally, the most important thing is how to drink delicious tea from such a vaunted samovar. If you have no experience, you will have to read the instructions.
 Before lighting the samovar, prepare a sufficient amount of wood chips
Lighting up a fire samovar:
- Place the samovar on a small table, it should be stable;
- Fill with water, close the lid;
- Light the wood chips and throw them into the jug, then add more wood chips (if the first one has not gone out);
- Place the pipe, let it flare up;
- Add wood chips until the water boils (the pipe, in turn, will create draft for combustion);
- At the very end, add herbs or the same cones for flavor;
- Pour tea into a teapot, pour boiling water over it and place on top of the samovar.
The tea should be tasty, aromatic, and the very atmosphere of such tea drinking is incomparable with automatic tea brewing from an electric kettle.
How to heat a samovar (video)
A fire samovar in your home or dacha is a necessary thing that will definitely decorate summer evenings and family or friendly gatherings. And the process of brewing tea itself is at the same time a pleasant ritual, which, like all good traditions, should be adopted from older generations.
Wood-burning samovar (photo)


In execution, this is not a complex MK. It all depends on your taste and well-chosen parts and materials.
So - let's get started!
These, seemingly far from doll life, drugs from the home medicine cabinet gave me a good idea 
For the elegant beauty of my future samovar, I bought the following items from a store that sells beads and other riches for making jewelry:
- golden metal things (called something like a “bead grabber”) - one flatter one with a diameter of approx. 2.5 cm
- a large beautiful metal part, quite heavy - as the legs of a samovar
- 4 wire nails made of flexible wire with beautiful tips
- two long wooden beads for handles
- a metal key (I took 2 different ones to look at the location)
A few details were not useful - I’ll use them another time) 
The rest of the items are - as they call here - junk - a flight of fancy :)
The lid is plastic with a hole cut out in the center (I cut it out earlier for something - it’s useful now) 
A ring from a Soviet pacifier - the diameter suited well as a samovar lid (on the right in the photo; the small one was not useful) 
Plastic tube stick from a ball 
Two large beads for the handles on the lid, sequin flowers for decorating the handles (6 pcs) and a bead holder for the spout of the samovar. 
A piece of stiff wire and a bead. 
Tools:
- awl
- knife
For gluing parts - Moment-gel glue 
Acrylic paints “Black Gold” and “Gold”. You can get by with just gold, but it seemed to me that this option would be more interesting for the effect of antiquity. 
Peel off the label on the ascorbic acid jar and cut off the top thread with a knife. 
Remove the cap from an empty Pinosol tube (I only succeeded when I broke the bottle).
Turn the lid over in the opposite direction to that in the photo and cut off the top ring with a knife. 
In a large jar, use an awl to make a hole in the bottom in the center, widening it slightly, and on the sides of the jar there are 2 holes for the handles of the samovar. 
We thread the nails as shown in the photo (2 for each bead) 
Bend the wire 
We pass the wire through the holes and bend it from the inside. 
Handles are ready!
We make a hole in the side of the jar at the bottom for the spout of the samovar. First with an awl, and then we expand the hole with a thicker tool or scissors to a diameter equal to the cut diameter of the ball stick. 
Using a knife, cut 2 pieces of about 1.5 and 0.7 cm from the ball stick.
In the long one we pierce a through hole for a key.
We cut the key and insert it into the holes. It is desirable that the key fits tightly. 
Unfortunately, I didn’t photograph the important moment of assembling the spout of the samovar.
I'll try to explain...
The photo above shows 2 tubes. We cut the edges of each slightly diagonally so that they can be connected at an angle of 90 degrees.
We coat it with glue and place a small bead wrapper on top of the formed corner, pressing a little along the edges so that it fits well into the tubes.
I think I explained it clearly - see the photo below in its finished form.
We coat the hole in the large jar under the spout with glue and insert the finished spout with a key into it.
We put a small bead on the wire and bend it in half, as in the photo above.
And then we put it on like a pyramid. We start with the large piece for the legs.
The ring in the photo was not useful - instead there was a cap with a hole.
Then a large jar, a pacifier ring, a golden part and a cap from Pinosol. We bend the wire in different directions and cut it. 
This is how the samovar turned out. 
I slightly missed the level of the hole for the spout, so I had to cover my mistake with a cardboard oval and make the hole a little higher. But this did not spoil the view at all. On a real samovar, there is a gasket at the junction of the spout and the body.
At the base of the handles and on the top of the lid we glue decorative flower palettes on both sides. On the top of the lid there are beads of flowers - these are handles (they can also be seen on the finished samovar, because I remembered about them after painting.
The samovar is almost ready!
Next is the most interesting part - painting.
First, the entire samovar was opened with “Black Gold” paint (metal parts superficially, so as not to spoil the effect of the metal, and plastic parts carefully). Next, everything is opened with “Gold” paint. Do not forget that it is necessary to create an object that is many years old, which has darkened with time, and then it was polished to a shine, but the years take their toll, and therefore the effect of imperfect cleaning must remain. 
Showing a little imagination, let's breathe life into our handsome guy)))

Ready for tea party!!!
Sweets are very helpful...
Everyone enjoys a samovar - In the cold it’s simply a gift from God!
I suggest you show everyone what you have done and what parts you can use. Thank you for stopping by and reading to the end!
The popularity and widespread distribution of samovars over several centuries are the main reasons due to which a fairly simple household utensil transformed, over time, into a symbol of Russian tradition. From the beginning of their appearance on the territory of the state, such products were used for boiling water, and some models were used for cooking. The samovar could be heated by placing a splinter, spruce cones, or wood chips inside a special pipe. By igniting the fuel, the owner of the device could count on fairly quickly receiving hot water that would maintain the temperature for a long time.
Modern connoisseurs of ancient Russian traditions know that you can get unusually soft and tasty water for tea only by using a fire samovar. Unfortunately, the use of more modern electric analogues does not give the desired effect (there is no characteristic taste provided by wood smoke) and, as many believe, turns the unique tea ceremony, loved by our ancestors, into simple entertainment.
Quite often, all of the above becomes the reason that a person who has at his disposal a “grandmother’s” device wants to learn how to convert an electric samovar into a wood-burning one and strives to turn the idea into reality.
Is it possible to convert an electric samovar into a wood-burning one?
Russia has always been famous for its talented craftsmen, and if you really want to, you can remove the heating element and remake the container for burning wood. However, practice shows that such an action is advisable only if you have the skills to work with a welding machine and a sufficient amount of time. It is also worth noting that even in this case, a positive result may not be achieved, since important nuances, among other things, are also the integrity of the tank and the material from which the pipe will be made. Correctly taken measurements are also important. For those who want to experiment and make a fire samovar from an electric one, it is recommended to follow the following tips:
- The fuel pipe must be made of stainless steel. Such material today is the most resistant to heating and safe for health during repeated use.
- Before drilling the cover and making the pipe, it is recommended to take measurements. The diameter of the nozzle on a samovar is very important.
- It is forbidden to use ordinary solder, since when the device is further heated, particles of the substance that get into the water can cause poisoning.
It should be noted that even when creating a functioning device, its aesthetic appeal will be lost. A wood-burning samovar made from an electric one, of course, can be placed in the garden at the dacha, but it is not suitable for a feast.

Advantages of choosing a ready-made wood-burning samovar
Modern models of samovars are devices designed for boiling water. However, the main advantage of buying them is, above all, their aesthetic value. The Samovarnaya Lavka brand store offers a wide selection of fire-heating models from the best Tula craftsmen, who can not only decorate an outdoor feast, but also recreate the atmosphere of an original Russian tea party.
The products presented in the catalog of our website are distinguished by their unique design in the classical Russian style. Painted with Khokhloma and Gzhel, artificially aged and covered with silver amalgam, such devices are perfect for tea ceremonies with family and friends. In addition to the classic models made in the shape of a ball, glass, tank and others, there are also souvenir sets. Each of them is a worthy option for a valuable gift to a colleague, employee, or close friend.
Operating since 1992, the Samovarnaya Lavka company has several stores in Tula and Moscow, and also supplies products upon orders to all corners of Russia. We offer the best conditions for the purchase and delivery of ordered goods.
Articles on the topic