Self-assessment of the nightgown technology project. Defense of the creative project "nightgown"
Sergievsky branch of MBOU Muchkapsky secondary school Creative project using the “Nightgown” technology Completed by 7th grade student Valeria Popova Accepted by: technology teacher Popova O.I 2015
Problem situation I chose the theme of my project to make a sewing product - a nightgown, since I need this product! At night I like to sleep in my nightgown. Of course, you can buy it in a store, but you can also sew it yourself, especially since we learn to sew in technology lessons. If I sew a product myself, then firstly, I will gain experience in sewing products, and secondly, I will benefit financially, that is, I will save a little on the family budget. My nightgown should be comfortable, light, easy to wash and iron, so that you can sleep well in it. Therefore, I need to choose the right fabric for sewing.
Project goal: Develop a model and sew sleepwear.
Project Objectives: Conduct research and develop a sketch of my design product. Organize your workplace. Select tools and devices for various operations. Make a sewing pattern. Select fabric for the product. Cut the fabric. Prepare the product for fitting and carry out the fitting. Process the product after fitting. Control the quality of your work. Evaluate the quality of the finished item.
History of origin: European women until the 14th century slept in the clothes they wore during the day, or without clothes at all. Clothes specially made for sleeping appeared around the 15th century, in the Czech Republic, and they were called “Bedroom Skirt.” Nightgowns of that time were significantly different from those that girls know now. They were large in size, both in width and in length. Only rich people wore them because such shirts were expensive.
Criteria for selecting products Manufacturing technology corresponds to the 7th grade program. Economical fabric consumption. Simple design. Speed of production. Comfortable to wear. Fashionable. Inexpensive fabric. Beautiful coloring. Does not harm health. Not difficult to care for.
Choosing the best model
Name of measure. My measurements. Half chest girth Sg 37 Half waist girth St 35 Half hip girth Sat 43 Conclusion: My Russian measurements are 37- 35- 43 My European size is 41.
Pattern: I made a pattern according to the technological map.
Solution: I choose chintz fabric, since my mother gave it to me. The color of the fabric is delicate: delicate painting with pink and purple paint on a white background. Choosing the right fabric viscose fabric Crepe-satin chintz poplin
The fabric consumption can be accurately calculated by laying out the cut details on the sheets and folding them to the desired width. The fabric I chose is 150 cm wide. For my model and my height I will need 2m 90cm. Solution: I will need fabric 150 cm wide and 2 m 90 cm long. Calculation of fabric consumption
To find out the cost of the product, I calculated what materials and in what quantity I needed. Conclusion: since my mother gave me the fabric, it means I only take into account the cost of the threads. Calculation of the cost of manufacturing the product No. Name of material Conditional price per unit of measurement, rub. Material consumption for the product Material costs, rub. 1 Cotton paper threads 40 rub. for 1 reel 1 reel 40 rub. Total 40 rub.
Selecting additional materials and equipment For my product you will need: Threads in the color of fabric No. 40; Paper scissors, ruler, pencil - for creating a pattern; Tailor's chalk, tailor's scissors for cutting; Sewing machine, iron, ironing board, hand needle and safety pins - for sewing.
Product manufacturing plan Plan of my work on making a nightgown: 1. I will take my measurements and draw a drawing of a nightgown. 2. Based on the basic drawing of the nightgown, I will perform modeling in accordance with my model. 3. Prepare the fabric for cutting. 4. I will cut out the details of the product with seam allowances for cuts of 1.5 cm and a hem at the bottom of the product of 3.0 cm. 5. I will cut out the hem 4.0 cm wide 6. I will prepare the details of the cut for basting. 6. Baste the product in the following sequence: - side cuts - baste the hem of the bottom 5. Try on the product and correct defects if they arise. 6. Finish the neckline with a hem 7. Finish the side edges with a double linen seam 8. Finish the sleeves with a hem stitch with a closed cut. 9. Finish the bottom of the product with a closed hem seam. 10. Perform wet heat treatment of the product.
Ready product
Making the product and checking its quality I sewed the nightgown in accordance with the manufacturing plan, performed each of the operations, and checked the quality of my work.
Self-assessment and evaluation of the product I evaluate a sewn nightgown The production of the product corresponds to the technology program for grade 7, we studied all processing methods in technology lessons. The design of the nightgown is simple. I took my measurements exactly. I drew the pattern exactly, so the fitting went without any comments. The item is comfortable to wear, does not restrict movement and is pleasant to the body. The nightgown is cheaper than its industrial counterparts. Made from fabric of natural origin. The product is easy to care for, as the fabric is easy to wash and iron. In my opinion, I coped with the task. I will ask my parents, teachers, and friends to evaluate my work.
Send your good work in the knowledge base is simple. Use the form below
Students, graduate students, young scientists who use the knowledge base in their studies and work will be very grateful to you.
Posted on http://www.allbest.ru/
Creative project
Nightdress
Introduction
pattern technological fabric shirt
ABOUTjustification for the project topic
Nowadays, it is difficult to find a woman who does not have a nightgown in her night wardrobe. Such products are distinguished by a variety of styles, materials and colors. A nightgown can not only provide a comfortable sleep, but also emphasize the dignity of a woman’s figure. Today, a variety of women's shirts fit so organically into our lives that it is difficult to imagine a time when these clothes were not in use.
Since in technology lessons we learn to sew products for ourselves, I decided that I would sew a nightgown.
1 . Historical information
The history of fashion is a topic in which one can trace a certain time line. Here I present a timeline of rather unusual content - this is the story of the nightgown.
Until the 14th century, women either slept naked or slept in what they wore during the day. They had to sleep in uncomfortable outer clothing or naked. What was the main reason for the creation of the nightgown is unknown today. Either it was too cold to sleep naked, or it was not possible to rest properly in outer clothing.
The first mention of special sleepwear appeared in the Czech Republic in the 15th century, where they spoke of a “bedroom skirt”. At that time, the nightgown was very large - wide and long, and only wealthy people could afford this piece of clothing.
Only in the 19th century did the nightgown become more accessible and became widespread, becoming an integral element of both women's (women's nightgown) and men's wardrobe (men's nightgown) - many men also slept in similar clothes. In addition, a shirt was no longer considered a luxury as before. Thanks to this accessibility, every woman had the opportunity to diversify her wardrobe with several models of nightgowns. Even in those days, different styles of such products were used. The most popular were the strict, classic models of nightgowns, which were made of cotton or linen. Women from wealthy families preferred luxurious models made of natural silk. Such shirts were usually decorated with expensive lace. Thanks to this, they looked more like a dress than sleepwear.
Since then, a variety of shirts have never left the women's night wardrobe. But men no longer sleep in such clothes - they prefer to wear pajamas or something else.
Nightgowns, which were worn in our country just a couple of decades ago, were quite ugly - wide and shapeless, made of unattractive and uncomfortable fabrics. Most often, such nightgowns were made of satin, cotton or flannel. And even “getting” such a product in a store was considered a great happiness. Due to the total shortage, women had to sit down at sewing machines and make their own nightgowns.
Now every woman can afford to have several shirts for different purposes - a simple cotton shirt of a classic cut for warmth, you can choose a sports shirt, or choose a shirt made of natural silk, short or long, reminiscent of an evening dress, open, with lace inserts on the chest, trims in the form of ruffles.
Having seen the inscription “women's nightgowns” on the window and looking there with the desire to buy a nightgown, everyone will understand that nightgowns are not necessarily just comfortable and beautiful clothes for sleeping. Today's nightgowns can be very elegant and sophisticated clothing.
2 . Product selection
Project goals and objectives
Purpose This project is to make a nightgown for yourself during technology lessons, which has practical significance.
Objectives of this project:
1. Deepen knowledge of design and modeling,
2. Improve and develop skills in working with new fabrics,
3. Master new techniques for working with a sewing machine,
4. Fostering perseverance and hard work.
Product selection
Model№ 1 . Straight silhouette nightgown. The sleeves are short and one-piece. The neck and bottom are oval. Length max.
Model№ 2 . Nightgown with yoke. Length max. Front and back under the gathered yoke. The bottom of the shirt is trimmed with a frill. The sleeves are short, one-piece, gathered at the bottom and end with cuffs.
Model№ 3 . The nightgown has a trapezoidal silhouette with a straight yoke, parallel to the widening of the lower part. Short, one-piece sleeves, oval neckline. The length is average.
Model№ 4 . Nightgown with wing sleeves. The bottom of the shirt is trimmed with a frill. The length is average.
Model№ 5 . The nightgown is one-piece, with straps. Fitted cut, made of jersey, with thin openwork braid.
Model№ 6 . Nightgown "Grandmother's". The shirt is one-piece. The sleeves are short, the neckline is oval. The length is average.
I chose model No. 6, since I was sewing a nightgown for the first time and decided not to complicate my work. The straight silhouette also fits my figure well and I don’t regret my choice.
Fabric selection
I chose fabric for the night magpie from two types: flannel and chintz. I chose chintz because summer is coming and it will be hot to sleep in a flannel nightgown.
Chintz is a natural material made from cotton. Chintz is very thin and delicate, it allows air to pass through better than flannel, is pleasant to the body and washes well.
I chose a fabric with a spring floral pattern. Since the nightgown is sleepwear, I didn't choose the fabric to match my eye or hair color. My choice was practical - natural fabric is pleasant to the body, as well as its low cost. This fabric is optimal for beginner craftswomen.
3 . Design and modeling
Measurements for drawing
Ssh-17 cm; СrII-42 cm; Dts-35 cm; St-35 cm; Op-27 cm; Di-78 cm.
Line designations on the pattern
Laying out patterns on fabric
4. Plandesign and manufacturing of the product
Tools and materials
Routing
|
The name of the operation. |
Tools and accessories. |
|||
|
Taking measurements. |
Tape measure. |
|||
|
Constructing the basis of a drawing of a shoulder product with a one-piece sleeve (nightgown) on a sheet of whatman paper. |
Whatman paper, pencil, ruler |
|||
|
Product cutting: a) Take the fabric and fold it right side inward. b) pin the pattern and trace it. c) Cut out, leaving seam allowances |
Fabric, pencil, pattern, scissors, pins. |
|||
|
We sew the product with copy stitches |
Needle, floss, scissors |
|||
|
Finishing the neck with a facing |
||||
|
Hemming the side sections of the product |
Sewing machine, thread, scissors |
|||
|
Processing the bottom of the sleeve and the product closed hem seam |
Sewing machine, thread, scissors |
|||
|
Wet heat treatment |
5. Results
Calculation of the cost of materials spent on making a nightgown
|
Name used materials |
Material consumption per product |
for materials |
|||
|
Fabric "Chintz" |
150 rub. (1m) |
2 m (1.5 m fabric width) |
|||
|
Sewing threads No. 40 |
30 rub. (1 PC.) |
1 reel |
|||
|
Floss threads |
25 rub. (1 skein) |
||||
Self-esteem
So my work is over. I'm generally pleased with it. My nightgown turned out neat and true to size. The stitches are even, the hem of the fabric is the same on all sides.
When developing my model, I fulfilled almost all the requirements for clothing. My nightgown ensures the normal functioning of the body (the skin breathes in it). The fabric is quite durable and wear-resistant.
The model has a comfortable silhouette; when sleeping, the shirt does not hug the body, and you feel comfortable in it.
The cheerful colors of the fabric have a positive effect on my morning mood.
This model is inexpensive and accessible.
I am very pleased that I managed to sew my own nightgown and have one more nightgown in my wardrobe.
This is a real victory for me!
Posted on Allbest.ru
...Similar documents
Characteristics of the product model and materials, specification of cut details. Selection of processing methods, equipment and means of small-scale mechanization. Development of a technological sequence for processing a product, constructing a graph of its manufacturing process.
course work, added 12/25/2015
Analysis of the assortment and identification of the basic requirements for a women's jacket. Selection of fabric, tools and devices for making the product. Layout of cut details. Safety instructions for working with fabric. Economic justification for the project.
course work, added 01/20/2016
The concept and methods of manufacturing glass products, their classification and types, methods and materials used. History of ceramics and general description of the manufactured product, equipment. Features of the use of glass and ceramic products in decoration.
course work, added 11/17/2013
General characteristics, basic physical and chemical properties of the steel used in the manufacture of the part. Analysis of the technical requirements of the drawing. Workpiece calculation. Selection of equipment and its technical features. Route description of the process.
course work, added 01/07/2015
Justification of the problem, implementation scheme, choice of model. Selection, rationale for choosing fabric. Equipment, tools, accessories for sewing. Drawing, skirt modeling, manufacturing sequence, cost calculation.
practical work, added 10/02/2009
Mass production of garments. Mechanization and automation of assembly and connecting operations. Technological process of making a shirt. Selection and characteristics of the model. Selection and justification of materials and accessories, product processing.
course work, added 05/14/2009
Materials for making a kitchen table. Drawing up a table drawing, specifications and calculation of dimensions. Rough cutting of boards and bars for the frame. Drilling holes for dowels on the lid. Tools and equipment. Organization of the workplace.
course work, added 03/15/2015
Description of the product "Layrinth cover with honeycomb seal" and requirements for it. Assessment of material weldability. List of possible methods of welding a product, selection of its design options. Welding materials, main and auxiliary equipment.
thesis, added 04/20/2017
Description of the design and operating principle of the designed product, description of the design. Justification of the type of production, main stages and principles of implementation of the corresponding technological process. Calculation of workpiece parameters. Processing machines.
test, added 10/17/2014
Technological sequence of manufacturing a women's jacket. Requirements for the product. Justification of the chosen model, description of its appearance. Selection and justification of materials and accessories. Methods of processing products, means of small-scale mechanization.
Figure 44 shows techniques for working with drawing tools: how to correctly draw a circle or arc and curved lines. A circle or arc is drawn with a compass, turning it by the holder in a clockwise direction (Fig. 44, a).
Curved lines connecting given points are drawn using patterns. The edge of the pattern is selected so that it connects as many points as possible (at least three), and a line is drawn along it (Fig. 44, b).
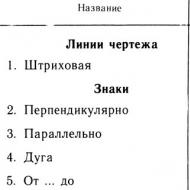
When making drawings and patterns, as well as when drawing up instruction cards, you must use the correct techniques for working with drawing tools and use the lines and signs shown in Table 25.
The clothes we wear can be divided into three types: outerwear, light clothing and underwear (color table 4).
Underwear includes outerwear (pajamas, shirtfronts, collars, cuffs) and underwear (shirts, slips, briefs, sleepwear, etc., Fig. 45). Underwear is sewn from linen fabrics (see p. 62).

The following requirements apply to finished linen:
1. Hygienic- underwear should be comfortable to wear, loose, and have few finishing details.
2. Operational- underwear must have a certain wear life. This depends on the convenience of the design, the correctly chosen processing methods and the quality of the work performed.
3. Aesthetic- linen should be beautiful in shape and finish.

Designing a nightgown
Nightgowns are very diverse in cut and finish. They can be with or without a collar, with different collar shapes, sleeveless or with sleeves of different lengths, long and short (Fig. 46).
Nightgowns should be loose in shape.
Taking measurements to create a drawing of a nightgown

To construct a drawing of a nightgown, take the measurements given in Table 26.


Details of the nightgown The nightgown consists of two parts - the back and the front. The shape and size of the parts are the same, they differ only in the shape of the goal line. At the front, the collar is cut deeper than at the back (Fig. 48).

This is explained by the structure of the human figure: most of the neck, at the base of which the collar is located, is located in the front.

Remember the words: outerwear, light clothing, outerwear, underwear, cut, measurements: half neck girth, half chest girth, shoulder girth.
Questions and tasks
1. Why are measurements taken?
2. Which of the measurements are recorded in half size, and which in full, and why?
3. By what measure is the size of the product determined?
4. What parts does a shirt consist of and what is the difference between them?
5. Look at Figure 49 and remember the names of the lines of the shirt drawing.
6. Take each other's measurements.
7. Prepare a sheet of album for constructing a drawing of a nightgown.
Practical work
Instruction card. Drawing a nightgown for size 38, height II
Tools and accessories: scale ruler, square, compass, pattern, TM and 2M pencils, eraser, album

Questions and assignment. 1. What measurements determine the width and length of a shirt? 2. Why is the increase given to the POg measure? 3. What tools are used when constructing a drawing of a shirt? 4. Make calculations and create a nightgown pattern according to the measurements taken. MODELING A NIGHTGIY You can sew products of different styles using the same pattern. When modeling, the style lines are applied to the pattern of the base of the product. Figure 46 shows models of nightgowns. They differ from each other in length, collar shape and design (use of finishes). Shirts 2, 3 and 5 are sewn using one pattern, to which changes and additions have been made. These changes are applied to the pattern of the base of the shirt when modeling it. Figure 50 shows samples for finishing shirts with vyshiyoka.


Questions and tasks
1. What is the modeling process?
2. What changes can be made to the shape of the shirt details?
3. How is a product sketch made?
4. Select the shape of the collar for the shirt you will be sewing and the trim in accordance with the chosen fabric (Fig. 51).
5. Design the style of the nightgown. An example of the work is shown in Figure 52. Draw a sketch of a shirt in your album. Make a sample of the product from colored paper (in M 1:4) in accordance with the sketch and glue it to the album.
6. Calculate the approximate amount of fabric that will be required to make a nightgown according to your measurements: 2Di+40 (for processing the bottom of the shirt and for the hem).

Preparing the pattern for cutting
Tasks
1. Cut out the shirt pattern.
2. Make a pattern for the facing of the collar of the shirt: trace the facing pattern along the pattern (you should take the pattern depending on your POSH measurements). You can draw the facing pattern yourself, as shown in Figure 53. Cut out the pattern. 3. Apply inscriptions to the pattern of the shirt parts - the names of the parts and the size of the allowances - and indicate the direction of the grain thread and the position of the shoulder line on the facing (Fig. 54).


Sewing a nightgown
For the manufacture of nightgowns, mainly cotton and linen fabrics are used: madapolam, chintz, chiffon, cotton wool, flannel, linen. These should be light-colored fabrics, plain-dyed or with small patterns (color table 5).
Practical work
When performing practical work on the manufacture of garments, it is necessary to remember about the economical use of fabric, comply with sanitary and hygienic requirements (see Appendix 4) and safety rules when working on a sewing machine, with an electric iron, scissors, needle and pins (see Appendix 5) and technical conditions for performing manual and machine work (see Appendices 11 and 12).

Instruction card. Cutting the nightgown (see appendix 10)
Tools and accessories: work box, nightgown pattern, fabric.
Questions and assignment. 1. How to prepare fabric for cutting? 2. What should you consider when laying out pattern pieces on fabric? 3. What safety rules must be followed when cutting? 4. Calculate how much fabric is required for the nightgown.
Instruction card. Preparing cutting details for processing
Questions. 1. Why are control lines laid on the cut details? 2. Why, when making copy stitches, their loops must be at least 5 mm1 3. How to protect your finger from being pricked by a needle when sewing by hand?
Processing the collar with undercut facing
Color table 6 shows an instruction card for performing the work of processing a collar with an undercut facing.
Self-control. Check: 1) the accuracy of making and sweeping the overlock seam; 2) accuracy of stitching; 3) uniform width of the facing along the entire length; 4) quality of ironing.
Questions. 1. What machine and hand stitches did you use when finishing the collar? 2. Why do you sweep the inner edge of the facing along the line of the facing seam? 3. What safety rules must be followed when sewing on a sewing machine?
Instruction card. Finishing the bottom of the sleeve with a hem seam
Tools and accessories: working box, cutting details.

Questions. 1. What is the sequence for sewing a hem seam with a closed cut? 2. What device can be used when sewing a hem seam? 3. What hand tools did you use to finish the sleeve bottom?
Instruction card. Joining shirt parts with a double seam
Tools and accessories: working box, cutting details.

Questions. 1. What seams are used for sewing linen? 2. How is a double seam made? 3. What safety rules must be followed when working with an electric iron?
Instruction card. Finishing the bottom of a shirt with a hem seam
Tools and accessories: work box, semi-finished shirt.

Questions. 1. What manual techniques are used when making a hem seam? 2. How to iron the finished bottom of a shirt? 3. What tool is used to remove running stitches?
Instruction card. Final processing of the shirt
Tools and accessories: work box, nightgown.

Questions and assignment. 1. What temporary stitches are removed when finishing a shirt? 2. Tell us about the sequence of ironing a shirt. 3. How to check the quality of the finished shirt?
Various types of processing of shirt cuts (color, tables 7 and 8)
Processing collars and sleeve cuts
The collar of the nightgown is treated with a hem from finishing or main fabric. You can trim with lace, ribbon, piping, bindweed, frill from the main or finishing fabric, embroidery: The lower sections of the sleeves can be finished with a hem seam with a closed cut or hemming using the same finishing as when processing the collar In shirts 1 and 4 lace is inserted between the facing and the main fabric. The shirt has 2 collars with a hem facing, and the bottom of the sleeve with a hem seam with a closed cut. The lace is applied from the wrong side to the finished collar and the bottom of the sleeve. In shirt 3, from under the facings with which the sections of the shirt are processed, an edging can be released from a strip of finishing fabric cut at an angle of 45°. You can also stitch bindweed onto the facing or perform a finishing stitch on it.
Processing the bottom edge of the shirt
The bottom section of the shirt is finished with a hem seam with a closed cut and trimmed with lace, a frill of ribbon or finishing fabric. They are adjusted from the front (shirt 5) or back (shirt 6) side.
Questions and tasks for reviewing the topic “Making a nightgown”
1. What types of underwear do you know?
2. What measurements should be taken to draw a drawing of a nightgown and which of them determine the size of the collar and sleeves?
3. Name the lines of the shirt drawing.
4. What is the design process for a shirt?
5. How to prepare a pattern for cutting?
6. Tell us about the cutting sequence.
7. How to prepare the cut details of a shirt for processing?
8. How are the collars, the bottom of the sleeves and the bottom of the shirt processed?
9. What is the final processing of the shirt?
10. Fill out the table. To do this, find the correct answers and enter their numbers.

Purpose of measurements (answers)
1) to determine the sleeve width;
2) to determine the length of the shirt;
3) to determine the size of the gate;
4) to determine the width of the shirt.


The work was completed by 8th grade student Victoria Sabarova Project leader: N.S. Kyle Creative project on technology on the topic “Nightgown”
- Problem situation
- Project objectives
- Research the problem
- Bank of ideas and suggestions
- Technological sequence
- Economic assessment
- Environmental assessment
- Conclusion
- List of used literature
- I chose the theme of my project to make a sewing product - a nightgown, since I need this product! At night I like to sleep in my nightgown. Of course, you can buy it in a store, but you can also sew it yourself, especially since we learn to sew in technology lessons. If I sew a product myself, then, firstly, I will gain experience in sewing products, and secondly, I will benefit financially, that is, I will save a little on the family budget.
- My nightgown should be comfortable, light, easy to wash and iron, and allow me to sleep soundly in it. Therefore, I need to choose the right fabric for sewing.
- - study what a shirt is, as it was called before;
- - explore when the patterns appeared;
- - explore the types of fabrics from which the product can be sewn;
- - describe the process of making a nightgown;
- - sew a neat nightgown.
- Shoulder clothing originates from primitive cloaks and skins. Over the millennia, clothing changed and began to consist of several pieces of fabric that were not sewn, but draped over the human figure. The costume consisted of two parts: a lower shirt - a chiton, and an upper cape - a himation. This cape was thrown over the left shoulder onto the back and chest.
- In Russia, the first information about clothing dates back to the period between the 8th and 12th centuries. Women of that time wore a long canvas shirt - a chemise, wide, straight cut, belted at the hips and embroidered at the edges.
- In the 15th – 16th centuries, nightgowns and pantaloons appeared, which for a long time belonged to the toilet only of privileged segments of the population. Nowadays, everyone uses nightgowns, regardless of their position in society.
- V.I. Dal in his explanatory dictionary of the Russian language gives definitions to the words “shirt” and “shirt”.
- “Shirt – shirt, shirt; women's muslin shirt-front, waist-length; blouse, round, outerwear, outer shirt, work shirt, hunting shirt, etc.”
- “Sorochitsa, a type of white shirt with scarlet shields, which peasant women wear over their shirt and sundress.”
- “Shirt, shirt - shirt, koszul, vest; clothing from the category of underwear, worn under the bottom, on the body.”
- From these definitions by V.I. Dahl it follows that the name “shirt” is more suitable for the nightgown of our time.
- And yet, why “shirt” and not something else? Probably, in ancient times, a piece of fabric was simply “hemmed”, hence the “shirt”. As a rule, shirts were wide, cut from straight panels. There is even a proverb: “Women’s
- shirts are the same bags: tie your sleeves and put whatever you want.”
- Pattern- This is a piece of paper cut out of a product for cutting fabric. But how long has it been around? It turns out that a very long time ago - from the 10th century. At that time, patterns were the property of members of tailoring workshops and were carefully protected from copying. Tailors guarded their secrets.
- Paper patterns, approximately the same as those we use now, appeared in the 19th century, first in England and then in France. They began to be published in magazines only in 1850 as an appendix, and before that time there were only descriptions and skillfully made engravings. In 1860, industrial production of paper patterns began. The founder of the company that produces patterns is considered to be the Italian E. Batterico.
- Nightgown models
MODEL No. 1
Long shirt with one-piece sleeves
Model No. 2
- Nightgown made of silk fabric
- Short nightgown
- made of cotton fabric
- with one-piece sleeves,
- with a round neckline.
- Based on one pattern, you can model many different nightgowns. Of all the ideas, I choose model No. 3, since this model is made of cotton fabric, which is easy to wash and iron well, unlike fabrics made from chemical fibers and linen. Cotton fabric does not cause any difficulties for me to work with.
- Measurements are taken on the right side of the figure; The waist is pre-girdled with a cord.
- When taking measurements, the person being measured should stand straight without tension; Measurements are taken with a measuring tape; when measuring, do not pull the tape
- Or weaken. Length measurements are recorded in full, and width and girth measurements are recorded in half size; Since the drawing is built on one half of the figure;
Manufacturing sequence
MEASUREMENTS
- S w - half-girth of the neck;
- S t – half waist circumference;
- C b – semi-circumference of the hips;
- O p - shoulder circumference;
- D and is the length of the product.
The process of constructing a drawing;
1 STEP
STEP 2
Open the textbook and start building the drawing:
From (.) B down, set aside the DI measurement
Construction:
STEP 3
STEP 4
The width of the shirt can be adjusted
according to the standard of Sat: BB1= Sat: 2+3
Back neck width:
BB2 = Ssh: 3+1, neck depth
BB3 = BB2: 3
Construction of the drawing:
STEP 5
STEP 6
7 STEP
Constructing the depth of the neck from (.) B3B4 set aside 5cm in/n
Armhole depth:
V1G = Op:2 + 7
Construction of sleeve width: B1B5 – v/p = 7
Construction of the drawing:
8 STEP
9 STEP
We design the armhole of the shirt, connect G1 and G2
Divide G1 and G2 in half, raise the perpendicular to the top 1.5 cm and connect the arc.
Construction of the drawing:
STEP 10
STEP 11
We expand the bottom of the product, set aside from H1 = from 8-10cm
Connect (.)G2 and (.)H2
From (.) H2 top set aside 1cm
Connect with a smooth line.
Finished drawing; Cutting the product
- Cut on the fabric taking into account the grain and pattern.
- Mark the necessary inscriptions on the pattern.
- Trace the drawing on the fabric along the contour lines (from the wrong side according to the cutting rules);
- Cut the product onto the fabric;
- Prepare the product for processing.
- Stitch the side seams, press them, and finish them with a zigzag stitch.
- The neck of the product is treated with an edge facing
- The bottom of the product is finished with a “closed hem seam”.
- The sleeves are finished with a closed hem stitch, and I placed satin ribbon along all the lines.
- The cost of my product turned out to be small - 80 rubles, since I sewed the nightgown myself, and the money was spent only on materials. If my mother bought me a nightgown in a store, she would spend 150 - 180 rubles.
- Therefore, we can conclude that sewing a nightgown with your own hands is a profitable and almost waste-free production.
- The manufacturing process and operation of my product will not entail changes in the environment or disruptions in human life, since my nightgown is made from environmentally friendly materials. I will not throw away the remaining fabric, but use it to make products using the “patchwork” technique.
- We can conclude that sewing a nightgown is an environmentally friendly production.
- I completed a project work - “Making a nightgown”.
- In the process of completing the project work, I completed the following tasks:
- - I studied what a shirt is, as it was called before;
- - researched when the first patterns appeared;
- - researched the types of fabrics from which the product can be sewn;
- - described the process of making a nightgown;
- - sewed a neat nightgown.
- I sewed a nightgown that no one else had, and I really liked it myself.
- My shirt turned out to be very comfortable, light, it irons well, as it is made of cotton fabric. I gained experience in sewing products and won financially, that is, I saved the family budget a little.
- It's so nice that I sewed a nightgown with my own hands, rather than asking my mother to buy it at the store.
- Now, when I go to bed, I will only wear it.
- 1 Illustrated explanatory dictionary of the Russian language. / V.I.Dal. – M.:
- Eksmo, 2006. – 896 pp.: ill.
- 2 Makhmutova H.I. We design, model, sew. Book for students. –
- M.: Education, 1994.
- 3 Technology: Textbook for 7th grade students of secondary schools.
- / V.D. Simonenko, O.V. Taburchak, N.V. Sinitsa and others; Ed. V.D. Simonenko
- – M.: “Ventana – Count”, 2002.
Creative project
"Nightdress"
Completed by 7th grade student Ionova Ksenia
Technology teacher Lobacheva N.V.
2013
One day I wanted to sew a nightgown myself. And when I moved to 7th grade, I found out that we would be sewing a nightgown. I was glad. One day I wanted to sew a nightgown myself. And when I moved to 7th grade, I found out that we would be sewing a nightgown. I was glad.
Develop a model in accordance with my conditions. Develop a model in accordance with my conditions.
Conduct research and develop a sketch of my project product. Conduct research and develop a sketch of my project product.
Organize your workplace.
Select tools and devices for various operations.
Make a sewing pattern.
Select fabric for the product.
Cut out the fabrics.
History of originHistory of origin
European women, until the 14th century, slept in the same clothes they wore during the day, or without any clothes at all. Clothing specially made for sleeping appears around the 15th century, in the Czech Republic, and it was called a “bedroom skirt.” Nightgowns of that time were significantly different from those that girls know now. They were large in size, both in width and in length. Only rich people wore them because such shirts were expensive.
In the 19th century, nightgowns became accessible to any woman and began to be used everywhere. By this time, women could already have several nightgowns designed for different purposes: daily ones - usually made of cotton, classic cut; for travel - sports shirts; decorative - long or short nightgowns for plus size ones, made of natural silk. In the 19th century, sexy night negligees also appeared - open, with a lot of ruffles and lace, somewhat similar to evening dresses
1. Manufacturing technology corresponds to the 7th grade program.1. The manufacturing technology corresponds to the 7th grade program.
2. Economical fabric consumption.
3. Simple design.
4. Speed of production.
5. Comfortable to wear.
6. Fashionable.
7. Inexpensive fabric.
8. Beautiful colors.
9. Does not harm health.
10. Easy to care for.
We don’t know how to sew very well yet, so we were offered to sew everyone the same model of nightgown: a nightgown with a one-piece sleeve.
Slide No. 10
Conclusion: my Russian size is 37-35-43 Measurement name
My measurements
Half girth gudi Sg
Semi waist circumference St
Semi hip circumference Sat
Conclusion: my Russian size is 37-35-43
my European size is -41
Slide No. 11
I made a pattern according to a technological map. I built a pattern according to a technological map.
Slide No. 12
Solution: I choose viscose fabric because my mother gave it to me. The color of the fabric is very nice: small yellow and black stripes. fabric
Crepe satin
Slide No. 13
Slide No. 14
For my product you will need: For my product you will need:
Threads in the color of the fabric No. 40 (50.60 according to the model);
Paper scissors, ruler, pencil - for creating a pattern;
Tailor's chalk, pins, tailor's scissors for cutting;
Sewing machine, iron, ironing board, hand needle, pins - for sewing;
Slide No. 15
To find out the cost of the product, I calculated what materials and in what quantity I would need. To find out the cost of the product, I calculated what materials and in what quantity I would need.
Conclusion; Since my mother gave me the fabric, I will only have the cost for the threads.
Name of material
Conditional price per unit of measurement, rub.
Material consumption per product
Material costs, rub.
Cotton threads
6r for 1 reel
1 reel
Slide No. 16
Fabric consumption can be accurately calculated by laying out the pattern pieces, for example on the fabric, folding it to the desired width.Fabric consumption can be accurately calculated by laying out the pattern pieces, for example on the fabric, folding it to the desired width.
The fabric I chose is cm wide. For my model of my height, I will need 2 m 90 cm.
Solution: I need cm of fabric.
Articles on the topic