DIY flower pots: ideas, photos and instructions. Master class with step by step photos on how to decorate a glass pot with polymer clay Flowers in polymer clay pots
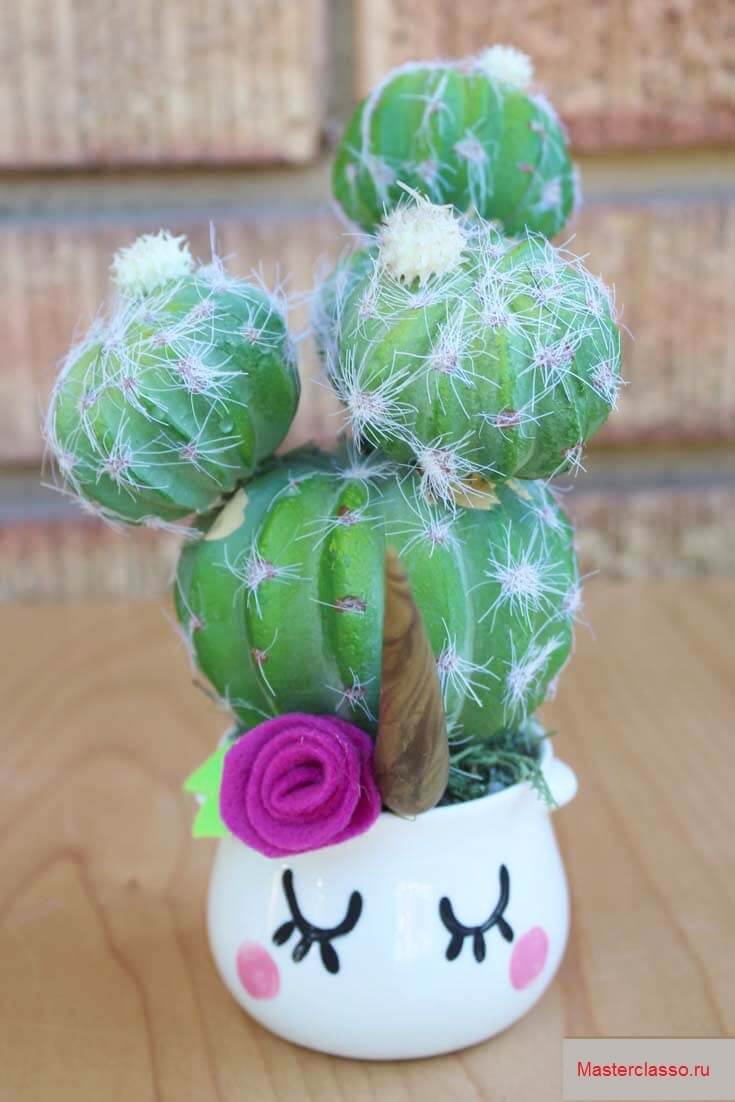
We bring to your attention a master class on decorating flower pots in the form of unicorns with your own hands. What could be more charming than the combination of large cacti and fabulous animals? This is perfect harmony. They are so soft and fluffy!
Tools and materials Time: 3-4 hours Difficulty: medium
- white ceramic pots;
- artificial cacti of the Faux type;
- natural lichen/moss;
- Styrofoam balls, for placement inside the pots;
- gold-colored polymer clay;
- black and pink paint;
- felt in white, pink, green, blue and purple;
- scissors;
- hot glue gun.
Sleepy unicorn flower pot decor is incredibly cute, don't you think? These charming crafts are perfect for decorating large gifts or children's parties. Place real flowers or fake cacti (like ours) in these fun pots to get your little creative unicorn lovers in the holiday spirit!

Which of these pots do you like the most? We like them all, but our favorite is the small, light pink flower on the left side of the photo. He is so cute!

Flower pot decor - step by step instructions
Step 1: Place the cacti in pots
Place a Styrofoam ball in each ceramic pot. If your Styrofoam is too big, squeeze it with your hands and push it inside the pot.

Remove the styrofoam balls from the pots, apply some hot glue to the bottom of them, and reinsert them into the pots.


Apply some hot glue to the top of the styrofoam and press the lichen/moss into it. Then place cacti on the lichen.

Step 2: make the horns
Take golden clay and roll it to a smooth mass. If you feel that your clay is hard, knead it in your hands for a few minutes to warm it up.

Make a figure in the shape of a unicorn horn about 8 cm long from softened clay. Insert a toothpick into the bottom of this figure.

Repeat the horn making process as many times as you have pots available. Bake the products together with the toothpicks in the oven, according to the recommendations on the package of clay. When finished baking, remove the finished products from the oven and let them cool.

You can also add swirls to your horns, and after baking, paint them with metallic gold paint, just like we did for the largest horn!

Step 3: Draw Sleepy Faces on the Pots
Using black paint, draw U-shaped eyelids with three eyelashes on the pots. Also draw pink cheeks.


Step 4: Make Felt Flowers and Leaves
Cut a spiral about 3 centimeters wide from colored felt.

Roll the spiral from the outside towards the center, securing it along the way with hot glue.

After rolling, apply glue to the base of the flower, then close it with the free end of the felt.

Repeat the above steps for any other flowers you want to decorate the pots with.

Also cut out a few small leaves from the green felt.

Step 5: Make the Ears
Also cut out a few ears from the white felt, if they are not provided on the sides of your pots. For example, our large pot does not have ears, unlike small ones that have small protrusions on the sides. Therefore, ears do not need to be made for these pots.

Attach the ears to the sides of the pots using hot glue.

Step 6: Finish the Composition
Insert the Golden Unicorn Horn straight into the styrofoam, center front.

Using hot glue, attach the felt roses and leaves to the sides of the horn.

Repeat the above steps for small pots.

Insert the horns into the foam from the front center.

Attach one small flower and 1-2 leaves to the moss next to the horn with hot glue.

The decor of flower pots in the form of sleepy unicorns is ready! He is so simple and cute! We only added one flower per small pot, but you can go ahead and add as many as you like. Plus, if you're using artificial cacti (like we are), you can even add flowers to the top of the plants.
Funny flower pots can decorate a children's room. Making them yourself is very easy. Even children can cope with this task. They themselves can decorate such a pots at their own discretion.
materials
To make a polymer clay planter with your own hands, prepare:
- polymer clay;
- container with water;
- paints;
- brush;
- paper plate.

Step 1. Take a piece of polymer clay. Roll it into a ball about the same size as a flower pot. Ball try to make the correct shape.

Step 2. Place the ball on a work surface. Mark the middle of the ball with your finger from above and gently push it inward. The distance between the recess and the table at the bottom of the planter should be about 5 - 7 mm. Expand the resulting recess with your fist.
Step 3. Start pulling the side walls of the resulting workpiece. Do this with your hands, giving the walls of the pots the desired shape. Form the edge of the pot.

Step 4. After the main shape of the planter is ready, take a container of water and dip your fingers in it. Smooth out all sorts of cracks and bumps on the pot. If necessary, adjust the shape, if desired, leave patterns, signs or hieroglyphs on the front side.
Step 5. Send the finished work to the oven. When determining the time and temperature, follow the recommendations of the polymer clay manufacturer. In this case, the planter was sent to the oven for half an hour at a temperature of 190 degrees.
Step 6. Take the pot out of the oven, let it cool completely. Paint the outside of the pot with white acrylic paint. This will be the base layer.

Step 7. Color the pots according to your own taste and desire. In addition to paints, you and your children can use various glitters, decoupage materials, and more.
Is it possible to find a house in the modern world that would not have flowers? Probably not, almost every house has some kind of plant. But how many apartments are there in which the plant fits very well into the design of the room and is in a beautiful pot? Most likely a few ... Today we will tell you how to make a flower pot quickly and easily with your own hands.
We weave flower pots step by step with our own hands in a master class
This question can be asked by all readers of this article to themselves. Indeed, why not go to the store and find a suitable pot there. Now thousands of different pots are sold for every taste and color. Well, while you are thinking, you can list the most popular reasons for such an “act”:
- Don't want to spend money, or the price of a flower pot seems too high
- After going around all the shops, we could not find anything very original and interesting.
- Can't find the right size pot
- I want to do something useful
These are the most popular reasons why people refuse to go to the store and want to make their own pot. People who potty for a second or fourth reason will have the least amount of trouble and are more likely to get to the "winning end". These people clearly understand that they really want to make a pot with their own hands and will not go to the store for it, no matter what the difficulties. But they should be pleased - no big difficulties and no!

There is no clear list of improvised materials, probably, materials that pass moisture well will not work. You can take absolutely any materials. From improvised materials you can get a very beautiful and good pot. Most often, various cans are used as a container, for example, from canned pineapples. You can see an example of such a pot in the photo below.

Approximately the same result can be obtained from a mayonnaise bucket. Now such a bucket is not as common in supermarkets as it used to be, but you can find it.
Despite the huge variety of materials, we will almost always need: scissors, a ruler, a simple pencil, paints, colored paper, glue that glues iron and plastic surfaces. This is the minimum of materials that will be required in the manufacture of any pot.
A lot depends on what you need a new pot for and on your plant. The pot can be hung on the wall or put on the windowsill. Here we can not advise you something specific.
Large flower pot:
As many have understood, this pot is made from an ordinary iron bucket. When choosing a bucket, make sure that it is made of stainless steel. Otherwise, your bucket will deteriorate due to corrosion. Do not forget to make a few holes in the bottom of such a bucket so that the water after watering can drain into the pan.
If the bucket is not enough for your flower, then you can make it a “house” from waste material.
Create a small pot or a beautiful decoration from salt dough
A pot made from salt dough is suitable for small flowers. It will be strong enough, but its strength will not be enough to support a large plant. Salt dough gives another advantage - the ability to make a pot of any shape. Let it be a small pot, but it can have a very amazing shape and relief on its surface. To make such a pot or pot decoration, we need the following materials:
- Substances: flour, water, salt, glue, nail polishes of different colors.
- Scissors, toothpicks and always a hard, sharp object.
We need the last item for embossing and shaping the dough. You can use a knife, but you may have difficulty cleaning the dough from its blade.
You make the solution in proportions of 2 to 1. That is, two kilograms of flour per kilogram of salt. Be sure to stick to this ratio! Only small deviations from this proportion are allowed. Then start adding a little water, trying to get a composition that looks like soft plasticine. When you get such a solution, you can proceed to the direct manufacture of the pot.
Varnish is great for coloring salt dough. Probably, a worthy replacement for him can not even be found.
If you do not want to make a pot out of dough, then you can make a pot out of polymer clay, which has roughly the same properties.
Video on the topic of the article
The resulting pot can be decorated in many different ways. One of these methods is the decoupage technique. This technique consists in stickers on the product of images or their painting. This method of decorating is quite young, but it is very beautiful and allows you to get very high-quality images of various objects on your product.
The pot can be decorated not only by painting it, but also by placing beautiful crafts on it. It can be anything: butterflies, dragonflies and other beautiful insects that are easy to make with polymer clay. And all this will be done by your hands!
The following videos resemble a master class, and are built according to its principle. In each video, an experienced craftsman will show you how to make a particular pot.
Hyacinth is a primrose adored by many, and there are many varieties of it. Today we will look at how to mold such a flower from self-hardening (cold porcelain). The work will be long, but not particularly difficult. It is with hyacinth that one should begin the development of ceramic floristry. Well, or with a lilac. Or forget-me-not. Why?
- You train your finger motor skills by working with small details and learn to feel the clay.
- Collected together, small flowers look much more beautiful than one large one. That is, if you blind one iris, for example, it will look boring. What a hyacinth cap!
- Modeling a hyacinth from cold porcelain does not require special skills, such as creating complex flowers such as gladiolus or alstroemeria, where it is necessary to take into account the degree of bending of the petals and stamens, as well as go through all the circles of hell, the stages of tinting (just look at alstroemeria! horror!).
So, if you want to try your hand at ceramic floristry, start with hyacinth. How to make the flowers themselves is not a secret, there are many such MKs, Antonina Melnichenko is especially successful, you can easily find this lesson. And I'll show you how to collect all the flowers together, and how to make a hyacinth bulb from polymer clay, and how to set a flower in a pot.
Hyacinth from HF - master class
Step 1. For the centers of small flowers, we need yellow polymer clay. We mix yellow paint into purchased clay (or) and be sure to add quite a bit of titanium white, which will remove transparency (if not added, the middle will turn out to be very strange).

Step 2 We prepare as many short wires (no more than 5 cm long) as there will be flowers on the hyacinth. I have 100 - 120 flowers for one hat. But you can make the hyacinth smaller. In a word, your choice. At the ends of the wire we make as small a loop as we can bend.
You will also need PVA glue (or latex, if available) and nail scissors.

Step 3 We pinch off a tiny piece of yellow HF, paste it on a loop of wire previously lubricated with PVA. The loop should be completely hidden in the clay.

Step 4 We cut the resulting yellow drop into 3 - 5 parts, as it turns out. We put the wire to dry on a foam rubber washcloth or simply put it on a surface to which the clay will not stick.

Step 5 These are blanks for hyacinth from cold porcelain - the master class ahead is quite long, we have so far passed the very first stage.

I recommend making blanks with a margin, because if during assembly it turns out that there are not enough flowers, it will be problematic to make new ones: you will have to guess the proportions of the colors of the tutelka to the tutelka, otherwise the difference will be very striking - the flowers are all located side by side. I once foolishly made a two-color hyacinth
Step 6 We prepare the clay for running the stems. We mix oil paint “grass green”, “titanium white”, “dark yellow” into unpainted cold porcelain.

Step 7 We pinch off a little green clay and run it around the stalk. It is convenient to do this with a finger on the palm of your hand. Leave the tip of the stem bare.

Step 8 These are blanks for hyacinth from cold porcelain.

Do-it-yourself hyacinth - MK
We turn to the creation of the flowers themselves. We will have them yellow, so we are preparing yellow clay, not forgetting to add a little titanium white. If you have planned a hyacinth of a different color, do it your way.
Step 9 We prepare PVA glue, the main stack and a bulb with the smallest ball (what to replace the tools for ceramic floristry, I already wrote), prepared stems (necessarily dried up!), manicure scissors and a lot of patience.

Step 10 We form a droplet from yellow clay. We cut with scissors from the larger (blunt) edge in half, and then each of the parts into three. The result should be six identical parts, and the depth of the notch should be equal.

Step 11 Using the main stack (or knitting needles), we roll each of the parts, forming a petal. Don't rush, don't push too hard. First, a little bit of each petal, then go around in a circle again, giving everyone the same shape.

Step 12 With the sharp end of the stack, we make a recess in the center, and then lower the bulb there and make the hole a little wider, so that the outside of the “ass” of the flower is not sharp, but round.

Step 13 We coat the stem between the green and yellow parts of the PVA (a little, otherwise it will crawl out of the edges!) And thread it into our flower.

Step 14 And now the most important touch, without which the hyacinth will look like a big lilac, and not like itself. It is necessary to press three petals (through 1) into the center, as shown by the arrows. Take a look at the photo of a live flower to understand what is required of us.

Hyacinth tinting from polymer clay
Step 15 And now we tint the flowers. We apply a dark yellow or light yellow or even light green color with a thin brush (oil paint, you can dilute it a little with a thinner so that it is liquid), and then with a second dry brush we drive along the petal back and forth, but precisely along the axis, that is, in the longitudinal direction, not across. Ideally, if the paint does not come out at the edges, but only in the center.

Step 16 Here, we get such flowers.

Step 17 The result of toning on the example of blue flowers.

Sculpting a hyacinth stem
Step 18 For the stem, you will need the thickest wire you can find. I have an ordinary copper one. We take it as much as the height of the flower from the bulb to the crown, plus about 7 cm for the loop for the bulb.

Step 19 We roll the wire with teip tape.

Step 20 From white HF (you can paint it green, I'm too lazy) we roll a long sausage.

Step 22 We lubricate the stem rolled with teip tape with PVA glue.

Step 23 We make a groove in the white sausage.

Step 24 We put a wire lubricated with glue into the groove.

Step 25 We pinch the HF, like dough on a dumpling. And then we roll it either on a flat surface (like rolling a rolling pin on the table, only without pressure), or in the palms (this is well shown in) and in step 29.

Step 26 Do not be alarmed, this is only a blank for the stem, because it is white. At the end, you need to leave our 7 cm under the loop - there the wire is bare, without clay.

Step 27 And now we roll the white stem with green polymer clay.

Step 28 You can in parts, and blur the joints with water to make it smooth.

Step 29 Pay attention to which parts of the palm to roll the stem - those from which the thumbs “grow”. Then the stem will be straight.

Step 30 Or nearly flat

Step 31 We apply brown oil paint on the upper part, tint (shade) with a dry brush.

Step 32 Now, not just green, but with a brown tint.

In the tutorial on sculpting a hyacinth from HF, we will look at the assembly process, creating a bulb and foliage, and also plant a flower in a pot.
All inspiration and more flowers!
If you want to be the first to know about fresh master classes, subscribe to the news of the site metallicFlower– ceramic floristry for beginners.
Related Articles