How to make a box of CDs. Decor of the box with a mosaic of CDs
The article gives several ideas on how to make many useful things from CDs: a box, a candlestick, a photo frame or a roof covering.
Many people have accumulated old CDs that become obsolete or become unusable. Of course, you can throw them away, but it’s better to store them and at some point use them for a global project, for example, to cover a roof. And from small quantities you can make interesting crafts.
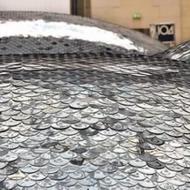
Original disc roof covering
If you have accumulated a lot of such material, then you can make a roof covering from old disks. It will literally look brilliant, and will also not let moisture into the room due to the correct arrangement of the elements.

First, the discs need to be attached to a wooden base, for example, to plywood, and then to the roof. To lay one square meter you will need 120 pieces. They need to be fixed using this technology.

Place the discs end to end in the first row so that there are no gaps. In the second one, place it in a checkerboard pattern relative to this one so as to block the holes of the first one. The third row will also be located relative to the second in a checkerboard pattern, with the holes overlapping. This is how a scaly roof is made from old discs.
Those who have accumulated a lot of unnecessary vinyl records can also implement a similar technology, but using them.

However, let's return to the idea of what can be made from old disks. When laying them, make small holes. Secure parts using small nails or screws.

Come up with a pattern, following which you will lay such an improvised tile roof. You can place the discs either matte or glossy side up.

If you don’t have enough disks or records, then you can put them not on the roof of the house, but on the canopy.

See how English artist Bruce Monroe came up with the idea of using old disks. According to him, he wanted to enhance the natural beauty of the garden in this way. It took him 65,000 discs to make water lilies.

You're unlikely to have that much on hand, so you can make small water lilies or home decor items.
DIY rigid curtains made from discs
You won't need to wash them, just brush off the dust occasionally. Such curtains will decorate the room and add positive notes to it.

The manufacturing process is extremely simple. For it you will need:
- CD disks;
- paper clips;
- drill.
Such curtains can be easily fixed to the cornice; to do this, you need to use a sharp stationery knife to go through the markings of the larger inner circle, and then squeeze it out with your fingers to enlarge the hole. You can also use a drill for this purpose. Bathroom curtain holders are made using the same technique from old discs.

You can also make curtain ties using the same material.

Place a smaller round object on the disk. While holding it, trace it with a knife, then cut along the markings with scissors.

The resulting ring is decorated with a satin ribbon, which just needs to be wrapped around it.

You can decorate curtain tiebacks with satin flowers made using the kanzashi technique, and attach rings to curtains using sushi sticks. They can be painted or also rewound with satin ribbon, gluing it.

Beautiful crafts from CDs

Even from very old disks you can make a New Year's toy using fragments untouched by time. Cut out pieces from this material, which then glue to the Christmas ball like a mosaic. Wipe off excess glue with a cloth.

Using the same technique, you can decorate the collar of a blouse. For this purpose, discs are also cut into fragments. Then they need to be glued to the fabric.

To make a photo frame with your own hands, prepare:
- thick cardboard;
- PVA glue;
- CD disks;
- scissors;
- black paint in a tube with a fine tip.

Use scissors to cut the disks into individual elements. Apply PVA to the photo frame - a small area of it, attach the resulting pieces here.
Let your artwork dry, then fill in the gaps between the pieces with tube paint. When it dries, then you can use the frame for its intended purpose.

And from just one disk you can make a candlestick. For it you will need:
- glass balls;
- 1 disk;
- super glue or another one designed for working with these materials;
- candle.

Cover the outer contour of the circle with balls. Glue the second row on top of these, arranging its elements in a checkerboard pattern. This way create 4 chains. All that remains is to attach the candle using hot wax and you can plunge into the romantic atmosphere.
Homemade jewelry box

It is made of the same material. Here's what it took to create this necessary thing:
- 3 disks;
- textile;
- padding polyester;
- needle with thread;
- scissors.
Divide both circles into 16 equal sectors. To make your task easier, first divide in half, then into 4 parts, then into 8 and 16.

Transfer the pattern to the fabric or immediately draw on it. You need to make 2 such blanks from canvas. Now sew along the markings, making 16 stitches from the outer to the inner edge. Place padding polyester in the resulting pockets. Sew up the top of the disc box.

If you want to make handles, then weave a braid from three strips of fabric.

To make a lid for a box with your own hands, fold two pieces of fabric in a pile, place on a disk, outline with chalk, cut out with a seam allowance of 7 mm on all sides. Cover the disc on top and bottom with these fabrics. If you want the lid to be soft, then cut out two circles of padding polyester and cover the disk first with them and then with fabrics. Sew along the edges with a blind stitch.

Here's how to make a box.
How to make an owl from old CDs?
Try making this funny owl from this material. It will become a room decoration or an original gift.

To get started you will need this:
- several disks (10–12 pcs.);
- a simple pencil;
- scissors with soft finger rings to avoid rubbing calluses;
- scotch;
- foil;
- strong glue;
- yellow and black cardboard;
- ball pen.

Cut out 2 circles from yellow cardboard; they should be larger in size than the holes in the disks. Cut out 2 smaller black circles from thick black paper and glue these bird pupils onto the yellow ones as shown in the photo.

From the dark areas of the disk, cut out the beak, 2 eyebrows and 2 paws of the owl.

Do not throw away the remaining pieces. You need to draw leaves on them and also cut them out. These elements will be useful for decoration.

Glue an eye to the center of each disc. Glue these two disks together and attach the beak to them. Take another light disk and cut fringe on it only on one side and the opposite side. This is the head of an owl. Glue the blank eyes and beak onto it, based on the photo hint.

To make the owl further, take 5 light disks.
To save energy, do not completely decorate their edges with fringe; do it only where necessary. The photograph shows this moment.
Start gluing them together as follows.

Cut out two wings from a dark disk, decorate them with fringe and glue them, eyebrows, and paws of the bird into place.

Place the pencil on the foil and wrap it in this shiny sheet.

Glue pre-cut leaves from disks to the perch. You have such a wonderful owl that will certainly bring good luck to your home.

Coasters for cups made from CDs
These kitchen utensils will prevent the tablecloth from getting dirty with drops of tea and will decorate the table. They are made extremely simply.
Take:
- disks;
- textile;
- ballpoint pen;
- padding polyester;
- needle and thread.

Now place the padding polyester on the wrong side of the fabric and sew the two layers together using a basting stitch. Place the padding polyester on the SD, tighten the thread, tie two knots. Place another circle of padding polyester and fabric on top of the disk, sew the blanks together as shown in the photo. You can put a loop on the side to hang your DIY cup stand from.
Interesting country ideas from old CDs
You can read how to make such a peacock from a tire in the corresponding article, and its tail is made from the material that this review is devoted to. For it, you will need to cut a metal mesh in the shape of a large fan, attach disks to it with wire in rows or lay out a pattern for the tail from them.

Here are other summer cottage ideas. To create one of these brilliant fish, you will only need two CDs, as well as colored cardboard. If these figures will not hang under a canopy, then it is better to use rubber or other synthetic sheets instead. From these you will cut out the fin, tail and mouth of the fish.

Place these parts between two disks and glue them together. Don’t forget to first put a fishing line or thin cord inside to hang the craft.
It’s also not difficult to create a funny caterpillar by first painting 5 disks, attaching legs to four, and gluing eyes, mouth, nose and hair from threads to the fifth. You can easily attach the caterpillar itself to a chain-link mesh or to a picket fence using wire.

You can also make a windmill or street lamps from disks for your dacha.

Choose your favorite idea and bring it to life. If you want to see how to make these and other things from old disks, we suggest watching the videos:
![]()
In our computer era, there are few people who do not have at least one CD or DVD disc. There are also very few people who do not have at least one unnecessary disk. Well, most of us, needlewomen, collect a lot of seemingly unnecessary things, including CDs.
I offer one option for using unnecessary disks and turning them into something needed. Let's decorate the box with our own hands using a mosaic of disks!
To implement this brilliant plan we will need:
casket;
unnecessary disks (I needed 4 pieces);
sharp scissors;
template with a mosaic pattern;
disc marker;
alcohol solution (erase marker);
glue (I used PVA);
grout;
paper for gluing the inside of the box.
Brief explanations of tools and materials
Instead of such a box (made of a thin layer of wood in the shape of a heart), you can even take a cardboard box for the base of the mosaic. The only condition: the cardboard must be quite durable, do not move back and forth when opening and closing, otherwise the mosaic glued with your own hands will fly off very quickly.
You can cover a mosaic of disks, not necessarily just a box. It would look interesting, for example, to have a frame around a mirror (in the hallway or even the bathroom).
The frame will increase its area, the mirror will appear larger, but due to the use of reflective disks, it will seem that the frame is also made of mirror pieces.
It’s better to take any discs, not just any kind. The easiest way to work is with factory-recorded discs. These can be music discs, data discs (for example, those discs that come with various office equipment). 
As a rule, such discs have one side with printed pictures and logos, and the other is simply mirror-silver, without any tints. They give a reflection of all the colors of the rainbow.
Discs that we record ourselves at home (“blanks”) are much less suitable for making mosaics, because they delaminate when cut. Transparent plastic separately, reflective foil also separately. One without the other is unlikely to be useful for our mosaic, and gluing them together is problematic (but if you really want to, you can, of course, cover the ends with transparent glue or melt them over a flame, in the latter case the smell will linger throughout the entire apartment).
Choose the right discs to use. A different shade or different reflectivity of some fragments will unfavorably distinguish them from others (unless, of course, this is not your idea).
The difficulty of working with all disks is that when cutting, they do not listen at all to our needs and plans and crack in the most unpredictable directions (often right across the part being cut out). 
Use strong, sharp scissors for cutting. Some people advise taking scissors without plastic rings (they will break), but I don’t insist on this. I myself cut out the parts from the disks using large scissors from IKEA with plastic rings. My scissors had hardly been used before, so they were sharp. The scissors are still functioning, but they are pretty dull.
To make cutting the discs easier, some people recommend heating them. Perhaps this really helps, but I haven't tested it. It seemed to me that heating the discs and then cutting them while hot was even more problematic than working with cold ones. But if you have a really bad time cutting your discs, you can try heating them.
If the work that you plan to cover with your own hands with a mosaic of disks is quite large, stock up on adhesive tape before you start cutting out fragments from the disks. It's the least you can do for your hands. Once you understand where your fingers come into contact with the scissors, seal those places before blisters form and rip off.
And one last thing. About the shape of the mosaic fragments. Many people cut out all the fragments in the same shape: in the form of squares or small rectangles. Of course, such a mosaic also has a right to exist, but I suggest you take a different route and cut out mosaics of different sizes and shapes. 
Progress
The first thing you need to do is circle your box on a piece of paper, outline what design you want to put on it, draw the design more schematically, and divide it into simple fragments for cutting out from disks. The simpler the fragment is in shape, the easier it will be for you to cut it out. It is difficult to cut very long and thin parts (they break), rounded-concave parts (they crack).
I drew this rose with a bud and a leaf for my heart-shaped box:  Many details have undergone changes. When I couldn’t cut some of the fragments even the fifth time, I made them simply composite.
It is best to circle the cut lines several times or simply draw with a fairly thick dark felt-tip pen or marker. Then the details can be more easily transferred to disk by simply placing the diagram on the window first, and the disk on top.
You need to draw with a marker on the shiny side of the disk.
If you can't see anything through the disk, you'll have to come up with other ways to transfer the image to the disk. Starting with using carbon paper and ending with cutting out each element, placing it on a disk and then tracing over the disks with a marker.
When the parts are cut out, you can immediately place them on a box (or other surface you decorate with your own hands), away from moving objects (so as not to turn them over!).
Gradually, the entire box is laid out with your own hands.
We still trim some parts (so that there is a gap for grouting). Now the mosaic needs to be glued. I just took a piece and glued it with PVA. You can try gluing tape to the surface of the mosaic, carefully turn the mosaic over, coat all the pieces with glue, place the inverted box on top, press down, and then turn it over and remove the tape. If the whole picture doesn’t fall apart, it will turn out faster than with my gluing method. 
When the mosaic is glued, you need to wipe off the entire marker on the disks with which we marked the parts, using any alcohol solution. Be careful, the cotton wool often gets caught in the corners of the mosaic!
Of course, I covered not only the top surface of the box with mosaics, but with the side parts everything was simpler and more prosaic. Here I used pieces of the same height, but randomly cut in width. I glued narrower pieces in the bends of the box. In relatively straight places they are wider.
Don't skimp on glue. Several parts later came off, and one even got lost, so I had to cut out a new one.
If you have a glue other than PVA, try to see if it is suitable for gluing disks (some glues are so strong that they can dissolve the plastic of disks, so they are not suitable for such work).
We also wipe the marker from the sides with an alcohol solution with our own hands and begin grouting. We dilute a little grout and smear it into the box. I did this directly by hand, you can use a rubber spatula or cardboard (so as not to scratch the discs).
When the grout dries, wipe off any excess with a damp sponge or cloth.
Do not be too overzealous, use gentle movements (the sponge or cloth may still catch on the mosaic).
It remains to decorate only the inner surfaces of the box (except for those in contact with each other when closing, so that the box continues to open and close freely) and its lower plane.
For this I used gift wrapping paper with images of roses and the same PVA glue.
When the glue dries, the box is ready!
That's all I can tell you about the technique of making mosaics from unnecessary disks with your own hands. I hope this idea gets your creative juices flowing and you figure out how to make it happen! I wish you creative success!
In our time of computers and digital technologies, every person has a certain number of CDs that are not needed, but are still stored. Many find original uses for them, these are all kinds of stands, decorations for cars and many other interesting things. These discs themselves are interesting for their sparkling appearance. Today we will tell you how to arrange box using waste disks as mosaic material.
For work we will need:
- box,
- discs (the quantity depends on the size of the box 4-6 pieces),
- sharp scissors,
- a template on which a mosaic pattern is applied,
- a marker used to write on disks,
- alcohol solution,
- PVA glue, grout,
- decorative paper.
For the box, we took a heart-shaped wooden box, but any other box can be suitable, even cardboard, the main thing is that the cardboard is strong and does not bend, the box should open and close easily, otherwise the mosaic will quickly come off.

This mosaic can be used to decorate other objects in the house, for example, a mirror in this design looks very original - shiny mosaic visually increases its size and it seems that the frame itself is mirrored.
It is more convenient to work with factory disks, which are often included with mobile phones or office equipment. One side of such discs has a logo or pictures with advertising, while the other is clean, with a mirror-silver tint; in the light it gives reflections of all the colors of the rainbow. Simple blanks are unsuitable for such work, since they delaminate when cut. Yes, and these should be cut very carefully with very sharp scissors, since they can burst in unnecessary places, and then you will have to use more disks. It is also worth looking at the discs for shades, so that individual fragments of the mosaic do not stand out from the overall picture.

The work of cutting out individual pieces of the mosaic is quite difficult, so it is worth pre-sealing the places where your fingers come into contact with the scissors with an adhesive plaster, otherwise blisters cannot be avoided; also choose durable scissors, preferably without plastic rings.
To select a mosaic pattern, trace the box on a piece of paper and draw a picture on this piece of paper, which we want to post. Next, we divide the entire drawing into segments, which are small in size and preferably in the form of regular geometric shapes, this is necessary for the convenience of cutting the disks. When oval in shape or with curves, they often burst and deteriorate. We got a rose with a bud. Large parts should be divided into several small ones, then cutting will be easier and the appearance of the finished product will be more interesting.

To transfer the pattern onto the disc, you can use glass and a disc marker, don't be afraid to draw thick lines on the discs themselves, they can then be easily removed using an alcohol solution or nail polish remover. The finished parts can be immediately laid out on the box, but it must be placed on a rigid base so as not to accidentally disturb the mosaic. Gradually the whole mosaic is laid out, it is worth watching the seams, they must be uniform, then we will remember them by grouting.
When all the pieces are ready, just take glue and glue each piece in its place. The simplest would be PVA, as we said at the beginning, but you can use any glue other than silicate, you just need to try it on a piece first, since some glues can dissolve the thin plastic of the disk. We also cover the sides of the box; here you can use rectangular strips of different widths.

Carefully wipe off the inscriptions with a marker that remained.


All that remains is to grout the joints, take a little grout, spread it and grout the seams.

When it dries, gently use a sponge wipe the residue from the disks.

Left decorate the inside of the box. To do this, we simply cover the inside with gift wrapping paper.

The box is ready.
Remember the days when our shelves were filled with CDs with music, movies, programs and backups of the most important files from the computer? If you still haven't thrown out stacks of these CDs, as well as unnecessary or used DVD discs, the following list of ideas will definitely come in handy!
From unique Christmas ornaments to glamorous bowls and mirrors, this list will show you the best ways to reuse your pile of old CDs.
IMPORTANT: remember that if you try to break the disks with your hands, they will spray fragments in all directions (this has been tested personally). If you cut with scissors as is, you will be able to separate the discs into pieces, but the shiny coating may crack or peel off pieces. To get perfectly even pieces, we recommend: a jigsaw; repeated reuse of the cutter until it penetrates deeply into the layers of the disc, and then carefully breaks off along the cut line; Lightly warm the disc (under hot water or at minimum temperature in the oven) before cutting with scissors. You will probably find many more methods on the Internet - just try them one by one and choose yours.
CAREFULLY: When covering any thing with pieces of discs, remember that they are very easy to cut off. Therefore, you should not, for example, attach pieces to a decorative bowl for jewelry or to a guitar without then putting a good layer of one or another transparent coating on top, which will save you from the problem described.
1. Real master artists put together magnificent small sculptures from pieces of disks. The base can be, for example, air-drying plastic or a similar material that does not need to be exposed to high temperatures to harden. And the fragments from the disks themselves are already attached to the base by pressing and at the same time placing them on the glue.


2. “Tiles” cut from discs can be used to lay out a bird bath for a summer cottage. And again, do not forget about the covering so that the birds do not injure their paws. The result is an amazing vintage mosaic, especially if the bath itself is copper or blackened metal.


3. A guitar in the hippie style can be made just as well from broken pieces with additional decorative elements. Here, light exposure to fire was applied to some of the pieces (not for long and at a distance - experiment), as well as a special dyeing technique.

This decoration technique looks no worse on an electric guitar:

4. The mirror frame is lined with fragments of CDs, like shell fragments.

And its “cousin” is the photo frame:

5. From solid disks, artists Alice Morin and Clemens Elyar created a huge installation called “Wastelandscape” - “waves of music”, which, at the suggestion of the authors, became the embodiment of an oil slick. Inside the Centquatre gallery, Paris as part of the green movement.


On topic: George Raidbo puts entire sculptures out of disks...


...or how do you like this sea of discs from Bruce Munro?
.jpg)
Christmas tree on the street...

...her colleague...

...or a lizard laid out on the asphalt on a single base and then suspended from the house by cables and ropes.


Installation-ball for a school/institute library…

...or pavilion-arch.

6. If you lay out at least a simple pattern from pieces of CDs, as here, and not just stick them randomly, you will get an original and very nice jewelry box.

7. This is how you can decorate the most ordinary flower pot with pieces of disks. Black sealant or mastic is placed between the glued “shards”.

8. A coffee table tiled with mosaics looks great. In this case, it is better to place the mosaic under solid impact-resistant glass.


And one more table, which, thanks to its small size and white mastic between the CD pieces, despite its brightness, looks more delicate and appropriate in an apartment with a calm decor.

9. Christmas tree decorations made from transparent balls and CD pieces...


...from whole disks and fabric, beads and wire...

Toys and candlestick in combination with various accessories.

New Year themed triptych on the wall:
10. Decorating a cardboard box with a paper napkin dispenser with pieces from disks.

11. Disc holders for the bathroom curtain.

12. The transparent part of the kitchen door or the door to the living room is lined with pieces of discs.

13. Thick scrapbooking paper was glued onto the discs, resulting in brightly colored cup holders. You won't be able to make hot pads out of discs, because they will start to melt even under the knitted layer.


There is a chance with hot if only with this option:

Or like this: coffee beans are glued onto a disk, resulting in a fragrant stand-plate.
14. A creative idea is to cover leather, suede or nubuck shoes with disc fragments. The main thing is to take a good waterproof glue, put the first layer on the shoes and let it dry, and then glue the pieces on top. And the second key point is not to glue pieces where the leather bunches up or stretches when you put on and wear the shoes. Also, do not glue the pieces onto thin straps, as there is a high chance of scratching your feet later.

Continued in the second part of the article “How to creatively use unnecessary CDs: more than 80 ideas. Part 2.”: the creative component of the following ideas increases exponentially with each step!
Sources including:
www.boredpanda.com/recycled-cd-diy
pinterest.com
You need: unnecessary discs, a nice thick box, scissors, glue, regular tile grout for joints. Will:
We collect everything we need in a pile. There are nuances. I have to say goodbye to the thumb on my right hand for two days - it will go numb from the cutting. You can say goodbye to scissors too. They say that the discs can be heated, then they are easier to cut. It didn’t work out for me, so I cut it without anesthesia. Discs must be of decent quality or even licensed. Regular discs crumble and delaminate; discs from computer toys or from exhibitions (like mine) work well. 
We cut the disks into pieces that please our hearts. For those who are not lazy, you can cut with an ornamental design. Glue it on the box. Let's dry it. 
After drying, we grout the seams between the pieces with regular tile grout. You can use putty. 
After the grout has dried, remove the excess. The discs get a little scratched, yes. But it is noticeable only to the master maker. Remains in the corners - carefully with sandpaper. All. 
Articles on the topic