The right foundation for a bath. How to fill the foundation under the bath? From reinforced concrete blocks
So, we drew a diagram of the future bath, calculated the main premises: a rest room, a toilet-shower and a steam room! The result was a plan of 4 x 6 m. Whatever the walls are, reliable foundations are their basis. One of the most ancient, which has survived to this day, is a strip foundation for a bath.
Soils - the name of all types of rocks, the choice of a constructive scheme begins with them.
Foundations - soils in a natural or artificially altered state, perceiving the load from the structure.
In general, by type of soil are:
- rocky - high density, low moisture capacity, as a rule, reliable and durable;
- related - clays and loams (with sand impurities);
- unbound - sands and sandy loams (sand with impurities.
The properties of the last two groups depend on the level of groundwater. When the water is deep and the soil is dense, the depth of laying the strip foundation under the bath is allowed 0.15 - 0.2 m below the freezing level of the soil. The recessed version is used on slightly heaving and heaving soils; the latter are: clay, coarse clastic with clay more than 15%, fine and silty sand.
The estimated freezing depth is taken from observational data or is determined by simple formulas "Foundations of buildings and structures" taking into account the set of rules "Construction climatology".
The depth of freezing may not be taken into account in cases where:
- the foundation rests on a rocky base, coarse and medium sands, soils of a different composition without signs of heaving;
- to prevent freezing of the soil, special measures were taken to insulate it.
When the water is close to the surface or the area is swampy, work is required to divert water, strengthen the top layer of the base and prevent heaving. Errors in the construction of structures lead to the fact that freezing-thawing by the force of heaving breaks the foundation and everything that is built from above.
How to make a strip foundation? In difficult soils, even for a 4x6 m bath, it is necessary to calculate the loads and limit states. By making preliminary calculations, you can avoid disappointment and serious costs for strengthening underground structures.
The groundwater level is determined in the spring after the snow melts according to the level in wells and boreholes.
Any construction begins with the preparation of the site:
- made with a cord and pegs,
- remove the top layer of soil
- along the perimeter of the building plan, they dig a trench, the depth and width of which depend on the type of soil and the design of the foundation;
- the bottom of the trench is leveled;
- the bedding at the bottom of the trench made of crushed stone, gravel and sand is carefully compacted in layers.
![]()
Appointment of bedding
At a low level of groundwater on clay soils, up to 10 cm of compacted coarse and medium sand is added; with dense, non-rocky soils, it serves as a leveling layer for laying rolled waterproofing. On a heaving base, a thick layer of sand compensates for heaving and protects the foundations from deformation.
At a high level of groundwater, the soil layer is replaced with compacted rubble. It is used as a drain and, well-packed into the soil, reinforces the base. To level the top layer under monolithic structures, ASG is used - a sand-gravel mixture and sand.
Strip foundations
The main material for strip foundations is stone, crushed stone, sand, cement-sand mortar, concrete, reinforcement.
Estimated structures of the building: walls - wooden or artificial stone with insulation; ceilings are wooden.
For buildings of this type, with a reliable foundation, it is allowed to arrange a strip foundation of rectangular section.
Rubble
Building rubble - torn or flagstone stone 15-50 cm in size.
If there is a lot of stone around, groundwater is deep, the soils are loamy or clayey dense, - it is cheapest to make a strip foundation for a 6 x 4 m bath with your own hands.
A stone for construction from a blow with a hammer should make a ringing sound and not break. Laying it by hand is a laborious and rather time-consuming process, but with cheap material it justifies itself.
There is a practice of arranging a rubble foundation without mortar: cracks in densely laid masonry are well compacted with fine gravel, sand and gravel mixture, sand. The width of the structure is recommended to be taken at least 50 cm, when using buta flagstone, it can be reduced to 35 cm. The basement part is made on a mortar of stone or brick.

A one-story light house can withstand such a foundation well. They say that the foundation of the fortress walls of Novgorod is arranged according to this principle.
Butoconcrete
It is easier to make a rubble-concrete strip foundation for a bath with your own hands than a rubble one: the stone is used as a backfill and does not require selection when laying, its width should be at least 35 cm, preferably more.
The bottom of the trench is leveled with sand. At a high level of groundwater, the base is reinforced with rammed rubble.
To prevent the flow of cement mortar over sand preparation, it is recommended to lay a layer of waterproofing material. On dense non-clay soil in a trench, it is possible to concrete without an underlying waterproofing.
Formwork is vertically installed along the slopes: boards, plywood scraps wrapped in polyethylene or roofing material from the side of the trench. Formwork can be mounted above ground level, in which case the foundation will serve as a plinth.
Cement-sand mortar is used not lower than M 400. The concrete grade should ultimately be at least 75, and the recommended mass of rubble stone is about 40%.
The foundation should be poured in layers of 15 - 25 cm: the stones are not laid tightly and the seams are poured with mortar with the obligatory compaction with a vibrotamper. For better adhesion with the upper layer, the butt of the lower layer is not completely deepened into the solution. In the process of setting, rubble concrete should be moistened and covered with polyethylene from drying out and cracking.
After dismantling the formwork from the outside, it is desirable to perform vertical waterproofing.
Reinforced concrete buried
Correctly make tape reinforced concrete
the foundation will help the experience of the device of rubble concrete. This type is used for weak soils, including when a solid base is located at a considerable depth.

The order of work is as follows:
- the material for the device of the underlying layer is selected taking into account the level of groundwater;
- the standards recommend arranging preparation from lean concrete for screed and waterproofing, given that the loads from the bath are small, waterproofing can be laid on a bed of sand;
- formwork from boards or boards is installed above ground level;
- in accordance with the calculation, a reinforcing cage is mounted from vertical and horizontal rods connected with wire or special fasteners;
- concrete is poured in layers 15-20 cm thick at a time, compacted with a vibrotamper or bayonet,
- covered with polyethylene and moistened with water.

Shallow
How to make a shallow strip foundation for a bath? The shallow one is designed for different types of soils, including those with high heaving, and the allowable depth is 50-80 cm. Depending on the type of soil, a scheme is selected: prefabricated blocks laid freely or rigidly interconnected; monolithic reinforced concrete. It should be noted that on medium and heavily heaving soils, the foundations under all walls are combined into a single system of cross tapes with rigid joints.

Work order:

Of the two considered monolithic options, in terms of the volume of reinforced concrete work, the shallow foundation is the least laborious.


Some requirements for reinforced concrete structures
When reinforcing the strip foundation for a bath, in addition to the calculations performed or the proposed ready-made schemes, the design requirements set forth in should be taken into account, the main of which are:
- the geometric dimensions of the reinforced concrete structure must ensure the joint operation of reinforcement with concrete;
- the thickness of the protective layer of concrete must ensure the strength of adhesion to the reinforcement;
- do not allow the reinforcement to come into contact with the formwork;
- the thickness of the concrete protective layer in the foundations in the presence of concrete preparation is assumed to be 40 mm;
- for joints of non-tensioned reinforcement, the following are used: wire knitting, welded and mechanical joints.
When reinforcing corners, be sure to use anchoring, as in the diagram below.

More complete information on reinforcing the corners of the strip foundation.
You should pay attention to:
- In order to protect against getting wet from the outside of the foundation, it is necessary to perform vertical pasting (roofing material) or coating (bitumen) waterproofing. For rubble - the old method has proven itself well - a castle made of greasy clay, it is also suitable for the reinforced concrete version.
- The floor level in the bath should be above the plinth (above the horizontal insulation) and not lower than 0.3 m relative to the ground level - for the convenience of laying insulation and laying communications. The level of the floor depends on the chosen design; as a rule, it is made of planks along the logs on brick columns: the height of the brick column plus the height of the log is about 30 cm.
- There is a rule for the blind area: its device is mandatory and should be carried out along a layer of insulation - this will reduce the depth of soil freezing. Width - at least 70 cm, slope - towards the site.
- On the horizontal surface of the foundation above the level of the blind area, horizontal waterproofing must be laid under the wall structure, as an option - roofing material in two layers.
Advice! If you need contractors, there is a very convenient service for their selection. Just send in the form below a detailed description of the work to be done and you will receive offers with prices from construction teams and firms by mail. You can see reviews of each of them and photos with examples of work. It's FREE and there's no obligation.
The construction of the foundation is a fundamental part of the building. The reliability, durability and appearance of the bath depends on the successful construction of this design. You should follow the procedure correctly so that the bath pleases with aesthetics and a cozy atmosphere.
How to pour the foundation under the bath with your own hands - a step by step guide


The cost of building a foundation for a bath is about 17% of the construction of the entire building. The foundation is installed not only for walls along the perimeter of the structure, but runs along the line of load-bearing partitions. Also, sometimes a base for a furnace or a free-standing support is additionally produced.

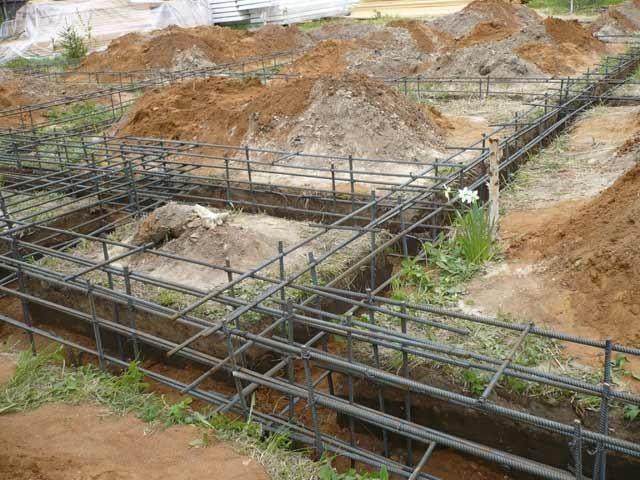
An example of an equipped strip foundation for a bath. The tape runs along the perimeter of the walls and under the future interior partition
| Description | |
|---|---|
| It is necessary for the construction of a small and light structure, but it can also withstand heavy loads, depending on the depth and properties of the soil |
| Necessary for the installation of light structures. Looks great when you need to create several compartments of the bath, for example, for the main compartment and the pool |
| Recently, this is a common type of foundation for baths. It requires minimal labor and material costs, but is suitable only for one-story baths. A pile foundation can be used even with a heavy building structure and a high level of groundwater |
| They are rarely used for baths, but if you want to create a building on heterogeneous, quickly freezing or flooded soil, it is very difficult to do without them. |
Foundation materials
| Name | Explanations |
|---|---|
| These are limestone, shell rock in solid fractions, but also sandstone. |
| The foundation can be constructed in one piece or consist of separate blocks, that is, be prefabricated. |
| These elements are used for pile foundations. |
| When choosing, you need to make sure that it has a sufficient degree of firing. |
| Usually used only for wooden baths. |
Rules for the construction of foundations for a bath
According to the construction methods, the foundations are divided into the following types:
- industrial. They are built from separate blocks or modules;
- non-industrial. They are produced simultaneously, directly during the activation of construction work.
Building regulations
| prescriptions | Explanations |
|---|---|
| Before digging trenches or other recesses, it is necessary to clean off the top fertile soil layer. When it is planned to build a blind area or additional bath buildings, the soil is cleared under them once. If you ignore this rule and leave the topsoil intact, then after the foundation is erected, the plants can rot, and when a wooden structure comes into contact with the soil, there is a risk of damage to the building material, up to the need to completely replace it, which is a laborious process. |
| After removing the top soil, a significant depression forms under the future building. If a strip foundation is being created, new soil must be filled into empty areas. You should choose cleared land that does not contain debris and organic residues. If an underground is additionally formed, then they use the same method so that when the water level rises, there is no flooding of the bath building. |
Digging a trench for a strip foundation according to a template | Recesses and trenches break out to a certain depth. The exact size of the deepening is determined by the properties of the soil, the level of seasonal rise in groundwater, and the strength of soil freezing in the cold months. For each area there is a certain depth where the soil freezes to 0 °C, and for clay soils to -1 °C. To accurately know the depth of soil freezing in a particular area, it is enough to order geological surveys. If the trench is up to 100 cm deep and up to 60 cm wide, its sides must be completely vertical. When the depth is greater than this mark, the decision is often made to expand the faces upwards. If the ground is unreliable, temporary formwork can be installed, which must subsequently be removed. |

Foundations, located along the perimeter of the walls, and sometimes partitions, have the shape of a tape. They are made not only from reinforced concrete mix with reinforcement. Reinforced concrete blocks, which are stamped in the factory, bricks are actively used. The material is selected depending on the type of soil and the features of the entire design of the bath, including its shape, dimensions and weight. In frequent construction, strip foundations are made of rubble concrete, since the basis of their design is natural stone, which is densely poured with concrete mixture.


If the soil is not reliable or its properties are dangerous for the building, it is necessary to use a monolithic reinforced concrete foundation, which is a reliable foundation and a barrier to the movement of soil layers or floods, if it is properly deepened and located during construction.

When the soil in the area where the bath is being built is guaranteed to be safe, you can safely create a shallow strip foundation, as it is also able to withstand significant loads. The smaller the foundation structure, the cheaper and easier it is to build. For most baths, a shallow foundation is optimal and completely safe.


Symbols on the image:
- a - a rectangular foundation through the wall;
- b - stepped;
- in - rectangular under a wall from a bar;
- g - foundation wall for the underground;
- e - prefabricated structures made of reinforced concrete blocks.
The dimensions of strip foundations for baths with any number of floors are approximately the same. The loads that are transferred even from a three-story bath to the base are not very large, while the area of \u200b\u200bthe foundation is often several times greater than that necessary to support the weight of the structure.

The width of the sole is determined depending on the type of foundation:
- rubble - more than 60 cm;
- reinforced concrete and others containing a significant percentage of concrete - more than 40-60 cm;
- brick - 51 cm.
These parameters must be maintained, as they provide ease of use and the possibility of trouble-free dressing of stones located in the vertical direction.

Foundation for strip foundation
To ensure the durability of the strip foundation, it is necessary to install it on a sand cushion. Typically, a layer of sand in height should be more than 20 cm, which should be taken into account when digging a trench. If the soil is recognized as heaving, the sand cushion can be placed more than 60 cm, since it limits the impact zone on the foundation.
 Sand cushion - scheme
 Excess water leads to the opposite - loosening of the soil cushion
Typically, building codes provide for compacting sand when backfilling the base by pouring water. If you perform this action on soft soils, significant erosion of the base is possible. When the foundation is installed on silty soils or loams, it is advisable to fill in pre-moistened with water, that is, weighted sand.

An alternative to completely sandy can be sand and gravel bedding, which is made up of sand and gravel in a ratio of 4:6. Weak soils affect not only the features of the formation of the foundation for the foundation, but also the construction of the strip foundation. The entire internal surface of the trench must be completely insulated with geotextile prior to sand bedding. This feature during construction will help protect the sand bed from mixing with silt or erosion during the rise of groundwater to a high level.
Video - Sand cushion under the foundation

 Formwork installation - scheme


Formwork is mounted in a pre-prepared trench. It is necessary to protect the exact contours of the foundation and prevent its spreading. To do this, pegs are driven in along both edges of the trench, which insure wooden shields, beams or metal ceilings from falling. It is also possible to install fixed formwork. In this case, after the end of the work, it remains in its original place and can act as the front part of the foundation.
For arranging removable formwork, not only wooden structures are suitable, but also slate, plywood and other sheet materials that can be placed along the trench in an even row. A roofing material is laid inside the formwork, which is a waterproofing for the foundation.


Video - Wooden formwork

It is desirable to perform foundation reinforcement when creating any bath, even a small economy option design, since excessive strength will help the foundation survive for many years. A frame consisting of several faces is enough.

Before mounting the reinforcing cage, it is necessary to substitute chairs for reinforcement or stable stones under all elements standing on the lower surface. The reinforcement cannot be installed directly on the sand cushion, since when pouring concrete, all faces must be covered by it in order to ensure maximum structural strength.

Dense reinforcing bars are driven into two rows. Perpendicular to them are long, but thinner elements, which are fastened with vertical stripes at all joints. For this, welding or a special wire is used.
Manual for SNiP 2.03.01-84 and SNiP 2.02.01-83. Download file

The proportional composition of the concrete mixture is calculated after the acquisition of the cement powder, since its strength characteristics vary depending on the brand of all components, their class, as well as the presence of additional elements in the composition of the mixture.
A common scheme is usually used, in which cement, sand and gravel are mixed in a ratio of 1:3:5. Water is added as much as necessary to create a complete mixture, however, it should be remembered that the proportional ratio of water to cement is 0.5.
Video - Preparation of concrete for the foundation of the bath

The mixture is placed in the formwork immediately after the end of its preparation, as it is able to quickly harden. It is necessary to release bubbles from the cement composition in parallel. For this, a shovel or an ordinary stick is used, but if possible, it is worth buying or renting a deep vibrator.


To ensure that the concrete is positioned correctly without the initial formation of significant air pockets, it is necessary to tap the formwork along its entire length. If the concrete mixture is poured in the cold or rainy season, then immediately after it is placed in the formwork, the concrete should be covered with plastic wrap, insulation should be placed on it, and the structure should be carefully laid on top with high-quality waterproofing.

The formwork can be removed until the concrete has completely hardened. Usually it is enough to wait a week or a little less.


The columnar foundation is designed for heavy loads that are carried out on it from wooden structures or under the action of brick baths. The depth level is calculated individually. The parameters are affected not only by the severity and length of the building, but also by the natural conditions of the area in which the construction is carried out. A shallow strip foundation can be safely used if predominantly sandy soils are located, and groundwater is at a considerable depth, floods are not typical for the area.
When should a columnar foundation be erected?

Column foundations can be chosen for most baths. The exception is buildings for which it is planned to create basements or underground. When it is necessary to save on construction, a columnar foundation should be built, since it is much cheaper than a strip foundation, and its construction is not difficult.
It is only necessary to clearly measure the depth of the columnar foundation if the soil on the site is prone to heaving. Reinforced concrete pillars must fall below the level of maximum freezing of the soil so that there is no risk of the bath being skewed. It is advisable to deepen them taking into account the most severe frosts, and not focusing on averages.

Materials for creating a columnar foundation

Column-strip foundation with a base for a furnace
The foundation is formed from many small pillars on which the entire structure rests. In some cases, large natural stones serve as supporting pillars. They are placed in the corner parts of the log house, and in between it is allowed to use smaller stones.


In most cases, reinforced concrete blocks are used, which can be purchased in advance or built independently directly during the construction of the foundation. Recently, builders have learned to skillfully use bricks or asbestos-cement pipes as poles, which is a very relevant and convenient idea. In this case, these materials are first placed in the ground, and then poured with a concrete mixture. Formwork is necessarily used, a frame of several reinforced concrete rods is provided in each recess.
Creating a column foundation
The construction scheme of the columnar foundation practically does not change, regardless of the material chosen.
| Stage | Description |
|---|---|
| For this, a drilling rig is used. It turns out a small well. |
| The resulting space is filled with sand to a level of about 20 cm. |
| The sand cushion is compacted by pouring water into the holes. |
| When the pits are dry, the chosen material for the posts should be placed in them. Usually these are reinforcing bars, after installation of which concrete mixture is poured into the recesses. |
| Outside, reliable waterproofing is used for the pillars. These are volumetric layers of roofing material and bituminous mastic, which are used in several steps, that is, they form several alternating rows of coverage. |


Pillars must be installed in the corners of the structure. Sometimes the bath has two separate rooms connected by a small partition. In this case, the corners of all departments are taken into account. Also, poles are needed at the intersection of internal partitions. Along the entire perimeter of the walls, you can place poles of a slightly smaller or the same length at a distance of 1.5 m to 2 m from each other.

A shallow foundation can be designed both from monolithic concrete and when using a brick structure. Pillars are often installed, the walls of which gradually narrow.

Often, a columnar foundation is made from a mixture of concrete, which is poured either into a hole with reinforcing bars inserted, or into an asbestos-cement pipe, which is a kind of structure frame. Less commonly, columnar foundations are made from pre-prepared blocks that have undergone factory processing. They also need a sand cushion.
If the building has a heavy structure or the terrain is characterized by unreliable soil, it is possible to organize a grillage, which is made in the form of a reinforced concrete belt. It is a structural link that unites all elements. Usually, a grillage is necessary when building a brick bath, but it is often used for a wooden one.

Column foundation - the nuances of arrangement

The technology for creating this foundation involves drilling wells. You can make recesses both using a special installation and manually. For wells, the optimal diameter and depth are pre-assigned. The holes are then reinforced and filled with concrete.

Supports should be placed under the walls of the bath and often along the line of its partitions. Their number is calculated taking into account the total load created from the building. The diameter of the piles supporting the outer frame and located inside is different. The width of the internal supports is influenced by the total load from the floor, partitions and other elements inside the structure.
You can manually create pits with a maximum depth of 3 m. If the design of the bath has a significant load or the work is done with heaving soil, a drill should be used. With the help of this installation, wells of 5 m in depth and more are created. If the bath is being built in areas where the supports have to be buried at a distance of more than 6 m, it is necessary to use an electric or motor drill, since a manual one will not cope with this task.
Video - Column Foundation
Reinforcing and concreting the foundation
It is necessary to choose roofing pipes. Their length is always greater than the depth of the wells, since they must come out of the ground for a considerable distance. The upper sections of these structures are formwork. To do this, they are wrapped with roofing material in 3 layers and connected with a thin steel wire.

When the formwork is formed, it must be lowered into the finished well. Sometimes groundwater is visible in the wells. If their level does not exceed the surface of the earth, you should not worry, since pile foundations are designed specifically for those areas in which floods occur or the groundwater level is too high. If water accumulates so much that it exceeds the level of the well, it must be pumped out using a special pump. Only after the elimination of water from all the pits can concrete be poured.


The roofing material serves as a protection of the pillar from destructive processes. If you do not use these pipes, there is the possibility of some inconvenience.
- When there is not enough cement laitance in concrete, the setting and hardening of the structure is problematic, because if there is no roofing material pipe, part of the cement laitance is transferred to the surrounding soil.
- Symmetry is not observed in the walls of the foundation supports. Only with the help of a roofing material base can you make them absolutely even. If irregularities are left unchanged, destruction of these areas is possible due to the action of low temperatures in winter.
Reinforcement of the pile foundation for the bath is carried out using rods with a diameter of approximately 6 mm. They must be connected to each other with special crossbars. When arranging the rods, it is necessary to take into account the height of the future grillage, since the reinforced concrete rod should be slightly lower than it. This will ensure proper connection of structural elements. To lower the level of reinforcing bars, it is enough to deepen them a few centimeters into the ground.

The concrete mixture is poured in batches. It should be measured so that each time the layer does not exceed 5 m. Concrete must be compacted in wells. Vibrators are used for this. It is necessary to pour the entire foundation in a short time so that it dries evenly.


Creating a grillage
When erecting a pile foundation, two types of grillages are used.
- Monolithic.
- Consisting of reinforced concrete structures.

For the correct construction of the grillage, it is necessary to follow some rules.
- The height of the foundation is over 3 meters.
- The width of the grillage should be similar to the thickness of the basement structure if the piles are standing in the same row. When the piles are spread apart, to determine the width of the grillage, the thickness of the walls on the first floor is estimated. It should be remembered that the width of the structure cannot exceed 4 meters.

Rostverk - photo
When the grillage is assembled from several components, special attention must be paid to the correct fastening of the piles in the head. During concreting, another object is connected to the grillage - a special rod with the shape of the letter T. The pile head must be covered with an additional reinforcing rod with restrictive plates.

The plates should be slightly thicker than the piles. The height of the head is optimal in order to be able to horizontally cover the pile and the section of the grillage to which the structure is mounted. When all the parameters are met, you can start concreting the joint. All reinforcing elements that go beyond the structure must be attached to the mounting loops by welding. At the end of the work, the formed seams must be filled with cement mortar or concrete.
The level accuracy of the grillage affects the possibility of safe wall construction. If it has a significant skew, it is necessary to level it by adding a layer of cement in the necessary areas. Before completing the construction of a pile foundation for a bath, it is necessary to measure all its sides and check their compliance with the originally planned parameters.

This is the most reliable and easiest type of bath foundation to manufacture. It requires high-quality materials, since more requirements are imposed on a monolithic slab than on other structures. The work process is not complicated, many developers are pleased that there is no need to use construction equipment.
| Stage | Description |
|---|---|
| Usually, a pit is dug for a monolithic slab with an allowance for creating a special cushion of gravel or sand. The surface needs to be exactly level. Creation of slopes is prohibited. If you neglect this rule, the foundation is guaranteed to undergo cracking and deformation. |
| To create formwork, it is necessary to select boards of at least 25 mm thick. They are installed with supports. Before laying the reinforcement, it is necessary to check the rigidity of the fasteners so that after pouring the concrete there is no deformation or destruction of the formwork. |
| Drainage is created for subsequent water supply and sanitation. Layers of waterproofing are applied to the sand cushion, if necessary, insulation. When using the latter, care should be taken that it is covered on both sides with a material that does not allow moisture to pass through. |
| The reinforcing mesh is knitted with the use of reinforced concrete rods of various sections. Initially, it is necessary to provide a base on which the reinforcing cage can be placed. It should be remembered that it is impossible to lower the reinforcement into the pit directly on the insulating layers. When pouring concrete in this case, the mixture will not cover the lower edges of the reinforced concrete mesh, which will significantly reduce the strength of the entire structure and may lead to cracking of the foundation. Special chairs for fittings are installed on the surface of the pit. It is advisable to use these elements. Volumetric bricks and other rigid structures can be an alternative, but it is very difficult to attach a reinforcing cage to them. The widest reinforcing bars are selected. They are necessary for the installation of a vertical row. To make it convenient to work with the structure, you can immediately install all the rods on the chairs for fittings. Horizontal frame elements are laid out in 1-3 layers, depending on the depth of the foundation. The distance between the layers can be made from 10 cm, since a tighter fastening is rarely justified. At all intersections, the reinforcing bars are fastened by welding or steel wire. |
| You can independently create a concrete mixture, guided by a common recipe. Crushed stone, sand and cement are mixed in exactly the proportion of 5:3:1. If this work seems too long, you can purchase a ready-made mortar, which is sold dry. To dilute the mixture, both self-preparation and factory preparation, it is necessary to use water. The exact framework is not determined, however, the concrete should be brought to a consistency resembling low-fat sour cream. Immediately after dilution, it is necessary to start pouring the mixture. It is very difficult to do this manually. If necessary, the work is carried out in several stages, that is, in layers. This technique negatively affects the strength characteristics of the foundation, however, it is allowed in building codes. It is advisable to use special equipment. The device can be rented or borrowed from friends. In this case, the device will take the finished mixture from the mixer and feed it to the object using a tray. During the pouring of the concrete mixture, it is necessary to work in parallel with a deep vibrator. With its help, the structure becomes strong and even, as excess air is removed in time. It is impossible to do without this measure. |
| After pouring the foundation, you must wait 24 hours and moisten it. This requires a sprinkler. It is forbidden to flood the structure with a strong jet of water. If the work is carried out at low temperatures, the foundation must be covered with a waterproofing polyethylene film. The slab foundation dries for a long time. It is advisable to refrain from further construction work for 3-5 weeks. |
Anyone can pour the foundation under the bath with their own hands. To do this, it is necessary to choose the appropriate type of construction, correctly carry out all stages of work and use only high-quality materials. If the foundation is poured carefully, all building codes are observed, the base of the bath will be strong and durable.
Video - How to pour the foundation under the bath with your own hands
The construction of any building begins with the construction of a solid foundation. Bath in this case is no exception. The bath foundation is not much different from the brownie. The characteristics and features of the installation of the most popular bases for the building of the bath will be described in our article.

To begin with, let's figure out what needs to be considered before choosing the type of foundation and how to prepare the site.
The method of laying the base under the structure depends on the following indicators:

Let's start by determining the type of soil. To do this, you need to dig a hole and study the soil.


To find out about GWL, you can talk to your neighbors. In addition, if you have built a house, you have already experienced this. The most accurate way to find out how deep the water goes is to drill into the ground with a garden drill. Such a well should be deep enough, at least 2-2.5 m. The easiest way is to build a foundation where the GWL is one and a half meters deeper than the zero temperature point of the soil.

Knowing the type and characteristics of the soil, it is easier to choose the foundation option.
- For arranging a small bath on clay and loamy soils with a deep groundwater level, a columnar foundation is suitable.
- A universal option for medium-sized buildings is a strip base, a special case of which for moist soils is a monolithic foundation.

There are other types of foundations, but still the most popular and often self-built are strip and columnar.
When constructing any foundation at a preliminary stage, it is necessary to mark the area for building a bath.

Mark the area for the foundation of the bath after preparing this site. To do this, remove the sod and level the site. To exclude flooding, the site is leveled with a slope in any direction except the north.
Now you can start marking for the foundation.
Note! The width and length of the base must be at least 10 cm more than the same parameters of the bath structure itself.
Step 1. To begin with, half-meter pegs are prepared, for example, from reinforcement. You will also need a rope that does not stretch, and a square.

Step 2. The first peg is driven into one of the corners.

Step 3. The square is applied at a right angle to the peg, and focusing on the legs, measure the sides and indicate the adjacent corners of the foundation. The procedure is repeated until all 4 corners are marked. A rope is pulled between all the pegs. This is internal markup.
Step 4. Check the correct marking by measuring the diagonals, the difference between the lengths of which should not exceed 20 mm.
Step 5. Install a cast-off at a distance of about one and a half meters from the pegs. It is a vertically placed wooden bars, to which a board is nailed from above at the height of the future floor. The boards must be necessarily parallel to the walls of the future bath.
Step 6. The markings from the pegs are transferred to the cast-off. To do this, nails are driven into the board in places corresponding to the corners of the foundation and a rope is tied to them, which marks the inner walls.

Step 7. On the cast-off, the outer surfaces of the foundation are marked in the same way. The width of the base of the bath can be 25 cm for wooden and 35 cm for brick buildings.

Step 8. Measure the diagonals of the outer rectangle to check if the outer sides of the foundation are laid evenly.

Now you can proceed directly to the construction of the foundation.

If you decide to build a wooden bath and the soil allows, then you can make a columnar foundation, which will significantly save money at this stage of construction.
Note! The bearing elements of such a foundation are located at a distance of no more than 2 meters from each other.
The material for the columnar base of the bath can be different: brick columns, logs, steel or asbestos pipes filled with concrete.
It is the last option, which is the most popular, that we will consider.

Step 1. In the marked corners, a one and a half meter tunnel is drilled with a garden drill, the diameter of which is usually 5-10 cm larger than the diameter of the asbestos pipe prepared for the installation of the foundation.
Step 2 Pipes are inserted into the wells, which should rise 0.4 m above the ground. Most often, products with a diameter of 200 mm are used.
Step 3 Align the pipes, guided by the spirit level.
Step 4. Backfill the soil around the pipes. In the process of backfilling, the earth is compacted.
Step 5 Cement mortar is poured inside the pipe for about half a meter. Don't skimp on cement.
Note! To prepare the solution in hot weather, it is better to use cold water. In cool weather, the liquid should be warm.
Step 6. Slightly raise the pipe in the well to allow the cement to drain a little to the bottom of the hole.
Step 7. Continue pouring cement, leaving 15 cm of the top of the pipe unfilled.

Step 8 Until the cement in the pipe has hardened, a reinforcing bar is immersed in it.
Step 9. Now you can pour cement to the edges of the pipes.

Step 10 Between the pillars make brickwork half a brick wide.
Note! The masonry must be deepened by a quarter of a meter, and during its construction, take into account the places where the sewer exits.
Step 11. The resulting base is leveled with cement and covered with roofing material.
A simple and solid foundation for a wooden bath is ready.


For the construction of such a foundation, more labor and material resources will be required. But it is more versatile. Yes, and the principle of its construction is enough post.
Step 1. Within the markup, trenches are dug under the sides of the foundation. The depth of the ditches depends on the load on the foundation, the type of soil and the depth of soil freezing. Typically, the bottom of the ditch runs 0.2 m below the freezing point of the soil. The trenches should be 10-20 cm wider than the foundation walls. In crumbling soils, ditches look like an inverted trapezoid. At the end of digging, it is necessary to level and tamp the bottom, remove collapsed soil from it

Shallow strip foundation - trench
Step 2. A pillow of sand and gravel is made in the trench. First, a ten-centimeter layer of sand, preferably a fine fraction, is poured, then it is poured with water and covered with gravel, also with a layer of 10 cm. The procedure is repeated until the middle of the trench is reached. The last layer should be sand.


Step 3. The pillow is covered with one brick layer on top, which will serve as support for the reinforcement and prevent it from sagging.
Step 4 Install the formwork. At this stage, you need to take care of the exit of the sewer pipes. To do this, inlet and outlet holes are made in the formwork and a pipe section is pulled through them.

Note! Formwork boards must be tightly fitted to each other to prevent seepage of the mortar. You can additionally line the formwork from the inside with polyethylene.
Step 5 Prepare a cement mortar. To do this, first mix the required amount of sand and dry cement, then gravel is added to this mixture and mixed. Add water.
Step 6 Reinforcing bars are laid out perpendicular to each other inside the formwork. The intersections of the rods are fixed not by welding, but by wire strapping. This will give strength and, at the same time, flexibility to the future foundation. From the edge of the rods to the reinforcement must be at least 50 mm.

Step 7. Now you can pour cement in portions. The height of each layer, which is carefully leveled and rammed, should not exceed 0.15 m.

It is better to pour cement during a period without precipitation. For another week, the foundation will need to be watered every four hours. Maintaining the base in a wet state must be carried out for another 2-3 weeks, covering it with polyethylene. The formwork is removed after about a month. But in some cases it is retained for thermal insulation of the foundation.

The base for the bath is ready. For large baths, a columnar-strip foundation is often built. In this case, a strip base is made under the external walls, and a columnar base under the internal ones.

Video - How to make a strip foundation for a bath
Video - Types of foundations
If you decide to build a bath yourself, then your main task will be to equip the foundation for your building. But before you buy everything you need for the foundation, you must decide on its type.
The foundation of any building is the foundation.
Choosing the type of foundation for the bath
To determine the type of foundation for your building, you must first examine the soil on your site. To do this, you must dig a hole 1.5 m deep and understand what the composition of the soil is.
![]()
If your soil consists of wet fine sand or peaty, then its bearing capacity will be the most minimal. In such areas, it is advisable to build a pile-screw or slab foundation.
Note! It is also allowed, but it is desirable that it be not from blocks, but from reinforced concrete or monolithic.
Medium-density soils also include those that include coarse sand, gravel, various clays and loams. For such soil, in addition to those listed above, a columnar foundation may be suitable.

If the soil in its composition has rocks, then you can opt for any type of foundation when arranging the foundation for a bath. Just remember that the price of its construction will depend on the type of foundation.
Necessary materials
To equip a strip foundation with your own hands for a foam block or brick bath, you will need:
- brick;
- natural stone;
- concrete and concrete blocks, for the pouring of which you need to install a formwork with a frame and reinforcement.

You should calculate the consumption of materials based on the size of your building and the depth of the foundation under it. The depth of the foundation is affected by the weight of the structure that will be installed on it, as well as the level of groundwater and the depth of soil freezing in the place where the foundation is required to be installed.
Note! The width of the walls of the base under the bath should be about 10 cm more than the thickness of the walls.
Preparatory work
Thinking about the question of how to make the foundation for the bath, first you will need to choose a place for your building. It is desirable to choose a flat area with a slight slope for this. This way you can ensure better drainage of wastewater that will flow naturally, thereby eliminating the likelihood of flooding your building during the spring flood.

The order of work is as follows:
- the site you have chosen will need to be cleared by removing bushes, debris and stumps from it;
- then remove the top layer of earth along with the turf and level the site;
- determine and mark the contours of the base for your bath, you can do this with the help of wooden pegs and twine;
- check the ratio of the opposite sides and compare the diagonals using a tape measure, a carpenter's corner and a level.

Advice! Accuracy in this matter is very important, it will affect the appearance of your bath, its strength and quality of installation.
Column Foundation
How to make a foundation for a bath from a log or timber? The best option for you in this case is . Unlike other types of bases, it is the most economical and ideal for a building made from these materials.

The supports for this foundation should be located at a distance of no more than 2.5 m from each other, but at the same time they must be located at the corners and along the line on which the partitions between the rooms will be located. They can be made from both concrete and brick, or using stone or reinforced concrete.
The cross section of such supports should be approximately 50 by 50 cm, but if you plan to build a frame bath, then these dimensions can be reduced.
Work order
- Supports for the foundation are usually created from metal or asbestos-cement pipes with a diameter of 150 mm or more. To place them, you will have to first dig holes of the required depth, and then in several stages, ramming the concrete each time. Make sure that the height of the supports is the same;

- We determine the depth of the pipes based on the depth of freezing of the soil, while adding about 25 cm. Under the supports, you will need to install a cushion of gravel and sand. On top of it you need to lay a layer of waterproofing;
- After you place the pipes, backfill and compact the soil;
- Coat the support with bituminous mastic, this is necessary in order to exclude the possibility of soil freezing to the surface of the support.

Baths of small size can be installed on wooden supports, while giving preference to oak logs, which were previously treated with an antiseptic.
In this case, do this:
- In this case, you will need to wrap each rack with a thick plastic film in several layers, which will not allow the soil to freeze to the surface;
- To ensure better preservation of the wood, the surface will need to be burned using a blowtorch.

Advice! In no case should the erected structure be left unloaded for the winter; it is necessary to start building a bathhouse immediately after the concrete has hardened. If you do not do this, then the supports may warp due to the fact that the ground will not evenly affect them.
pile foundation
You already know how to make a columnar foundation for a bath, now we will tell you how you can.
We make the foundation for the bath pile.

This type of foundation can be used for log baths, especially if the soil in this place is weak or swampy. But before starting installation work, you will need to mark up, while screwing the piles into the ground at least every 2 meters. In this case, the depth of laying piles may be different, it will depend mainly on the degree of soil homogeneity.

The thickness of the piles will depend on the massiveness of your bath. So, for example, for a frame structure, you can choose the smallest option. Piles are metal pipes that have sharp tops, on which helical blades are welded, necessary for screwing in the soil.
For a small bath, you can choose piles with dimensions ranging from 57-133 mm, with a length of 1.65 to 3 m. When installing piles, no special equipment is required, only 2 people may be needed to screw them into the ground. After installation, they will need to be cut, aligned in height.

Then concrete will need to be poured into the cavity of the pipes, and then a head should be welded to the upper edge. Connect the upper parts of the piles to each other using a corner, beam, reinforced concrete grillage or channel.
Advantages of a pile foundation for a bath
- you can build a bath immediately after the completion of installation work;
- it is possible to screw piles into the ground under any weather conditions, except for the time when the ground is frozen;

- it can be applied in areas with non-uniform heights;
- no need to insulate.
Strip foundation
For a light structure with an acceptable bearing capacity, a tape-type foundation is quite suitable. Preparatory work for the arrangement of such a foundation for a bath is required to be carried out the same as in the above-described variants of other types of foundation.
The difference between the installation of such a base is only in the final stage of work, where it will be necessary to dig a trench to pour concrete and install formwork from boards.
Work order
- At the bottom of the trench, you will need to lay a sand cushion with medium-sized sand;
- Lay waterproofing on top of it;
- Mount the reinforcing belt and pour concrete;
- After the concrete mortar hardens, the formwork will need to be dismantled;

- After the concrete has completely hardened and the foundation has settled, it will be possible to begin to build the walls of the bath.
Note! This type of foundation is only suitable for a bath built from lightweight materials such as wood or foam blocks. It is possible to build a bathhouse of stone or brick only on a tape-type foundation, but with a deep foundation.
Tiled Foundation
If your soil is very weak or swampy, then a monolithic foundation may suit you under the bath. It requires installation on completely cleared soil.

You will need to first cover the area under the base with waterproofing material, and then pour crushed stone and sand on it. Only after that, concrete should be poured, while laying a reinforcing mesh in the middle layer of the pour.
Slab foundation almost ready
Conclusion
We have told you about the different types of foundations that you can use when building a different type of structure. This or that instruction for installation work is applied depending on the type of foundation. You can learn more about this topic from the video in this article.
Every owner of a country house or cottage dreams of his own bath. Any construction begins with laying the foundation, because it is it that must bear the entire load from the weight of the structure. It is not difficult to make a foundation for a bath with your own hands; you can save a lot on this part of the building. After all, the construction of the foundation already costs the owner 40% of the cost of the entire bath.
How do-it-yourself foundations for a bath are being built with step-by-step instructions, photos and videos will be shown in this article.
Where to start work
Regardless of what type of foundation is chosen for the construction of the bath, the first step is to prepare the site for construction.
All stumps are uprooted from the ground, large stones are removed, and other debris is removed. It is better to mow or pull out the grass on the site so that there are no roots and stems left. Then the entire turf is removed from the site - the top layer of soil and removed to the side.

Now we need to markup. To do this, use metal rods, such as reinforcement, and a strong inelastic rope. The most important thing at this stage is to set aside a right angle. This can be done with a large construction square or improvised means.
Important! Each side of the foundation should be 5-10 cm larger than the intended perimeter of the building.
Choosing the type of foundation
You can determine which base is more suitable for a particular bath, based on several factors:
- depth of groundwater;
- type of soil on the site;
- the depth of freezing of the earth in the winter season;
- building material;
- bath area.
A phased analysis of all components will help determine the most reliable foundation for the construction of a particular bath.
Most often, they use a tape shallow foundation for a 4x6 bath. However, this is far from the only option. You can also apply:
- pile-screw - they are being built when the construction site has strong elevation differences;
- columnar - suitable for stable soils on which there are no landslides and shifts;
- pile-grillage- applicable for unstable soils prone to shifts and shedding;
- monolithic - universal, is the most reliable, but, at the same time, the most expensive in terms of cost. A solid concrete slab evenly distributes the loads from the bath, the soil does not sag, and the building does not deform or crack.

All are used for the construction of baths, but most often, nevertheless, they use columnar or tape types of foundations - they will be discussed in more detail.
How to arrange a columnar foundation for a bath
It is quite possible to make a columnar foundation for a 6x4 bath with your own hands. Such a base is especially suitable for lightweight buildings made of timber, logs, foam or aerated concrete.

Attention! The foundation of wooden logs or timber must not only be carefully waterproofed, but also treated with an antiseptic to prevent decay.
Columns can be constructed from the following materials:
- bricks;
- concrete poured into prepared formwork;
- asbestos-cement pipe;
- metal pipe;
- solid concrete slabs;
- wooden logs or beams.

Advice! Whatever material the pillars for the foundation are constructed from, they must be carefully waterproofed. For this, roofing material or bituminous mastic is used.
More often than others, pipes are used for a columnar base: metal or asbestos-cement. The description of the installation process looks like this:


Attention! The cost of a column foundation is much lower than the construction of a strip foundation. And the strength of such a foundation is quite enough for a small bathhouse made of wood or other light material.
Construction of a strip foundation
For small buildings, such as a garage, a summer kitchen, a bathhouse, you can arrange a shallow strip foundation. In order to calculate the depth of the trench for such a foundation, it is necessary to study the composition of the soil on the site.

If the soil is stable - not crumbly, moderately moist - a trench about 40 cm deep will suffice. For more unstable soils - chernozem, peat, sandy - this value should be increased to 70-80 cm.
The width of the foundation depends on the material of the walls of the bath: 25 cm will be enough for light structures, and at least 35 cm is required for stone or brick walls. The trench itself, at the same time, should be even wider - about 5 cm.
A step-by-step description of the process of laying a strip foundation for a bath looks like this:


Attention! For the construction of the foundation on the street there must be a positive temperature - optimally up to +5. If it is too cold, the concrete will harden unevenly, causing it to become brittle.
When building a concrete foundation, it is important to remember that any air bubbles in the thickness of the solution will sooner or later lead to the destruction of the material. Therefore, concrete can be poured from a height of no more than 50 cm, and after pouring, compact it with a vibrating machine or, at least, pierce the solution with a rod in several places.
Related Articles